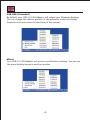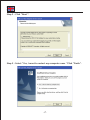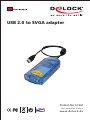
1
USB 2.0 to SVGA adapter
Product-No: 61434
User m anu al No: 614 34-a
w w w. de l oc k . d e
=== IMPORTANT NOTE ===
Three USB2.0 SVGA adaptors in Blue, Silver, and Dark Grey individually are
available to connect 4 monitors, first on your VGA Port of the Computer, the
other 3 via USB HUB. Please notice that each USB2.0 SVGA adaptor should be
installed separately.
Introduction
Thank you for purchasing the USB 2.0 VGA Adapter. The USB 2.0 VGA
Adapter enables you to connect any monitor, LCD, projector to your PC or
notebook. You can use it as an extended desktop or as a larger/different
display for you main screen. By using USB 2.0 technology, there is no need
to open the computer or struggle with compatibility issues related to a
second VGA card.
What are the benefits and uses?
Office workstation:
•View your large spreadsheets across two screens with display continuity
•Multitask more effectively without overlapping windows
•Open attachments on one screen while reading the e-mail on the other
On the road:
•Do multiple screen displays and presentati ons without bringing an other
computer
Graphics workstation:
•Use second display for pallets/tools
Editing workstation:
•Type documents on one screen while viewing reference material on the
other
Wall Street:
•Use a notebook for viewing multiple screens
•View charts and live data at the same time
Entertainment:
•View videos/TV on one screen and reviews on the other
-1-
How will YOU use it?
System Requirements
•Available USB 2.0 port
•Windows 2000/XP operating system.
Package Contents
•USB 2.0 VGA Adapter x 1
•Driver/Manual CD x 1 ( Driver version : 5.4.2.0831.0101H )
*Make sure that product package contains all items before operation. If any
item is missing or damaged, then please contact your dealer immediately.
Quick installation
Follow these steps to quickly install your new USB 2.0 VGA Adapter:
NOTE:
Do not plug the USB 2.0 VGA adapter into the system before the driver is
finished installing.
1. Insert the driver/manual CD and follow the instructions.
2. Make sure to restart the computer.
3. Turn on your 2nd monitor and connect it to the adapters.
4. Plug the adapter into an available USB 2.0 port.
5. After complete, you should see the extended display on the 2nd monitors.
See Appendix for detail instruction of the driver installation, Frequently Asked
Questions and Troubleshooting Tips sections for additional help.
-2-
Display Utility
After the driver is installed, a utility will appear in the lower right taskbar. This
utility allows you to quickly change the settings and resolution for your
USB 2.0 VGA Adapter. Access the menu by right clicking on the icon.
Support Function :
1. Primary
2. Extended
3. Mirror
Support Resolution :
Resolution
1280 x 1024
1280 x 768
1152 x 864
1024 x 768
800 x 600
640 x 480
Color Bits
8, 16
8, 16, 32
8, 16, 32
8, 16, 32
8, 16, 32
8, 16, 32
USB-VGA (Primary)
Make the USB 2.0 VGA Adapter the main display adapter in the system. The
system’s main display adapter (and monitor) will automatically switch to being
the secondary display adapter and act as the extended desktop.
Note: Some display utility and drivers that ship with AGP and built-in display
adapters will prevent this option from working on some systems.
You can disable the other utility (usually found in the same toolbar located on
the bottom right hand corner) to make this function work properly.
-3-
USB-VGA (Extended)
By default, your USB 2.0 VGA Adapter will extend your Windows desktop.
You can change the relative position of this extension under the Display
Properties See instructions located later in the manual.
Mirror
Your USB 2.0 VGA Adapter will mirror your Windows desktop. You can see
the same desktop image in another monitor.
-4-
USB-VGA (Off)
This option disables the USB 2.0 VGA
Adapter on the system.
USB 2.0 VGA Adapter Properties
To access the Display Properties for the USB 2.0 VGA Adapter, go to “ Control
Panel ” and double click on the “ Display ” icon. Select the “Settings ” tab.
Click on the “Display” pull down menu and select the “USB 2.0 VGA DEVICE”.
From here, you can change the resolu tion and color depth as desired.
Click “OK” to apply the settings.
You can also make these changes using the USB 2.0 VGA Adapter utility.
-5-
Virtual Repositioning Your Displays
On the Settings tab of your Display Properties, click and drag the appropriate
monitor icon (labeled 1 or 2) to the desir ed position. For example, the
secondary display can be dragged to the left of the primary display, allowing
it to be virtually on the left. Click OK or Apply to save the changes.
Appendix --- Driver Installation Procedure
Step 1 : Execute the Setup.exe from the CD driver, and click “Next “.
-6-
Step 2 : Click “Next “.
Step 3 : Select “Yes, I want to restart my computer now. ”Click “Finish“.
-7-
Frequently Asked Questions (FAQ)
Q: Why can I not make the USB 2.0 to VGA Adapter the primary display?
A: Some video cards ship their product with a ut ility that prevent other
video cards from being set as the primary card. Check the bottom right
hand corner taskbar for the utility.
Disable the utility before switching ouradapter to be the primary display.
Q: Why will my DVD player not work when Imove it over to the extended
display?
A: Some DVD playback software packages do not support playing on a
second display adapter of any kind.
Q: How come my video will not play on Media Player if I move it over to the
extended desktop?
A: Check that you have moved the Media Player window completely over to
the second screen.
Q: Why does my mouse not move pass the right side of the screen as it
should onextended desktop?
A: Check the display settings and make sure that your display number ‘2’ is
on the right side of display number ‘1’. You can rearrange how Windows
treats each display in relation to each other in the Display Properties
Settings.
Q: There are lines running horizontally up and down my screen.
A: This is due to a low refresh rate setting. You can change this in the Display
Properties Settings Advanced Monitor. Make sure you select the USB 2.0
VGA Device first and not set the refresh rate higher than what your
monitor can support. This may damage your monitor. You can also try to
reset/re fresh/resynchronize your monitor.
Q: Direct3D does not work?
A: This is a current limitation of the adapter. Please check for driver updates
in the future to add support for this. If your application requires this,
please use the main display adapter.
-8-
Troubleshooting Tips
The following troubleshooting tips may help if you are experiencing any
issues. Contact your dealer for additional help if needed.
•Check to make sure that all connectors are plugged in correctly.
•Make sure that the USB port that you are using is USB 2.0.
•Check to see that the monitor is connected correctly and the power is ON.
•Try connecting the adapter directly to the computer instead of through a
hub.
•Unplug all other USB devices from the system.
•Make sure you restart your comput er after the driver installation.
•Try a different USB 2.0 port and/or computer
•Check the website to make sure you have the latest drivers.
•Reset/refresh/resynchr onize your monitor.
•If you have problems during the boot up process, start your computer in
Safe Mode and uninstall the driver. Hold the CTRL key until the Windows
startup menu appears and select Safe Mode.
-9-
Support Delock
If you have further questions, please contact our customer support
[email protected] / www.delock.de or phone
0700 - DELOCKGE (0700 - 335 625 43).
You can contact our service hotline during the following times:
Mon – Fri: 9:00 – 17:30 pm charge 0,12 € / min*
* A connection fee applies according to fee schedule of Deutsche Telekom AG
or your local tlephone provider.
You can find current product information on our homepage: www.delock.de
Final clause
Information and data contained in this manual are subject to change without
notice in advance. Errors and misprints excepted.
Copyright
No part of this user's manual may be reproduced, or transmitted for any
purpose, regardless in which way or by which means, electronically or
mechanically, without explicit written approval of Delock.
Edition: 11/05
-10-