1
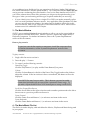
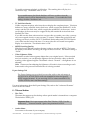
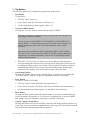
iVCD™ Read Me
iVCD
Read Me
www.mireth.com
[email protected]
The Right Software For The Job™
Table of Contents
Table of Contents .............................................................................................. 1 About iVCD™ .................................................................................................... 2 System Requirements ................................................................................................... 3 About Making Videos ......................................................................................... 4 Source Movie files ......................................................................................................... 4 Time and Money Saving tips when making DVDs and VCDs ............................... 4 Installing/Uninstalling iVCD™ ............................................................................ 6 How to Install iVCD™ .................................................................................................. 6 How to uninstall iVCD™ ............................................................................................. 7 How to upgrade iVCD™ .............................................................................................. 7 The iVCD™ Interface ......................................................................................... 8 The iVCD™ Project Window ....................................................................................... 8 The iVCD™ Menu ....................................................................................................... 14 How to Use iVCD™ .......................................................................................... 15 How to make a project folder .................................................................................... 15 How to Make a DVD ................................................................................................... 15 How to Make a VCD ................................................................................................... 16 How to Make an SVCD .............................................................................................. 16 How to Make a KVCD ................................................................................................ 16 How to Make an XVCD .............................................................................................. 17 How to Make an XSVCD ............................................................................................ 17 Advanced Features ......................................................................................... 18 Expert Settings Tab...................................................................................................... 18 How to convert to MPEG ........................................................................................... 19 How to make a Looping DVD ................................................................................... 20 How to make a Looping VCD ................................................................................... 20 How to rescue video that appears cropped on a TV .............................................. 20 How to lighten dark video ......................................................................................... 20 Creating VCDs with Video and Music ..................................................................... 21 Making movies with Menus ...................................................................................... 22 Help ................................................................................................................ 29 Troubleshooting Guide ............................................................................................... 29 Known Problems ......................................................................................................... 29 Appendix A - Demo .......................................................................................... 31 How to install and run the iVCD™ demo ............................................................... 31 1
iVCD™ Read Me
10/16/15 8:05 AM. Copyright ©2002-2015, The Mireth Technology Corporation
iVCD™ Read Me
About iVCD™
iVCD™ allows you to easily make DVDs, VCDs (Video CDs), SVCDs (Super Video CDs),
XVCDs, XSVCDs and more on Mac OS X. It creates DVDs from iMovie, Quicktime, AVI,
WMV or MPEG movie files. It supports both NTSC and PAL broadcast formats as well as
playlists and menus.
With iVCD™, each project that you make is stored in a separate folder, so you can easily
make additional copies of your home movies or corporate training videos. As added
conveniences, it also erases rewriteable optical media (CD-RW, DVD-RW, etc) and
includes features for creating looping Kiosk discs, for lightening dark video and for
rescuing video that is clipped when displayed on a TV screen.
Features include:
•
•
•
•
•
Burns DVD video on both DVD and CD media
Burns Video CD (VCD), Super Video CD (SVCD), KVCD, XVCD and XSVCD on CD
Converts from a variety of source files (AVI, DivX, XviD, MPG, WMV, iMovie &
iMovie HD, Quicktime and MOV)
Encodes to MPEG-1 (VCD), MPEG-2 (SVCD or DVD), generic MPEG-1 or generic
MPEG-2
Convenience Features
•
•
•
•
Video Rescue features
•
•
•
Lighten video slider to rescue video that's too dark
TV Safe Border effect for rescuing video that appears cropped on a TV screen
Flexible operation
•
•
•
•
Easy-to-use "drag and drop" interface and one-step “Convert + Image + Burn”
operation
Maintains a project folder so multiple copies can easily be made
Erase rewriteable optical media (CD-RWs, DVD-RWs, etc)
Use the convenient one-step “Convert + Image + Burn” operation, or use the
standalone MPEG converter/encoder
Use the CPU Usage Control to manage the amount of CPU used by iVCD during
the Convert process
Use the CDR Disk At Once (cdrdao) option to use with CD drives not supported
by Apple's Disc Recording APIs
Advanced Options
•
•
•
•
•
•
Burns looping DVDs for use in Kiosks and retail outlets
Burns VCDs with play lists and menus (playback control), hybrid movie/music
VCDs, VCDs that will Autorun on Windows, looping VCDs for use in Kiosks and
retail outlets
selectable MPEG encoding quality
Pixel Aspect Ratio selection (1:1 – for computer display, 4:3 – for standard
television, 16:9 –for widescreen television)
interlace option
Supports NTSC and PAL broadcast format output
2
iVCD™ Read Me
10/16/15 8:05 AM. Copyright ©2002-2015, The Mireth Technology Corporation
iVCD™ Read Me
System Requirements
To run iVCD™ you need
•
•
Macintosh G3 or later
Mac OS X version 10.4 or later
To convert AVI (Xvid, DivX, other MPEG4 derived formats) you need the following:
•
For Mac OS X 10.4 or later - The Perian Quicktime Component. Pre-compiled, easy
to install, version of this component available here:
http://www.perian.org/
Please show your appreciation by visiting their donate page.
To convert other proprietary AVI formats you need the Quicktime
Component developed by the producers of the proprietary format. If the
developers do not provide a component for Quicktime it may not be
possible to convert that format and you will need your source video reencoded in a standard format.
To convert WMV (Windows Media Video) you need the following:
•
Flip4Mac WMV Studio
To preview MPEG2 or to convert from MPEG2, you need the following:
•
the Quicktime MPEG2 Playback Component available from Apple
3
iVCD™ Read Me
10/16/15 8:05 AM. Copyright ©2002-2015, The Mireth Technology Corporation
iVCD™ Read Me
About Making Videos
Creating a DVD or VCD is a 2 step process:
1. Create the content - the movies to be shown. These are called the source movie files.
2. Author the DVD or VCD. Authoring a DVD or VCD is the term used when you
convert the source files to MPEG, create an image of the converted files and then burn
the MPEG to a CD or DVD media. iVCD is the utility that will do all these steps for
you with the push of one button.
Source Movie files
iVCD™ works with a variety of iMovies, Quicktime movies, AVI movies, WMV and
MPEG source movies. However, to make a DVD or VCD from a source file, you must be
able to play the source movie. If you are unsure if the movie can be played, drag it in to
the iVCD movie files list and play it using the iVCD movie window. (For further
information, refer to the “How to play a movie” section of this document.)
For more information about video formats and video on your Mac, refer to our site:
http://www.mireth.com
Using AVI, DivX, XviD as your source movies
To work with AVI, DivX or XviD, you need to install the AVI Component. Refer to the
System Requirements for a direct link to the AVI Components download and developer
pages.
Using WMV as your source movies
To work with WMV you need to install the Flip4Mac Studio Component. Refer to the
System Requirements for a direct link to the Component purchase page.
Using MPEG-2s as your source movies
If you have MPEG-2 source files you want to make into VCDs or DVDs that require
conversion to the correct MPEG format, you need to buy the Apple MPEG-2 Playback
Component. Refer to the System Requirements for a direct link to the Component
purchase page. If your MPEG-2 files are already correctly formatted for SuperVCD or
DVD, you don't need the Apple Playback component. Just select the "Don’t Convert
MPG" setting.
Time and Money Saving tips when making DVDs and VCDs
As with all video projects, authoring DVDs and VCDs takes some trial and error to get
right. Many of the common pitfalls can be avoided by using the following tips:
1. A disc that can't be played by your intended audience is a complete waste of your time
Find out what kind of equipment your audience will be playing the disc on. For
instance, if it's to be played on a TV, make sure you know which broadcast standard
that country uses - NTSC, SECAM or PAL - and encode with that video type.
2. Test the disc you produce on the type of equipment your audience will be watching it on
What looks great on your computer monitor, might be clipped on a TV screen. What
looks in focus on a small screen might be too blurry to watch on a large one.
Wherever possible, test the disc under real life conditions before your audience does.
4
iVCD™ Read Me
10/16/15 8:05 AM. Copyright ©2002-2015, The Mireth Technology Corporation
iVCD™ Read Me
3. Avoid Overburning - Keep your total video length under the maximum
Each format standard has a maximum allowable length that will fit on the media. To
avoid running over the end of the media (overburning), keep your total project
movies length under these limits. (Because DVD and SVCD use variable bit rates, you
may be able to fit more video on by reducing the bit rate, but this will also reduce the
output quality.)
DVD Single Layer - 120 minutes
DVD Dual Layer - 240 minutes
CD - 74 minutes in VCD Format
CD - 40 minutes in SVCD Format.
4. Make several short movies instead of one long one
Creating several short movie files (10 minutes or less) makes editing much easier.
For instance, if you divide your 40 minute presentation in to four, 10 minute sections
and you find a mistake in one of them, you only need to edit and re-convert that one.
It takes a long time to convert a movie to MPEG, about fives times as long as the
length of the file. So while it may take 50 minutes to re-convert a 10 minute movie, it
may take 3 hours to convert a 40 minute movie.
5. Save money on discs by using a DVD-RW or CD-RW until your project is complete
It would be great if your video came out perfectly the first time you burned it.
Unfortunately, this is seldom the case. Making the best quality video is a trial and
error process. It could take several tries, and several discs to get it right, which could
get expensive. Use a DVD-RW or CD-RW when making your video so that you don't
waste discs while experimenting. (Erase and re-use the disc until the project is
correct.)
6. Once you've perfected a project, make a backup of your project folder
Keep this "gold master" project folder somewhere safe. If you lose your disc, you can
always make another. If you make a series of disastrous changes in an attempt to
improve on perfection, you'll always have your "gold master" backup to fall back on.
7. Don't start at the last minute
It would be great if your input movies were all perfect, converting to MPEG took
almost no time, and your video looked great when you tested your very first attempt.
Unfortunately, this is seldom the case. Making the best quality video is a trial and
error process. It usually takes several tries and several hours to produce a video you
are proud of. Give yourself enough time to do a good job.
5
iVCD™ Read Me
10/16/15 8:05 AM. Copyright ©2002-2015, The Mireth Technology Corporation
iVCD™ Read Me
Installing/Uninstalling iVCD™
How to Install iVCD™
1. Drag the iVCD™ folder to wherever you keep application software.
2. Double click the iVCD™ icon. The Registration dialog will appear when you launch
the program, displaying four buttons:
Figure 1: Registration Dialog
Quit – to quit the program, click the “Quit” button
Run Demo – (Downloaded version only). For further information, refer to the
“Appendix A - Demo” section of this document.
Buy Now – (Downloaded version only) If you wish to purchase this program now
online, click the “Buy Now” button and follow the instructions.
Register – To register the program now, follow the instructions below.
3. Register iVCD™.
The Registration dialog will appear when you launch the program.
•
Enter the License Type, Purchaser’s Email Address and Registration Key/Serial
Number supplied when you bought the product.
If you purchased online, the easiest way to do this is to copy (Apple C) and paste
(Apple V) the information from the email we sent you.
If you purchased a CD, the Registration Key/Serial Number will also be printed on
the CD jacket.
•
Click the “Register” Button
If you have entered the Registration information correctly, the “Registered” message
will be displayed.
If there is a problem with the registration information, the “Invalid Registration
Information” dialog will appear. To correct the problem, refer to the Help section
on our website.
4. Configure the iVCD™ preferences. For further information, refer to the “Configuring
the Preferences” section of this document.
6
iVCD™ Read Me
10/16/15 8:05 AM. Copyright ©2002-2015, The Mireth Technology Corporation
iVCD™ Read Me
How to uninstall iVCD™
1. Drag the preferences files to the trash
"$HOME/Library/Preferences/com.mireth.ivcd.plist"
2. Move the iVCD™ Folder from wherever you keep application software to the Trash.
3. If you've created an alias to iVCD™, move it to the Trash. If you are running iVCD™
from the Dock, drag it out of the Dock.
4. If you have configured iVCD™ to run automatically, open the System Preferences,
click Login, Single click to select iVCD™ icon and click the Remove button.
5. Empty the Trash.
How to upgrade iVCD™
1. If you've created an alias to the previous version of iVCD™, move the alias to the
Trash.
2. Move the iVCD™ folder for the previous version from wherever you keep application
software to the Trash.
3. Empty the Trash.
4. To install the upgrade, follow the instructions in the “How to Install iVCD™” section
of this document.
7
iVCD™ Read Me
10/16/15 8:05 AM. Copyright ©2002-2015, The Mireth Technology Corporation
iVCD™ Read Me
The iVCD™ Interface
The iVCD™ Project Window
Figure 2: iVCD Main Screen
The iVCD™ project window consists of seven parts,
1. The Menu tabs
2. The Capacity Indicator bar
3. The Movie window
4. The Movie/Music file list
5. The Project Settings tabs
6. Title and Author
7.
The Buttons
1 - The Menu Tabs
There are two menu tabs, the “No Menu” tab to make a movie without a menu. and the
“Enable Menu” tab to make a movie with a menu. The default is "No Menu".
To make a movie with a menu, use the "Enable Menu" tab. For further information, refer
to the "Advanced Features" section of this document.
2 - The Capacity Indicator Bar
The green/amber/red capacity indicator is provided to avoid overburning the disc. The
default type of optical media (disc) is selected based on the type of product (VCD, SVCD,
or DVD) you have selected. You can change the default using the popup button to see
how well your project would fit on a different type of optical media.
Important note: DVD video can be burned onto CD media but a VCD
cannot be burned onto DVD media. This is indicated by the indicator
going off the top of the scale when you select DVD media in combination
with a VCD project type. If you are going to make a VCD you must use
CD media or the burn will fail.
8
iVCD™ Read Me
10/16/15 8:05 AM. Copyright ©2002-2015, The Mireth Technology Corporation
iVCD™ Read Me
As you add movies to the Movie List, pay attention to the Green/Amber/Red indicator
bar, which indicates how full the optical media is. Try to keep the indicator below the red
area to prevent overburning the optical media. Once you’re more familiar with iVCD™,
you’ll have a better idea of how many minutes you can put on the optical media, given
the type of video you are burning and the type of optical media that you are using.
•
If your video(s) is too long to fit on a single CD or DVD you need to manually split it
into 2 or more Quicktime reference movies. Any application (like Quicktime Pro) that
can save movies works for splitting. Just select part of the Movie (shift-click in the
movie controler), Edit->Copy, File->New, Edit->Paste and File->Save. And use each
reference movie in a different iVCD Project.
3 - The Movie Window
iVCD™ uses a standard Macintosh movie window to allow you to play a movie file as
well as preview encoded MPEG files. (MPEG-2 preview, requires the Apple MPEG-2
Playback Component. For further information, refer to the "System Requirements"
section of this document.)
How to play a movie
To preview a movie that requires a component, install the component first.
For further information, see the "Systems Requirement" section of this
document.
To play a movie:
1. Single-click the movie to select it
2. Press the play “>” button.
3. To control, use the following controls:
Pause/Play Toggle
Click the Play Button (>) to play and the Pause Button (II) to pause
Volume
Click the Volume Button (to the left of the Pause/Play Toggle) and use the slider to
adjust the volume. If the movie doesn’t have a soundtrack, this button will not be
displayed.
Some MOV files may have no audio. This is because you used an audio
format that Quicktime will not export (like a protected iTunes song) . To
get audio, export the MOV file to a DV format prior to using it with iVCD.
Scroll Fast Forward/Fast Reverse
Click the Scroll Slider to the right to fast forward to another position and to the left to
fast reverse to a previous position in the movie
Frame Forward
Click the Frame Forward Button (|>) to advance one frame in the movie
Frame Backwards
Click the Frame Backward Button (<|) to advance one frame in the movie
4 - The Movie/Music File List
The file list is used to display, add and delete the Movies, Playlists and Music being used
in your project.
9
iVCD™ Read Me
10/16/15 8:05 AM. Copyright ©2002-2015, The Mireth Technology Corporation
iVCD™ Read Me
Using the Movies List
To add a movie,
•
Click the "Movies" tab
•
Using the Finder, find a movie and single-click it to select it
•
Drag it to the Movies List
If you drag an iMovie HD .iMovieProject file into the iVCD Movie List,
iVCD will find the Shared Movies/iDVD folder and add that to the Movies
List and create a playlist called "iDVD" in the Movies List that contains the
MOV file from that .iMovieProject. You may wish to drag the MOV file
out of the iDVD playlist and delete the iDVD playlist from the iVCD
Movies List.
To add a playlist
•
Click the "Movies" tab
•
Click the “Add Playlist” button
•
In the Movie List a new playlist will appear with a folder icon. Beside the icon,
type in a name for the playlist
To change the order of a movie/playlist in the Movie List
•
Click the "Movies" tab
•
Single-click the movie/playlist to select it
•
Drag it to a different spot in the Movie List
To delete a movie/playlist from the Movie List
•
Click the "Movies" tab
•
Single-click the movie/playlist to select it
•
Click the “Delete” button
Using the Music List
This feature is for VCDs only
Because this feature requires the use of CDRDAO for burning, it does not
work with non-MMC or with USB CD-RW Drives. If you have configured
Apple Disc Recording in the Preferences, iVCD will automatically switch
to CDR Disk At Once (cdrdao) for VCDs that contain music.
This feature only supports .wav files as input. To convert a music file to
.wav, use Music Man.
To add music (.WAV only),
•
Click the "Music" tab
•
Using the Finder, find a .wav music file and single-click it to select it
•
Drag it to the Music List
10
iVCD™ Read Me
10/16/15 8:05 AM. Copyright ©2002-2015, The Mireth Technology Corporation
iVCD™ Read Me
•
Set the pre-gap in seconds
To delete a file from the Music List
•
Click the "Music" tab
•
Single-click the music file to select it
•
Click the “Delete” button
5 - The Project Settings Tabs
Once you have opened or created a project, you can configure the settings in the project
using the settings in the iVCD™ project window.
There are two Settings tabs,
•
the “Settings” tab and
•
the “Expert Settings” Tab.
Your changes will be saved in your project, but will not affect the default settings. To
change the default settings, refer to the “Configuring the Preferences” section of this
document.
Settings Tab
•
Media Type
Video CD
Select Video CD to produce MPEG1 VCDs.
or
Super Video CD
Select Super Video CD to produce MPEG2 SVCDs.
or
DVD
Select DVD to produce MPEG2 DVDs.
•
Broadcast Standard Type
North America (NTSC)
Select NTSC if you plan to watch your discs on a television that uses the North
American standard. This includes the USA, Canada and many countries outside of
Europe.
or
Europe (PAL)
Select PAL if you plan to watch your discs on a television that uses the European
standard. This includes the England, France (technically SECAM but PAL works),
Germany and other European countries.
Important Note: If you are not sure which settings to use, we suggest you
experiment with a CD-RW or DVD-RW until you find a setting that works
with your equipment.
•
Kiosk
VCDs and DVDs intended for use in information Kiosks need to play continuously.
11
iVCD™ Read Me
10/16/15 8:05 AM. Copyright ©2002-2015, The Mireth Technology Corporation
iVCD™ Read Me
To enable continuous playback, tick this box. The resulting disc will play in a
continuous loop. The default value is “Off”.
If you enable menus, the Kiosk checkbox will have no effect, since the
playback control will be determined by your menu. To re-enable the Kiosk
setting, click the “No Menu” tab.
•
TV Safe Black Border
Unlike computer monitors, televisions do not display the complete picture. Television
defines two areas, called the Action Safe Area, which occupies the middle 95% of the
screen, and the Title Safe Area, which occupies the middle 90% of the screen. Action
on the edges of the screen may be cropped if they fall outside the Action Safe Area.
Similarly for Titles.
If you did not take these safe areas into account when you made your video, you may
see come cropped of action or text on some TV screens. Rather than going back and
redoing your movie, tick the iVCD TV Safe Black Border effect and iVCD will shrink
your video into the Action Safe Area. For most video this will result in acceptable
display on a television. The default value is “Off”.
•
MPEG Encoding Quality
Slide this lever to the left to reduce the time it takes to encode an MPEG. The better
the quality of the MPEG encoding, the longer it takes to encode. The default setting is
“Good”.
•
Video Lightness Slider
Sometimes encoded video appears darker than your original movie. If the encoded
movie is too dark, you can adjust the lightness and re-encode the video so that the
resulting video appears brighter. The default value is “Normal” – the lightness is not
adjusted.
Note: Please note that adjusting the lightness will result in slower encoding as each
frame needs to be processed when the movie is being encoded.
Expert Settings Tab
The Expert Settings are provided for users that wish to take advantage of
iVCD's XVCD, XSVCD, DVDs with non-standard bit rates and generic
MPEG support features. If you are using iVCD to create standard VCDs,
SVCDs or DVDs, don’t use these settings.
For more information about the Expert Settings Tab, refer to the "Advanced Features"
section of this document.
6 - Title and Author
•
Disc Title
The name that appears on the desktop when optical media is inserted into a computer.
The default is VIDEO_CD.
Important Note: Don’t put a space in the Disc Title for a VCD. Use the
underscore “_” character instead. Spaces are permitted for DVD.
•
Author Name
Your name or the name of your company.
12
iVCD™ Read Me
10/16/15 8:05 AM. Copyright ©2002-2015, The Mireth Technology Corporation
iVCD™ Read Me
7 - The Buttons
The following buttons are available along the bottom of the screen.
•
•
Eject Button
To eject a disc,
•
Click the “Eject” button, or
•
Select “Eject” from the “CD”Menu (CD>Eject), or
•
Use the keyboard equivalent (Apple + Shift + E)
Convert to MPEG Button
Clicking the “Convert” button converts the movie file to MPEG.
This takes a long time - at least four times as long as the movie length and
even longer on slower machines.
You can convert to VCD (MPEG-1), SVCD (MPEG-2), DVD (MPEG-2) or
Generic MPEG. To Select what to convert TO, use the Project Settings. For
further information, refer to the "The Project Settings" section of this
document.
You can convert from iMovie (.MOV), Quicktime (.MOV), .MOV, MPEG,
AVI, DivX, XviD. Conversion from MPEG-2 or WMV, requires additional
components. For further information, refer to the "System Requirements"
section of this document.
•
When the "Convert" button is clicked, the Convert Sheet will be displayed.
You may manage the amount of CPU used by iVCD during the Convert process
by sliding the slider on the Convert sheet. This is useful if you want to work on
something else while iVCD converts video in the background. Reducing the
amount of CPU used by iVCD will result in longer conversion times.
•
Create Image Button
Clicking the “Create” button creates the disk image. If you haven’t completed the
“Convert to MPEG” step, the program will prompt you before continuing.
•
Erase Button
To erase a CD-RW or DVD-RW,
•
Click the “Erase” button and follow the instructions, or
•
Select “Erase” from the “CD”Menu (CD>Erase) and follow the instructions, or
•
Use the keyboard equivalent (Apple + E) and follow the instructions
•
Burn Button
Clicking the “Burn” button burns the optical media. If you haven’t inserted the disc
yet, the program will prompt you. If you haven’t completed the “Convert to MPEG”
and “Image” steps, the program will prompt you before continuing.
•
Convert + Image + Burn Button
Clicking this button will convert to MPEG, create the disk image and burn the disc all
in one step. If you have already completed some of the steps, iVCD will skip them and
only perform the remaining steps that are required.
13
iVCD™ Read Me
10/16/15 8:05 AM. Copyright ©2002-2015, The Mireth Technology Corporation
iVCD™ Read Me
The iVCD™ Menu
The iVCD™ menu contains the preferences.
Configuring the Preferences
The Preferences are used to set the default setting used when you create a new project.
You will still be able to change these settings in a project using the settings in the iVCD™
project window. To configure the preferences, do the following:
1. From the “iVCD” menu, select “Preferences”.
Settings Tab
Click the "Settings" tab. Configure the default settings. For an explanation of each of
these settings, refer to the "The Project Settings" section of this document.
Burn Tab
Click the "Burn" tab. Configure the default Burn settings.
Apple Disc Recording API – This is the preferred and most compatible method for
burning VCDs on Mac OS X 10.3 and and DVDs on Mac OS X 10.4. If you are
successfully burning discs, use this option.
The default value is “On”.
CDR Disk At Once (cdrdao) – This option is available for users who are having
problems burning VCDs using Apple Disc Recording APIs on Mac OS X 10.3. If you
are experiencing burn failures and are running Mac OS X 10.3 then use this option and
try again. The default value is “Off”.
VCD Only - This preference is only required if you are running Mac OS X
10.3 or later and are having burn failures when burning VCDs. On Mac OS
X 10.2, CDR Disk At Once is always used. Changing this preference will
have no effect. This setting has no effect on DVD burning, which must use
Apple’s Disk Recording APIs
2. Once you have changed the default settings, click the “Save” button to save the
settings.
•
To revert to the last saved default settings, click the “Revert” button.
•
To revert to the factory set iVCD default settings, click the “Default Settings”
button.
14
iVCD™ Read Me
10/16/15 8:05 AM. Copyright ©2002-2015, The Mireth Technology Corporation
iVCD™ Read Me
How to Use iVCD™
Once you have finalized your movie content and created your input files, you are ready to
start your project. Storing your movie and it’s settings in a project folder makes it easy to
save your information so you don’t have to finish your project in one sitting and it also
makes it easy to create more copies of a DVD or VCD once you have perfected your
project.
How to make a project folder
1. If you haven’t already done so, launch iVCD™
2. From the Project Folder Dialog, select the disk type DVD, VCD or SVCD and select
“Save Project”.
3. Name the new project folder. (for example My DVD).
4. The project will be configured using the default settings. If required, edit the settings
for this project. For more information on the configuring the settings, refer to the “The
Project Settings” section of this document. Your changes will be saved in your project,
but will not affect the default settings.
How to Make a DVD
This process is a one step process that will convert the source files and burn the DVD in
just one step. It will make a DVD from AVI, DivX, XviD, WMV, MPEG, MOV, iMovie or
Quicktime movie source files. (For AVI, DivX, XviD, MPEG-2, WMV, refer to the "System
Requirements" section of this document.)
1. Make sure you have at least 5GB of free disk space since you’ll need room to create
your DVD work files. If you run out of disk space during the process of making the
DVD, you may be able to re-start from the last successful step in the process.
2. Launch iVCD™
3. Create a new project folder (For more information, refer to the “How to make a project
folder” section of this document.)
4. The project will be configured using the default settings. If not already set, change the
"Media Type" to "DVD". For more information on the configuring the settings, refer
to the “The Project Settings” section of this document.
5. Drag your movie files into the movie list. As you add movies to the Movie List, pay
attention to the Green/Amber/Red Capacity Indicator bar at the top of the iVCD™
screen. For more information, refer to the “The Capacity indicator bar” section of this
document.
6. Click the one-step “Convert + Image + Burn” button.
Converting to MPEG takes a long time, at least four times as long as the movie length.
If you're using an old, slow computer, try running this overnight.
7. Insert a blank DVD-R, DVD+R or DVD-RW (if you have less than 15 minutes of DVD
Video and you only plan to playback the video on a computer you may also use CD-R
or CD-RW).
8. Once the “burn” process has completed successfully, test the DVD on the type of
equipment your audience will be using, especially before making multiple copies.
15
iVCD™ Read Me
10/16/15 8:05 AM. Copyright ©2002-2015, The Mireth Technology Corporation
iVCD™ Read Me
How to Make a VCD
This process is a one step process that will convert the source files and burn the VCD in
just one step. It will make a VCD from AVI, DivX, XviD, WMV, MPEG, MOV, iMovie or
Quicktime movie source files. (For AVI, DivX, XviD, MPEG-2, WMV, refer to the "System
Requirements" section of this document.)
Make sure you have at least 1GB of free disk space since you’ll need room to create your
VCD work files. If you run out of disk space during the process of making the VCD, you
may be able to re-start from the last successful step in the process.
1. Launch iVCD™
2. Create a new project folder (For more information, refer to the “How to make a project
folder” section of this document.)
3. The project will be configured using the default settings. If not already set, change the
"Media Type" to "Video CD". For more information on the configuring the settings,
refer to the “The Project Settings” section of this document.
4. Drag your movie files into the movie list. As you add movies to the Movie List, pay
attention to the Green/Amber/Red indicator bar at the top of the iVCD™ screen. For
more information, refer to the “Capacity indicator bar”section of this document.
5. Click the one-step “Convert + Image + Burn” button.
Converting to MPEG takes a long time, at least four times as long as the movie length.
If you're using an old, slow computer, try running this overnight.
6. Insert a blank CDR or CD-RW.
7. Once the “burn” process has completed successfully, test the VCD on the type of
equipment your audience will be using, especially before making multiple copies.
How to Make an SVCD
This process is a one step process that will convert the source files and burn the SVCD in
just one step. It will make an SVCD from AVI, DivX, XviD, WMV, MPEG, MOV, iMovie
or Quicktime movie source files. (For AVI, DivX, XviD, MPEG-2, WMV, refer to the
"System Requirements" section of this document.)
Follow the instructions in the “How to Make a VCD” section of this document, changing
the “Media Type” tick box to "Super Video CD". (For further information on this, refer to
the “The Project Settings Tabs” section of this document.)
How to Make a KVCD
This process will convert the source files and burn the XVCD in just one step. It will make
an KVCD from AVI, DivX, XviD, WMV, MPEG, MOV, iMovie or Quicktime movie source
files. (For AVI, DivX, XviD, MPEG-2, WMV, refer to the "System Requirements" section of
this document.)
1. Follow the instructions in the “How to Make a VCD” section of this document,
changing the “Media Type” tick box to "Video CD" and ticking the “Expert Settings
KVCD” tick box. (For further information on this, refer to the “Expert Settings Tab”
section of this document.)
16
iVCD™ Read Me
10/16/15 8:05 AM. Copyright ©2002-2015, The Mireth Technology Corporation
iVCD™ Read Me
How to Make an XVCD
This process will convert the source files and burn the XVCD in just one step. It will make
an XVCD from AVI, DivX, XviD, WMV, MPEG, MOV, iMovie or Quicktime movie source
files. (For AVI, DivX, XviD, MPEG-2, WMV, refer to the "System Requirements" section of
this document.)
1. Follow the instructions in the “How to Make a VCD” section of this document,
changing the “Media Type” tick box to "Video CD" and changing the “Expert
Settings MPEG Bit Rate” setting to your specification. (For further information on
this, refer to the “Expert Settings Tab” section of this document.)
How to Make an XSVCD
This process is a one step process that will convert the source files and burn the XSVCD in
just one step. It will make an XSVCD from AVI, DivX, XviD, WMV, MPEG, MOV, iMovie
or Quicktime movie source files. (For AVI, DivX, XviD, MPEG-2, WMV, refer to the
"System Requirements" section of this document.)
1. Follow the instructions in the “How to Make a VCD” section of this document,
changing the “Media Type” tick box to "Super Video CD" and changing the “Expert
Settings MPEG Bit Rate” setting to your specification. (For further information on
this, refer to the “Expert Settings Tab” section of this document.)
17
iVCD™ Read Me
10/16/15 8:05 AM. Copyright ©2002-2015, The Mireth Technology Corporation
iVCD™ Read Me
Advanced Features
Expert Settings Tab
The Expert Settings are provided for users that wish to take advantage of
iVCD's XVCD, XSVCD, KVCD, DVDs with non-standard bit rates and
generic MPEG support features. If you are using iVCD to create standard
VCDs, SVCDs or DVDs, don’t use these settings.
•
Bit Rate
Use this setting to override the standard bit rate (1152 for VCD, 2500 for SVCD, 7500
for DVD). Higher bit rate results in higher quality. Change this setting to use iVCD to
encode non-standard bit rate VCDs, SVCDs and DVDs. To revert the MPEG Bit Rate
back to the standard, tick Video CD, Super VCD, or DVD tick box as documented
above. (Non-standard bit-rate VCDs are called XVCDs; non-standard SVCDs are
called XSVCDs. Please note that although all computers should play XVCDs and
XSVCDs, they are not playable by all component DVD players. Windows may have
problems playing back non standard bit rate DVDs, although Mac does not.)
•
Frame Size
Use this setting to override the standard frame size setting. If you are using MPEGs
for something other than VCDs or DVDs, you can adjust the frame size to suit your
presentation.
The specified frame size of the output will be adjusted to take the pixel aspect ratio of
the output device into account. You need to select the correct pixel aspect ratio for
your planned display:
• 1:1 – Adjust for computer display
• 4:3 – Adjust for standard television
• 16:9 – Adjust for widescreen television
To revert the Frame Size back to the standard, un-tick the “Frame Size” tick box.
•
Frame Rate
This option allows you to create output MPEG video with a specific frame rate. The
default is 0 – Default which give you the default frame rate for the selected media and
format.
•
Generic Profile
iVCD can be used as a batch MPEG encoder. Tick this box to create a generic MPEG
instead of a VCD/SVCD.
(You might want to do this to use an MPEG with another application, such as a
Powerpoint® presentation. This will allow for a wider range of Bitrate and Frame
Size settings. The advantage of creating a generic MPEG is that it is cross-platform
and high quality. Generic MPEG output is not for use when making
VCDs/SVCDs/DVDs.)
•
KVCD
Tick this to create a KVCD. The default setting is "off".
18
iVCD™ Read Me
10/16/15 8:05 AM. Copyright ©2002-2015, The Mireth Technology Corporation
iVCD™ Read Me
•
Interlaced
By default, iVCD will de-interlace your video so that the resulting VCD looks good on
both computer displays and television displays. For certain VCDs (primarily
SuperVCD which is intended to be interlaced) this can result in slightly reduced
quality when the video is presented on a Television.
To optimize the VCD for television display, tick the "Interlaced" tick box. The default
setting is "off".
•
Autorun
This option allows you to create a VCD that will autorun (autoplay) when inserted
into the CD Drive of a Windows computer.
To disable this, tick "Off".
To have iVCD generate a playlist and autorun file, tick "iVCD"
iVCD will generate a playlist and autorun file compatible with
- Windows Media Player (6.4 or above; 7 or above recommended).
- Windows Me, Windows 2000, Windows XP (or later), or earlier versions of Windows
provided Internet Explorer 5 (or above) is installed.
To create your own autorun.inf file, tick "Selected File Name"
iVCD will use your custom file.
iVCD will still generate the playlist.asx file and you may reference that file in your
custom autorun.inf.
The default value is “Off”.
How to convert to MPEG
This process will convert the source files to MPEG (MPG) but will not burn the DVD. It
will convert from AVI, DivX, XviD, WMV .MOV, Quicktime movie, iMovie, generic
MPEG to MPEG. (For AVI, DivX, XviD, WMV, refer to the "System Requirements" section
of this document.)
iVCD™ can be used as an MPEG encoder. It can encode as MPEG-1 (VCD profile),
MPEG-1 (generic), MPEG-2 (SVCD profile), MPEG-2 (generic), or MPEG-2 (DVD profile):
1. Launch iVCD™
2. Create a new project folder in your Movies folder. For more information on the
settings, refer to the “How to make a project folder” section of this document.
3. Drag your movie files into the movie list. Since you are not burning a disc, you can
ignore the Capacity Indicator bar at the top of the screen.
To make changes to the movie list, refer to the “Using the Movies List” section of this
document.
4. Configure the Project Settings.
MPEG -1 (VCD profile): change "Media Type" to "Video CD"
MPEG -2 (SVCD profile): change "Media Type" to "Super Video CD"
MPEG -2 (DVD profile): change "Media Type" to "DVD"
Generic MPEG-1: change "Media Type" to "Video CD" and configure the Expert
settings (See the "Expert Settings Tab" section of this document)
Generic MPEG-2: change "Media Type" to "Super Video CD" and configure the
Expert settings (See the "Expert Settings Tab" section of this document)
19
iVCD™ Read Me
10/16/15 8:05 AM. Copyright ©2002-2015, The Mireth Technology Corporation
iVCD™ Read Me
5. Click the “Convert to MPEG” button.
Converting to MPEG takes a long time, at least four times as long as the movie length.
If you're using an old, slow computer, try running this overnight.
6. When the Convert to MPEG process has completed successfully, the “Convert to
MPEG” dialog will disappear.
How to make a Looping DVD
Looping DVDs are used in information Kiosks, at trade shows or anywhere where you
want to show a video presentation continuously.
This process is a one step process that will convert the source files and burn the DVD in
just one step.
1. Follow the instructions above to make a DVD, and tick the “Kiosk” checkbox. (For
further information on this, refer to the “5 - The Project Settings Tabs” section of this
document.)
How to make a Looping VCD
Looping VCDs are used in information Kiosks, at trade shows or anywhere where you
want to show a video presentation continuously.
This process is a one step process that will convert the source files and burn the VCD in
just one step.
1. Follow the instructions above to make a VCD, SVCD, XVCD or SXVCD, and tick the
“Kiosk” checkbox. (For further information on this, refer to the “The Project Settings”
section of this document.)
How to rescue video that appears cropped on a TV
Unlike computer monitors, televisions do not display the complete picture. Television
defines two areas, the Action Safe Area, which occupies the middle 95% of the screen, and
the Title Safe Area, which occupies the middle 90% of the screen. Action on the edges of
the screen may be cropped if they fall outside the Action Safe Area. Similarly for Titles.
If you did not take these safe areas into account when you made your video, you may see
come cropping of action or text on some TV screens. Rather than going back and redoing
your movie, use this procedure to try an rescue it.
1. Follow the instructions above to make a DVD, VCD, SVCD and tick the “TV Safe
Black Border” checkbox on the Settings tab. (For further information on this, refer to
the “The Project Settings” section of this document.)
How to lighten dark video
Sometimes encoded video appears darker than your original movie. If the encoded movie
is too dark, you can adjust the lightness and re-encode the video so that the resulting
video appears brighter.
20
iVCD™ Read Me
10/16/15 8:05 AM. Copyright ©2002-2015, The Mireth Technology Corporation
iVCD™ Read Me
Note: Please note that adjusting the lightness will result in slower encoding as each
frame needs to be processed when the movie is being encoded.
1. Follow the instructions above to make a DVD, VCD, SVCD and slide the “Video
Lightness” slider on the Settings tab. (For further information on this, refer to the
“The Project Settings” section of this document.)
Creating VCDs with Video and Music
The VCD format supports hybrid CDs that contain Video followed by Audio. The Audio
portion can be played on a standard audio CD player. This format is typically used to
create an Audio CD with one or more video clips. You can make hybrid VCDs, SVCDs,
XVCDs and XSVCDs.
Modern DVD players can play the video and the audio on these hybrid format CDs.
This feature requires the use of CDRDAO for burning so it does not work
with non-MMC or with USB CDRW Drives.
1. Follow Steps 1-6 of the instructions to make a VCD, SVCD, XVCD or SXVCD.
2. In the Movie/Music File List window, Click the Music tab. Drag .wav files into the
Music List pane and set the pre-gap value in seconds.
3. Follow the rest of the instructions to make a VCD, SVCD, XVCD or SXVCD.
21
iVCD™ Read Me
10/16/15 8:05 AM. Copyright ©2002-2015, The Mireth Technology Corporation
iVCD™ Read Me
Making movies with Menus
Using the Enable Menu tab
To make a movie with a menu, use the "Enable Menu" tab.
Figure 3: iVCD Menu Tab
The “Menu” button
The menu button is the large one on the left of the “Enable Menu” tab. When no menu
movie is selected, it is marked “No Menu”. When a menu movie is selected, the name of
the menu movie is displayed.
The Looping Menu controls
The three looping menu controls are at the top right of the menu tab, the time-out “clock
face” button, the number of times stepper and the wait time stepper.
The mapping buttons
The numeric, |<<, >, and >>|buttons on the tab are used to map a menu item to the
buttons on your remote control.
The DVD menu colors
The DVD menu color buttons allow you to select the three colors for the DVD menu.
These colors represent the normal, highlighted, and selected menu states.
Configuring a Menu movie
To configure a menu movie, do the following:
1. In the movie list, select the movie you want to use as the menu movie.
2. Click the large menu button, titled “No Menu”. Once you have successfully selected
the menu movie, the name of the movie will be displayed on this button.
Configuring an Looping Menu movie
To configure a looping menu movie, do the following:
1. Configure the Menu movie (refer to the “Configuring a Menu” section of this
document).
2. Using the number of times stepper, select the number of times you want the Menu
movie to play before the time-out play list is played.
3. Using the wait stepper, select the number of seconds to wait after the Menu movie has
played before continuing. (Limit of 59 seconds)
4. In the movie list, select the time-out play list you want to play if no selection is made.
5. Click the time-out button that looks like a clock face. Once you have successfully
selected the time-out playlist, the playlist name will be displayed when you pass the
cursor over this button.
22
iVCD™ Read Me
10/16/15 8:05 AM. Copyright ©2002-2015, The Mireth Technology Corporation
iVCD™ Read Me
Disabling a Menu
You can disable the menu for a project without losing its setup simply by pressing the No
Menu Tab. To re-enable it just press the Enable Menu Tab. configure a menu movie, do
the following:
Mapping a play list to the Remote Control
VCD and SuperVCD
When using the menu, the user selects a menu item to play and then enters it by selecting
the corresponding button on the remote control. To configure each menu item, do the
following:
1. In the movie list, select the play list you want to play when a particular button is
pressed (0 through 9, “|<<”, “>” or “>>|”).
2. Click the corresponding button from the Mapping buttons on the Menu tab. Once
you have successfully selected a play list, the play list name will be displayed when
you pass the cursor over the corresponding button.
3. Repeat until all the selections in the Movie menu are mapped to a corresponding play
list.
DVD
When using the menu, the user selects a menu item to play by using the remote control
navigation keys to choose the displayed menu text and the enter button to select it. With
DVDs there are 10 menu lines corresponding the the digits 0-9 and the > button – the
remaining menu buttons are not used with DVD menus. To configure each menu item,
do the following:
1. In the movie list, select the play list you want to be displayed on menu lines 0-9 and
use the > button for menu line 10.
2. Click the corresponding button from the Mapping buttons on the Menu tab. Once
you have successfully selected a play list, the play list name will be displayed when
you pass the cursor over the corresponding button.
3. Repeat until all the selections in the Movie menu are mapped to a corresponding play
list.
Displaying the Remote Control mapping
To display which playlist has been mapped to a mapping button, mouse over it without
clicking. A tool tip will display the movie name.
Deleting the mapping of a play list to a mapping button
To delete the mapping of a playlist to a mapping button, press the mapping button. It
will no longer be mapped to a play list.
Creating VCDs with a menu
The VCD format supports menus, similar to DVD menus. When you play a VCD with a
menu, the menu of items to view is displayed on the screen with a corresponding Remote
Control key to press beside each one. The user selects an item to watch, presses the
corresponding key on the Remote Control and that item is played.
iVCD™ allows you to map actions to the following keys on your DVD/VCD Player
Remote Control for use with your menu:
•
the number buttons 0 through 9
23
iVCD™ Read Me
10/16/15 8:05 AM. Copyright ©2002-2015, The Mireth Technology Corporation
iVCD™ Read Me
•
the skip backwards button “|<<”
•
the play button “>”
•
the skip forwards button “>>|”
iVCD™ always programs the “Return” button to return to the Menu Movie. It does not
allow you to map actions to any other keys on your DVD/VCD Player Remote Control.
To implement a menu on your VCD is a 6 step process
1. Create a Menu movie which will allows the user to select items to watch.
2. Organize the movies the user will watch into play lists, each play list containing one
or more movies.
3. Map each playlist to a mapable key on the remote control (0 through 9, “|<<”, “>” or
“>>|”).
4. Map other mapable keys on the remote control to actions. This is optional.
5. Decide if there is a time-out action that will be performed if the user does not make a
selection in a specified amount of time. This is optional.
6. Burn the VCD. Follow the instructions in the “How to Make a VCD” section of this
document.
These steps are explained below, using a sample movie that contains a still picture Menu
Movie, five movies mapped to the numbers on the Menu Movie, the Play button “>”
plays all five movies, and the time-out action is to play all five movies.
Step 1: Create a Menu Movie
Since iVCD™ does not support still picture menus, you need to make a menu movie.
The menu movie should display what buttons you have programmed and what they do.
In our example, we would remove the “My favorite movies” text, replacing it with a
description and perhaps a picture from each of the four movies.
Figure 4: Menu Movie
If you want to use a still picture as a menu, import it into iMovie (or your favorite movie
package) and save it as a movie that is at least 4 seconds long. Then use it as your menu
movie.
If you want to use a movie as a menu, you’ll want to consider making a looping menu.
Otherwise, the movie will only play once when you start the movie, displaying the last
frame until the time-out action occurs, if there is one.
24
iVCD™ Read Me
10/16/15 8:05 AM. Copyright ©2002-2015, The Mireth Technology Corporation
iVCD™ Read Me
Once you have created the Menu Movie, drag it into the Movie Files window and
configure it as the Menu Movie. For more information, refer to the “The Enable Menu
tab” section of this document.
Step 2: Organizing the Play lists
Each menu item is mapped to a play list, even if that play list only contains a single
movie. In our example we have five movies: “springtime flowers.MOV”, “summer
gardening.MOV”, “summer vacation.MOV”, “fall leaves.MOV”, and “winter ski
trip.MOV”
We organize them into the following four play lists:
•
Spring Play list containing “springtime flowers.MOV”
•
Summer Play list containing “summer gardening.MOV” and “summer
vacation.MOV”
•
Fall Play list containing “fall leaves.MOV”
•
Winter Play list containing “winter ski trip.MOV”
To create the play lists,
1. Drag the five movies into the movie list
2. Create the four play lists above
3. Drag the movies into the play lists.
For more information, refer to the “How to make changes to the Movies List” section of
this document.
In our example, our movie list would look like the following:
Figure 5: Example Movie List
Step 3: Mapping Play lists to Numbered Remote Control Buttons
Now that the movies have been organized into play lists, we can map each play list to the
Remote Control Button corresponding to a Menu Item on the Menu Movie.
In our example we have four play lists to map to the Remote Control Buttons
corresponding to the four Menu Items, 1 through 4, on the Menu Movie. We’ll map them
as follows:
•
Spring Play list to Number 1
•
Summer Play list to Number 2
•
Fall Play list to Number 3
•
Winter Play list to Number 4
To map the play lists to the Remote Control Buttons, use the “Mapping buttons” in the
Menu tabs. For more information, refer to the “The Menu Tabs” section of this document.
In our example, our map would have the buttons 1 through 4 map, like the figure below.
25
iVCD™ Read Me
10/16/15 8:05 AM. Copyright ©2002-2015, The Mireth Technology Corporation
iVCD™ Read Me
Figure 6: Example Remote Control Mapping
Step 4: Mapping Play lists to Other Remote Control Buttons
•
You can also map play lists to the following Remote Control buttons:
•
the skip backwards button “|<<”
•
the play button “>”
•
the skip forwards button “>>|”
In addition, iVCD™ always programs the “Return” button to return to the Menu Movie.
In our example we will map a play list that plays all the movies to the play button “>”. To
do this we need to create a new play list.
To create the play list,
1. Create the a new play lists and name it “All”
2. Drag the other four play lists into the “All” play list.
For more information, refer to the “How to make changes to the Movies List” section of
this document.
Figure 7: Movie List with "All" Playlist
In our example, our map would have the “>” button mapped to the “All” playlist, like in
figure 9.
Step 5: The Time-Out Action
The Time-Out Action specifies which play list is played if no selection is made from the
menu after the specified amount of time. Configuring a default action is optional.
If you’ve used a still picture as a menu and you want to configure a time-out action, use
the “Looping Menu” feature, configuring the number of times stepper to 1. For more
information, refer to the “The Looping Menu controls” section of this document.
If you’ve used a movie as a menu and you want to configure a time-out action, you
should consider showing the menu movie more than once, with some delay between
showings before performing the time-out action. Using, the “Looping Menu” feature,
configure the number of times stepper to more than 1. For more information, refer to the
“The Looping Menu controls” section of this document.
If you want the time-out action to be playing a particular play list, configure that play list
using the “time-out” button in the “Looping Menu” controls.
26
iVCD™ Read Me
10/16/15 8:05 AM. Copyright ©2002-2015, The Mireth Technology Corporation
iVCD™ Read Me
In our example, we will play the Menu Movie, looping it 1 time. If no selection is made
after 59 seconds, the time-out action of playing all the movies will be performed. To do
this, we do the following:
1. Using the looping control on the Enable Menu tab, set the number of times stepper to
1.
2. Set the wait stepper to 59 seconds (0:59).
3. Select the “All” play list as the time-out play list.
For more information, refer to the “The Enable Menu tab” section of this document.
In our example, our map have the Looping Menu controls configured, like in figure 9.
Step 6: Burn the VCD
Follow the instructions in the “How to Make a VCD” section of this document to burn the
VCD. Test all the menu items and any other actions you have configured to ensure that it
all performs as expected before you use it.
27
iVCD™ Read Me
10/16/15 8:05 AM. Copyright ©2002-2015, The Mireth Technology Corporation
iVCD™ Read Me
Creating DVDs with a menu
Follow the same steps used to create a VCD menu. A DVD menu will be created and the
Playlist names will be displayed and selectable like any standard DVD menu.
Differences from VCD
The following list the things that are different when making a DVD menu instead of a
VCD menu.
1. Only the buttons numbered 0-9 and the > button are used. If you map other
buttons, they will be ignored.
2. The name of the play list will be displayed on top of your menu movie so, unlike a
VCD, you should not include any text related to menus in your menu movie.
Button 0 is at the top of the screen and the > button is at the bottom of the screen.
The other buttons map to their relative positions on the screen as shown in this
example so if you only mapped buttons 0, 1, and > then only the highlighted menu
position would be displayed (the unused items would not be displayed):
Play list for button 0
Play list for button 1
Play list for button 2
Play list for button 3
Play list for button 4
Play list for button 5
Play list for button 6
Play list for button 7
Play list for button 8
Play list for button 9
Play list for button >
3. Looping menus do not timeout, the loop delay is used to repeat the menu movie
infinitely. If the menu is not set to loop it will play once and pause until a menu
item is selected.
If you understand how DVD menus image files work then you can
override the default iVCD menu with a custom menu of your own design.
Create three PNG files named Menu_0_0.png, Menu_0_1.png, and
Menu_0_2.png and put them in a folder called CustomDVDMenu. Put
the CustomDVDMenu folder inside the folder where your iVCD project
assets are stored. Then when you create your DVD image, iVCD will use
your PNG files for the menu instead of the ones it created.
28
iVCD™ Read Me
10/16/15 8:05 AM. Copyright ©2002-2015, The Mireth Technology Corporation
iVCD™ Read Me
Help
Troubleshooting Guide
If you have a problem with the software, please do the following:
•
Refer to the "Known Problems" section of this document for the latest information
on existing problems.
•
Check our site for answers to your question:
http://mireth.com
•
If your question is not answered, please contact Product Support at
[email protected]. Please include the following information:
•
Problem description.
•
If you are having problems with a particular product, please include the
following information as well:
•
• What product and version you are having problems with.
To find the version number,
Mac: single click the product icon and Get Info
(OS8/9- File:Get Info)
(OSX- File:Show Info)
Windows: single click the product icon and show properties
(File:Properties:Version tab)
•
• What OS version you are running.
To find the version number,
Mac: OS8/9: (Apple Menu:About this Computer)
OS X: (Apple Menu:About this Mac)
Windows: (Start Menu:My Computer:Help:About Windows)
•
• Whether you are using the demo version or the registered version of the
product
Known Problems
•
iVCD™creates discs with no audio if the .MOV uses MPEG media
This is a problem because Quicktime will not extract the audio from a .MOV that
uses MPEG media. The solution is to use the .mpg directly (don’t wrap it in a
.MOV) to make your disc. If you are downloading the .mpg from the Internet,
control-click the link to save the movie as a .mpg file instead of single clicking it
and saving is as a Quicktime movie. This problem may also occur if you use
iTunes protected songs in your iMove. To use that type of movie first export it
using a DV video setting and an uncompressed audio setting.
•
iVCD™creates discs with no audio if the .MOV uses protected iTunes media
This is a problem because Quicktime will not extract the audio from a .MOV that
uses iTunes protected songs in your iMove. To use that type of movie first export
it to Quicktime using a DV video setting and an uncompressed audio setting.
•
iVCD™ needs Quicktime components for some movies
iVCD™ will only create a disc from Quicktime movies if you have the component
29
iVCD™ Read Me
10/16/15 8:05 AM. Copyright ©2002-2015, The Mireth Technology Corporation
iVCD™ Read Me
required to play them. For example, to make a disc from an MPEG-2, you need
the MPEG-2 Playback Component component.
•
iVCD™ keeps all media in the project folder so using the same movie on different VCDs or
DVDs requires it to be converted to MPEG more than once
iVCD™ keeps everything related to a VCD or DVD in the project folder. A future
version of iVCD™ may consolidate MPEG media so that multiple conversions are
not required.
•
Eject button ejects all CD media if the computer has multiple CD/DVD drives
iVCD™ will eject multiple CDs if you have multiple drives attached to the
computer and you press the eject button. The workaround is to use the erase or
burn setup panels to eject the CD as they allow you to select a CD-RW drive. Since
most Macintosh computers have only 1 optical drive, this problem may not affect
you.
•
Burning VCDs fails with an error
This is a problem if you are using Mac OS X 10.2 or earlier. Upgrade to Mac OS X
10.3 which has much improved support for disc recording.
If you still have problems burning discs, open the Preferences, click the Burn tab
and select CDR Disk At Once (cdrdao) instead of Apple Disk Recording. The
Restart your Macintosh. If you still have problems burning discs, your CD Drive
is not supported.
30
iVCD™ Read Me
10/16/15 8:05 AM. Copyright ©2002-2015, The Mireth Technology Corporation
iVCD™ Read Me
Appendix A - Demo
The iVCD™ DEMO is iVCD™ without a Serial Number. It is provided so that you can see
how the program works. The demo looks and performs exactly like the full version of the
software, but overlays a text message on the video that you produce.
Once you have purchased iVCD™, you can enable the fully functional version of the
program by entering the registration information.
How to install and run the iVCD™ demo
1. To install, follow the “How to Install iVCD™” instructions in this document, omitting
Step 3. (To run the demo, registration is not required.)
2. To run, follow the ”How to Use iVCD™” instructions in this document.
31
iVCD™ Read Me
10/16/15 8:05 AM. Copyright ©2002-2015, The Mireth Technology Corporation