1
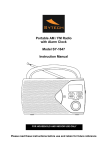
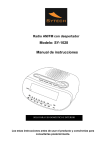
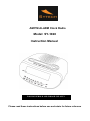
AM/FM ALARM Clock Radio
Model: SY-1028
Instruction Manual
FOR HOUSEHOLD AND INDOOR USE ONLY
Please read these instructions before use and retain for future reference
LOCATION OF CONTROLS
1.
2.
3.
4.
5.
6.
7.
8.
Alarm Set Button
Time Set Button
Sleep Set Button
Mains Lead
FM Antenna
Snooze Button
Hour Set Button
Minute Set Button
9.
10.
11.
12.
13.
14.
15.
16.
Volume Control
Band Selector
Tuning Control
LED Display
Headphone Jack
Function Selector
Auto Indicator
Battery Door
REAL TIME SETTING
1. Set the Function Selector (14) to”OFF”. Connect the mains lead to the power supply. The
clock display will flash on and off indicating a power interruption and that the displayed time is
incorrect.
2. To set the correct time, press the Time Set Button (2) and Hour Set Button (7), or Minute Set
Button (8), together, until the correct time is displayed.
3. Open the Battery Door (16) on the back of the unit and put in a 6LR61 (or equivalent) 9-volt
battery (battery not included). The purpose of this battery is to store the information relating to
alarm time and to keep the clock functioning in the event of disconnection from the mains
supply or power interruption. Should this occur, the clock would continue to keep time, but will
not display.
PLEASE NOTE: When operating from battery only, the clock will only remain accurate for a short
period of time. It is important that the mains supply is restored as soon as possible.
ALARM TIME SETTING
1. Press the Alarm Set Button (1) and simultaneously press the Hour Set Button (7) or Minute
Set Button (8) as appropriate until the required alarm time is reached.
2. To double check the alarm time, simply press the Alarm Set Button (1) then the display will
show the pre-set alarm time.
RADIO OPERATION
For AM reception, this unit uses an internal directional aerial, rotate the unit for best reception.
For FM reception, the wire FM Antenna (5) on the back of the unit should be fully unwound.
1. Set the Function Selector (14) to the “ON” position.
2. Set the Band Selector (10) to the required waveband.
3. Use the Tuning Control (11) to select the desired station.
4. Adjust the Volume Control (9) to the desired listening level.
5. To turn off the radio, set the Function Selector (14) to ”OFF”. If the radio does not switch off
this may be caused by inadvertent operation of the Sleep Set Button (3). To cancel this, press
the Snooze Button (6) once.
WAKE TO RADIO
Having selected your desired station and adjusted the desired listening level, proceed as follows:
1. Follow the instructions for “ALARM TIME SETTING” above.
2. When the desired alarm time has been selected, set the Function Selector (14) to the “AUTO”
position.
3. The radio will switch on automatically at the pre-set alarm time.
4. The alarm can be temporarily stopped for 9 minutes by pressing the Snooze Button (6) once.
5. Depress the Alarm Set Button (1) to turn off the radio. The alarm will activate again after 24
hours unless the Function Selector (14) is set to “OFF”.
WAKE TO BUZZER
1. Follow the instructions for “ALARM TIME SETTING” above.
2. When the desired alarm time has been selected, set the Function Selector (14) to the “BUZZ”
position.
3. The alarm tone will switch on automatically at the pre-set alarm time.
4. The alarm can be temporarily stopped for 9 minutes by pressing the Snooze Button (6) once.
5. Depress the Alarm Set Button (1) to turn off the buzzer. The alarm will activate again after 24
hours unless the Function Selector (14) is set to “OFF”.
SLEEP TO RADIO
The radio can be set to switch off automatically after a period of time from 1 minute to 1 hour
59 minutes, by following this procedure:Set the FUNCTION Selector (14) to “OFF” position or, if the Alarm is to be activated, the “AUTO”
position or “BUZZ” position. Then depress the Sleep Set Button (3) and the Minute Set Button (8),
or Hour Set Button (7) until the display shows the exact sleep time you wish the radio to continue
to play before switch off. To switch off the radio before the end of the registered sleep time period,
simply press the Snooze Button (6) once.
USING HEADPHONES (not included)
A headphone jack has been provided so that the set can be used without disturbing others.
Plug in the 3.5mm headphones at the point marked ‘ ’. Turn the listening volume to the lowest
setting before adjusting the volume up to your chosen level. Excessive sound pressure from
earphones and headphones can cause hearing loss. The speakers will not operate when
headphones are fitted.
CLEANING
Clean the cabinet with a soft cloth moistened with water or mild detergent. Do not use solvents
such as alcohol, benzene or thinner, as they may damage the cabinet finish. Make sure to
disconnect the mains lead from the supply before cleaning.
CAUTION
1. Ensure minimum distances around the apparatus for sufficient ventilation. The ventilation
should not be impeded by covering the ventilation openings with items, such as newspapers,
table-cloths, curtains, etc.
2. No naked flame sources, such as lighted candles, should be placed on the apparatus.
3. It shall not be exposed to dripping or splashing and that no objects filled with liquids, such as
vases, shall be placed on the apparatus.
4. Do not place the product in closed bookcases or racks without proper ventilation.
5. Where the mains plug is used as the disconnect device, the disconnect device shall remain
readily operable.
6. Attention should be drawn to the environmental aspects of battery disposal.
7. The use of apparatus in moderate climates.
8. Danger of explosion if battery is incorrectly replaced. Replace only with the same or
equivalent type.
9. Batteries (battery pack or battery installed) shall not be exposed to excessive heat such as
sunshine, fire or the like.
10. Excessive sound pressure from earphones and headphones can cause hearing loss.
11. The Location of the rating plate is affixed on the bottom surface of appliance.
TECHNICAL SPECIFICATION
Rated voltage
230V~ 50Hz
Battery (for Clock Back-up) 1x9V Battery Size 006P / PP3 / IEC 6F22 (not included)
Radio frequency
AM 530 – 1600 kHz
FM 88 – 108 MHz
Due to continuous product development, design and specifications are subject to change without notice.
DECLARATION OF CONFORMITY
Manufacturer Name: Satyatrade S. L.
Address: Pol. Ind. La Raya. C/ Guadalquivir, 2.
Camarma de Esteruelas, 28816 Madrid
Tel: 902 430 967
Fax: 91 8864285
NIF: B83254763
Manufacturing country: China
Sytech® SY-1028 complies with the following directives:
CE standard: MC Directive 2004/108/EC
EN 55013:2001+A1:2003+A2:2006
EN 55020:2007
EN 61000-3-2:2006
EN 61000-3-2:2008
Low Voltage Directive: LVD 2006/95EC
EN 60065: 2002+A1:2006
ROHS standard:2002/95/EC Restriction of Hazardous Substance
Signed: Ajeet Nebhwani Utamchandani
Sole Administrator