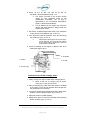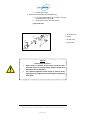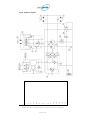
1
Original user manual Soffie feeding machines 600 - 700 – 950 - 1500 1 1. Declaration of Conformity CE Declaration of Conformity Manufacturer: Jasopels A/S 3500 Address: Fabriksvej 19 Phone +45 7694 DK-7441 Bording Denmark Machine: Fodermaskine Soffie Type 600 D / 700 / 950 D / 1500 D : Jasopels Produktion A/S declares that this product conforms to the provisions of the following EU Directives: 2006/42/EC 2006/95/EC 2006/108/EC Furthermore, we declare that the following harmonised standards have been applied: DS/EN 60204-1 DS/EN 12100 : 2005 DS/EN 14121 - 1 DS/EN 14121 – 2 DS/EN 13857 : 2008 Place and date: Bording, June 1, 2013 Name: Managing Director Poul A Bach Jasopels Fabriksvej 19 7441 Bording, Denmark Sales Department: Phone +45 98420566 Fax +45 76951343 Service: Phone +45 9843 9966 Page 2 of 70 2. Copyrights Jasopels A/S has published this user manual and is the owner of all copyrights. Neither this document nor any extract of it may be reproduced, photocopied or distributed in electronic format or hard copy version without the written consent of Jasopels A/S. Jasopels A/S reserves the right to update this user manual and documents to reflect the up-to-date version of the product, and is not obliged to update the copies, which have already been published. Jasopels A/S will therefore inform on the company’s website about important changes in the user manual or other documents. Jasopels Fabriksvej 19 7441 Bording, Denmark Sales Department: Phone +45 98420566 Fax +45 76951343 Service: Phone +45 9843 9966 Page 3 of 70 3. Table of contents 1: Declaration of Conformity ...............................................................2 2: Copyrights ......................................................................................3 3: Table of Contents ...........................................................................4 4: Preface ............................................................................................6 5: Explanation of Symbols .................................................................7 6: Introduction to the Machine ...........................................................8 7: Safety Information ..........................................................................9 8: Operating Instructions ................................................................ 11 8.1.0 8.2.0 8.2.1 : Instrument Guide .......................................................................... 11 : Operating Instructions for Instruments ......................................... 12 : Automatic Portioning..................................................................... 12 8.2.1.1: Start-up Screen ...................................................................... 12 8.2.1.2: Changing the Programme/ Values .......................................... 13 8.2.1.3: Calibration of Automatic Portioning ........................................ 13 8.2.2 8.2.3 8.2.4 8.2.5 8.2.6 8.2.7 8.2.8 8.2.9 8.2.10 8.2.11 8.2.12 8.2.13 8.2.14 8.2.15 8.2.16 8.3.0 : Regulation of Engine Rotations .................................................... 17 : Function Switch ............................................................................ 17 : Drive Foot Pedal ........................................................................... 18 : Steering ........................................................................................ 18 : Water Dosage Regulation ............................................................ 18 : Instrument Panel ........................................................................... 18 : Engine Temperature ..................................................................... 20 : Fuel meter ..................................................................................... 20 : Hour Meter .................................................................................... 20 : Ignition .......................................................................................... 21 : Foot Pedal for Fodder Dosage ..................................................... 22 : Fodder Dosage Adjustment .......................................................... 22 : Fuse Box ....................................................................................... 22 : 12 V Plug 2-pole ........................................................................... 22 : Feeding Hose Holder .................................................................... 22 : Engine Operating Instructions ...................................................... 23 8.3.1: Starting and Stopping the Engine .............................................. 24 8.4.0 : Control during Operation / Driving ................................................ 25 8.4.1: Controlling and Operating the Cooling System .......................... 25 8.4.2: Controlling and Operating the Oil Indicator ................................ 26 8.4.3: Fuel Level Control ..................................................................... 27 9: Feeding Machine Propulsion System ......................................... 29 9.1.0 : Hydraulic System Control ............................................................. 29 10: Fodder and Water Tank ................................................................ 31 Jasopels Fabriksvej 19 7441 Bording, Denmark Sales Department: Phone +45 98420566 Fax +45 76951343 Service: Phone +45 9843 9966 Page 4 of 70 11: Maintenance ................................................................................. 33 11.1.0: Engine Maintenance ....................................................................... 34 11.1.1: Controls and Intervals for Engine Oil Change ........................... 35 11.1.2: Changing Engine Oil and Oil Filter ........................................... 36 11.2.0 : Radiator Maintenance................................................................... 39 11.2.1: Controlling and Filling up the Antifreeze ................................... 40 11.2.2: Coolant Replacement .............................................................. 41 11.3.0 : Maintenance of Ventilator V-Belt .................................................. 43 11.4.0 : Air Filter Maintenance ................................................................... 44 11.5.0 : Battery Maintenance ..................................................................... 46 11.6.0 : Fuel System Maintenance ............................................................ 48 11.7.0 : Hydraulic System Maintenance .................................................... 49 11.8.0 : Moveable Parts Lubrication .......................................................... 51 11.9.0 : Hydraulic Hoses between Side Members..................................... 52 11.10.0: Maintenance Table ....................................................................... 53 11.11.0: Gear Pump Replacement ............................................................. 54 12: Electric / Hydraulic Diagram ........................................................ 57 12.1.0 : Fuses ............................................................................................ 59 13: Technical data / Specification...................................................... 60 13.1.0 : Noise Level………………………………………………………........61 14: List of Spare Parts ........................................................................ 62 15: Troubleshooting ........................................................................... 63 15.1.0 : Towing ........................................................................................... 67 16: Technical Tables........................................................................... 68 17: User’s notes .................................................................................. 71 Jasopels Fabriksvej 19 7441 Bording, Denmark Sales Department: Phone +45 98420566 Fax +45 76951343 Service: Phone +45 9843 9966 Page 5 of 70 4. Preface This user manual is intended for use of Jasopels A/S feeding machines Soffie 600D, 700, 950D and 1500D. This user manual is an important part of your new feeding machine. Read it thoroughly before you start using the machine. If you have any queries regarding the use of the machine, you are always welcome to call Jasopels A/S service for more information. However, we would like to notice, that this user manual should be used as a reference handbook for troubleshooting, list of spare parts and operating instructions. The manual contains important information about the safety and use of this machine. Keep this manual together with the machine. It is important that this user manual is enclosed when the machine resells or lends out. The owner/ user of the machine is to ensure that operator, service personnel and others who have access to the machine have been instructed in the correct operation and handling of the machine. Please remember, that Jasopels emphasizes safety of the machine user. If you have any queries regarding the machine and its use, you are always welcome to call Jasopels A/S service for more information. However, refer to this user manual for further information on the use of the machine and troubleshooting. Jasopels Fabriksvej 19 7441 Bording, Denmark Sales Department: Phone +45 98420566 Fax +45 76951343 Service: Phone +45 9843 9966 Page 6 of 70 5. Explanation of symbols Symbols used in this manual user emphasize important instructions. Please read and follow the instructions before using the machine. The symbols below express the following information. Note!! A triangle containing an exclamation mark is a warning symbol warning you of important instructions or information concerning the machine. DANGER!! A triangle containing a warning of the risk of crushing. Jasopels Fabriksvej 19 7441 Bording, Denmark Sales Department: Phone +45 98420566 Fax +45 76951343 Service: Phone +45 9843 9966 Page 7 of 70 6. Introduction to the Machine Feeding machine Soffie is designed to bring liquid fodder to fur farms. The feeding machine may not be used for a different purpose than for which it has been constructed. Under the construction of the machine the operator and his workplace has been the centre of attention concerning the design, i.e. construction of the correct machine arrangement and its maintenance. Operator’s comfort: Safe construction: Robust construction Good driving comfort Stability due to compensation of centres of gravity Low-noise engine Easy to maintain and clean Good manoeuvrability Note !! The user of the machine is to ensure that operator, service personnel, and others who have access to the machine have been instructed in the correct operation and handling of the machine. Refer to this user manual for further information. Read the entire user manual before using the machine. The machine may only be used for the purpose for which it is designed. Upon use for any other purpose, the CE declaration becomes void. Under no circumstances, may faults in the machine or its operation, no matter what they are, be corrected before the machine has been properly switched off, unless a minor correction can be made through the machine control buttons. The user manual must always be available for the operator. If the machine is operated by young persons of 16 years of age, the driving license for tractors is not required according to Labour Inspection Regulation No 239, Annex 2 (2) (C). Jasopels Fabriksvej 19 7441 Bording, Denmark Sales Department: Phone +45 98420566 Fax +45 76951343 Service: Phone +45 9843 9966 Page 8 of 70 7. Safety Information To avoid accidents when using the machine, read this manual user thoroughly. Jasopels recommends reading the manual irrespective of the operator’s experience. The user manual should be always read before using the machine. This will help the operator gain all the information about the use and on how to secure the machine in order to avoid accidents. Note !! It is the owner’s legal duty to instruct all users in the safety precautions. 7.1 Safety precautions The operator, personnel and owner must observe following safety precautions before using the machine. Get to know your machine and its limitations. Please read this user manual thoroughly, before starting and using the machine. Before other people are allowed to use the feeding machine, you should explain in detail how it has to be used and let the person concerned read this user manual thoroughly. For safety reasons inexperienced personnel should conduct a trial run of the machine in an open and level area, at low rotation speed of the engine in order to get used to the machine propulsion system. The engine exhaust fumes can be very dangerous, if they accumulate. The machine must be placed in a well-ventilated area, where there are no people or animals nearby. Take good care of the environment and ecology. Before you tap the fluids from the machine, make sure to dispose of it correctly. Observe the relevant rules for environmental protection before you dispose of oil, fuel, coolant, filters and batteries. Jasopels Fabriksvej 19 7441 Bording, Denmark Sales Department: Phone +45 98420566 Fax +45 76951343 Service: Phone +45 9843 9966 Page 9 of 70 Never remove the radiator cap while the engine is running or after it has stopped and the engine is still warm. Otherwise, you can risk that boiling hot water sprays out and scalds people, who are close by. Remove the radiator cap first, when the engine has cooled down for at least 10-20 minutes depending on the climate. Always use spare parts and auxiliary equipment of high quality. Do not use spare parts of poor quality when replacement is necessary. Release all the pressure in the oil and cooler system before cables, mountings or the like are removed or disconnected. Never check a possible leakage with your hands, since the high oil, water or fuel pressure can cause personal injuries. Make always sure that the drain taps for the coolant and oil are closed, the radiator cap is closed securely and the strap is fastened before start. If any of these parts are either removed or loose, this may result in serious personal injuries. Do not mix gasoline or spirits with diesel oil, since this may cause an explosion. Never use the machine in an environment, where there may be a danger from inflammable materials or vapour. Always stop the engine during daily or periodical maintenance, refuelling, check-ups or cleaning. The machine can be operated by persons at the age of 16 years and over according to Labour Inspection Regulation No 239, Annex 2 (2) (C). Note !! Avoid sudden shifts between forward and backward movements, since the machine may rear. The owner must be registered in either agriculture or gardening association to be eligible for the abovementioned regulation. If this condition is not fulfilled, persons under 18 years of age must not operate the machine. DANGER ! You may only stay in the feeding container or do the maintenance works on the feeding pump, repair, clean Fabriksvej 19 7441the Bording, Denmarkfirst when the andJasopels otherwise maintain machine engine has stopped. Sales Department: Phone +45 98420566 Fax +45 76951343 Service: Phone +45 9843 9966 Page 10 of 70 8. Operating Instructions Feeding machine is equipped with an instrument panel used to operate and control the machine before starting and while operating. For a correct use and control of the machine before starting and while operating, read this section first. 8.1 Instrument Guide Fig. 1 shows a standard feeding machine, Soffie model 600 D. Instrument panels for different models have the same functions. Figure 1 Instruments in the feeding machine: 1. Automatic portioning 7. Instrument panel * Additional equipment placed in the instrument panel * Alarm light signals 8. Engine temperature 2. Gas handle * Engine heat control * Regulation of engine rotations 9. Fuel meter 3. Function switch * Fuel level control * Feeding pump switch 10. Hour meter 4. Drive foot pedal * Control of the machine time usage * Machine forward or backward movements 11. Ignition * Engine warm-up + start 5. Steering wheel with the knob * The steering wheel knob is an additional equipment 12. 12 V plug, 2-pole * Additional equipment for an optional light 6. Water dosage * Regulation of water use in the feed 13. Fodder dosage adjustment * electric foot contact right side Figure 2 The right side of the control box 14. Adjusting fodder dosage * different pressure, feeding pump 16. Fuse box In case of Soffie 650 and Soffie 700, the tank is tilted, the cover is opened and you have an access to the fuses. In case of other models the fuses are found in the strearing column under the engine hood. Jasopels Fabriksvej 19 7441 Bording, Denmark Sales Department: Phone +45 98420566 Fax +45 76951343 Service: Phone +45 9843 9966 Page 11 of 70 8.2 Operating Instructions for Instruments: Every function of the instrument illustrated in fig. 1 is described below for the correct guidance and instructions regarding use of the machine. 8.2.1 Automatic Portioning, pos. 1 fig. 1: Automatic fodder portioning is a computer unit, which can be connected to the machine as additional equipment. The automatic fodder portioning can be set to give the required dosage for each portioning. The automatic portioning system is regulated by the engine rotations and time intervals, which are adjusted to each operator. There are three components included in the automatic portioning system. 1. An electrical foot pedal placed on the right side of the instrument panel, pos. 12 fig. 1. 2. A function switch with 4 positions, pos. 3 fig. 1. o The system activates when function switch is in pos. 3. 3. Automatic fodder portioning unit, pos. 1. fig. 1. 8.2.1.1 Start-up Screen: When the ignition is connected and set to position ON, the computer will activate. Turn the function switch to pos. 0. Fig. 3 shows the display of portioning computer after activation. Figure 3 Start-up screen of portioning computer Jasopels Fabriksvej 19 7441 Bording, Denmark Sales Department: Phone +45 98420566 Fax +45 76951343 Service: Phone +45 9843 9966 Page 12 of 70 Start-up screen shows following data Fodder today: The amount of fodder in kg distributed by the machine today. Fodder in total: The amount of fodder in kg distributed by the machine in total. Indicates the number of hours left until next service check-up needs to be performed. Service in X hours: 8.2.1.2 Changing the Programme / Values To change programme / values in the computer when the function switch is in an automatic mode pos. 3, follow the steps below. Change programme for fodder portioning with horizontal arrow keys. Change weight of the portion and/or time in the chosen programme with vertical arrow keys. To accept the function on the display press Enter button. Figure 4 Example of how to program / change the portioning Jasopels Fabriksvej 19 7441 Bording, Denmark Sales Department: Phone +45 98420566 Fax +45 76951343 Service: Phone +45 9843 9966 Page 13 of 70 8.2.1.3 Calibration of Automatic Portioning To calibrate the automatic portioning of the fodder, set the function switch to pos. 3. Now choose calibration from the menu on the display by pressing the horizontal arrow keys. To accept the program, press the enter button. (Fig. 5) Figure 5 Example of how to calibrate the portioning unit, menu To calibrate computer, fill up the feeding pipe / hose with fodder, so there is no air in the feeding hose. To do this, press the electrical foot pedal X times until the feeding hose is emptied of air. Remember to put the hose in the feeding tank, before you activate the foot pedal. If the hose is not emptied of air, choose step 1 again. (Fig. 6) Jasopels Fabriksvej 19 7441 Bording, Denmark Sales Department: Phone +45 98420566 Fax +45 76951343 Service: Phone +45 9843 9966 Page 14 of 70 Figure 6 Calibrating of portioning unit, step 1 Jasopels Fabriksvej 19 7441 Bording, Denmark Sales Department: Phone +45 98420566 Fax +45 76951343 Service: Phone +45 9843 9966 Page 15 of 70 To calibrate / control weight, there is a bucket with a known weight. Place the feeding hose into the bucket and activate the foot pedal. The portioning unit will pump 20 portions of 200 gram into the bucket. (Fig. 7) When 20 portions have been released, press enter to accept calibrating, step 2. (Fig. 8) Figure 7 Calibrating of portioning unit, step 2 Figure 8 Example of an accepted calibrating of portioning unit, step 2 Once the portioning unit has been calibrated, weigh the bucket with fodder. Key weight of the pumped fodder into the portioning computer under a new reference. Save the weight value, you have just keyed in by pressing enter. The unit is now calibrated and ready to use. Jasopels Fabriksvej 19 7441 Bording, Denmark Sales Department: Phone +45 98420566 Fax +45 76951343 Service: Phone +45 9843 9966 Page 16 of 70 8.2.2 Regulation of Engine Rotations, pos. 2 fig. 1 The machine has a gas handle on the left side of the column with the instrument panel. When pushing the gas handle forward in driving direction, the rotations will increase, i.e. higher driving speed and mixer rotations in the feeding tank. When pulling the gas handle back, the engine rotations will be reduced. The rotations activate mechanically by cables. Only the operator can activate the rotations in neutral position. Note !! The rotations activate mechanically by cables. Only the operator can activate the rotations in neutral position. 8.2.3 Function Switch, pos. 3. fig. 1 The machine is equipped with a function switch to activate feeding. (Fig. 1, Pos. 3) With the function switch, you can change direction of circulation in the feeding pump. Note !! Avoid sudden shifts between forward and backward movements, since the machine may rear. (Fig. 1 Pos. 4) Positions of the function switch: 0. Feeding pump disconnected 1. Feeding pump cycle runs forward, when the foot pedal is activated 2. Feeding pump cycle runs backward, when the foot pedal is activated 3. Automatic portioning of the fodder, when the foot pedal is activated. (Fig. 1, Pos. 12) Jasopels Fabriksvej 19 7441 Bording, Denmark Sales Department: Phone +45 98420566 Fax +45 76951343 Service: Phone +45 9843 9966 Page 17 of 70 8.2.4 Drive foot pedal, pos. 4 fig. 1 To activate forward and backward movements of the feeding machine, activate the drive foot pedal. To move forward, press the pedal down forward with the left foot. To reverse, press the pedal down backward with the left foot. The drive pedal is a part of the machine hydraulic system. It is a hydraulic regulator valve, which is operated by the left foot. The hydraulic flow is regulated by the regulator valve and engine rotations. Note !! Avoid sudden shift between forward and backward movements at high engine rotations, since the machine may rear. (Fig. 1 Pos. 4) 8.2.5 Steering, pos. 5 fig. 1 The feeding machine is equipped with a hydraulic power steering system, which improves the comfort of manoeuvring and enhances driving control. The machine can be equipped with a steering wheel knob to improve comfort when manoeuvring/ feeding. (Fig. 1 Pos. 5) 8.2.6 Water Dosage Regulation, pos. 6 fig. 1 Feeding machines are equipped with a water tank. The water tank is necessary to supply water to the fodder. The amount of water added to the fodder is regulated by the water dosage regulator. 8.2.7 Instrument Panel, pos. 7 fig. 1 The instrument panel includes a control panel, which informs the operator with control lights about start-up and alarms while operating. Following symbols are used in the feeding machine Soffie 600 D / 700. Jasopels Fabriksvej 19 7441 Bording, Denmark Sales Department: Phone +45 98420566 Fax +45 76951343 Service: Phone +45 9843 9966 Page 18 of 70 Description: Battery Symbol: Function: This symbol gives out red light when starting and for control. The light should turn off when driving. If the symbol is illuminated when driving, it is a warning. Oil indicator This symbol gives out red light when starting and for control. The light should turn off when driving. If the symbol is illuminated when driving, it is a warning. Warm-up This symbol turns on when engine is warming up. When the light turns off, engine is ready to start. When the light does not turn on during the warm-up, it is a warning. Feeding pump active This symbol gives out a continuous green light when the feeding pump is actively connected. When automatic portioning is activated, the symbol blinks. Water dosage active This symbol gives out a continuous green light when the water supply is actively connected. When automatic portioning is activated, the symbol blinks. Working light active This symbol gives out a continuous green light when working light is actively connected. * Additional equipment Fodder mixer This symbol is illuminated when the mixer is active. If the emergency stop has been activated, you need to start the mixer again. Note !! If the control panel shows a warning, stop the Jasopels Fabriksvej 19 7441 Bording, Denmark machine immediately and repair the fault before Sales Department: Phone 98420566 again. Fax +45 76951343 Service: Phone +45 9843 9966 using the+45 machine Page 19 of 70 8.2.8 Engine Temperature, pos. 8 fig. 1 The instrument panel is equipped with an engine temperature indicator, which informs the operator about the temperature of the working engine. Note !! When working temperature is over 95° C, stop the engine immediately. If you continue working with too high temperature, the engine may be damaged. 8.2.9 Fuel Meter, pos. 9 fig. 1 The instrument panel is equipped with a fuel meter, which indicates a fuel level in the tank. The fuel meter is illuminated when starting the machine. Never drive the machine until the fuel tank is empty, since this may stop filters and hoses. 8.2.10 Hour Meter, pos. 10 fig. 1 The instrument panel is equipped with an hour meter, which indicates in hours the total working time of the feeding machine. The hour meter activates when starting the machine and is illuminated in the instrument panel. Note !! The hour meter does not warn of service intervals. The operator must observe the working time usage and service intervals. Jasopels Fabriksvej 19 7441 Bording, Denmark Sales Department: Phone +45 98420566 Fax +45 76951343 Service: Phone +45 9843 9966 Page 20 of 70 8.2.11 Ignition, pos. 11 fig. 1 The instrument panel is equipped with an ignition switch to start the engine. The ignition switch has four functions. (Fig. 9) Symbol A Function: ”OFF” Disconnected Description: There is no ignition to the engine. You can remove the key from the switch. B ”ON“ Ignition Turn the key to the left to activate the ignition to the machine. The control panel activates and the control lights are illuminated. C ”GL” Warm-up Turn the key again to the left and hold it in position C, until the warm-up control light turns off. D ”ST” Start Turn the key to position D to start the engine after the warm-up has finished. Let go of the key. It will stay in position B when driving. To stop the engine, turn the key to position A. Figure 9 Ignition switch Jasopels Fabriksvej 19 7441 Bording, Denmark Sales Department: Phone +45 98420566 Fax +45 76951343 Service: Phone +45 9843 9966 Page 21 of 70 8.2.12 Foot Pedal for Fodder Dosage, pos. 13 fig. 1 The machine is equipped with an electrical foot pedal for fodder dosage on the right side of the machine. This foot pedal is connected with the function switch. (Pos. 3 Fig. 1) When activating the foot pedal for fodder by pressing the foot switch, the feeding pump will activate. The direction of circulation depends on the function switch position. Note !! Feeding pump is active, when its switch in the control panel (Pos. 7 Fig. 1) and ignition (Pos. B Fig. 8) are connected. The feeding pump is in a constant active mode to mix the fodder. Remember that feeding hose needs to be placed in the feeding tank. 8.2.13 Fodder Dosage Adjustment, pos. 14 fig. 1 The machine is equipped with a regulator of fodder dosage, which regulates its amount. By turning the regulator to the right or left, adjust the circulation speed of the fodder supply in the feeding pump. 8.2.14 Fuse Box, pos. 15 fig. 2 The machine is equipped with a fuse box on the right side of the steering column. 8.2.15 12 V Plug 2-pole, pos. 12 fig. 2 The machine is equipped with a plug for use of a standard plug DIN ISO 4165. The connection for the plug is above the switch for working light on the control panel. The plug may for example be used to connect working light to the feeding machine. It is additional equipment. Jasopels Fabriksvej 19 7441 Bording, Denmark Sales Department: Phone +45 98420566 Fax +45 76951343 Service: Phone +45 9843 9966 Page 22 of 70 8.3 Engine Operating Instructions: To ensure proper conditions of the engine, perform a start check-up before using the machine. The check-up helps the operator find possible faults. If you find any functional faults, you will need to repair them first before using the machine. Check following list before starting the engine. Start check-up Engine check: Oil spill / loss of water Engine oil level / purity Activation of ignition / Start: Correct function of control lights in the control panel Correct glow tube warm-up time Coolant level Colour of the exhaust fumes Dirt in the air filter Damaged parts Loose bolts and nuts Unusual sound of the engine Note !! Before starting / activating the machine, make sure the machine stands on the level ground Never keep the engine running, when the machine is on the uneven ground and pours the fodder Do not use ether or any other starting fluid at the engine air intake. This can cause serious personal injuries and material damage. Jasopels Fabriksvej 19 7441 Bording, Denmark Sales Department: Phone +45 98420566 Fax +45 76951343 Service: Phone +45 9843 9966 Page 23 of 70 8.3.1 Starting and Stopping the Engine To start and stop the feeding machine engine, follow the steps below. Read also about the functions of the control panel in section 8.2.7. Instructions for engine start 1. Perform the start check-up of the machine. 2. Set the gas handle to ¼ of the operational speed. 3. Turn the key in the ignition switch to pos. B – “ON”. 4. Oil indicator and batteries should be active. 5. Turn the key to pos. C – “GL”. Keep the key in this position until the control light for warming-up turns off. a. Warm-up time of the engine can vary depending on the air temperature. If the temperature is below +10C, the warm-up time needs to be longer. b. Warming-up is not necessary if the engine is already warm. 6. Turn the key to pos. D – “ST” to start the engine. Let go of the key when the engine is started. The key stays in pos. B – ”ON” when operating. a. When starting the engine in pos. D – ”ST”, the continuous activation time must not exceed 10 sec. Never turn the key while the engine is running. 7. Let the engine idle for a few minutes before starting a normal work. a. Warm up the engine before using it in all seasons, not only during wintertime. Insufficient warm-up of the engine may reduce its life. Instructions for engine stop 1. Set gas handle to minimum of operational speed. 2. Turn the key in the ignition switch to the right to pos. A – ”OFF”. 3. Check any possible, visible damages or oil / water spill. Jasopels Fabriksvej 19 7441 Bording, Denmark Sales Department: Phone +45 98420566 Fax +45 76951343 Service: Phone +45 9843 9966 Page 24 of 70 Note !! If oil control light does not turn off right away after starting the machine (pos. 6), stop the engine immediately. o The engine must be operational before activating/ starting the machine. If the control light does not turn on while starting the engine (pos. 4), you must not activate/ start the machine. o The control panel must be operational before activating/ starting the machine. If the engine does not start within 10 – 20 sec. after activation, you need to wait about 30 sec. before starting the engine again. o While trying to start the engine second time, follow the manual instructions again. Before starting / activating the machine, perform a start check-up. See the manual. (pos. 8.3) 8.4 Control during Operation / Driving It is the operator’s responsibility to use the machine in the correct operational conditions. This means the feeding machine should be controlled and checked continuously while operating. To control continuously the operational conditions of the machine, check virtual indicators, control lights in the control panel and perform the interval services. For more details read section 11.10 Maintenance Table. 8.4.1 Controlling and Operating the Cooling System While the machine is running, it is important that you check the working temperature on the temperature indicator in the control panel. (8.2.8. and Fig. 1 Pos. 8) If the machine exceeds its normal working temperature of max. 95º, stop the engine immediately. If the machine / coolant starts boiling, steaming or the water pours out of the overflow hose, stop the engine immediately. Jasopels Fabriksvej 19 7441 Bording, Denmark Sales Department: Phone +45 98420566 Fax +45 76951343 Service: Phone +45 9843 9966 Page 25 of 70 Instructions for check for faults in the radiator 1. Check for leaks in the cooling system. a. Hoses / Jointings / Hose clamps 2. Check for blockages at the air intake. a. Dirt in filter / Blocked filter 3. Check if the cooling ribs of the radiator are intact. a. Blocked with dirt or straw b. Damaged / Broken 4. Check if the fan V-belt is intact. a. Belt is too loose / Perished / Broken 5. Check if cooling hoses are intact. a. Bad flow / Blockage Note !! If there is a fault in the machine cooling system, stop the machine immediately. o The engine must be operational, before activating/ starting the machine. When driving with a defect in the cooling system, the engine may be damaged. Danger !! Avoid personal injuries. Never remove the radiator cap while the engine is running or, after it has stopped and the engine is still hot. Otherwise, you can risk that boiling water sprays out and scalds people, who are nearby. Do not remove the radiator cap before the engine has stopped and is cold. 8.4.2 Controlling and Operating the Oil Inidicator While the machine is running, it is important that you check the oil indicator in the control panel (8.2.7 and Fig. 1 Pos. 7) If the oil indicator is illuminated, stop the engine immediately. If the engine oil pressure is lower than specified by the manufacturer, the oil indicator light turns on. Jasopels Fabriksvej 19 7441 Bording, Denmark Sales Department: Phone +45 98420566 Fax +45 76951343 Service: Phone +45 9843 9966 Page 26 of 70 If the oil indicator light turns on from time to time while the machine is running, stop the engine immediately. Instructions for control of oil indicator 1. Check if the cables for oil indicator are connected. a. Disconnected cable / Short circuit 2. Check the oil level in the engine. a. Lacking oil / Oil viscosity 3. Check for leakage in the engine. a. Damaged gaskets / Leakage in the jointings 4. Check for the engine oil pressure. a. Special tool is needed / manometer. Note !! If the control light of the oil indicator is turned on, stop the engine immediately. o The engine must be operational, before activating/ starting the machine. When driving with a defect in the lubrication system or lacking oil, the machine engine may be damaged. 8.4.3 Fuel Level Control While the machine is running, it is important that you check the fuel level in the machine. The instrument panel is equipped with a fuel meter, which indicates the level of fuel in the tank. (8.2.9. and Fig. 1 Pos. 9) Never empty the fuel tank completely, since the air may accumulate in the fuel system and block fuel filter and hoses. If the fuel level does not show and the fuel tank is full, stop the engine immediately. Jasopels Fabriksvej 19 7441 Bording, Denmark Sales Department: Phone +45 98420566 Fax +45 76951343 Service: Phone +45 9843 9966 Page 27 of 70 Instructions for control of fuel meter 1. Check if fuel meter cables are connected. a. Disconnected cable / Short circuit 2. Check for fuel level in the tank. a. Lacking fuel / Wrong type fuel 3. Check for leakage in the fuel tank. a. Damaged gaskets / Leakage in the jointings 4. Check if there is air in the fuel system. a. Change fuel filter b. Air the fuel system. Note !! You must not use fuel of different quality than the one specified by the manufacturer of the engine: Diesel Fuel No. 2-D (ASTM D975). Jasopels Fabriksvej 19 7441 Bording, Denmark Sales Department: Phone +45 98420566 Fax +45 76951343 Service: Phone +45 9843 9966 Page 28 of 70 9. Feeding Machine Propulsion System To move the feeding machine forward or backward, press the drive foot pedal. The drive foot pedal is a part of the machine hydraulic system, as it is connected with a hydraulic pump. The hydraulic pump supplies the wheel engine with hydraulic oil, which gives the propulsion. The propulsion system / speed is determined by a specific combination of the engine rotations and the position of the hydraulic regulator valve. (Drive foot pedal Fig. 1 pos. 4 or 8.2.4) The hydraulic flow, which is controlled by the regulator valve, depends on the engine rotations. The hydraulic regulator valve / drive pedal is equipped with springs which bring the regulator/ pedal back to a neutral position if it is not pressed. The hydraulic regulated flow to the wheel engine stops at the neutral position and then the flow is diverted to the hydraulic tank. If the machine does not move, stop the engine immediately. 9.1. Hydraulic System Control If you notice any problems with the hydraulic system, stop the machine immediately. Follow the instructions below to control the machine hydraulic system. Instructions for hydraulic system control: 1. Check the hydraulic oil flow in the system. a. Blocked pipe / Blocked filter 2. Check the hydraulic oil level in the tank. a. Lacking hydraulic oil / Wrong hydraulic oil type 3. Check for leakages in the hydraulic system. a. Damaged gaskets / Leakage in the jointings 4. Check if there is air in the hydraulic system. a. Change hydraulic oil filters b. Air the hydraulic oil system Jasopels Fabriksvej 19 7441 Bording, Denmark Sales Department: Phone +45 98420566 Fax +45 76951343 Service: Phone +45 9843 9966 Page 29 of 70 Note !! For safety reasons inexperienced personnel should conduct a trial run of the machine in an open and level area, at the engine low rotation speed in order to get used to the machine propulsion system. If you lose control over the feeding machine, release the foot pedal immediately and the machine will stop. Note !! When you start the machine, the drive pedal / hydraulic regulator valve should be in a neutral position. Avoid sudden shift between forward and backward movements at high engine rotations, since the machine may rear. (Fig. 1 Pos. 4) Note !! If the machine does not move, stop the engine immediately. o The hydraulic system must be operational before activating / starting the machine. Driving with a defect in the hydraulic system, lacking oil, may damage the machine hydraulic components. You must not use hydraulic oil of a different quality than the one specified by the manufacturer. S46 Hydraulic oil Jasopels Fabriksvej 19 7441 Bording, Denmark Sales Department: Phone +45 98420566 Fax +45 76951343 Service: Phone +45 9843 9966 Page 30 of 70 10. Fodder and Water Tank The feeding machine is equipped with a stainless steel water tank. There are four different water tanks available depending on the machine model. The water tanks for the feeding machine can be external or integrated into the stainless steel feeding tank. At the bottom of the feeding tank there is mounted a feeding pump, which pumps fodder up through the feeding hose. The pump is operated either by the switch in the control panel or by the electrical foot pedal. (8.2.7. or Fig. 1 pos. 12) The feeding tank construction allows turning the tank over or tilting it to a side, which makes it easy to clean. After use, clean the feeding tank and the pump. Never tip up the feeding tank to clean it while machine is in use. There is a high risk of crushing fingers and hands. Feeding tank models Figure 10 Feeding Tank 600 L Feeding tank with sloping sides is used primarily in Soffie 600 D model. The sloping sides make fodder go down to the feeding pump. Water tank can be connected externally. Figure 11 Feeding Tank 950L Feeding tank with sloping sides at the bottom and screw conveyor is used primarily in Soffie 950 model. The sloping sides make fodder go down to the screw conveyor. The screw conveyor mixes and transports fodder to the feeding pump. Water tank can be connected externally or integrated into the feeding tank. Jasopels Fabriksvej 19 7441 Bording, Denmark Sales Department: Phone +45 98420566 Fax +45 76951343 Service: Phone +45 9843 9966 Kombineret vandtank. Page 31 of 70 Figure 12 Feeding Tank 1320 / 1520L The latest model of the feeding tank with round curved bottom. Round curved feeding tanks are primarily used in Soffie 1500 and 950 models. The feeding tank is equipped with a mixer, which mixes and transports fodder to the feeding pump. Feeding tanks with mixers have a safety wire, which automatically stops the mixer when it touches the feeding tank. Water tank can be connected externally or integrated into the feeding tank. Water Tanks Figure 13 Feeding Tank 1320 / 1520L Water tanks are designed to all models. They can be either Kombineret vandtank. mounted externally or integrated into the feeding tank. The tank is equipped with a water pump, which is operated by the control panel. The amount of water delivered to the feeding mixer can be regulated by the water dosage. Use only clean water in the water tanks. Danger !! Avoid personal injuries. Stop the engine, when cleaning the tipped feeding tank. Stop the engine, when repairing the feeding pump. Never stand in front of the feeding tank, while the tank is being turned over. When you bring the feeding tank back to the normal position, mind your fingers and hands, as there is a risk of crushing. If the mixer does not stop when a safety wire touches the feeding tank, stop the machine immediately. o Repair any faults before activating/ starting the machine. Jasopels Fabriksvej 19 7441 Bording, Denmark Sales Department: Phone +45 98420566 Fax +45 76951343 Service: Phone +45 9843 9966 Page 32 of 70 11. Maintenance To ensure a flawless performance of the machine, the various maintenance intervals are necessary. Read about service intervals for the machine in section 11.10. In the event of lacking maintenance, reparations of the machine operational parts or parts damaged during a normal operation, any form of the machine warranty will be invalidated. Maintenance of machine parts is important to ensure the machine operation, its life and safe conditions for the operator. Damaged parts or machine defects, which are not corrected or repaired immediately, may cause faults or damages on other parts of the machine. This may consequently lead to personal injuries. DANGER !! Maintenance work, service or repairs of damages need to be performed immediately to ensure safe conditions for the operator and the machine use. o Repair any faults before activating / starting the machine. Always stop the engine before you start maintaining, cleaning or performing any other service works. Jasopels Fabriksvej 19 7441 Bording, Denmark Sales Department: Phone +45 98420566 Fax +45 76951343 Service: Phone +45 9843 9966 Page 33 of 70 11.1 Engine Maintenance The engine has many parts, which you must check while performing a service check-up. Following figures show the engine parts, which affect the service. Figure 14 Kubota engine D 905-B, view from the right 11. Exhaust manifold 1. Oil filler plug 2. Generator 12. Engine hook . 3. Oil pressure meter 4. Oil filter 5. Water drain cock 13. Flywheel 6. Starter 14. Oil pan 7. Oil drain plug Figure 15 Kubota engine D 905-B, view from the left 5. Oil refill 6. Radiator airscrew 1. Air intake manifold 2. Speed regulator 7. Injection pump 3. Stop arm 8. Driving wheel, radiator airscrew 4. Fuel pump (Mounted on chassis frame) Jasopels Fabriksvej 19 7441 Bording, Denmark Sales Department: Phone +45 98420566 Fax +45 76951343 Service: Phone +45 9843 9966 Page 34 of 70 11.1.1 Controls and Intervals for Engine Oil Change You need to change engine oil more often when engine is new. This needs to be done for safety reasons and for engine’s longer life. When changing the oil, always change the oil filter. If you do not change the old oil filter, the new oil will go through the dirty filter while using the machine. The engine oil viscosity features are consequently earlier worsened, which causes damages in the engine and shortens its life. Intervals for oil change Oil change after first 50 hours Second oil change after first 100 hours Oil change after every 200 hours of operation or once a year To check the oil level in the engine, follow the instructions below. Check the engine oil daily when performing a start check-up. See section 8.3. Instructions for oil level control 1. Before performing service works or reparations on the machine, stop the engine first. a. Performing service works or repairs while the engine is running or trying to adjust engine parts may be dangerous for the mechanic. b. Performing service works or repairs while the engine is running or trying to adjust engine parts may damage the engine. 2. Stop the engine, before checking the engine oil level. 3. Pull out the oil dipstick and dry it. Put it again into the engine. Wait about 10 sec., before you pull out the dipstick again. Now check the oil level on the dipstick. (Fig. 14 Pos. 1 and Fig. 16 Pos. A) 4. If the oil level is under its minimum, fill up the oil through the oil filler cap. (Fig. 16 Pos. 1) a. 5. If the oil level in the engine is too low, the engine may be damaged. Too much oil is also harmful for the engine. Always remember to have the correct oil level in the engine. The engine oil needs to be of MIL-L-2104C quality or have properties equal to API classification CC/CD/CE. The oil type is determined by the surrounding temperature. (Table 1, below technical tables) Jasopels Fabriksvej 19 7441 Bording, Denmark Sales Department: Phone +45 98420566 Fax +45 76951343 Service: Phone +45 9843 9966 Page 35 of 70 Figure 16 Oil control A. Maximum and minimum levels indicated on the oil dipstick 1. Oil cap 2. Oil dipstick 11.1.2 Changing Engine Oil and Oil Filter When performing standard service check-ups of the feeding machine, change the engine oil according to the instructions for interval change, see section 11.1.1. To change the oil in a correct manner, follow the three instructions below. Always remember to stop the engine, before performing service works or repairs. Instructions for oil change – step 1 1. Stop the engine before performing service works or repairs on the machine. a. Performing service works or repairs while the engine is running or trying to adjust engine parts may be dangerous for the mechanic. b. Performing service works or repairs while the engine is running or trying to adjust engine parts may damage the engine. 2. Let the engine idle for about 5 min., before you start the service work. The oil will be warm. a. Stop the engine, before changing the oil. b. Place a collecting tray under the oil pan in order to prevent spilling the oil onto the ground. 3. Loosen the oil drain plug and the old oil from the engine will pour out into the collecting tray. (Fig. 17 pos. 2) a. Let the oil drain off from the engine completely for about 5 min. It is important that the old oil has been removed from the engine in order not to mix the old oil with the new one while filling up. 4. Check the drain plug for any defects and fasten it again in the oil pan. Read table 3 in section Technical tables for instructions on how to fasten the plug. 5. Pull out the oil dipstick, dry it and put it again into the engine. (Fig. 17 Pos. 3) Jasopels Fabriksvej 19 7441 Bording, Denmark Sales Department: Phone +45 98420566 Fax +45 76951343 Service: Phone +45 9843 9966 Page 36 of 70 6. Screw off the oil filler cap and fill up the oil. See table 2.Technical tables and Fig. 17. 4. a. The engine oil needs to be of MIL-L-2104C quality or have properties equal to API classification CC/CD/CE. The oil type is determined by the surrounding temperature. (Table 1, below technical tables) b. The oil spilled over the engine may cause fire danger and smell nuisance. Always clean the engine off the oil spill. 7. Pull out the oil dipstick again after about 5 min. Read the engine oil level on the dipstick. (Fig. 16 Pos. A) 8. If the oil level is below its minimum, fill up the oil through the oil filler cap. (Fig. 17 Pos. 4) a. If the oil level in the engine is too low, the engine may be damaged. Too much oil is also harmful for the engine. Always remember to have the correct oil level in the engine. 9. Check for leakage in the engine or gaskets, also when starting the engine, step 3. Figure 17 Oil change 3. Oil dipstick 1. Oil filter 4. Oil refill 2. Oil drain plug Instructions for oil filter change, step 2 1. Always change the engine oil filter when changing the oil. a. Before oil filter can be changed, stop the engine. Follow step 1 as first working process. 2. Place a collecting tray under where the oil filter is installed in the engine, so the oil from the filter does not spill over the ground when it is loosened. 3. Loosen the oil filter with a special pair of pliers designed for oil filters. See the oil filter location. (Fig. 13 Pos. 1) 4. Clean the surface of oil filter packing. 5. Spread a thin layer of oil over the new filter rubber packing before mounting. (Fig. 14. Pos. 2) Jasopels Fabriksvej 19 7441 Bording, Denmark Sales Department: Phone +45 98420566 Fax +45 76951343 Service: Phone +45 9843 9966 Page 37 of 70 a. The thin oil layer protects packing against damage while mounting and makes it easier to loosen the filter, when changing it next time. 6. It is enough to tighten the oil filter by hand until it gets in touch with the engine surface. Never use the special pair of pliers to tighten the filter. Figure 18 Oil filter 1. Oil filter 2. The top rubber packing of the oil filter Instructions for engine start after oil change, step 3 1. Follow service instructions mentioned in section 11.1.2, step 1 and 2, before starting the engine again. a. If you start the engine with missing oil drain plug, oil, filter and packings, the engine will be damaged. 2. Check the instructions for control panel. (8.2.11) 3. Start the engine. The oil pressure indicator should turn off shortly after the engine has started. a. If the oil pressure indicator does not switch off, this may be caused by lacking oil pressure, oil or faulty indicator. If the oil pressure indicator does not turn off, stop the engine immediately. 4. Let the engine idle for about 2 minutes and then check for leakages and rapping sounds. 5. Check again the oil level in the engine as shown in section 11.1.1. a. Check the engine oil level again after starting the machine, as the new oil filter absorbs some of the filled up oil. Note !! Always stop the engine before you start maintaining, cleaning or performing any other service works on the machine. Check daily the engine conditions concerning leakages and oil level before using the machine. o If the oil is missing, the engine must be operational again before activating / starting the machine. Driving with a faulty, lacking or wrong type of oil, may damage the internal parts of the machine. Use only the engine oil specified by the manufacturer. Oil MIL-L-2104C or oil with properties equal to API Classification CC/CD/CE. Jasopels Fabriksvej 19 7441 Bording, Denmark Sales Department: Phone +45 98420566 Fax +45 76951343 Service: Phone +45 9843 9966 Page 38 of 70 11.2 Radiator Maintenance For a flawless operation of the machine cooling system, check often the system for damages and loose suspension, which may cause leakages. If the cooling system is leaking, there is a high risk of overheating and burning the engine. If there is a defect in the cooling system, stop the engine immediately. Check daily the engine coolant, before using the machine. Check cooling hoses and suspension every 200 hours of operation as a part of service interval. While performing a check-up and control of the cooling system, check the following. Instructions for cooling system control The engine cooling system must cool down, before performing any service works on it. Never work on the hot engine / cooling system, as it may cause personal injuries. 1. Check the water level of the coolant as shown at fig. 19 or fig. 20, if the engine is equipped with a water container. a. Water level between point A and B, as shown at fig. 20 must not be below minimum level B. b. If the water level diminishes from the maximum level, it means the cooling system has a leakage. 1a: Check the amount of water without a water container. (Fig. 19) a. Remove the radiator cap and check whether water level reaches up to the filling hole. If water does not reach that level, it means the engine lacks water or its cooling system is leaking. 2. Check jointings and bolts in the cooling system and the suspension fitting. a. Before performing service work, stop the engine and wait until it has cooled down. 3. Check the cooling ribs for dirt. Blocked cooling ribs reduce the cooling effect of the engine. (Fig. 19) a. Clean the radiator cooling ribs only with clean water and do not use high pressure. b. The pressure from a high-pressure washer may damage the radiator cooling ribs. c. Do not use hard tools like a screwdriver or filling knife for cleaning, as it may cause damages to the radiator cooling ribs. Jasopels Fabriksvej 19 7441 Bording, Denmark Sales Department: Phone +45 98420566 Fax +45 76951343 Service: Phone +45 9843 9966 Page 39 of 70 Figure 19 Radiator Figure 20 Water container 2. Water container A. Radiator cap A 1. Cooling hose, right A. Max. water level 2. Cooling hose, left B. Min. water level Note !! Avoid personal injuries. Never remove the radiator cap or the water container cap while the engine is running or has just stopped and is still hot. Otherwise, you risk that boiling water from the cooling system sprays out and scalds people, who are nearby. Remove the radiator cap first at least 10 – 15 minutes after the engine has stopped. 11.2.1 Controlling and filling up the antifreeze In the frosty weather, coolant may damage cylinders and radiator. When the surrounding temperature is below 0° C, it is necessary to add antifreeze fluid to the cooling system. Check yearly the freezing point for antifreeze fluid in the cooling system. It is recommended to do it before winter season starts. There are two types of antifreeze fluid for this type of engine, the permanent type (PT). See table 4 Technical Tables. Instructions for controlling and filling up the antifreeze fluid 1. Check the antifreeze efficiency (freezing point) to cool. a. The antifreeze fluid should have freezing point at min. -30 C during winter season. The antifreeze fluid mixed with water may not be more than 50 %. See Table 4. 2. If there is too little antifreeze in the cooling system, fill up the missing part with antifreeze fluid. a. Always mix antifreeze fluid with clean water, before filling up the engine cooling system. b. If you mix the antifreeze fluid with the clean water, the antifreeze may not be more than 50%. Jasopels Fabriksvej 19 7441 Bording, Denmark Sales Department: Phone +45 98420566 Fax +45 76951343 Service: Phone +45 9843 9966 Page 40 of 70 3. Before adding the antifreeze fluid to the cooling system for the first time, the cooling system must be emptied and rinsed with water a couple of times. 11.2.2 Coolant Replacement To achieve a flawless operation of the engine cooling system, change the coolant every 500 hours of operation. The coolant, which solution has a wrong proportion, may cause overheating and damages to machine cylinders and radiator while operating the machine. Change the coolant after 500 hours of operation and check it according to service intervals. If the surrounding temperature is below 0° C, you will need to add antifreeze fluid to the cooling system. If the surrounding temperature is above 0° C, it is not necessary to add larger amount of antifreeze fluid to the cooling system. Instructions for coolant change 1. Before performing service works or repairs on the cooling system, stop the engine and wait until it has cooled down. c. Performing service works or repairs while the engine is running or trying to adjust engine parts may be dangerous for the mechanic. d. Performing service works or repairs while the engine is running or trying to adjust engine parts may damage the engine. 2. Place the collecting tray under the drain taps in order not to spill the coolant over the ground. Now you can loosen the taps to drain off the coolant. a. If you start the engine with lacking coolant, leaking cooling system or without the radiator cap, the engine will be damaged. 3. To drain off the coolant from the system, open both taps. One of the taps is located in the bottom of the radiator (Fig. 21), the other one is on the left side of the engine block. (Fig. 14 Pos. 5) 4. To get a free air passage of the internal cooling system in the engine, remove the radiator cap. (Fig. 19 Pos. A) a. If the radiator cap is not screwed off, it is impossible to drain off the coolant completely in the cooling system. 5. Rinse the internal engine cooling system with clean water, before filling up a new coolant. Jasopels Fabriksvej 19 7441 Bording, Denmark Sales Department: Phone +45 98420566 Fax +45 76951343 Service: Phone +45 9843 9966 Page 41 of 70 a. Before adding the antifreeze fluid to the cooling system for the first time, the cooling system must be emptied and rinsed with water a couple of times. 6. When filling up the engine cooling system with new antifreeze, use either clean water or mix it with antifreeze fluid depending on the season. a. At temperatures above 0 °C (summertime), it is not necessary to mix water with larger amounts of antifreeze. b. At temperatures below 0 °C (wintertime), it is necessary to mix water with an antifreeze. Mix clean water with antifreeze fluid. Antifreeze may not be more than 50 %. 7. When starting the engine after it has been filled up with coolant, check the engine and its cooling system for water leakage before using the machine. Figure 21 Radiator 1. Cooling ribs (1) 2. Drain tap at the bottom of the radiator Note !! As antifreeze fluid absorbs damp, keep it in an airtight container, before using it. Never use cleaning liquid for cooling systems, if antifreeze is added to the coolant / cooling system. Antifreeze contains anticorrosive substance, which reacts with cleaning liquid and creates waste acid. This acid is harmful to the engine parts. Jasopels Fabriksvej 19 7441 Bording, Denmark Sales Department: Phone +45 98420566 Fax +45 76951343 Service: Phone +45 9843 9966 Page 42 of 70 11.3 Maintenance of Ventilator V-Belt A V-belt tightened insufficiently may cause engine overheating and an insufficient charge of the battery. It is therefore important, that you check the V-belt regularly for tension and breakages. Check the V-belt for tension and breakages at each service interval. Instructions for V-belt control and tension 1. Before checking or performing service works on the engine V-belt, stop the engine and wait until it has cooled down. a. If the engine is hot, there is a risk of personal injuries in form of burning. 2. Check the V-belt by pressing a finger on the middle of the belt (Fig. 22 Pos. A). The V-belt may yield max. about 79 mm, see Table 5 in Technical Tables section. a. If the slack in the V-belt is more than 9 mm, you need to tighten it. See Table 5 in Technical Tables section. 3. Check the V-belt for cracks, breakages and if it is correctly placed in the pulley. The belt may not have any cracks and must be correctly placed in the pulley as shown in fig. 23 pos. A. a. Change the V-belt, if you notice any cracks on it. The V-belt with cracks may burst and damage radiator and engine. b. If the V-belt surface does not fit correctly into the pulley as shown in fig. 23 pos. B, the belt will wear out. Change the belt to have a proper charging and engine cooling. 4. The V-belt is adjusted in the generator, which is fastened with 2 bolts. (Fig. 22 Pos. 2) Loosen the bolts and adjust the belt to desired tension. After adjusting or changing the belt, tighten bolts and nuts. Figure 22 V-belt Figure 23 Pulley 1. V-belt 2. Adjustment and tightening of V-belt and generator. A. Correct position B. Position causing the V-belt to wear out A. V-belt slack Jasopels Fabriksvej 19 7441 Bording, Denmark Sales Department: Phone +45 98420566 Fax +45 76951343 Service: Phone +45 9843 9966 Page 43 of 70 Note !! Avoid personal injuries. Never check or perform service works on the V-belt while the engine is running or if it is still hot. Always stop the engine and wait until it has cooled down. For a flawless operation of the engine cooling and charging system, check the V-belt for tension and cracks frequently. 11.4 Air Filter Maintenance The air-supply system in the engine is equipped with an air filter. The air filter is to ensure that no dust or dirt get into the engine while it is running. Check and clean the air filter regularly for a flawless engine operation and its maintenance. Check the air filter more often when operating in dusty and dirty environment. Change the air filter at least yearly. The air filter is a dry component and therefore you must not add oil or other liquids. Clean the air filter and check it for the first 6 hours of operation. It is also important that you check the air filter body and air supply hoses for fastening and any cracks to prevent getting false, dirty air to the engine. Instructions for air filter control and cleaning 1. Before checking or performing service works on the air filter, stop the engine and wait until it has cooled down. a. If the engine is still hot, there is a risk of personal injuries in form of burning. 2. Dismount the air filter from its body. (Fig. 24) Clean the filter with a weak air-pressure in order to remove dust and dirt from the air filter. a. Change the air filter, if you cannot clean it with airpressure. b. Change the filter if its dry components are damaged. c. Air the supply hoses and check the clamps. Change the air-supply hoses, if they have cracks. Jasopels Fabriksvej 19 7441 Bording, Denmark Sales Department: Phone +45 98420566 Fax +45 76951343 Service: Phone +45 9843 9966 Page 44 of 70 d. Change faulty clamps. 3. Check the mounted filter and bolt tightening. a. If the engine absorbs false, dirty air while it is running, this will shorten the engine’s life. b. Never start the engine without the air filter. Figure 24 Air filter 1. Air-supply hose (3) 2. Clamp 3. Air filter body (4) 4. Dry air filter Note !! Avoid personal injuries. Never check or perform service works on the air filter while the engine is running. Always stop the engine and wait until it has cooled down. For a flawless operation of the engine air system, check regularly the air-supply hoses and clamps for tightening and cracks. Jasopels Fabriksvej 19 7441 Bording, Denmark Sales Department: Phone +45 98420566 Fax +45 76951343 Service: Phone +45 9843 9966 Page 45 of 70 11.5 Battery Maintenance The engine start is powered by the battery. The engine generator charges the battery in order to maintain a continuous energy supply to start the engine. For battery maintenance, it is important that battery has the correct efficiency. Battery power may be neither too high nor too low, as this may damage the electric system or cause problems with starting the engine. To ensure the correct service and operation of the battery, follow the instructions below. Check electrolyte level in the battery yearly. It is recommended to do it before winter season starts as the battery discharges at low temperatures. Check the battery cable connections regularly in order not to damage the electrical system when the machine is operating. Loose connections and faulty cables may cause damages to the machine electrical system. Take the battery out and keep it in a dry and dark place, when the machine is not in use for longer periods. To recharge battery correctly, connect battery positive pole with positive pole in the charger and battery negative pole with charger negative pole. If you connect poles incorrectly, there is a risk of explosion. If necessary, add only distilled water to the battery. See fig. 21 for battery acid levels. Direct contact with battery acid may cause clothes disintegration and skin burning. In the event of skin contact, wash your skin with water. In case of ingestion or eye contact, drink water/ rinse eyes with water and contact a doctor immediately. Jasopels Fabriksvej 19 7441 Bording, Denmark Sales Department: Phone +45 98420566 Fax +45 76951343 Service: Phone +45 9843 9966 Page 46 of 70 Instructions for Battery Dismounting 1. Before dismounting or performing service works on the battery, stop the engine first. a. If you dismount the battery while the engine is running, this will cause damages to generator, regulator and electrical system. 2. When dismounting the battery, disconnect the negative pole first. a. Ensure the correct assembly process consequently reduce the risk of short circuit. and 3. When mounting the battery, connect the positive pole first. a. Ensure the correct assembly process consequently reduce the risk of short circuit. and 4. Check battery cables for tightening and location. a. Loose connections and faulty cables cause damages to the machine electrical system. b. Check cable location if there is any risk of crushing. Figure 25 Battery (4) 1. Max. electrolyte 2. Min. electrolyte 3. Battery 4. Poles (3) Note !! Avoid personal injuries. If you connect poles incorrectly when charging or helping to start the engine, there may be a risk of explosion. Direct contact with battery acid may cause clothes disintegration and skin burning. In the event of skin contact, wash your skin with water. In case of ingestion or eye contact, drink water/ rinse eyes with water and contact a doctor immediately. Loose connections and faulty cables cause damages to the machine electrical system. If temperature falls below -15 C, take the battery out and keep it in a dry, dark place until mounting it again just before using the machine. Jasopels Fabriksvej 19 7441 Bording, Denmark Sales Department: Phone +45 98420566 Fax +45 76951343 Service: Phone +45 9843 9966 Page 47 of 70 11.6 Fuel System Maintenance The machine is equipped with fuel filter and prefilter. Prefilter is located just behind the tank, see fig. 28. Prefilter is transparent to make it easy to check it visually. Filter function is to absorb dirt particles coming from the fuel and the tank. Change fuel filters yearly or according to service interval. When you change fuel filter in the engine or you run out of diesel oil when operating the machine, it is necessary to air the fuel system. Instructions for airing the fuel system: 1. Before dismounting the fuel system or performing service works on it, stop the engine and wait until it has cooled down. a. When dismounting the fuel system or trying to air it when the engine is running, the engine may be damaged. 2. Fill up the fuel tank or fuel filter with diesel oil. (Fill up the filter with diesel oil when changing it and before mounting). a. Tighten filter by hand. (Fig. 33) 3. Loosen the vent screw on the fuel filter by turning it anticlockwise. (Fig. 26 Pos. 1) a. Loosen the vent screw, do not remove it. 4. Turn the ignition key to position ON to start the diesel pump. (Fig. 33) The pump moves fuel through the system. a. When airing the fuel system, both fuel and air get out through the vent screw on the fuel filter. 5. When diesel oil is free of air bubbles, tighten the vent screw on the filter again and turn the ignition key to position OFF. 6. Loosen the vent screw on the fuel pump by turning it anticlockwise. (Fig. 26 Pos. 2) 7. Turn the ignition key to position ON to start the electric pump. If there are no air bubbles in the fuel when airing the system, tighten the vent screw again. a. Turn the ignition key to position OFF, remove any spill of fuel from filter, pump and engine. 8. Now turn the ignition key to position START and the engine should start! Jasopels Fabriksvej 19 7441 Bording, Denmark Sales Department: Phone +45 98420566 Fax +45 76951343 Service: Phone +45 9843 9966 Page 48 of 70 a. If the engine does not start, try airing the fuel system again. b. If the failure persists, please contact the mechanic. Figure 26 Fuel filter and pump 1. Vent screw on the fuel filter 2. Vent screw on the fuel pump Note !! Avoid personal injuries. Never air the fuel system, when the engine is very hot. Fuel may get into the glowing-hot exhaust manifold and cause fire. Do not air the fuel system, when the engine is running, as it will cause damages to the engine. 11.7 Hydraulic System Maintenance For a flawless operation of the machine hydraulic system, check hoses and hydraulics regularly. Leaking hoses or couplings cause getting dirt into the hydraulic system and consequently damages it. Change hydraulic oil and filter yearly and at standard intervals. See Maintenance Table in section 11.10. You can check the oil level in the hydraulic system through the sight glass in the oil tank. The oil level needs to be checked daily before using the machine. Intervals for hydraulic oil and filter change: First service after 50 hours of operation Second service after 500 hours of operation Third service after 2000 hours of operation, afterwards service once a year. Location of filter / filters varies depending on Soffie model. Models with articulated steering have filters located under Jasopels Fabriksvej 19 7441 Bording, Denmark Sales Department: Phone +45 98420566 Fax +45 76951343 Service: Phone +45 9843 9966 Page 49 of 70 driver seat, and filters in models with front steering are located on the right under the steering column. Insert filter in the hydraulic tank is mounted on the top of the tank cap. Figure 27 Hydraulic filter 950 – 1500 Figure 28 Hydraulic filter 600 - 700 Hydraulic insert filter Hydraulic filter Battery Fuel for filter Hydraulic pressure filter Hydraulic oil radiator Interval for Hydraulic Oil Change First service after 500 hours of operation Afterwards after every 1000 hours of operation Always fill up the hydraulic oil through the filter. Use only oil of established brand, hydraulic oil S46. Viscosity as specified by the manufacturer according to the operating conditions. Note !! If the machine does not move, stop the engine immediately. o Hydraulic system must be operational before activating/ starting the machine again. Driving with a defect in the hydraulic system or lacking oil cause damages to the machine hydraulic components. It is not allowed to use hydraulic oil of different quality than the one specified by the producer. Hydraulic oil S46 Jasopels Fabriksvej 19 7441 Bording, Denmark Sales Department: Phone +45 98420566 Fax +45 76951343 Service: Phone +45 9843 9966 Page 50 of 70 11.8 Moveable Parts Lubrication Check the machine moveable parts regularly and lubricate them for a flawless operation. Check and lubricate machine moveable parts every service interval of 200 hours of operation. Depending on weather conditions, check the machine daily during the wintertime. Lubricate accelerator cable located on the left side of the steering column with acid free oil. Moveable parts Figure 29 Front steering: Steering: 4 lubricating nipples Steering cylinder: 2 lubricating nipples Figure 30 Articulated steering Steering: 3 lubricating nipples Steering cylinders: 4 lubricating nipples. Feeding hose in the undercarriage: Figure 31 Drive pedal Drive pedal: 1 lubricating nipple Jasopels Fabriksvej 19 7441 Bording, Denmark Sales Department: Phone +45 98420566 Fax +45 76951343 Service: Phone +45 9843 9966 Page 51 of 70 Figure 32 Feeding pump Feeding pump: 4 lubricating nipples 11.9 Hydraulic Hoses between Side Members To maintain an optimal check of the feeding machine, check the hoses and transmission for leakages at each service interval. Loosen and remove the footplate between the steering column and driver seat. Hydraulic and fuel hoses as well as jointings may not be leaking. Figure 33: Diesel electric pump Oil pump for steering Oil pump for feeding pump Diesel filter Bypass screw Transmission pump Propulsion arm ( mechanical ) Transmission Note !! If there is a leakage in the fuel or hydraulic system, stop the engine immediately. o Leakages in the machine may cause fire. o The machine must be operational, before activating / starting it again. Never clean transmission or hydraulic hoses, when the machine is hot. Do not use high-pressure washer transmission or hydraulic hoses. when cleaning Jasopels Fabriksvej 19 7441 Bording, Denmark Sales Department: Phone +45 98420566 Fax +45 76951343 Service: Phone +45 9843 9966 Page 52 of 70 the 11.11 Gear Pump Replacement The feeding pump (gear pump) efficiency decreases in the course of time. Therefore you will need to replace the pump depending on the desired operational condition. (Fig. 34) Feeding pump is a part of the machine that gets worn and its efficiency is calculated for about 600 - 800 tons of delivered fodder before replacing it. o With regular lubrication and maintenance, you can extend feeding pump’s life by more than 600 – 700 tons of fodder. Fodder with wrong content like bolts, nuts or other solid material will damage the gear pump instantly. Instructions for gear pump dismounting 1. Before dismounting the feeding pump or performing service work on it, stop the engine first. a. Dismounting the feeding pump while the engine is running or trying to adjust parts of the pump may expose mechanic to the risk of crushing. 2. Tip the feeding tank up for the correct working position. b. In models with articulated steering, dismount the feeding hose in the undercarriage first. c. In models with articulated steering, loosen the feeding tank from chassis frame in the sides on the right. The tank is mounted with 2 bolts. 3. Loosen and unscrew 2 screws in the flange of the hydraulic engine. Dismount encoder’s driving belt from the pulley. Take the nylon coupling out. 4. Dismount the water hose from the feeding pump. 5. Dismount feeding pipe / outlet pipe in the bottom of the feeding pump by unscrewing 4 screws. 6. Loosen and unscrew 6 bolts that holds feeding pump. Dismount the pump from the flange in the feeding tank. d. Hold the feeding pump, when dismounting it. The pump is heavy and you can risk dropping it. Instructions for gear pump mounting 1. Clean all mounting flanges and parts. 2. Mount and adjust the new packing between the feeding tank flange and the feeding pump. a. Tighten the feeding pump again with 6 top bolts. 3. Mount and adjust the new packing between the feeding pipe / outlet pipe and the feeding pump. Jasopels Fabriksvej 19 7441 Bording, Denmark Sales Department: Phone +45 98420566 Fax +45 76951343 Service: Phone +45 9843 9966 Page 53 of 70 a. Tighten the feeding pipe / outlet pipe again with 4 screws. 4. Mount the water hose on the feeding pump. 5. Prepare the hydraulic engine: a. Mount the nylon coupling on the feeding pump shaft. b. Pull the encoder’s driving belt on the driving shaft. 6. Mount the hydraulic engine on the driving shaft flange of the feeding pump. a. Adjust the nylon coupling to the shafts between the pump and the hydraulic engine. b. Pull the encoder’s driving belt through the flange opening in the feeding pump. c. Tighten the hydraulic engine with 2 bolts. 7. Mount the encoder’s driving belt on the driving wheel. a. Mount it at right angles to the driving shaft of the hydraulic engine. 8. Lubricate feeding pump shafts before starting the machine. (Fig. 32) a. Lacking shaft lubrication will damage the feeding pump instantly. 9. After mounting, test the portioning function, see section 8.2.1.3. Figure 34 Feeding pump Feeding tank Feeding tank flange Hydraulic engine Feeding tank / feeding pump packing Hydraulic engine 2 Mounting bolts 6 Top bolts Feeding pump Water hose Feeding pipe packing Encoder Feeding pipe / outlet pipe Encoder driving belt Fibre coupling 4 Bottom nuts Jasopels Fabriksvej 19 7441 Bording, Denmark Sales Department: Phone +45 98420566 Fax +45 76951343 Service: Phone +45 9843 9966 Page 54 of 70 Note !! While repairing feeding pump, hydraulic hoses, water hose or encoder in the feeding pump, stop the engine first. o Stop the engine immediately, if there are leakages in the feeding pump. o The machine must be operational, before activating or starting it again. Feeding pump’s life depends on the service and maintenance works performed by the operator. The pump is estimated to deliver 600 – 700 tons of fodder. o With regular lubrication and maintenance, you can extend feeding pump’s life by more than 600 – 700 tons of fodder. o Fodder with wrong content like bolts or nuts will damage gear pump instantly. DANGER !! Avoid personal injuries. Stop the machine while repairing the feeding pump or its components. When the feeding pump is rotating, there is a risk of finger/ hand crushing. Jasopels Fabriksvej 19 7441 Bording, Denmark Sales Department: Phone +45 98420566 Fax +45 76951343 Service: Phone +45 9843 9966 Page 55 of 70 12. Electric / Hydraulic Diagram of the Engine The machine has a wiring, which supplies energy to the electrical elements. Use the electric diagram below for troubleshooting and connection locations in case of electrical system failure. Figure 35 Electric diagram of the engine, Soffie model Figure 36 Hydraulic diagram, Soffie model Jasopels Fabriksvej 19 7441 Bording, Denmark Sales Department: Phone +45 98420566 Fax +45 76951343 Service: Phone +45 9843 9966 Page 56 of 70 Jasopels Fabriksvej 19 7441 Bording, Denmark Sales Department: Phone +45 98420566 Fax +45 76951343 Service: Phone +45 9843 9966 Page 57 of 70 15: 14. 13. 12: 11: 10: 9: 8: 7: 6. 5: 4,2 4:1 3: 2: 1: Fig.36: Hydraulic diagram 12.1 Fuses The feeding machine wiring is equipped with fuses, which absorb overload / short circuit when there is a failure. If a single electric function in the machine does not work when connected, always check the fuses before starting any repairs. . The fuse holder is located on the right side of the steering column, see fig. 2. If there is a failure in the wiring, stop the machine immediately and disconnect the battery from the electric system. When repairing the wiring, always disconnect the battery. Figure 37 Fuse box 1 1. 10A. Glow tube supply. 2 2. 10A. Generator supply. 3 4 3. 10A. Starter, engine supply. 5 4. 10A. Extern plug supply. 6 5. 10A. Supply for feeding pump, water, magnetic valve. 6. 10A. Additional outlet. 7. Extern 12 V plug. 7 Note !! If there is a failure in the machine wiring, stop the engine immediately. o The wiring must be operational before activating/ starting the machine. Driving with a defect in the wiring, short circuit or incorrect connection will cause damages to the machine electrical components. Faulty wiring may cause fire. When repairing the wiring, disconnect the battery. Jasopels Fabriksvej 19 7441 Bording, Denmark Sales Department: Phone +45 98420566 Fax +45 76951343 Service: Phone +45 9843 9966 Page 58 of 70 Soffie Fodermaskine model 13. Technical Data / Specifications Technical data and specifications of Jasopels Soffie feeding machines 2008. Soffie Feeding Machine Model: Data: 600 D/700 950 D 1500 D Diesel Engine 23 HK 26 HK 35 HK KUBOTA 3 cylinders watercooled 3 cylinders water-cooled 4 cylinders water-cooled Transmission Full hydraulic Full hydraulic Full hydraulic Hydraulic radiator No No Steering Servo – power steering Servo – power steering Servo – power steering Articulated steering Articulated steering Front axle steering Diesel tank 40 L 40 L 55 L Hydraulic tank 40 L 40 L 55 L Feeding tank capacity 600 L 950 L 1320 or 1520 L Water tank 60 L 80 L L Feeding mixer No Possible Possible Feeding pump Variable gear pump Variable gear pump Variable gear pump Measure L x W x H cm 223x84x150 cm 330x90x150 cm 375x89x155/169 cm Specifications: 600 D 950 D 1500 D 4 ways adjustable seat Little turning radius Articulated steering 4 WD No Low noise, easy to maintain Tippable feeding tank Can be ordered with mixer? Front steering Right side No Articulated Right side Jasopels Fabriksvej 19 7441 Bording, Denmark Sales Department: Phone +45 98420566 Fax +45 76951343 Service: Phone +45 9843 9966 Page 59 of 70 13.1 Noise Level The machine noise level is above the allowed value of a standard noise at work of 80 dB. Therefore, the operator must wear hearing protection when operating the machine. Persons working close to the machine operation must also wear hearing protection. The machine is equipped with an original silencer from the manufacturer to reduce airborne noise emission. Read below about the machine noise level according to manufacturer’s technical data. Soffie Feeding Machine Model: Engine model Engine speed 600 D 950 D 1500 D D905 / (D1105)* D1105 V1505 Loaded dB (A) Without load Loaded dB (A) Without load Loaded dB (A) Without load 1500 r/min 79,8 dB (A) 78,3 80,0 dB (A) 78,6 81,5 dB (A) 80,0 1800 r/min 82,1 80,7 82,5 81,0 84,0 82,5 2000 r/min 83,8 82,3 84,2 82,6 85,8 83,0 2500 r/min 87,5 85,9 87,8 86,4 89,5 84,2 3000 r/min 90,5 89,0 91,2 89,5 92,8 91,2 3600 r/min 93,8 92,3 - - - - *Machine 600 D is mainly equipped with engine D905. In the future, this model is going to be equipped with engine D1105. The engine manufacturer has performed a noise test with mounted radiator, fan, air filter and silencer. Note !! When operating the machine, the operator must wear hearing protection. o The machine has noise level above the allowed value of 80 dB while in use. Persons working close to the machine operation must wear hearing protection. Jasopels Fabriksvej 19 7441 Bording, Denmark Sales Department: Phone +45 98420566 Fax +45 76951343 Service: Phone +45 9843 9966 Page 60 of 70 14. List of Spare Parts Through the service level, Jasopels is achieving the highest customers’ satisfaction for its machines. Therefore, Jasopels has developed a list of spare parts, which are most often used during a service check-up. The list of spare parts reduces your order time and improves our order flow, as you as a customer can order spare parts directly from our stock by using an article number. Standard description: List of Spare Parts Soffie Diesel: Engine service parts: Technical data Fig. no. Spare part no. SAE10W40 17 5020-020360 Kubota, Assy filter 16271-3209-2 18 5019-3018 Prefilter 27 5011-7409010 Kubota 15221-4308-0 33 5019-3016 Accelerator cable Inside Ø 1,9 mm 1 5011-6205 Air filter Dry filter Kubota 24 5019-3150 Battery 12V 60 – 65 A 25 5017-720962 V-belt engine (RPF) 9,5 * 950 22 5961-8950 Technical data Fig. no. Spare part no. Hydraulic oil S46 10 L 27 / 28 5140-00185400 Hydraulic filter Tank filter 27 / 28 5020-290043 Hydraulic filter Oil filter 27 / 28 5020-290042 Pressure filter 27 5020-29044 Technical data Fig. no. Spare part no. Insert for blue foot switch 1 5018-0465 Engine oil Engine oil filter Fuel prefilter Fuel filter Hydraulic service parts: Hydraulic filter 1500 D Diverse service parts: Electronic foot pedal Feeding spout Feeding hose per m Feeding hose Ø 40 mm plastic 5013-0018 Blue 5013-00100 Ø 63 Articulated steering 30 5013-0029015 Feeding pump Gear pump Soffie XL 34 5020-010001 Fibre coupling Ø 28 34 5020-010502 Cork packing Feeding pump set 34 5020-010500 Water pump 12 l/min for dosage, orange 5018-0211 Complete wheel truck design 23 x 8,6 ( rim + tyre ) 5055-2129 Complete wheel plain design 23 x 8,6 ( rim + tyre ) 5055-1238500 16,5 x 6,5 ( rim + tyre ) 5055-1167000 in the undercarriage Complete front wheel plain design, only Soffie 600 D. Jasopels Fabriksvej 19 7441 Bording, Denmark Sales Department: Phone +45 98420566 Fax +45 76951343 Service: Phone +45 9843 9966 Page 61 of 70 15. Troubleshooting Jasopels has developed a troubleshooting table in case of failures while operating the machine. This troubleshooting table is intended for the operator to fix quickly a failure. Therefore, content of the table is less extensive. Serious mechanical defects, which require specialized technical knowledge should be repaired by the authorized mechanic. If the failure extent is larger than described here, you are always welcome to call Jasopels A/S service for assistance. Always remember to check fuses when there is a failure, before starting to repair the feeding machine. Troubleshooting: Symptom Cause Solution Page No fuel - diesel Replenish fuel 46 Air in the fuel system Repair damage and vent air out of the fuel system. 46 Fuel pipe clogged Clean or replace fuel pipes 46 Fuel filter clogged Replace fuel filter 46 Water in fuel system Change fuel and clean fuel system 46 Engine oil is thick Replace engine oil for correct type 34 Compression leak from cylinder head Engine repair Engine does not start Jasopels Fabriksvej 19 7441 Bording, Denmark Sales Department: Phone +45 98420566 Fax +45 76951343 Service: Phone +45 9843 9966 Page 62 of 70 Symptom Starter does not run Symptom Engine rotations are not smooth Symptom Cause Solution Page Missing power from battery Charge or replace battery There is power supply to starter, but it does not function Repair or replace starter Ignition key switch does not function Replace ignition key switch Wiring disconnected Connect wiring Cause Solution Fuel filter clogged Replace fuel filter 46 Air filter clogged Replace air filter 42 Fuel leakage Repair fuel leakage 46 Fuel pump or nozzle failure Repair or replace it 46 Cause Solution Page Excessive engine oil filled in the engine Reduce oil to specified level 34 Piston or piston ring worn Repair or replace it 45 Page White or blue exhaust gas Incorrect injection time Adjustment Jasopels Fabriksvej 19 7441 Bording, Denmark Sales Department: Phone +45 98420566 Fax +45 76951343 Service: Phone +45 9843 9966 Page 63 of 70 Symptom: Cause Solution Engine is overloaded Reduce the load, work conditions Page Low grade fuel used Change fuel and clean fuel system 46 Fuel pipes clogged Clean or replace fuel pipes 46 Fuel filter clogged Replace fuel filter 46 Air filter clogged Replace air filter 42 Deficient nozzle injection Repair or replace nozzle Symptom: Cause Solution Page Oil pressure is too high Wrong type of engine oil used Change engine oil for the correct type 34 Oil indicator defect. Change indicator 24 Cause Solution Engine oil insufficient Fill up engine oil to specified level Oil strainer clogged / dirty Clean oil strainer Wrong type of engine oil used Change engine oil for the correct type Oil pump defect Change oil pump Oil passage clogged Clean Cause Solution Head gasket defect Repair head gasket or replace it Black or dark exhaust gas Symptom: Oil pressure is too low Symptom: Water mixed into engine oil Engine block or cylinder head defect Symptom: Engine overheated Page 33 34 Page Engine repair Cause Solution Engine oil insufficient Fill up engine oil to specified level Page Fan V-belt broken or elongated Change 41 Coolant/ water insufficient Fill up coolant/ water 37 Jasopels Fabriksvej 19 7441 Bording, Denmark Sales Department: Phone +45 98420566 Fax +45 76951343 Service: Phone +45 9843 9966 Page 64 of 70 Symptom: Battery quickly discharged Cooling ribs clogged Rinse cooling ribs Radiator defect, inside Change radiator Water pump defect Change water pump Radiator thermostat defect Change radiator thermostat Engine is overloaded Reduce the load, work conditions Head gasket defect Repair gasket or replace it Cause Solution Battery defect or discharged Change or charge battery Fan V-belt defect Adjust slack, change Loose cables Check, fasten cables Generator defect Change generator 37 Page 41 Jasopels Fabriksvej 19 7441 Bording, Denmark Sales Department: Phone +45 98420566 Fax +45 76951343 Service: Phone +45 9843 9966 Page 65 of 70 15.1 Towing If it is necessary to tow the feeding machine to a garage without using machine’s own propulsion, loosen first the bypass screw on the transmission pump, as it is blocking the system. Do not drag or tow the feeding machine behind another vehicle before the BYPASS SCREW on the transmission pump has been loosened first. (Fig. 33) Instructions for correct towing Before dismounting the machine transmission system or performing service works on it, stop the engine first and wait until it has cooled down. o Repairing the transmission system while the engine is running will cause damages to transmission pump and wheel engine. o Towing the feeding machine before bypass screw has been loosened will cause damages to transmission pump and wheel engine. Loosen and remove the footplate between the steering column and the operator’s seat. Loosen bypass screw on the transmission pump. (Fig. 33) o You can now easy lift the feeding machine. Note !! Do not drag or tow the feeding machine behind another vehicle before the BYPASS SCREW on the transmission pump has been loosened first. (Fig. 33) o Towing the feeding machine before the bypass screw has been loosened will cause damages to transmission pump and wheel engine. Repairing the transmission system while the engine is running will cause damages to transmission pump and wheel engine. Jasopels Fabriksvej 19 7441 Bording, Denmark Sales Department: Phone +45 98420566 Fax +45 76951343 Phone +45 9843 model 9966 Soffie Service: Fodermaskine Specifikationer: 4 vejs juster bar sæde Page 66 of 70 600 D 950 D 1500 D 16. Technical Tables User manuals contain technical tables. The table data are provided by manufacturer of KUBOTA engine and has been copied from manufacturer’s workshop manual 9Y011-027 Table 1 Engine oil quality SURROUNDING TEMPERATURE ENGINE OIL QUALITY Above 25 °C SAE30 or SAE10W-30 SAE10W-40 0 -- 25 °C SAE20 or SAE10W-30 SAE10W-40 Below 0 °C SAE10 or SAE10W-30 SAE10W-40 Table 2 Oil amounts ENGINE MODEL CAPACITY / ENGINE OIL CAPACITY / HYDRAULIC OIL CAPACITY / DIESEL OIL Soffie 600 D 5,1 L 40 L 40 L D905-E2BE / 2BG 1,35 U.S. gals 10,6 U.S gals 10,6 U.S gals Soffie 950 D 5,1 L 40 L 40 L D1105-E2B / E2BG 1,35 U.S. gals 10,6 U.S gals 10,6 U.S gals Soffie 1500 D 6,7 L 55 L 55 L D1505-E2BG 1,77 U.S. gals 14,5 U.S. gals 14,5 U.S. gals Jasopels Fabriksvej 19 7441 Bording, Denmark Sales Department: Phone +45 98420566 Fax +45 76951343 Service: Phone +45 9843 9966 Page 67 of 70 Table 3 Tension PACKING TYPE BOLT TYPE TENSION 32,4 – 37,3 Nm Bottom screw with copper packing 3,3 – 3,8 kgf. m M12 x 1,25 23,9 – 27,5 ft ibs. 63,7 – 73,5 Nm 6,5 – 7,5 kgf. m M22 x 1,5 47,0 – 54,2 ft ibs. 44,1 – 53,9 Nm Bottom screw with rubber packing 4,5 – 5,5 kgf. m M22 x 1,5 32,5 – 39,8 ft ibs. Hand force Oil filter Table 4 Antifreeze FREEZING POINT ANTIFREEZE VOL. % 40 50 0 °C 0 °F - 24 -11,2 - 37 - 24 -34,6 -11,2 BOILING POINT 0 °C * 0 °C 0 °F 106 222,8 108 226,4 * At mercury column of 760 mm (mm Hg). To get a higher boiling point, use the radiator cap, which allows pressure in the cooling system. For this type of engine use following antifreeze: permanent type PT, SAE J1034 or SAEJ1814c. Always mix antifreeze with water before filling up the radiator. When mixing antifreeze with water, the antifreeze may not exceed 50 % of the solution. Jasopels Fabriksvej 19 7441 Bording, Denmark Sales Department: Phone +45 98420566 Fax +45 76951343 Service: Phone +45 9843 9966 Page 68 of 70 Table 5 V-belt Max. Slack A Check tension 7,0 – 9,0 mm. 98 N 0,28 – 0,35 in. 10 kgf. 22 Ibf Correct ** Worn-out V-belt A B V-belt must not have any cracks; change the V-belt if it has. ** If there are any cracks / wear and tear, there is a risk of belt bursting. Faulty V-belt will cause damages to radiator and engine. Jasopels Fabriksvej 19 7441 Bording, Denmark Sales Department: Phone +45 98420566 Fax +45 76951343 Service: Phone +45 9843 9966 Page 69 of 70 17. User’s notes. 70