1
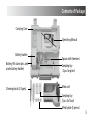
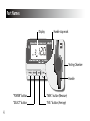
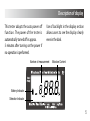
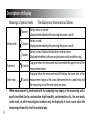
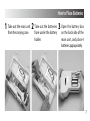
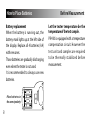
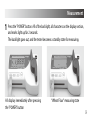
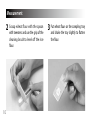
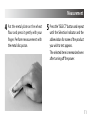
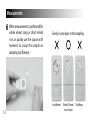
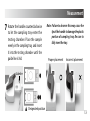
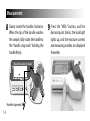
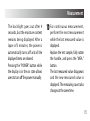
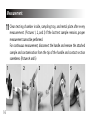
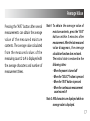
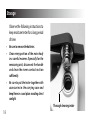
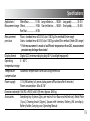
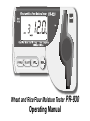
Wheat and Rice Flour Moisture Tester
Operating Manual
PR-930
Thank you for purchasing our Wheat and Rice Flour Moisture Tester, PR-930. This tester can measure the moisture of
flour by simple operation, but proper operation is necessary
for accurate moisture measurement.
Please read this operating manual carefully before use.
Table of contents
Contents of Package............................................................................. 3
Part Names................................................................................................ 4
Description of Display.......................................................................... 5
How to Place Batteries.......................................................................... 7
Before Measurement............................................................................. 8
Measurement........................................................................................... 9
Average Value........................................................................................17
Storage.....................................................................................................18
Specifications.........................................................................................19
Contents of Package
Carrying Case
Operating Manual
Battery holder
Battery (AA size x 4pcs and
under battery holder)
Cleaning brush (2 types)
Spoon with tweezers
Sampling tray
(2 pcs. for grains)
Main unit
Sampling tray
(2 pcs. for flours)
Metal plate (3 pieces)
3
Part Names
Display
Handle stop mark
Testing Chamber
Handle
4
“POWER” button
“MEA.” button (Measure)
“SELECT” button
“AVE.” button (Average)
Description of display
This tester adopts the auto power off
function. The power of the tester is
automatically turned off in approx.
5 minutes after turning on the power if
no operation is performed.
Use of backlight in the display section
allows users to see the display clearly
even in the dark.
Number of measurement
Moisture Content
Battery Indicator
Selection Indicator
5
Description of display
Meanings of special marks
Normal
Battery mark
Caution
Caution
Over mark
Caution
Under mark
Caution
•
6
The display may show marks as follows:
Battery status is normal.
(displayed immediately after pressing the power switch)
Battery is weak.
(displayed immediately after pressing the power switch)
Battery is dead. Replace the batteries with new ones.
(displayed immediately after pressing the power switch and while using)
Displayed when the measured result exceeded the upper limit of the
measurement range
Displayed when the measured result fell below the lower limit of the
measurement range, or the contact between the test sample tray and
the measuring unit of the main body was poor.
When measurement is performed with the sampling tray empty or the measuring unit is
poorly insulated due to condensation, high humidity, contamination, etc., the over mark,
under mark, or other meaningless numbers may be displayed. In such a case, clean the
measuring unit and dry it well in a natural way.
How to Place Batteries
1Take out the main unit 2Take out the batteries 3Open the battery box
from the carrying case.
from under the battery
holder.
on the back side of the
main unit, and place 4
batteries appropriately.
7
How to Place Batteries
Battery replacement
When the battery is running out, the
battery mark lights up at the left side of
the display. Replace all 4 batteries (AA)
with new ones.
Those batteries are gradually discharging
even when the tester is not used.
It is recommended to always use new
batteries.
8
Place batteries in
the correct polarity
Before Measurement
Let the tester temperature be the
temperature of the test sample.
PR-930 is equipped with a temperature
compensation circuit. However the
test unit and samples are required
to be ther mally stabilized before
measurement.
Measurement
1 Press the "POWER" button. All of the backlight, all characters on the display section,
and marks light up for 2 seconds.
The backlight goes out, and the tester becomes a standby state for measuring.
All display immediately after pressing
the "POWER" button
“Wheat Flour” measuring state
9
Measurement
2 Scoop wheat flour with the spoon
with tweezers and use the grip of the
cleaning brush to level off the rice
flour.
10
3 Put wheat flour on the sampling tray
and shake the tray slightly to flatten
the flour.
Measurement
4 Put the metal plate on the wheat
flour and press it gently with your
finger. Perform measurement with
the metal disc put on.
the "SELECT" button and repeat
5 Press
until the Selection Indicator and the
abbreviation for name of the product
you wish to test appears.
The selected item is memorized even
after turning off the power.
11
Measurement
measurement is performed for
6 When
whole wheat, long or short milled
Evenly in one layer in the sampling
rice, or paddy use the spoon with
tweezers to scoop the sample on
sampling tray flatwise.
Insufficient
12
Evenly Placed
in one layer
Too Many
Measurement
the handle counterclockwise
7 Rotate
to let the sampling tray enter the
testing chamber. Place the sample
evenly in the sampling tray, and insert
it into the testing chamber until the
guide line is hid.
Note: Failure to observe this may cause the
tip of the handle to damage the plastic
portion of sampling tray. Be sure to
fully insert the tray.
Proper placement
Incorrect placement
Guide line
Designated position
13
Measurement
8 Slowly rotate the handle clockwise.
When the tip of the handle reaches
the sample, fully rotate the handle to
the “handle stop mark” holding the
handle firmly.
Handle stop mark
14
9 Press the "MEA." button, and the
decimal point blinks, the backlight
lights up, and the moisture content
and measuring number are displayed
thereafter.
Measurement
The backlight goes out after 4
seconds, but the moisture content
remains being displayed. After a
lapse of 5 minutes, the power is
automatically turns off and all the
displayed items are cleared.
Pressing the "POWER" button while
the display is in the on state allows
users to turn off the power manually.
10
Fo r c o n t i n u o u s m e a s u re m e n t ,
per form the next measurement
while the last measured value is
displayed.
Replace the test sample, fully rotate
the handle, and press the "MEA."
button.
The last measured value disappears
and the new measured value is
displayed. The measuring count also
changes at the same time.
15
Measurement
11
Clean testing chamber inside, sampling tray, and metal plate after every
measurement. (Pictures 1, 2, and 3) If the last test sample remains, proper
measurement cannot be performed.
For continuous measurement, disconnect the handle and remove the attached
sample and contamination from the tip of the handle and contact section
sometimes. (Pictures 4 and 5)
1 23 4 5
16
Pressing the "AVE." button after several
measurements can obtain the average
value of the measured moisture
contents. The average value calculated
from the measured values of the
measuring count 2 to 9 is displayed with
the average characters and number of
measurement times.
Average Value
Note1: To o b t a i n t h e a v e ra g e va l u e o f
moisture contents, press the "AVE."
button within 5 minutes after
measurement. After the last measured
va l u e d i s a p p e a r s , t h e a v e r a g e
calculation function does not work.
The initial state is restored in the
following states:
• When the power is turned off
• When the "SELECT" button is pressed
• When the "AVE." button is pressed
• When the continuous measurement count exceeds 9
Note 2:AVE characters are displayed while an
average value is displayed.
17
Storage
Observe the following instructions to
keep moisture tester for a long period
of time:
•
Be sure to remove the batteries.
•
Clean every portion of the main body
in a careful manner. Especially for the
measuring unit, disconnect the handle
and clean the inner contact section
sufficiently.
•
Be sure to put the tester together with
accessories in the carrying case and
keep them in a cool place avoiding direct
sunlight.
Thorough cleaning inside
18
Specifications
Applications /
Wheat flour..................11-18% Long milled rice.........10-20% Long paddy.................10-35%
Measurement range Wheat.............................. 9-30% Short milled rice.........10-20% Short paddy.................10-30%
Rice flour......................... 8-18%
Measurement
Flours : standard error of 0.25%(1σ) at 130C 5g 2hrs method (Entire range)
precision
Grains: standard error of 0.5%(1σ) at 130C 5g crushed 2hrs method (Under 20% range)
*If the measurement is made at a different temperature than 20C, measurement
precision may be larger than stated.
Display format
Operating
temperature range
Temperature
compensation
Power supply
Digital (LCD, minimum display digit 0.1%, backlight equipped)
5 – 40 °C
Automatic temperature correction using thermistor
1.5 V (AA battery) x 4 pieces (auto power off function after 5 minutes)
Power consumption : Max. 0.3 W
Dimensions and weight 164 (W) x 94 (D) x 64.5 (H) mm, Approx. 0.44 kg
Accessories
Sampling tray 4 pieces (2pcs per each of rice flour and milled rice), Metal Plate
(3 pcs), Cleaning brush (2types), Spoon with tweezers, Battery (AA size x4pcs),
Battery holder, Carrying case, Operating Manual
19
Notes
● Copying some or all of the contents of this user manual without prior written consent is strictly prohibited.
● The contents of this user manual may be changed at any time in the future without any prior notice.
● The appearance and/or representations of the products and parts depicted in this user manual may not appear exactly as their actual counterparts, but this does not affect their operation or functionality.
● This user manual was intended to be written as clearly and accurately as possible. However, if you are unclear
about anything in this user manual or notice any missing information, please contact us directly.
● We cannot be held responsible for any actions or effects resulting from the execution of any operations outlined in this user manual.
1404・PA・0101・100_S