1
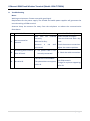
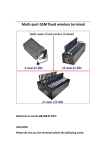
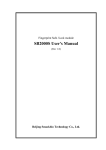
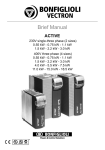
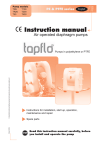
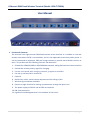
8 Channel GSM Fixed Wireless Terminal (Model: GSM-TIT200A) User Manual 1. Functions & Features The terminal is an eight-channel GSM fixed wireless access terminal. It is suitable in rural and remote areas where PSTN is not available, and it’s also applicable as wireless public phone. It can be connected to payphone, PBX and charge counter to provide more flexible services to users. This product has the following function characteristics: 1. Suitable for GSM 900/1800 or 850/1900 MHz network, taking SIM card as wireless interface. 2. Provide the reverse polarity signal for charging. 3. Can be connected with charging counter, payphone and PBX. 4. Can set up call-out/call-in restriction. 5. Caller ID. 6. Hands free, redial, sound volume adjustment while calling in/out. 7. Wireless signal indicator available. 8. Possess an agile function for setting up parameters through the phone set. 9. The power supply of DC12V and AC220V are both OK. 10. PIN code protection. 11. Ingenious outside appearance is the standard 1U 19 inches. 1|Page 8 Channel GSM Fixed Wireless Terminal (Model: GSM-TIT200A) 2. Terminal Configurations A terminal is matched with the following parts generally: 3. GSM fixed wireless access terminal: 1 pc Antenna: 8pcs SIM card cover board: 8pcs Telephone line: 8pcs Power resource line: 1 pc User manual: 1 set Fuse and bolt Terminal Installation Picture of GSM terminal Unit Front View Unit Back View A) Installation of SIM card: CAUTION! Please fix the SIM card without connecting to the power supply! 1 port with 1 SIM card, 1 antenna and 1 phone port connected with telephone set. 1. Upend the mainframe so you can see the SIM card pedestal at the bottom. 2. Push SIM card holder gently along with arrowhead to put it up. 3. Insert SIM card into the holder 4. Press down the holder of SIM card and push it by the backward direction of arrowhead until the SIM holder is fixed on the card pedestal. 5. Use the SIM cardboard to cover pedestal and screw it down. 2|Page 8 Channel GSM Fixed Wireless Terminal (Model: GSM-TIT200A) B) Assembly of the terminal: CAUTION! Make sure that the power switch is turned off. 1. Keep the terminal with fixed SIM card flatwise. 2. Screw down the connector of antenna to the bolt stick on the back of the terminal. 3. Plug one connector of standard phone cable to the phone, and plug the other end to the phone port on the back of the device. 4. If the customer need to charge, please put the multiplex counter (be prepared by the user) between the phone and the terminal. 5. Make sure the switch of device is off, and then plug the input connector of the adaptor to the AC power socket, and the output connector to the power port on the back of device. 6. If needing to use the spare power supply (prepared by the user), please connect the spare power supply to DC binding post of the terminal. (spare power supply is DC 12V) 7. Switch the power on, then you can choose to open the sub-switch button of each port. Note: Make sure each sub-switch is off when you switch the power on. Connecting Sketch Map 1 Antenna GSM terminal Terminal phone Connecting Sketch Map 2 Antenna GSM terminal Counter Terminal phone 3|Page 8 Channel GSM Fixed Wireless Terminal (Model: GSM-TIT200A) 4. Operation Instructions Before starting the following operations, please make sure the terminal is connected correctly. Then turn on the power switch in the front of the terminal. A) Explanation of state indicator light (take one port for example): 1) Network indicator (the first light): the light is on, it means the device get connected with network, vice versa. 2) Signal intensity indicators (rest 4 lights): They display the current signal intensity. When the signal is stronger, more indicator lights will be on, vice versa. B) Dialling a telephone call: 1. Take up the handset while the network LED is on. 2. Begin to dial the number after hearing the dialling tone. 3. Talk on the telephone after putting through. 4. Hang up the handset to end the call communication. C) Answering a telephone call: When the telephone rings on, answer the phone by picking up the handset. 5. Usage of the Charging Counter If the user connects the charging counter, please read the user guide of the charging counter carefully before using so as not to influence the normal use of the wireless terminal. 6. Setting functions 1. Set up the local area code in advance, then you can dial the local phone number without dialling the area code. 2. Can setup two groups of IP numbers in advance when dialling international and national phone numbers, then you do not add the IP code before the phone number; it will be added by the terminal itself. 3. The multi-lever volume can be adjusted. 4. The prohibited number can be setup. 5. Can set up calling in restrictedly. 6. SIM card can be locked. 4|Page 8 Channel GSM Fixed Wireless Terminal (Model: GSM-TIT200A) Caution! The system setup must be operated by the professional personnel. 7. Technique parameters 1) Working frequency: Transmit band (Tx) 824 to 849 MHz 1710 to 1785 MHz 1850 to 1910 MHz GSM 850 DCS 1800 PCS 1900 Receive band (Rx) 869 to 894 MHz 1805 to 1880 MHz 1930 to 1990 MHz 2) User access port: Dialling tone frequency: 450Hz continued Busy tone frequency: 450Hz 0.35s/0.35s Loop current off-hook: 25mA 3) Parameters: Items Parameters Working voltage AC220V / DC12V Environment temperature 0~45℃ Humidity 10%~95% Air pressure 85~110Kpa Environment noise <50dB Emission power 2W Statoscope Antenna plus -110dBm >5dB 4) Volume: 440(L)*245(W)*45(H) mm 5|Page 8 Channel GSM Fixed Wireless Terminal (Model: GSM-TIT200A) 8. Troubleshooting Notes Working environment: Choose areas with good signal Requirement for the power supply: The reliable and stable power supplies will guarantee the normal working of GSM terminal. Antenna: Keep the antenna far away from the telephone to reduce the communication disturbance. No Problem Possible Causes SIM 1 Not connected to network. card not Possible Remedy inserted Install the SIM card again. correctly. Clean the SIM card with a dry SIM card is dirty. cloth. Antenna is not well Check the antenna connection. connected. 2 No dialling tone is heard after off-hook. 1. The phone cable is not correctly connected. The service is not enabled. 3 No caller ID. The phone does not support caller ID. Adjust the antenna position. 1. Check the cable connection. Check the service is enabled on the GSM network. Change for a phone supporting caller ID. 6|Page