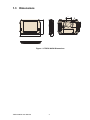
1
User Manual TREK-306DH 10.4” In-Vehicle Smart Display Copyright The documentation and the software included with this product are copyrighted 2014 by Advantech Co., Ltd. All rights are reserved. Advantech Co., Ltd. reserves the right to make improvements in the products described in this manual at any time without notice. No part of this manual may be reproduced, copied, translated or transmitted in any form or by any means without the prior written permission of Advantech Co., Ltd. Information provided in this manual is intended to be accurate and reliable. However, Advantech Co., Ltd. assumes no responsibility for its use, nor for any infringements of the rights of third parties, which may result from its use. Acknowledgements Microsoft Windows and MS-DOS are registered trademarks of Microsoft Corp. All other product names or trademarks are properties of their respective owners. Product Warranty (2 years) Advantech warrants to you, the original purchaser, that each of its products will be free from defects in materials and workmanship for two years from the date of purchase. This warranty does not apply to any products which have been repaired or altered by persons other than repair personnel authorized by Advantech, or which have been subject to misuse, abuse, accident or improper installation. Advantech assumes no liability under the terms of this warranty as a consequence of such events. Because of Advantech’s high quality-control standards and rigorous testing, most of our customers never need to use our repair service. If an Advantech product is defective, it will be repaired or replaced at no charge during the warranty period. For outof-warranty repairs, you will be billed according to the cost of replacement materials, service time and freight. Please consult your dealer for more details. If you think you have a defective product, follow these steps: 1. Collect all the information about the problem encountered. (For example, CPU speed, Advantech products used, other hardware and software used, etc.) Note anything abnormal and list any onscreen messages you get when the problem occurs. 2. Call your dealer and describe the problem. Please have your manual, product, and any helpful information readily available. 3. If your product is diagnosed as defective, obtain an RMA (return merchandize authorization) number from your dealer. This allows us to process your return more quickly. 4. Carefully pack the defective product, a fully-completed Repair and Replacement Order Card and a photocopy proof of purchase date (such as your sales receipt) in a shippable container. A product returned without proof of the purchase date is not eligible for warranty service. 5. Write the RMA number visibly on the outside of the package and ship it prepaid to your dealer. TREK-306DH User Manual Part No. 2008306D00 Edition 1 Printed in Taiwan May 2014 ii Declaration of Conformity CE This product has passed the CE test for environmental specifications. Test conditions for passing included the equipment being operated within an industrial enclosure. In order to protect the product from being damaged by ESD (Electrostatic Discharge) and EMI leakage, we strongly recommend the use of CE-compliant industrial enclosure products. FCC Class B Note: This equipment has been tested and found to comply with the limits for a Class B digital device, pursuant to part 15 of the FCC Rules. These limits are designed to provide reasonable protection against harmful interference in a residential installation. This equipment generates, uses and can radiate radio frequency energy and, if not installed and used in accordance with the instructions, may cause harmful interference to radio communications. However, there is no guarantee that interference will not occur in a particular installation. If this equipment does cause harmful interference to radio or television reception, which can be determined by turning the equipment off and on, the user is encouraged to try to correct the interference by one or more of the following measures: Reorient or relocate the receiving antenna. Increase the separation between the equipment and receiver. Connect the equipment into an outlet on a circuit different from that to which the receiver is connected. Consult the dealer or an experienced radio/TV technician for help. Technical Support and Assistance 1. 2. Visit the Advantech web site at http://support.advantech.com where you can find the latest information about the product. Contact your distributor, sales representative, or Advantech's customer service center for technical support if you need additional assistance. Please have the following information ready before you call: – Product name and serial number – Description of your peripheral attachments – Description of your software (operating system, version, application software, etc.) – A complete description of the problem – The exact wording of any error messages iii TREK-306DH User Manual Warnings, Cautions and Notes Warning! Warnings indicate conditions, which if not observed, can cause personal injury! Caution! Cautions are included to help you avoid damaging hardware or losing data. e.g. There is a danger of a new battery exploding if it is incorrectly installed. Do not attempt to recharge, force open, or heat the battery. Replace the battery only with the same or equivalent type recommended by the manufacturer. Discard used batteries according to the manufacturer's instructions. Note! Notes provide optional additional information. Document Feedback To assist us in making improvements to this manual, we would welcome comments and constructive criticism. Please send all such - in writing to: [email protected] Packing List Before setting up the system, check that the items listed below are included and in good condition. If any item does not accord with the table, please contact your dealer immediately. TREK-306DH In-Vehicle Smart Display I/O Cover (for IP55) Smart display (LVDS) Cable (BOM Optional) Quick Start Guide Please download driver and related documents from http://support.advantech.com Ordering Information P/N Description TREK-306D-HA0E TREK-306DH, 10.4" XVGA in-vehicle Smart Display 1700020007 M Cable SCSI 36P(M)/SCSI 36P(M) 200cm (LVDS Cable) 1700020008 M Cable SCSI 36P(M)/SCSI 36P(M) 500cm (LVDS Cable) 1700020329-01 M Cable SCSI 36P(M)/SCSI 36P(M) 800cm (LVDS Cable) RAM-MOUNT-06E VESA RAM mount w/VESA base, 1.5" ball TREK-306DH User Manual iv Safety Instructions 1. 2. 3. 4. 5. 6. 7. 8. 9. 10. 11. 12. 13. 14. Read these safety instructions carefully. Keep this User Manual for later reference. Make sure the back I/O bracket and the rubber I/O bracket on the side stick to the device closely before cleaning it by a damp cloth. Do not use liquid or spray detergents for cleaning. Keep this equipment away from humidity. Put this equipment on a reliable surface during installation. Dropping it or letting it fall may cause damage. Do not leave this equipment in an environment unconditioned where the storage temperature under -40° C or above 80° C, it may damage the equipment. Operating temperature: -30~70° C. This equipment is designed to be powered by TREK x86 computing box only. Do not connect it to car battery or other power sources directly. All cautions and warnings on the equipment should be noted. Never open the equipment. For safety reasons, the equipment should be opened only by qualified service personnel. If one of the following situations arises, get the equipment checked by service personnel: The cable or plug is damaged. Liquid has penetrated the equipment. The equipment has been exposed to moisture. The equipment does not work well, or you cannot get it to work according to the user's manual. The equipment has been dropped and damaged. The equipment has obvious signs of breakage. The device is provided without CD drivers. All utilities will run on the TREK x86 computing box. This device complies with Part 15 of the FCC rules. Operation is subject to the following two conditions: (1) this device may not cause harmful interference, and (2) this device must accept any interference received, including interference that may cause undesired operation. CAUTION: Always shut off the power before connecting or plugging out the cable. Do not make connections while the power is on. Sensitive electronic components can be damaged by sudden power surges. CAUTION: Any unverified component could cause unexpected damage. To ensure the correct installation, please always use the components (ex. screws) provided with the accessory box. v TREK-306DH User Manual Safety Precaution - Static Electricity Follow these simple precautions to protect yourself from harm and the products from damage. Never open the equipment. For safety reasons, the equipment should be opened only by qualified service personnel. TREK-306DH is designed to be connected to another TREK x86 computing box (e.g. TREK-550, TREK 668) via a Smart Display cable. Make sure the TREK computing box is power off when you installing TREK-306DH. After connecting the Smart Display cable, you could turn on/off TREK-306DH by its power button or via the ignition signal from TREK computing box. Warning! 1. 2. 3. TREK-306DH doesn’t support hot swapping. Make sure the device is turned off when making connections. Transport: carry the unit with both hands and handle with care. In order to keep IP55 protection, make sure the back I/O bracket and the rubber I/O bracket on the side stick to the device closely. European Contact Information: Advantech Europe GmbH Kolberger Straße 7 D-40599 Düsseldorf, Germany Tel: 49-211-97477350 Fax: 49-211-97477300 TREK-306DH User Manual vi Contents Chapter 1 General Information ............................1 1.1 1.2 Introduction ............................................................................................... 2 General Specifications .............................................................................. 2 Table 1.1: Compatible TREK x86 Computing Box List................ 2 Table 1.2: TREK-306DH Product Specification........................... 3 Dimensions ............................................................................................... 4 Figure 1.1 TREK-306DH Dimensions.......................................... 4 1.3 Chapter 2 System Setup .......................................5 2.1 2.4 A Quick Tour of the System ...................................................................... 6 Figure 2.1 Front View of TREK-306DH ....................................... 6 Figure 2.2 Rear View of TREK-306DH ........................................ 6 Figure 2.3 Side View of TREK-306DH......................................... 7 Figure 2.4 Make Sure All I/O Covers are Properly Sealed for IP-55 Compliance................................................................. 7 Overview of Hardware Installation ............................................................ 8 2.2.1 Mounting Kits for TREK-306DH .................................................... 8 Figure 2.5 Installation of RAM MOUNT Kits ................................ 8 2.2.2 Connect to TREK Computing Box ................................................ 8 BIOS Setup on TREK Computing Box ...................................................... 9 Table 2.1: BIOS version which support “panel auto-detection”. .. 9 Driver Installation on TREK Computing Box ............................................. 9 3 Pin Assignments ...............................11 3.1 3.2 Smart Display Connector ........................................................................ 12 Figure 3.1 Smart Display Port Connector on TREK-306DH ...... 12 Table 3.1: Pin assignment for Smart Display Ports ................... 12 Smart Display Cable ............................................................................... 12 Table 3.2: Ordering Information for Smart Display Cable (Optional).............................................................................. 13 Figure 3.2 Smart Display Cable Diagram .................................. 13 4 Software Demo Utility Setup ............15 4.1 Introduction ............................................................................................. 16 Table 4.1: TREK-306 On TREK Devices Support Table ........... 16 Demo Utility for TREK-306DH................................................................. 16 Figure 4.1 IMC Demo Utility....................................................... 16 Figure 4.9 Hotkey Utility............................................................. 17 How to Write an App with the MRM SDK Library.................................... 17 2.2 2.3 Chapter Chapter 4.2 4.3 vii TREK-306DH User Manual TREK-306DH User Manual viii Chapter 1 1 General Information This chapter gives background information on the TREK-306DH In-Vehicle Computing Box. Sections include: Introduction General Specifications Dimensions 1.1 Introduction TREK-306DH is a stylish, 10.4" In-Vehicle Smart Display which can be paired with all TREK X86 computing boxes (refer to Table 1.1) with a “One-Cable-Connection” (easy for installation). Its excellent display performance, combined with higher resolution XGA (1024 x 768) and higher brightness (400 cd/m2), and a reliable 5-wire resistive touchscreen, make it ideal for fleet management as well as in-vehicle surveillance applications in trucks and buses. With rich, user-friendly I/O (user-programmable hot-keys, auto dimming, and data access/communication capability with TREK computing boxes), TREK-306DH performs as both a vehicle-grade display and a smart console system. TREK-306DH can help drivers improve safety and efficiency while enhancing the driving experience. 1.2 General Specifications Key Features Vehicle-grade, 10.4" (4:3) XGA TFT LCD with 5-wire Analog Resistive Touchscreen. Five user-programmable function keys. Two 2-Watt water-proof speakers. Built-in light sensor for auto-dimming applications. Easy installation: “One Cable Connection” to be paired with TREK X86 computing box (Refer to table for the detail) Extended I/O ports (USB 2.0 type A x1, power button x1, reset button x1) for TREK computing box maintenance. -30 to 70° C wide working range temperature. Impact resistance level:EN62262 – IK06 compliant SAE-J1455 compliant. ISO/TS16949:2009 compliant Dust and water proof level: IP55 (with I/O Cover) Table 1.1: Compatible TREK x86 Computing Box List Model Name Remark TREK-306DH XPE, Linux Version. TREK-668 WES 7 Only.* TREK-674 WES 7, WES8, Linux Version. TREK-570 WES 7, WES8, Linux Version. Note! Due to an Intel graphic driver support issue, TREK-668’s Linux OS image does not support 1024x768 resolution now. For current updates regarding the Linux driver support issue, please visit our website: http:// support.advantech.com/ TREK-306DH User Manual 2 Table 1.2: TREK-306DH Product Specification Active Area (LCD Size) LCD Front Plane Rear I/O Side I/O Power Mechanical Environment Resolution XGA (1024 x 768) Video Input Single channel, 18 bit LVDS Pixel /Pitch 0.2055 (H) x 0.2055 (V) Brightness (cd/m 2 ) 400 cd/m 2 Viewing Angle (H/V) 178/178 Contrast Ratio 1400:1 Backlight Type LED Life (hrs) 50K Size 10.4" (4:3) format Type Five-wire analog resistive Transparency 80% ± 3% Hardness >3H Durability Knock test> 35,000,000 times (Stylus= R0.8,<=50g) IK Shock-Protection Rate IK-06 (Resistance against impacts with an energy up to 1,00 J) Speaker Built-in 2 x 2 W waterproof speaker Hot Keys 5x User-programmable Function keys with green LED Light Sensor 1 x Built-in light sensor for auto-dimming implementation Smart Display Port A 36-pin locking type high density connector to be paired with TREK-5xx/6xx USB Host 1 x USB 2.0 host. (Data access from/to TREK computing box) Power Button 1 x Power button. (To power on/off TREK computing box) Reset Button 1 x Reset button. (To Reset TREK computing box) DC Input 12V+/- 5% (supplied by TREK computing box) Power Consumption 8W (Nominal), 14W (Max.) Mounting VESA, RAM Mount (75 x 75 mm) Material PC Weight 1.7Kg Dimensions (H x W x D) 226 x 303 x 35 mm Operating Temperature -30 to 70° C Storage Temperature -40 to 80° C Vibration/Shock MIL-STD-810G, EN60721-3(5M3), SAEJ1455 Certifications CE, FCC IP Rating IP55 (with I/O Cover) 3 TREK-306DH User Manual General Information Touch screen 210.4 (H) x 157.8 (V) (10.4" diagonal) Chapter 1 Specifications 1.3 Dimensions 225.9 225.9 75 92 75 35 302.6 Figure 1.1 TREK-306DH Dimensions TREK-306DH User Manual 4 Chapter 2 2 System Setup This chapter details system setup on TREK-306DH. Sections include: A Quick Tour of the system Overview of hardware installation BIOS Setup on TREK computing box Driver installation on TREK computing box 2.1 A Quick Tour of the System Before starting to set up the TREK-306DH, take a moment to become familiar with the locations and functions of the connectors and features, which are illustrated in the figures below. E A C A. B. Speaker C. User-defined hotkeys D D. Light sensor E. Reset, power, USB host (side) Figure 2.1 Front View of TREK-306DH Smart Display Port Figure 2.2 Rear View of TREK-306DH TREK-306DH User Manual B 6 Chapter 2 Figure 2.3 Side View of TREK-306DH Note! The I/O ports on the side of TREK-306DH (e.g. power button, reset button, and USB 2.0 port) are designed to be routed to the TREK x86 computing box. The USB port, on the other hand, is for direct access to the TREK-306DH. Also, if you press the power or reset button on TREK306DH, it will affect both the TREK x86 computing box as well as the TREK-306DH. Caution! To assure that the entire system is fully IP55 compliant, please make sure that both the rubber cover for side I/O and the plastic rear cover for smart display port are properly sealed all the time. Figure 2.4 Make Sure All I/O Covers are Properly Sealed for IP-55 Compliance. 7 TREK-306DH User Manual System Setup Power Button USB Host Reset Button 2.2 Overview of Hardware Installation 2.2.1 Mounting Kits for TREK-306DH TREK-306DH is designed to be compatible with VESA mount and RAM Mount (75 x 75 mm). Advantech also provides several kind of mounting kits which are the perfect choice for securing MDTs (Mobile Data Terminal) to vehicles on the move. The mounting kits come with two plates and double socket arms which can absorb harmful shocks and vibrations. They are designed to absorb a shock of up to 40G, 11ms (MIL-STD-810G) or 100 G, 6ms (EN60721-3-5) and will hold MDTs/Display solidly in place even in the harshest of conditions. The viewing angle and position of MDTs is fully adjustable by the double socket design. You can consult with the your sales agent or visit our website for more detailed information: http://www.advantechdlog.com Figure 2.5 Installation of RAM MOUNT Kits 2.2.2 Connect to TREK Computing Box The same as with TREK-303R/DH, TREK-306DH can be paired with all TREK x86 computing boxes with a “One-Cable-Connection”. That is, you can just simply connect the one side of the “smart display cable” to TREK-306DH and connect the other side of cable to TREK x86 computing box directly. That’s all! To assure that the entire system is IP55 compliant, we recommend that when putting on the rear I/O Cover it is firmly sealed. Without the I/O Cover, TREK-306DH will stillwork well but will not be guaranteed to be IP55 compliant. Once the cable is installed, then you can turn on the entire system by either the power button on TREK-306DH or the ignition signal on TREK x86 computing box. Note! TREK-303/ 306DH are designed to be powered directly by the TREK computing box (e.g. TREK-306DH will be turned on/off together with TREK x86 computing box). Also, TREK-303 /306DH does not support hot-plugging. Please make sure that the TREK computing box has been completely powered off before making cabling changes. TREK-306DH User Manual 8 Note! All the MP models, like TREK-550 and TREK-668, need to upgrade BIOS to support “Panel auto-detection”. That is, BIOS will automatically detect which Panel (TREK-303 or TREK-306D) has been connected to the TREK computing box and adjust its resolution setting directly (Refer to the Table 2.1 for details). Table 2.1: BIOS version which support “panel auto-detection”. Model Name Description TREK-550 V1.20 (P/N: 1420033614) or above TREK-668 V2.05 (P/N: 1420033463) or above Note! The system might need to be rebooted after the 1st boot up to assure that the resolution setting has been auto-detected and stored as the default value. 2.4 Driver Installation on TREK Computing Box All the pre-requisite drivers related to TREK-306DH are already stored on each TREK computing box. Please download all the drivers for your TREK computing box from our website: http://support.advantech.com Note! The drivers and utilities used are subject to change without notice. If you are in doubt, check Advantech's website http://support.advantech.com/ or contact Advantech application engineers for further assistance. 9 TREK-306DH User Manual System Setup In most cases, the TREK computing box will have been properly set up and configured by the dealer or SI prior to delivery. However, it may still be necessary to adjust some of the computer's BIOS (Basic Input-Output System) setup programs to change the system configuration data, like the current date and time, or the specific type of hard drive currently installed. The setup program is stored in read-only memory (ROM). It can be accessed either when turning on or resetting the computer, by pressing the “Del” key on the keyboard immediately after powering up the computer. The settings that are specified with the setup program are recorded in a special area of the memory called CMOS RAM. This memory is backed up by a battery so that it will not be erased when turning off or resetting the system. Whenever the power is turned on, the system reads the settings stored in CMOS RAM and compares them to the equipment check conducted during the power on self-test (POST). If an error occurs, an error message is displayed on screen, and the user is prompted to run the setup program. Chapter 2 2.3 BIOS Setup on TREK Computing Box TREK-306DH User Manual 10 Chapter 3 3 Pin Assignments This chapter explains pin assignments on the TREK-306DH. Sections include: Smart Display Port Connector Smart Display Cable 3.1 Smart Display Connector A smart display port is a TREK-specific, high density connector which includes a variety of signal interfaces to achieve the “One-Cable-Connection” between TREK-30x and TREK computing box. What interfaces have been embedded in the smart display port are: LVDS, UART, USB, Power button, Reset button, Audio Line out, 12V DC power, and ground. Please refer to Table 3.1 for detailed pin assignments of the Smart Display Port connectors. Figure 3.1 Smart Display Port Connector on TREK-306DH Table 3.1: Pin assignment for Smart Display Ports Pin Signal Pin Signal 1 Backlight Enable output # 2 Panel Power Enable output # 3 LVDS Ground 4 Reset Button Input # 5 LVDS Clock + 6 LVDS Clock - 7 LVDS Ground 8 LVDS Ground 9 LVDS Data2 + 10 LVDS Data2 - 11 RS232 TXD1 # 12 RS232 RXD1 # 13 LVDS Data1 + 14 LVDS Data1 - 15 LVDS Ground 16 LVDS Ground 17 LVDS Data0 + 18 LVDS Data0 - 19 USB D- 20 USB D+ 21 USB Ground 22 USB Ground 23 +12 VDC output (+/- 5%, max 1A) 24 +12 VDC output (+/- 5%, max 1A) 25 +12 VDC output (+/- 5%, max 1A) 26 +12 VDC output (+/- 5%, max 1A) 27 Power Ground 28 Power Ground 29 Power Ground 30 Power Ground 31 RS-232 TXD2 # 32 RS-232 RXD2 # 33 RS-232 RTS2 34 Power Button Input # 35 Audio Ground 36 Mono. Line-out 3.2 Smart Display Cable TREK-306DH can be paired with TREK x86 computing box by a “Smart Display Port “Cable. Advantech provides a cable ordering list for customer reference. Contact your sales agent for details and choose the proper one to add into your order list. Note! There are three different cable lengths available (2-meter, 5-meter, or 8meter). TREK-306DH User Manual 12 Chapter 3 Table 3.2: Ordering Information for Smart Display Cable (Optional) P/N Description 1700020007 M Cable SCSI 36P(M)/SCSI 36P(M) 200cm (LVDS Cable) 1700020008 M Cable SCSI 36P(M)/SCSI 36P(M) 500cm (LVDS Cable) 1700020329-01 M Cable SCSI 36P(M)/SCSI 36P(M) 800cm (LVDS Cable) P1 1 2 3 4 5 6 7 8 9 10 11 12 13 14 15 16 17 18 P2 1 2 3 4 5 6 7 8 9 10 11 12 13 14 15 16 17 18 Color Brown White Ground Brown red white Ground Ground white red yellow white Ground Ground Green white 19 20 21 22 23 24 25 26 27 28 29 30 31 32 33 34 35 36 19 20 21 22 23 24 25 26 27 28 29 30 31 32 33 34 35 36 Blue white Ground yellow Blue Purple Grey Black black Black Black Black Brown red white Black Orange Yellow green blue Black Black purple grey Caution! To assure signal quality, the maximum cable length is limited to 10meters. If longer cable length is desired, an additional signal booster box might be required. Please contact Advantech for further assistance. 13 TREK-306DH User Manual Pin Assignments Figure 3.2 Smart Display Cable Diagram TREK-306DH User Manual 14 Chapter 4 4 Software Demo Utility Setup This appendix explains the software demo utility for TREK306DH. Sections include: Introduction Demo Utility for TREK-306DH How to write an App with the MRM SDK library 4.1 Introduction To make hardware easier to access for programmers, Advantech has developed a demo utility in order to let customers test the functions on the TREK computing box. This section describes detailed information for each Advantech demo utility so that application developers can become more familiar with using them. TREK-306 can be supported on a verity of TREK series devices; Table 4.1 shows the current SDK and Demo tools that we have released. Table 4.1: TREK-306 On TREK Devices Support Table Platform SDK Support Demo Tool TREK-550 Available on Advantech website Available on Advantech website TREK-668 Available on Advantech website Available on Advantech website TREK-570 Will be released in 2014/Q3 Will be released in 2014/5E TREK-674 Will be released in 2014/5E Will be released in 2014/5E Note! For further technical support or to get the news updates, please contact Advantech application engineers or visit our website: http://support.advantech.com 4.2 Demo Utility for TREK-306DH This section explains how to install the Advantech demo utility in Windows XP Pro / Embedded. 1. Execute IMC demo utility under the imc_demo_vX.X.X.X folder. Figure 4.1 IMC Demo Utility TREK-306DH User Manual 16 Click on Hot Key, the Hot Key window will appear. Chapter 4 2. 3. The steps below guide you how to test the each function on TREK-306DH: – Brightness level: The panel’s brightness can set from level 0~10, a total of 10 levels. When finished setting the brightness level, click “Apply”. To check the current brightness level of TREK-306, click “Get”. – Duty cycle: Brightness strength can be set up to 10 levels. After setting the brightness strength, click “Apply”. To check the current brightness strength for a certain level of TREK-306, click “Get”. – Light sensor: When the sensor has detected a change in brightness in the environment, the value will change. For the lowest level of brightness, the lowest value is presented, and the converse is true for the highest level. – Hotkey: The hotkey backlight brightness can be adjusted by setting the value from 0 ~100. – Key status: Hotkey status changes from 0 to 1 by pressing the key. – Key function definition: Set the parameters to connect to the application program function of the hot key. 4.3 How to Write an App with the MRM SDK Library 1. 2. 3. Download the SDK zip file from Advantech site and extract it. For the SDK guide, refer to the TREK SDK API Reference Manual v1.10 under the Doc folder. The demo tool source codes are under ‘demo’ folder, 17 TREK-306DH User Manual Software Demo Utility Setup Figure 4.9 Hotkey Utility TREK-306DH User Manual 18 www.advantech.com Please verify specifications before quoting. This guide is intended for reference purposes only. All product specifications are subject to change without notice. No part of this publication may be reproduced in any form or by any means, electronic, photocopying, recording or otherwise, without prior written permission of the publisher. All brand and product names are trademarks or registered trademarks of their respective companies. © Advantech Co., Ltd. 2014