1
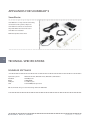
SoundEar 3
®
Manual – UK
Model 300
Model 310
Model 320
TABLE OF CONTENTS
Congratulations on your new SoundEar®3
Box Content
3
4
Before you start
SoundEar®3 model 300 and 310
SoundEar®3 model 320
Mounting SoundEar®3 on wall
· Model 300 or model 310
· Model 320
Set time
Formatting the USB key
5
5
6
7
7
7
7
8
Touch display
9
Software
Software installation
Configuration of devices
Navigating the software
File
· Live measurements
· Open measurements
· Import from USB
· Save Settings
Log/Settings
· Device Info
· Log Settings
Display
· Display Settings
Light Settings
· Standard/ Day
· Night Settings
Advanced Settings
· Analog Output
· Microphone Calibration
SoundEar®3 User Manual
About SoundEar®3
Factory Settings
11
11
12
13
17
17
17
19
20
20
20
21
22
22
23
23
24
25
25
27
30
30
30
Choosing alarm levels
31
Maintenance
· Disinfection / cleaning
Appliances for SoundEar 3
· SoundBuster
Technical Specifications
· SoundEar®3
31
31
32
32
32
33
Congratulations on your new
S ound E ar ® 3
We are pleased that you selected one of our products to help you create
a better auditive environment for yourself and others. This instruction
manual provides information on how to take advantage of your product to
the fullest.
In order to fully understand the features and possibilities of SoundEar®3,
we advice you to read this manual carefully before you start using your
SoundEar®3.
Please find the latest updates for software and the manual on our web site
www.soundear.dk
For any questions or comments, please contact at: [email protected]
Yours sincerely,
SoundEar A/S
SE300
SoundEar®3 – manual
SE320
SE310
R e t u r n t o Ta b l e o f C o n t e n t s
Box Content
Check package contents depending on the package purchased.
1
2
3
4
5
6
SoundEar®3
USB key with software
External microphone
4 pole extension cable for calibration
Power adaptor with EU, US og UK plug
USB adaptor cable (A-plug or micro-B)
R e t u r n t o Ta b l e o f C o n t e n t s
SoundEar®3 – manual
BEFOrE yOU STArT
SOUNDEAr®3 – MODEL 300 AND 310
Power
24 VDC
3
4
5
Out 2
2
-
GND
1
+
Out 1
5
USB Log/
config.
Analogue 0-10V/
Outputs 4-20 mA
Power
5 VDC/
PC data
SoundBuster
Ext. mic.
24 VDC/150 mA
Analog output
for connection
to an external
system.
SoundEar®3 – manual
Export data
Micro USB to
from the
power adaptor
internal memory. or PC.
Software
configuration.
SoundBuster
is a relay used
for controlling
connected
sound systems,
lamps etc.
Microphone
input.
R e t u R n t o ta b l e o f C o n t e n t s
SoundBuster
USB Log/
config.
Power
5 VDC/
PC data
4
3
Out 1
Ext. mic.
5
GND
66
Out 2
SOUNDEAr®3 – MODEL 320
Analogue 0-10V/
Outputs 4-20 mA
2
-
1
+
Power
24 VDC
24 VDC/150 mA
Microphone input. SoundBuster is
a relay used for
controlling
connected sound
systems, lamps
etc.
R e t u R n t o ta b l e o f C o n t e n t s
Micro USB to
power adaptor
or PC.
Export data
from the internal
memory.
Software
configuration.
Analog output for
connection to an
external system.
SoundEar®3 – manual
Mounting SoundEar®3 on wall
When choosing a location for your SoundEar®3, please make sure to follow the instructions below:
1. Make sure not to cover the microphone at the bottom of the device.
2. Avoid placing SoundEar®3 close to sound absorbing materials.
Directly on the wall:
Model 300 or 310
Check if there is an available plug socket nearby. Fasten a screw (diameter 8-9mm.) to the wall 150-200 cm above the
floor. Check if the cabinet is attached securely. If you are using a Vesa wall mount, please consult the included user
manual.
Model 320
Loosen the screw to remove the wall mount.
Fasten the wall mount to the wall with 4 screws. Hang SoundEar®3-320 onto the wall mount and fasten it with the
screw.
Set time
SoundEar®3 has a built-in time and date function that will
set automatically when you connect the device to your PC.
SoundEar®3 – manual
R e t u r n t o Ta b l e o f C o n t e n t s
Formatting the USB key
The USB key included is formatted in the format called
”FAT32”.
If you wish to use an alternative USB key with a larger
memory, it is important that it has the same format.
Please follow the steps below to format your USB key.
Note! Remember to export any files you may have on
your USB key before formatting, as the formatting will
override any existing files.
1. Connect the USB key to your PC.
2.Right-click on the USB drive.
3. Select “Format” from the drop-down menu.
4. Select “Fat 32” under File System.
4. Select “Fat 32” under File System.
5. Check the box “Express formatting”
5. Check the box “Express formatting”
6. Click “Start”
6. Click “Start”
7. The USB key is now ready for use.
R e t u r n t o Ta b l e o f C o n t e n t s
SoundEar®3 – manual
Touch display
Located on the front of SoundEar®3 you will find a touch
display from which you can control the device manually.
The functions of the touch display include setting alarm
levels, time, noise level, temperature, Leq15 and on/off
function for the mini display.
Use the horizontal arrow heads to navigate between the
different options.
Use the vertical arrow heads to set the alarm level.
Please note! To lock the touch display, please go to
”Display Settings” in the software.
Set the alarm level.
Navigate between
the different options.
Touch display options
Clock – See the time in the mini display.
The time settings will sync automatically when you
connect SoundEar®3 to your PC for the first time.
°C – Shows the room temperature.
AL – Set alarm level.
Set the visual alarm level.
With the horizontal arrow heads select the ”AL” function.
Place a finger on either of the vertival arrow heads to set
SoundEar®3 – manual
R e t u r n t o Ta b l e o f C o n t e n t s
the alarm level. Hold your finger down until the desired
alrarm level is reached.
Example: If the alarm is set to 80 dB, the red light will be
lit when the noise level reaches 80 dB. As a standard setting, the yellow light will be lit 5 dB before the alarm level
is reached, in this case at 75 dB. These standard settings
can be changed under ”Light Settings” in the software.
Please note! Changing the alarm level on the touch
display will override any special settings made in “Light
Settings” in the software.
Leq 15 – Shows the average noise level in the past 15
minutes.
dB.A S – Shows the current noise level in dB (A) Slow.
10
10
OFF – Turn off the mini display. When turned off, a
small red light will be lit to indicate that the device is
turned on.
R e t u r n t o Ta b l e o f C o n t e n t s
SoundEar®3 – manual
Software
Software installation
Please find the software on the included USB key.
Insert the USB key in your PC’s USB
port. A pop-up window should automatically open from which you can
install the software.
11
If the pop-up window does not
appear, please find the installation programme on the USB drive.
Double-click on the SoundEar®3
installation programme to begin
the software installation.
SoundEar®3 – manual
R e t u r n t o Ta b l e o f C o n t e n t s
Select language to be used for the software installation.
Click OK.
Follow the instructions and
complete the installation.
12
Configuration of devices
Configuration of SoundEar®3 can be performed in 2 different ways. The first option is to have SoundEar®3 connected
to your PC while performing the configuration (Direct configuration). The second option is to save the settings on a
USB key (Offline configuration).
Direct configuration:
Connect your SoundEar®3 to your PC. When using this method it is important to click ”Configure” whenever you have
made changes in your settings. This way, your settings will be exported directly from your PC to your SoundEar®3. The
next chapter is based on a direct configuration.
Offline configuration:
Transfer your settings from the software to your SoundEar®3 via the included USB. Insert the included USB key in your
PC’s USB port. Perform the configuration and click ”Save Settings” in the menu to the left. Afterwards, you can save
your settings on your computer or on the USB key. For more details, please look up ”Save Settings”.
R e t u r n t o Ta b l e o f C o n t e n t s
SoundEar®3 – manual
Navigating the software
Live Measurement Window
Hold the cursor over the graph to view measurement and time.
13
Select what values you
want the graph to show.
View LAeq max, LAeq min,
LAeq mean and LAeq peak
max values for the entire
measuring time.
SoundEar®3 – manual
R e t u r n t o Ta b l e o f C o n t e n t s
Show Marker
Start by checking the box ”Show marker”. A red left-marker and a blue right-marker will appear.
14
R e t u r n t o Ta b l e o f C o n t e n t s
SoundEar®3 – manual
15
Double-click in either
the red or blue time
box.
Type the time you
want to view.
Note! Use semicolon
between hours and
minutes.
The graph is updated.
Alternatively, use the cursor to pull the markers into the desired time position.
Leq-15, Leq-30 and Leq-60 indicate
the average noise level in the past 15,
30 or 60 minutes, based on the time
position of the red marker.
SoundEar®3 – manual
The values shown (LAeq-min, LAeqmax, LAeq-gennem and LCpeak)
represent the measurements of the
time interval between the red and
the blue marker.
Shows time and noise level.
R e t u r n t o Ta b l e o f C o n t e n t s
Zoom function
When data is shown on the graph it is possible to zoom in on a specific area.
16
Current measurement.
• Position your cursor anywhere on the graph.
• Left-click and use the cursor to pull the box,
pulling towards the right.
• Release the cursor when the wanted area
is selected.
• View the magnified area.
R e t u r n t o Ta b l e o f C o n t e n t s
SoundEar®3 – manual
Selected area.
17
How to exit the zoom function:
1. Position your cursor anywhere on the graph.
2. Left-click and use the cursor to pull the box, pulling towards the left until the box is visible again.
File
Live measurements
Connect your SoundEar®3 directly to your PC to view all your measurements. All data will be saved on your PC’s
C-drive under ”SoundEar3 Data”.
Open measurements
SoundEar®3 stores all live measurements on the C-drive in the folder called ”SoundEar3 Data” automatically. This is
also where data is stored when you export data from SoundEar®3 to your PC via a USB key.
All files are saved in a CSV-format that can be exported to Excel.
Live measurements will be saved as ”PC” and imported data from SoundEar®3’s internal memory will be saved as
”Internal”.
SoundEar®3 – manual
R e t u r n t o Ta b l e o f C o n t e n t s
The names for the log files consist of 3 elements:
1. Name of device
2. Date
3. ”PC” for live measurements and ”Internal” for imported
data from USB.
Example of a live measurement:
• Office1-11-03-2015-PC
Example of an imported measurement:
• Office1-09-03-2015-internal
Click ”SoundEar3 Data” to update the folder in the
software.
18
To edit, re-name or save the log files in an
alternative folder, go to ”SoundEar Data” on the
C-drive.
Click ”Open in Explorer” to take a short cut to the
”SoundEar Data” folder.
R e t u r n t o Ta b l e o f C o n t e n t s
SoundEar®3 – manual
import from usB
1. Connect the USB key to your SoundEer®3. The words
”USB” followed by ”COPy” will appear in the mini display.
The import will now begin. Counting from 0-100 the mini
displays shows the progress of the export to USB. when
the mini display shows ”100” the export is complete.
2. remove the USB key from the SoundEar®3
and insert into your PC.
3. Open the software and click ”Import from USB”.
4. Select the file you want to import.
1
5. The software now
converts the ear-file to a
CSV-file and saves it in
the internal library.
SoundEar®3 – manual
R e t u R n t o ta b l e o f C o n t e n t s
Save Settings
Transfer your settings from the software to your SoundEar®3 via the included USB. This makes it easy to apply
the same configuration to several devices.
Change the settings:
• Log Settings
• Display Settings
• Standard/ Night
1. Click “Save Settings” to save your changes.
2. Save the changes on your PC or directly
to the included USB key.
Export new settings from USB to SoundEar®3
1. Disconnect the power from SoundEar®3.
2. Insert the USB key with your new configuration.
3.Re-connect the power to SoundEar®3.
4. The word ”USB” will appear in the mini display.
The diodes will turn off for 3 seconds. When the mini
display shows ”100”, the configuration is exported to
SoundEar®3 and your new settings are ready for use.
Please note! Changing the settings on the touch display
will override your software settings, unless you lock the
mini display in ”Display Settings”.
Log/Settings
Device Info
20
•
•
•
Version: Shows the firmware version installed on your SoundEar®3.
Name: Name your device. Log files will be named after the name of their device.
Location: Type in the location of the device.
Note! To name a device, it must be connected directly to your PC. Any name
changes cannot be imported to SoundEar®3 via the USB key.
R e t u r n t o Ta b l e o f C o n t e n t s
Save your settings by
clicking ”Configure” in the
bottom right corner.
SoundEar®3 – manual
Log Settings
SoundEar®3 has an internal 16MB memory. “Logging time” indicates how much time the device can log before the
internal memory is full.
Select 1 or more types of measurements by
checking the boxes to the left. The logging
time will change relative to the type and
amount of measurements you choose to log.
Note! Remember to export the measurements
within the given logging time. If the time limit
is exceeded, the device will override the oldest
files automatically.
21
If you need a larger memory, you can log externally
on a 8GB USB key.
Save your settings by
clicking ”Configure” in the
bottom right corner.
Note! This way, all data will be logged on the USB
key only.
SoundEar®3 – manual
R e t u r n t o Ta b l e o f C o n t e n t s
Display
Display Settings
22
The digital mini display can be set to show the following informations:
• Db (A) slow
• LAeq15
• Alarm level
• Temperature
• Time (clock)
• Off (turn off the mini display)
Save your settings by
clicking ”Configure” in the
bottom right corner.
If you wish to lock your software settings, so SoundEar®3 cannot be
operated manually via the touch display, simply check the box ”Locked
display”.
R e t u r n t o Ta b l e o f C o n t e n t s
SoundEar®3 – manual
Light Settings
Standard / Day
In light settings you have the ability to make
individual settings for each of the 3 alarm colours:
23
• Lit or flashing alarm
(Lit/Flashing)
• dB interval, choose
between 30 - 130 dB
• Duration of noise before the alam is
activated (Only for dB(A) or dB(C))
• Duration of the visual alarm. In this
example, it is 0,5 seconds.
Choose between these measurent types:
• dB(A) – A weighted value
equivalent to human hearing.
• dB(C) - A weighted value
that is equally high across the
entire frequency spectrum.
• LAeq15 – Average noise
level over the past 15 minutes i
A weighted values.
• LAeq30 - Average noise
level over the past 30 minutes
i A weighted values.
• LAeq60 - Average noise
level over the past 60 minutes
i A weighted values.
Note! Changing settings manually on the touch display will override the light settings made in the software. To avoid
this, simply lock the touch display in “Display settings”.
To save your settings, click ”Configure” in the bottom right corner.
SoundEar®3 – manual
R e t u r n t o Ta b l e o f C o n t e n t s
Night Settings
In Night Settings you can create special light and alarm
settings that stay activated during a specific period of
time. This can be useful in hospitals where a minimum
of light is needed to avoid disturbing the patients’ sleep
at night.
Check the box and select time interval.
24
Set the visual alarm (see ”Light Settings”). We recommend setting the dB level relatively high, e. g. 60 dB,
to avoid the visual alarm from constantly being lit.
Note! During night mode it is not possible to change
alarm settings manually via the touch display.
R e t u r n t o Ta b l e o f C o n t e n t s
Save your settings by
clicking ”Configure” in the
bottom right corner.
SoundEar®3 – manual
Advanced Settings
Analog Output
The analog outputs enable you to connect SoundEar®3 to Building Management Systems ( BMS ) or communicate with
other devices that are compatible with analog outputs.
Note! SoundEar®3 must be provided with 24VDC through the screw terminal for the analog outputs to function.
Please find an overview and description of the various outputs on the back of the device.
Note! The 2 analog outputs have common ground connection.
Power
24 VDC
USB Log/
config.
Analogue 0-10V/
Outputs 4-20 mA
Power
5 VDC/
PC data
SoundBuster
Ext. mic.
24 VDC/150 mA
Ext. mic.
SoundBuster
Power
5 VDC/
PC data
USB Log/
config.
5
4
3
GND
5
Out 1
4
SE 320
Out 2
3
GND
2
-
Out 2
1
+
Out 1
SE 300 and 310
Analogue 0-10V/
Outputs 4-20 mA
2
-
1
+
Power
24 VDC
24 VDC/150 mA
25
You can record up to two indivual measurements
simultaneously, one per analog output.
In the drop-down menu you can choose between
7 different values for each output.
SoundEar®3 – manual
R e t u r n t o Ta b l e o f C o n t e n t s
26
Choose analog output
format, either 0-10V or
4-20mA.
Set dynamic area, e. g.
30-120 dB.
Save your settings by
clicking ”Configure” in the
bottom right corner.
R e t u r n t o Ta b l e o f C o n t e n t s
SoundEar®3 – manual
miCrophone CaliBration
To calibrate the SoundEar®3 microphone, you will need a calibrator. you can use any standard calibrators on the market with a microphone input of 1⁄2 inch.
note! For proper calibration, only use the included 4-pole
extension cable. If calibrating more than 1 microphone,
disconnect the extension cable from the SoundEar®3 and
reinsert it between each calibration.
The specific microphone ID and last date
of calibration is displayed in the upper
left corner of the microphone.
we recommend that the microphone is
calibrated once a year, or as needed.
Connect SoundEar®3 to your PC with a mini USB
cable and remove the external microphone.
SoundEar®3 – manual
R e t u R n t o ta b l e o f C o n t e n t s
Connect the microphone to the 4-pole extension cable
and insert the cable into SoundEar®3’s microphone input.
Set the calibrator to 94 dB and connect the microphone.
Under “Measurements” you can view
what the microphone detects. Depending
on time since last calibration, the
measurement should be approx. 94 dB.
Click “Perform Calibration” in the bottom right
corner.
R e t u R n t o ta b l e o f C o n t e n t s
SoundEar®3 – manual
The calibration takes a short moment.
A new pop-up window will tell you when the calibration
is complete.
when the calibration is complete, connect the
microphone to SoundEar®3. SoundEar®3 is now
ready for use.
SoundEar®3 – manual
R e t u R n t o ta b l e o f C o n t e n t s
SoundEar®3 User Manual
The online library allows you to access the latest updated versions of the user manual at any time. To access, simply
click on ”SoundEar®3 User Manual” in the menu.
About SoundEar®3
View what version of the SoundEar®3 software is installed
on your PC.
Click “Software update” to update to the latest version. You
will be linked to our web site where you can access the latest
versions.
30
Factory Settings
To reset SoundEar®3 to factory settings, please use the settings below:
Log setting:
dB(A) Slow
Light settings
Green:
30 dB - 120 dB
Yellow:
75 dB -120 dB
Red:
80 dB -120 dB
All measurements are shown as dB (A) Slow.
Night Settings
Green:
60 dB - 120 dB
Yellow:
60 dB -120 dB
Red:
60 dB -120 dB
Night settings are not part of the standard settings. To activate, check the ”Night Settings” box.
Advanced settings
Output 1:
dB(A) slow
Output 2:
dB (C ) Fast
Output Type: 0-10 V
Min output:
30 dB
Max output: 120 dB
R e t u r n t o Ta b l e o f C o n t e n t s
SoundEar®3 – manual
Choosing alarm levels
We recommend the settings below:
Auditive EnvironmentNoise limit in dB
Exam
- No disruptive noise
- Intense concentration
35 - 45 dB
Operating rooms, Neonatal Departments
35 - 45 dB
Educational, schools
50 - 60 dB
Open-plan offices, call centers
55 - 65 dB
Industry without noisy machines
Storage, assembly and laboratory work
60 - 70 dB
Day care
70 - 80 dB
Factories with noisy machines
75 - 85 dB
31
Concerts etc., rehearsal rooms, music schools
(shorter stays)
92 - 105 dB
Maintenance
To ensure correct and precise performance of SoundEar®3, repairs and service should be carried out by a trained technician. After any reparirs or service, a functionality check must be performed before using SoundEar®3 again.
Disinfection / cleaning
SoundEar®3 consists partly of materials that cannot tolerate certain substances used in surface disinfectants.
Disinfection by wiping
• Firstly, remove dirt and grime from the surface using a damp disposable cloth.
• Then disinfect the surface with alcohol wipes, followed by dry cloth.
SoundEar®3 – manual
R e t u r n t o Ta b l e o f C o n t e n t s
Appliances for SoundEar®3
SoundBuster
SoundBuster is a relay used for controlling
connected sound systems, lamps etc.
Sound Buster connects or disconnects
the power when the noise limit set in
SoundEar®3 is exceeded.
Download product sheet here.
32
Technical Specifications
SoundEar Software
Operative system: Windows XP SP3, Windows Vista, Windows 7, Windows 8
Harddisk: 100 Mbytes fri
RAM:
512MB RAM
USB port:
1 x USB 2.0 port
CPU:
1.5GHz AMD/Intel processor
We recommend using a screen measuring minimum 1366x768.
R e t u r n t o Ta b l e o f C o n t e n t s
SoundEar®3 – manual
SoundEar®3
SE 300
SE 310
Frequency Range:
Measuring Level Range:
Accuracy:
Frequency Weighting:
Time Weighting:
Dynamic Range RMS:
Light managing:
Alarm settings:
Alarm trigger display:
2 x Outputs (1 for dB A + 1 for dB C):
2 x USB ports:
Display Data:
Power Supply:
Microphone:
Mass Storage (Internal memory):
Real Time Clock:
Mechanical Features:
Standards:
SoundEar®3 – manual
SE 320
20 Hz – 20kHz
30 dB – 120 dB
+/- 0.5 dB
dB(A) and dB(C) filters
Slow (1S) & Fast (125mS)
90dB and Peak detection
Full configurability through SoundEar software, including night setting
30-120 dB
1 sec – 5 min
Either 0-10V or 4-20mA outputs
Micro USB (Power & PC), USB OTG (Log, config)
dB(A) Slow, Leq(A)15, Alarm settings, Temp, Clock
5VDC (micro USB) / 24VDC (screw terminal),
Current consumption: max 2.5W.
20 Hz – 20 KHz
16MB (128MBit) (5-90 days log time, depending on log settings)
High-precision type with battery backup (CR2032).
Cabinet: Shockproof acrylic Measurements: length: 265 mm,
width: 205 mm, height: 46 mm Weight: 1.5 kg
IEC61672-2-2002. Type 2, ANSI S1,4 Type 260601-1: Medical electrical
equipment - Part 1: General requirements for basic safety and essential
performance. 60601-1-2: Medical electrical equipment
- Part 1-2: General requirements for basic safety and essential performance
R e t u r n t o Ta b l e o f C o n t e n t s
33
UK: The crossed-out wheeled bin means that
within the European Union the product must be
taken to separate collection at the product end
of its life. This applies not only to your device
but also to any enhancements marked with this
symbol. Do not dispose of these products as
unsorted municipal waste.