1
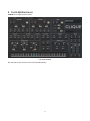
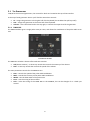
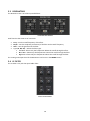
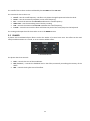
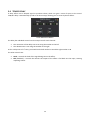
1 CONTENTS 2 Welcome to CLIQUE .................................................................................................................................... 2 2.1 3 About CLIQUE .............................................................................................................................................. 3 3.1 4 5 Synthesis & Effects .............................................................................................................................. 3 Getting Started ............................................................................................................................................ 4 4.1 Using Reaktor ...................................................................................................................................... 4 4.2 Included Files ....................................................................................................................................... 4 4.3 Opening CLIQUE .................................................................................................................................. 4 4.4 Control Help......................................................................................................................................... 4 The CLIQUE Interface................................................................................................................................... 5 5.1 The Generators .................................................................................................................................... 6 5.1.1 PWM OSC..................................................................................................................................... 6 5.1.2 STRINGS ....................................................................................................................................... 7 5.1.3 PERC ............................................................................................................................................. 8 5.2 6 System Requirements.......................................................................................................................... 2 The Modulators ................................................................................................................................... 9 5.2.1 Envelopes..................................................................................................................................... 9 5.2.2 FILT LFO........................................................................................................................................ 9 5.3 RESONATORS ..................................................................................................................................... 10 5.4 LP FILTER ............................................................................................................................................ 10 5.5 PHASER .............................................................................................................................................. 11 5.6 TEMPO DELAY .................................................................................................................................... 12 5.7 MIXER ................................................................................................................................................ 13 5.8 The Virtual Keyboard ......................................................................................................................... 14 Credits........................................................................................................................................................ 15 1 2 WELCOME TO CLIQUE Thank you for purchasing CLIQUE from ICEBREAKER AUDIO and HEAVYOCITY. This guide will show you how to use the instrument, give you an overview of the controls, and offer some useful hints and tips along the way. I personally hope you enjoy this release and find it to be an inspirational addition to your musical toolkit. 2.1 SYSTEM REQUIREMENTS • PC/Mac running Native Instruments REAKTOR 5.9.2 or higher. CLIQUE does not run in Reaktor Player, only the full version of Reaktor. More information on Reaktor can be found on the Native Instruments website: http://www.native-instruments.com/en/products/komplete/synths/reaktor-5/ 2 3 ABOUT CLIQUE CLIQUE is a polyphonic synthesizer inspired by early polyphonic electronic keyboards, including transistor organs and string machines. The core of CLIQUE is based around the ability to split the keyboard into two parts, and then alter the routing based on this split. 3.1 SYNTHESIS & EFFECTS CLIQUE has three sound generators: 1. PWM Oscillator – a pulse wave oscillator with built-in pulse width modulation. The polyphony here is simple, with each voice essentially getting its own oscillator. 2. Strings – using the divide down concept of transistor organs and string machines to produce its polyphony, this generator can be made to sound like either. 3. Perc – a monophonic sine wave with a single decay envelope, this generator can be used to add low end emphasis to the attack of the sound. These sounds can then be sent either directly to the mixer, to the resonators (a 3-band filter bank), or to a 4pole low-pass filter. These filtered sounds can then be processed via the on-board effects: 1. Ens (ensemble) – a simple switch below each mixer slider allows you to send a signal to the ensemble effect. This is a very lush chorus that adds a lot of thickness and movement to the sound. It has no parameters – it is either on or off. 2. Phaser – the phaser is a classic string machine effect. It uses a modulated all-pass filter to animate the timbre of the sound. 3. Tempo Delay – could also be called an echo effect. You can use this either to add space to the sound, or to create rhythmic effects. 3 4 GETTING STARTED 4.1 USING REAKTOR For help and guidance with using Reaktor, either as standalone or in a host, please refer to the Reaktor user manual. The full details of Reaktor’s features will not be covered in this manual. For additional help and support with using Reaktor, use the Native Instruments’ user forum, or contact the Native Instruments’ support team. Only contact ICEBREAKER AUDIO if you are having a problem with the CLIQUE instrument specifically. 4.2 INCLUDED FILES CLIQUE is included in Reaktor’s *.ens format, which is Reaktor’s main instrument and effect format. This file can be placed anywhere on your hard drive, but for use in Reaktor’s browser we suggest you place it in the Reaktor user folder, located here: <user>/Documents/Native Instruments/Reaktor5/Library 4.3 OPENING CLIQUE To open CLIQUE, either: • Double click on the Clique.ens file • Open Reaktor and go to File -> Open Ensemble … (or press Ctrl+O) • Drag and drop the Clique.ens file onto the Reaktor desktop icon, or into Reaktor itself. • Browse for CLIQUE in Reaktor’s file browser. Now CLIQUE should be open and ready to use. 4.4 CONTROL HELP All controls in CLIQUE have info text. You can use this to better understand what each control in CLIQUE does without the need to refer to this manual. You can view these by activating Info Hints, either by clicking on the i symbol beside Reaktor’s transport controls, or by pressing Ctrl + i. With Info Hints active, you can view the info text by hovering your mouse pointer over any control. 4 5 THE CLIQUE INTERFACE CLIQUE has a single interface panel. 1 THE CLIQUE INTERFACE We will look at each section of the interface individually… 5 5.1 THE GENERATORS CLIQUE has three sound generators, the controls for which are located at the top of the interface. At the top of each generator section you’ll find the same three controls: • • • Hi – assigns the generator to the higher half of the keyboard (this includes the split key itself). Low – assigns the generator to the lower half of the keyboard. Volume – this is the white knob to the top right, it controls the output level of the generator. 5.1.1 PWM OSC The PWM Oscillator gives a single pulse wave per voice, and allows for modulation of the pulse width via an LFO. 2 THE PWM OSC CONTROLS The PWN Osc includes a vibrato effect with two switches: • • Vib (vibrato amount) – a three-way switch that controls the intensity of the vibrato. Rate – a two-way switch that controls the speed of the vibrato. The main parameter controls for the PWM Osc are: • • • • • Rate – controls the speed of the pulse width modulation. Mod – controls the intensity of the pulse width modulation. Width – sets the base width of the pulse wave. Tune – sets the tuning of the oscillator. Lock – locks the tuning of the PWM OSC to the STRINGS; this can be thought of as a hard-sync control. 6 5.1.2 STRINGS The Strings section uses a variation on the divide down technique that was used in transistor organs and string machines. The result of this is that each octave of the same note is in perfect phase and sync. This produces a rather subtle, but characteristic sound unique to these devices. Like most organs and string machines, the Strings section gives you controls to mix between different harmonics, acting like a very crude additive synthesizer. 3 THE STRINGS CONTROLS There are 4 knobs for controlling each harmonic, each named after the traditional footage measurement from pipe organs: • • • • 16 – controls the level of the fundamental (lowest harmonic). 8 – controls the level of the second harmonic (one octave above the fundamental). 5 1/3 – controls the level of the third harmonic (an octave and a fifth above the fundamental). 4 – controls the level of the fourth harmonic (two octaves above the fundamental). The Strings section includes a vibrato effect with two switches: • • Vib (vibrato amount) – a three-way switch that controls the intensity of the vibrato. Rate – a two-way switch that controls the speed of the vibrato. Beside the vibrato controls is a single three-way switch for selecting the oscillator shape, and a button for controlling the sound further: • • Wav – select between three waveform shapes: I: Strings – a saw wave. II: Brass – a blend of saw and pulse waves. III: Flute – a square wave. Bright – toggles a filter on/off to control the high frequencies of the sound. 7 5.1.3 PERC The Percussion (Perc) generator is unique for a number of reasons: 1. It is monophonic. 2. It uses its own volume envelope. 3. It automatically bypasses the filters and the Ensemble effect. 4 THE PERC CONTROLS The Percussion generator has three switches to control its parameters: • • • Decay – sets the length of the envelope decay. I = short II = long Poly Env – toggles envelope re-triggering on or off. I = off – the envelope will only trigger with the first note played. Re-triggering only occurs when all notes are released and a new note is played. II = on – the envelope will re-trigger with each note played. Low Prio – sets the note priority for setting the pitch of the Percussion generator. I = off – the last note played sets the percussion pitch. II = on – the lowest held note sets the percussion pitch. 8 5.2 THE MODULATORS In the centre of the left side of the interface you will see three modulators: 1. VOL ENV – the volume envelope for the PWM OSC and the STRINGS generators. 2. FILT ENV – the envelope for the LP FILTER. 3. FILT LFO – an LFO for the LP FILTER. 5.2.1 ENVELOPES 5 THE VOL ENV & FILT ENV Both the VOL and FILT envelopes have the same three controls: • • • Attack – sets the fade-in time for the envelope. Decay – sets the time it takes to decay to the sustain level while the key is held, and then to decay to zero when the key is released. Sustain – sets the level at which the envelope will sustain after the decay phase and for as long as the key is held. The intensity of the FILT ENV is set in the LP FILTER section. 5.2.2 FILT LFO The Filt LFO has a single Freq knob for setting the rate of the LFO. 6 THE FILT LFO CONTROL The intensity of the LFO is set in the LP FILTER section. 9 5.3 RESONATORS The Resonators are a set of three parallel filters. 7 THE RESONATORS CONTROLS Each filter has the same set of 4 controls: • • • • Freq – sets the cutoff frequency of the filter. Emph – sets the emphasis (resonance) of the filter at the cutoff frequency. Gain – sets the gain level of the filter. Type (LP, BP, HP) – selects the filter type: Low-Pass: allows only the frequencies below the cutoff through the filter. Band-Pass: allows only the frequencies around the cutoff through the filter. High-Pass: allows only the frequencies above the cutoff through the filter. The routing and output level of the Resonators can be set in the MIXER section. 5.4 LP FILTER The LP Filter is a 4-pole low-pass ladder filter. 8 THE LP FILTER CONTROLS 10 The cutoff of the LP Filter can be modulated by the FILT ENV and the FILT LFO. The controls for the LP Filter are: • • • • • • Cutoff – sets the cutoff frequency. The filter only allows through frequencies below this level. Reson – sets the resonance (emphasis) at the cutoff frequency. Env – controls the amount the FILT ENV modulates the cutoff frequency. Glide Time – sets the smoothing time of the key-tracking. LFO – controls the amount the FILT LFO modulates the cutoff frequency. K-track – controls how much the filter will follow the pitch of the notes played on the keyboard. The routing and output level of the LP Filter is set in the MIXER section. 5.5 PHASER A phaser uses modulated all-pass filters to alter the timbre of a sound over time. The effect can be used subtly to add movement to a sound, or as an extreme wobble effect. 9 THE PHASER CONTROLS The phaser has three controls: • • • Rate – controls the rate of the modulation. Fbk (feedback) – controls the feedback level in the effect, essentially controlling the intensity of the effect. Mix – controls the dry/wet mix of the effect. 11 5.6 TEMPO DELAY A delay effect uses a delayed signal to produce echoes, which can give a sense of space to the sound. CLIQUE’s delay is automatically synced to the host tempo, allowing you to create rhythmic effects. 10 THE TEMPO DELAY CONTROLS The delay has individual control over the tempo rate for each channel: • • The numerator of the delay time is set using the number to the left. The denominator is set using the number to the right. So for a delay time of a ¼ note, you would set the left number to 1 and the right number to 4. The other controls are: • • Send – controls the level of the signal being sent to the effect. Fbk (feedback) – controls the amount the output of the effect is fed back into the input, creating repeating echoes. 12 5.7 MIXER The three main sources in the instrument can all be mixed together in the Mixer. The Mixer also allows further flexibility of the keyboard split. 11 THE MIXER CONTROLS The inputs of the mixer come from the generators (Direct) and the filters (Resonator & Filter). The combined output of the mixer is then fed into the PHASER and TEMPO DELAY effects. Each channel in the mixer has 4 controls: • • • • Hi – assigns the channel to the higher half of the keyboard (this includes the split key itself). Low – assigns the channel to the lower half of the keyboard. Level – controls the output level of the channel. Ens (ensemble) – toggles an ensemble effect for the channel. This can be used to thicken the sound to make it sound like many instruments playing at once. 13 5.8 THE VIRTUAL KEYBOARD 12 THE VIRTUAL KEYBOARD The virtual on screen keyboard is not only a display, but is also where you define the key-split point. 13 SETTING THE KEY-SPLIT POINT • Click and drag on the Keyboard to set the position of the key-split. 14 THE VIRTUAL KEYBOARD WHEN PLAYED • • Keys on or above the split key will light up cyan when played. Keys below the split key will light up magenta when played. 14 6 CREDITS Instrument Design/Programming: Adam Hanley GUI Design: Voger Design Artwork: Alex Zhukov Snapshot Programming: Adam Hanley, Luis D'Elias, Ryan Mallen 15