1
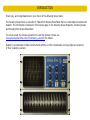
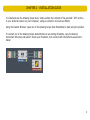
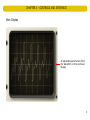
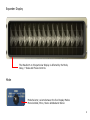
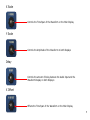
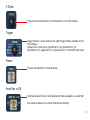
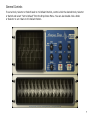
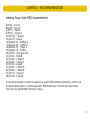
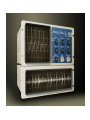
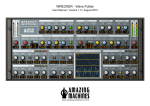
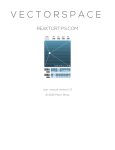
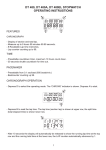
Amazing Scope Suite
User Manual • Version 1.0 • May 2014
INTRODUCTION
Thank you, and congratulations on your choice of the Amazing Scope Suite.
The Amazing Scope Suite is a bundle of 3 Waveform Dsiplay Ensembles that run inside Native Instruments’
Reaktor. The information contained in this manual apply to the Amazing Scope Expander, Amazing Scope
and Amazing Slim Scope Ensembles.
You must accept the license agreement to use this product. Please see
www.amazingmachines.com.br/software_eula.html for details.
Reaktor is a trademark of Native Instruments GmbH, all other trademarks and copyrights are property
of their respective owners.
TABLE OF CONTENTS
Chapter
Chapter
Chapter
Chapter
1
2
3
4
-
System Requirements ...............................1
Installation Guide .....................................2
Controls and Interface ..............................3
MIDI Implementation ................................8
CHAPTER 1 - SYSTEM REQUIREMENTS
Windows
Windows 7 or Windows 8 (latest Service Pack, 32/64 Bit)
Intel Core Duo or AMD Athlon 64 X2, 2 GB RAM (4 GB recommended)
Mac
Mac OS X 10.7 or 10.8 (latest update)
Intel Core 2 Duo, 2 GB RAM (4 GB recommended)
General System Requirements
Native Instruments’ Reaktor 5.8 or newer
1
CHAPTER 2 - INSTALLATION GUIDE
To install and use the Amazing Scope Suite, simply extract the contents of the provided “.ZIP” archive
to your prefered location on your Computer, using an extraction tool such as WinZip.
Using the Reaktor Browser, open one of the Amazing Scope Suite Ensembles to start using the product.
To connect one of the Amazing Scope Suite Modules to an existing Ensemble, copy the desired
Instrument Structure and paste it inside your Ensemble, then connect both Instruments as pictured
below:
2
CHAPTER 3 - CONTROLS AND INTERFACE
Main Display
All adjustable parameters affect
the Waveform on this particular
Display
3
Expander Display
The Waveform on this particular Display is affected by the Mode,
Delay, Y Scale and Freeze Controls
Mode
Mode Selector, selects between the four Display Modes:
Mono Gridded, Mono, Stereo Gridded and Stereo
4
X Scale
Controls the Time Span of the Waveform on the Main Display
Y Scale
Controls the Amplitude of the Waveform on both Displays
Delay
Controls the amount of Delay between the Audio Input and the
Waveform Display on both Displays
X Offset
Offsets the Time Span of the Waveform on the Main Display
5
Y Offset
Controls the Vertical Position of the Waveform on the Main Display
Trigger
Trigger Selector, selects between the eight Trigger Modes available for the
Main Display:
Display Clock, Audio Input, Quantized to 1/16, Quantized to 1/8,
Quantized to 1/4, Quantized to 1/2, Quantized to 1/1 and MIDI Input Gate
Freeze
Freezes the Waveform on both Displays
Knob Res • A/B
Switches between the two Knob Resolution Modes available: Low and High
Also switches between the A and B Parameter Settings
6
General Controls
To set a Knob, Selector or Switch back to it’s Default Position, control+click the desired Knob, Selector
or Switch and select “Set to Default” from the Drop Down Menu. You can also double click a Knob
or Selector to set it back to it’s Default Positon.
7
CHAPTER 4 - MIDI IMPLEMENTATION
Amazing Scope Suite MIDI Implementation
Note On - 0 to 127
Note Off - 0 to 127
3 (Ctrl 3) - Mode A
9 (Ctrl 9) - X Scale A
14 (Ctrl 14) - Y Scale A
15 (Ctrl 15) - Delay A
16 (General #1) - X Offset A
17 (General #2) - Y Offset A
18 (General #3) - Trigger A
19 (General #4) - Freeze A
20 (Ctrl 20) - Knob Res • A/B
21 (Ctrl 21) - Mode B
22 (Ctrl 22) - X Scale B
23 (Ctrl 23) - Y Scale B
24 (Ctrl 24) - Delay B
25 (Ctrl 25) - X Offset B
26 (Ctrl 26) - Y Offset B
27 (Ctrl 27) - Trigger B
28 (Ctrl 28) - Freeze B
To set a Knob, Selector or Switch to respond to a specific MIDI Continuous Controller, control+click
the desired Knob, Selector or Switch and select “MIDI & OSC Learn” from the Drop Down Menu,
then move the desired MIDI Controller to assign.
8