1
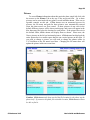
Clivia
Access
User’s Guide and Reference
v1.3
By:
Michael Kinzer
Colorado Clivia Company
Clivia Access v1.3
User’s Guide and Reference
By: Michael Kinzer
Colorado Clivia Company
Copyright ©2010 Colorado Clivia Company All rights reserved.
Clivia Access User‘s Guide and Reference
If this User’s Guide and Reference is distributed with software that includes an end user licensing agreement
(EULA), this User’s Guide and Reference, as well as the software described in it, are furnished under
license and may be used or copied only in accordance with the terms of such license. Except as permitted
by any such license, no part of this guide may be reproduced, stored in a retrieval system, or transmitted, in
any form or by any means, electronic, mechanical, recording, or otherwise, without the prior written
permission of Colorado Clivia Company. The content of this User’s Guide and Reference is protected
under copyright law even if it is not distributed with software that includes an end user licensing agreement.
Because Clivia Access contains a run-time version of Microsoft’s 2007 Access®, portions of the Clivia
Access software, and by reference portions of this User’s Guide and Reference, are protected by copyrights
held by Microsoft Corporation in the United States and in other countries. Colorado Clivia Company has a
license from Microsoft Corporation to distribute run-time versions of Microsoft’s 2007 Access®. All
unique (Non-Microsoft) portions of Clivia Access software and this User’s Guide and Reference are
copyrighted by Colorado Clivia Company, with all rights reserved. Microsoft, Windows, Windows XP,
Windows Vista, Windows 7, Office 2007 and Access 2007 are either registered trademarks or trademarks of
Microsoft Corporation in the United States and/or other countries. Other trade names are registered
trademarks of their respective organizations. Any references to company names or brand names are
protected by their respective trademarks and are acknowledged.
Export of Clivia Access software is allowed without an export license to most countries under United States
ECCN 5D992.b.1 and CCATS G060498. Export is not allowed to Cuba, Iran, North Korea, Sudan, or
Syria.
Printed: July, 2010
Colorado Clivia Company
621 Saint Paul Street
Denver, Colorado 80206
United States
Table of Contents Page i
Table of Contents
Clivia Access Concepts ............................. 1
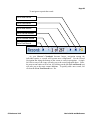
Event Record .................................................. 50
General Philosophy...........................................1
Optional Use .....................................................1
Plant Numbers ..................................................1
Validation Lists .................................................1
Edit Existing .............................................52
Installing Clivia Access ............................. 2
Requirements ....................................................2
Installation ........................................................3
Getting Started ........................................ 10
Introduction.....................................................10
Review the Manual .........................................10
Create Plant Numbering Scheme ....................10
Determine Units and Formats .........................11
Decide User Defined Category Use ................12
Design and Populate Lists ..............................13
Collect Data ....................................................13
Organize Mothers and Fathers First ...............14
Organize for Bulk Entry .................................14
Plan on Unknowns ..........................................15
Create Print Outs.............................................16
Using the Program .................................. 16
On Screen Forms ............................................16
Moving About .................................................18
Toolbars ..........................................................19
Validation Lists ...............................................21
Reserved Characters .......................................23
Error Messages ...............................................24
Reports ............................................................25
Photos and Images ..........................................25
Database Menu ........................................ 28
Create New ............................................... 29
Plant Record....................................................29
Plant Records (in Bulk) ..................................35
Soil Mix ..........................................................36
Source .............................................................38
Bloom Record .................................................40
Pollination Progress Record ...........................44
Division Record ..............................................46
Pot Record ......................................................48
Clivia Access V1.3
Plant Record ................................................... 52
Edit Lists ........................................................ 61
Soil Mix.......................................................... 63
Source............................................................. 64
Stored Pollen .................................................. 65
Seed Harvest................................................... 66
Bulk Update ................................................... 68
Grower’s Notebook ........................................ 74
Greenhouse Diary and Reports ...................... 86
Reports ......................................................89
List Reports .................................................... 89
Find Plant Reports .......................................... 90
Family Tree Report ........................................ 93
Date Based Reports ........................................ 95
Seed Inventory Report.................................... 96
Stored Pollen Report ...................................... 98
Find Pollen Report ......................................... 98
Miscellaneous ..........................................102
User’s Manual .............................................. 102
Export Data and Reports .............................. 103
Quit Database ............................................... 108
Don‘t Forget ............................................108
Appendix A - Validation List Contents....1
General ............................................................. 2
Acquired As List .............................................. 2
Breeding Group and Breeder Lists ................... 2
Color List ......................................................... 2
Disposition List ................................................ 3
Flower Shape List ............................................ 3
Fragrance List................................................... 3
Inflorescence Height List ................................. 3
Leaf Color & Style List .................................... 3
Leaf Length List ............................................... 4
Leaf Width List ................................................ 5
Location List .................................................... 5
Pot Description List ......................................... 5
Propagation List ............................................... 5
User’s Guide and Reference
Table of Contents Page ii
Soil Mix List .....................................................6
Source List ........................................................6
Species List .......................................................6
Appendix B - Sample Data Collection
Forms .......................................................... 1
New Plant Form ................................................2
New Soil Mix Form ..........................................3
New Source Form .............................................4
New Bloom/Pollination Form...........................5
New Division Form ..........................................6
New Pot Form ...................................................7
New Pot Form (Bulk Entry) .............................8
New Event Form ...............................................9
Seed Harvest Form .........................................10
Stored Pollen Form .........................................11
Clivia Access V1.3
User’s Guide and Reference
Page 1
Clivia Access Concepts
General Philosophy
Clivia growers, breeders, and collectors are more successful in their
endeavors if they have access to a wide range of information about their particular
plants. Clivia Access is a Microsoft Windows® and Access® based software
program designed to efficiently collect and present a wide range of information
used in the growing and breeding of Clivias. The software is intended to replace
paper records performing similar activities. In addition, the software is designed
to accommodate many of the unique features of a Clivia collection and breeding
program. While collectors of other species may find the software usable and
helpful, the software is intended specifically for growers of the Clivia species.
Optional Use
Clivia Access can collect a wide range of information regarding the
characteristics and history of individual plants, along with Grower’s Notes about a
variety of subjects. Depending on the goals of individual growers, some of this
information may not be needed. Clivia Access allows individual growers to only
collect the information they feel appropriate for their collection goals. Use of
most fields in the software is optional. And data entry forms are laid out so most
commonly collected information is entered first.
Plant Numbers
Clivia Access uses a unique Plant No. to track each plant in the software.
This number is critical. All plants involved in the breeding or growing collection
must have a valid plant number – there is no option. Some plants, which have
never been in the possession of the grower, may also need a valid Plant No. since
they are parents, grandparents, etc. of plants in the collection. Use of plant
numbers allow the software and its user to minimize mistakes, speed entry of
data, use common sorting techniques and allow easy conversion of numerous
plant numbering systems to a common base.
Validation Lists
Clivia Access uses numerous validation lists to check data entries for
accuracy, standardize data entry, simplify sort and selection criteria definitions,
and keep the database in a clean condition. Individual validation lists can be
modified by particular growers to suit their specific needs. Sample, generic
validation lists are included as a starting point. Many growers may wish to
expand the generic validation lists or replace them with one of their own.
Clivia Access V1.3
User’s Guide and Reference
Page 2
Installing Clivia Access
Requirements
Clivia Access includes a run-time version of Microsoft’s Access 2007®. As
shown in the end user licensing agreement (EULA) you see when installing the
software, you are authorized to install one copy without additional licensing
required from Microsoft. The minimum hardware requirements for Clivia Access
are the same as for Microsoft Access 2007®. They are:
Personal computer (desktop or notebook) with an Intel Pentium® 500
megahertz or faster processor. Pentium III® or later is recommended.
Similar AMD processors are also supported.
256MB of RAM or greater. 512MB to 1GB RAM is strongly recommended..
165 MB, or more depending on the amount of data, of available hard disk
space on the computer’s C:\ drive, for the program, installation files, an
electronic copy of this manual; and data files. If you include pictures in Clivia
Access, the amount of hard disk space will increase significantly. During the
installation process, up to 1.5 Gbytes of hard disk space may be used
temporarily.
1024 x 768 or higher resolution monitor.
A data backup mechanism capable of storing 5 Mbytes or more of data plus
additional storage if photos are used. .
Windows XP® with Service Pack 2 (SP2), or Windows Vista®.
Other Software or Hardware
The following additional software or hardware will be needed to use all
functions of Clivia Access:
Clivia Access V1.3
A Windows based printer capable of printing black and white (grayscale)
documents 8 ½ by 11 inches in size (or equivalent). Color capabilities are
recommended if color photos are to be used.
For users installing Clivia Access from a compact disk, a compact disk reader.
For users downloading Clivia Access from the Internet, an Internet
connection and browser (Internet Explorer, Firefly, etc.).
For photo features, a digital camera capable of producing *.jpg images or
photo manipulation or organization software capable of producing *.jpg
images.
For reading this User’s Guide, a copy of Adobe Reader version 7.0 or later.
This software is currently available free at www.adobe.com/products/reader/
User’s Guide and Reference
Page 3
Installation
File Locations
The installation software for Clivia Access will create a directory or folder
called Clivia in your C: drive’s root directory, which will look like C:\Clivia.
The following files will be installed at this location – ClivA1v3.accdr (the
program), UserManual1v3.pdf (the software manual), Clivia.ico (the icon for
the Window’s desktop), ClivA_Data1.accde (the data files) and IsLicense40.dll
(the license manager). ClivA_Data1.accde will contain all of your data and all of
the validation lists. It is one of two parts of the software that changes over time.
Because it contains your data, ClivA_Data1.accde should receive regular data
backups.
Danger: The file IsLicense40.dll should be left alone. Because it is the license manager,
this file contains numerous security features to protect itself. Attempts to view or change this
file will initiate file tampering routines. If this file believes a tampering attempt has
occurred, your license will be cancelled. Colorado Clivia does not refund purchase prices
for tampered licenses.
Another needed file location is for photos, if that function is used in Clivia
Access. Clivia Access data files do not contain the photos only a reference to
their location. In order for Clivia Access to use photos, individual photos must be
placed in a new directory or folder C:\Clivia\Photo. The installation software
will create this directory or folder and install one photo there – NoPhoto1.jpg.
The Photo folder will need to be backed up as well as your data. See page 25 for
additional details on using photos.
The last needed file location is for the Grower’s Notebook data and the
associated images or photos. Those items must be placed in a NBook directory or
folder C:\Clivia\NBook. The data file for the Grower’s Notebook is contained in
this directory and is named NBook_Data.accde. A second Image directory will
also be placed here and a NoPhoto2.jpg photo file will be placed in it. The
NBook_Data.accde file and all of the files in the Photo directory need to be
backed up as well. Most users simply backup the entire C:\Clivia directory.
Clivia Access V1.3
User’s Guide and Reference
Page 4
The installation process creates these directories and files. In outline form,
all of these directories and files will look like:
C:\Clivia (a directory or folder)
ClivA1v3.accdr
UserManual1v3.pdf
ClivA_Data1.accde
Clivia.ico
IsLicense40.dll
Photo (a directory or folder)
NoPhoto1.jpg
NBook (a directory or folder)
NBook_Data.accde
Image (a directory or folder)
NoPhoto2.jpg
Caution: With all Clivia collection records in one electronic location, backing
up your data is a critical operation. Always remember the three critical computer
operations:
BACKUP, BACKUP, BACKUP!!!!
All of the Photo and
NBook\Photo directories and the ClivA_Data1.accde and NBook_Data.accde
files must be backed up regularily.
Regardless of whether an existing full featured copy of Access 2007® is
installed on the computer to receive Clivia Access, a copy of the runtime version
of Access 2007® will be installed for use by Clivia Access. This is done to
prevent Clivia Access from making changes to other full featured Access 2007
programs setup on the computer. The Access 2007® Runtime files will be
automatically installed where other programs are installed on the computer. The
Microsoft Save As PDF or XPS Add-in for 2007 Microsoft Office is also installed
on the computer where the Access Runtime files were installed.
Installation Process
If you received Clivia Access on a compact disk in the mail:
1. Start your computer, and shut down any application programs running,
including virus protection and spyware. If you leave virus protection and
spyware operating, during and initially after the installation you will receive
several warnings from these two software types. Clivia Access was scanned
for viruses using up-to-date Trend Micro® software before shipment. If your
computer contains more than one login, you will need to login with
Administrator rights. Many computers are setup with no logins or only one,
so this requirement is not applicable in those cases.
2. Inspect the compact disk to make sure it was not physically damaged in the
mail. If CD is physically ok, insert the disk into the CD reader on your
computer. On most computers the Clivia Access installation program will
Clivia Access V1.3
User’s Guide and Reference
Page 5
automatically start after several seconds. If the Clivia
Access installation program automatically starts go to step
4.
3. (Use this step only if the Clivia Access installation program
does not automatically begin.) Using My Computer or
Windows’ Explorer open the CD. In the first level of files
and folders you will see a file named Setup.exe. Double left click with the
mouse on the Setup.exe file name. The Clivia Access installation program
will begin.
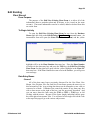
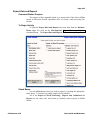
4. During the installation process follow the on-screen prompts for the Clivia
Access installation program. You will be asked to accept an End User’s
License Agreement, optionally enter your name or organization, and choose
between a Typical or Custom installation. Choose Typical. The installation
program will create all of the folders or directories and install all of the files.
It will also install a shortcut on your Windows Desktop with an orange, clivia
blossom icon. After Clivia Access has been installed, the Access 2007
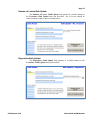
Runtime installation will automatically begin. Several times during the
installation process
the screen will look
like the installation
has finished.
Just
wait. Until you have
seen the dialog box
shown on the below,
the installation is still
proceeding. Left click on the OK button to complete the installation.
5. After the installation, turn your virus protection and spyware on again. To
start Clivia Access double left click the Clivia Access icon on the Windows
Desktop. See the Activate License subject later in this section for license
information.
6. Place the Clivia Access installation disk in a safe place. You will need this
disk to move the software to a new machine, or to uninstall the software at a
later date.
Note: A safe place for a CD is a dark place with moderate/room temperatures.
7. If you do not have Adobe Reader version 7.0 or later installed on the
computer you will need to download the program from
www.adobe.com/products/reader/ in order to view and print the Users Guide.
Follow the instructions on the web site to install this free software. After
installing Adobe Reader, to open the Users Guide go to
C:\Clivia\UserManual1v3.pdf and double left click on the file name.
Clivia Access V1.3
User’s Guide and Reference
Page 6
To install Clivia Access from an Internet download:
1. Clivia Access is transmitted over the Internet in a compressed, ZIPped folder
displaying the name ClivA1v3 or ClivA1v3.zip. During the download, you
should opt to Save this folder to your hard drive, remembering where you
saved it. Go to the saved folder and double left click. Depending on the
software on your computer, you can then copy the files to a software
installation folder on your C: drive, or will need to extract them first. You
should end up with files and folders in the following configuration:
Installation folder name (your choice)
setup.exe (a file)
autorun.inf (a file)
files (a folder)
AccessRuntime.exe (a file)
SaveAsPDFandXPS.exe (a file)
ClivA1v3.msi (a file)
Setup (a folder)
Setup.ini (a file)
2. If the computer has more than one login, you must login with Administrator
rights. Shut down any application programs running, including virus
protection and spyware. If you leave virus protection and spyware operating,
during and initially after the installation you will receive several warnings
from these two software types. Clivia Access was scanned for viruses using
up-to-date TrendMicro® software before shipment.
3. Using My Computer or Windows’ Explorer go to the just transferred
installation folder. In this folder you will see a file named Setup.exe. Double
left click with the mouse on the Setup.exe file name. The Clivia Access
installation program will begin.
8. During the installation process follow the on-screen
prompts for the Clivia Access installation program. You
will be asked to accept an End User’s License
Agreement, optionally enter your name or organization,
and choose between a Typical or Custom installation.
Choose Typical. The installation program will create all
of the folders or directories and install all of the files. It will also install a
shortcut on your
Windows
Desktop
with an orange, clivia
blossom icon. After
Clivia Access has
been installed, the
Access 2007 Runtime
installation
will
Clivia Access V1.3
User’s Guide and Reference
Page 7
automatically begin. Several times during the installation process the screen
will look like the installation has finished. Just wait. Until you have seen the
dialog box shown previously, the installation is still proceeding. Left click on
the OK button to complete the installation.
4. After the installation, turn your virus protection and spyware on again. To
start Clivia Access double left click the Clivia Access icon on the Windows
Desktop. See the Activate License subject later in this section for license
information.
5. If you do not have Adobe Reader version 7.0 or later installed on the
computer you will need to download the program from
www.adobe.com/products/reader/ in order to view and print the Users Guide.
Follow the instructions on the web site to install this free software. To open
the Users Guide using Adobe Reader go to C:\Clivia\UserManual1v3.pdf.
Move Clivia Access to a New Computer
The End User License Agreement (EULA) for Clivia Access allows you to
move the software to a new computer if you remove it from the previous
computer. The process to move Clivia Access to a new computer is as follows:
1. On the old computer, back up your data and photos by placing a copy of
ClivA_Data1.accde, all of the Photo subdirectory (both in the C:\Clivia
directory), NBook_Data.accde and all of the Image sub directory (both in the
C:\Clivia\NBook directory) to another location on your hard drive. Also
create a copy of these files on transferable media (such as burning a CD, using
a thumb drive, etc.).
2. Using the Clivia Access installation disk or the installation files originally
received via the Internet, install the software on the new computer as
described in the last section of this manual. You will need to enter the
License Key after the installation.
3. Using the transferable media containing your data and photos from the old
computer, copy the ClivA_Data1.accde file and Photo subdirectory to the
new computer’s C:\Clivia directory or folder.
Also copy the
NBook_Data.accde and the Image subdirectory to the new computer’s
C:\Clivia\NBook directory or folder. When asked if you wish to over-write
the existing files, answer YES.
4. Test the installation on the new computer to insure everything is working as
intended. Just like the original installation, you will need to enter the License
Key into the new installation.
5. If and only if the new installation is working, uninstall the software from your
old computer. To uninstall Clivia Access from the old computer follow the
Clivia Access V1.3
User’s Guide and Reference
Page 8
instructions in the following section. You can also erase the backup copy of
your data and photos on the old computer’s hard drive.
6. Place the transferable media with the backup copy of your data and photos in
a safe place. This is a backup. Return the Clivia Access installation disk to its
safe place as well.
Uninstall Clivia Access
At some point in the life of Clivia Access on your computer you may decide
to uninstall the software. Following is the process to uninstall Clivia Access.
Danger: The Clivia Access uninstall process may erase any and all data and photos/images
in the C:\Clivia directory or folder. Always create a backup first.
1. Backup your data and photos/images by copying the ClivA_Data1.accde file
(your data and validation lists), the entire Photo sub directory (your photos),
both contained in the C:\Clivia directory or folder, the NBook_Data.accde
(your Grower’s Notebook data and validation lists), and the entire Image sub
directory (your Grower’s Notebook images), both contained in the
C:\Clivia\NBook directory or folder, to someplace else on your hard drive. If
you own a full featured copy of Access 2007® you can read the data file and
can export the information to another database using your copy of Access®.
Even if you do not own a full featured copy of Access® you should still make
a backup copy of the data file as you may in the future be able to borrow or
obtain a copy to manipulate the data.
2. If you do not own a full featured copy of Access®, you should use the Export
functions of Clivia Access to export as much data as possible.
3. Use the standard Windows® uninstall process to uninstall Clivia Access. You
will need to uninstall three programs, Clivia Access, Microsoft Office Access
2007 Runtime, and Microsoft Save As PDF or XPS Add-in for 2007
Microsoft Office. To do the three uninstalls from the Windows Desktop, left
click on the Start ButtonSettingsControl PanelAdd or Remove
ProgramsClivia Access or Microsoft Office Access 2007 Runtime or
Microsoft Save As PDF or XPS Add-in for 2007 Microsoft Office
Remove. At some point the computer may ask you to enter the Clivia
Access installation CD into the CD reader. Do so. Clivia Access, its data, its
photos, the user guide, the C:\Clivia directory, and the desktop icon may be
removed from the computer. None of these files will be placed in the Recycle
Bin, so there is virtually no recovery from this maneuver.
Note: If you have a full featured, registered version of Microsoft’s Office 2007
and you wish to keep the “Save As PDF” functionality, just leave that
program on the computer. It not only adds PDF publishing capabilities to
Clivia Access, but will also add PDF publishing capabilities to all Microsoft
Office 2007 programs. Sorry, it does not work for earlier versions of Office.
Clivia Access V1.3
User’s Guide and Reference
Page 9
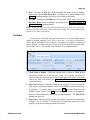
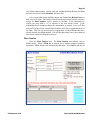
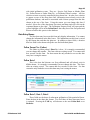
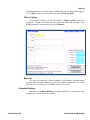
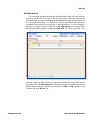
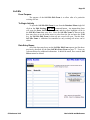
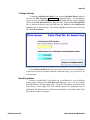
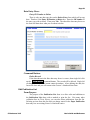
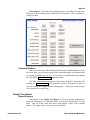
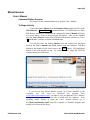
Activating License
Clivia Access is a licensed software product and as such requires a valid License
Key to operate. Two types of License Keys are distributed: permanent and
evaluation. A permanent license key is good until December 31, 2099. An
evaluation license key is good for 30 calendar days after installation or a specific
date, whichever comes first. When you first open Clivia Access and every time
thereafter until a valid, permanent license key is entered, you will see the
following screen.
To use this form, enter exactly the license key you have been given. Include
dashes, use capital letters as shown in your key, and all 0’s are zeros. Then single
left click on Go To Clivia Access . Depending on your license key’s situation,
either Clivia Access will open or an instruction will appear in the Notes section of
the form. Using an evaluation license key will bring up this form every time until
a permanent key is entered. For a valid evaluation license key just use the Notes
instructions and single left click on Go To Clivia Access. Once a valid
permanent license key has been entered, Clivia Access will skip this form and go
directly to the Database Menu.
Note: Although two different types of license keys are distributed, only one
version of the software is included. With both types of license keys you receive a
Clivia Access V1.3
User’s Guide and Reference
Page 10
full featured version of Clivia Access. And any data placed in an evaluation copy
of Clivia Access will still be there when a permanent key is entered. The
restriction on an evaluation license is it will only be valid for a limited number of
days.
Danger: Colorado Clivia does not replace missing, lost, or stolen license keys. It is very
important you keep a copy of your permanent license key in a safe place. Without it, you
cannot re-install the software at a later time.
Getting Started
Introduction
Clivia Access is intended to replace previously used paper processes for
tracking the history and breeding activities involving individual plants. Bringing
a current collection into the database can be a rather large task. Following the
steps listed below can simplify that effort.
Review the Manual
Reviewing this manual should be the first step taken in the implementation of
a Clivia Access system. Of particular importance are the sections on Installing
Clivia Access, Getting Started, and at least a review of Using the Program.
Although the remaining portions of the manual will give new users an idea of the
capabilities and features of the software.
Create Plant Numbering Scheme
Clivia Access requires the use of a Plant No. for each plant in the system. A
Plant No. can be any unique number between 1 and 1,000,000. The numbers do
not have to be used consecutively. No number can be duplicated and Clivia
Access checks each time a number is assigned to make sure the number is not a
duplicate.
However, within the range of possible Plant No‘s. it is possible to classify
plants. For example:
Clivia Access V1.3
A grower who collects several different species may use the 10,000 series of
plant numbers for Clivias, the 20,000 series of plant numbers for Orchids, the
30,000 series of plant numbers for Daylilies, etc.
A grower of variegated Clivias may use the 10,000 series of plant numbers for
one type of variegation, the 20,000 series of plant numbers for another type of
variegation, etc.
A grower emphasizing various colors of Clivia flowers may use the 10,000
series of plant numbers for orange flowers, the 20,000 series of plant numbers
for the red flowers, the 30,000 series for yellow flowers, etc.
User’s Guide and Reference
Page 11
Using the goal of your Clivia collection process as a base, you should
determine your own plant numbering scheme. Determining this scheme before
starting to number plants will greatly simplify the process.
Given that Clivia Access can collect 33 plant characteristics, you may decide
to consecutively number all plants without putting a scheme in place. If need be,
Plant No‘s. can later be changed to any number not already used in the system.
As will be explained later on in this manual, you should save room in your
Plant No. scheme for a significant number of unknown parent plants. When you
first open Clivia Access you will find one plant record already exists. It is Plant
Number 999,999 an unknown plant. Most users will select the 990,000 series of
Plant Nos. for unknown plants and parent plants.
Because of the large amount of numbers available in Clivia Access you should
leave lots of extra numbers in each classification block. That way the system you
devise will handle any increases in your Clivia collection in the coming years. As
you probably already know, Clivia collections never get smaller.
Alternative Plant Number. Clivia Access contains a field named User
Defined Category. User Defined Category can be used for alternative plant
identification labels. This feature has been included because many growers have
historically used an alpha-numeric label to identify individual plants. That
historical label can be placed here. You will still need to have a Plant No. as
described above. The User Defined Category field or data entry box can be used
to search for plants in the Find Plant and Find Pollen reports. Even though
these features exist, it is still strongly recommended that growers with alphanumeric labeling systems convert them to just numbers. The reasons are:
When entering data for Bloom, Division, Pollination, Re-potting and General
Events, data entry is significantly faster and less prone to mistakes using
numbers—particularly for computer operators who are comfortable using the
numeric key pad.
Numeric sorting of lists makes sense to most people, alpha-numeric sorting
usually does not make sense.
Alpha-numeric labels can often be easily converted to Plant Nos. The large
number of available numbers in Clivia Access is helpful in this conversion. If
you would like some suggestions on how to convert your existing labels to the
Plant Numbering scheme please feel free to contact us.
Determine Units and Formats
When it comes to cost, value, or price data, Clivia Access uses the Windows®
Currency format for your particular computer. Different personal computers
may have been setup differently. To see what your particular computer uses for
Currency go to the Windows® Control Panel and select Regional and
Clivia Access V1.3
User’s Guide and Reference
Page 12
Language Options. Select the Regional Options tab. The Currency format
will be shown and can be changed from this dialog box.
Date formats, in all cases, are defined by Clivia Access as the Windows®
Short Date format. Different personal computers may have been setup
differently. To see what your particular computer uses go to the Windows®
Control Panel and select Regional and Language Options. Select the Regional
Options tab. The Short Date format will be shown and can be changed from this
dialog box.
Caution: If you change the Short Date or Currency formats, they will be
changed for all software programs on the machine.
Several data fields in Clivia Access require measurement numbers. You need
to select which measurement units you will use in the program. The measurement
units should have the range to cover various sizes of plant parts (from blossom
size to leaf length). For measurements, the US unit most suitable is inches.
Elsewhere it is probably mm, or cm. The units you select must be consistently
applied from the beginning use of the program. All measurement numbers can
include decimals, but not fractions.
Plant Numbers are up to six digits long, 1 to 1,000,000. When entering these
numbers you do not and should not enter the commas. Clivia Access will do that
for you. If you wish to use a different ―thousands separator‖ than commas, you
can change that through the Windows® operating system, not Clivia Access.
Changes made to the Windows® operating system will apply to all software
programs on the computer, not just Clivia Access. Plant Numbers cannot have
decimal points or decimal places.
Decide User Defined Category Use
The User Defined Category is a single field of many fields of data, which can
be collected for each individual plant. The User Defined Category is not a
defined field and can be used for anything. Individual growers may use this field
differently. Because you can sort on this field, its use can be very powerful. The
field will accept any combination of letters, numbers, spaces, symbols, and some
punctuation marks 30 characters or less in length. User Defined Category does
not have a validation list. Some possible example uses of this field include:
Clivia Access V1.3
Growers who use alphanumeric codes to summarize a plant’s genetics or
reuse old alpha-numeric plant numbers may wish to place that code in the
User Defined Category field.
Because the use of User Defined Category field is optional, users who feel the
other data fields in Clivia Access cover their needs do not need to use this
field.
User’s Guide and Reference
Page 13
Design and Populate Lists
Validation lists are used to check the entries in the Acquired As, Flower
Color, Flower Throat Color, Flower Exterior Color, Flower Edge Color,
Disposition, Breeding Group, Breeder, Flower Shape, Fragrance,
Inflorescence Height, Leaf Color/Style, Leaf Length, Leaf Width, Location,
Pot Description, Propagation Method, Soil Mix, Source, and Species fields. If
an entry is not on the list, Clivia Access will not accept it in the appropriate field.
When first delivered, Clivia Access contains pre-defined validation lists for
everything except Breeding Group, Breeder‘s Name, Location, Pot
Description, Soil Mix, Source and Species. Many pre-defined validation lists
can be easily edited, and if needed all of their entries deleted. Using the processes
in Clivia Access starting on page 61, examine, populate, and edit as needed the
validation lists. While validation lists can have items added while entering plant
data on a form, it is faster and easier to start with some commonly used lists
already in place.
We have successfully used validation lists with up to 10,000 entries. These
long validation lists do not noticeably slow down computer processing.
Therefore, you can be quite detailed and lengthy in your use of validation lists.
The secret to long validation lists is to establish strict organization and format
requirements on the list and to religiously implement those standards without
exceptions. When adding a new item to the list carefully make sure it does not
already exist under another spelling or wording.
Caution: Once you start entering plant data into Clivia Access, it is
recommended you do not delete items from a validation list. Except as noted in
the next paragraph, deleting a validation list item will not delete the same entry
already in the database. Problems will result because selection criteria in reports
are also controlled by validation lists.
Because of the different search routines in the Grower’s Notebook, entries in the
Publication and Source validation lists for the Grower’s Notebook functions can
be deleted if needed.
Caution: Clivia Access will not allow deletion of individual list items in the
Location, Soil Mix, and Source validation lists. Individual items in each list may
be changed – for example if a company changes its name, you can change the
entry in the Source validation list. On these three lists only, any change made in
the validation list will be reflected on all of the various data entry fields, forms
and reports that use that entry.
Collect Data
For growers who have a number of plants to enter into Clivia Access,
collection and organization of the data before beginning the data entry process can
significantly speed the process. Although Clivia Access will allow you to enter
Clivia Access V1.3
User’s Guide and Reference
Page 14
information about a particular plant over time, it is always faster and easier to do
it all at once. Some users may find the sample forms in Appendix B an assist in
collecting some or all of their data for entry into Clivia Access.
Organize Mothers and Fathers First
In Clivia Access, the genetic history of a plant is tracked from the child to the
parents, not the other way around. Also Clivia Access has no ability to add
parents to newly created plants on the fly. These conditions allow Clivia Access
to present a more complete genetic history in the Family Tree Report while
maintaining the integrity of your data. When initially loading Clivia Access with
data on your current collection, enter data on the mother and father plants first.
That way when child plants are entered, the software can find the mother and
father plants already in the system. If the mother and father plants do not exist in
Clivia Access when the child is entered, those data entry boxes will need to be left
blank. Once the parents are established in the system, you can then edit the child
plant’s record to provide the updated information about its parents. It is always
easier to enter mother and father plants first, rather than going back a second time
to enter them later.
Organize for Bulk Entry
Clivia Access gives you two methods to create Plant Records. The first
method requires you to enter all data about a plant from scratch. This method is
ideal for situations when only one or two unique Plant Records need to be
entered, or when a large number of Plant Records must be created that are
significantly different from each other.
However, by organizing plants with similar characteristics together for data
entry, you can use the second method – bulk entry. The Plant Records (in bulk)
form is similar to the ―from scratch‖ form except it remembers what was entered
for the last plant. If you have 10 plants that are identical in every way to each
other, using the bulk entry form will allow you to enter the data for the first plant
and then only provide the Plant No for the next 9 Plant Records. The bulk entry
form can also be used for entering just planted seeds since several seeds will have
the exactly same characteristics. The Plant Record (in bulk) form is also good
for creating Plant Records for plants that are only partially similar. This form will
allow you to only change the data fields that are different from the last plant
entered. Bulk entry is an amazing time saver. You will also notice bulk entry
characteristics for the forms creating Pollination, Bloom, Division, Pot/Repot,
Event Records, and the Bulk Update processes. When using these other forms,
organizing for bulk entry can likewise save lots of time entering data.
Clivia Access V1.3
User’s Guide and Reference
Page 15
Plan on Unknowns
To fully implement the genetic history features of Clivia Access you need to
always fill in the Mother’s Plant No. and if appropriate the Father’s Plant No.
(divisions have no fathers, only mothers; while self pollinated plants have the
same father and mother). This remains true even if you know very little about the
parents of a plant. The use of Unknown Plants and partially Unknown Plants fills
this need. Some examples:
Example 1. A traditional orange Clivia miniata has been in my possession for
over 20 years. I have no idea where I obtained it, let alone any information
about its parents. The father and mother Plant No data entry boxes for this
plant show an Unknown plant (Plant No. 999,999) with all Unknown
characteristics. Plant No. 999,999 has itself as its parents.
Example 2. I obtained some seed from another grower, which was labeled
Clivia miniata Sunrise Sunset x San Marcos Yellow. The parents of the
resulting seedlings were listed in Clivia Access as newly created Plant No’s in
the 999,000 series (my plant’s not owned number section), listed as ―Sunrise
Sunset‖ and ―San Marcos‖ and using Unknown for the characteristics of these
parents. Unknown was used for the characteristics of these fairly well known
Clivias, because I have never seen the parents and the grower did not provide
any of their characteristics. They may be big or small, etc. The parents of the
parents were listed as Plant No. 999,999 or ―Unknown‖ since I have no
information about these plants.
The software when delivered contains only one pre-established plant – Plant
No. 999,999, an Unknown plant with all unknown characteristics. If your plantnumbering scheme uses some other number series for unknown plants, you will
need to change this Plant No. to the one consistent with your numbering scheme.
To change a Plant No. use the Edit Existing: Plant Record command button
on the Database Menu screen.
In addition to Unknown plants, all Validation Lists should contain an
Unknown entry. At a minimum, many of the Validation List Unknowns will be
used on Unknown parents. Other times, you may find it appropriate to use an
Unknown characteristic description for plants you have a significant amount of
information on, but do not know everything.
The difference between an Unknown data entry and no data (or a blank) is
significant. Unknown means you do not know the information and probably will
never know the information. A blank means you do not know the information
right now, but at some point in the future you will probably know the information.
For example, when you plant a seed, you do not know the exact flower color that
will occur as the plant matures. No data (or a blank) in this case is the
recommended selection.
Clivia Access V1.3
User’s Guide and Reference
Page 16
Note: All validation list controlled entries will also accept a blank field entry.
You do not need to create a blank entry in each validation list to use a blank
entry. Clivia Access automatically adds a blank to each validation list, even
though it is not evident when viewing the list from the Edit Lists functions.
Create Print Outs
Clivia Access is intended to be a complete electronic replacement for paper
records on a Clivia collection. However, some people will find it easier to use
some print outs of selected data. All or part of the software’s information can be
easily printed out if needed. In addition, Appendix B of this manual contains
data entry forms to assist in the organization of information prior to entry into
Clivia Access. Depending on how you work, printed data entry forms or printed
validation lists may assist your use of the program.
Using the Program
There are several common features used in Clivia Access to operate the
software. Experienced users of the Windows® Operating System and its
application programs will find these features similar to other programs they use
and some may even find them intuitive. These features are explained below.
On Screen Forms
Except for report previews, all aspects of Clivia Access are shown via onscreen forms. Each on-screen form has a name in the upper right hand corner and
will contain one or more of three general elements – Command Buttons, Data
Entry Boxes, or Red Box Sub-forms.
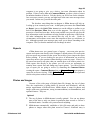
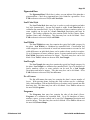
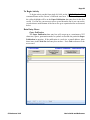
Command Buttons
On many forms, appear rectangular
buttons called Command Buttons. One
such Command Button is shown on the
right. Each Command Button will have a
label that indicates what form, report, or action this particular button will open or
perform. Command Buttons are used to execute commands in Clivia Access.
To activate the command place the mouse cursor over the Command Button and
single left click. The associated command will begin execution. There are
several common Command Button functions that appear on several on-screen
forms and report forms in Clivia Access. They are:
Clivia Access V1.3
Save and Return to Database Menu This Command Button saves the onscreen form’s current information, closes the form, and returns the user to the
Database Menu.
User’s Guide and Reference
Page 17
Save and Return to Previous Screen This Command Button saves the onscreen form’s current information, closes the form, and returns the user to the
previous screen, which in some cases may be the Database Menu.
Return to Database Menu Where all information on an on-screen form is
temporary and would never be saved, you will see this Command Button.
When left clicked, the form is closed and all information on it is lost to future
uses.
Cancel and Return to Database Menu This Command Button does NOT
save the changed information in an on-screen form or does NOT save a new
record with the information. After canceling the operation, the form is closed
and the user returned to the Database Menu. When forms are used to create
multiple records at the same time, only the current record will be cancelled.
Clivia Access automatically saves the record you are adding or editing as soon
as you move the insertion point to a different record. On forms with Red Box
Sub Forms, entry into the sub form will disable the Cancel and Return to
Database Menu command button.
Cancel and Return to Previous Screen This Command Button operates in
a similar manner to Cancel and Return to Database Menu.
Prepare Report This Command Button will prepare a report based on the
on-screen form’s information and show the report in print preview mode. The
report can be inspected, read, etc., and then printed if desired.
Print Report This Command Button will prepare a report based on the onscreen form’s information and then print the report to the Windows® default
printer without any intervening steps. You will not see the report on the
screen first.
Data Entry Boxes
On all forms appear white, yellow or blue boxes. These boxes are Data
Entry Boxes and are used to input or display data.
Clivia Access V1.3
Blue Data Entry Boxes only display information and cannot be changed.
White Data Entry Boxes are available for entry of data by the user.
Only one Yellow Data Entry Box occurs on each on-screen form. And the
yellow highlight moves from one white data entry box to the next. A Yellow
Data Entry Box indicates that a particular box is currently hooked to the
keyboard/mouse and can receive information. When you move to the next
Data Entry Box, the yellow highlight will transfer to the new box making it
ready for data input.
User’s Guide and Reference
Page 18
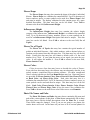
Yellow Data Entry Boxes
where a date entry is
expected will also have a
little calendar symbol next to
them. Single left clicking on
this calendar icon will show
an actual calendar which can
be used to select dates using
the mouse.
Red Boxes
Parts of some on-screen
forms are enclosed in a red line.
This area of the form is a subform. Sub-forms are used when multiple sub-form items can be associated with
one main form item. For example, one particular plant can have many bloom
events, many potting events, and many division events. Or a single bloom can be
pollinated by several different Pollen Parents (Fathers). In each of these cases
you will see a red box sub-form.
Moving About
As discussed previously Command Buttons are used to move from onscreen form to other on-screen forms and reports. Once you are in a form the
yellow highlight on Data Entry Boxes will show where the form’s focus is
currently. To move from Data Entry Box to another Data Entry Box there are two
methods – the mouse and the keyboard. Like Command Buttons you can move
from Data Entry Box to Data Entry Box by single left clicking on your new
destination with the mouse. The yellow highlight will follow. Or you can use
one of the following keyboard keys to move about:
Clivia Access V1.3
TAB. Pressing the TAB key on the keyboard will advance the yellow
highlight to the next Data Entry Box or Command Button. When you reach
the end of a form, the TAB key will move to the next (usually new) record or
start over at the top of the form.
Ctrl + TAB. Simultaneously pressing the keyboard’s Ctrl key and the TAB
key will move the yellow highlight from within a red box to the next stop after
that red box. Simply pressing the TAB key within a red box will only allow
you to circulate within the red sub-form box.
Ctrl + ―Plus Sign‖. Simultaneously pressing the Ctrl key and the + or = key
will advance you to the next record, regardless of where you are currently in
the form. On bulk entry forms this will allow you to accept the default
settings shown and move on to the next record without a lot of keystrokes.
The shown data will be saved as part of the record you just created.
User’s Guide and Reference
Page 19
ESC. Pressing the ESC key on the keyboard will undo all of the changes
made to the current Data Entry Box. It operates in a similar manner to the
Cancel Command Button, only the on-screen form is not closed.
ENTER. Pressing the ENTER key will, on most forms, return you to the
Database Menu screen as though you clicked on the Save and Return to
Database Menu command button.
Note: If you are ever not sure which keyboard keys to press for a particular
situation just look at the form. Most of the forms outline the various keyboard key
sequences in a Note on the form.
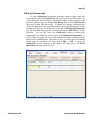
Toolbars
At the top of each form and previewed report is a special Clivia Access
ribbon or toolbar, and the Clivia Access Home tab. For users of Microsoft’s
Office 2007®, this ribbon will be familiar. For others, the ribbon or toolbar will
appear different. In some cases, the various icons will be grayed out and therefore
not available for use. Each of the icons and their use is explained below.
C
l
o
s
e
F
o
r
m
Clivia Access V1.3
Close Form or Report. Closes the current form or report in Clivia Access
and usually returns you to the previous screen. For example, use this icon
when viewing previewed reports to return to the previous screens. Using this
icon on any form is the same as the Cancel and Return to Previous Screen
command button.
Quit Clivia Access. Closes the Clivia Access program. This icon should be
used only in emergency situations, such as when Clivia Access has locked up.
If possible, it is always better to use the Quit command button on the
Database Menu screen. The Quit command button cleans up the database,
and does other maintenance before leaving Clivia Access. The Quit Clivia
Access icon does not.
Page Setup. Sets the margins and other print page setups for the current form
or report. For 8.5 inch by 11.0 inch paper, all forms and reports have been
properly preset and no changes should be necessary.
User’s Guide and Reference
Page 20
Clivia Access V1.3
Zoom. Increases or decreases the magnification of reports when previewed
on the screen. Not available for on-screen forms.
Zoom 2 Pages. A present zoom setting which displays two pages side by side
on the user’s display monitor. This setting is particularly useful for some of
the Family Tree reports.
Quick Print. Prints the current form or report using the Windows® default
printer. There are no options with this print command.
Print Dialog. Displays the standard Windows Print Dialog box, where the
user can select different printers, print ranges, number of copies, and other
print options.
Cut. The standard Window’s cut function.
Copy. The standard Windows copy function.
Paste. The standard Windows paste function. Particularly useful when used
to paste the License Key into the Check License form.
User’s Guide and Reference
Page 21
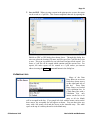
Save As PDF. When viewing a report in the print preview screen, the report
can be saved as a *.pdf file. This icon accomplishes that task by opening the
Publish as PDF or XPS dialog box shown above. Through this dialog box
users can select the location, file name, and file type of the *.pdf file they wish
to save. This icon is available for use with forms and previewed reports. For
forms, a *.pdf file will be created which contains only the current view. For
reports, the entire report will be created as a *.pdf, unless you instruct
otherwise using the Options command button in the dialog box.
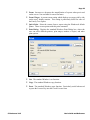
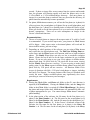
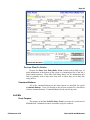
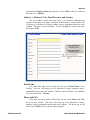
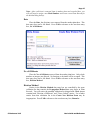
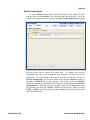
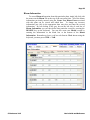
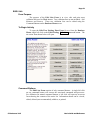
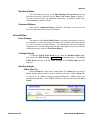
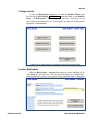
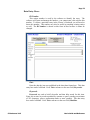
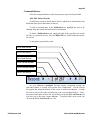
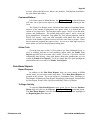
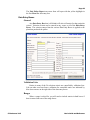
Validation Lists
Many of the Data
Entry Boxes in on-screen
forms have down arrows
on the right hand side of
the box. These Data
Entry Boxes are backed
up by validation lists. In
a Data Entry Box with a
Validation List, only
entries on the list or no
entry at all (its blank)
will be accepted in the box. If you single left click with the mouse cursor on the
down arrow, the acceptable list will appear as shown. You can then select any
entry with a left mouse click and the cursor on the intended entry. The white
space at the top of each drop down list is the blank entry.
Clivia Access V1.3
User’s Guide and Reference
Page 22
When you first go to a Data Entry Box with a Validation List and start keying
in the information, the software will search the list of valid entries and show the
first candidate. If the entry is correct, even though you have only entered a couple
of characters, you can TAB to the next Data Entry Box and the computer will
complete the entry. If Smithson is in a validation list and you wish to add Smith,
enter Smith followed by a space. Otherwise, the computer will assume you want
Smithson and will fill in the missing characters automatically.
If after keying in the entry, the computer cannot find the entry on the
validation list, a message will appear. At that point you can choose to add the
current entry to the list or go back and change the entry to an existing one. The
two most common causes of a ―Not In List‖ message are different spellings or
different spelling orders. For example (minor differences in red type),
Grow Mix 1 is different from Grow Mix #1 and would not be accepted
Mix #1 – Grow is different from Grow Mix #1 and would not be accepted
Growe Mix #1 is different from Grow Mix #1 and would not be accepted
Even though we as humans would probably figure they are all the same thing.
When you add to validation lists be careful to spell entries correctly and always
check for slightly different duplicates.
Caution: Validation lists are also used in Clivia Access for finding information
on reports. Deleting items from some validation lists is possible, but never
recommended once you start entering plant data. Deleting in such a case will
prevent you from being able to find the record containing deleted validation list
items. Changing or deleting validation list entries does not change or delete all
of the information on already created records, except for Location, Soil Mix, and
Source entries.
Many validation lists, such as leaf length and leaf width use a range of values
for a particular entry. This grouping is done for three reasons. First, not all
leaves will be the same length on a particular plant, but all of the leaves of a plant
can be characterized within a group. Second, finding a plant using this
characteristic is easier if a general description is used instead of specific
measurements. And third, many other Clivia classification systems use ranges
instead of specific measurements.
Because entries in validation list controlled fields are limited to a certain
number of characters and spaces, you may be required to use some abbreviations.
If you enter more characters than allowed, Clivia Access will only accept the first
characters entered.
All Clivia Access validation lists cannot accept reserved characters. See the
next section for more information.
Clivia Access V1.3
User’s Guide and Reference
Page 23
Reserved Characters
All database programs that use Visual Basic as the programming language,
like Clivia Access, reserve some characters for use in executing program
functions. These are called reserved characters. In Clivia Access, any entry that
has to be processed by the software is setup so it will disregard any entry of a
reserved character. Other fields that do not need to be processed by the software
can use these reserved characters. The primary area where you will notice this
limitation is in the validation list entries. Take the Source entries as an example.
The Company Name entry is a validation list controlled entry and will not accept
the entry of reserved characters. However, the backup fields for Company Name
such as Address, City, Phone Number, etc. will accept the entry of reserved
characters. The easiest method for users to use the software is to just go ahead
and enter the data as you normally would. If you use one or more of the reserved
characters in a processed field, Clivia Access will simply disregard that entry of
reserved characters. If on the other hand you enter a reserved character in a field
that is not processed, Clivia Access will include it. No action is needed on your
part, just an understanding on why certain fields will ignore certain characters you
have tried to enter. The reserved characters for Clivia Access are:
Character
,
.
;
:
`
‗
―
?
/
>
<
[
]
{
}
\
|
~
!
@
#
Clivia Access V1.3
Name
Comma
Period
Semicolon
Colon
Acute
Apostrophe (single quote)
Quote (double quote)
Question
Solidus (slash)
Greater than
Less than
Left square bracket
Right square bracket
Left curly brace
Right curly brace
Reverse solidus (backslash)
Vertical bar (pip)
Tilde
Exclamation
Commercial at
Number (pound, hash)
User’s Guide and Reference
Page 24
Character
$
%
^
&
*
(
)
=
+
Name
Dollar
Percent
Carot
Ampersand
Asterisk
Left parenthesis
Right parenthesis
Equal
Plus
Error Messages
As you work with Clivia Access you will receive three different types of error
messages. The first type of error message will communicate in regular English
and make sense to plant growers. Calling these messages ―errors‖ is often
incorrect. Error messages are often used to communicate to users what is about to
happen. Some examples:
Plant No does not exist. You will receive this message when entering a bad
plant number on Pollination, Bloom, Division, Repot, and Event Record
forms. You may also receive it when trying to edit an existing plant record or
enter Mother and Father Plant Nos.
Duplicate Plant No. You will receive this message when entering new Plant
Nos. on the New Plant Record, New Plant Records (in bulk), and Edit
Existing Plant Record forms that have already been used for other plants.
―Not In List‖ error messages, previously explained.
The second type of error message will still be in English but will have
some computer language. The most common occurrence of this type of message
is a ―Wrong Data Type‖ message, which you will receive when trying to enter
text into a Data Entry Box that is expecting either a number or date.
The third type of error, and very rare, may cause the program to shutdown
and return you to the Windows Desktop®. However, in most cases these errors
will be ignored by Clivia Access. These error messages are characterized by the
statement ―An error has occurred in Clivia Access‖. Following this statement will
be an error number and a more complete description. If the problem continues,
please write down the error message and let us know what it was.
Error messages will have one or more command buttons. If there is only
one Command Button it will say OK. Clicking on OK does not mean you
agree, just that you have seen the message. A single OK button means the
Clivia Access V1.3
User’s Guide and Reference
Page 25
computer is not going to give you a choice, just some information about its
problem. If there is more than one Command Button, you have a choice, but not
an unlimited number of choices. Pick the choice you feel is best for the situation.
In a worst-case scenario, you may end right back at the same error message where
you started. In that case, just take the other path.
The absolute worst thing that can happen is Clivia Access will lock up.
Locking up is an extremely rare event. At that point you can use the Close Form
or Report icon or the Quit Clivia Access icon on the ribbon or toolbar to get
back to the Database Menu form or to exit the program. The software is very
protective of itself and your data. In the worst possible case you will only lose the
new information on the record that was being worked on at the time of the lockup.
All other information that was entered that day will be safe. Under no
circumstances will software errors cause the computer to blow up, melt down, or
die. Although repeated error messages may cause you to throw something at the
computer. Don’t, at best the machine will not change its mind.
Reports
Clivia Access uses two general types of reports – on-screen print preview
reports and reports sent directly to the computer’s default printer. On screen print
preview reports are presented on the screen first to allow you to inspect the report
before printing. If you are looking for one piece of information, an on-screen
report may answer your question without having to waste any paper. Likewise, if
the on-screen report is not quite what you wanted, there is no need to print it out.
With reports sent directly to the printer you will receive no opportunity to
examine these reports first and change any report options. You can tell which
type of report you are going to receive by examining the Command Button
creating the report. Command Buttons that say Prepare Report mean prepare a
report for on-screen viewing. While Print Report means prepare the report and
send it to the printer without viewing on screen first.
Photos and Images
Because of the wide range of digital photo file formats, the size of photo
files, the complexities of using photos in Access® and Windows®, and the
unique requirements of different users, Clivia Access is setup for photos and
images with some requirements, strong recommendations, recommendations, and
optional features. They are:
Optional:
The use of photos in Clivia Access is totally optional. You can use photos
none of the time or only use photos in particular plant records or Grower’s
Notebook entries. In either case you need not do anything.
Clivia Access V1.3
Clivia Access automatically establishes a link (file name and path) to three
photos or images when each plant record or Grower’s Notebook entry is
User’s Guide and Reference
Page 26
created. If photo or image files are not entered into the system until months
later, the program will function equally well until the photos arrive in the
C:\Clivia\Photo or C:\Clivia\NBook\Image directory. And once photos or
images for a particular plant or notebook entry are placed in the directory, all
photo functions automatically become operational.
For plants, Clivia Access assumes you will use the first photo (or A photo) for
a flower picture, the second photo (or B photo) for an overall plant photo, and
the third photo (or C photo) for a detailed picture of either the flower or leaf.
What you decide to use the three photos for is up to each user, despite Clivia
Access’ assumptions. There are no such assumptions on images in the
Grower’s Notebook functions.
Recommendations:
The use of vertical photos or images with an aspect ratio of 2x wide by 3x tall
is recommended. If you use this aspect ratio, your pictures in Clivia Access
will be bigger. Other aspect ratios or horizontal photos will work and be
shown in their entirety, just not as large.
Depending on which portions of the software you are using, Clivia Access
may restrict the size digital photos used. The Edit/View Existing Plant onscreen form, and the Photo reports will function with low to high resolution
photos. The Family Tree report can only use low to moderate resolution
photos. Photos do not all need to be the same resolution for use in Clivia
Access. If you are only going to use your Clivia photos via Clivia Access,
photos larger than 216 pixels wide by 324 pixels tall for on-screen viewing
and the Family Tree report are excessive. If you are going to make photo
quality prints via the Photo reports in Clivia Access, photos larger than 900
pixels wide by 1350 pixels tall are excessive. All functions within Clivia
Access do function with 900 x 1350 pixel sized photos or images, including
the Family Tree Reports. The image portions of the Grower’s Notebook work
exactly the same. Higher resolution photos may significantly slow down
processing or cause out of memory error messages.
Requirements:
Placing the Clivia folder, and Photo sub folder on the C:\ root directory is
required (C:\Clivia\Photo). Placing the NBook folder, and the Image sub
folder in the Clivia folder is required (C:\Clivia\NBook\Image). By placing
the photo and image folders here, Clivia Access will automatically take care
of photo management for you. You cannot change Clivia Access’ automatic
photo handling.
Clivia Access V1.3
In the plant section of the software, the file name for the first photo (or A
photo) is the Plant Number + A. The file name for the second photo (or B
photo) is the Plant Number + B. And the file name for the third photo (or C
photo) is the Plant Number + C. In the Grower’s Notebook section of the
software, the file name for the first photo (or A photo) is the Entry ID
Number + A. The file name for the second photo (or B photo) is the Entry
User’s Guide and Reference
Page 27
ID Number + B. And the file name for the third photo (or C photo) is the
Entry ID Number + C.
Clivia Access V1.3
Using the Clivia Access photo file default type of *.jpg is required because
then Clivia Access will automatically take care of photo management for you.
By using the Photo or second Image folder, file naming scheme, and default
photo file type for photos means Clivia Access will enter the necessary data
and find the photos when they become available. You need not take any
action. For example, by default, Clivia Access expects the file name and path
for the three photos for plant number 115 to be: C\Clivia\Photo\115A.jpg,
C\Clivia\Photo\115B.jpg, and C:\Clivia\Photo\115C.jpg.
If a particular photo needs to be rotated, cropped, or modified in any manner,
you will need to perform that function in the digital camera, or using a
separate stand alone photo manipulation or photo organization application
program. Many digital cameras and scanners already come with these
application programs for your computer.
User’s Guide and Reference
Page 28
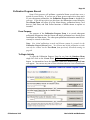
Database Menu
The first screen you will always see when you open Clivia Access is the
Database Menu screen. All portions of the program are executed from here and
you will always return to the Database Menu after completing a particular
function. To execute a particular function place your mouse cursor over the
appropriate command button and single left click. That function will begin. Each
function is described in the following pages.
Clivia Access V1.3
User’s Guide and Reference
Page 29
Create New
Plant Record
Form Purpose
The purpose of the Enter New Plant Form is to create a new plant record.
To Begin Activity
To open this form for use from the Database Menu single left click on the
Create New: Plant Record command button. The form will open and the
yellow highlight will be in the Plant No. data entry box.
Data Entry Boxes
Plant No.
A Plant No. is required for all plants in Clivia Access.
A valid Plant No. is:
1 or greater,
Less than 1,000,000, and
Not currently used by another plant in the database.
After a valid Plant No. is entered a plant record has been created. When a
Plant No. is entered, do so without commas separating thousands. Clivia Access
will automatically add them. After entering a valid Plant No., press TAB to
advance to the next field, Species.
Species
Your common name of the plant’s Species is entered here. Species Common
Name is a validation list controlled field. This data entry box can be left blank.
The common name of a plant’s Species is whatever you normally call the plant.
If you are creating a new Species common name, the validation list addition
process will allow you to enter the full scientific name of the plant’s species.
Since the Species common name field is limited to 40 characters and spaces, you
may need to use abbreviations. Press TAB to advance to the next field, Source.
Source
The Source data entry box contains the Company Name where you obtained
the plant. Source is a validation list controlled field. A Company Name can be
any combination of letters, numbers, and some spaces or punctuation marks up to
30 characters long and must be unique. This data entry box can be left blank.
Individuals without Company Names can have their name used as the Company
Name. And since for a certain number of your plants you are the Source, do not
forget to create yourself as a Source in the validation list. When adding a Source
to the validation list you can also enter address and contact information. Through
the Reports: List Reports command button you can print out your list of
Clivia Access V1.3
User’s Guide and Reference
Page 30
Sources much like an address book. Press TAB to advance to the next field,
Acquired As. The Breeder’s Name can be different than the Source. See later is
this section for those entries.
Acquired As
The Acquired As data entry box contains the state of the plant when you first
obtained it. Acquired As is a validation list controlled field. This data entry box
can be left blank. The entry can be any combination of letters, numbers, spaces or
some punctuation marks up to 20 characters long and must be unique. In the
standard Acquired As validation list that comes with Clivia Access is a Not
Acquired entry. Us this entry for parents and other plants you have never owned.
Press TAB to advance to the next field, Price.
Price
The Price data entry box contains the price you paid to acquire the plant.
This data entry box can be left blank. The entry can only be a number with a
variable number of decimal places. Entering currency symbols will cause an error
message. For a plant obtained from your own garden, use a price of 0. Press
TAB to advance to the next field, Date Planted.
Clivia Access V1.3
User’s Guide and Reference
Page 31
Date Planted
The Date Planted data entry box contains the date you first planted this
plant. This data entry box can be left blank. Only a ―short date‖ entry will be
allowed. The purpose of this data entry box is to let you know the age of the plant
or when you obtained the plant. When plants are subsequently repotted, that
information is placed in the repot portions of the database, not here. Press TAB
to advance to the next field, Mother Plant No.
Mother Plant No.
The Mother Plant No. data entry box contains the Plant No. for the mother
or pod parent of this plant. Mother Plant No. operates like a validation list
controlled field. However, if the mother does not exist as a plant in the database,
you will not be given an opportunity to add it at this time. This data entry box can
be left blank. Without this information the database will not be able to determine
the genetic history of this plant. When a Mother Plant No. is entered, do so
without commas separating thousands. Clivia Access will automatically add
them. Press TAB to advance to the next field, Father Plant No.
Father Plant No.
The Father Plant No. data entry box contains the Plant No. for the father or
pollen parent of this plant. Father Plant No. operates like a validation list
controlled field. However, if the father does not exist as a plant in the database,
you will not be given an opportunity to add it at this time. This data entry box can
be left blank. Plants created from divisions or using tissue culture techniques do
not have fathers, so leaving this data entry box blank is also appropriate in these
cases. When a Father Plant No. is entered, do so without commas separating
thousands. Clivia Access will automatically add them. Press TAB to advance to
the next field, Location.
Location
The Location data entry box contains the current location of the plant.
Location is a validation list controlled field. Up to 30 characters of letters,
numbers, spaces, or some symbols can be used for a Location Description and
must be unique. This data entry box can be left blank. Location is included in
the database to help you find particular plants – particularly if you have a large
number to sort through. Where planting areas are large enough to house more
than 50 plants, you may wish to divide the area into smaller Location descriptions
to make finding a particular plant easier. Press TAB to advance to the next field,
Propagation.
Propagation
The Propagation data entry box contains the method used to create the plant.
Propagation is a validation list controlled field. Up to 20 characters of letters,
numbers, spaces, or some symbols can be used for a Propagation Label and must
Clivia Access V1.3
User’s Guide and Reference
Page 32
be unique. This data entry box can be left blank. Press TAB to advance to the
next field, Fruit Color.
Fruit Color
The Fruit Color data entry box contains the color of the fruit at maturity.
Fruit Color is a validation list controlled field. Up to 30 characters of letters,
numbers, spaces, or some symbols can be used for a Fruit Color Description and
must be unique. This data entry box can be left blank. Fruit Color, Flower
Interior Color, Flower Exterior Color, Flower Throat Color and Flower Edge
Color all use the same Color validation list. Press TAB to advance to the next
field, Disposition.
Disposition
The Disposition data entry box shows how the plant was disposed of when it
left the collection. That information is often not available at this time. However,
the Disposition validation list includes three special entries:
―Current
Collection‖, ―For Sale‖, and ―Not Acquired‖. By using these disposition entries
where appropriate, additional search and sort options are available in the
preparation of reports. Press TAB to advance to the next field, Breeding Group.
Breeding Group
The Breeding Group lists the general breeding group of the plant. This data
entry box was included because often times flower color or Species are very
specific. By grouping your plants into general categories, searches often produce
better results. Breeding Group is a validation list controlled field. Up to 30
characters of letters, numbers, spaces, or some symbols can be used in the
Breeding Group data entry box and must be unique. This data entry box can be
left blank. Press TAB to advance to the next field, Breeder.
Breeder
The Breeder data entry box is for the breeder’s name, particularly if it is
different from the source. Breeder is a validation list controlled field. Up to 30
characters of letters, numbers, spaces, or some symbols can be used in the
Breeder data entry box and must be unique. This data entry box can be left
blank. Press TAB to advance to the next field, User Defined Category.
User Defined Category
The User Defined Category data entry box is a user-defined field. User
Defined Category is NOT validation list controlled. Up to 30 characters of
letters, numbers, spaces, or some symbols can be used in the User Defined
Category data entry box. This data entry box can be left blank. Press TAB to
advance to the next field, Pigmented Base.
Clivia Access V1.3
User’s Guide and Reference
Page 33
Pigmented Base
The Pigmented Base? Check box is where you can indicate if the plant has a
pigmented base. Check for a pigmented base, leave blank for a green base. Press
TAB to advance to the next field, Leaf Color/Style.
Leaf Color/Style
The Leaf Color/Style data entry box is used to record variegation and other
leaf style characteristics – but not leaf length or width. Leaf Color/Style is a
validation list controlled field. Up to 30 characters of letters, numbers, spaces, or
some symbols can be used for a Leaf Color/Style Description and must be
unique. The backup validation list also contains fields for the Chinese Name,
Japanese Name, and a Definition. This data entry box can be left blank. Press
TAB to advance to the next field, Leaf Width.
Leaf Width
The Leaf Width data entry box contains the typical leaf width category for
the plant. Leaf Width is a validation list controlled field. Classification leaf
width categories are used instead of actual leaf measurements to account for leaf
width differences on individual plants, and to produce better results in searches.
Up to 30 characters of letters, numbers, spaces, or some symbols can be used for a
Leaf Width Description and must be unique. This data entry box can be left
blank. Press TAB to advance to the next field, Leaf Length.
Leaf Length
The Leaf Length data entry box contains the typical leaf length category for
the plant. Leaf Length is a validation list controlled field. Up to 30 characters of
letters, numbers, spaces, or some symbols can be used for a Leaf Length
Description and must be unique. This data entry box can be left blank. Press
TAB to advance to the next field, No. of Leaves.
No. of Leaves
The No. of Leaves data entry box contains the plant’s current number of
leaves. With growing plants, keeping this field accurate may be a challenge.
Only whole numbers, with no decimal places or fractions can be entered into this
data entry box. This data entry box can be left blank. Press TAB to advance to
the next field, Fragrance.
Fragrance
The Fragrance data entry box contains the odor of the plant’s flower.
Fragrance is a validation list controlled field. Up to 20 characters of letters,
numbers, spaces, or some symbols can be used for a Fragrance Description and
must be unique. This data entry box can be left blank. Press TAB to advance to
the next field, Flower Shape.
Clivia Access V1.3
User’s Guide and Reference
Page 34
Flower Shape
The Flower Shape data entry box contains the shape of the plant’s individual
blooms. Flower Shape is a validation list controlled field. Up to 30 characters of
letters, numbers, spaces, or some symbols can be used for a Flower Shape Label
and must be unique. The backup validation list also contains space for a more
detailed Description. This data entry box can be left blank. Press TAB to
advance to the next field, Inflorescence Height.
Inflorescence Height
The Inflorescence Height data entry box contains the relative height
category of the inflorescence. Inflorescence Height is a validation list controlled
field. Up to 20 characters of letters, numbers, spaces, or some symbols can be
used for an Inflorescence Height Description and must be unique. This data
entry box can be left blank. Press TAB to advance to the next field, No. of
Tepals.
Flower No. of Tepals
The Flower No. of Tepals data entry box contains the typical number of
pedals on individual blossoms. Only whole numbers, with no decimal places or
fractions can be entered into this data entry box. This data entry box can be left
blank. Usually this data entry box will contain a default value of 6, the usual
number for a Clivia. If your plant has more or less tepals, just enter the new
value. It will replace the number 6. Press TAB to advance to the next field,
Flower Interior Color.
Flower Colors
Clivia Access uses four data entry boxes to describe the color of flowers.
Even with four data entry boxes, the software may not adequately describe in an
orderly manner, complicated flower-coloring schemes. For those complicated
flower coloring schemes use the Plant Remarks data entry box. Data entry boxes
are provided for Flower Interior Color, Flower Exterior Color, Flower Throat
or Basal Color, and Flower Edge Color. Each color data entry box is a
validation list controlled field. Up to 30 characters of letters, numbers, spaces, or
some symbols can be used and must be unique. This data entry box can be left
blank. Fruit Color, Flower Interior Color, Flower Exterior Color, Flower
Throat Color, and Flower Edge Color all use the same Color validation list.
Press TAB to advance to the next flower color field or move on to Remarks.
Photo File Names and Paths
The Photo File Names and Paths data entry boxes contain the file name and
path of the various photos of this plant. Clivia Access automatically fills in these
data entry boxes with the default descriptions when the Plant No. is created.
These fields cannot be changed. Even if you are not going to use photos, the
entries shown will work. In the future all you have to do to activate photos for
Clivia Access V1.3
User’s Guide and Reference
Page 35
this plant is to place the photos named using the default schemes in the default
folder. Clivia Access will manage the photos from there.
Remarks
The Remarks data entry box is an all-purpose place to record notes about the
plant. At Colorado Clivia we often use this data entry box for the breeder’s
comments. A virtually unlimited number of letters, numbers, spaces, and some
symbols can be used here. The data entry box can be left blank. Press TAB to
advance to the next, new record.
Command Buttons
All of the Command Buttons on this form are common to Clivia Access and
their use has been previously described. Command Buttons can be used at any
time.
Plant Records (in Bulk)
Form Purpose
Like the Enter New Plant Form just described, the purpose of the Enter
New Plant (Bulk) Form is to create a new plant record. However, the Enter
New Plant (Bulk) Form fills in all data entry boxes using information from the
last record entered. This allows users to minimize the amount of keyboard
information needing entry.
To Begin Activity
To open this form for use from the Database Menu single left click on the
Create New: Plant Records (in bulk) command button. The form will open and
the yellow highlight will be in the Plant No. data entry box. The new Plant
Record is created when the form is opened, because much of the information is
available. If the information is not correct you can change it. And if everything is
wrong you can left click on the Cancel and Return to Database Menu
command button and not create a new record.
Data Entry Boxes
All of the data entry boxes on this form operate as described for the Enter
New Plant Form. Users are directed to the previous section for a discussion of
those data entry boxes. When the In Bulk form is first opened all of the data
entry boxes, except for Plant No., will be filled in with default values from the
previous new plant record. If the previous record had blank data entry boxes,
those blanks will be repeated here. Users should enter a valid Plant No., press
TAB to check the Plant No. and advance to the next field, check all other data
entry box information for accuracy, change only the incorrect information and
then press Ctrl + ―plus sign‖ to advance to the next new record. You can then
create a second new record for another new Plant No.
Clivia Access V1.3
User’s Guide and Reference
Page 36
Previous Plant No Entries
Because the Enter New Plant (Bulk) Form is often used for bulk entry of
plant information, at the bottom of the screen is a chronological list of the last 4
plant numbers entered. These Blue Data Entry Boxes are for information only
and are generally used to help users keep track of where they are in their data
entry process.
Command Buttons
All of the command buttons on this form operate as described for typical
Command Buttons. Users are directed to the previous sections for a discussion
of those command buttons. Command Buttons can be used at any time.
Soil Mix
Form Purpose
The purpose of the New Soil Mix Entry Form is to create new soil mixes for
Clivia Access’ validation list and to record the recipe for each mix.
Clivia Access V1.3
User’s Guide and Reference
Page 37
To Begin Activity
To open this form for use from the Database Menu single left click on the
Create New: Soil Mix command button. The form will open and the yellow
highlight will be in the Soil Mix Name data entry box.
Data Entry Boxes
Soil Mix Name
Soil Mix Name is the soil mix entry that appears on other forms in Clivia
Access. It is the validation list entry. So pick a name that is easy to remember. A
Soil Mix Name can be up to 30 characters of letters, numbers, spaces and some
symbols. The entry must be unique – no duplicate Soil Mix Names are allowed.
An entry is required. Press TAB to advance to the first line of the soil mix recipe,
Parts.
Clivia Access V1.3
User’s Guide and Reference
Page 38
Parts
Because many soil mix recipes are made by volume, Clivia Access uses
Parts. Parts allow easily up and down sizing a recipe depending on how much
mix you need. The Parts field will only accept whole numbers. Decimals,
fractions, letters, spaces, punctuation marks, or symbols are not allowed. If a
particular soil mix recipe requires an entry like 1½ cups clean sand, the entire
entry will need to be placed in the Materials blank. Press TAB to advance to the
Materials data entry box on the same line.
Material
The Material data entry box is a description of individual materials used to
make this particular soil mix. Material can contain up to 30 characters of letters,
numbers, spaces, punctuation marks, and some symbols. Anything that cannot be
placed in the Parts data entry box can be placed here. Press TAB to advance to
the Parts data entry box on the next line.
Command Buttons
Only typical Command Buttons previously described are used on this form.
See previous sections for their descriptions.
Note: The only way to print out a soil mix recipe is to use the Quick Print or
Print Dialog icons on the ribbon or toolbar on this form or on the Edit Soil Mix
form.
Source
Form Purpose
The purpose of the Enter New Source Form is to create new source
Company Names for the validation list and to record other address book type
information.
To Begin Activity
To open this form for use from the Database Menu single left click on the
Create New: Source command button. The form will open and the yellow
highlight will be in the Company Name data entry box.
Data Entry Boxes
Company Name
The Company Name data entry box contains up to 30 characters of letters,
numbers, spaces, punctuation marks or some symbols for use in identifying the
source of your plants. Company Name is a required field if you going to create a
source record, and must be unique. Entries in the Company Name data entry box
make up the validation list for Source, and appear on other forms in Clivia
Access. If your plant came from an individual, the individual’s name can be
Clivia Access V1.3
User’s Guide and Reference
Page 39
placed in the Company Name data entry box. Press TAB to advance to the next
data entry box, Address1.
Address 1, Address 2, City, State/Province, and Country
The use of these various data entry boxes is very flexible, although most
people will use them in a manner consistent with their titles. Each of these will
accept up to 30 characters of letters, numbers, spaces, punctuation marks or some
symbols. The boxes can be left blank. To move through the various data entry
boxes press TAB.
Postal Code
Like other data entry boxes on this form the use of Postal Code is very
flexible. This box will accept up to 10 characters of letters, numbers, spaces,
punctuation marks, and some symbols. The box can be left blank. Press TAB to
move to the next box – Country.
Phone and FAX
Like other data entry boxes on this form, the use of the Phone and FAX
boxes are very flexible. The boxes will accept up to 20 characters of letters,
numbers, spaces, punctuation marks and some symbols. The boxes can be left
blank. Press TAB to move to the next data entry box.
Clivia Access V1.3
User’s Guide and Reference
Page 40
Email
This data entry box is for the email address of the source Person/Company.
Placing an email address here creates and saves a hyperlink to the email address.
If email addresses are entered in an email standard format, users later on can
single left click on this hyperlink and cause your email program to open a new
email addressed to this person.
Contact
Like other data entry boxes on this form, the use of Contact box is very
flexible. The box will accept up to 50 characters of letters, numbers, spaces,
punctuation marks and some symbols. The box can be left blank. Press TAB to
start the process over on another new record.
Command Buttons
Only typical Command Buttons, previously described, are used on this
form. See previous sections for their description.
Bloom Record
Form Purpose
The Create New Bloom Form is designed to record bloom and initial
pollination events at the same time. Users are strongly encouraged to wait and
record bloom information when the initial pollination information is also
available. While it is possible to record pollination information via other
methods, recording an initial pollination on this form is significantly faster and
easier. Users who like to record subsequent pollinations of the same bloom can
do so using the Pollination Progress Form, not this form
Note: Growers may have plants that they do not pollinate. Clivia Access does
not require, pollination and seed harvest information for every bloom. The
Create New Bloom Form can be used to enter bloom events without pollination
information.
To Begin Activity
To open this form for use from the Database Menu single left click on the
Create New: Bloom Record command button. The form will open and the
yellow highlight will be in the Plant Number data entry box.
Data Entry Boxes
As you look at the Create New Bloom Form, you may find that certain
information about the plant’s flowers is missing. Much of the flower information,
such as color and shape, is contained in the Plant Record, not in the Bloom
Record. That is because color and shape of a flower is primarily controlled by the
plant’s genetics and does not change from bloom to bloom. By placing the fixed
information in the Plant Record, there is significantly less data entry required.
Clivia Access V1.3
User’s Guide and Reference
Page 41
Any bloom characteristics missing from the combined Bloom Record and Plant
Record can be placed in the Remarks data entry box.
Like several other forms in Clivia Access, the Create New Bloom Form is a
bulk entry style form. The entries from the last bloom entered into the software,
except for Plant Number, will be shown as a default. If the information is
correct just press Ctrl + ―+‖ to advance to the next bloom record. If the
information needs changing change the information as needed. Users will also
notice a list of previously entered Plant Numbers in the lower right hand corner of
the form. This list is to assist users by keeping track of which blooms they have
already entered into Clivia Access. Like all blue data entry boxes, the content of
these boxes cannot be changed by the user.
Plant Number
Enter the Plant Number here. The Plant Number must already exist in
Clivia Access. When a Plant No. is entered, do so without commas separating
thousands. Clivia Access will automatically add them. Press TAB to advance to
Clivia Access V1.3
User’s Guide and Reference
Page 42
the next data entry box, Bloom Date.
Bloom Date
Enter the date the plant bloomed here. Although Clivias bloom over a period
of several days, enter only one representative date here. Bloom Dates are used to
differentiate between different bloom events, so for a plant that blooms only once
or twice a year Bloom Dates do not need to be perfectly accurate. Never the less,
you still need to enter a specific date—month, day and year in your computer’s
short date format. Press TAB to advance to the next data entry box, Umbel
Diameter.
Umbel Diameter
Umbel Diameter is the diameter of the flower sphere or umbel. Umbel
Diameter is measured in the units you have previously established and can have
one decimal place. Fractions are not allowed. This data entry box can be left
blank. Press TAB to advance to the next data entry box, Blossom Size.
Blossom Size
Blossom Size is the size or width of the individual blossoms in an umbel.
Blossom Size is measured in the units you have previously established and can
have one decimal place. Fractions are not allowed. This data entry box can be
left blank. Press TAB to advance to the next data entry box, No of
Blooms/Scape.
No of Blooms/Scape
Enter the number of individual blooms or flowers per scape or main stalk
here. Only whole numbers or integers are allowed. This data entry box can be
left blank. Press TAB to advance to the next data entry box, Sepal Size.
Sepal Size
In Clivia, individual blossoms are comprised of two rings of parts called
tepals. The outer ring has typically three sepals and the inner ring has three
petals. Sepal Size is the size or width of one sepal. Sepal Size is measured in the
units you have previously established and can have one decimal place. Fractions
are not allowed. This data entry box can be left blank. Press TAB to advance to
the next data entry box, No. of Scapes/Plant.
No. of Scapes/Plant
Enter the number of umbels, flower spheres, scapes or flower stalks per plant
here. Only whole numbers or integers are allowed. This data entry box can be
left blank. Press TAB to advance to the next data entry box, Petal Size.
Petal Size
Petal Size is the size of one petal (see Sepal Size description above). Petal
Size is measured in the units you have previously established and can have one
Clivia Access V1.3
User’s Guide and Reference
Page 43
decimal place. Fractions are not allowed. This data entry box can be left blank.
Press TAB to advance to the next data entry box, Remarks.
Remarks
Use up to 250 characters of letters, numbers, some symbols, and punctuation
marks to add information about the bloom that you feel is important. A brief
description of the bloom or comments to yourself about the bloom are some
typical uses. Remember there are Remarks data entry boxes elsewhere for
comments about the plant. Only Remarks about the bloom need be placed here.
If you are not going to enter pollination information at this time, press CTRL +
plus sign to go to the next record, or click on the Save and Return to Database
Menu command button. If you are going to enter pollination information at this
time, press TAB to advance to the next data entry box Pollen Parent No.
Pollination: Pollen Parent No. (Father)
Place the Plant Number of the parent or father of the pollen used to pollinate
this bloom here. The Plant No. of the Pollen Parent must already exist in Clivia
Access. This is a required field. Press TAB to advance to the next data entry box,
1st Pollinated Date.
Pollination: 1st Pollinated Date
Enter the date, in short date format, the bloom was first pollinated here.
Subsequent pollination of the same blossom is recorded on the Pollination
Progress Form described elsewhere. Press TAB to advance to the next data entry
box, Tag.
Pollination: Tag
Many growers use colored tags or other forms of identification to identify on
the individual blossoms which pollen parent was used on that particular blossom.
That color or tag description can be entered here. Use of this data entry box is
optional. You can use it never, some of the time, or always depending on your
Clivia collection. If the flowers have been pollinated by more than one Pollen
Parent create additional pollination records for each Pollen Parent No. by
pressing the TAB key. Pressing CTRL + TAB will move the cursor out of the
red pollination box.
Command Buttons
Only typical Command Buttons, previously described, are used on this
form. See previous sections for the descriptions.
Note:
Once a first pollination event is recorded on this form, subsequent pollinations of
the same flower can be recorded using the Pollination Progress Record process.
The Pollination Progress Record is not functional if the first pollination event is
not recorded here. See the following section for details.
Clivia Access V1.3
User’s Guide and Reference
Page 44
Pollination Progress Record
Some Clivia growers will pollinate a particular bloom several times over a
period of several weeks. If you are one of those growers and wish to keep track
of your subsequent pollinations, the Pollination Progress Form is designed for
your use. If you do not wish to use this form, the information created using the
New Bloom Form will allow all of the bloom history, pollination history, seed
harvest, Find Plant, and Find Pollen functions of Clivia Access to operate as
intended.
Form Purpose
The purpose of the Pollination Progress Form is to record subsequent
pollination information when the bloom and initial pollination have already been
established in Clivia Access. The subsequent pollination information entered here
can only be viewed via this form.
Note: New initial pollination records and blooms cannot be created via the
Pollination Progress Record form. New bloom and initial pollination records
can only be created via the New Bloom form previously described starting on
page 40.
To Begin Activity
To open the Pollination Progress Form for use from the Database Menu
single left click on the Create New: Pollination Progress Record command
button. An intermediate form, the Selection Criteria for Pollen Progress Form
will appear. You can use any one of four selection criteria to view recent blooms
Clivia Access V1.3
User’s Guide and Reference
Page 45
with initial pollination events. They are: Species, Pod Parent or Mother Plant
No., Pollen Parent or Father Plant No., or Pollinated Plant Location. All four
selection criteria are strictly controlled by drop down lists. In order for a criterion
to appear on one of the drop down lists, information must already exist in the
pollination database, and must be associated with a bloom younger than the date
shown at the top of the form. Using the mouse you can change this date if
needed. Select one of the drop down list criteria and then single left click on the
command button to the right. The Pollination Progress Form will open and the
yellow highlight will be in the Pollen Date 2 data entry box of the first pollen and
bloom record for this species in the database.
Data Entry Boxes
The blue data entry boxes on this form only display information. You cannot
change the information in the blue boxes. The information on this form is sorted
by the bloom date and then the plant no. In addition to these fields, a location
blue box field is also shown to help the user find individual plants.
Pollen Parent No. (Father)
The father or pollen parent’s Plant No. is here. It is strongly recommended
you not change this number. This form edits an existing record. You cannot add
new records via this form. For that reason the only method to access this data
entry box is using the mouse.
Pollen Date 1
This is the date the blossom was first pollinated and will already exist in
Clivia Access. It is strongly recommended you not change this date. This form
edits an existing record. You cannot add new records via this form. For that
reason the only method to access this data entry box is using the mouse.
Pollen Date 2, Date 3, Date4
These fields are the dates of subsequent pollination of this particular bloom.
Enter the date in the short date format. Use of all three of these data entry boxes
is optional. Pressing the TAB key will advance to the next Pollen Date or to
Remarks.
Clivia Access V1.3
User’s Guide and Reference
Page 46
Remarks
Use up to 250 characters of letters, numbers, some symbols, and punctuation
marks to add information about the pollination that you feel is important.
Remember there are Remarks data entry boxes elsewhere for comments about
the plant, and its blooms. Only Remarks about the pollination need be placed
here.
Command Buttons
Only typical Command Buttons, previously described, are used on this
form. See previous sections for their descriptions.
Division Record
Form Purpose
The purpose of the Create New Division Form is to record when and how
many divisions are removed from a mother plant.
Like several other forms in Clivia Access, the Create New Division Form is
a bulk entry style form. The entries from the last bloom entered into the software,
except for Plant Number, will be shown as a default. If the information is
correct just TAB to the next data entry box. If the information needs changing
change the information as needed.
Note: Although tissue culture of Clivias is fairly rare at this time, that may
change in the future. Tissue culture is a form of division and should be recorded
using the Create New Division Form as well.
To Begin Activity
To open this form for use from the Database Menu single left click on the
Create New: Division Record command button. The form will open and the
yellow highlight will be in the Plant Number data entry box.
Data Entry Boxes
Like several other forms in Clivia Access, the Create New Division Form is
a bulk entry style form. The entries from the last division entered into the
software, except for Plant Number, will be shown as a default. If the
information is correct press Ctrl + ―plus sign‖ to move to another new record. If
the information needs changing change the information as needed.
Plant Number
Place the Plant Number of the mother plant giving up the divisions or tissue
culture cells. The Plant Number must already exist in a Plant Record in Clivia
Access. When a Plant No. is entered, do so without commas separating
thousands. Clivia Access will automatically add them. Press TAB to advance to
the next data entry box, Date.
Clivia Access V1.3
User’s Guide and Reference
Page 47
Note: After a division is removed from its mother plant and recorded here, you
will still need to assign a new Plant Number and create a new Plant Record for
the divided/baby plant(s).
Date
Place the Date, the divisions were removed form the mother plant here. This
data entry box can be left blank. Press TAB to advance to the next data entry
box, No. of Offshoots.
No. of Offshoots
Place the No. of Offshoots removed from the mother plant here. Only whole
numbers or integers are allowed. No fractions or decimals will be accepted. This
data entry box can be left blank. Press TAB to advance to the next data entry
box, Division Method.
Division Method
Entries in the Division Method data entry box are controlled by the same
validation list that controls the Propagation Method data entry boxes in Plant
Records. You will notice the standard validation list shipped with Clivia Access
contains both ―Division of Offshoots‖ and ―Tissue Culture‖ entries. Use of other
entries from that validation list in the Create New Division Form may be
inappropriate. Press TAB to advance to the next data entry box, Remarks.
Clivia Access V1.3
User’s Guide and Reference
Page 48
Remarks
Use up to 250 characters of letters, numbers, some symbols, and punctuation
marks to add information about the division that you feel is important. Use of this
data entry box is optional. Press TAB to create a new record.
Command Buttons
Only typical Command Buttons, previously described, are used on this
form. See previous sections for the descriptions.
Pot Record
Form Purpose
The purpose of a Pot Record is to document when and with what you pot or
repot individual plants.
Like several other forms in Clivia Access, the Create New Pot Form is a
bulk entry style form. The entries from the last bloom entered into the software,
except for Plant Number, will be shown as a default. If the information is
correct just TAB to the next data entry box. If the information needs changing
change the information as needed. Users will also notice a list of previously
entered Plant Numbers in the lower right hand corner of the form. This list is to
assist users by keeping track of which blooms they have already entered into
Clivia Access. Like all blue data entry boxes, the content of these boxes cannot
be changed by the user.
To Begin Activity
To open this form for use from the Database Menu single left click on the
Create New: Pot Record command button. The form will open and the yellow
highlight will be in the Plant Number data entry box.
Data Entry Boxes
Like several other forms in Clivia Access, the Create New Pot Form is a
bulk entry style form. The entries from the last pot event entered into the
software, except for Plant Number, will be shown as a default. If the
information is correct press Ctrl + ―plus sign‖ to move to another new record. If
the information needs changing change the information as needed.
Plant No.
Enter the Plant No. of the repotted plant here. The Plant No. must already
exist in a Plant Record in Clivia Access. Press TAB to advance to the next data
entry box, Date. Or press Ctrl + ―Plus sign‖ to create a new record and then
enter the next repotted plant number.
Date
Enter the Date the plant was repotted here. Press TAB to advance to the next
data entry box, Pot.
Clivia Access V1.3
User’s Guide and Reference
Page 49
Pot
Place the description of the new Pot here. Pot is a validation list controlled
entry. If the Pot description does not exist as you have keyboarded it into the
computer, you will be asked to define a new Pot. Press TAB to go to advance to
the next data entry box, Soil Mix.
Soil Mix
Enter the Soil Mix description of the new soil used to repot the plant. This
data entry box is controlled by the Soil Mix validation list. If the Soil Mix does
not exist as you have keyboarded it into the computer, you will be asked to define
a new Soil Mix. Press TAB to advance to the next data entry box, Remarks.
Remarks
Use up to 250 characters of letters, numbers, some symbols, and punctuation
marks to add information about the potting that you feel is important. Use of this
data entry box is optional. Press TAB to create a new record.
Command Buttons
Only typical Command Buttons, previously described, are used on this
form. See previous sections for the descriptions.
Clivia Access V1.3
User’s Guide and Reference
Page 50
Event Record
Form Purpose
For some growers, events other than blooms, repotting, division, and
pollination may need to be documented. The general Event Record form allows
for that documentation. The Event Record is designed to be very easy to use for
a variety of events. One feature in an Event Record not available in other types
of records is the Follow Up Date. By placing a date in the Follow Up Date field,
a report can be generated to remind you to do the follow up. A good example of
this would be the use of extended release fertilizer. Creating a extended release
fertilizer event with a follow up date will allow you several months from now to
create a report showing when you need to renew the extended release fertilizer.
Like several other forms in Clivia Access, the Create New Event Form is a
bulk entry style form. The entries from the last event entered into the software,
except for Plant Number, will be shown as a default. If the information is
correct just TAB to the next data entry box. If the information needs changing
change the information as needed. Users will also notice a list of previously
entered Plant Numbers in the lower right hand corner of the form. This list is to
assist users by keeping track of which plants they have already entered into Clivia
Access. Like all blue data entry boxes, the content of these boxes cannot be
changed by the user.
Note: Event records are entered one plant at a time. If you have an event that
impacts all plants, you may wish to use the Greenhouse Diary function. Like
individual plant Event Records, Greenhouse Diary entries can have a follow up
date.
To Begin Activity
To open this form for use from the Database Menu single left click on the
Create New: Event Record command button. The form will open and the
yellow highlight will be in the Plant No. data entry box.
Data Entry Boxes
Plant No.
Enter the Plant No. here. The Plant No. must already be a Plant Record in
Clivia Access. Press TAB to advance to the next data entry box, Date.
Date
Place the Date the Event occurred in this data entry box. Press TAB to
advance to the next data entry box, Event.
Event
Use up to 100 characters of letters, spaces, some symbols, and punctuation
marks to describe the Event. In many cases, it is good practice to use a short
Clivia Access V1.3
User’s Guide and Reference
Page 51
summary statement as the first sentence followed by a more complete description.
Press TAB to advance to the next data entry box, Follow Up Date.
Follow Up Date
If you need to follow up on the Event place a Follow Up Date in this data
entry box. A blank in this data entry box means no follow up is needed. Press
TAB to advance to the next data entry box, Remarks.
Remarks
Use up to 250 characters of letters, numbers, some symbols, and punctuation
marks to add information about the event that you feel is important. Use of this
data entry box is optional. Press TAB to create a new record.
Command Buttons
Only typical Command Buttons, previously described, are used on this form.
See previous sections for the description.
Clivia Access V1.3
User’s Guide and Reference
Page 52
Edit Existing
Plant Record
Form Purpose
The purpose of the Edit/View Existing Plant Form is to allow all of the
information about a particular plant and its history to be viewed on the same
screen(s). That same information can also be edited, added or deleted from this
on-screen form.
To Begin Activity
To open the Edit/View Existing Plant Form for use from the Database
Menu single left click on the Edit Existing: Plant Record command button. An
intermediate form will open (the Enter Plant Number Form) and the yellow
highlight will be in the Plant Number data entry box. Place the Plant Number
of interest in the data entry box and press the TAB key, the Edit/View Existing
Plant Form for that plant will open with the yellow highlight in the Plant No.
data entry box. If the Plant Number does not exist in the database, you will get an
error message.
Data Entry Boxes
General
All of the data entry boxes previously discussed for the New Plant, New
Bloom, New Division, New Pot, and New Event forms operate the same way on
this form and its Tabs. Any existing data shown can be changed to a new value or
converted to a blank. Validation lists control the entries in any data entry box
with a down arrow on the right of the box, just like previously described. And
you can move about the form using the TAB or CNTL + TAB keys, or left
clicking with the mouse. Because of the forms length, individual subject areas
have been placed on separate Tabs. You will need to left single click on the Tabs
at the top of the page to go to the various subject areas.
Clivia Access V1.3
User’s Guide and Reference
Page 53
Plant No.
If needed, the Plant No. associated with this plant can be changed to a new
number. The new number cannot currently be duplicated in Clivia Access. Do
n
o
t
e
n
t
e
r
a
n
e
w
P
l
a
n
t
N
o
.
in this data entry box in an attempt to change the screen to another plant—it will
not work. Do not try to leave the Plant No. data entry box blank—it will cause
problems. Press TAB to advance to the next field.
Disposition
In order to preserve family history information, you can never delete a plant
from Clivia Access. You can however identify individual plants as being
disposed of in the Disposition data entry box. That way when a plant dies, is sold
or given away, or fails to germinate you can still maintain its genetic information
as well as history. Disposition is a validation list controlled entry and can be left
blank until needed. Many users will find it helpful when using the Find Plant
Reports function if for plants currently in the collection, a Current Collection
entry is placed in the disposition field. That way you can limit your search to
plants you currently own. Or for parent plants you have never owned, use a Not
Acquired entry in the disposition field.
Clivia Access V1.3
User’s Guide and Reference
Page 54
Division Information
To access Division information about this particular plant, single left click
with the mouse on the Division Tab at the top of the on-screen form. All of the
information previously entered using the Create New Division Form associated
with this plant can be viewed and edited here. To change any incorrect
information just click in the appropriate data entry box and enter the revised
information. By left clicking in the grey box on the left side of each line of
Division Information you can then delete that particular Division record by
pressing the DELETE key on the keyboard. You can also create new Division
records by entering the information in the blank line at the bottom of the Division
Information list. Remember to leave a red box sub-form in Clivia Access using
the keyboard, you must press CTRL + TAB or use the mouse. When you press
CTRL + TAB to leave the red box sub-form, Clivia Access will take you to the
Pot Tab and sub-form.
Clivia Access V1.3
User’s Guide and Reference
Page 55
Pot Information
To access Pot information about this particular plant, single left click with the
mouse on the Pot Tab at the top of the on-screen form. All of the information
previously entered using the Create New Pot Form associated with this plant can
be viewed and edited here. To change any incorrect information just click in the
appropriate data entry box and enter the revised information . By left clicking in
the grey box on the left side of each line of Pot Information you can then delete
that particular Pot record by pressing the DELETE key on the keyboard. You
can also create new Pot records by entering the information in the blank line at
the bottom of the Pot Information list. Remember to leave a red box sub-form in
Clivia Access using the keyboard, you must press CTRL + TAB. Doing so will
advance you to the Bloom Tab.
Clivia Access V1.3
User’s Guide and Reference
Page 56
Bloom Information
To access Bloom information about this particular plant, single left click with
the mouse on the Bloom Tab at the top of the on-screen form. All of the bloom
information previously entered using the Create New Bloom Form associated
with this plant can be viewed and edited here. To change any incorrect
information just click in the appropriate data entry box and enter the revised
information. By left clicking in the grey box on the left side of each line of
Bloom Information you can then delete that particular record by pressing the
DELETE key on the keyboard. You can also create new Bloom records by
entering the information in the blank line at the bottom of the Bloom
Information. Remember to leave a red box sub-form in Clivia Access using the
keyboard, you must press CTRL + TAB.
Clivia Access V1.3
User’s Guide and Reference
Page 57
Pollen/Seed Information
To access Pollen/Seed information about this particular plant, single left
click with the mouse on the Pollen/Seed Tab at the top of the on-screen form. All
of the pollination and seed harvest information related to this particular plant
previously entered using the Create New Bloom form and the Seed Harvest
form can be edited from this screen. To change any incorrect information just
click in the appropriate data entry box and enter the revised information. By left
clicking in the grey box on the left side of each line of Pollen/Seed Information
you can then delete that particular record by pressing the DELETE key on the
keyboard. You can also create new Pollen/Seed records by entering the
information in the blank line at the bottom of the Pollen/Seed Information. If
you do create new pollen or seed records remember the bloom information must
already exist in Clivia Access. Remember to leave a red box sub-form in Clivia
Access using the keyboard, you must press CTRL + TAB. Leaving the
Pollen/Seed red box sub-form in this manner will send you to the Event
Information sub-form on the next Tab.
Clivia Access V1.3
User’s Guide and Reference
Page 58
Event Information
To access Event information about this particular plant, single left click with
the mouse on the Event Tab at the top of the on-screen form. All of the
information previously entered using the Enter New Event Form associated with
this plant can be viewed and edited here. To change any incorrect information
just click in the appropriate data entry box and enter the revised information. By
left clicking in the grey box on the left side of each line of Event Information
you can then delete that particular Event record by pressing the DELETE key on
the keyboard. You can also create new Event records by entering the information
in the blank line at the bottom of the Event Information list. Remember to leave
a red box sub-form in Clivia Access using the keyboard, you must press CTRL +
TAB. Leaving the Event red box sub-form in this manner will take you to the
Pictures tab.
Clivia Access V1.3
User’s Guide and Reference
Page 59
Pictures
To access Picture information about this particular plant, single left click with
the mouse on the Picture Tab at the top of the on-screen form. Up to three
pictures can be associated with any plant’s record in Clivia Access. There are no
operable controls on this tab. Clivia Access uses an automated process for
pictures, the file name and path for three pictures were automatically entered
when the plant record was first created. If those pictures do not exist in the
default folder no pictures will be shown on this page, and a note will appear in the
blue data entry box below the location for each picture. If the pictures do exist in
the default folder, Clivia Access will display them as shown. Please note, the
flower pictures on the left are horizontal pictures. Clivia Access has displayed the
entire picture but in a smaller space than the one vertical picture on the right. If
you need to change a picture you will need to change the photos names in
C:\Clivia\Photo to the file names used here. Changing the file name there will
update the picture in this on-screen form.
Caution: Clivia Access only keeps track of the file location for the photo, not the
photo itself. If you move the photo file to another location, Clivia Access will not
be able to find it.
Clivia Access V1.3
User’s Guide and Reference
Page 60
Caution: If you need to change the Plant No. for a particular plant, you will
need to manually change the photo’s file name in the Photo directory. Changing
the plant number changes the file name and path link on this tab automatically.
Command Buttons
At the bottom of all Tabs in the Edit/View Existing Plant Form are four
command buttons. They can be used at any time, by a single left click of the
mouse.
If after viewing the first plant using the Edit/View Existing Plant Form, you
wish to view a second plant, you will need to close this form and return to the
Enter Plant Number Form to identify the new plant by its Plant Number. To
do this single left click on the Save and Edit/View Another Plant or the
Cancel and Edit/View Another Plant command button. If the Save option is
selected, any changed information on the current form will be saved. If the
Cancel option is selected, any changed information on the current form will be
returned to its original state.
Because of the complexity of this form, using one of these command buttons
may take some time for your computer to execute the command. Please be aware
of the delay.
Clivia Access V1.3
User’s Guide and Reference
Page 61
Edit Lists
Form Purpose
The purpose of the Edit Lists Form is to view, edit, and print most
validation lists used in Clivia Access. Two validation lists are not included – Soil
Mixtures and Sources. These two validation lists can be edited using the
Command Buttons on the Database Menu screen.
To Begin Activity
To open the Edit/View Existing Plant Form for use from the Database
Menu, single left click on the Edit Existing: Edit Lists command button. The
on-screen form shown below will open.
Command Buttons
The Edit Lists Form consists of only command buttons. A single left click
on any command button will execute the associated commands and processes.
For validation list named command buttons, a left click will open an on-screen
form showing the contents of the entire list. Information shown can be viewed,
edited, deleted (not recommended), added to, or printed.
Clivia Access V1.3
User’s Guide and Reference
Page 62
Delete List Item
Deleting a list item is not recommended after you have started entering
plant data. For most validation lists, deleting an item from the validation list,
does not remove the same entries in the plant database. To delete an item from
the list, single left click in the gray box at the left side of the line containing the
item. Then press the DELETE key on the keyboard.
Add List Item
If an addition must be made to a list, the user should check to make sure the
addition does not duplicate entries already on the list. To add a new item, simply
type in the item in the blank data entry box(es) at the bottom of the list. Be
careful to correctly spell the addition. Some list items are limited to 20 characters
and spaces while others are limited to 30 characters and spaces. You may need to
use abbreviations. Try to be consistent with other abbreviations and formats
already used in the list.
Edit List Item
Like deletions, edits can cause serious problems when using report selection
criteria. To edit an item, highlight or select the element to be changed with the
mouse, and make the changes.
Caution: Changes (edits) made to the Location, Soil Mix, and Source validation
lists change and update all information in the database. Clivia Access will not
allow deletion of items on one of these special lists because deletions will cause
problems.
Print List
A single left click on the Print Report command button will send a copy of
the list to the default Windows printer. Unlike some reports, you do not get to see
the report first. Since what you see on the list form, is very similar to the report,
you should not need to preview the report first. That is the reason Clivia Access
takes this approach on these printouts.
Clivia Access V1.3
User’s Guide and Reference
Page 63
Soil Mix
Form Purpose
The purpose of the Soil Mix Edit Form is to allow edits of a particular
existing soil mix.
To Begin Activity
To open the Soil Mix Edit Form for use from the Database Menu single left
click on the Edit Existing: Soil Mix command button. An intermediate form
will open (the Enter Soil Mix Name Form) and the yellow highlight will be in
the Soil Mix Name data entry box. Place the Soil Mix Name of interest in the
data entry box or use the down arrow to select from the list and press the TAB
key, the Soil Mix Edit Form for that soil mix record will open. On this form,
Soil Mix Name is validation list controlled so only existing soil mixes can be
edited.
Data Entry Boxes
All of the data entry boxes on the Soil Mix Edit Form operate just like those
previously described for the New Soil Mix Entry Form on page 37. Users are
referenced there for additional information. It should be noted, once created, Soil
Mixes cannot be deleted.
Clivia Access V1.3
User’s Guide and Reference
Page 64
Command Buttons
Only typical Command Buttons, previously described, are used on this
form. See previous sections for the description.
Source
Form Purpose
The purpose of the Edit Existing Source Form is to edit the information for
existing sources. Once created, sources cannot be deleted, but they can be
changed. Any information changed by this process is used to update all other
source references.
To Begin Activity
To open the Edit Existing Source Form for use from the Database Menu
single left click on the Edit Existing: Source command button. An intermediate
form will open (the Enter Source Name Form) and the yellow highlight will be
in the Source/Company Name data entry box. Place the Source/Company
Name of interest in the data entry box or use the arrow to select from the drop
down list and press the TAB key, the Edit Existing Source Form for that record
will open. On this intermediate form, Source/Company Name is validation list
controlled so only existing sources can be edited.
Clivia Access V1.3
User’s Guide and Reference
Page 65
Data Entry Boxes
All of the data entry boxes on the Edit Existing Source Form operate just
like those previously described for the Enter New Source Form on page 38.
Users are referenced there for additional information. It should be noted, once
created, Sources cannot be deleted.
Command Buttons
Only typical Command Buttons, previously described, are used on this
form. See previous sections for the description.
Stored Pollen
Form Purpose
The purpose of the Stored Pollen Form is to manage stored pollen as part of
the collection. On this one form pollen entries can be added, edited, and deleted
as a user’s inventory of pollen changes. The information created and managed
using this form is used in conjunction with the various plant records to provide the
information used to create the Find Pollen Report.
To Begin Activity
To open the Stored Pollen Form for use from the Database Menu single
left click on the Edit Existing: Stored Pollen command button. The Stored
Pollen Form will open with the yellow highlight in the Pollen Plant No. data
entry box.
Data Entry Boxes
Pollen Plant No.
Enter the Plant No. of the source of the pollen. This Plant No. must exist in
Clivia Access‘s plant records or an error message will result. When a Plant No.
is entered, do so without commas separating thousands. Clivia Access will
automatically add them. Press TAB to advance to the next data entry box, Date
Stored.
Clivia Access V1.3
User’s Guide and Reference
Page 66
Date Stored
Using your computer’s short date format enter the date the pollen was placed
in storage in this data entry box. Press TAB to advance to the next data entry
box, Storage Method.
Storage Method
Up to 20 characters of letters, numbers, spaces, and some symbols may be
entered in the Storage Method data entry box to describe the storage method.
Press TAB to advance to the next data entry box, Remarks.
Remarks
Up to 250 characters of letters, numbers, spaces, punctuation and some
symbols may be entered in the Remarks data entry box. Many users will use this
data entry box for a narrative about the source plant. Press TAB to go to the next
record, or create a new record.
Add, Edit, Delete Records
To add a new record or stored pollen item to the list, add the new information
to the blank data entry boxes at the bottom of the list.
To edit an existing entry in the stored pollen list, highlight the area to be
changed using the mouse and enter the new information.
To delete a stored pollen record, single left click in the gray/blue box on the
left side of a particular stored pollen line or record. Press the DELETE key on
the keyboard to delete the record.
Command Buttons
Only typical Command Buttons, previously described, are used on this
form. See previous sections for the description.
Note: Clivia Access provides two different reports to manage pollen inventories.
The first report, Stored Pollen, is simply a print out including all pollen records in
a format similar to the Stored Pollen Form. The second report allows users to
specify criteria based on the pollen’s source plant. The second report is called
the Find Pollen Report.
Seed Harvest
Form Purpose
The purpose of the Seed Harvest Form is to allow the addition of seed
information to previously established pollination records.
Clivia Access V1.3
User’s Guide and Reference
Page 67
To Begin Activity
To open the Seed Harvest Form for use from the Database Menu single left
click on the Edit Existing: Seed Harvest command button. An intermediate
form will open (the Enter Plant No. for Seeds Form) and the yellow highlight
will be in the Pod Parent Plant No. data entry box. Place the Pod Parent Plant
No. of interest in the data entry box and press the TAB key, the Seed Harvest
Form for that record will open. The yellow highlight will now move to the first
No. of Seeds Produced.
If the Pod Parent Plant No. does not exist in Clivia Access or if pollination
events have not been recorded within the listed date range, you will receive an
error message.
Data Entry Boxes
Because an individual Clivia bloom can be pollinated by several different
pollen parents (fathers), the Seed Harvest Form gives you a list of available
pollinated blooms for this mother plant. Using the information in the Blue Data
Entry Boxes, select (single left click with the mouse) the appropriate line of
pollination and then enter the seed harvest information. Remember, Blue Data
Entry Boxes cannot be changed.
Clivia Access V1.3
User’s Guide and Reference
Page 68
No. of Seeds Produced
Enter the number of seeds produced by this particular pollination event in this
data entry box. No decimals, letters, or fractions are allowed. Press TAB to
advance to the next data entry box, Date Seed Harvested.
Date Seed Harvested
In the Short Date Format enter the date the seeds were harvested here. This
date is important since it is used to create the Seed Inventory Report. If needed
because of multiple pollinations of this umbel, other lines in this form can be
edited by advancing to that line using the TAB key or mouse.
Command Buttons
Only typical Command Buttons, previously described, are used on this
form. See previous sections for the description.
Bulk Update
Form Purpose
Individual plants can have their characteristics updated using the Edit
Existing: Plant Record functions. However, many times you need to update
one characteristic for several records. The easiest method to accomplish this
update is to use the Bulk Update functions. Using this series of functions you
can quickly update plant locations, number of leaves, disposition status, the sale
price/value, pigmented base, and flower colors. Since these characteristics either
change often, or are not known when the plant is first obtained, the bulk update
functions can be very helpful.
Clivia Access V1.3
User’s Guide and Reference
Page 69
To Begin Activity
To open the Bulk Update Forms for use from the Database Menu single
left click on the Edit Existing: Bulk Updates command button on the Database
Menu. The Bulk Update – Select Type form will open. From here you can
select which plant characteristic you wish to update by single left clicking on the
appropriate command button.
Location Bulk Update
When the Bulk Update – Location form opens the yellow highlight will be
in the Plant No. data entry box. Enter the first plant number to be updated here.
(Plant Numbers do not have to be entered in any particular order.) Then press
Clivia Access V1.3
User’s Guide and Reference
Page 70
TAB to advance to the Location (Proposed Value) data entry box. When you
press TAB, the software checks to make sure the Plant Number exists in the
system. If the Plant Number does not exist you will get an error message. TAB
also causes the three blue boxes in the middle of the form to be filled in. These
blue boxes are there to help verify you have entered the right plant. Like all blue
boxes, these cannot be changed.
In the Location data entry box you can use the down arrow and select from
the list, or just type in the value you want. If the value is not included in the
validation list, you will be asked if you wish to add it, much like on other forms.
After filling in the Plant No. and Location data entry boxes you can do one
of two things. First, you can left click on the Update Record command button.
The record for the listed Plant No. will be updated, and a red label will appear
indicating the update occurred. You other option is to just press ENTER on the
keyboard. The same update process will occur and the yellow highlight will
automatically return to the Plant No. data entry box, ready for the next entry.
Notice the blue Previous Entries data entry boxes down the left side of the form.
These are there to help you keep track of the updates you have made. Like all
blue boxes the entries cannot be changed. If you make a mistake, you need to edit
the plant using the Edit Existing: Plant Record function.
Once you have set the Location data entry box to the correct listing for
several plants, you can just enter the plant’s numbers in the Plant No. data entry
box and then press ENTER, enter the next plant’s number, then press ENTER,
etc. Each time you press ENTER, the listed plant’s information will be updated.
When you need to change to another Location, just press TAB as you did in the
beginning.
Clivia Access V1.3
User’s Guide and Reference
Page 71
Number of Leaves Bulk Update
The Number of Leaves—Bulk Update form operates in a similar manner to
the Locations—Bulk Update form just described. No. of Leaves should be
entered without commas, and no decimal places.
Disposition Bulk Update
The Disposition—Bulk Update form operates in a similar manner to the
Locations—Bulk Update form just described.
Clivia Access V1.3
User’s Guide and Reference
Page 72
Sale Price/Value Bulk Update
The Sales Price/Value—Bulk Update form operates in a similar manner to
the Locations—Bulk Update form just described. The only difference is the
Sales Price/Value data entry box is not validation list controlled. Like elsewhere
in Clivia Access, Sale Price can have two decimal places, and should be entered
with no currency symbol.
Pigmented Base Bulk Update
The Pigmented Base—Bulk Update form operates in a similar manner to
the Locations—Bulk Update form just described. The only difference is that
Pigmented Base is a checkbox.
Clivia Access V1.3
User’s Guide and Reference
Page 73
Flower Colors Bulk Update
The Flower Colors—Bulk Update form operates in a similar manner to the
Locations—Bulk Update form just described. The only difference is that the
Flower Colors--Bulk Update form updates all four color categories at once. Do
not leave one data entry box blank, unless a blank value is what you wish to enter.
Clivia Access V1.3
User’s Guide and Reference
Page 74
Grower’s Notebook
The Grower‘s Notebook in Clivia Access is designed as a place to
electronically file all of that information you would like to keep, and later find,
about a wide range of growing subjects. A single left click on the Grower‘s
Notebook command button on the Database Menu will take you to the
Grower‘s Notebook switchboard menu shown below. From here you can create
new entries, find, edit and print existing entries, and delete previous entries. You
can also edit the Publication and Source Lists, both validation lists used in the
functioning of the Grower’s Notebook functions.
Command Buttons
Single left click on any of the command buttons to go to that particular
function. Pressing the ENTER key will also take you back to the Database
Menu. Each command button is further explored below.
Create Notebook Entry
Form Purpose
The purpose of the Grower‘s Notebook – Create Entry form is to create a
new entry in your grower’s notebook.
To Begin Activity
To open this form from the Grower‘s Notebook start switchboard, single left
click on the Create Notebook Entry command button. The Create Entry form
will open and the yellow highlight will be in the Date data entry box.
Clivia Access V1.3
User’s Guide and Reference
Page 75
Data Entry Boxes
ID Number
This unique number is used by the software to identify the entry. The
software will create and manage the number—you cannot enter, edit or delete this
number. To delete a particular entry in the Grower’s Notebook you will need to
know this number. This number may also be useful in searching existing entries
as well. The ID Number is shown on this form in blue because it cannot be
changed.
Date
Enter the date the item was published in the short date format here. This data
entry box can be left blank. Press Tab to advance to the next field, Keywords.
Keywords
Keywords are used to briefly describe and then help search for this item.
Enter one or more keywords separated by commas or spaces, totaling a maximum
of 255 characters, spaces, punctuation marks or some symbols. This data entry
box can be left blank. Press Tab to advance to the next field, Headline.
Clivia Access V1.3
User’s Guide and Reference
Page 76
Headline
Enter the subject matter Headline here using a maximum of 75 characters,
spaces, or some symbols. This data entry box can be left blank. Press Tab to
advance to the next field, Source.
Source
Source is the subject matter expert who created this entry. Source is usually
a person, while the Paper Publication or Web Site is the item used to publish the
expert’s material. For a book, the Source would be the author and the
Publication would be the book’s title, publisher, copyright date, etc. For an
online newsgroup, the Source would be the person posting the material and the
Web Site would be the newsgroup’s Internet URL. Enter the Source here using a
maximum of 75 characters, spaces, or some symbols. Source is a validation list
controlled entry. You can select previously used sources from the drop down list
or enter a new one. If a new source is entered, you will be asked if you would
like to add it to the validation list, much like on other Clivia Access forms with
validation lists. As elsewhere, be careful to correctly spell new entries and not
duplicate existing entries. The Source data entry box can also be left blank.
Press Tab to advance to the next field, Paper Publication.
Paper Publication
The Paper Publication box in Clivia Access is the same as a footnote in a
scientific paper minus the author’s name. Enter the Publication here using a
maximum of 255 characters, spaces, or some symbols. Because Paper
Publication is a validation list controlled entry, you cannot use any of the
reserved characters. Since most Web Site addresses include many reserved
characters, a separate data entry box is provided for them. The Paper
Publication data entry box is intended for traditional publishing mechanisms.
You can select previously used sources from the drop down list or enter a new
one. If a new publication is entered, you will be asked if you would like to add it
to the validation list, much like on other Clivia Access forms with validation lists.
The Paper Publication data entry box can also be left blank. Press Tab to
advance to the next field, Web Site.
Web Site
The Web Site data entry box is where you can place the Internet URL
(address) for items published electronically. Placing an URL here creates a
hyperlink. Single left clicking on this hyperlink, when shown on the screen, will
open your Internet browser and take you to the web site listed. It is recommended
you include the complete URL—including the http: This data entry box can be
left blank. Press Tab to advance to the next field, Entry.
Entry
The Entry data entry box is where the content of your entry is placed. This
data entry box is special because it will accept up to 65,000 characters, spaces,
Clivia Access V1.3
User’s Guide and Reference
Page 77
punctuation, all symbols, and even allow rich text based formatting. Since the
entries in this data entry box are the essence of your Grower’s Notebook entry, do
not leave blank, although you can. Press Tab to create another new entry in your
Grower’s Notebook.
Suggestion: The easiest method to transfer electronic information to the
Web Site or Entry data entry boxes, especially when it is long and
complicated is to use the Windows copy and paste functions. To transfer
an entry from the Internet, highlight then press Copy in your Internet
Browser. Then go to Clivia Access and using the icon on the ribbon or
toolbar, Paste it in either the Web Site or Entry data entry boxes.
Information transferred in this manner will maintain much of its original
formatting.
Images
Images for a Grower’s Notebook entry are handled exactly like photos are
handled for individual plant records. When a new Grower’s Notebook entry is
recorded, three links to images are created. Then when images with the proper
file name and format are added to the C:\Clivia\NBook\Image directory those
features become fully functional. Image names are the particular entry’s ID
Number plus A, B, or C. The file type and extension must be jpg. So the file
names of the three images associated with the Grower’s Notebook entry
associated with ID Number 126 are: 126A.jpg, 126B.jpg, and 126C.jpg. These
files must be placed in the C:\Clivia\NBook\Image directory. See page 25 of this
manual for more information.
Command Buttons
All command buttons on this form are as previously described.
Search/Edit Entries
Form Purpose
The purpose of the series of functions grouped under the Search/Edit
Entries heading is to find existing Grower’s Notebook entries, allow editing of
those entries, allow on-screen viewing of those entries and allow printing of
selected entries. Deleting of Grower’s Notebook entries is handled through a
different process. All of Search/Edit Entries’ functions start with a search form.
To Begin Activity
From the Grower’s Notebook Start Form, users should single left click on the
Search/Edit Entries command button. The Search form will open and the
Search for this text data entry box will have the yellow highlight.
Clivia Access V1.3
User’s Guide and Reference
Page 78
Data Entry Boxes
Search for this text
Place the text you wish to search for in this data entry box. If you wish to
only search using Dates or entry ID Numbers, or if you wish to see all entries,
leave this data entry box blank. Press Tab to advance to the next field, Dates.
Dates
Place the date range you wish to search in these two data entry boxes. If you
wish to search all dates, leave both date boxes blank. If you wish to search only
one date, place the same date in the From this date and To this date boxes.
Dates should be entered in the short date format. If a date entry appears in one
data entry box, the other date box will need an entry as well or you will get an
error message. Press Tab to advance to the next field, ID Numbers.
ID Numbers
Place the ID Number range you wish to search in these two data entry boxes.
If you wish to search all ID Numbers, leave both date boxes blank. If you wish
to search only one ID Number, place the same number in the From this ID No.
and To this ID No. boxes. If an ID Number entry appears in one data entry box,
the other date box will need an entry as well or you will get an error message.
Using the mouse, make your selection in the next section, Search for text in
these fields.
Search for text in these fields
You can choose which field is searched using the just described criteria.
Selections include Keywords, Headlines, Sources, Publications, Web Sites,
Entries, and All Fields. To select one just single click on the radio button next to
the description.
The goal of this set of functions is to take you to a specific entry so you can
view, edit, or print it. These tasks can only occur on what the form calls Detailed
Output. If however, you think you will have to review a long list of entries after
applying the search criteria, it is better to choose Summary Output.
From the Summary form you can then select a particular entry to view in
Detailed Output. You establish which output type via your selection from the
boxed area on the Search form by making a selection in the Summary Output or
Detailed Output column.
Using either Summary Output or Detailed Output you can sort the output
using one of seven criteria. Select the check box in the Sort Output By box to
establish your sort order with a single left click of the mouse.
If you wish to include images in your detailed output, check the Include
Images check box using a single left click of the mouse. A second left click will
remove the check if needed.
Clivia Access V1.3
User’s Guide and Reference
Page 79
Command Buttons
Perform Search
Single left clicking on the Perform Search command button will take you to
either the Summary Output or Detailed Output form. Shown below is the
Summary Output form.
You will notice all of the data entry boxes are blue. You cannot edit your
entry from the Summary Output form. Edits can only be made from the Detailed
Output form. To go to a particular entry’s Detailed Output form single left click
on the See Full Entry command button to the right of each set of entries. You
will be taken to the Detailed Output form, which is the same form you will go to
if you select a field from the Detailed Output column on the Search form. The
Detailed Output form is shown below.
Clivia Access V1.3
User’s Guide and Reference
Page 80
Except for the Entry ID Number data entry box, all of the data entry boxes
on this form work just like similar ones on the Create Entry form. From this
form you can edit or change any of the data. The only thing you cannot do from
here is delete the entry in its entirety. If that is what you wish to do, jot down the
ID Number of the entry you wish to delete and then go to the Delete Notebook
Entry function described below.
If you checked the Include Images check box on the Search form you will
have tab labeled Pictures. To go to that tab just single left click on the word
Pictures.
The Prepare Report command button on the Detailed Output form will
show the report in print preview mode with or without images, depending on your
selection
Delete Notebook Entry
Form Purpose
The purpose of the Delete Entry form is to allow users to delete individual
entries to the Grower’s Notebook.
To Begin Activity
Using the Search functions just described, determine the Entry ID Number
of the entry you wish to delete. Then from the Grower’s Notebook start form,
single left click on the Delete Notebook Entry command button. The Delete
Entry form will open and the yellow highlight will be in the Entry ID Number
to Delete data entry box.
Clivia Access V1.3
User’s Guide and Reference
Page 81
Data Entry Boxes
Entry ID Number to Delete
There is only one data entry box on the Delete Entry form which will accept
data. That box is the Entry ID Number to Delete box. Enter the ID Number of
the entry you wish to delete. Then press Tab. The other blue data entry boxes on
the form will then show what you are about to delete.
Command Buttons
Delete Record
If the data shown in the blue data entry boxes is correct, then single left click
on the Delete Record command button. The record will be deleted. Single left
clicking on this command button cannot be undone. After deleting the data, the
form will close and you will return to the Grower’s Notebook Start form.
Edit Publication List
Form Purpose
The purpose of the Publication List form is to allow edits and additions to
the Publication List along with a method to print the list. Like many other
validation lists in Clivia Access, you can also delete publications form the list.
Deleting an item from this list does not change entries in the Paper Publication
data entry box on existing Grower’s Notebook entries.
Clivia Access V1.3
User’s Guide and Reference
Page 82
To Begin Activity
To begin activity on this form single left click on the Edit Publication List
command button on the Grower’s Notebook start form. The form will open and
the yellow highlight will be in the Paper Publication data entry box for the first
record. You can use your mouse to move up and down the list or you can use the
record selectors at the bottom of the list to also go to a particular item as discussed
below.
Data Entry Boxes
Paper Publication
The Paper Publication data entry box will accept up to a maximum of 255
characters, spaces, punctuation marks or symbols to describe the particular Paper
Publication in question. If the publication is a web site, or email address, place
those items in the Web Site data entry box not here. Press Tab to advance to the
next record.
Clivia Access V1.3
User’s Guide and Reference
Page 83
Command Buttons
All of the command buttons on this form operate as previously described.
Add, Edit, Delete Records
To add a new record or stored item to the list, add the new information to the
blank data entry box at the bottom of the list.
To edit an existing entry in the Publication list, highlight the area to be
changed using the mouse and enter the new information.
To delete a Publication record, single left click in the gray/blue box on the
left side of a particular record. Press the DELETE key on the keyboard to delete
the record.
To navigate to a particular record:
Go to New Record
Go to Last Record
Go to Next Record
Go to Record Number
Go to Previous Record
Go to First Record
As your Grower‘s Notebook becomes longer, navigation among the
individual entries or records will become more complicated. Use the Record
Navigation Bar along the bottom of the screen to assist in navigation. A single
left click to any of the icons will take you to the record indicated above. Since,
the most recent entries will be last, left clicking on the Go To Last Record icon
will take you to the most current additions. To quickly add a new record, left
click on the Go to New Record icon. Etc.
Clivia Access V1.3
User’s Guide and Reference
Page 84
Edit Source List
Form Purpose
The purpose of the Source List form is to allow edits of existing sources,
creation of new sources, and printed reports of the Source List. This list operates
like most other validation lists.
To Begin Activity
To begin activity from the Grower’s Notebook start form, single left click on
the Edit Source List command button. The form will open and the yellow
highlight will be in the Description data entry box of the first source record. You
can use your mouse to move up and down the list or you can use the record
selectors at the bottom of the list to also go to a particular item.
Data Entry Boxes
Description
The Description data entry box will accept up to 75 characters, space,
symbols, or punctuation marks to describe the subject matter expert (person) who
is the source. Press Tab to advance to the next record. New items can be added
in the blank box at the bottom of the list.
Command Buttons
All of the command buttons on this form operate as previously described.
Add, Edit, Delete Records
To add a new record or item to the list, add the new information to the blank
data entry box at the bottom of the list.
To edit an existing entry in the Source list, highlight the area to be changed
using the mouse and enter the new information.
To delete a Source record, single left click in the gray/blue box on the left
side of a particular line or record. Press the DELETE key on the keyboard to
delete the record.
Clivia Access V1.3
User’s Guide and Reference
Page 85
To navigate to a particular record:
Go to New Record
Go to Last Record
Go to Next Record
Go to Record Number
Go to Previous Record
Go to First Record
As your Grower‘s Notebook becomes longer, navigation among the
individual entries or records will become more complicated. Use the Record
Navigation Bar along the bottom of the screen to assist in navigation. A single
left click to any of the icons will take you to the record indicated above. Since,
the most recent entries will be last, left clicking on the Go To Last Record icon
will take you to the most current additions. To quickly add a new record, left
click on the Go to New Record icon. Etc.
Clivia Access V1.3
User’s Guide and Reference
Page 86
Greenhouse Diary and Reports
Form Purpose
Many times a collector will perform some activity that impacts the entire
collection or a major portion of it. Rather than enter that data on many individual
plants, a technique is needed to document the activity in a general way. For
example, “Today I applied the annual systemic insecticide to all plants. Next
application due September 1, 2009.” Other times you may wish to document
general events in the greenhouse/garden for future reference. For example, “The
gardenii generally started blooming today. They are early this year.” And
finally you may wish to keep a diary or blog about your collection. All of these
are best recorded in a diary. The Greenhouse Diary function in Clivia Access
fills that need.
To Begin Activity
To open the Greenhouse Diary Form for use from the Database Menu
single left click on the Edit Existing: Greenhouse Diary and Reports
command button. The Greenhouse Diary form will open and the yellow highlight
will be in the Entry Date data entry box.
Data Entry Boxes
Entry Date
The Entry Date data entry box contains the date of the entry. By default
Clivia Access places today’s date there. If you need to enter another date, just do
so in the short date format. After completing the entry press TAB to move to the
Follow Up Date data entry box.
Follow Up Date
As discussed in the Form’s Purpose section of this subject, sometimes it is
useful to schedule a follow up date for future actions. On the Greenhouse Diary
form you can schedule that follow up by placing a date in this data entry box.
Using Clivia Access’s Date Based Reports functions, you can then print out a list
Clivia Access V1.3
User’s Guide and Reference
Page 87
of follow ups. Entries made in this data entry box should be in the short date
format. If this field is left blank, no follow up will be scheduled. Press TAB to
advance to the next data entry box, Activity.
Activity
The Activity data entry box is the diary entry. A maximum of 65,500
characters, including spaces, numbers, many symbols, punctuation marks, etc. can
be entered in this data entry box. To enter a carriage return hold down the CTRL
key plus the ENTER key. Press TAB to advance to the next Diary record.
Command Buttons
Add, Edit, Delete Records
To delete individual Diary records, single left click in the blue box on the left
of the record. The record will be selected. The press the Delete key on the
keyboard. Once deleted, records are permanently gone; there is no recycle bin
function in Clivia Access.
To edit a portion of an existing record use the mouse to select the items to be
changed and make the changes.
Go to New Record
Go to Last Record
Go to Next Record
Go to Record Number
Go to Previous Record
Go to First Record
As your Greenhouse Diary becomes longer, navigation among the
individual entries or records will become more complicated. Use the Record
Navigation Bar along the bottom of the screen to assist in navigation. A single
left click to any of the icons will take you to the record indicated above. Since,
the most recent entries will be last, left clicking on the Go To Last Record icon
Clivia Access V1.3
User’s Guide and Reference
Page 88
will take you to the most current additions. To quickly add a new record, left
click on the Go to New Record icon. Etc.
Prepare Reports
Single left clicking on the Prepare Reports command button will take you
to the Date Based Reports form where you can prepare Greenhouse Diary and
Diary Follow Up reports. This is the same screen you will see when you left
click on the Reports: Date Based Reports command button on the Database
Menu.
Other Command Buttons
The remaining command buttons are typical Command Buttons, and have
been previously described. See previous sections for the description.
Clivia Access V1.3
User’s Guide and Reference
Page 89
Reports
List Reports
Report Purpose
The purpose of the List Reports function is to print one or more of the
validation lists. This function does not allow the user to view the reports first. If
you wish to view individual reports before printing use the Edit Lists function.
To Begin Activity
To open the Print Lists Form for use from the Database Menu single left
click on the Reports: List Reports command button. The Print Lists Form will
open.
Clivia Access V1.3
User’s Guide and Reference
Page 90
Data Entry Boxes
Check Boxes
To the left of each validation list title is a white check box. A single left
mouse click in any of these boxes will place a check there (make the selection). If
after checking a box, you need to undo the check, simply check the box a second
time.
Command Buttons
Only typical Command Buttons, previously described, are used on this
form. See previous sections for the description.
Find Plant Reports
Report Purpose
The purpose of the Find Plant Report is to list all plants that meet one or
more of 34 criteria. For a wide variety of situations, this is a very powerful
reporting tool. This report can be used to show breeding candidates, the location
of plants meeting particular criteria, the plants obtained from a particular source,
deaths in certain soil mixes, etc. Once you have entered the selection criteria, and
Clivia Access has found matching plants, you can then select one of three types of
reports with a variety of sorting and subtotaling options.
To Begin Activity
To open the Find Plant Report setup screen for use from the Database
Menu, single left click on the Reports: Find Plant Report command button.
The Find Plant Report on-screen form will open with the yellow highlight in the
first Plant No. data entry box.
Data Entry Boxes
General
Any Data Entry Box that is left blank will select all entries for those
particular criteria. Selection criteria can be entered in any, some, or all of the
Data Entry Boxes.
Validation Lists
Entries in many of the 34 selection criteria are controlled by validation lists.
Like on other on-screen forms, validation list controlled entries are indicated by
blue down arrows on the right side of the data entry boxes.
Ranges
Where a range is asked for, you will need to include entries in both boxes if
data is entered into one of the range boxes.
Clivia Access V1.3
User’s Guide and Reference
Page 91
Color and User Defined Category
The five Color and User Defined Category data entry boxes on this form
accept wild card characters. This feature is useful for searching for patterns or
text ranges in these fields. The following wild card characters can be used:
Wild Card Character
Result
?
Selects any single character in that position
*
Selects zero or more characters in that position
#
Selects a single numeric character in that position
!
Excludes characters
[ and ]
Selects a range of characters in that position
If you know the exact entry you wish to search for in the Color or User
Defined Category data entry boxes, just enter the exact entry in the box without
any wild card characters. In the Color data entry boxes you can also select from
the drop down validation lists. Only if you use one or more of the wild card
characters will a range of values be selected.
Clivia Access V1.3
User’s Guide and Reference
Page 92
For example, entering ?[a-k]D[!0-9]* searches for entries that meet the
following criteria:
Character Position
Search Character Results
1st Position
?
2nd Position
[a-k]
3rd Position
D
th
Any single character
Any single character in the a to k
range
Uppercase D only
4 Position
[!0-9]
Any single character except numerals
0 to 9
Remaining
Positions
*
Any number of characters, including
zero characters, consisting of any
character
The reason the Color data entry boxes allow wildcard characters is because
the standard colors listed are fairly specific. Often times, you may wish a more
general selection. For example, by entering something like *Red* in one of the
Color data entry boxes will return all colors with red in the entry, not just one
specific red color.
Command Buttons
Only typical Command Buttons, previously described, are used on this
form. See previous sections for the description. Selecting the Prepare Report
command button will determine if data exists for the report and if data does exist
an intermediate on-screen form will appear—the Find Plant Report Format
form.
Form Purpose
The purpose of the Find Plant Report Format form is to select the format of
the report you wish produced. Only data meeting the Find Plant criteria will be
included.
Detail Report. The detailed report will present data on each plant, with a
count of the number of plants for each of the selected sort or group by field.
Summary Report. The summary report will only present the count of the
number of plants for each of the selected sort or group by field. No individual
plant data is included.
Clivia Access V1.3
User’s Guide and Reference
Page 93
Photo Report. The photo report displays photos if available for each plant,
and most of the individual plant’s characteristic information. This is similar to a
catalog cut sheet.
Command Buttons
When you select one of the numbered report format command buttons on this
on-screen form, you will notice some of the command buttons will disappear and
are no longer available for your use. If you wish to re-establish all format options
left click on the Reset This Form command button.
The other command buttons operate as previously described. Remember left
clicking on Prepare Report will present the report in Print Preview mode so
you can examine the output without wasting paper. Closing the selected report
will return the user to this form.
Family Tree Report
Report Purpose
The purpose of the Family Tree Report is to list the parents, grandparents,
and great grandparents of individual plants, and selected characteristics of each
plant. One set of this report also shows plant photos, if they exist in Clivia
Access. The report can be viewed on-screen or printed.
Clivia Access V1.3
User’s Guide and Reference
Page 94
To Begin Activity
To open the Family Tree Report setup screen for use from the Database
Menu single left click on the Reports: Family Tree Report command button.
The Family Tree Form will open with the yellow highlight in the child Plant
No. data entry box.
Data Entry Boxes
Plant No.
Enter the Plant No. of the child plant whose parents, grandparents, and great
grandparents are of interest. Press the TAB key to complete the entry.
Blue Boxes
Like all blue Data Entry Boxes in Clivia Access, the blue boxes on the
Family Tree Form cannot be edited or changed. They simply show information
contained in the database. If after entering the Child’s Plant No., and then
pressing the TAB key, no information is shown in one or more blue boxes, parent
information is missing in the database. Remember, plants propagated via division
Clivia Access V1.3
User’s Guide and Reference
Page 95
or tissue culture should have no fathers, only mothers. Selfed plants should have
the same father and mother.
Command Buttons
Like other reports in Clivia Access, the Prepare Report command buttons
will allow you to preview the report on screen before printing or returning to this
form.
The Family Tree Reports come with and without photos of individual plants.
Because of the amount of information on a photo report, it is divided into two
reports of two pages each. The first photo report, pages 1 and 2, covers the child,
parents, and grandparents. The second photo report, pages 3 and 4, covers the
great grandparents. Remember, large photo file sizes present problems with the
Family Tree report. And, even with reasonable sized photo files, this report
because of the number of photos involved will take some time to prepare. Photo
based reports are prepared one page at a time. As you move from page to page in
these reports you will see the preparation taking place.
A Neat Trick
Given the long time it takes a Clivia plant to go from pollinated flower, to
seed, to seedling, and then to seed producing mature plant, the Family Tree
Reports provided will meet most users’ needs. However, if you have entered
substantially more history, along with photos, than great grandparents you can
extend the Family Tree Reports. To do so, simply place the great grandparent
plant numbers into a second set of Family Tree Reports.
Date Based Reports
Report Purpose
In addition to the Find Plant Reports, there are seven reports in Clivia
Access where you can select results using dates. These Date Based Reports are
grouped in this section. The seven reports are Greenhouse Diary, Blossoms by
Date Report, Pollination by Date Report, Repotting by Date Report, Stored Pollen
by Date Report, Event Follow Up Report, and Diary Follow Up Report.
To Begin Activity
To open the Date Based Reports setup screen for use from the Database
Menu single left click on the Reports: Date Based Reports command button.
The Date Based Reports on-screen form will open with the yellow highlight in
the Beginning Date data entry box.
Clivia Access V1.3
User’s Guide and Reference
Page 96
Data Entry Boxes
Beginning Date
Using the short date format enter the beginning date of interest in this data
entry box. Press TAB to advance to the next data entry box, Ending Date.
Ending Date
Using the short date format enter the last or ending date of interest in this data
entry box. If you wish to see the results for only one date, enter the same date in
the beginning and ending date data entry boxes. Date entries are required in both
the Beginning and Ending Date data entry boxes.
Command Buttons
Only typical Command Buttons, previously described, are used on this
form. Notice all reports will be presented in Print Preview form first. Upon
closing any of the reports, you will return to this form.
Seed Inventory Report
Report Purpose
The purpose of the Seed Inventory Report is to provide a listing of all seeds
harvested during a particular time period.
Clivia Access V1.3
User’s Guide and Reference
Page 97
To Begin Activity
To open the Seed Inventory Report setup screen for use from the Database
Menu single left click on the Reports: Seed Inventory Report command
button. The Seed Inventory Form will open with the yellow highlight in the
Beginning Date data entry box.
Data Entry Boxes
Beginning and Ending Date
Enter a Beginning and Ending Date in the data entry boxes using the short
date format. To move from one box to the other press TAB. To only select seeds
harvested on one date, enter the same date in both the Beginning and Ending
Date data entry boxes. Entries are required in both Date data entry boxes.
Command Buttons
Only typical Command Buttons, previously described, are used on this
form. See previous sections for the description. A typical report is shown below.
Clivia Access V1.3
User’s Guide and Reference
Page 98
Stored Pollen Report
Report Purpose
The purpose of the Stored Pollen Report is to list all of the pollen records
currently contained in the database. The Stored Pollen Report shows the same
information as the Stored Pollen Form available from the Database Menu, Edit
Existing, Stored Pollen command button.
To Begin Activity
To create the Stored Pollen Report from the Database Menu single left
click on the Reports: Stored Pollen Report command button. The Stored
Pollen Report will print to the default Windows printer without any intervening
steps.
Find Pollen Report
Report Purpose
The purpose of the Find Pollen Report is to list stored pollen contained in
the database, using up to 28 different criteria applied to the plant that produced
the pollen. The body of the report looks just like the Stored Pollen Report,
except only those entries meeting the criteria are shown. This report operates in a
similar manner to the Find Plant Report.
Note: While there may be numerous plants in Clivia Access which meet the
criteria listed for the Find Pollen Report, if no pollen is stored under the
associated plant numbers, then no data will be displayed.
To Begin Activity
To open the Find Pollen Report setup screen for use from the Database
Menu single left click on the Reports: Find Pollen Report command button.
Clivia Access V1.3
User’s Guide and Reference
Page 99
The Find Pollen Report on-screen form will open with the yellow highlight in
the first Plant No. data entry box.
Data Entry Boxes
General
Any Data Entry Box that is left blank will select all entries for that particular
criteria. Selection criteria can be entered in any, some, or all of the Data Entry
Boxes. The criterion entered into the various Data Entry Boxes is applied to the
plant that produced the pollen.
Validation Lists
Entries in many of the 26 selection criteria are controlled by validation lists.
Like on other on-screen forms, validation list controlled entries are indicated by
blue down arrows on the right side of the data entry boxes.
Ranges
Where a range is asked for, you will need to include entries in both boxes if
data is entered into one of the range boxes.
Clivia Access V1.3
User’s Guide and Reference
Page 100
Color and User Defined Category
The five Color and User Defined Category data entry boxes on this form
accept wild card characters. This feature is useful for searching for patterns or
text ranges in these fields. The following wild card characters can be used:
Wild Card Character
Result
?
Selects any single character in that position
*
Selects zero or more characters in that position
#
Selects a single numeric character in that position
!
Excludes characters
[ and ]
Selects a range of characters in that position
If you know the exact entry you wish to search for in the Color or User
Defined Category data entry boxes, just enter the exact entry in the box without
any wild card characters. In the Color data entry boxes you can also select from
the drop down validation lists. Only if you use one or more of the wild card
characters will a range of values be selected.
For example, entering ?[a-k]D[!0-9]* searches for entries that meet the
following criteria:
Character Position
Search Character Results
1st Position
?
2nd Position
[a-k]
3rd Position
D
th
Any single character
Any single character in the a to k
range
Uppercase D only
4 Position
[!0-9]
Any single character except numerals
0 to 9
Remaining
Positions
*
Any number of characters, including
zero characters, consisting of any
character
The reason the Color data entry boxes allow wildcard characters is because
the standard colors listed are fairly specific. Often times, you may wish a more
general selection. For example, by entering something like *Red* in one of the
Color data entry boxes will return all colors with the word Red in the entry, not
just one specific red color.
Clivia Access V1.3
User’s Guide and Reference
Page 101
Command Buttons
Only typical Command Buttons, previously described, are used on this
form. See previous sections for the description. A typical report is shown below.
Clivia Access V1.3
User’s Guide and Reference
Page 102
Miscellaneous
User’s Manual
Command Button Purpose
The purpose of this command button is to open the User’s Manual.
To Begin Activity
To open the User‘s Manual from the Database Menu single left click on the
Miscellaneous: User‘s Manual command button. If Adobe Reader (or other
PDF Reader software) is installed on the computer the User‘s Manual will open
in a new window. If not, an error message will appear. After you are finished
with the User‘s Manual, simply Exit (FileExit) the Reader software or Close (
X )the Reader’s window to return to Clivia Access.
You can also leave the User‘s Manual open and switch back and forth
between the User‘s Manual and Clivia Access using the Windows Task Bar
buttons at the bottom of your screen (next to the Start button). The highlighted
button is the open window on top. To switch windows, single left click the
window button you wish on top.
If you do not have Adobe Reader version 7.0 or later installed on the
computer
you
will
need
to
download
the
program
from
www.adobe.com/products/reader/ in order to view and print the User’s Manual.
Follow the instructions on the web site to install this free software. After
installing Adobe Reader, to open the User’s Manual directly go to
C:\Clivia\UserManual1v3.pdf using My Computer or Windows Explorer and
double left click on the file name.
Clivia Access V1.3
User’s Guide and Reference
Page 103
Export Data and Reports
Command Button Purpose
The purpose of this command button is to export much of the data in Clivia
Access to Microsoft Excel® spreadsheet files or various word processing file
formats.
To Begin Activity
To open the Export Data and Reports on-screen form from the Database
Menu single left click on the Miscellaneous: Export Data and Reports
command button. The Export Data and Reports on-screen form will open.
Check Boxes
You tell Clivia Access what you wish to export by checking the appropriate
check boxes. To check a box simply single left click that box.
All of the Export to Word Processing: Reports and Validation List
Reports are the same style and format as similarly named reports in Clivia
Access.
Clivia Access V1.3
User’s Guide and Reference
Page 104
Export to Excel
The Export to Excel: Items in each of the listed exports include the
following elements. In each export the data for each individual plant, bloom,
division, repotting, event, pollination, seed entry, pollen entry, or source entry is
contained on one row in the spreadsheet.
Plant Number Data. This check box will export all plant data in Clivia Access
of the following types:
Plant ID number
Plant No.
Species
Source
Acquired As
Price
Date First Planted
Mother Plant No.
Mother Species
Father Plant No.
Father Species
Location
Propagation Method
Disposition
Leaf Color and Style
Leaf Width
Leaf Length
No. of Leaves
Flower Interior Color
Flower Basal/Throat Color
Flower Exterior Color
Flower Edge Color
No. of Tepals
Flower Shape
Inflorescence Height
Fragrance
Fruit Color
User Defined Category
Breeding Group
Breeder
Bloom Data. This check box will export all bloom data in Clivia Access of the
following types:
Clivia Access V1.3
Plant ID number
Plant No.
Species
Bloom Date
Flower Size
No of Umbel/Plant
Blossom Size
Petal Size
Sepal Size.
Remarks
No of Blooms/Umbel
User’s Guide and Reference
Page 105
Division Data. This check box will export all division data in Clivia Access of
the following types:
Plant ID number
Plant No.
Species
No of Offshoots
Division Method
Remarks
Date
Repot Data. This check box will export all repotting data in Clivia Access of the
following types:
Plant ID number
Plant No.
Species
Soil Mix Label
Pot
Remarks
Date
Event Data. This check box will export all event data in Clivia Access of the
following types:
Plant ID number
Plant No.
Species
Event
Follow Up Date
Remarks
Date
Pollination/Seed Data. This check box will export all pollination/seed data in
Clivia Access of the following types:
Plant ID number
Plant No.
Species
Bloom Date
Pollination Date 1
Pollen Parent Number
Date Seed Harvest
Tag
Pollination Date 2
Pollination Date 3
Pollination Date 4
Remarks
No of Seeds Produced
Seed Inventory Data. This check box will export all seed data in Clivia Access
of the following types:
Clivia Access V1.3
Pod Parent Number
Pollen Parent Number
Number of Seeds
Date of Seed Harvest
User’s Guide and Reference
Page 106
Soil Mix Data. This check box will export all soil mix data in Clivia Access of
the following types:
Soil Mix ID
Label
#1 Parts
#2 Parts
#2 Material
Etc.
#1 Material
Stored Pollen Data. This check box will export all pollen and pollen parent data
in Clivia Access of the following types:
Pollen Plant Number
Date Pollen Stored
Pollen Storage Method
Pollen Remarks
Species
Leaf Color and Shape
Leaf Width
Leaf Length
Flower Interior Color
Flower Basal/Throat Color
Flower Exterior Color
Flower Edge Color
Flower Number of Tepals
Fragrance
Inflorescence height
Fruit Color
User Defined Category
Breeding Group
Breeder
Remarks
Source Data. This check box will export all data in the Clivia Access address
book. That includes the following fields:
Company Name
Address 1
Address 2
City
State
Postal Code
Country
Phone
FAX
Email
Contact Person
Remarks
Export to Word Processing
Seed Inventory Report. When this check box is selected you will be shown a
selection on-screen form identical to the Seed Inventory Report form. A Seed
Inventory Report will be exported.
Clivia Access V1.3
User’s Guide and Reference
Page 107
Stored Pollen Report. If selected, a Pollen Inventory Report, previously
described will be exported.
Validation List Reports. If individual check boxes are selected, List Reports
previously described will be exported.
Using Command Buttons
Left clicking on Export Selected Data or Reports command button will
prepare the exports and open one or more Output To dialog box(es). Here you
can specify the file name and file location just like any Save As function in other
application programs. After you have selected the file location and entered the
file name for your export, left click on OK . Then you can quit Clivia Access,
open Excel® or your word processing program, and then open the Excel® or
word processing file you just saved.
Word processing files are saved in the Rich Text Format or *.rtf. *.rtf files
can be opened by most word processing programs without additional conversion.
PDF Files
Remember, you can always create a PDF file of any report in Clivia Access
using the Save As PDF icon on the Toolbar or Ribbon. Simply create the report,
and from the Print Preview screen single left click on the Save As PDF icon.
Because Microsoft Access 2007® has no capabilities to export pictures, and Save
As PDF will save pictures, this command is particularly powerful. The Save As
PDF icon is available for use on all forms and for all reports prepared by Clivia
Access.
Clivia Access V1.3
User’s Guide and Reference
Page 108
Quit Database
Command Button Purpose
The purpose of this command button is to clean up the various databases and
then close Clivia Access.
To Begin Activity
To begin the Quit Database activity, single left click on the command button
with the mouse. Depending on the amount of cleanup required, it may take a
couple of seconds to return to the Windows desktop. After you are finished with
Clivia Access, always use the Quit Database command button. Never simply
shut off the computer. Quit Database allows an orderly shutdown of Clivia
Access and preserves your data.
Caution: Sometimes quitting Clivia Access will take longer than other times.
That is because the Quit Database command button cleans up your data,
compacts the files, and repairs any defects it is capable of repairing. Sometimes
these other activities take longer than other times. Users are strongly encouraged
to allow this process to occur, even if it is not fast.
Caution: The Quit Clivia Access icon in the Ribbon or Toolbar is not the same
as the Quit Database command button. The Quit Database command button
cleans up and repairs the database before closing Clivia Access. The Quit Clivia
Access icon just closes the database without repair. Unless Clivia Access is
locked up, always use the Quit Database command button on the Database
Menu on-screen form.
Don’t Forget
Don’t forget to periodically backup your data. All data in Clivia Access is
contained in the C:\Clivia\ClivA_Data1.accde file and all photos are contained
in the C:\Clivia\Photo directory or folder. Grower’s Notebook data is contained
in C:\Clivia\NBook\NBook_Data.accde and images are contained in the
C:\Clivia\NBook\Image directory or folder. These will also need to be backed
up.
Clivia Access V1.3
User’s Guide and Reference
Page A1
Appendix A - Validation List Contents
Clivia Access V1.3
User’s Guide and Reference
Page A2
General
As you work with the packaged validation lists you will notice many use
ranges rather than specific units. This is a better method to classify plants than
the use of specific numbers. Remember validation lists are used for both
inputting data and for generating reports. A range of values usually works best
for report generation.
When designing validation lists from scratch, users are encouraged to
develop lists which cover all possible situations for that particular criterion. All
lists should also contain an Unknown value to cover certain situations.
Acquired As List
The Acquired As list generally shows all possible states in which a Clivia or
other plant can be acquired. Because the definitions of each state are general,
individual users may define them differently. To increase the functionality of the
Find Plant report users should use a Not Acquired value on this list for parent
plants not owned.
Breeding Group and Breeder Lists
Breeding Group and Breeder lists are defined by the user. As shipped with
the software, these lists only contain an Unknown value.
Color List
The Color list is pre-populated with colors from three standard color charts
with a fourth list of general color names added.
The first chart is the Royal Horticultural Society Mini Colour Chart©.
The RHS colors are shown in a Page Number-Color Number Color
Name format. A typical RHS entry would look like: 12-51B Dk
Pink Red.
The second color chart listed in the same list is the Cape Clivia Club’s
2003 Clivia Colour Chart©. The Cape Colour Chart colors are shown
in a Color Number Color Name format. A typical Cape Clivia
entry would look like: YG7 Lt Green.
The third color chart listed in the same list is the Cape Clivia Club’s
Clivia Colour Chart II©. The Chart II colors are shown in a CC plus
Color Number plus General Color Name format. A typical entry
from Chart II would look like: CC42 Pink.
The fourth list of general color names include: Orange, Red, Bronze,
Yellow, Green, Peach, Apricot, Pink, White and Purple.
The format used for these four systems of color descriptions allows the lists
to co-exist in the same validation list. Clivia Access will quickly sort and find a
particular color when a user puts the first few digits into the Data Entry Box. The
Clivia Access V1.3
User’s Guide and Reference
Page A3
lists are available from the organizations that publish them or their local
representatives.
Software users who have variegated fruits or splash colored flowers will need
to add entries for those items, or place that information in Remarks.
Disposition List
The Disposition list generally shows all possible states in which a Clivia or
other plant will leave the collection of a Clivia Access user. Because the
definitions of each state are general, individual users may define them differently,
or significantly add, delete, or modify the entries. To increase the functionality of
the Find Plant report, users should use a Current Collection, For Sale, and Not
Acquired disposition list items. These criteria allow users to sort among only
plants currently active in their collection, plants you would like to sell, or parents
not owned.
Flower Shape List
The Flower Shape list is based on Harold Koopowitz’s Clivias© book, with
substantial modifications. We suspect many users will substantially modify this
list to match their particular collection goals and conditions. Users of Clivia
Access for plants other than Clivias may also wish to more accurately model their
collection’s characteristics.
Fragrance List
The Fragrance list is a standard list of general fragrances used by the perfume
industry.
Inflorescence Height List
The Inflorescence Height list generally shows all possible states of a Clivia’s
inflorescence height. Because the definitions of each state are general, individual
users may define them differently and some may wish to add more specificity.
Leaf Color & Style List
The validation list for Leaf Color & Style is compiled from a wide range of
sources. Some sources agree with each other, some are different. Individual
users may find this list helpful, while others may have problems with it. Please
feel free to add, edit, and delete individual elements (deletions only before you
start entering data). The categories’ measurement units in the provided validation
list are in inches. Listed below is the conversion to mm.
Clivia Access V1.3
User’s Guide and Reference
Page A4
Inches
mm
Leaf width
3½ - 4½ in.
90 – 110 mm
Leaf length
> 18 in.
> 450 mm
Leaf width
3½ - 4½ in.
90 – 110 mm
Leaf length
14 - 18 in
350 – 450 mm
Leaf width
3½ - 4½ in.
90 – 110 mm
Leaf length
< 14 in
< 350 mm
Leaf width
3½ - 6 in
90 – 150 mm
Leaf length
> 10 in.
> 250 mm
Leaf width
3½ - 6 in
90 – 150 mm
Leaf length
8 - 10 in.
200 - 250 mm
Leaf width
3½ - 6 in
90 – 150 mm
Leaf length
< 8 in.
< 200 mm
Henglan
Longest leaf
6 in.
150 mm
Monk - Long
Leaf width
3½ - 4½ in.
90 – 110 mm
Leaf length
12 - 20 in
300 – 500 mm
Leaf width
3½ - 4½ in.
90 – 110 mm
Leaf length
14 - 18 in
350 – 450 mm
Leaf width
See ratio
See ratio
Leaf length
< 14 in
< 350 mm
Broadleaf – Long
Broadleaf – Medium
Broadleaf - Short
Daruma – Long
Daruma – Medium
Daruma - Short
Monk - Mid
Monk - Short
Leaf Length List
Because there is a certain amount of variation in the length of leaves on
individual Clivia, the Leaf Length list uses leaf length categories. The categories
in the provided validation list are shown in inches. Listed below is the conversion
to mm.
Clivia Access V1.3
Inches
mm
Miniature <7 7/8 inches
Miniature <199 mm
Short 8 – 13 ¾ inches
Short 200 – 349 mm
Medium 14 – 23 5/8 inches
Medium 350 - 599mm
Long >23 ¾ inches
Long >600 mm
User’s Guide and Reference
Page A5
Leaf Width List
Because there is a certain amount of variation in the width of leaves on
individual Clivia, the Leaf Width list uses leaf width categories. The categories in
the provided validation list are shown in inches. Listed below is the conversion to
mm.
Inches
mm
Extra Narrow <1 inch
Extra Narrow <25mm
Narrow 1 - 2 inches
Narrow 25 – 50 mm
Semi Broad 2 - 3 inches
Semi Broad 51 - 75 mm
Broad 3 – 4 inches
Broad 76 – 100 mm
Very Broad 4 – 5 inches
Very Broad 101 – 125 mm
Extra Broad 5 – 6 inches
Extra Broad 126 – 150 mm
Ultra Broad >6 inches
Ultra Broad >150 mm
Location List
The Location list currently contains only one entry – Unknown. Users will
need to add their locations to this list. Because location information is used to
find particular plants, it is recommended individual locations be divided so each
only contains 50 to 100 mature plants maximum. When deciding on your
standard locations it is often helpful to ask, ―How many plants do I wish to go
through before finding the one I want?‖ Once a location is added to the list it
cannot be deleted. Edits made to locations in this list will change all Clivia
Access location entries as well.
Pot Description List
The Pot Description list currently contains only one entry – Unknown. Users
will need to add their Pot types to this list.
Propagation List
The Propagation list generally shows all possible states in which a Clivia can
be propagated. Because the definitions of each state are general, individual users
may define them differently. As tissue culture becomes a larger event in Clivia
collections, users may wish to add culture methods to this list. Other plant users
may wish to add other methods – for example, cuttings to the list as well.
Clivia Access V1.3
User’s Guide and Reference
Page A6
Soil Mix List
The Soil Mix list currently contains only one entry – Unknown. Users will
need to add their soil mixes to this list. Once a soil mix is added to the list it
cannot be deleted. Edits made to soil mixes in this list will change all Clivia
Access soil mix entries as well.
Source List
The Source list currently contains only two entries – Unknown and Colorado
Clivia (the developer of this software). Users will need to add their sources and
themselves to this list. Once a source is added to the list it cannot be deleted.
Edits made to sources in this list will change all Clivia Access source entries as
well.
Species List
The Species list currently contains only one entry – Unknown Clivia. Users
will need to add their species to this list. Clivia users who wish to use the Genus,
Species, Cultivar Group, Variety, and Family names correctly are encouraged to
review Harold Koopowitz’s Clivias© book for the specifics of how these name
categories apply to Clivias. A short cheat sheet follows:
If it is called:
Place in this field:
Clivia
Genus
miniata, gardenii, nobilis, caulescens, Species
etc.
Cyrtanthiflora, interspecifics
Cultivar Group
Amaryllidaceae
Family
Once a species is added to the list it cannot be deleted. Edits made to species
in this list will change all Clivia Access species entries as well.
Clivia Access V1.3
User’s Guide and Reference
Page B1
Appendix B - Sample Data Collection Forms
Clivia Access V1.3
User’s Guide and Reference
Page B2
New Plant Form
Plant No.
Species
Acquired As
Source
Price
Date 1st Planted
Location
Propagation Method
Disposition
Breeding Group
User Defined Category
Mother Plant No.
Fruit Color
Father Plant No.
Sale Price/Value
Breeder
Pigmented Base (Check for Yes)
Leaf Color/Style
Leaf Width
Flower Fragrance
Flower Shape
Flower Interior Color
Flower Exterior Color
Leaf Length
Inflorescence Ht.
Flower Throat/Basal Color
No. of Leaves
No. of Tepals
Flower Edge Color
Remarks
Plant No.
Species
Acquired As
Source
Price
Date 1st Planted
Location
Propagation Method
Disposition
Breeding Group
User Defined Category
Mother Plant No.
Fruit Color
Father Plant No.
Sale Price/Value
Breeder
Pigmented Base (Check for Yes)
Leaf Color/Style
Leaf Width
Leaf Length
Flower Fragrance
Flower Shape
Inflorescence Ht.
Flower Interior Color
Flower Exterior Color
Flower Throat/Basal Color
No. of Leaves
No. of Tepals
Flower Edge Color
Remarks
Clivia Access V1.3
User’s Guide and Reference
Page B3
New Soil Mix Form
Soil Mix Name
Parts:
Material:
Soil Mix Name
Parts:
Material:
Clivia Access V1.3
User’s Guide and Reference
Page B4
New Source Form
Company Name
Company Name
Address 1
Address 1
Address 2
Address 2
City
City
State
State
Postal Code
Postal Code
Country
Country
Phone
Phone
FAX
FAX
Email
Email
Contact
Contact
Clivia Access V1.3
User’s Guide and Reference
Page B5
New Bloom/Pollination Form
Plant Number
Bloom Date
Umbel Diameter
Blossom Size
Petal Size
Pollen Parent No.
Pollination Date
Tag
Plant Number
Bloom Date
Umbel Diameter
Blossom Size
Petal Size
Pollen Parent No.
Pollination Date
Tag
Plant Number
Bloom Date
Umbel Diameter
Blossom Size
Petal Size
Pollen Parent No.
Pollination Date
Tag
Plant Number
Bloom Date
Umbel Diameter
Blossom Size
Petal Size
Pollen Parent No.
Pollination Date
Tag
No. Bloom/Scape
Sepal Size
No. Scapes/Plant
No. Bloom/Scape
Sepal Size
No. Scapes/Plant
No. Bloom/Scape
Sepal Size
No. Scapes/Plant
No. Bloom/Scape
Sepal Size
No. Scapes/Plant
Remarks
Remarks
Remarks
Remarks
Clivia Access V1.3
User’s Guide and Reference
Page B6
New Division Form
Plant No.
Date
No. of Offshoots
Division Method
Plant No.
Date
No. of Offshoots
Division Method
Plant No.
Date
No. of Offshoots
Division Method
Plant No.
Date
No. of Offshoots
Division Method
Plant No.
Date
No. of Offshoots
Division Method
Plant No.
Date
No. of Offshoots
Division Method
Plant No.
Date
No. of Offshoots
Division Method
Plant No.
Date
No. of Offshoots
Division Method
Plant No.
Date
No. of Offshoots
Division Method
Plant No.
Date
No. of Offshoots
Division Method
Plant No.
Date
No. of Offshoots
Division Method
Plant No.
Date
No. of Offshoots
Division Method
Plant No.
Date
No. of Offshoots
Division Method
Plant No.
Date
No. of Offshoots
Division Method
Plant No.
Date
No. of Offshoots
Division Method
Plant No.
Date
No. of Offshoots
Division Method
Plant No.
Date
No. of Offshoots
Division Method
Plant No.
Date
No. of Offshoots
Division Method
Plant No.
Date
No. of Offshoots
Division Method
Plant No.
Date
No. of Offshoots
Division Method
Clivia Access V1.3
User’s Guide and Reference
Page B7
New Pot Form
Plant No.
Date
Pot
Soil Mix
Plant No.
Date
Pot
Soil Mix
Plant No.
Date
Pot
Soil Mix
Plant No.
Date
Pot
Soil Mix
Plant No.
Date
Pot
Soil Mix
Plant No.
Date
Pot
Soil Mix
Plant No.
Date
Pot
Soil Mix
Plant No.
Date
Pot
Soil Mix
Plant No.
Date
Pot
Soil Mix
Plant No.
Date
Pot
Soil Mix
Plant No.
Date
Pot
Soil Mix
Plant No.
Date
Pot
Soil Mix
Plant No.
Date
Pot
Soil Mix
Plant No.
Date
Pot
Soil Mix
Plant No.
Date
Pot
Soil Mix
Plant No.
Date
Pot
Soil Mix
Plant No.
Date
Pot
Soil Mix
Plant No.
Date
Pot
Soil Mix
Plant No.
Date
Pot
Soil Mix
Plant No.
Date
Pot
Soil Mix
Clivia Access V1.3
User’s Guide and Reference
Page B8
New Pot Form (Bulk Entry)
Date
Pot
Plant No.
Plant No.
Plant No.
Plant No.
Plant No.
Plant No.
Plant No.
Plant No.
Plant No.
Plant No.
Plant No.
Plant No.
Plant No.
Plant No.
Plant No.
Plant No.
Plant No.
Plant No.
Plant No.
Plant No.
Plant No.
Plant No.
Plant No.
Plant No.
Plant No.
Plant No.
Plant No.
Plant No.
Plant No.
Plant No.
Plant No.
Plant No.
Plant No.
Plant No.
Plant No.
Plant No.
Plant No.
Plant No.
Plant No.
Plant No.
Plant No.
Plant No.
Plant No.
Plant No.
Plant No.
Plant No.
Plant No.
Plant No.
Plant No.
Plant No.
Plant No.
Plant No.
Plant No.
Plant No.
Plant No.
Plant No.
Plant No.
Plant No.
Plant No.
Plant No.
Plant No.
Plant No.
Plant No.
Plant No.
Plant No.
Plant No.
Plant No.
Plant No.
Plant No.
Plant No.
Plant No.
Plant No.
Plant No.
Plant No.
Plant No.
Plant No.
Plant No.
Plant No.
Plant No.
Plant No.
Plant No.
Plant No.
Plant No.
Plant No.
Plant No.
Plant No.
Plant No.
Plant No.
Plant No.
Plant No.
Plant No.
Plant No.
Plant No.
Plant No.
Plant No.
Plant No.
Plant No.
Plant No.
Plant No.
Plant No.
Plant No.
Plant No.
Plant No.
Plant No.
Plant No.
Plant No.
Plant No.
Plant No.
Plant No.
Plant No.
Plant No.
Plant No.
Clivia Access V1.3
Soil Mix
User’s Guide and Reference
Page B9
New Event Form
Plant No.
Date
Event
Follow Up Date
Plant No.
Date
Event
Follow Up Date
Plant No.
Date
Event
Follow Up Date
Plant No.
Date
Event
Follow Up Date
Plant No.
Date
Event
Follow Up Date
Plant No.
Date
Event
Follow Up Date
Plant No.
Date
Event
Follow Up Date
Plant No.
Date
Event
Follow Up Date
Plant No.
Date
Event
Follow Up Date
Plant No.
Date
Event
Follow Up Date
Plant No.
Date
Event
Follow Up Date
Plant No.
Date
Event
Follow Up Date
Plant No.
Date
Event
Follow Up Date
Plant No.
Date
Event
Follow Up Date
Plant No.
Date
Event
Follow Up Date
Plant No.
Date
Event
Follow Up Date
Plant No.
Date
Event
Follow Up Date
Plant No.
Date
Event
Follow Up Date
Plant No.
Date
Event
Follow Up Date
Plant No.
Date
Event
Follow Up Date
Clivia Access V1.3
User’s Guide and Reference
Page B10
Seed Harvest Form
Pod Parent No. (Mother)
Pollen Parent No.(Father)
Bloom Date
No. of Seeds Produced
Date Seed Harvested
Pod Parent No. (Mother)
Pollen Parent No.(Father)
Bloom Date
No. of Seeds Produced
Date Seed Harvested
Pod Parent No. (Mother)
Pollen Parent No.(Father)
Bloom Date
No. of Seeds Produced
Date Seed Harvested
Pod Parent No. (Mother)
Pollen Parent No.(Father)
Bloom Date
No. of Seeds Produced
Date Seed Harvested
Pod Parent No. (Mother)
Pollen Parent No.(Father)
Bloom Date
No. of Seeds Produced
Date Seed Harvested
Pod Parent No. (Mother)
Pollen Parent No.(Father)
Bloom Date
No. of Seeds Produced
Date Seed Harvested
Pod Parent No. (Mother)
Pollen Parent No.(Father)
Bloom Date
No. of Seeds Produced
Date Seed Harvested
Pod Parent No. (Mother)
Pollen Parent No.(Father)
Bloom Date
No. of Seeds Produced
Date Seed Harvested
Pod Parent No. (Mother)
Pollen Parent No.(Father)
Bloom Date
No. of Seeds Produced
Date Seed Harvested
Pod Parent No. (Mother)
Pollen Parent No.(Father)
Bloom Date
No. of Seeds Produced
Date Seed Harvested
Pod Parent No. (Mother)
Pollen Parent No.(Father)
Bloom Date
No. of Seeds Produced
Date Seed Harvested
Pod Parent No. (Mother)
Pollen Parent No.(Father)
Bloom Date
No. of Seeds Produced
Date Seed Harvested
Pod Parent No. (Mother)
Pollen Parent No.(Father)
Bloom Date
No. of Seeds Produced
Date Seed Harvested
Pod Parent No. (Mother)
Pollen Parent No.(Father)
Bloom Date
No. of Seeds Produced
Date Seed Harvested
Pod Parent No. (Mother)
Pollen Parent No.(Father)
Bloom Date
No. of Seeds Produced
Date Seed Harvested
Pod Parent No. (Mother)
Pollen Parent No.(Father)
Bloom Date
No. of Seeds Produced
Date Seed Harvested
Pod Parent No. (Mother)
Pollen Parent No.(Father)
Bloom Date
No. of Seeds Produced
Date Seed Harvested
Pod Parent No. (Mother)
Pollen Parent No.(Father)
Bloom Date
No. of Seeds Produced
Date Seed Harvested
Pod Parent No. (Mother)
Pollen Parent No.(Father)
Bloom Date
No. of Seeds Produced
Date Seed Harvested
Pod Parent No. (Mother)
Pollen Parent No.(Father)
Bloom Date
No. of Seeds Produced
Date Seed Harvested
Clivia Access V1.3
User’s Guide and Reference
Page B11
Stored Pollen Form
Pollen Plant No.
Date Stored
Storage Method
Date Stored
Storage Method
Date Stored
Storage Method
Date Stored
Storage Method
Date Stored
Storage Method
Remarks
Pollen Plant No.
Remarks
Pollen Plant No.
Remarks
Pollen Plant No.
Remarks
Pollen Plant No.
Remarks
Clivia Access V1.3
User’s Guide and Reference