1
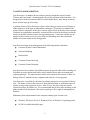
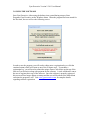
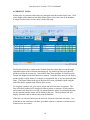
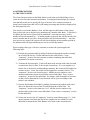
Gym Executive
Version 2.3.01
User Manual
Copyright 2007-2012
CK Applied Technology Corp.
Last Revised 12/3/12
Gym Executive Version 2.3.01 User Manual
TABLE OF CONTENTS
Page
1.0 Software Description ………………………………………………….. 1
2.0 Installation …………………………………………………………….. 3
3.0 Using The Software …………………………………………………… 4
3.1 Setup Form ..………..……………………………………...….. 6
3.2 General Data Entry Tips ………………………………………. 8
3.3 Backing Up Your Database …………………………………….10
4.0 Data Entry Forms ……………………………………………………... 11
4.1 Customers …..…………………………………………………. 11
4.2 Trainers ………………………………………………………. 13
4.3 Products …………..………………………………………….. 15
4.4 Sessions ………….….…………………………………………. 16
4.5 Product Sales …….….………………………………………….18
4.6 Invoices …………..……………………………………………. 20
5.0 Reports ………………………………………………………………… 21
6.0 Other Features …...……………………………………………………. 22
6.1 Create Invoices ..………………………………………………. 22
6.2 Export Data ..………………………………………………….. 24
6.3 Import Data …………………………………………………… 25
7.0 Glossary ………………………………………………………………. 26
Gym Executive Version 2.3.01 User Manual
1.0 SOFTWARE DESCRIPTION
Gym Executive is a database driven software package designed to assist Personal
Trainers and Gym Owner’s in managing the day-to-day operation of their business. It is
designed to be used by businesses that are session-based, that is, they charge customers
by the session or group of sessions.
A primary feature of Gym Executive is that it allows the gym owner to treat Trainers as
either employees of the gym or independent contractors. If sessions are scheduled for
trainers who are employees of the gym, sessions will be invoiced directly to the customer.
If trainers are independent contractors, sessions will be invoiced to the trainer so that the
trainer can bill the customer at their own agreed upon rate. A discount schedule can be
applied so that a trainer receives a price break for scheduling more than a particular
number of sessions within an invoicing period.
Gym Executive helps in the management of the following business functions:
Customer/Trainer Contact Information
Session Scheduling
Product Sales
Customer/Trainer Invoicing
Customer/Trainer Payments
Gym Executive has a number of predefined reports for general office and accounting use.
It includes an export feature that can be used to transfer data to other accounting and
reporting packages. The import feature can be used with prior data exports to allow for
backup retrieval, reinstalls on new computers and software version upgrades.
Gym Executive is available for download as a demo package for a test period of 50 trial
uses. The demo version of the software is fully functional with no restrictions and will
operate exactly as the registered version. After 50 uses, the demo software must be
registered to allow for further use. It is recommended that all users take advantage of the
demo period to fully determine if the software package will be right for managing their
business.
Minimum system requirements for the computer running Gym Executive are:
Windows XP (Service Pack 2), Windows Vista, or Windows 7 operating system
10 GB of available hard disk space
1
Gym Executive Version 2.3.01 User Manual
1MB system memory
Gym Executive uses the Microsoft Access database engine. Users who are familiar with
other Microsoft Access applications will recognize the user interface and will be able to
edit, select and filter data the similar to the way they do in other Access applications.
2
Gym Executive Version 2.3.01 User Manual
2.0 INSTALLATION
Gym Executive requires that Microsoft Access 2007 or a later version is installed on the
user’s system. For user’s that do not already have this installed, the Access 2007
Runtime can be installed by downloading from the Microsoft website. The link to this
file is:
http://www.microsoft.com/download/en/details.aspx?id=4438
Download and install this program on the computer that will be running Gym Executive.
If you received the program on CD or flash drive, run the file named AccessRuntime.exe
in the root directory of your disk/drive to install Access 2007 Runtime.
If installing a downloaded zipped version of Gym Executive (Gym_Executive_2201.zip),
extract the zip file to a temporary folder of your choosing. After unzipping, this folder
will contain a file named setup.exe. Run this file to begin setup. The installation
program will require acceptance of the license agreement and will then begin copying the
program files to the user’s computer.
If installing from a CD, insert the disc into the CD drive. The installation program should
begin within a few seconds. Follow the instructions provided by the installation program
to accept the license agreement and copy the program files to the computer where the
software is being installed. If the installation does not begin automatically, run the file
named setup.exe on the root folder of the disk to begin setup.
3
Gym Executive Version 2.3.01 User Manual
3.0 USING THE SOFTWARE
Start Gym Executive, either using the desktop icon created during setup or StartPrograms-Gym Executive on the Windows menu. When the program has been started for
the first time, the user will see the following screen:
In order to use the program, you will need to either enter a registration key or click the
continue button (which will count as one of the 50 demo uses). To purchase a
registration key, you will need to submit the unique Demo Code shown on the top of the
form to Gym Executive along with payment for the software. A code will then be sent to
the user to register their copy of the software. Once the software is properly registered,
this screen will no longer appear on startup and the user will be taken to the Main Menu
each time the program is run. Visit www.gymexecutive.com for complete details
regarding software registration.
4
Gym Executive Version 2.3.01 User Manual
Upon leaving the registration screen, the user will be taken to the Main Menu as shown:
5
Gym Executive Version 2.3.01 User Manual
3.1 SETUP FORM
The first step in using Gym Executive is to enter information about the gym in the Setup
section. Click on the Setup button under the Other section of the Main Menu. The user
will see the following screen:
6
Gym Executive Version 2.3.01 User Manual
Enter the information about the business including business name, address, etc. See
Section 3.2 of this document for some useful tips and tricks regarding data entry and
working within the data entry forms.
The Sales Tax Rate will be used when invoicing product sales for products where a sales
tax charge is required.
It is not required, but recommended that all fields be filled in with some initial values.
This will allow the user to see where they show up on reports and will eliminate any
errors in reporting due to an unpopulated field.
The subforms for Product Categories, Session Types, Payment Methods and Credit Card
Types have been initially populated with some typical values to demonstrate their use.
The values in these subforms are used in drop-down lists on other forms to ensure
correctness in data entry. By default, these drop-down lists will be sorted alphabetically
as shown in the examples provided for Product Categories, Session Types and Payment
Methods. If it is desired to sort the items in an order that is non-alphabetical, the user can
assign a number to the sort column next to the list value that will allow for a unique sort
order. This has been demonstrated in the subform used for Credit Card Types. To resort
the items in the subforms after adding new data, go to the Main Menu and then return to
the Setup form.
It is recommended that before entering any further data in the database, you fill in any
values for Product Categories, Session Types, Payment Methods and Credit Card Types
that are unique to your business. You may use the sample values if they relate to your
business but can also delete them if they don’t apply. You will be able to see these lists
in use as you move on to the other data entry forms.
Again, be sure to review section 3.2 of this document for some useful tips regarding data
editing, adding records to forms and deleting records in forms.
7
Gym Executive Version 2.3.01 User Manual
3.2 GENERAL DATA ENTRY TIPS
Data Entry
To move from one field to the next, use the TAB or ENTER key on the keyboard.
Fields with a yellow background are locked. Data cannot be entered into these fields.
Times can be entered in shorthand on the Sessions form or anytime a time is entered as
data. Enter 9A for 9:00 AM or 2P for 2:00 PM.
Records
The navigation buttons at the bottom of each form and subform allow the user to move
between records. Buttons exist to: go to first record, go to previous record, go to next
record, go to last record, create new record. The counter at the bottom left side of a form
or subform shows the current record number and the total number of records. If a
number is entered into the counter, the form will move to that record after the Enter key
is pressed.
To select a record, click on the gray bar to the left of the record. This bar will then turn
black after selecting. Once a record is selected, use the delete key on the keyboard or the
delete button on the ribbon to delete that particular record.
Filtering
The term “filter”, when used in reference to a database, typically refers to limiting the
number of records displayed based on a user specified criteria. For example, when the
user clicks on the Sessions of Products Sold data entry screens, at first the database only
shows records for the current date (until the user clicks the Show All button in the upper
right corner of the screen). The fact that these screens are filtered is indicated by the
filter icon in the lower left corner of the screen next to the record counter.
The appearance of the filter icon indicates that you are only viewing a partial set of
records. To remove or apply a filter to a form, click on this icon or the funnel shaped
object on the ribbon.
The filter by selection button on the toolbar (funnel with lightning bolt) can be used to
filter a form based on an entry in the current record. For example, say you wish to find
all customers located in Los Angeles. You would open the customer form, find a record
that has Los Angeles as the city, set the cursor in this field, then click “filter by selection”
to apply the filter. The number of records in the lower left corner will indicate how many
customers have Los Angeles as their city. If you cannot find a record with the data you
wish to search for, it is always possible to create a new record, enter the data you wish to
filter for, then use “filter by selection” to find all similar records.
The Sessions and Products Sold forms also have a means of filtering using the fields in
the dark blue box in the upper right-hand corner of the screen. Changing the value of any
of these fields will cause the form to be filtered according to the criteria specified as soon
8
Gym Executive Version 2.3.01 User Manual
as the cursor leaves that field. Note that when these forms first appear, the current date
appears in the Date From and Date To fields. This is what causes these forms to initially
display data only for the current date.
9
Gym Executive Version 2.3.01 User Manual
3.3 BACKING UP YOUR DATABASE
Once you have begun entering data into Gym Executive, it is important that you backup
your database on a regular basis to avoid losing data to hard drive failures, operating
system crashes, and so on. If the Gym Executive software needs to be reinstalled, it can
only install a blank copy of the database on your computer. To retrieve data, the user
must import a previously exported data set or copy an old version of the database file to
the current working directory.
There are two ways to backup data entered into Gym Executive. The first method is to
create a copy of the database file, which is named Gym_Executive_2201.accdr. This file
can be saved from the working database folder to another folder, CD, DVD or flash stick.
It is highly recommended that the backup be made on a media that can be removed from
the system the database resides on. This way if the computer has a complete failure or
goes missing, the backup will still be available for data recovery. The file will generally
have a date stamp associated with the last date/time the file was accessed.
The second method for backing up data is to use the import and export data features
described in this document in Sections 6.2 and 6.3. Again, it is recommended that a
regular backup be created that does not reside on the computer that is running Gym
Executive.
10
Gym Executive Version 2.3.01 User Manual
4.0 DATA ENTRY FORMS
4.1 CUSTOMERS
To enter contact information or payment history for a particular customer, click the
Customer button on the Data Entry section of the Main Menu. The Customers data entry
screen will open, which will allow the user to enter contact details regarding a particular
customer.
The Customer ID field is an automatically assigned number that is locked and cannot be
changed by the user. This ID is used to link customers to sessions, product sales,
payments and invoices in the underlying tables of the database. Once a customer has any
of these items associated with them, they should not be deleted from the database. If the
user attempts to delete a customer, any associated items (payments, sessions, product
sales) will also be deleted. Use care when entering data to avoid having to remove
customer records at a later date.
11
Gym Executive Version 2.3.01 User Manual
The default trainer field is used when scheduling sessions for a customer. When a
session is scheduled (using the Sessions form) for a customer, the customer will initially
be assigned their default trainer. If their default trainer is an in-house employee, the rate
and guest rate entered on the Customers form will be used to determine the charge for the
session. If the default trainer is an independent contractor, the rate from the trainer’s
page will be used.
Customer payments are entered using the subform near the bottom of each customer’s
record. The invoice number is locked and will be assigned by the program during the
creation of invoices. The payment date will default to the current date, but can be
changed if necessary. The method drop-down uses the values that were entered in the
Payment Methods section of the Setup form.
The envelope button at the top of the form can be used to print a business size (#10)
envelope for any customer. The receipt button next to each payment item will print a
single page receipt listing details of a particular payment.
To find a particular customer, use the Find Record by Customer Name field at the top of
the form. Find the customer name on the drop-down menu, and after one has been
selected, the database will go that particular customer’s contact information page.
If you want to search for a customer on a field other than their name, you can use the
Find tool (on the ribbon). Before clicking on Find, place the cursor in the field that the
search will be applied to. For example, say a phone message was taken from a customer
but the person answering the phone did not get the name correctly. You can search for
the phone number by clicking in the phone number field, and then by clicking on Find. A
dialog box will appear requesting the information to be searched for, whether to search
the current field or entire record, and whether the search needs to be an exact match or
just a portion of the data field.
12
Gym Executive Version 2.3.01 User Manual
4.2 TRAINERS
To enter contact information or payment history for a trainer, click the Trainer button on
the Data Entry section of the Main Menu. The Trainers data entry screen will open,
which will allow the user to enter contact details or payments for a particular trainer. A
sample record is shown below:
The Trainer ID field is an automatically assigned number that is locked and cannot be
changed by the user. This ID is used to link trainers to sessions, product sales, payments
and invoices in the underlying tables of the database. Once a trainer has any of these
items associated with them, they should not be deleted from the database. If the user
attempts to delete a trainer, any associated items (payments, sessions, product sales) will
also be deleted. Use care when entering data to avoid having to remove customer records
at a later date.
13
Gym Executive Version 2.3.01 User Manual
The Ind. Contractor check box in the Other section of the form is used to indicate that the
trainer is an Independent Contractor and not an in-house employee. These trainers
typically bill their customer on their own, and are charged a separate rate for gym usage
when scheduling sessions with customers and their guests. When a session is scheduled
with a trainer who is an Independent Contractor, the software will use the rate and guest
rate listed in the trainer’s information record. A discount schedule can also be applied to
Independent Contractors, allowing discounts to be provided after a certain number of
sessions have been scheduled during an invoice period.
The sample screen displayed earlier in this section shows a trainer who effectively gets a
rate discount of 10% after 10 scheduled sessions, 20% after 20 scheduled sessions, and
30% after 30 scheduled sessions. Since the trainer’s typical gym charge is $30 per
customer and $20 per guest, the Rate Discount Schedule is setup to subtract $3 and $2
from each customer and guest session respectively after each 10 sessions have been
counted. After each of the next two session breaks (20 and 30) an additional 10% is
subtracted. The number of sessions counted are all of those that occur within a given
invoicing period. The discount is applied to all sessions that occur in an invoiced period,
not just the sessions exceeding the quantity specified.
Trainer payments are entered using the subform near the bottom of the each trainer’s
record. The invoice number is locked and will be assigned by the program during the
creation of invoices. The payment date will default to the current date, but can be
changed if necessary. The method drop-down uses the values that were entered in the
Payment Methods section of the Setup form.
The envelope button at the top of the form can be used to print a business size (#10)
envelope for any trainer. The receipt button next to each payment item will print a single
page receipt listing details of a particular payment.
To find a particular trainer, use the Find Record by Trainer Name field at the top of the
form. Find the trainer name on the drop-down menu, and after one has been selected, the
database will go that particular trainer’s contact information page.
14
Gym Executive Version 2.3.01 User Manual
4.3 PRODUCTS
The products form, accessed from the Main Menu by using the Products button in the
Data Entry section, is used to list products and prices for use in the Product Sales section.
Products can be categorized using the choices created on the Setup form.
The Taxable check box is used to indicate whether sales tax will be added to the product
price when a sale is made. The sales tax rate to be applied is specified on the Setup form.
The Discontinued check box is used to indicate that a product is no longer available or
has been discontinued. Any discontinued products will not show up on the drop-down
list used to select a product on the Product Sales form.
15
Gym Executive Version 2.3.01 User Manual
4.4 SESSIONS
To schedule sessions for customers and trainers, click on the Sessions button on the Main
Menu form. A sample session screen is shown in the following:
The dark blue area in the upper right-hand corner is used to filter the Sessions form and
make it more useful for the person doing data entry and viewing. By default, the
Sessions form will show all sessions for the current day. Note the Date From and Date
To fields have the current date displayed any time the form is opened. Using this filter
area, the user can display sessions for a single trainer on a single day, for a single
customer for a single month, or any other criteria that the user can think of. The Report
button at the top of the form will create a printable report using the same filter that is
applied to the data entry screen. As an example, by filtering for a single trainer and a
single day, a report can be printed that contains a trainer’s schedule for a particular day.
When entering a new session, the date will default to the current date. This can be
modified if scheduling a future appointment.
The session type is a drop-down list of the items entered on the Session Types area of the
Setup form.
The Start Time is the scheduled start time for a session. By default, the End Time will be
set to one hour later than the Start Time. The End Time may be modified if sessions are
longer or shorter than one hour.
16
Gym Executive Version 2.3.01 User Manual
The Customer drop-down is a list of all customers in the database. If a customer has a
default trainer associated with them, this will appear in the Trainer field after a customer
is entered. The Session Cost will automatically be pulled from the customer’s rate
information on the Customer form if the trainer is an in-house trainer. If the trainer is an
independent contractor, the rate will be pulled from the trainer’s rate information on the
Trainer form. All of these fields may be changed if necessary.
The Trainer drop-down is a list of all trainers in the database. If a trainer is selected who
is an independent contractor, the Session Cost will automatically be pulled from the
trainers rate information on the Trainer’s form.
The Guests field is used when a customer has a guest with them for a workout session. A
number is entered here to indicate the number of guests. The appropriate rate (see
description of customer drop-down list) will be added to the Session Cost, depending on
whether the trainer being used is in-house or an independent contractor.
The Session Cost field shows the amount that will be invoiced to either the customer or
trainer for the session. If the trainer is in-house, this will be invoiced to the customer. If
the trainer is an independent contractor, this amount will be invoiced to the trainer.
The ID and Invoice fields (with a yellow background) are locked and cannot be edited.
The ID field is a unique number automatically applied to each record and can be used for
reference purposes. The invoice field displays the invoice that a session charge showed
up on, and is populated automatically during the creation of invoices.
The Notes button next to each record opens a pop-up form that allows notes regarding a
particular session to be added. If a session has a related note, the Note check box will be
checked.
The Recurring Session button at the top of the form is used to make creating multiple
sessions for a customer easier. When this button is clicked, a pop-up form will appear
prompting the user for a number of items that include: Session Type, Start Date, Start
Time, End Time, Customer, Trainer, Session Cost, Number of Sessions and Frequency of
Sessions. When the Continue button is clicked after completing this form, the specified
number of sessions will be created at the specified intervals using the rest of the
information to complete the new session records. You should test this out using a limited
number of sessions, and then filter the Sessions form for the particular customer to get a
feeling for how this feature works.
17
Gym Executive Version 2.3.01 User Manual
4.5 PRODUCT SALES
Product sales to customers and trainers are managed using the Product Sales form. Click
on the Product Sales button on the Main Menu form to access this area of the database.
A sample Product Sales screen is shown in the following:
The Product Sales form, similar to the Sessions form, has a dark blue area in the upper
right-hand corner used to filter the data displayed. By default, the form will show all
products sold for the current day. Note that the Date From and Date To fields have the
current date displayed any time the form is opened. Using the filter, the user can display
product sold to a single trainer or customer on a particular day or over any particular date
range. The Report button at the top of the form will create a printable report using the
same filter that is applied to the Product Sales screen.
To complete a product sale, go to a new record and select a trainer or customer. The
form will allow products to be charged to either a trainer or customer. If both a trainer
and customer are entered in a record, it is assumed that the trainer is purchasing the item
for the customer and the trainer will be billed for the item. The drop-down lists will
display all trainers and customers entered in the database.
If the sale is a cash sale and will not be invoiced, check the Cash Sale check box. Any
items that are not cash sales will show up on their respective customer or trainer invoice
when invoices are created.
18
Gym Executive Version 2.3.01 User Manual
The Product drop-down list contains all items that are not listed as discontinued from the
products screen. Once selected, the unit price and sales tax will appear using the values
that were previously entered on the Products form.
If a quantity other than one is being purchased, enter this in the Qty field. The software
will recalculate the Total Cost each time a new quantity is entered.
The Total Cost, ID, and Invoice fields are locked and cannot be changed. The total cost
for each record is determined using the unit price, quantity and sales tax specified in each
record. The ID is a unique number that is set automatically and can be used for
referencing each sales transaction. The invoice field contains the invoice number that a
particular product sale appears on. This field is populated during the invoice creation
process.
19
Gym Executive Version 2.3.01 User Manual
4.6 INVOICES
The invoices screen displays all of the invoices that have been created by the system, one
record at a time. New invoices are created automatically by the program using the Create
Invoices button on the Main Menu (see section 6.1 of this document) and cannot be
created using the Invoices form. There are some minor differences between invoices
created for customers and invoices created for trainers. Trainers have extra fields
displayed to account for session discounts. For trainers, the session count will be
displayed on the lower left-hand corner of the invoice, and an extra field called Trainer
Discount is added to the Amount Owed.
Most of the fields on the invoices form are locked, with a couple of exceptions. Invoice
Date From, Invoice Date To, and Invoice Date can be changed to allow flexibility in the
display of the invoicing period. It is important to understand that while these dates may
be changed to affect what is on the printed invoice, the actual dates used for grouping
charges and payments are selected when invoices are created.
The Additional Charges and Additional Charges Notes fields are used to make
adjustments or add non-standard charges to customer and trainer invoices. When an
additional charge is added using this form, the Amount Owed will be adjusted. A
modified invoice can be printed using the Report button at the top of the screen.
20
Gym Executive Version 2.3.01 User Manual
REPORTS
The best way to see how the reports work in Gym Executive is to populate the database
with data and give them a test. When a report is in preview mode (displayed on the
screen), the user may click on the body of the report to zoom in/out. There are
commands on the ribbon for printing, sizing and zooming in or out. If you need to select
a specific printer other than the default for printing, click Print on the ribbon and change
the printer in the pop-up window before actually printing the report. You can also click
Page Setup on the ribbon to change printers, paper source and many other standard
printer settings. Clicking on many of the report buttons will bring up a criteria form that
allows the user to specify report criteria (date ranges, names, etc.). These criteria will be
displayed at the top of the corresponding report.
Some notes regarding the specific reports:
Customer List – This is a list of name, address, phone and email info for all customers in
the database.
Trainer List – This is a list of name, address, phone and email info for all trainers in the
database. The user can filter to display independent contractors or in-house staff only.
Invoices - Clicking on this report button will bring up a criteria form allowing the user to
specify invoice type (customer or trainer), and invoice date range, and a range or invoice
numbers. It is important to understand that trainer invoices and customer invoices are
essentially two different reports, as they are formatted somewhat differently. When both
are being run, trainer invoices will appear as a window on top of customer invoices
Products Sold Summary – This report can be run to show product sold totals over a
particular period of time for all products or products within a specified category. The
report shows the number of units sold along with subtotals for pretax and taxable
amounts.
21
Gym Executive Version 2.3.01 User Manual
6.0 OTHER FEATURES
6.1 CREATE INVOICES
The Create Invoices button on the Main Menu is used at the end of the billing cycle to
create invoices for both customers and trainers. Pressing this button brings up a criteria
form that allows the user to specify the type of invoices to be created (customer or
trainer) and various dates that will be used during processing and which are displayed on
the final printed invoice.
If no invoices exist in the database, a box will also appear at the bottom of the criteria
form to allow the user to begin invoice numbering at a number other than 1. If this box is
left blank, the first invoice created will be numbered 1 and each successive invoice
number will be incremented by 1. If another number is entered, that will become the first
invoice number and all successive invoice numbers will be incremented by 1. Any time
new invoices are created, the system will look for the highest invoice number present in
the database and will begin numbering new invoices from this number.
When creating either type of invoice (customer or trainer) the system applies the
following logic:
1) Evaluate the payments table by taking all uninvoiced payment records occurring
on or before the Invoice To Date indicated on the criteria form. Create
“temporary” invoices for each customer or trainer containing the individual
payments to be shown on invoices.
2) Evaluate the Sessions table. Look at all uninvoiced sessions with a date less than
or equal to the Invoice Date To box on the criteria form. If a record applies to a
trainer who is checked as an independent contractor, the session will be applied to
a trainer invoice. If not, the session will be applied to a customer invoice. If a
“temporary” invoice was created in step 1, add this invoice number to each
customer and trainer session record for the correct individual. If not, create a
“temporary” invoice for the individual. For trainers, total the number of sessions
so that it can be determined if a rate discount will be given according to that
trainer’s rate schedule.
3) Evaluate the Products Sold table by looking for uninvoiced products sold with a
date on or before the Invoice Date To indicated on the criteria form. If a
“temporary” invoice exists from step 1 or 2, add this invoice number to the
product sold record for the correct individual. If not, create a “temporary” invoice
for the individual.
4) Create new invoices for all “temporary” invoices created during steps 1-3. Look
up the Amount Owed from the last invoice (highest invoice number) of each
individual to determine the Prior Balance to be used on the current invoice.
22
Gym Executive Version 2.3.01 User Manual
5) For trainer invoices, apply a discount if the number of sessions totaled in step 2 is
greater than one of the rate schedule breaks as entered on the trainer’s information
form.
When the system has finished creating invoices, a message will be displayed along with
the printable versions of both trainer and customer invoices. Since the invoice layout is
different for customers and trainers, these will show as separate printed reports. You
must close the trainer invoice in order to view customer invoices. This is only necessary
when creating both types of invoices at the same time.
If adjustments need to be made before invoices are delivered to customers and trainers,
use the Invoice button on the Data Entry portion of the Main Menu to go the invoice form
and make changes. A single invoice can be printed from this form for the invoice
representing the displayed record.
23
Gym Executive Version 2.3.01 User Manual
6.2 EXPORT DATA
The export data feature in Gym Executive allows the user to export the data in all files to
delimited text files. Delimited means that a specific text character separates all data,
typically this is one that is never seen in the data being saved. Gym Executive uses the
pipe symbol “|” as a delimiter, the symbol that shares the backslash key “\” on a standard
keyboard. If you intend to use the export and import data features in Gym Executive, you
must be careful not to use the pipe symbol “|” when entering data into the database.
WARNING: In order to use the export and import data features of Gym Executive, the
data cannot contain the pipe symbol “|”.
An exported set of data contains the following ten text files:
1. Business_Info.txt
2. Customer_Payments.txt
3. Customers.txt
4. Invoices.txt
5. Products.txt
6. Products_Sold.txt
7. Sessions.txt
8. Setup.txt
9. Trainer_Payments.txt
10. Trainers.txt
When you click on the Export Data button on the Main Menu, you will be prompted for a
folder to save the exported files to. Only one set of files are allowed in a single folder, so
if you make multiple copies of the data or export on a regular basis, you will want to
name the folders appropriately so that you can identify each data set at a later time
(perhaps by including the export date as part of the folder name).
When the export operation begins, the system will first search the selected folder to make
sure no files already exist in the folder with the same name as one of the ten files to be
exported. If any of these files are seen in the destination folder, the export process will
be aborted and a message will be displayed to the user as to why the operation was
canceled. If the destination folder does not already have any of the ten text files present,
the system will export the data tables one at a time until all ten text files have been
created.
A spreadsheet, word processor, or any other program that allows the viewing of delimited
text files can read the exported data. In most cases, the user will have to specify the
delimiter (pipe symbol “|”) in the software that will be used to read the data.
24
Gym Executive Version 2.3.01 User Manual
6.3 IMPORT DATA
WARNING: In order to use the export and import data features of Gym Executive, the
data cannot contain the pipe symbol “|”.
WARNING: Using the Import Data feature will overwrite all data currently in the
database. If you need to save the data currently in the database, make a backup copy of
the database or export the files to a safe location.
The Import Data button on the Main Menu is used to import a complete set of ten Gym
Executive text files having the following names:
1. Business_Info.txt
2. Customer_Payments.txt
3. Customers.txt
4. Invoices.txt
5. Products.txt
6. Products_Sold.txt
7. Sessions.txt
8. Setup.txt
9. Trainer_Payments.txt
10. Trainers.txt
These are the same ten files that are created using the Export Data feature of Gym
Executive. When the Import Data button is clicked, the user will first see a dialog box
letting them know that all data in the current copy of the database will be overwritten. If
you are sure you want to replace all data in the database, click yes to proceed. You will
then be prompted to select the folder where the set of ten files will be imported from.
Once a folder is selected, the system will first check to see that all ten files exist in the
selected folder. If all files are present, the process of importing the files into the database
tables will begin.
After importing data, the user should inspect the database by browsing through the
various forms to insure there is no missing data and that all tables were imported
correctly.
25
Gym Executive Version 2.3.01 User Manual
7.0 GLOSSARY
Dialog Box – A pop-up form used to display information or warning messages to the
user. Some dialog boxes allow the user to select a particular action to be taken during
code processing.
Field – A single piece of information from a database table. Fields from the Customers
table would include First Name, Last Name, Address, Home Phone, etc.
Form – A screen that may or may not contain data fields. It has been designed for
viewing on the computer monitor.
Record – One complete collection of fields from a database table. The Customers and
Trainers forms each are designed to show one record at a time. The Sessions and
Products Sold forms show multiple records simultaneously.
Record Selector – The gray space to the left of each record is called the record selector.
Clicking on this will “select” the record and turn the record selector black. An entire
record can be deleted or copied by selecting in this fashion.
Report – A collection of database information that has been designed for printing.
Ribbon – The graphical command bar displayed at the top of each form and report. This
can change appearance between different forms and reports. Commands that cannot be
used will be grayed out and not available.
Table – A database structure that contains related information pertaining to a single
subject. Tables in this database include Customers, Trainers, Products Sold, Sessions,
etc.
26