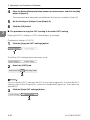
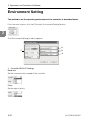
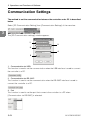
1
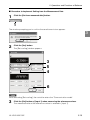
96138E
For LK-G Series
Setting and Support Software
LK-H1W
LK-Navigator
User’s Manual
Read this manual before using the software in order
to achieve maximum performance.
Keep this manual in a safe place
for future reference.
Introduction
This manual describes installation procedure, handling method, operating procedure and precautions of the LK-Navigator. Read this manual carefully before starting
to use the software to ensure the optimum performance and full function of the LKNavigator. Keep this manual in a safe place for future reference.
Together with this User’s Manual, read the LK-G series User’s Manual when using the "LKNavigator".
The following terminology is used in this manual.
"Controller": Indicates the Controller (LK-G3001V, LK-G3001) of the LK-G series.
■ Symbols
The following symbols alert you to matters concerning the prevention of human injury and
product damage beforehand in this Manual.
Note
Provides additional information on proper operations that can be easily mistaken.
Reference
Provides advanced and useful information for operation.
Safety Precautions
"LK-Navigator" and User’s Manual contain the important information to prevent injury or
death to the machine operators and other people, to prevent damage to the assets
beforehand, and to ensure safe use. Fully understand the meanings of the warning indications (conventions and symbols) first. Then, read the User’s Guide thoroughly and follow the safety rules as specified. Read the User’s Guides and Operation Manuals of the
related devices and equipment before starting to use the system.
■ Symbols
Note
Provides additional information on proper operations that can be easily mistaken.
Reference
Provides advanced and useful information for operation.
■ General Cautions
• At startup and during operation, be sure to monitor the functions and performance of
the LK-Navigator.
• We recommend that you take substantial safety measures to avoid any damage in the
event of a problem occurring.
• Do not attempt to open or modify the sensor or use it in any way other than as
described in the specifications. If the sensor is modified or used other than as
described, the warranty will be voided.
• When the sensor is used in combination with other devices, functions and
performance may be degraded, depending on the operating conditions and
surrounding environment.
• The information and contents described herein are subject to change without prior
notice.
■ Trademarks
• Windows is a the registered trademark of Microsoft Corporation.
• Pentium is a registered trademark of Intel Corporation.
• Acrobat Reader is a registered trademark of Adobe Systems Incorporated.
LK-H1W-M-NO0-E
96138E
1
License Agreement on Use of Software
"LK-Navigator" is available to you provided you agree with the following license agreement contract.
Read the following terms of the contract carefully before using the software.
By using the LK-Navigator, you signify that you agree with the statements herein and the
contract is accepted.
Terms of license agreement on use of the software
Read the following terms of the license agreement before using this software.
License agreement of use
1. License of use
KEYENCE Corporation shall license the Multi-User Agreement of the LK-Navigator under the
terms of the license agreement herein.
2. Copyright
The copyright on the software and supplied documentation belong to KEYENCE Corporation,
and you hold only the license for its use.
3. Prohibited matter
The user may not copy this software and sell or distribute it to a third party. However, when
using this software on a computer that is connected to the KEYENCE product that was
purchased with this software, this software may be installed onto multiple computers for the
same company. Also, you may copy this software for the purpose of keeping backup copy for
your personal use.
4. Escape clause
KEYENCE Corporation shall not be held liable by the user or a third party for any damages
arising from the use of the software.
5. Cancellation of contract
If you violate this license agreement, the contract will be canceled immediately. In such a case,
you must destroy the software or return it and its copies to KEYENCE Corporation.
2
LK-H1W-M-NO0-E
Organization of this Manual
Chapter
1
Chapter
2
Chapter
3
Appendices
Overview
Describes the package contents, outline of the LKNavigator, and operating environment.
Preparations
Describes the installation procedure, startup and stop
of the "LK-Navigator".
Operations and Functions
of Software
Describes the method of setting parameters and
operation procedure of the "LK-Navigator".
Appendices
Describes the list of error messages together with their remedies, and index of the words and terms used in this Manual.
LK-H1W-M-NO0-E
1
2
3
A
3
Table of Contents
Safety Precautions .................................. 1
License Agreement on Use of
Software .................................................. 2
Terms of license agreement on
use of the software............................. 2
Organization of this Manual .................... 3
Setting the Programs ......................... 3-26
Copy Program............................... 3-26
Initializing Program ....................... 3-28
View Measurement Value .................. 3-29
View Received Light Waveform ......... 3-32
Data Storage Setting .......................... 3-34
Reading and Saving the Setting File . 3-42
Reading the Setting File................ 3-42
Saving the Setting File .................. 3-43
Chapter 1 Overview
Appendices
Overview of LK-Navigator .................... 1-2
Functions and Features .................. 1-2
Operating Environment................... 1-5
Error Messages and Countermeasures .....A-2
Shortcut Keys List ................................A-6
Index ....................................................A-7
Chapter 2 Preparations
Connecting the Controller to a PC ....... 2-2
Connection using USB.................... 2-2
Connection using RS-232C ............ 2-3
Installation ............................................ 2-4
Uninstallation ....................................... 2-8
Installing the USB Driver .................... 2-10
Start and Quit ..................................... 2-11
Start............................................... 2-11
Quit ............................................... 2-15
Chapter 3 Operations and
Functions of Software
Identifying Part Names and Functions of the
Main Screen ......................................... 3-2
Flow of Operations ............................... 3-4
Basic Settings ...................................... 3-6
Head-A/Head-B .............................. 3-6
OUT1/OUT2 .................................. 3-10
Common Settings ......................... 3-17
Settings List .................................. 3-20
Sending/Receiving the Settings.... 3-21
Environment Setting ........................... 3-22
Communication Settings .................... 3-24
4
LK-H1W-M-NO0-E
Overview
1
1
Overview of LK-Navigator..................................................... 1-2
LK-H1W-M-NO1-E
1-1
1 Overview
Overview of LK-Navigator
1
The "LK-Navigator" is the parameter setting and monitoring software of the controller. When the controller is connected to a PC, this software enables the operator to
set the parameters and to monitor the operating status of the controller from a PC.
Functions and Features
The main functions and features of the "LK-Navigator" are described as follows.
■ Operation Setting
• The settings of the controller can be received by a PC, enabling the operator to check
and modify the settings. When multiple equipment or programs need to be set, they can
be quickly and easily set by using the Copy and Paste functions of the software.
• The settings created on the PC can then be sent to the controller to set it. Communication
between the controller and PC is done simply by pressing the corresponding buttons.
• The settings of the controller can be read and saved by PC. Because the controller
settings can be saved in a PC, the settings can be recovered from a file saved in the PC
in the event of accidental erasure of the settings in the controller.
The following settings can be made from a PC.
· Head Settings
· OUT Settings
· Common Settings
· Environment Settings
1-2
LK-H1W-M-NO1-E
1 Overview
■ Monitoring Function
This software can monitor the following two items.
• Measured value
• Received light waveform
The following screen shows an example of [Measurement Value Display].
LK-H1W-M-NO1-E
1
1-3
1 Overview
■ Data Storage
1
This controller has a data storage function that can store the measured values.
The functions that can be operated from a PC are shown below.
• Starting/stopping/clearing the data storage
• Determining the method of data storage
• Sending and receiving the settings between the controller and PC
• Receiving the stored data from the controller
• Reading and saving the stored data from a PC
• Displaying on a PC up to four waveforms of data received from the controller
• Displaying the calculated values between two waveforms selected by moving the
cursor
1-4
LK-H1W-M-NO1-E
1 Overview
Operating Environment
The following environment is required to run the "LK-Navigator". Check that the system complies with the following conditions and the required equipment is available.
CPU
Pentium III, 400 MHz or higher
Supported OS
Windows 7*1
Windows Vista*2
Windows XP*3
Windows 2000 Professional
Memory capacity
64 Mbytes or more
Display resolution
800 x 600 pixels, 256 colors or more
Free space on hard disk
10 Mbytes or more
Interface
RS-232C (serial port) or USB (version 1.1 onward) must be installed.
*1 Home Premium, Professional, and Ultimate editions each are supported.
*2 Ultimate, Business, Home Premium, and Home Basic editions each are supported for
Windows Vista ver. 1.5 or later.
*3 Professional and Home Edition editions each are supported.
LK-H1W-M-NO1-E
1-5
1
1 Overview
MEMO
1
1-6
LK-H1W-M-NO1-E
Preparations
2
2
Connecting the Controller to a PC........................................ 2-2
Installation ............................................................................ 2-4
Uninstallation ........................................................................ 2-8
Installing the USB Driver .................................................... 2-10
Start and Quit ..................................................................... 2-11
LK-H1W-M-NO2-E
2-1
2 Preparations
Connecting the Controller to a PC
The method to connect the controller to a PC is described below. Either the USB or RS232C interface can be used. Select an appropriate method in accordance with the PC.
2
Note
The USB and RS-232C interfaces cannot be used at the same time even though they are
both connected.
Connection using USB
The method to connect the controller to a PC via a USB cable is described as follows.
The location and direction of the USB connector may differ depending on PC. When
connecting a USB cable, refer to the Operating Instructions supplied with the PC.
Note
The USB connector of the controller is Type-B connector. Connect the USB cable that has
the Type-B connector at one end.
1
2
Connect the Type-B connector of the USB cable to the controller.
Connect the other end to the USB connector of the PC.
If the PC is already running, it will recognize the controller automatically.
When connecting the controller to the PC with the USB interface for the first time, install
the driver software. Refer to "Installing the USB Driver" (page 2-10).
Note
Do not remove the USB cable while the controller is runnning. Otherwise, the controller
may not function correctly. If the communication is disabled by accidental disconnection
of the USB cable, restart both of the "LK-Navigator" and the controller.
2-2
LK-H1W-M-NO2-E
2 Preparations
Connection using RS-232C
The method to connect the controller to a PC using the RS-232C cable is described as
follows.
The location and direction of the RS-232C port may differ depending on PC. When
connecting the RS-232C cable, refer to the Operating Instructions supplied with the PC.
To connect the controller to a PC using the RS-232C cable, a dedicated cable OP-96368
(straight cable 2.5 m) and a OP-96369 (D-sub 25-pin connector) or OP-26401 (D-sub 9pin connector) are required as shown below.
PC
OP-96369 or
OP-26401
OP-96368
1
Connect the dedicated cable OP-96368 to the RS-232C connector of the controller.
2
Connect OP-96368 to OP-96369, and connect the cable to the RS-232C connector of a PC.
Connection using OP-96369 (D-sub 25-pin connector) is shown as an example.
LK-H1W-M-NO2-E
2-3
2
2 Preparations
Installation
The procedure to install the "LK-Navigator" and "USB Driver" in a PC is described
below.
2
Note
• Installation of the USB driver in Windows XP is described as an example.
• Before starting installation, quit all applications that are already running.
• To install the USB driver, log on to the PC as the user that has administrator authority.
1
Insert "LK-H1W" in the CD-ROM drive and double-click "Setup.exe".
The [InstallShield Wizard] window appears.
2
2-4
LK-H1W-M-NO2-E
2 Preparations
2
Click the [Next] button.
The [Customer Information] window appears.
2
3
3
Enter the User name and Organization name, then click the [Next] button.
The [Destination Folder] window appears.
4
LK-H1W-M-NO2-E
2-5
2 Preparations
4
Confirm the destination folder and click the [Next] button.
The [Ready to Install the Program] window appears.
2
5
Reference
• By default, the program is installed in "C:\Program Files\KEYENCE\LK-Navigator\".
• If you want to change the destination folder of installation, click the [Change] button,
and select the desired drive name and folder name.
5
Check the setting and click the [Install] button.
If the [Device Driver Installation Wizard] window appears, follow the instructions.
When installation ends successfully, the [InstallShield Wizard Completed] window
appears.
6
2-6
LK-H1W-M-NO2-E
2 Preparations
6
Click the [Finish] button.
This completes the installation.
Note
The "LK-Navigator" Help file is displayed using the "Acrobat Reader " supplied by the
Adobe Systems Incorporated. If "Acrobat Reader" has not been installed in your PC, double-click the "Acrobat Reader51_JPN.exe" in the supplied CD-ROM (LK-H1W) and install it
by following the instructions on the screen.
LK-H1W-M-NO2-E
2-7
2
2 Preparations
Uninstallation
The procedure to uninstall the "LK-Navigator" from a PC is described below.
Note
2
• Uninstallation of "LK-Navigator" from Windows XP is described as an example.
• Before starting uninstallation, quit all applications that are already running.
• To uninstall "LK-Navigator", log onto the PC as the user that has administrator authority.
1
Double-click [Add/Remove Programs] on the Control Panel.
1
The [Add/Remove Programs] window appears.
2-8
LK-H1W-M-NO2-E
2 Preparations
2
2
Select "LK-Navigator" and click the [Remove] button.
The window prompting you to confirm removal appears.
2
3
3
Click the [Yes] button.
Uninstallation starts.
If uninstallation does not complete even after performing steps 1 to 3, continue to execute the following steps 4 to 6.
4
Insert the CD-ROM "LK-H1W" in the CD-ROM drive and double-click
"Setup.exe".
The [Confirming the file to remove] window appears.
5
Click the [OK] button.
The [Maintenance completed successfully] window appears.
6
Click the [Finish] button.
This completes the uninstallation.
LK-H1W-M-NO2-E
2-9
2 Preparations
Installing the USB Driver
2
The driver is installed at the same time as the application software for Windows 7, Vista,
XP, and 2000. Normally following operations are not necessary. If the driver installation
is cancelled while installing the application software, follow the procedure to install the
USB driver that is described below. When the USB driver is installed in a PC, it recognizes the controller automatically.
Note
•
•
•
•
Installation of the USB driver in Windows XP is described as an example.
Before starting installation, quit all applications that are already running.
To install the USB driver, log on to the PC as the user that has the administrator authority.
The USB connector of the controller is Type-B. Use a USB cable that has a Type-B
type connector at one end.
• The controller conforms to the USB 2.0 Full Speed. Since the USB interface maintains
the backward compatibility, the controller can communicate with a PC in which USB
version 1.1 is installed.
1
Start up the controller and the PC.
2
Connect the controller to the PC using the USB cable.
The [New hardware search wizard] window appears.
3
Insert the CD-ROM "LK-H1W" in the CD-ROM drive and double-click the [Next]
button.
The [Installing the software. Please wait a while] window appears. Installation starts.
Reference
• If the following window appears during installation, click the [Continue] button.
• Depending on your Windows version, [Found New Hardware Wizard] may appear,
prompting you to connect Windows Update. In this case, select [No, not this time] and
click the [Next] button.
When installation ends successfully, the [New hardware search wizard ends] window
appears.
4
2-10
Click the [End] button.
This completes the USB driver installation.
LK-H1W-M-NO2-E
2 Preparations
Start and Quit
The procedures to start and quit the "LK-Navigator" are described below.
Start
1
2
From the [Start] button, select [LK-Navigator].
1
Note
• "LK-Navigator" cannot be start up multiple times simultaneously.
• The USB and RS-232C interfaces cannot be used at the same time even though they
are both connected.
• Communication is disabled when the controller is in the "Setting mode".
LK-H1W-M-NO2-E
2-11
2 Preparations
[LK-Navigator] starts up, and the main screen and the [Select the setting contents to be
displayed at startup] window are displayed.
2
2
Select [Start up with the default values].
When [Start up with the default values] is selected, the PC settings return to the default values.
Note
‘
Even though [Start up with the default values] is selected here, the controller’s settings do
not return to the default values.
2
3
When any other item as shown below is selected, refer to the respective procedures.
• [Read from file.]
Refer to "Procedure for reading from a file" (page 2-13).
• [Read Controller Settings]
Refer to "Procedure to read the setting contents of the connected controller" (page 213).
2-12
LK-H1W-M-NO2-E
2 Preparations
3
Click the [OK] button.
The program is initialized.
■ Procedure for reading from a file
Execute step 1 of [Start] to start up "LK-Navigator".
1
Select [Read from file.]
2
1
2
2
Click the [OK] button.
The [Open] window appears.
3
4
3
Select the setting file you want to read.
Select "LK-G_Config.ldt" here.
4
Click the [Open] button.
The setting contents are read out.
Reference
If you click the [Cancel] button here, the same operation as that of [Start up with the default
values] is executed. (
page 2-12).
■ Procedure to read the setting contents of the connected controller
Execute step 1 of [Start] to start up "LK-Navigator".
LK-H1W-M-NO2-E
2-13
2 Preparations
1
Select [Read Controller Settings].
1
2
2
2
Click the [OK] button.
The setting contents are read out from the controller.
Reference
The communication settings that were in use at the time of quitting "LK-Navigator" last time
are also used.
Note
If the controller is not connected, or if communication fails, an error message is displayed.
The communication setting when the software is started up for the first time is shown
below.
• Interface : USB
If the communication fails, the same operation as that of [Start up with the default values]
is executed. (
page 2-12).
2-14
LK-H1W-M-NO2-E
2 Preparations
Quit
1
Click the [Exit] button in the bottom right of the main screen.
Reference
When you click the
2
button of the Title Bar, the same operation will be executed.
When the settings are modified, the window prompting to save current setting is
displayed.
2
2NoteClick the [Yes] button.
• If you click the [No] button, the program is terminated without saving the settings.
• If you click the [Cancel] button, the screen returns to the original display.
The [Save As] window is displayed.
3
4
3
Enter the name of the file in which the setting contents are to be saved.
Enter "LK-G_Config.ldt" here.
Reference
The extension ".ldt" is automatically added to the saved file to indicate that the file is the
setting file of the LK-G series.
4
Click the [Save] button.
The settings are saved in the file and "LK-Navigator" is terminated.
LK-H1W-M-NO2-E
2-15
2 Preparations
MEMO
2
2-16
LK-H1W-M-NO2-E
Operations and
Functions of Software
3
3
Identifying Part Names and Functions of the Main Screen .. 3-2
Flow of Operations ............................................................... 3-4
Basic Settings....................................................................... 3-6
Environment Setting ........................................................... 3-22
Communication Settings..................................................... 3-24
Setting the Programs.......................................................... 3-26
View Measurement Value ................................................... 3-29
View Received Light Waveform .......................................... 3-32
Data Storage Setting .......................................................... 3-34
Reading and Saving the Setting File .................................. 3-42
LK-H1W-M-NO3-E
3-1
3 Operations and Functions of Software
Identifying Part Names and Functions of
the Main Screen
The part names and functions on the main screen of "LK-Navigator" are descrived
as follows.
3
1
2
3
5
4
7
6
8
1. Menu bar
Shows the operation menu of "LK-Navigator".
2. Tool bar
Shows the frequently used tools of the menu bar in the form of buttons.
For the operating method of the respective tools, refer to "View Measurement Value" (page
3-29) to "Data Storage Setting" (page 3-34).
3. Program Settings
Used to select the desired Program No., to copy it and to initialize it.
For the method of setting the programs, refer to "Setting the Programs" (page 3-26).
3-2
LK-H1W-M-NO3-E
3 Operations and Functions of Software
4. Controller Envriroment Setting
Sets the operating environment settings of the controller.
For the method of setting the environment settings, refer to "Environment Setting" (page 322).
5. Setting Window
Sets the respective heads and their outputs.
For the method of setting the respective tabs, refer to "Basic Settings" (page 3-6).
6. Open or Saving the Setting File
Used to read the settings that are made by "LK-Navigator", and save them.
3
For the method of reading and saving the setting file, refer to "Reading and Saving the
Setting File" (page 3-42).
7. Quit
Quits the "LK-Navigator".
For the method of quitting the LK-Navigator, refer to "Start and Quit" (page 2-11).
8. Help
Opens the Help file of the "LK-Navigator".
LK-H1W-M-NO3-E
3-3
3 Operations and Functions of Software
Flow of Operations
The procedure to set the Head-A signal to be output from OUT1 when the "LK-Navigator"
is started up for the first time after purchase, is described below.
Connect the controller to a PC using the RS-232C cable or USB cable.
Refer to "Connecting the Controller to a PC" (page 2-2).
3
Start up the controller first, then start up the PC.
Start up LK-Navigator.
Refer to "Start and Quit" (page 2-11).
Select [Start up with the default values] from the [Select the settings to be displayed at startup] window.
Refer to "Start and Quit" (page 2-11).
Select the Program No.
Refer to "Setting the Programs" (page 3-26).
Set the [Common Settings].
Refer to "Common Settings" (page 3-17).
3-4
LK-H1W-M-NO3-E
3 Operations and Functions of Software
Set [Head-A].
Refer to "Head-A/Head-B" (page 3-6).
Set [OUT 1].
Refer to "OUT1/OUT2" (page 3-10).
3
Confirm contents of the settings on [Settings List].
Refer to "Settings List" (page 3-20).
Set the method to communicate with the controller using [Controller Environment Setting].
Refer to "Environment Setting" (page 3-22).
Send the settings to the controller.
Refer to "Sending/Receiving the Settings" (page 3-21).
Confirm the operations using the tools.
Refer to "View Measurement Value" (page 3-29) to "Data Storage Setting" (page 3-34).
Save the setting file in a PC.
Refer to "Reading and Saving the Setting File" (page 3-42).
End
LK-H1W-M-NO3-E
3-5
3 Operations and Functions of Software
Basic Settings
Basic settings of "LK-Navigator" are described below.
Head-A/Head-B
3
The screen and functions of the Head-A tab and those of the Head-B tab are
described below.
The heads that are connected to the controller can be set using this function. The
items required to be set are identical in Head-A and Head-B. The settings should be
made in accordance with the environment in use.
Click the [Head A] tab or the [Head B] tab on the setting window.
1
2
5
3
4
6
1. Measurement mode
Select the measurement mode.
2. ABLE
Select either automatic (AUTO) or the manual (MANUAL) control of the light intensity.
3-6
LK-H1W-M-NO3-E
3 Operations and Functions of Software
Reference
• Select [AUTO] for normal operation.
• When [MANUAL] is selected, the upper limit and the lower limit of the light intensity
control are set.
Setting range: 1 to 99
3. ABLE Tuning
Calibrate the settable range of the [MANUAL] mode using the [ABLE] function for
optimum performance in accordance with the actual work-piece.
3
Refer to "Setting Procedure of ABLE Calibration" (page 3-8).
1
4. Relfection type selection mode
Select the reflection type.
5. Alarm Error
Number of Errors
Set the number of times of the normal measurement obtained before the error is held while
an error is occuring.
Reference
Setting range: 0 to 999
Number of errors
Error processing
0
Immediate processing of the ALARM error
1 to 998
The normal value immediately before
occurrence of the error is HELD.
999
ALARM error processing is not performed.
LK-H1W-M-NO3-E
3-7
3 Operations and Functions of Software
ALARM Level
Set the alarm threshold level.
3
Setting range: Low (0) to High (9)
• Low (0): When "Low" is selected, ALARM is issued at the high waveform level, i.e., is
not issued easily.
• High (9): When "High" is selected, ALARM is issued at the low waveform level, i.e., is
issued easily.
6. Copy the Head-A setting. Paste the copied head setting.
This function is used to copy the already established setting of a specific head, to another
head (including the head setting of other program No.)
Refer to "Procedure to Copy the Setting of a Head to Another Head" (page 3-9).
■ Setting Procedure of ABLE Calibration
1
Click the [ABLE Tuning] button.
The [Head Setting] window appears.
2
3
Note
• If you do not want to send the head setting to the controller at the time when
calibration starts, turn OFF the check box [Send the PC setting to the controller while
executing is in progress].
• While executing the [ABLE Tuning], the controller enters the "Communication mode".
2
3-8
Click the [Start] button to start calibration.
Then both the [Stop] button and the [Cancel] button become active.
LK-H1W-M-NO3-E
3 Operations and Functions of Software
3
Click the [Stop] button. The calibration ends and the optimal values are set
automatically.
Note
If the [Cancel] button is clicked, the calibration is cancelled so that the settings are not
changed.
■ Procedure to Copy the Setting of a Head to Another Head
The procedure of copying the [Head-A] setting to [Head-B] is described below as an example.
First, complete all settings of [Head-A].
1
Click the [Copy the Head-A setting] button.
1
The [Paste the copied head setting] button becomes active.
2
Click the [Head-B] tab.
2
Reference
You can paste the setting to the head setting of other Program No. To paste the setting to
the head setting of other Program No., select first the desired Progam No., then select the
head.
3
Click the [Paste the copied head setting] button.
3
LK-H1W-M-NO3-E
3-9
3
3 Operations and Functions of Software
OUT1/OUT2
Functions and screens of the OUT1/OUT2 tab are described below.
Use this function to set the processing method that is best suited for the specific
measured value. The items required to be set are identical in OUT1 and OUT2.
Click the [OUT1] tab or the [OUT2] tab of the setting window.
4
3
1
5
2
3
6
1. Calculation method
Set the calculation method that is best suited for the selected method of measurement
and for the specific measurement target.
2. Measurement target
When [Head-A transparent object] or [Head-B transparent object] is selected by [Calculation method], the [Measurement target] is required to be set.
3-10
LK-H1W-M-NO3-E
3 Operations and Functions of Software
3. Measurement, Tolerance
The method to set the Measurement and to set the Tolerance Comparator is described below.
3
Measurement mode
Set the measurement mode.
TRIGGER
When any item other than [NORMAL] is selected by the [Measurement mode], trigger is
requested to be set.
Filter
• Type
Use this function to set the filter processing that is best suited for the measured value.
• Averaging Times
Set the number of the Averaging Times when [Moving-average] is selected by [Type].
LK-H1W-M-NO3-E
3-11
3 Operations and Functions of Software
Reference
As the number of Averaging Times decreases, response speed of measured value
increases. As the number of Averaging Times increases, a more stable measurement
value can be obtained.
• Cut-off frequency
When either [LOW-PASS FILTER] or [HIGH-PASS FILTER] is selected by [Type], its cut-off
frequency is requested to be set.
3
Tolerance Comparator
• Upper limit value
Sets the upper limit value of the Tolerance.
• Lower limit value
Sets the lower limit value of the Tolerance.
• Hysteresis
Sets hysteresis of the Tolerance Comparator.
4. Scaling, Offset
Set the Scaling and Offset.
3-12
LK-H1W-M-NO3-E
3 Operations and Functions of Software
Scaling Setting
• Head-A input value-1/Display value-1, Head-A input value-2/Display value-2
The method to display the Head-A input value on the display can be set using the Scaling
function at the two measurement points as follows.
• Head-B input value-1/Display value-1, Head-B input value-2/Display value-2
The method to display the Head-B input value on the display can be set using the Scaling
function at the two measurement points as follows.
• Setting from the Measurement Data
Set the Scaling while confirming the actual measurement data.
Refer to "Procedure to Implement Setting from the Measurement Data" (page 3-15).
Offset
Set the offset.
5. Display, Analog
Set the measurement value display and the analog output.
Minimum display unit
Set the decimal point position of the measurement and setting values, and set the number
of digits to display.
Reference
The digits that are not displayed below decimal point will be rounded off.
LK-H1W-M-NO3-E
3-13
3
3 Operations and Functions of Software
Note
When the setting [Minimum display unit] is changed, settings of the following items are
initialized.
Scaling/Offset/Tolerance Setting/Analog Output Scaling/Auto Zero Reference Value
Analog output
• Analog through
Set whether the measurement value is output to the Analog output with or wihtout
processing, regardless of the setting of [Measurement Mode].
3
• Analog output scaling
Set the Scaling on the Analog output with respect to the measurement value.
Reference
Scaling can be applied to the Analog output in the range of ±10.5 V.
6. Copy OUT-1 settings. Past OUT settings.
This function is used to copy the already established OUT-1’s setting to the other OUT’s
settings (including the OUT setting of other program No.)
Refer to "The procedure to copy the OUT’s setting to the other OUT’s setting" (page 3-16).
3-14
LK-H1W-M-NO3-E
3 Operations and Functions of Software
■ Procedure to Implement Setting from the Measurement Data
1
Click the [Set from measured data] button.
1
The window prompting you to confirm the send transmission appears.
3
2
2
Click the [Yes] button.
The [Set scaling] window appears.
3
5
4
6
Note
While executing [Set scaling], the controller enters the "Communication mode".
3
Click the [Set] button of [Input 1] when measuring the reference surface.
The measured value at the reference surface is entered in [Input 1].
LK-H1W-M-NO3-E
3-15
3 Operations and Functions of Software
4
Place the Master Work-piece below sensor for measurement, and click the [Set]
button of [Input 2].
The measured value obtained from the Master Work-piece is entered in [Input 2].
5
6
3
Set the Scaling on [Output 1] and [Output 2].
Click the [OK] button.
■ The procedure to copy the OUT’s setting to the other OUT’s setting
Copying the OUT1 setting to OUT2 is described as an example.
Complete all settings of [OUT1].
1
Click the [Copy the OUT1 settings] button.
1
The [Paste OUT settings] button becomes active.
2
Select the [OUT2] tab.
2
Reference
You can copy the OUT’s setting to the OUT of any other program No. To paste the OUT’s
setting to that of other Program No., select first the desired Program No., then select the
desired OUT.
3
Click the [Paste OUT settings] button.
3
3-16
LK-H1W-M-NO3-E
3 Operations and Functions of Software
Common Settings
Functions and screen of the Common Settings tab are described below.
Click the [Common Settings] tab of the Setting window.
1
2
3
3
6
4
5
7
1. Sampling cycle
Set the sampling cycle of measurements.
2. Mutual interference prevention
This function is used to prevent mutual interference between two heads when the two
heads are connected to the same controller.
3. Timing synchronization
This function is used whether to synchronize the timin inputs of OUT1 and OUT2, or not to
synchronize them.
LK-H1W-M-NO3-E
3-17
3 Operations and Functions of Software
4. Strobe time
When any measurement mode other than NORMAL is selected, the strobe time can be
set.
3
5. Tolereance comparator output format
This function is used to set the operation of the Tolerance Comparator Output when result
of the Tolerance Comparator judgment changes from ON to OFF.
6. Data Storage
Selected OUT
Set the OUT that becomes the target of data storage.
Amount of Data Stored
Set the number of data to be stored.
Storage cycle
Set the interval at which the data is stored.
Reference
Data is stored at the interval (in units of milli second or micro second) of the storage cycle
that is displayed under the set value.
7. Copy common settings, Past common settings
This function is used to copy the already established setting of a program to the Common
Settings of the other program No.
Refer to "Procedure of Copying the Settings of the Common Settings to Other Programs"
(page 3-19).
3-18
LK-H1W-M-NO3-E
3 Operations and Functions of Software
■ Procedure of Copying the Settings of the Common Settings to Other Programs
Copying the setting of program No. 0 to [Common Settings] of program No. 1 is described
as an example.
Complete all settings of [Common Settings].
1
Click the [Copy common settings] button of program No. 0.
3
1
The [Paste common settings] button becomes active.
2
Select the program No.1.
2
3
Click the [Paste common settings] button.
3
LK-H1W-M-NO3-E
3-19
3 Operations and Functions of Software
Settings List
You can confirm the items that have been set, within the program.
Click the [Settings List] tab of the Setting window.
3
1
2
3
1. Settings List
The Settings List of the selected program is displayed.
2. Adding the connected head to types the Settings List
Model of head that is connected to the controller can be added to the Settings List by
using this function.
3. Copy the Settings List to the clipboard
This function is used to copy the setting to the clipboard. It is useful when pasting the
settings to other applications.
Reference
• The setting that is copied to the clipboard will become the tab-delimited format when it
is pasted to other applications.
• If any setting is changed after any of the following operations is made, the changed
portion is displayed in blue.
· Start of LK-Navigator
· Sending/receiving the setting to/from Controller
· Open/Save the Setting File
3-20
LK-H1W-M-NO3-E
3 Operations and Functions of Software
Sending/Receiving the Settings
The procedure to send or to receive the setting to or from the controller is described
below.
■ Receiving the Settings
Click the [Receive settings from controller] button of the tool bar.
3
Reference
The same operation is obtained by selecting [Receive Settings from Controller] from
[Communication] menu bar.
■ Sending the Settings
Click the [Send settings to controller] button of the tool bar.
Reference
The same operation is obtained by selecting [Send settings to controller] from [Communication] menu bar.
Note
• The communication is disabled when the controller is in the "Setting mode", "Program
Change mode", and "Tolerance Setting mode".
• When the controller is connected to a PC with RS-232C, and when the RS-232C
setting is changed by using [Controller Environment Setting], [PC Communication
Setting] of "LK-Navigator" is also changed automatically when the setting is sent to the
controller.
• While executing sending/receiving setting, the controller enters the "Communication
mode".
LK-H1W-M-NO3-E
3-21
3 Operations and Functions of Software
Environment Setting
The method to set the operating environment of the controller is described below.
From the main screen, click the [Controller Environment Setting] button.
3
The [Environment Setting] window appears.
2
1
3
4
1. Controller RS-232C Settings
Baud rate
Set the communication speed of the controller.
Parity
Set the type of parity.
3-22
LK-H1W-M-NO3-E
3 Operations and Functions of Software
Automatic Transmission
Set OUT that executes the automatic transmission to the RS-232C interface.
Note
When the controller is connected to a PC with RS-232C, and when the RS-232C setting is
changed by using [Controller Environment Setting], [PC Communication Setting] of "LKNavigator" is also changed automatically after the setting is sent to the controller.
2. Energy-saving Mode
Set the energy-saving mode of the controller.
3. Panel lock
Set whether to lock the display panel that is connected to the controller.
4. Program Change
Set the method of switching the programs.
Reference
When [Terminal] is selected by [Program Change] and the setting is completed by sending/receiving the setting, the operation of “LK-Navigator” follows the Program No. that is
specified by the LK-G terminal wiring.
LK-H1W-M-NO3-E
3-23
3
3 Operations and Functions of Software
Communication Settings
The method to set the communication between the controller and a PC is described
below.
Select [PC Communication Setting] from [Communication Settings] of the menu bar.
3
The [PC Communication settings] window appears.
1
2
3
4
5
1. Communication via USB
This function is used to set the communication when the USB interface is used to connect
the controller to a PC.
2. Communication via RS-232C
This function is used to set the communication when the RS-232C interface is used to
connect the controller to a PC.
3. Port
This function is used to set the port that connects the controller to a PC when
[Communication via RS-232C] is selected.
3-24
LK-H1W-M-NO3-E
3 Operations and Functions of Software
4. Baud rate
This function is used to set the baud rate in accordance with the communication speed of
the controller when [Communication via RS-232C] is selected.
5. Parity
This function is used to set the method of parity check when [Communication via RS232C] is selected.
LK-H1W-M-NO3-E
3
3-25
3 Operations and Functions of Software
Setting the Programs
The method to copy and to initialize the program that is registered in the controller is
described below.
Copy Program
3
Settings can be copied to the other program No. so that the nuissance to create the
settings repeatedly can be avoided.
Reference
Settings of the program where settings are being copied to will be overwritten.
1
3
2
4
1
Select the desired copy source program No. from the main screen.
Program No. 1 is selected in this example.
2
Click the [Copy] button.
3
Confirm that the [Paste] button becomes active. Then select the program No.
that is selected as the copy target.
Program No. 4 is selected in this example.
4
3-26
Click the [Paste] button.
The window prompting your confirmation appears.
LK-H1W-M-NO3-E
3 Operations and Functions of Software
5
5
Click the [Yes] button.
The setting is copied.
LK-H1W-M-NO3-E
3
3-27
3 Operations and Functions of Software
Initializing Program
Programs can be returned to the default settings when shipped from the factory by
clicking [Initialize]. When a setting is initialized, the previous setting will be deleted.
1
3
2
1
Select a program No. that you want to initialize from the main screen.
Program No. 1 is selected in this example.
2
Click the [Initialize] button.
The window prompting your confirmation appears.
3
Reference
When you want to initialize settings of all program Nos., click the [Global initialization] button.
When you click the [Global initialization] button, the following window prompting your
confirmation appears.
3
3-28
Click the [Yes] button.
The settings are initialized.
LK-H1W-M-NO3-E
3 Operations and Functions of Software
View Measurement Value
The [View Measurement Value] function that allows you to view the measured values
on a PC is described below.
Click the [View Measurement Value] button of the tool bar.
3
Reference
The same operation is executed by selecting [View Measurement Value] from [View] on
the tool bar.
The [View Measurement Value] window appears.
1
3
2
4
5
10
9
1. Measurement value acquisition start
Start acquisition of the measurement values from the controller.
When you click the [Measurement value acquisition start] button, it changes to the
[Measurement value acquisition stop] button.
Reference
Until you click the [Measurement value acquisition start] button, any of the [Zero]/[Reset]/
[Timing]/[Simultaneous Timing]/[Update Statistical Values]/[Clear Statistical Values] buttons cannot be clicked.
2. Status display
Displays the measured value/comparator output/head status.
For viewing the display, refer to "LK-G Series User’s Manual" refer to "Chapter 2
Operations and Functions during Measurement" (2-1 page).
LK-H1W-M-NO3-E
3-29
3 Operations and Functions of Software
3. Display OUT1/Display OUT2
The following three types of display are available.
• OUT1 independent display
: Turn ON the [Display OUT1] check box.
• OUT2 independent display
: Turn ON the [Display OUT2] check box.
• OUT1 and OUT2 simultaneous display : Turn ON both of the [Display OUT1] and
[Display OUT2] check boxes.
Reference
3
Both of the [Display OUT1] and [Display OUT2] check boxes cannot be turned OFF at the
same time.
4. Displaying the measured values after auto zero, reset, and timing processing are
applied.
Zero
The measured values are displayed after the present measured value is set to the reference value (zero).
For the auto zero function, refer to "LK-G Series User’s Manual" refer to "Chapter 2
Operations and Functions during Measurement" (2-1 page).
Reset
The measured values displayed after the processing in a Measurement Mode are cleared.
For the Measurement Value Reset function, refer to "LK-G Series User’s Manual" refer to
"Chapter 3 Function Settings" (3-1 page).
Timing
Timing ON and OFF are toggled.
For the timing function, "LK-G Series User’s Manual" refer to "LK-G Series User’s Manual"
refer to "Chapter 3 Function Settings" (3-1 page).
Simultaneous Timing
When OUT1 and OUT2 are displayed at the same time, the timing inputs to OUT1 and
OUT2 should also be input at the same time.
5. Statistical Value Indication
When you click the [Statistical Value Indication] button, [Statistical Values List] is
displayed.
7
6
8
3-30
LK-H1W-M-NO3-E
3 Operations and Functions of Software
6. Statistical Value Update
The statistical values are updated to the newest values.
7. Statistical Value Clear
The present statistical values are cleared.
Reference
When you click the [Statistical Value Clear] button, the statistical values of the controller
are also deleted.
8. Copying the Statistical Values List to the Clipboard
This function is used to copy the Statistical Values List on display to the clipboard. It is
useful when pasting the statistical value to other applications.
Reference
The statistical value that is copied to the clipboard will become the tab-delimited format
when it is pasted to other applications.
9. Exit
Closes the [View Measurement Value] window.
10. Help
Opens the Help file of "LK-Navigator".
LK-H1W-M-NO3-E
3-31
3
3 Operations and Functions of Software
View Received Light Waveform
The [View Received Light Waveform] function allows you to view the measured light
intensity on a PC as described below.
Click the [View Received Light Waveform] button of the tool bar. The [Head-A Received
Light Waveform Display] button is clicked in this example.
3
Reference
The same operation as above is executed by selecting [Head-A Received Light Waveform
Display] from [View] of tool bar.
The [Head-A Received Light Waveform Display] window appears.
3
1
2
4
6
5
7
8
Reference
Size of the [Head-A Received Light Waveform Display] window can be changed.
Size of the [Head-A Received Light Waveform Display] window cannot be reduced
smaller than the original size of the window.
1. Start acquiring the received light data
Starts acquiring the received light data from the controller and starts displaying the newest waveform.
When you click the [Start acquiring the received light data] button, it changes to [Interrupt
acquiring the received light data].
3-32
LK-H1W-M-NO3-E
3 Operations and Functions of Software
2. Waveform display change bar
Enlarge/Reduce
Waveform can be displayed after it is enlarged/reduced of its size in the vertical and
horizontal directions.
Moving the display position
Waveform display position can be moved up/down.
ABLE
When [Transparent object-2] is selected by [Measurement Mode], the ABLE processing is
applied to the waveforms 1 through 4, and the resultant waveforms after the processing
are displayed.
For ABLE, refer to "LK-G Series User’s Manual" refer to "LK-G Series User’s Manual" refer
to "Chapter 3 Function Settings" (3-1 page)..
3. Model display
Models of the heads that are showing their waveforms are indicated.
4. View Received Light Waveform
Displays waveform of the received light data. The white vertical line on the waveform
indicates the present measuring position. The method to read the waveform is explained
below.
• Horizontal axis
: It indicates position of the received light waveform. As it is
positioned closer to the left end, it indicates that the received
light is positioned closer to the head.
• Vertical axis
: It indicates intensity of the received light. As it goes higher, it
indicates that the received light is more intense.
• Waveform display : Waveform after the controller applies the ABLE processing is
displayed.
5. Copying the screen image
The present waveform is copied to the clipboard.
6. Double-writing the waveforms
While the waveform that is obtained at the time of clicking is kept displayed, doublewriting of the present waveform over the above-mentioned waveform is executed so that
the double-writing waveforms are displayed.
7. Exit
Closes the [Head-A Received Light Waveform Display] window.
8. Help
Opens the Help file of "LK-Navigator".
LK-H1W-M-NO3-E
3-33
3
3 Operations and Functions of Software
Data Storage Setting
The [Data Storage] function that can display the measurement result or change of
data storage setting, is described below.
■ Identifying names and functions of the data storage setting window.
Click the [Data Storage] button of the tool bar.
3
Reference
The same operation as above is executed by selecting [Data Storage] from [View] on the
tool bar.
The [Data Storage] window appears.
4
5
3
1
6
2
3-34
LK-H1W-M-NO3-E
3 Operations and Functions of Software
A maximum of the following four data can be displayed as the waveforms on the [Data
Storage] window. The data listed below can be displayed.
• The storage data that is read out from the main unit.
• The storage data that has been stored in a PC.
Reference
Size of the [Data Storage] window can be changed.
Size of the [Data Storage] window cannot be reduced smaller than the original size of the
window.
1. Data Storage Setting
Set the method to store the measured data.
3
Refer to "Data Storage Setting" (page 3-34).
2. Storage Data Readout
Reads out the storage data from the controller.
Refer to "Read Storage Data" (page 3-41).
3. Start Storage
The controller starts storing the data.
4. Stop Storage
The controller stops storing the data.
5. Clear Stored Data
The data that is stored in the controller is cleared.
Note
Clear Stored Data clears all data that is stored in the controller.
6. Status Display
The data storage status of the controller is displayed.
Reference
The statuses listed below can be displayed.
Status
Status on display
Number of storage data display
Not connected
Not connected
*****
NORMAL mode: Storage in progress
Storage in progress
Number of data that are being
stored at present
NORMAL mode: Stopping in progress
Stopping in progress
Number of data that are being
stored at present
When communication error occurs
*****
*****
When another system error occurs
System error
*****
LK-H1W-M-NO3-E
3-35
3 Operations and Functions of Software
7
9
8
10
3
11
12
13
14
15
16
7. Waveform display change bar
Display data side by side/Display waveforms by overlapping
Set whether the waveforms of the measurement values are displayed side by side or by
overlapping
Enlarge/Reduce
Waveform can be displayed after it is enlarged/reduced of its size in the vertical and
horizontal directions.
Automatic reduction
Reduction scale in the vertical direction is adjusted automatically and then displayed.
Moving the display position
Waveform display position can be moved up/down.
Non-display of the cursor
Set the cursor to non-display.
Selection of the cursor
Select the cursor to display.
3-36
LK-H1W-M-NO3-E
3 Operations and Functions of Software
8. Display Position Change
Move the display position of waveform.
Note
The waveform display position can be moved only when waveform is being displayed.
9. Waveform Name
Give an arbitrary name to the waveform.
Note
• A maximum of 16 alphanumeric characters (excluding "," (comma) and "." (period))
can be used in a name of waveform.
• Name can be given to waveform only when waveform is being displayed.
10. Change the Waveform Color
Waveform color can be set.
Note
Waveform color can be set only when waveform is being displayed.
11. Display of Measured Value Waveform
Waveform of the readout measurement value is displayed.
12. Cursor Information
List of cursor information is displayed.
13. Read from File
Reads out the storage data from file.
14. Save in File
The stored data is saved in file.
Reference
The stored data is saved in file in the CSV format.
15. Exit
Closes the [Data Storage] window.
16. Help
Opens the Help file of "LK-Navigator".
LK-H1W-M-NO3-E
3-37
3
3 Operations and Functions of Software
■ Basic data storage procedure
1
3
2
3
1
Click [Data Storage Setting].
The Target OUT, the Number of storages and the Storage cycle should be set
beforehand.
For the procedure of [Data Storage Setting], refer to "Data Storage Setting" (page 3-39).
2
Click the [Start Storage] button.
The controller starts storing the measurement data.
When the number of data reaches the set number that is specified by [Number of
storages], the storage stops automatically.
Reference
• If you want to stop the data storage in the middle of storage, click the [Stop Storage]
button.
• When you click the [Start Storage] button again after the storage is stopped once, the
storage is resumed from the point where the storage was stopped.
3
Click the [Read Storage Data] button.
For the method to set [Read Storage Data], refer to "Read Storage Data" (page 3-41).
The [Read Storage Data] window appears.
4
4
3-38
Click the [Readout] button.
The data that are accumulated in the controller are transferred to the PC.
When the bar graph indicating the transfer status reaches the right-most end,
reception of the data is complete.
LK-H1W-M-NO3-E
3 Operations and Functions of Software
■ Data Storage Setting
Click the [Data Storage Setting] button.
The [Data Storage Setting] window appears.
1
3
2
3
4
6
5
1. Selected OUT
Set the OUT that becomes the target of data storage.
2. Amount of Data Stored
Set the amount of data to be stored.
3. Storage cycle
Set the interval at which the data is stored.
4. Receive from Controller
Receive the setting from the controller.
LK-H1W-M-NO3-E
3-39
3 Operations and Functions of Software
5. Send to Controller
Send the settings to the controller.
Note
While executing sending or receiving the data, the controller enters the "Communication
mode".
3
6. Exit
Closes the [Data Storage Setting] window.
3-40
LK-H1W-M-NO3-E
3 Operations and Functions of Software
■ Read Storage Data
Click the [Storage Data Readout] button.
The [Read Storage Data] window appears.
1
2
3
3
4
1. Target OUT
Set the OUT that becomes the target of data readout.
2. OUT1
When either [OUT1] or [OUT1/OUT2] is selected by [Target OUT], the data to read out
from OUT1 is selected as described below.
A waveform is displayed on the [Data Storage] window by specifying the data number
that corresponds to the already set data number.
3. OUT2
When either [OUT2] or [OUT1/OUT2] is selected by [Target OUT], the data to read out
from OUT2 is selected as described below.
A waveform is displayed on the [Data Storage] window by specifying the data number
that corresponds to the already set data number.
4. Readout
Readout of the storage data starts.
Note
While [Readout] is being executed, the controller enters "Communication mode".
LK-H1W-M-NO3-E
3-41
3 Operations and Functions of Software
Reading and Saving the Setting File
The method to read the setting and to save it in a PC is described below.
Reading the Setting File
3
1
Click the [Open] button of the main screen.
1
Reference
The same operation is executed by selecting [Open Setting File] from [File] of the menu
bar.
The [Open] window appears.
2
2
Select the setting file you want to read.
LK-G_Config.Idt is selected in this example.
3
Click the [Open] button.
3-42
3
LK-H1W-M-NO3-E
3 Operations and Functions of Software
Saving the Setting File
1
Click the [Save] button of the main screen.
1
3
Reference
The same operation is executed by selecting [Save Setting File] from [File] on the menu
bar.
The [Save As] window is displayed.
2
2
3
Open the folder where you want to save the setting file, and enter the filename
to be used for saving, in [File name].
[LK-G_config.ldt] is entered in this example.
Reference
The extension ".ldt" is automatically added to the saved file to indicate that the file is the
setting file of the controller.
3
Click the [Save] button.
LK-H1W-M-NO3-E
3-43
3 Operations and Functions of Software
MEMO
3
3-44
LK-H1W-M-NO3-E
Appendices
A
A
Error Messages and Countermeasures ............................... A-2
Shortcut Keys List................................................................. A-6
Index..................................................................................... A-7
LK-H1W-M-NOA-E
A-1
Appendices
Error Messages and Countermeasures
List of error messages and countermeasures are shown below when error occurs in
"LK-Navigator".
During running
During data communication
Error message
A
Cause
Remedy
Failed to (communicate).
* The indication in
parenthesis ( ) varies
depending on the
contents of errors.
The controller cannot start
communication.
The controller is in the setting
mode from the display panel or via
RS-232C.
The controller is communicating
with other PC using LK-Navigator.
A communication error occurs.
Set the controller in the
measurement mode.
Exit the other LK-Navigator being
used for communication with other
PC.
Check the cable connection and
the communication settings. Then
repeat the communication
operation again. If the
communication cable happens to
be disconnected by mistake,
restart "LK-Navigator".
System error occurs.
An abnormality occurs in the
controller.
Confirm the displays of the
controller, and implement the
correct settings of the controller.
For the operation method and
display contents of the
controller, refer to the User's
Manual of LK-G Series.
If this error occurs repeatedly, contact
your nearest KEYENCE office.
While the controller is running
Error message
Cause
Remedy
Head cannot be
recognized. Check the
connection with the sensor
head.
Head is not connected.
After confirming that heads are
connected and the normal
operations are executed, restart
LK-Navigator.
Error occurs in the Head-A
(-B).
An abnormality occurs in head.
Confirm that the head is connected
correctly. If the normal operation
cannot be resumed, contact your
nearest KEYENCE office.
There is an abnormality in the
controller memory.
Initialize the controller. Perform
operations following the directions
given on the screen. This window
cannot be canceled.
Error occurs in the Head-A
and -B.
Memory error occurs.
Initialize the controller.
A-2
LK-H1W-M-NOA-E
Appendices
During setting
Head Settings
Error message
Cause
Remedy
ABLE Calibration
The settable range is from 1 to
99.
ABLE is left blank or 0 is set.
Implement the setting so that the A value that is larger than the
lower limit value is equal to or
upper limit value is set in the
smaller than the upper limit
lower limit value of ABLE.
value.
Enter a value into ABLE in the
range of 1 to 99.
Implement the setting so that the
lower limit value is equal to or
smaller than the upper limit
value.
Number of alarm warnings
Sets the number of alarm
warnings. The settable range is
from 0 to 999.
The Number of alarm warnings
column is left blank.
Enter a value in the range of 0 to
999 in the column of Number of
alarm warnings.
The measurement mode of the
head whose calculation method
is set to transparent object, is
not set to the measurement
mode of either "Transparent
object" or "Transparent object-2".
This message appears when
inappropriate setting is made. If
you want to implement the
measurement as it is, select OK.
If you want to change the
setting, select NO.
Cause
Remedy
Measurement mode
The measurement mode of the
head whose calculation method
is set to transparent object, is
not set to the measurement
mode of either "Transparent
object" or "Transparent object-2".
There is a possibility that correct
measurement cannot be made.
Are you sure you want to make
measurement?
OUT settings
Error message
Scaling input value
Illegal entry. Enter a value in the The scaling setting input column In the scaling setting input
range of (–99.9999 to 99.9999). is left blank. Or any character
column, enter a number within
other than numerical value, or a the displayed range.
value exceeding the settable
range is set in the scaling
setting input column
The identical value cannot be
set for the Input values
The identical value is set in both Enter different values in the
of the Input value-1 column and Input value-1 column and Input
Input value-2 column of scaling. value-2 column of scaling.
Scaling indication value
Illegal entry.
Enter a value in the range of
(–99.9999 to 99.9999).
LK-H1W-M-NOA-E
The scaling setting indication
In the scaling setting indication
value column is left blank. Or any value column, enter a number
character other than numerical
within the displayed range.
value, or a value exceeding the
settable range is set in the
scaling setting output column.
A-3
A
Appendices
Error message
Cause
Remedy
Overall scaling
Implement the scaling setting so Inclination of the scaling setting
that span value of the scaling
exceeds 9.999.
setting is 9.999 or less.
Set the input/output values of
scaling setting so that inclination
of the scaling setting is 9.999 or
less.
Offset
Illegal entry.
Enter a value in the range of
(–99.9999 to 99.9999).
A
The offset setting input column
is left blank. Or any character
other than numerical value, or a
value exceeding the settable
range is set in the offset setting
input column.
Enter a value from –99.9999 to
99.9999 as an offset.
Upper limit and lower limit of tolerance
Illegal entry.
Enter a value in the range of
(–99.9999 to 99.9999).
The tolerance upper limit/lower Enter a value from –99.9999 to
limit column is left blank. Or any 99.9999 for the upper and lower
character other than numerical limit values.
value, or a value exceeding the
settable range is set in the
tolerance upper limit/lower limit
input column.
Set the value in the way that the A value that is larger than the upper Enter a value that is smaller than
lower limit value is smaller than limit value is set in the tolerance
the upper limit value in the
the upper limit value.
lower limit value column.
tolerance lower limit column.
Tolerance hysteresis
Illegal entry.
Enter a value in the range of
(0 to 99.9999).
The tolerance hysteresis column Enter a value from 0 to 99.9999
is left blank. Or any character
for the tolerance hysteresis.
other than numerical value, or a
value exceeding the settable
range is set in the tolerance
hysteresis input column
A tolerance hysteresis value that
exceeds [Upper limit value] –
(minus) [Lower limit value]
cannot be set.
A value that exceeds the
tolerance measurement range
([Upper limit value] – (minus)
[Lower limit value]) is set in the
tolerance hysteresis.
Enter a positive value that is
smaller than the tolerance
[Upper limit value] – (minus)
[Lower limit value] in the
tolerance hysteresis.
Illegal entry.
Enter a value in the range of
(–99.9999 to 99.9999).
The analog scaling measured
value is left blank. Or any
character other than numerical
value, or a value exceeding the
settable range is set in the
column of analog scaling
measured value.
Enter a value from –99.9999 to
99.9999 for the analog scaling
input.
The identical value cannot be
set for the Input values.
The identical value is set in both
of the Input value-1 column and
Input value-2 column of the
analog scaling measured value.
Enter different values in the
Input value-1 column and Input
value-2 column of the analog
scaling measured value.
Analog scaling measured value
* ( ) The value within the parenthesis differs depending on the setting specified in [Minimum display unit].
A-4
LK-H1W-M-NOA-E
Appendices
Error message
Cause
Remedy
Analog scaling output voltage
Illegal entry.
Enter a value in the range of
–10.500 V to +10.500 V.
The analog scaling output
voltage column is left blank. Or
any character other than
numerical value, or a value
exceeding the settable range is
set in the column of analog
scaling output voltage.
Enter a value in the range of
–10.5 V to +10.5 V, for the
analog scaling output voltage.
Overall analog scaling
Implement the scaling setting so Inclination of the analog scaling Set the measured value and
that inclination of the scaling
setting exceeds the setting
output voltage so that inclination
setting is (9.999) or less per 1 V. value.
of the analog scaling setting
becomes smaller than the
displayed value.
* The value in parenthesis ( ) varies depending on the value specified for [Minimum display unit].
Common Settings
Error message
Cause
Remedy
Number of data stored
The settable range is from 1 to
65536.
LK-H1W-M-NOA-E
The Number of data stored field Enter a value in the range of 1 to
is left blank or a value of 0 or
65536 in the field for Number of
larger than 65536 is set in the
data stored.
field.
A-5
A
Appendices
Shortcut Keys List
List of shortcut keys that can be used in LK-Navigator is described.
Shortcut Keys List
Menu
File (F)
A
View (D)
Communication
(J)
Submenu
Key
Operation
Save Setting File (S)
Ctrl + S
Save Setting in File.
Open Setting File (o)
Ctrl + O
Open Saved Setting File.
View Measurement
Value (D)
F5
Toggle between Display and Non-display
of the Measurement Value Window.
Head-A Received Light F6
Waveform (A)
Toggle between Display and Non-display
of the Head-A Received Light Waveform
Window.
Head-B Received Light F7
Waveform (B)
Toggle between Display and Non-display
of the Head-B Received Light Waveform
Window.
Data Storage (S)
F8
Open Data Storage Window.
Send Setting from
Controller (S)
F3
Send the Setting of LK-Navigator to
controller.
Receive Setting from
Controller (L)
F4
Read Setting of Controller into LKNavigator.
Communication
Setting (O)
PC Communication
Setting (C)
Help (H)
View Help (H)
Start Communication Setting Window.
F1
Version Information (A)
Overall
A-6
Operation
Start Help.
Shows version number of the LK-Navigator
software.
Copy Program
Alt+W
Copy the Selected Program No.
Paste Program
Alt+Z
Paste to the Selected Program No.
Initialize Program
Alt+I
Initialize the Selected Program No.
Global Initialization
Alt+8
Initializes all the program Nos.
LK-H1W-M-NOA-E
Appendices
Index
A
ABLE ............................................... 3-6
ABLE Tuning .............................3-7, 3-8
Alarm Error ....................................... 3-7
Amount of Data Stored .................... 3-18
Analog output ................................. 3-14
C
Calculation method ......................... 3-10
Common Settings ........................... 3-17
Communication Settings ................. 3-24
Communication via RS-232C ........... 3-24
Communication via USB .................. 3-24
Connection using RS-232C ............... 2-3
Connection using USB ...................... 2-2
Controller Envriroment Setting ..3-3, 3-22
Controller RS-232C Setting .............. 3-22
Copy Program ................................ 3-26
Cursor Information .......................... 3-37
D
H
Head-A/Head-B ............................... 3-6
I
Identifying Part Names and Functions of
the Main Screen ............................... 3-2
Initializing Program ......................... 3-28
Installation ....................................... 2-4
Installing the USB Driver ................. 2-10
M
Measurement mode ................. 3-6, 3-11
Measurement target ....................... 3-10
Menu bar ......................................... 3-2
Minimum display unit ...................... 3-13
Mutual interference prevention ........ 3-17
O
Offset ............................................ 3-13
OUT1/OUT2 ................................... 3-10
P
Panel Lock ..................................... 3-23
PC Communication settings ............ 3-24
Program Change ............................ 3-23
Data Storage .........................3-18, 3-38
Data Storage Setting .....3-34, 3-35, 3-39
Double-writing the waveforms .......... 3-33
Q
E
R
Energy-saving Mode ....................... 3-23
Environment Setting ........................ 3-22
Error Messages and Countermeasures .A-2
Read Storage Data ......................... 3-41
Reading the Setting File .................. 3-42
Relfection type selection mode .......... 3-7
Reset ............................................. 3-30
Quit ............................................... 2-15
F
Filter .............................................. 3-11
Flow of Operations ............................ 3-4
G
Global initialization .......................... 3-28
LK-H1W-M-NOA-E
S
Sampling cycle .............................. 3-17
Saving the Setting File .................... 3-43
Scaling Setting ............................... 3-13
Sending/Receiving the Settings ....... 3-21
A-7
A
Appendices
A
Setting from the Measurement
Data .....................................3-13, 3-15
Setting Procedure of
ABLE Cablibration ............................3-8
Settings List ...................................3-20
Shortcut Keys List ............................ A-6
Simultaneous Timing .......................3-30
Start ...............................................2-11
Statistical Value Indication ...............3-30
Status Display ................................3-35
Storage cycle .................................3-18
Storage Data Readout .....................3-35
Strobe time .....................................3-18
T
Timing ...........................................3-30
Timing synchronization ....................3-17
Tolerance Comparator ....................3-12
Tolereance comparator output format .3-18
Tool bar ...........................................3-2
TRIGGER .......................................3-11
U
Uninstallation ....................................2-8
V
View Measurement Value ................3-29
View Received Light Waveform ........3-32
Z
Zero ...............................................3-30
A-8
LK-H1W-M-NOA-E
Appendices
MEMO
A
LK-H1W-M-NOA-E
A-9
Revision history
Date of printing
March, 2005
Version
Revision contents
Official release
December, 2007
2nd edition
December, 2008
3rd edition
January, 2011
1st revision
Windows Vista supported.
Windows 7 supported.
Copyright (c) 2011 KEYENCE CORPORATION. All rights reserved.
130074E 1011-1 96138E Printed in Japan