1
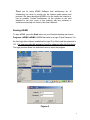
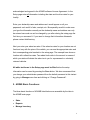
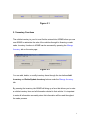
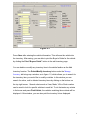
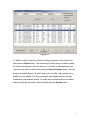
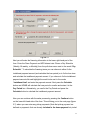
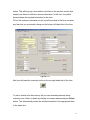
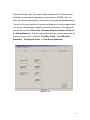
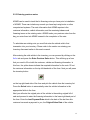
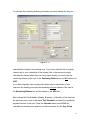
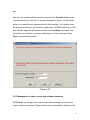
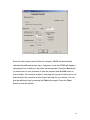
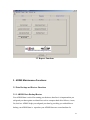
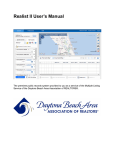
ADIMS User’s Manual
Version 2.0
The use of this software is subject to the Software License Agreement
included in the software setup. This software is protected by US and
International Copyright laws. Any unauthorized copying or reproduction of
this software is strictly prohibited and punishable by Law.
Copyright © 2002 Intelliventory Inc. All rights reserved.
1
T hank you for using ADIMS Software from Intelliventory Inc. At
Intelliventory we strive to provide you the highest quality service and
products. We have developed ADIMS to be as simple and intuitive to
use as possible. Contact Intelliventory (at the number on the card
attached to the front cover of this manual) with any technical or
customer service help not found in this User’s Manual.
Starting ADIMS
To start ADIMS, press the Start button on your Windows desktop and choose
Programs >ADIMS >ADIMS. ADIMS then asks for a login ID and Password. For
the first login after software installation the login ID is Admin and the password is
123 . For your security this password must be changed after the first login.
The login process allows the authorized users to enter the program.
Figure A
2
The user named Admin is the software administrator and has complete access to
all functions of the software. After the first login the administrator must change
his/her password and can setup new users by going to the main menu under
Maintenance. Any users other than the Admin have limited rights to businesssensitive parts of the software.
1. Setup
Figure 1.1
The ADIMS software needs to be setup for your dealership’s specific information
before the software can be used. The setup page can be accessed through the
main menu under Maintenance. Before proceeding to Setup you must have
3
acknowledged and agreed to the ADIMS software License Agreement. In the
Setup page enter all information including the state and local tax rates for your
locality.
Enter your dealership name and address as it would appear on all your
paperwork such as bill of sale, receipts, etc. Be especially careful to make sure
you type the information correctly as the dealership name and address can only
be entered once and can not be changed by you after closing the setup page the
first time you accessed it. If you need to change that information afterwards
please contact Intelliventory.
Next you enter your sales tax rates. If the sales tax rates for your location are not
fixed and vary with the price of the vehicle, you can use the appropriate rates and
their corresponding price brackets in the setup page. The example here shows a
location with unfixed tax rates. Tax rebate limits refer to the amount in excess of
which your state will rebate the sales tax to you for repossessed or voluntarily
returned vehicles.
All white text boxes in the Setup page must be filled before the setup
information can be saved by pressing the Save button. We also recommend that
you change your administrator password from the default password at this instant
by going to Manage menu item and clicking on “Change Passwords”.
2. ADIMS Basic Functions:
The three basic functions of ADAMS listed below are accessible by the tabs in
the ADIMS main page:
•
Sales
•
Reports
•
Manage Inventory
4
Figure 2.1
2.1 Inventory Functions
The vehicle inventory in your lot must first be entered into ADIMS before you can
use ADIMS to administer the sale of the vehicles through lot-financing or cash
sales. Inventory functions in ADIMS can be accessed by pressing the Manage
Inventory tab on the main page.
Figure 2.2
You can add, delete, or modify inventory items through the two buttons Add
Inventory and Delete/Update Inventory buttons under the Manage Inventory
tab.
By pressing the inventory tab ADIMS will bring up a form that allows you to enter
a vehicle inventory item and all information related to that vehicle. It is important
to enter all information accurately since this information will be used throughout
the sales process.
5
Figure 2.3
Press Save after entering the vehicle information. This will save the vehicle into
the inventory. After saving, you are able to print the Buyer’s Guide for the vehicle
by clicking the Print “Buyers Guide” button in the add inventory page.
You can delete or modify any inventory item in the similar fashion as the Add
Inventory function. The Delete/Modify Inventory button under the Manage
Inventory tab brings up a window, as in figure 1.5, which allows you to search for
the inventory item you would like to modify or delete. In this window you can
search for active, sold or deleted inventory items by clicking on the buttons on
the top right corner. Search criteria such as Year, Make, VIN or Stock number
can be used to look for specific vehicles in each list. To do that enter any criteria
in the boxes and press Find Vehicle; the vehicles matching those criteria will be
displayed. A this window, you can also print the inventory list as displayed.
6
Figure 2.4
To delete a vehicle, select the vehicle by clicking anywhere on the vehicle line
and press the Delete button. The software will confirm that you intend to delete
the vehicle and deletes it from the inventory. To modify or add expenses to an
inventory entry select a vehicle and press the Select to Update button. This will
bring up a window (figure 1.6) which allows you to modify, add expenses to, or
publish on your website (For those customers with Website services through
Intelliventory) the selected vehicle. To modify any information about the vehicle
simply change the information. When finished press the Update button.
7
Figure 2.5
2.2 Sales Functions
ADIMS sales tab allows you to access four functions related to the sales of cars
and management of customers and payments. These functions are:
Creating a lot-financing note for a new sale
Doing a new cash sale
Entering previous notes (administered prior to installation of ADIMS)
Management of sales records and customer payments
2.2.1 New lot-financing Sale
ADIMS can be used to create and track a lot-financing loan from the beginning to
the end of the note. ADIMS also creates sales and legal documents related to the
8
new note such as the Bill of Sale, the odometer statement and Buyer’s Guide
among others.
To administer a new note click on the Sales tab and press the Lot Financing
Sale button. This will bring up a form (Figure 1.7) to fill out with the customer,
vehicle and financing information. In this form, the yellow boxes indicate the
required information for the note. Fill out the customer information on the top lefthand side of the form. Press the Cosigner/Ref button to enter cosigner and
reference information on the customer.
Next you will press the inventory button on the top right hand side of the form.
9
Figure 2.6
To pick a vehicle from the inventory list which you have entered previously during
inventory entry. Select a vehicle by clicking on its name and pressing the Select
to Sell button. This automatically enters the vehicle information in the
appropriate fields in the sales form. You can change the vehicle price and
mileage at this point. If you are taking a trade-in as part of this sale click the
Trade-In button and enter the vehicle information after closing the Trade-in box
the trade-in allowance is automatically deducted from the sales price and trade-in
vehicle entered into your inventory.
You do not need to enter any tax amounts; taxes will be calculated automatically
(using the percentages and limits you set in the setup stage) by the software.
Enter any fees that you customarily charge on the bottom left hand side of the
form.
10
Figure 2.7
Next you will enter the financing information in the lower right hand part of the
form. Enter the Down Payment and APR interest rate. Chose a Pay Schedule
(Weekly, Bi-weekly, or Monthly) from the pull-down menu next to the words “Pay
Schedule”. To calculate the financing terms you can choose to either fix the
installment payment amount (and calculate the loan period) or to fix the loan term
and calculate the installment payment amount. If you choose to fix the installment
payment amount click and highlight the small circle next to the words
“Installment Amt” and enter the payment amount. Next press the Calculate
button and ADIMS will calculate the loan period in months and enters it in the
Pay Period box. Alternatively, you can fix the Pay Period and press the
Calculate button to calculate the installment payment amount.
Now you can continue with the sales process by pressing the Continue button
on the lower left-hand side of the form. This will bring you to the next page (figure
2.7) where you can enter any pickup payments (Note that pickup payment are
defined as payments that are already included in the down-payment but picked
11
up later from the customer), or vary the payment amount for up to first 10
payments on the loan, or set the first payment date. All of the options entered
here will appear on the bill of sale. Pressing continue will confirm your intention to
continue and finish the sale and brings you to the next page (figure 2.8) where
you can print out the documents related to the sale such as the Bill of Sale,
Odometer Statement, Buyers Guide etc. You can view and then print any of
these documents by pressing on appropriate buttons.
Figure 2.8
2.2.2 Administering a new cash sale (including wholesales)
ADIMS can be used to administer a cash vehicle sales, record keeping and sales
documents. The process is identical to the creation of a new lot financing sale
explained in the previous section.
To administer a cash sale click on the Sales tab and press the Cash Sale
12
button. This will bring up a form similar to the form in the previous section that
needs to be filled out with the customer information. In this form, the yellow
boxes indicate the required information for the note.
Fill out the customer information on the top left-hand side of the form and enter
any fees that you customarily charge on the bottom left hand side of the form.
Figure 2.9
Next you will press the inventory button on the top right hand side of the form
To pick a vehicle from the inventory list you have entered previously during
inventory entry. Select a vehicle by clicking on its name and pressing the Select
button. This automatically enters the vehicle information in the appropriate fields
in the sales form.
13
Chosse the “Sales Type” from among Retail (taxable), Out of State (tax free),
Wholesale or International (depending on your version of ADIMS). Next you
enter the customer cash payment and proceed by pressing the Continue button.
This will confirm your intention to continue and brings you to the next page where
you can print the documents related to this vehicle transaction. This page gives
you options to print the Bill of Sale, Odometer Statement, Buyers Guide and
the Airbag Statement. You can view and then print any of these documents by
pressing on any of the four buttons: “Print Bill of Sale”, “Print Odometer
Statement”, “Print Buyers Guide” or “Print Airbag Statement”.
Figure 2.10
14
2.2.3 Entering previous notes
ADIMS can be used to track the lot-financing notes you have prior to installation
of ADIMS. These can include any records you have kept using books or other
computerized systems. The main information that ADIMS requires is the
customer information, vehicle information, and the remaining balance and
financing terms on the existing notes. ADIMS tracks your previous notes from the
day you enter them into ADIMS onward to the completion of the note.
To administer an existing note you must first enter the vehicle sold in that
transaction into your inventory. Please refer to the section on entering your
Inventory discussed earlier in this user’s manual.
After entering the sold vehicle in the inventory you can proceed by clicking on the
Sales tab and press the Enter Previous Sales button. This will bring up a form
that you need to fill out with the customer, vehicle and financing information. In
this form, the yellow boxes indicate the required information for the note. Fill out
the customer information on the top left-hand side of the form. Next you will press
the inventory button
on the top right hand side of the form and pick the vehicle from the inventory list.
Press the Select button to automatically enter the vehicle information in the
appropriate fields in the form
Next you will enter the original price of the vehicle in the existing original bill of
sale and proceed to enter the financing information in the lower right hand part of
the form. Enter the Last Payment Date which is the date of the last time this
customer has made a payment to you, the Original Sales Date of the vehicle.
15
To calculate the remaining financing information you must indicate the way you
Figure 2.11
calculated the interest in the existing note. If you have used the flat (or simple)
interest rate in your calculation of the interest (this is the way most people
calculate the interest when they are using simple books) you must enter the
remaining balance of the loan in the Remaining Balance box and 0% interest for
APR.
If you have originally used a compound interest rate for calculation of your
interest in the existing note enter the remaining principal balance of the loan in
the Remaining Balance box and the interest in the APR box.
Next indicate the Pay Schedule (Weekly, Bi-weekly, or Monthly) of the note from
the pull-down menu next to the words “Pay Schedule” and enter the installment
payment amount of the note. Press the Calculate button and ADIMS will
calculate the remaining loan period in months and enters it in the Pay Period
16
box.
Now you can continue with the process by pressing the Continue button on the
lower left-hand side of the form. A window will appear (Figure 2.12) that would
allow you to enter the next payment date for that customer. You cal also enter
the account number from your previous system here. ADIMS will allow you to find
this customer using the old account number. Press Continue to proceed. This
will confirm your intention to continue and brings you to the next page. Press
Done to conclude the process.
Figure 2.12
2.2.3 Management of sales records and customer payments
ADIMS helps you manage your customer and sales information and track and
receive customer payments. These functions can be accessed by clicking on the
17
Sales tab and pressing the Manage Sales button. This will bring up a window
shown in figure 2.13 that allows you to find and view each sale and associated
customer.
Figure 2.13
To list all active financing customers simply press the Search button and the
customer list will appear in the list box. To search for a specific customer or
vehicle enter the customer or vehicle information and press the Search button.
To list all customers both from notes and cash sales and from paid-off and active
customers, check the box named Search all Notes/Customers and press the
Search button.
Select a customer that you would like to view or receive payments from by
clicking on and highlighting the customer name and pressing the Select button or
by highlighting the item and pressing the Enter button on your keyboard. This will
bring up a window with the customer information, payment history and future
payments.
18
Figure 2.14
The customer and vehicle information appear on the top of the window and the
payment information appears in the list box below. The customers next payment
is highlighted in blue. You can post a payment for this customer by pressing the
Post Payment button on the bottom of the window. Pressing this button brings up
a Payment Receipt box, which allows you to enter the payment made by the
customer and print the customer receipt.
19
Enter the total amount received from the customer. ADIMS will automatically
calculate the additional amount if any. If payment is overdue ADIMS will display a
late payment box in which you can enter the late payment. Press the Save button
(or press Enter on your keyboard) to post the payment and the Print button to
print a receipt. The receipt is printed on one page the top part of which can be cut
and handed to the customer and the bottom part kept for your records. You can
print an additional copy by pressing the Print button again. Press the Close
button to close the window.
20
2.2 Reports Functions
3. ADIMS Maintenance Functions:
3.1 Data Backup and Restore Functions
3.1.1 ADIMS Data Backup/Restore
Your ADIMS data is critical for running your business, therefore it is important that you
safeguard your data against accidental loss such as computer hard drive failures, viruses,
fire, theft etc. ADIMS helps you safeguard your data by providing you with utilities to
backup your ADIMS data i.e. reproduce your ADIMS data on a second medium for
21
safekeeping. You should backup your data on daily or weekly basis upon exiting
ADIMS.
22