1
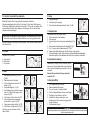
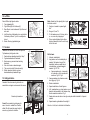
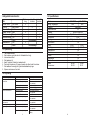
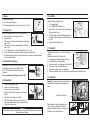
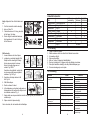
1. Indholdsfortegnelse
2.
Sikkerhedsforskrifter
3
3.
Før start - brændstof og kædeolie
5
4.
Choker
5
5.
Start
5
BETJENINGSVEJLEDNING
6.
Stop
6
7.
Kædebremse
6
Benzin motorsav
8.
Automatisk smøring
6
9.
Brændstoffilter
6
AC / CS 350
AC / CS 380
10. Luftfilter
7
11. Tændrør
7
12. Vedligeholdelse
7
13. Opbevaring
9
14. Fejlfinding
9
15. Specifikationer
10
16. EU Overensstemmelseserklæring
11
Dansk
Reservedele
Reservedelstegning over det pågældende produkt findes
på vores hjemmeside www.texas.dk
Finder du selv varenumre, giver det en hurtigere ekspedition.
Texas A/S
Knullen 2 - 5260 Odense S - Danmark
Tlf. 63 95 55 55 - [email protected] - www.texas.dk
9096-31A117
For køb af reservedele, kontakt venligst din nærmeste forhandler.
Du finder forhandlerliste på Texas' hjemmeside.
2
2. Sikkerhedsforskrifter
-
Læs denne betjeningsvejledning grundigt, dermed du forstår og kan følge alle
sikkerhedsforskrifter og betjeningsfunktioner fuldstændigt, før du går i gang
med at arbejde med maskinen.
-
Arbejd kun med træfældning, hvis du er specielt uddannet til det.
-
Alle reparationer, som ikke er beskrevet i denne betjeningsvejledning, må kun
udføres af specialuddannet personale på et autoriseret serviceværksted. Brug
af forkert værktøj kan ødelægge din kædesav.
-
Kædebremsen er monteret for at beskytte mod "kast", som er en hurtig
opadgående bevægelse i sværdet. Dette kan forekomme, hvis sværdspidsen
rammer fremmedlegemer. Det er derfor vigtigt, at du er opmærksom på, om
kædebremsen virker.
-
Børn må ikke bruge saven.
-
Hvis du føler dig syg, træt eller har indtaget alkohol eller medicin, skal du undlade at arbejde med motorsaven.
-
Brug altid sikkerhedsfodtøj, sikkerhedsbukser, beskyttelsesbriller, høreværn og
sikkerhedshjelm.
-
-
Brændstof må kun påfyldes udendørs. Aftør spildt brændstof før maskinen
startes. Gå mindst 3 meter væk fra brændstofbeholderen og påfyldningsstedet
før kædesaven startes. Fyld aldrig brændstof på en varm motor, vent til den er
afkølet.
Hold kædesaven fast med begge hænder i håndtaget, og hold den så tæt ind til
dig, at du hele tiden har kontrol over den. Som vist på tegning.
-
Lad motorkroppen ligge mod træet, mens du saver.
-
-
Sørg for, at eventuelle tilskuere er mindst 10 meter fra det sted, hvor du starter
/ arbejder med kædesaven.
Undgå at save med sværdspidsen og kontroller at sværdspidsen ikke rammer
noget, mens du saver.
-
Sav ikke med kædesaven over skulderhøjde.
-
Begynd aldrig at save før:
-
Følg vejledningen for filning og vedligeholdelse i denne betjeningsvejledning.
-
Start ikke kædesaven uden at have sværd og kæde monteret, da motoren kan
komme op i et højere omdrejningstal end koblingen og kædestop er beregnet
til. Dette kan medføre skade på både maskine og bruger.
- Arbejdsområdet er ryddet.
- Du har sikkert fodfæste.
- Du har vurderet, hvor træet vil lande.
-
Hold om kædesavens håndtag med begge hænder og med tommelfingeren
under forreste bøjle.
-
Hold kædesaven væk fra kroppen.
-
Før du starter kædesaven, skal du kontrollere, at kæden ikke er i kontakt med
noget.
-
Stop altid motoren, når du stiller kædesaven fra dig. Sørg for at sværd og kæde
vender bagud, når du bærer maskinen. Pas på du ikke brænder dig på den
varme udstødning.
-
Undersøg din kædesav for slidte, løstsiddende eller ødelagte dele, spænd bolte
og møtrikker efter. Maskinen bør ikke anvendes, før den er i korrekt og
driftsmæssig stand. Vær sikker på at kæden altid står stille, når motoren går i
tomgang.
-
Vær ekstra forsigtig, når du saver i buske og små træer. Små grene kan gribe
fat i kæden og blive slynget imod dig eller få dig til at miste balancen.
-
Sørg for at håndtagene er rene, og at der ikke er rester af olie og benzin.
-
Arbejd kun med kædesaven udendørs.
3
4
3. Før start - brændstof og kædeolie
6. Stop
Bland blyfri benzin oktan 95 og godkendt halvsyntetisk 2-takts olie.
Brug den medfølgende dunk på 95 ml til de første 2,5 liter benzin. Dette giver en
5% blanding. Efterfølgende anbefales Texas Motex 2 TX med en 2% blanding. Hvis
der anvendes andre typer olier anbefales en blanding på 4% eller du kan følge
olieproducentens anvisninger.
ADVARSEL
Undgå åben ild i nærheden af påfyldningsstedet. Vær opmærksom på om der er
snavs eller vand i benzinen. Opbevar altid benzin i en ren og godkendt dunk.
Brug altid kædeolie til smøring af sværd og kæde. Texas anbefaler Klingtex kædeolie viskositet 125.
4. Choker
Chokeren har 3 positioner.
Fig. 9A
A
A - Ingen choker
B - Halv choker
C - Fuld choker
5. Start
5
Fig. 9B
7. Kædebremse
Test kædebremsen på følgende måde.
B
A
1. Placer saven på et fast underlag.
C
2. Start motoren.
3. Hold med højre hånd på bagerste gashåndtag(A). Fig
11
Fig. 11
4. Hold med venstre hånd på forreste håndtag(B). Fig 11
5. Giv 1/3 gas og aktiver kædebremsen(C). Fig 11
6. Kæden skal øjeblikkeligt stoppe. Når den stopper, frigiv gassen.
7. Hvis kædebremsen virker, stop maskinen og placer kædebremsehåndtaget i
deaktiveret position. Hvis kæderbremsen ikke virker, kontakt din forhandler.
Kædesaven er udstyret med et automatisk smøresystem, der sikrer at kæden altid er smurt optimalt.
Det er dog en forudsætning, at der altid er olie på
maskinen.
Bemærk Texas anbefaler Klingtex kædeolie
viskositet 125.
C
F
D
8. Automatisk smøring
B
1. Sæt tændingskontakten(D) på "start".
Fig 9B
2. Sæt chokeren på fuld choker.
3. Tryk på karburatorens primer(F) 10
gange. Fig 9D
4. Lås gashåndtaget(A). Fig 10A
5. Placer kædesaven på et fast underlag
som vist. Træk hurtigt 4 gange i startsnoren. Fig 10B
6. Flyt chokeren til halv choker. Fig 10C
7. Træk i startersnoren et par gange,
saven skulle nu starte. Fig 10D
8. Frigør gassen hurtigst muligt. Fig 10E
9. Flyt chokeren til ingen choker. Fig 10F
Hvis saven er varm, behøves der ikke
choker til start.
1. Slip gashåndtaget.
2. Lad motoren gå i tomgang.
3. Tryk maskinens tændingskontakt på "stop". Fig 9B
D
Påfyld olie her
9. Brændstoffilter
Fig. 9D
Fig. 9B
A
D
Fig. 10A
B
Fig. 10B
Fig. 10C
F
E
Fig. 10D
Fig. 10E
Fig. 10F
1.
2.
3.
4.
5.
6.
Fjern brændstoftankens dæksel.
Dræn al brændstof fra tanken.
Form en krog ud af et stykke ståltråd.
Grib fat i brændstoffilteret i tanken med krogen.
Drej filteret af og installer et nyt filter.
Indsæt filter / slange i tanken igen, vær
opmærksom på at det kommer rigtig på plads i
bunden af tanken.
7. Fyld brændstof på igen.
Fig. 19
A
ADVARSEL
Brug aldrig maskinen uden brændstoffilter. Det kan skade maskinens indre dele og
forkorte maskinens levetid.
6
10. Luftfilter
Rens luftfilteret på følgende måde.
1. Fjern topdækslet(A).
2. Tag luftfilteret(B) ud af holderen(C).
3. Rens filteret i varmt sæbevand. Skyl efter med
rent vand.
4. Lad filteret tørre fuldstændig, kom nogle dråber
2-taktsolie på filteret. Tryk evt. overskydende
olie ud.
5. Monter filteret og topdækslet igen.
Fig. 18
B
C
A
Kæde. Kæden bør files jævnligt for at opnå
det bedste resultat.
1. Sørg for at sværdet er spændt godt
fast.
2. Brug en 4,0 mm" fil.
3. Fil alle tænderne med 3-4 strøg, så de
er ens, som vist på tegningen.
4. Det er nødvendigt jævnligt at efterse
højden af tænderne, hvis de er for høje,
bør de files ned.
Fig. 25
Fig. 26
Fig. 24
11. Tændrør
Tændrøret skal holdes rent for at virke optimalt.
Tjek tændrøret på følgende måde.
1. Sæt maskinens tændingskontakt på "stop".
2. Tag tændrørshætten af tændrøret.
3. Børst snavs og savsmuld væk omkring
tændrøret.
4. Skru det ud med en tændrørsnøgle.
5. Tjek, rens eller udskift hvis nødvendigt.
6. Monter tændrøret sikkert og placer
tændrørshætten på tændrøret igen.
Fig. 21
B
A
12. Vedligeholdelse
Smørehul. Afmonter sværd og kontroller om
smørehullet er stoppet med savsmuld eller snavs.
Smørehul på maskinen
Sværd. Rens næsehjul og løbegang for
snavs. Vend evt. sværdet for at fordele
sliddet. Et slidt sværd kan være farligt at
anvende, og bør derfor udskiftes.
Skift af kæde.
A
C
1. Afmonter sidedækslet.
2. Læg kæden rundt om kædehjulet på
sværdet. Når kæden har godt fat i
Fig. 3B
Fig. 3A
B
Fig. 3C
kædehjulet, sættes sværdet ind på
motorenheden, og kæden lægges i
F
sværdet. Fig 3D / 3B
D
a. Vær opmærksom på, at smørehullet i sværdet er ud for smørehullet i
maskinen. Fig 3A / Fig 6
E
G
Fig. 3D
Fig. 3B
3. Vær opmærksom på at kæden vender
Fig. 5
den rigtige vej. Fig 4A
B
4. Monter sidedækslet.
5. Spænd møtrikkerne til med fingrene.
6. Løft i sværdspidsen, og stram kæden op ved
hjælp af strammerbolten, indtil kæden netop
berører sværdets underkant. Fig 5
7. Kæden skal være så stram at man lige netop kan løfte drivleddet fri af sporet i
sværdet.
8. Spænd sværd og sidedæksel forsvarligt til.
Hvis du er i tvivl, bør du kontakte din forhandler.
Fig. 27
7
Fig. 28
8
15. Specifikationer
Vedligeholdelsesintervaller:
Del
Skruer / bolte
Luftfilter
Brændstoffilter
Sværd / drivhjul
Tændrør
Brændstofslange
Kædebremse
Efter hver
brug
X
Tjek / stram
Rens / udskift
Udskift
Rens
Rens / juster/ udskift
Tjek
Udskift
Tjek
Udskift
Hver 10
køretime
Hver 20
køretime
X
X
X
X
X
Hvis nødvendigt
X
Hvis nødvendigt
13. Opbevaring
1.
2.
3.
4.
5.
6.
7.
8.
Tøm brændstoftanken.
Start maskinen og lad den køre til alt brændstof er brugt.
Lad maskinen køle af.
Skru tændrøret af.
Hæld 1 teskefuld 2-taktsolie i tændrørshullet.
Træk roligt i startsnoren 2-3 gange, dermed olien bliver fordelt i maskinen.
Skru tændrøret forsvarligt på, og sæt tændrørshætten på igen.
Opbevar motorsaven et tørt sted.
Model
Boring / slaglængde
Tænding
Elektrodeafstand
Tændrør
Brændstof
Tankindhold
Smøring
Anti-vibration
Vægt
Sværdtype
Kædebremse
Håndskarm
Gaslås
Kædefanger
Barksted
Kæde
Varenummer:
AC / CS 350
AC / CS 380
35cc
38cc
Elektronisk
0,6
DENSO W22MP-US
Blyfri 95 oktan, olieblandet, 2-takt
0,29 L
Klingtex kædeolie Viskositet 125
Ja
5,5 kg
5,6 kg
14” / 35cm
16” / 40cm
Ja
Ja
Ja
Ja
Ja
49 Led
54 Led
40-109
40-115
14. Fejlfinding
PROBLEM
Starter, men vil ikke køre.
Starter ikke.
ÅRSAG
Forkert startprocedure.
Forkert karburatorjustering.
Motoren starter, men maskinen
har intet kraftoverskud.
Defekt tændror.
Brændstoffilter stoppet.
Forkert chokerposition
Snavset gnistfang
Snavset luftfilter
Forkert karburatorjustering.
Maskinen har intet
kraftoverskud
Kører uregelmassigt.
Ryger meget
Forkert karburatorjustering.
Forkert / snavset tændrør.
Forkert karburatorjustering.
Forkert karburatorjustering.
9
LØSNING
Følg instruktionerne.
Juster karburator. Kontakt et
service værksted.
Rens eller udskift.
Rens eller udskift.
Sæt choker på KØR
Rens gnistfang. Kontakt et
service varksted.
Rens luftfilter
Juster karburator. Kontakt et
service værksted.
Juster karburator. Kontakt et
service værksted.
Udskift eller rens tændrør.
Juster karburator. Kontakt et
service værksted.
Brug den foreskrevne 2-takts
blanding.
10
EU overensstemmelseserklæring
EU-importør Texas Andreas Petersen A/S
Erklærer herved at materiel:
• Motorsav AC31A114TD (AC / CS 350) 35 cc
• Motorsav AC31A116TD (AC / CS 380) 38 cc
er fremstillet i overensstemmelse med følgende direktiver:
89/392/EC
Maskindirektivet
89/336/EEC
EMC direktivet
Materiellet er udført i henhold til følgende standarder:
EN 292-2 1991 og EN 608
Texas Andreas Petersen A/S
Knullen 2
5260 Odense S
BETJENINGSVEJLEDNING
Bensin motorsåg
AC / CS 350
Verner Hansen
Direktør
AC / CS 380
18.08.2004
Svensk
Texas A/S
Knullen 2 - 5260 Odense S - Danmark
Tlf. 63 95 55 55 - [email protected] - www.texas.dk
11
12
1. Innehållsförteckning
2. Säkerhetsföreskrifter
2.
Säkerhetsföreskrifter
14
3.
Før start –bränsle och kedjeolja
16
4.
Choke
16
5.
Start
16
6.
Stopp
17
7.
Kedjebroms
17
8.
Automatisk smörjning
17
9.
Bränslefilter
17
-
Läs denna bruksanvisning noggrant, så att du förstår och kan följa alla säkerhetsföreskrifter och betjäningsfunktioner innan du börjar arbeta med maskinen.
-
Låt inte barn använda sågen.
-
Använd aldrig motorsågen om du är sjuk, trött, har druckit alkohol eller har tagit
medicin.
-
Använd alltid personlig skyddsutrustning såsom; skyddsskor, säkerhetsbyxor,
skyddsglasögon, hörselskydd samt skyddshjälm.
-
Påfyllning av bränsle får endast ske utomhus. Spillt bränsle torkas av innan
maskinen startas. Gå minst tre meter bort från bränslebehållaren och påfyllningsplatsen innan kedjesågen startas. Fyll aldrig på bränsle när motorn är
varm, utan vänta tills den har blivit kall.
-
Se till att inga obehöriga finns inom arbetsområdet (minst 10 meter från den
plats där du arbetar).
-
Börja aldrig såga innan:
10. Luftfilter
18
11. Tändrör
18
12. Underhåll
18
13. Förvaring
20
-
Fatta tag om kedjesågens handtag med båda händer och med tummen under
den främre ringen.
14. Felsökning
20
-
Håll kedjesågen bort från kroppen.
15. Specifikationer
21
-
Innan du startar kedjesågen, skall du kontrollera att kedjan inte kan gripa tag i
något.
16. EC Överenskommelseförklaring
22
-
Stoppa alltid motorn när du ställer kedjesågen ifrån dig. Bär motorsågen med
svärd och kedja vända bakåt. Se upp så att du inte bränner dig på det varma
utblåsröret.
-
Undersök din kedjesåg för slitna, lösa eller förstörda delar, och dra åt bultar och
muttrar om så behövs. Maskinen bör inte användas innan den är i korrekt och
driftsmässigt skick. Var säker på att kedjan alltid står stilla när motorn går på
tomgång.
-
Var extra försiktig när du sågar i buskar och små träd. Små grenar kan gripa
tag i kedjan och slungas mot dig eller få dig att tappa balansen.
-
Se till att handtagen är rena, och att det inte finns rester av olja och bensin.
-
Arbeta endast med kedjesågen utomhus.
-
Arbeta endast med trädfällning om du är speciellt utbildad för det.
Reservdelar
Reservdelsförteckning för produkten finns på vår hemsida www.texas.dk
Om du själv tar fram varunumret, går det fortare att hitta rätt reservdel.
- du står stadigt.
- du har planerat en flyktväg vid fallande träd.
Kontakta din närmaste återförsäljare om du vill köpa reservdelar.
13
- arbetsområdet har städats.
14
3. Før start - Bränsle och kedjeolja
-
Alla reparationer som inte beskrivs i denna bruksanvisning får endast utföras af
specialutbildad personal på en auktoriserad serviceverkstad. Om fel verktyg
används, kan din kedjesåg förstöras.
-
Kedjebromsen är monterad för att skydda mot "kast", som är en snabbt uppåtgående rörelse i svärdet. Detta kan förekomma om svärdspetsen träffar ett
föremål. Därför är det viktigt att du är uppmärksam på om kedjebromsen inte
fungerar.
Blanda blyfri bensin (oktan 95) och godkänd halvsyntetisk 2-taktsolja. Vanlig
motorolja får inte användas.
Använd den medföljande dunken på 95 ml till de första 2,5 liter bensin. Detta ger
en 5 % blandning. Efterföljande rekommenderas Texas Motex 2 TX med en 2 %
blandning. Om andra oljetyper används, rekommenderas en 4 % blandning.
OBSERVERA
Gällande blandningsförhållanden, bör oljeproducentens anvisningar alltid följas.
Använd endast originala reservdelar.
-
Håll fast kedjesågen med båda händer, och håll den så tätt intill dig att du hela
tiden har kontroll över den.
-
Låt motorkroppen ligga mot trädet medan du sågar.
-
Undvik att såga med svärdspetsen, och kontrollera att svärdspetsen inte träffar
något medan du sågar.
Använd alltid kedjeolja till smörjning av svärd och kedja. Texas rekommenderar
Kedjeolja viskositet 125.
-
Såga inte med kedjesågen över axelhöjd.
4. Choke
-
Följ anvisningen för filning och underhåll i denna bruksanvisning.
-
Start aldrig motorsågen uden at have monteret svärd och kedja.
Choken har tre lägen:
A - Ingen choke
B - Halv choke
C - Full choke
VARNING
Undvik öppen eld i närheten av påfyllningsplatsen. Kontrollera så att det inte finns
smuts eller vatten i bensinen. Förvara alltid bensin i en ren och godkänd dunk
Fig. 9A
A
B
C
5. Start
1. Flytta tändningskontakten(D) till "start".
Fig. 9B
2. Flytta choken till läget full choke.
3. Tryck 10 gånger på förgasarens
primer(F). Fig. 9D
4. Lås gashandtaget(A). Fig. 10A
5. Placera kedjesågen på ett stadigt underlag, som på ritningen. Dra snabbt fyra
gånger i startsnöret. Fig. 10B
6. Flytta choken till halv choke. Fig. 10C
7. Dra i startsnöret några gånger, och
sågen startar. Fig. 10D
8. Frigör gasen så fort som möjligt. Fig.
10E
9. Flytta choken till ingen choke. Fig. 10F
Om sågen är varm, behövs ingen choke för
att starta.
15
16
F
Fig. 9D
D
Fig. 9B
A
D
Fig. 10A
B
Fig. 10B
Fig. 10C
F
E
Fig. 10D
Fig. 10E
Fig. 10F
10. Luftfilter
6. Stopp
1. Släpp gashandtaget.
2. Låt motorn gå på tomgång.
3. Med tändningskontakten trycks det på "stopp". Fig. 9B
D
Fig. 9B
7. Kedjebroms
Kontrollera kedjebromsens funktion på följande sätt:
B
A
C
1. Placera sågen på ett stadigt underlag.
2. Starta motorn.
3. Fatta tag om det bakre gashandtaget(A) med höger
Fig. 11
hand. Fig. 11
4. Fatta tag om det främre handtaget(B) med vänster
hand. Fig. 11
5. Ge 1/3 gaspådrag, och aktivera kedjebromsen (C). Fig. 11
6. Kedjan skall stoppa omedelbart. När den stoppar, frigör då gasen.
7. Om kedjebromsen fungerar, så stoppa maskinen och placera kedjebromshandtaget i deaktiverat läge.
8. Automatisk smörjning
Kedjesågen är utrustad med ett automatiskt smörjningssystem, som säkrar att kedjan alltid är
smord. Det förutsätter att det alltid finns olja i
maskinen.
Texas rekommenderar Klingtex viskositet 125.
Påfyld olie her
9. Bränslefilter
1.
2.
3.
4.
Ta bort bränsletankens kåpa.
Tappa ur allt bränsle ur tanken.
Forma en krok av en bit ståltråd.
Grip tag i bränslefiltret som sitter i tanken med
kroken.
5. Vrid av filtret, och lägg i ett nytt filter.
6. Sätt i filtret/slangen i tanken igen. Se till att filtret/slangen sätts tillbaks korrekt i tankens botten.
7. Fyll på med bränsle igen.
Fig. 19
Fig. 18
B
C
A
11. Tändstift
Tändstiftet skall hållas rent, för att kunna fungera
Fig. 21
optimalt.
Kontrollera tändstiftet på följande sätt:
B
1. tta maskinens tändningskontakt till "stopp".
2. av tändstiftskåpan från tändstiftet.
A
3. Borsta bort smuts och sågspån runt tändstiftet.
4. Skruva ut det med en tändstiftsnyckel.
5. Kontrollera, rengör eller byt ut vid behov.
6. Montera tändstiftet säkert, och sätt tillbaks tändstiftskåpan på tändstiftet igen.
12. Underhåll
Smörjhål. Demontera svärdet och kontrollera om
smörjhålet är igenproppat med sågspån eller
smuts.
A
VARNING
Använd aldrig maskinen utan bränslefilter. Det kan skada maskinens inre delar och
förkorta motorns livslängd.
17
Rengör luftfiltret på följande sätt:
1. Ta av toppkåpan(A).
2. Ta ut luftfiltret(B) ur hållaren (C).
3. Rensa filtret i varmt vatten med lite diskmedel.
Skölj med rent vatten.
4. Låt filtret torka helt och häll några droppar tvåtaktsolja på filtret. Avlägsna eventuellt överskott
av olja.
5. Montera filtret och höljet igen.
Smörjhål i maskinen
Svärd. Rengör noshjul och dragsko från
smuts. Vänd ev. svärdet för att fördela
slitaget. Ett utslitet svärd kan vara farligt att
använda, och bör därför bytas ut.
18
Fig. 27
Fig. 28
Underhåll intervallar:
Kedja. Kedjan bör filas ofta för bästa resultat.
1. Se till att svärdet är sträckt ordentligt.
2. änd en 4.0mm" fil.
3. Fila alla tänder med 3–4 drag, så att de
är lika långa. Se ritning.
4. Det är viktigt att undersöka tändernas
höjd regelbundet. Om de är för höga,
bör de filas ned.
Fig. 25
Fig. 26
Del
Skruvar/bultar
Luftfilter
Bränslefilter
Svärd / drivhjul
Tändstift
Bränsleslang
Kedjebroms
Efter varje
användning
X
Kontrollera/dra åt
Rengör/byt ut
Byt ut
Rengör
Rengör/justera/byt ut
Kontrollera
Byt ut
Kontrollera
Byt ut
Var 10:e
körtimme
Var 20:e
körtimme
X
X
X
X
X
Vid behov
X
Vid behov
Fig. 24
13. Förvaring
Skift av kedja.
1. Lossa muttrarna och ta bort kåpan.
A
C
2. g kedjan över svärdets kedjehjul. När
kedjan har fått ordentligt fatt i kedjehjulet, placeras svärdet i motorenheten, och kedjan läggs an mot
Fig. 3B
Fig. 3A
B
Fig. 3C
svärdet. Fig. 3D/3B
Kontrollera att smörjhålet i svärdet sitF
D
ter på samma ställe som smörjhålet i
maskinen. Fig. 3A/Fig. 6
3. Kontrollera att kedjan vänder åt rätt
E
G
Fig. 3D
Fig. 3B
håll. Fig. 4A
Fig. 5
4. Sätt tillbaks kåpan.
B
5. Dra åt muttrarna för hand.
6. Lyft svärdspetsen, och spänn kedjan med en
kedjespännare, tills kedjan nätt och jämt nuddar svärdets underkant. Fig. 5
7. Kedjan skall vara så pass sträckt att det nätt och jämt går att lyfta drivlänken ur
svärdets spår.
8. Spänn svärd och kåpa ordentligt.
Om du är osäker, bör du kontakta din återförsäljare.
1.
2.
3.
4.
5.
6.
7.
8.
Tappa ur bränsle ur tanken.
Starta maskinen och låt den köra tills allt bränsle har använts.
Låt maskinen bli kall.
Skruva av tändstiftet.
Häll ner 1 tesked 2-takssolja i tändstiftshålet.
Dra lugnt i startsnöret 2-3 gånger så att oljan fördelas i maskinen.
Skruva på tändstiftet ordentligt, och sätt på tändstiftskåpan igen.
Förvara motorsågen på en torr plats.
14. Felsökning
PROBLEM
Startar, men vill inte köra.
Startar inte.
ORSAK
Fel startprocedur.
Fel förgasarjustering.
Motorn startar, men maskinen
har inget kraftöverskott.
Defekt tändstift.
Bränslefiltret har stoppat.
Fel chokeläge.
Smutsig gnistfångare.
Smutsigt luftfilter.
Fel förgasarjustering.
Maskinen har inget
kraftöverskott.
Kör oregelbundet.
Ryker mycket.
Fel förgasarjustering.
Fel/smutsigt tändstift.
Fel förgasarjustering.
Fel bränsleblandning.
19
20
ATGÄRDER
Följ anvisningarna.
Justera förgasaren. Kontakta en
serviceverkstad.
Rengör eller byt ut.
Rengör eller byt ut.
Sätt choke på KÖR
Rengör gnistfångaren. Kontakta
en serviceverkstad.
Rengör luftfiltret.
Justera förgasaren. Kontakta en
serviceverkstad.
Justera förgasaren. Kontakta en
serviceverkstad.
Byt ut eller rengör tändstiftet.
Justera förgasaren. Kontakta en
serviceverkstad.
Använd den föreskrivna 2taktsblandningen.
15. Specifikationer
EC Överenskommelseförklaring
Modell
Borrning/slaghöjd
Tändning
Elektrodavstånd
Tändstift
Bränsle
Tankvolym
Smörjning
Antivibrationssystem
Vikt
Svärdlängd
Kedjebroms
Handskydd
Gaslås
Kedjefångare
Barkstöd
Kedja
Varunummer:
AC / CS 350
AC / CS 380
35cc
38cc
Elektronisk
0,6
DENSO W22MP-US
Blyfritt 95 oktan, oljeblandat, 2-takt
0,29 L
Automatisk
Ja
5,5 kg
5,6 kg
14” / 35cm
16” / 40cm
Ja
Ja
Ja
Ja
Ja
49 led
54 Led
40-109
40-115
EU-importør Texas Andreas Petersen A/S
Undertecknad förklarar på företagets vägnar att:
•
Motorsåg AC31A114TD (AC / CS 350) 35 cc
•
Motorsåg AC31A116TD (AC / CS 380) 38 cc
Uppfyller EU - direktiver:
89/392EC
89/336/EEC
Maskindirektiv
EMC direktiv
Materiellet er udført i henhold til følgende standarder:
EN 292-2 1991 og EN 608
Texas Andreas Petersen A/S
Knullen 2
5260 Odense S
Danmark
Verner Hansen
Adm. Direktør
18.08.2004
21
22
GENERAL SAFETY RULES
Meaning of symbols marked on the product
Read the user manual before using the machine
Wear dust mask to protect against dust
Wear safety goggles to protect your eyes
Wear glove to protect your hands
Wear ear protector to protect against noise
Wear safety boots to protect agains electric shock
WARNING! When using gas tools, basic safety precautions, including the following, should always be followed to
reduce the risk of serious personal injury and/or damage to the unit.
USER MANUAL
Read all these instructions before operating this product and save these instructions.
1.
Gasoline Chain Saw
AC / CS 350
AC / CS 380
English
DO NOT operate a chain saw with one hand! Serious
injury to the operator, helpers, bystanders, or any
combination of these persons may result from onehanded operation. A chain saw is intended for twohanded use.
2.
DO NOT operate a chain saw when you are fatigued.
3.
Use safety footwear, snug-fitting clothing, protective
gloves, and eye, hearing and head protection
devices.
15. Operate the chain saw only in well-ventilated areas.
16. DO NOT operate a chain saw in a tree unless you
have been specifically trained to do so.
17. All chain saw service, other than the items listed in
the user manual safety and maintenance instructions,
should be performed by competent chain saw service
personnel.
18. When transporting your chain saw, use the appropriate guide bar scabbard.
4.
Use caution when handling fuel. Move the chain saw
at least 10 feet (3m) from the fueling point before
starting the engine.
19. DO NOT operate your chain saw near or around
flammable liquids or gases whether in or out of doors.
An explosion and/or fire may result.
5.
DO NOT allow other persons to be near when starting or cutting with the chain saw. Keep bystanders
and animals out of the work area.
20. Do not tank fuel, oil or lubrication when the engine of
chain saw is running.
6.
DO NOT start cutting until you have a clear work
area, secure footing, and a planned retreat path from
the falling tree.
7.
Keep all parts of your body away from the saw chain
when the engine is running.
8.
Before you start the engine, make sure that the saw
chain is not contacting anything.
9.
Carry the chain saw with the engine stopped, the
guide bar and saw chain to the rear, and the muffler
away from your body.
21. USE THE RIGHT TOOL: Cut wood only. Do not use
the chain saw for purposes for which it was not
intended. For example, do not use the chain saw for
cutting plastic, masonry, or nonbuilding materials.
NOTE: This appendix is intended primarily for the consumer or occasional user. These models are intended for
infrequent use by homeowners, cottagers, and campers,
and for such general applications as clearing, pruning,
cutting firewood, etc. They are not intended for prolonged
use. If the intended use involves prolonged periods of
operation, this may cause circulatory problems in the
user’s hands due to vibration. It may be appropriate to use
a saw having an anti-vibration feature such as the models
covered in this manual with the suffix Anti-Vibration.
10. DO NOT operate a chain saw that is damaged,
improperly adjusted, or not completely and securely
assembled. Be sure that the saw chain stops moving
when the throttle control trigger is released.
11. Shut off the engine before setting the chain saw
down.
12. Use extreme caution when cutting small size brush
and saplings because slender material may catch the
saw chain and be whipped toward you or pull you off
balance.
Texas A/S
Knullen 2 - 5260 Odense S - Danmark
Tlf. 63 95 55 55 - [email protected] - www.texas.dk
23
13. When cutting a limb that is under tension, be alert for
springback so that you will not be struck when the
tension in the wood fibers is released.
14. Keep the handles dry, clean, and free of oil or fuel
mixture.
24
KICKBACK SAFEY PRECAUTIONS
IMPORTANT SAFETY
Kickback may occur when the nose or tip of the guide bar
touches an object, or when the wood closes in and pinches the saw chain in the cut. If the bar tip contacts, it may
cause a lightning-fast reverse reaction, kicking the guide
bar up and back towards the operator. Pinching the saw
chain along the top of the guide bar may push the guide
bar rapidly back towards the operator. Either of these
reactions may cause you to lose control of the saw, which
could result in serious personal injury. Do not rely exclusively upon the safety devices built into your saw. As a
chain saw user, you should take several steps to keep
your cutting jobs free from accident or injury.
1. With a basic understanding of kickback, you can
reduce or eliminate the element of surprise. Sudden
surprise contributes to accidents.
2. Keep a good firm grip on the saw with both hands,
the right hand on the rear handle, and the left hand
on the front handle, when the engine is running. Use
a firm grip with thumbs and fingers encircling the
chain saw handles. A firm grip will help you reduce
kickback and maintain control of the saw. Don’t let go.
Your Chain Saw is provided with a safety label located on
the chain brake lever/hand guard. This label, along with
the safety instructions on these pages, should be carefully read before attempting to operate this unit.
3.
Make sure that the area in which you are cutting is
free from obstructions. Do not let the nose of the
guide bar contact a log, branch, or any other obstruction which could be hit while you are
operating the
saw.
4. Cut at high engine speeds.
5. Do not overreach or cut above shoulder height.
6. Follow manufacturer’s sharpening and maintenance
instructions for the saw chain.
7. Only use replacement bars and chains specified by
the manufacturer or the equivalent.
NOTE: Low-kickback saw chain is chain that has met the
kickback performance.
•
AC / CS 350
35cc
Y
Y
Y
Y
25
A
A
B
Fig. 2B
Fig. 2A
BEWARE OF:
ROTATIONAL KICKBACK
(Fig. 2A)
A = Kickback path
B = Kickback reaction zone
C
THE PUSH
(PINCH KICKBACK)
AND PULL REACTIONS
(Fig. 2B)
A = Pull
B = Solid objects
C = Push
KICKBACK may occur when the NOSE or TIP of the
guide bar touches an object, or when wood closes in and
pinches the saw chain in the cut.
Tip contact in some cases may cause a lightning-fast
reverse reaction, kicking the guide bar up and back
toward the operator.
PINCHING the saw chain along the BOTTOM of the guide
bar may PULL the saw forward away from the operator.
PINCHING the saw chain along the TOP of the guide bar
may PUSH the guide bar rapidly back toward the operator.
Any of these reactions may cause you to lose control of
the saw, which could result in serious personal injury.
DANGER! BEWARE OF KICKBACK!
WARNING: Kickback can lead to dangerous
loss of control of the chain saw and result in
serious or fatal injury to the saw operator or to
anyone standing close by. Always be alert.
Rotational kickback and pinch-kickback are
major chain saw operational dangers and the
leading cause of most accidents.
AC / CS 380
38cc
1.2 Kw
10mm
1.3mm
2,800-3,300 min-1
8,000 min-1
296 cc
180 cc
Y
5,5 kg
5,6 kg
HOW TO READ SYMBOLS AND COLORS
(FIG. 1)
GREEN RECOMMENDED
Recommended cutting procedure.
WARNING
1. Beware of kick back.
1
3
2. Do not attempt to hold saw
with one hand.
4 3. Avoid bar nose contact.
2
RECOMMENDED
4. Hold Saw properly with both
Fig. 1
hands.
•
B
A
WARNING: RED Used to warn that an
unsafe procedure should not be performed.
SPECIFICATIONS
Model
Engine Displacement
Maximum Shaft Brake Power
Chain Pitch
Chain Gauge
Idel Speed
Speed in Max. power
Fuel Capacity
Oil Capacity
Anti-vibration
Net Weight
Cutting Length 14”
16”
Chain Brake
Clutch
Automatic Chain Oiler
Lowe KickBack Chain
A
ASSEMBLY INSTRUCTIONS
•
TOOLS FOR ASSEMBLY
•
You will need these tools to assemble your chain saw:
1. Combination wrench-screwdriver (contained in your
user’s kit).
2. Heavy duty work gloves (user supplied).
•
GUIDE BAR / SAW CHAIN / CLUTCH
COVER INSTALLATION
WARNING: Always wear protective gloves
when handling chain.
ASSEMBLY REQUIREMENTS
TO INSTALL GUIDE BAR:
To ensure the bar and chain receive oil, ONLY USE THE
ORIGINAL STYLE BAR with the oil passage hole (A) as
illustrated above (Fig. 3A).
1. Make sure the Chain brake lever is pulled back into
the DISENGAGED position (Fig. 3B)
2. Remove the 2 bar retaining nuts (B). Loosen the 2
screws at the rear of the clutch cover (C). Remove
the cover (Fig. 3C).
3. Using a screwdriver, run the adjustment screw (D)
COUNTERCLOCKWISE until the TANG (E) (projecting prong) is to the end of its travel toward the clutch
drum and sprocket (Fig. 3D).
4. Place the slotted end of the guide bar over the 2 bar
bolts (F). Position the bar so that the adjustment
TANG fits into the lower hole (G) on the guide bar
(Fig. 3E).
WARNING: DO NOT start saw engine until
unit is properly prepared.
Your new chain saw will require adjustment of chain, filling the fuel tank with correct fuel mixture and filling the oil
tank with lubricating oil before the unit is ready for operation.
Read the entire user manual before attempting to operate your unit. Pay particular attention to all safety
precautions.
Your user manual is both a reference guide and handbook
provided to furnish you with general information to
assemble, operate and maintain your saw.
26
2.
A
Fig. 3A
After making adjustment, and while still holding nose
of bar in the uppermost position, tighten the bar
retaining nuts securely. Chain has proper tension
when it has a snug fit all around and can be pulled
around by gloved hand.
NOTE: If chain is difficult to rotate on guide bar or if it
binds, too much tension has been applied. This requires
minor adjustment as follows:
A. Loosen the 2 bar retaining nuts so they are finger
tight. Decrease tension by turning the bar
adjustment screw COUNTERCLOCKWISE slowly. Move
chain back and forth on bar. Continue to adjust until
chain rotates freely, but fits snugly. Increase tension
by turning bar adjustment screw CLOCKWISE.
B. When saw chain has proper tension, hold nose of bar
in the uppermost position and tighten the 2 bar retaining nuts securely.
C
Fig. 3B
Fig. 3C
F
D
E
Fig. 3D
B
G
Fig. 3B
TO INSTALL SAW CHAIN:
1. Spread chain out in a loop with cutting edges (A)
pointing CLOCKWISE around loop (Fig. 4A).
2. Slip the chain around the sprocket (B) behind the
clutch (C). Make sure the links fit between the sprocket teeth (Fig. 4B).
3. Guide the drive links into the groove (D) and around
the end of the bar (Fig. 4B).
NOTE: The saw chain may droop slightly on the lower
part of bar. This is normal.
4. Install the clutch cover and tighten the 2 screws.
Make sure the chain does not slip off of the bar. Install
the 2 nuts hand tight and follow tension adjustment
instructions in Section SAW CHAIN TENSION
ADJUSTMENT.
NOTE: The guide bar retaining nuts are installed only
hand tight at this point because saw chain adjustment is
required. Follow instructions in Section SAW CHAIN
TENSION ADJUSTMENT.
Fig. 4A
A
•
FUEL AND LUBRICATION
WARNING: Never use straight gasoline in
your unit. This will cause permanent engine
damage and void the manufacturer’s warranty for that product. Never use a fuel mixture
that has been stored for over 90 days.
Gasoline and Oil Mix 40:1
WARNING: If 2-cycle lubricant other than
Texas Custom Lubricant is to be used, it must
be a premium grade oil for 2-cycle air cooled
engines mixed at a 40:1 ratio. Do not use any
2-cycle oil product with a recommended
mixing ratio of 100:1. If insufficient lubrication
is the cause of engine damage, it voids the
manufacturer’s engine warranty for that
occurrence.
•
1 U.S. Gal.
5 Liters
1 lmp. Gal.
Mixing
Procedure
MIXING FUEL
Mix fuel with Texas brand 2 cycle oil in an approved container. Use mixing table for correct ratio of fuel to oil.
Shake container to ensure thorough mix.
•
Texas 40:1 Ratio
Custom Lubricant
3.2 oz.
95ml (cc)
4.3 oz.
125ml (cc)
4.3 oz.
125ml (cc)
40 Parts Gasoline
to 1 part Lubricant
1ml = 1cc
RECOMMENDED FUELS
Some conventional gasolines are being blended with oxygenates such as alcohol or an ether compound to meet
clean air standards. Your Texas engine is designed to
operate satisfactorily on any gasoline intended for automotive use including oxygenated gasolines.
warranty.
Fig. 5
Oil Only
FUEL MIXING TABLE
GASOLINE
WARNING: Lack of lubrication voids engine
CAUTION: If saw chain is TOO LOOSE or TOO
TIGHT, the sprocket, bar, chain, and crankshaft
bearings will wear more rapidly. Study Fig. 6 for
information concerning correct cold tension (A),
correct warm tension (B), and as a guide for when
saw chain needs adjustment (C).
•
CHAIN AND BAR LUBRICATION
Always refill the chain oil tank each time the fuel tank is
refilled. We recommend using Texas Chain, Bar and
Sprocket Oil, which contains additives to reduce friction
and wear and to assist in the prevention of pitch formation
on the bar and chain.
OPERATING INSTRUCTIONS
B
SAW CHAIN TENSION ADJUSTMENT
A
Proper tension of saw chain is extremely important and
must be checked before starting, as well as during any
cutting operation.
Taking the time to make needed adjustments to the saw
chain will result in improved cutting performance and prolonged chain life.
TO ADJUST SAW CHAIN:
C
B
•
•
CHAIN BRAKE MECHANICAL TEST
Your chain saw is equipped with a Chain brake that
reduces possibility of injury due to kickback. The brake is
activated if pressure is applied against brake lever when,
as in the event of kickback, operator’s hand strikes the
lever. When the brake is actuated, chain movement stops
abruptly.
WARNING: The purpose of the chain brake
is to reduce the possibility of injury due to
kickback; however, it cannot provide the
intended measure of protection if the saw is
operated carelessly. Always test the chain
brake before using your saw and periodically
while on the job.
Hold nose of guide bar up and turn adjustment screw
(D) CLOCKWISE to increase chain tension. Turning
screw COUNTERCLOCKWISE will decrease amount
of tension on chain. Ensure the chain fits snugly all
the way around the guide bar (Fig. 5).
27
3.
4.
ENGINE PRE-START CHECKS
WARNING: Never start or operate the saw
unless the bar and chain are properly
installed.
Fig. 6
WARNING: Always wear heavy duty gloves
when handling saw chain or making saw
chain adjustments.
1.
FUEL
Use regular grade unleaded gasoline mixed with Texas
40:1 custom 2-cycle engine oil for best results. Use mixing ratios in Section FUEL MIXING TABLE.
•
B
D
•
•
CAUTION: A new saw chain stretches,
requiring adjustment after as few as 5 cuts.
This is normal with a new chain, and the
interval between future adjustments will
lengthen quickly.
Fig. 4B
C
FUEL AND LUBRICATION
1.
2.
3.
•
5.
Fill the fuel tank (A) with correct fuel mixture (Fig. 8A).
Fill the oil tank (B) with correct chain and bar oil (Fig.
8A).
Be certain the chain brake is disengaged (C) before
starting unit (Fig. 8A).
6.
7.
TO START ENGINE
8.
The choke has 3 positions: RUN (A), HALF (B) and
CHOKE (C) (Fig. 9A).
1. Slide red STOP switch (D) up for starting (Fig. 9B).
2. Move the yellow choke lever (E) to
(CHOKE) (Fig.
9C).
9.
28
Push the primer bulb (F) 10 times (Fig. 9D).
Latch throttle advance: depress latch and hold (A)
squeeze throttle trigger (B) release trigger and then
the latch (Fig. 10A).
Place saw on a firm, flat surface. Hold saw firmly as
shown. Pull starter rapidly 4 times. Beware of
moving chain! (Fig.10B)
Move yellow choke lever (D) to
(HALF)
(Fig.10C).
Hold saw firmly and pull starter rapidly 4 times.
Engine should start (Fig. 10D).
Warm up for 10 seconds. Depress and release
trigger (E) for IDLE, then go to step 9 (Fig. 10E).
Move yellow choke lever (F) to
(RUN) (Fig. 10F).
If engine failed to start, repeat these instructions.
GENERAL CUTTING INSTRUCTIONS
A
Fig. 8
2. Start engine.
3. Grasp the rear handle (A) with your right hand.
4. With your left hand, hold the front handle (B) [not
chain brake lever (C)] firmly.
5. Squeeze the throttle trigger to 1/3 throttle, then
immediately activate the chain brake lever (C).
Fig. 9A
A
B
B
C
C
F
D
WARNING: Activate the chain brake slowly
and deliberately. Keep the chain from touching anything; don t let the saw tip forward.
E
Fig. 9B
Fig. 9C
6.
Fig. 9D
Chain should stop abruptly. When it does, immediately release the throttle trigger.
WARNING: If chain does not stop, turn
engine off and take your unit to the nearest
Texas Authorized Service Center for service.
A
D
Fig. 10A
B
Fig. 10B
Fig. 10C
7.
If chain brake functions properly, turn the engine off
and return the chain brake to the DISENGAGED
position.
•
SAW CHAIN / BAR LUBRICATION
A
•
FELLING
Fig. 13
Felling is the term for cutting down a tree. Small trees up
to 6-7 inches (15-18cm) in diameter are usually cut in a
single cut. Larger trees require notch cuts. Notch cuts
determine the direction the tree will fall.
FELLING A TREE:
WARNING: A retreat path (A) should be planned
and cleared as necessary before cuts are started. The retreat path should extend back and diagonally to the rear of the expected line of fall, as
illustrated in Fig. 12.
Never saw completely through the trunk. Always leave a
hinge. The hinge guides the tree. If the trunk is completely cut through, control over the felling direction is lost.
Insert a wedge or felling lever in the cut well before the
tree becomes unstable and starts to move. This will prevent the guidebar from binding in the felling cut if you have
misjudged the falling direction. Make sure no bystanders
have entered the range of the falling tree before you push
it over.
CAUTION: If felling a tree on sloping ground, the
chain saw operator should keep on the uphill side
of the terrain, as the tree is likely to roll or slide
downhill after it is felled.
NOTE: Direction of fall (B) is controlled by the notching
cut. Before any cuts are made, consider the location of
larger branches and natural lean of the tree to determine
the way the tree will fall.
WARNING: Before making the final cut,
always recheck the area for bystanders, animals or obstacles.
B
C
F
FELLING CUT:
1. Use wooden or plastic wedges (A) to prevent binding
the bar or chain (B) in the cut. Wedges also control
felling (Fig. 14A).
2. When diameter of wood being cut is greater than the
bar length, make 2 cuts as shown (Fig. 14B).
B
E
Fig. 10D
•
Fig. 10E
Fig. 11
Fig. 10F
RE-STARTING A WARM ENGINE
Adequate lubrication of the saw chain is essential at all
times to minimize friction with the guide bar.
Never starve the bar and chain of oil. Running the saw
with too little oil will decrease cutting efficiency, shorten
saw chain life, cause rapid dulling of chain, and cause
excessive wear of bar from overheating. Too little oil is evidenced by smoke, bar discoloration or pitch build-up.
NOTE: Saw chain stretches during use, particularly when
it is new, and it will occasionally be necessary to adjust
and tighten it. New chain will require adjustment after
about 5 minutes of operation.
1.
2.
3.
4.
5.
Make sure the switch is in the ON position.
Move the choke lever to
(HALF).
Depress the primer bulb 10 times.
Set the throttle latch.
Pull the starter rope rapidly 4 times. The engine
should start.
6. Move the choke lever to
(RUN).
7. Release the throttle latch.
•
TO STOP ENGINE
•
1. Release trigger and allow engine to return to idle
speed.
2. Move STOP switch down to stop engine.
NOTE: For emergency stopping, simply activate chain
brake and move STOP switch down.
•
AUTOMATIC OILER
Your chain saw is equipped with an automatic gear driven oiler system. The oiler automatically delivers the proper amount of oil to the bar and chain. As the engine speed
increases, so does the oil flow to the bar pad. There is no
flow adjustment. The oil reservoir will run out at approximately the same time as the fuel supply runs out.
CHAIN BRAKE OPERATIONAL TEST
Test the chain brake periodically to ensure proper function.
Perform a chain brake test prior to initial cutting,
following extensive cutting, and definitely following any
Chain brake service.
A
Fig. 14A
Fig. 12
A
29
Fig. 14B
WARNING: Do not cut down a tree during high or
changing winds or if there is a danger to property.
Consult a tree professional. Do not cut down a
tree if there is a danger of striking utility wires; notify the utility company before making any cuts.
WARNING: As the felling cut gets close to
the hinge, the tree should begin to fall. When
tree begins to fall, remove saw from cut, stop
engine, put chain saw down, and leave area
along retreat path (Fig. 12).
GENERAL GUIDELINES FOR FELLING TREES:
Normally felling consists of 2 main cutting operations,
notching (C) and making the felling cut (D).
Start making the upper notch cut (C) on the side of the
tree facing the felling direction (E). Be sure you don t
make the lower cut too deep into the trunk.
The notch (C) should be deep enough to create a hinge
(F) of sufficient width and strength. The notch should be
wide enough to direct the fall of the tree for as long as
possible.
•
LIMBING
Limbing a tree is the process of removing the branches
from a fallen tree. Do not remove supporting limbs (A)
until after the log is bucked (cut) into lengths (Fig. 15).
Branches under tension should be cut from the bottom
up to avoid binding the chain saw.
WARNING: Never walk in front of a tree that
has been notched.
Make the felling cut (D) from the other side of
the tree and 1.5 - 2.0 inches (3-5 cm) above
the edge of the notch (C) (Fig. 13)
TEST CHAIN BRAKE AS FOLLOWS (Fig. 11) :
1. Place saw on a clear, firm, flat surface.
B
WARNING: Never cut tree limbs while standing on tree trunk.
30
FUEL AND LUBRICATION
Fig. 15
•
Log supported on both ends: First, overbuck 1/3
diameter of log to avoid splintering. Second, underbuck to meet first cut and avoid pinching (Fig. 16C).
NOTE: The best way to hold a log while bucking is to use
a sawhorse. When this is not possible, the log should be
raised and supported by the limb stumps or by using supporting logs. Be sure the log being cut is securely supported.
A
Fig. 16B
2
Fig. 16C
1
•
BUCKING USING A SAWHORSE
For personal safety and ease of cutting, the correct position for vertical bucking is essential (Fig. 17).
1
•
2
VERTICAL CUTTING:
A. Hold the saw firmly with both hands and keep the saw
to the right of your body while cutting.
B. Keep the left arm as straight as possible.
C. Keep weight on both feet.
BUCKING
Bucking is cutting a fallen log into lengths. Make sure you
have a good footing and stand uphill of the log when cutting on sloping ground. If possible, the log should be supported so that the end to be cut off is not resting on the
ground. If the log is supported at both ends and you must
cut in the middle, make a downward cut halfway through
the log and then make the undercut. This will prevent the
log from pinching the bar and chain. Be careful that the
chain does not cut into the ground when bucking as this
causes rapid dulling of the chain.
When bucking on a slope, always stand on the uphill side.
1. Log supported along entire length: Cut from top (overbuck), being careful to avoid cutting into the ground
(Fig. 16A).
2. Log supported on 1 end: First, cut from bottom
(underbuck) 1/3 diameter of log to avoid splintering.
Second, cut from above (overbuck) to meet first cut
and avoid pinching (Fig. 16B).
•
TO CLEAN AIR FILTER:
1. Remove the top cover (A) by loosening the cover
retaining screws. Cover will lift off.
2. Lift the air filter (B) out of air-box (C) (Fig. 18).
3. Clean air filter. Wash filter in clean, warm, soapy
water. Rinse in clear, cool water. Air dry completely.
NOTE: It is advisable to have a supply of spare filters.
4. Install air filter. Install engine / air filter cover. Make
sure cover fits properly. Tighten the cover retaining
screws securely.
Fig. 21A
WARNING: Never perform maintenance
when the engine is hot, to avoid any chance
of burning hands or fingers.
Fig. 18
Fig. 17
SPARK ARRESTER SCREEN (Fig. 20A)
NOTE: A clogged spark arrester screen will dramatically
reduce engine performance.
1. Remove the 2 bar retaining nuts (A) and loosen the 2
screws (B) that secure the chain brake cover (Fig.
20A).
2. Remove the chain brake cover. Remove the 3 screws
that hold the muffler to the cylinder. The muffler will lift
off after retaining screws are removed (Figure 7-4B).
3. Separate muffler halves (C). Remove the metal baffles (D) and spacer tubes (E).
4. Discard the used spark arrester screen and replace it
with a new one (F) (Fig. 20B).
5. Reassemble the muffler components and install the
muffler to the cylinder. Tighten screws securely.
CAUTION: Never operate saw without the air filter. Dust and dirt will be drawn into engine and
damage it. Keep the air filter clean!
3.
Fig. 16A
AIR FILTER
D
B
A
•
A
FUEL FILTER
CAUTION: Never operate your saw without a
fuel filter. The fuel filter should be replaced
after each 20 hours of use. Drain fuel tank
completely before changing filter.
All chain saw service, other than items listed here in your
user manual maintenance instructions, should be performed professional.
Maintenance
CHECKLIST
ITEM
•
PREVENTIVE MAINTENANCE
A good preventive maintenance program of regular
inspection and care will increase life and improve performance of your Texas chain saw. This maintenance
checklist is a guide for such a program.
Cleaning, adjustment, and parts replacement may be
required, under certain conditions, at more frequent intervals than those indicated.
Screws/Nuts/Bolts
Inspect/Tighten
Air Filter
Fuel Filter/Oil Filter
Clean or Replace
Replace
✔
Spark Plug
Clean/Adjust/Replace
✔
✔
EACH HOURS OF
USE OPERATION
ACTION
✔
✔
Inspect
✔
Replace as Required
Chain brake
components
Inspect
Replace as Required
20
✔
Spark Arrester Screen Inspect
Fuel Hoses
10
✔
E
SPARK PLUG
Fig. 21
1.
2.
3.
MAINTENANCE INSTRUCTIONS
Fig. 20B
NOTE: For efficient operation of saw engine, spark plug
must be kept clean and properly gapped.
1. Push STOP switch down.
2. Disconnect the wire connector (A) from the spark
plug (B) by pulling and twisting at the same time (Fig.
21).
3. Remove spark plug with spark plug socket wrench.
DO NOT USE ANY OTHER TOOL.
4. Reinstall a new spark plug, gapped at .635mm.
C
•
F
B
B
C
E
A
Remove the fuel tank cap.
Bend a piece of soft wire.
Reach into fuel tank opening and hook fuel line.
Carefully pull the fuel line toward the opening until
you can reach it with your fingers.
NOTE: Do not pull hose completely out of tank.
4. Lift filter (A) out of tank (Fig. 19).
5. Pull filter off with a twisting motion. Discard filter.
6. Install new filter. Insert end of filter into tank
opening. Make sure filter sits in bottom corner of tank. Use
a long handle screwdriver to aid in filter placement if
necessary.
7. Fill tank with fresh fuel / oil mixture. See Section
FUEL AND LUBRICATION. Install fuel cap.
B
A
•
CARBURETOR ADJUSTMENT
The carburetor was pre-set at the factory for optimum performance. If further adjustments are necessary, please
take your unit to the nearest professional.
•
STORING A CHAIN SAW
Storing a chain saw for longer than 30 days requires storage maintenance. Unless the storage instructions are followed, fuel remaining in the carburetor will evaporate,
leaving gum-like deposits. This could lead to difficult starting and result in costly repairs.
Fig. 19
A
CAUTION: Never store a chain saw for
longer than 30 days without performing the
following procedures.
31
32
1.
Remove the fuel tank cap slowly to release any pressure in tank. Carefully drain the fuel tank.
2. Start the engine and let it run until the unit stops to
remove fuel from carburetor.
3. Allow the engine to cool (approx. 5 minutes).
4. Using a spark plug wrench, remove the spark plug.
5. Pour 1 teaspoon of clean 2-cycle oil into the combustion chamber. Pull starter rope slowly several times to
coat internal components. Replace spark plug (Fig.
22).
NOTE: Store the unit in a dry place and away from possible sources of ignition such as a furnace, gas hot water
heater, gas dryer, etc.
The Lube Gun (optional) is recommended for applying
grease to the guide bar sprocket tip. The Lube Gun is
equipped with a needle nose tip which is necessary for the
efficient application of grease to the sprocket tip.
WARNING: Proper adjustment of the depth
gauge is as important as proper sharpening
of the chain.
REMOVING A UNIT FROM STORAGE
1.
2.
Remove spark plug.
Pull starter rope briskly to clear excess oil from combustion chamber.
Clean and gap spark plug or install a new spark plug
with proper gap.
Prepare unit for operation.
Fill fuel tank with proper fuel / oil mixture. See FUEL
AND LUBRICATION Section.
3.
4.
5.
•
WARNING: Never have more than 3 links
removed from a loop of chain. This could
cause damage to the sprocket.
CHAIN LUBRICATION:
Always make sure the automatic oiler system is working
properly. Keep the oil tank filled with Texas Chain, Bar and
Sprocket Oil.
Adequate lubrication of the bar and chain during cutting
operations is essential to minimize friction with the guide
bar.
Never starve the bar and chain of lubricating oil. Running
the saw dry or with too little oil will decrease cutting efficiency, shorten saw chain life, cause rapid dulling of
chain, and lead to excessive wear of bar from overheating. Too little oil is evidenced by smoke or bar discoloration.
Fig. 23
Fig. 22
•
BREAKING IN A NEW SAW CHAIN:
A new chain and bar will need chain readjustment after as
few as 5 cuts. This is normal during the break-in period,
and the interval between future adjustments will begin to
lengthen quickly.
After every 3-4 times the cutters have been sharpened
you need to check the height of the depth gauges and, if
necessary, lower them using the flat file and template supplied optional, then round off the front corner. (Fig. 26)
TO LUBRICATE SPROCKET TIP:
1. Move the STOP switch down.
NOTE: It is not necessary to remove the saw chain to
lubricate the guide bar sprocket tip. Lubrication can be
done on the job.
2. Clean the guide bar sprocket tip.
3. Using the Lube Gun (optional), insert needle nose
into the lubrication hole and inject grease until it
appears at outside edge of sprocket tip (Fig .23).
4. Rotate saw chain by hand. Repeat lubrication procedure until the entire sprocket tip has been greased.
GUIDE BAR MAINTENANCE:
Most guide bar problems can be prevented merely by
keeping the chain saw well maintained.
Insufficient guide bar lubrication and operating the saw
with chain that is TOO TIGHT will contribute to rapid bar
wear.
To help minimize bar wear, the following guide bar maintenance procedures are recommended.
WARNING: Always wear protective gloves
during maintenance operations. Do not carry
out maintenance when the engine is hot.
MANTENIMIENTO DE LA BARRA GUIA
Una lubricación frecuente de la rueda dentada de la barra
guía (barra de rieles que soporta la sierra-de-cadena) es
requerida. El mantenimiento propio de la barra guía,
como se explica en esta sección, es esencial para mantener su sierra en buenas condiciones de trabajo.
LUBRICACION DE LA RUEDA DENTADA:
CHAIN SHARPENING - The pitch of the chain (Fig. 24) is
3/8” LoPro x .050”.
CAUTION: The sprocket tip on your new saw has
been pre-lubricated at the factory. Failure to
lubricate the guide bar sprocket tip as explained
below will result in poor performance and seizure,
voiding the manufacturer’s warranty.
Fig. 24
Lubrication of the sprocket tip is recommended after 10
hours of use or once a week, which ever occurs first.
Always thoroughly clean guide bar sprocket tip before
lubrication.
Sharpen the chain using protective gloves and a round file
of ø3/16” (4.8mm).
Always sharpen the cutters only with outward strokes (Fig.
25) observing the values given in Fig. 24.
After sharpening, the cutting links must all have the same
width and length.
WARNING: A sharp chain produces welldefined chips. When your chain starts to produce sawdust, it is time to sharpen.
TOOLS FOR LUBRICATION:
WARNING: Wear heavy duty work gloves
when handling the bar and chain.
33
Fig. 25
Fig. 26
GUIDE BAR - The bar should be reversed every 8 working hours to ensure uniform wear.
Keep the bar groove and lubrication hole clean using the
bar groove cleaner supplied optional. (Fig. 27)
Check the bar rails frequently for wear and, if necessary,
remove the burs and square-up the rails using the flat file.
(Fig. 28)
CHAIN SHARPENING:
Chain sharpening requires special tools to ensure that
cutters are sharpened at the correct angle and depth. For
the inexperienced chain saw user, we recommend that the
saw chain be professionally sharpened by the nearest
professional Service Center. If you feel comfortable sharpening your own saw chain, special tools are available from
the professional Service Center.
WARNING: Never mount a new chain on a
worn sprocket or self-aligning ring.
Fig. 27
Fig. 28
BAR WEAR - Turn guide bar frequently at regular intervals (for example, after 5 hours of use), to ensure even
wear on top and bottom of bar.
OIL PASSAGES - Oil passages on the bar should be
cleaned to ensure proper lubrication of the bar and chain
during operation.
NOTE: The condition of the oil passages can be easily
checked. If the passages are clear, the chain will
automatically give off a spray of oil within seconds of starting
the saw. Your saw is equipped with an automatic oiler system.
•
CHAIN MAINTENANCE
CHAIN TENSION:
Check the chain tension frequently and adjust as often as
necessary to keep the chain snug on the bar, but loose
enough to be pulled around by hand.
34
TROUBLE SHOOTING THE ENGINE
PROBLEM
PROBABLE CAUSE
CORRECTIVE ACTION
Incorrect starting procedures.
Follow instructions in the User Manual.
Incorrect carburetor mixture adjustment
Have carburetor adjusted by an Authorized
setting.
Service Center.
Fouled spark plug
Clean / gap or replace plug.
Fuel filter plugged.
Replace fuel filter.
Incorrect lever position on choke.
Move to RUN position.
Dirty spark arrester screen.
Replace spark arrester screen.
Dirty air filter.
Remove, clean and reinstall filter.
Incorrect carburetor mixture adjustment
Have carburetor adjusted by an Authorized
setting.
Service Center.
Engine hesitates.
No power under load.
Incorrect carburetor mixture adjustment
Have carburetor adjusted by an Authorized
setting.
Service Center.
Runs erratically.
Incorrectly gapped spark plug.
Clean / gap or replace plug.
Smokes excessively.
Incorrect carburetor mixture adjustment
Have carburetor adjusted by an Authorized
setting.
Service Center.
Incorrect fuel mixture.
Use properly mixed fuel (40:1 mixture).
Unit won’t start or starts but will not run.
Unit starts, but engine has low power.
35