1
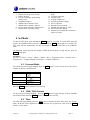
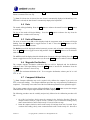
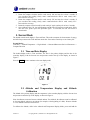
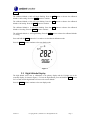
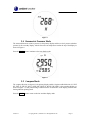
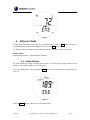
Ambient Weather WS-109 Keychain Altimeter, Barometer,
Thermometer & Compass User Manual
Table of Contents
1.
2.
Introduction ..................................................................................................................................... 2
Getting Started ................................................................................................................................ 2
2.1
Parts List................................................................................................................................. 2
2.2
Precautions ............................................................................................................................. 2
2.3
Installing the Battery .............................................................................................................. 2
3. Display Layout ................................................................................................................................ 3
4. Set Mode ......................................................................................................................................... 4
4.1
Forecast Mode ........................................................................................................................ 4
4.2
12Hr/ 24Hr Format ................................................................................................................. 4
4.3
Time ....................................................................................................................................... 4
4.4
Date ........................................................................................................................................ 5
4.5
Units of Measure .................................................................................................................... 5
4.6
Magnetic Declination ............................................................................................................. 5
4.7
Compass Calibration .............................................................................................................. 5
5. Normal Mode .................................................................................................................................. 6
5.1
Time and Date Display ........................................................................................................... 6
5.2
Altitude and Temperature Display and Altitude Calibration .................................................. 6
5.3
High Altitude Display............................................................................................................. 7
5.4
Barometric Pressure Mode ..................................................................................................... 8
5.5
Compass Mode ....................................................................................................................... 8
6. Altimeter Mode ............................................................................................................................... 9
6.1
Climb Altitude ........................................................................................................................ 9
6.2
Climb Rate............................................................................................................................ 10
7. Backlight ....................................................................................................................................... 10
8. Low Battery Indicator ................................................................................................................... 10
9. Discussion of Features and Limitations ........................................................................................ 10
9.1
Weather Forecasting ............................................................................................................. 10
9.2
Magnetic Declination ........................................................................................................... 10
9.3
Temperature Changes ........................................................................................................... 11
9.4
Pressure Altitude vs. True Altitude ....................................................................................... 11
9.5
Relative Pressure vs. Sea-level Pressure .............................................................................. 12
9.6
Digital Compass Measurement ............................................................................................ 12
10.
Glossary of Terms ..................................................................................................................... 12
11.
Specifications ........................................................................................................................... 13
12.
Other Specifications ................................................................................................................. 13
13.
Troubleshooting Guide ............................................................................................................. 13
14.
Accessories ............................................................................................................................... 14
15.
Liability Disclaimer .................................................................................................................. 14
16.
Warranty Information ............................................................................................................... 15
Version 1.1
©Copyright 2011, Ambient LLC. All Rights Reserved.
Page 1
1. Introduction
Thank you for your purchase of the Ambient Weather WS-109 Keychain Altimeter, Barometer,
Thermometer & Compass. The following user guide provides step by step instructions for operation
and troubleshooting. To download the latest manual and additional troubleshooting tips, please visit:
http://ambientweather.wikispaces.com/ws109
2. Getting Started
2.1 Parts List
QTY
1
1
1
Item
WS-109 Unit
Dimensions: 2.5 x 2.0 x 0.6 inches
CR2032 battery
Carbineer clip
2.2 Precautions
Caution: This unit is water resistant but not water proof. Do not submerse in water. When
installing the battery, make sure the gasket is properly seated (see battery installation instructions).
Avoid leaving out in the rain.
Caution: Keep away from strong magnetic forces, which can destroy the compass.
Caution: Do not drop or apply excessive force to the LCD display. When replacing the battery,
apply force to the outer ring.
Caution: Do not operate outside of the specified temperature range (14 to 140 °F). Use your
body warmth to keep within the low temperature range.
Note: Do not use a magnetized CR2032 battery, which can corrupt the compass measurement.
Note: Do not use near strong magnetic or EMI forces (TVs, computers, electronics) which can
corrupt the compass measurement.
2.3 Installing the Battery
Rotate the back cover counter clockwise about 20°, gripping the unit with both hands, using your
index fingers and thumbs. Rotate until it stops, then gently pry off the back cover with your fingers,
exposing the battery compartment.
Note: you may have to squeeze on the outer ring (not the display) and apply force in the
clockwise and counterclockwise direction repeatedly (work back and forth) to free the back cover
after extended use, due to sweat and other debris. Make sure your fingers are dry.
Insert the CR2032 battery (+ side up), and close the back cover, insuring the gasket is firmly seated in
the housing trace, as shown in Figure 1.
To remove the battery, use a small pen or paperclip to pry the battery out of the battery compartment.
Version 1.1
©Copyright 2011, Ambient LLC. All Rights Reserved.
Page 2
To close the back cover, rotate the back cover clockwise until the back cover is completely closed.
The display should be powered up in the time and date mode, and ready for use.
Figure 1
3. Display Layout
The display layout is shown in Figure 2.
Figure 2
Version 1.1
©Copyright 2011, Ambient LLC. All Rights Reserved.
Page 3
1.
2.
3.
4.
5.
6.
7.
8.
9.
Pressure Altitude
Pressure Trend (up, down, steady)
Relative Pressure
Forecast icon (sunny, partly cloudy,
cloudy, rainy)
Temperature degrees
Altitude units of measure (Feet)
Altitude units of measure (Meters)
Pressure units of measure (hectopascals)
Pressure units of measure (inHg)
10. Temperature units of measure (degC or
degF)
11. Low battery indicator
12. Compass mode
13. 16 point compass rose
14. Secondary parameter display
15. Sea level pressure
16. Barometric pressure mode
17. AM/PM time indicator (P = PM)
18. Primary parameter display
19. Altitude rate of change units of measure
(ft/min or m/min)
4. Set Mode
To enter the SET Mode, press and hold the MODE button for 3 seconds. To exit the SET mode and
return to the NORMAL mode at any time, press and hold the MODE button again for 3 seconds. The
SET mode will also automatically exit after 30 seconds of inactivity, and return to the NORMAL
mode.
The following sections describe the settings available in the Set Mode. To skip any step, press the
MODE button again.
Set Modes:
Forecast -> 12/24 Hr -> Hour -> Minute -> Month -> Day -> Temperature Units -> Pressure Units ->
Altitude Units -> Compass Magnetic Declination -> Compass Calibration
4.1 Forecast Mode
The current forecast will begin flashing. Press the ALTI button to set the forecast icon to the current
weather conditions, as defined below:
Condition
Sunny
Icon
Partly Cloudy
Cloudy
Rainy
Press the MODE button to continue to the next step.
4.2 12Hr/ 24Hr Format
The hour format will begin flashing. Press the ALTI button to toggle between 12 Hour (AM/PM)
and 24 Hour format. Press the MODE button to continue to the next step.
4.3 Time
The hour will begin flashing. Press the ALTI button to advance the hour. Note that in the 12 hour
mode, the P icon will be displayed to designate PM (no icon is present for AM). Press the MODE
button to set the minute.
Version 1.1
©Copyright 2011, Ambient LLC. All Rights Reserved.
Page 4
The minute will begin flashing. Press the ALTI button to advance the minute. Press the MODE
button to continue to the next step.
Note: If 12 hour time is selected, the date format is automatically displayed as Month.Day. If 24
hour time is selected, the date format is automatically displayed as Day.Month.
4.4 Date
The month will begin flashing. Press the ALTI button to advance the month. Press the MODE button
to set the day.
The day of the month will begin flashing. Press the ALTI button to advance the day. Press the
MODE button to continue to the next step.
4.5 Units of Measure
The units of measure icon (UN) will be displayed and the temperature units of measure will begin
flashing. Press the ALTI button to toggle between °F and °C. Press the MODE button to set the
barometric pressure units of measure.
The BARO icon will be displayed and the barometric pressure units of measure will begin flashing.
Press the ALTI button to toggle between inHg and hPa. Press the MODE button to set the altimeter
units of measure.
The ALTI icon will be displayed and the altitude units of measure will begin flashing. Press the ALTI
button to toggle between feet (ft) and meters (m). Press the MODE button to continue to the next step.
4.6 Magnetic Declination
The compass magnetic declination calibration Cb icon will be displayed and the declination
calibration value will begin flashing. Press the ALTI button to increase the declination. Press the
MODE button to advance to the next step.
Note: The maximum declination is 30°. To set a negative declination, advance past 30° to “roll
over” to -30°.
4.7 Compass Calibration
Note: Compass calibration may not be required. Only calibrate the compass if you receive an
error or inaccurate reading. The compass calibration procedure may exit prematurely if calibration is
completed. This usually occurs when one of the four calibration points have been passed through 0°.
The 16 point compass reference points will begin flashing. Press the ALTI button to enter the compass
calibration mode. The compass angle and CAL icon will be displayed.
The following procedure must be carefully and precisely followed or the calibration procedure will
fail.
1. On a flat, level surface, slowly rotate the compass in the clockwise direction. When the
compass reaches exactly 0°, stop for at least 3 seconds. If you overshoot this reading, slowly
rotate counterclockwise until it reads exactly 0°. Proceed to the next step.
2. Rotate the compass clockwise until it reads exactly 90° and stop for at least 3 seconds. If you
overshoot this reading, slowly rotate counterclockwise until it reads exactly 90°. Proceed to
Version 1.1
©Copyright 2011, Ambient LLC. All Rights Reserved.
Page 5
the next step.
3. Rotate the compass clockwise until it reads exactly 180° and stop for at least 3 seconds. If
you overshoot this reading, slowly rotate counterclockwise until it reads exactly 180°.
Proceed to the next step.
4. Rotate the compass clockwise until it reads exactly 270° and stop for at least 3 seconds. If
you overshoot this reading, slowly rotate counterclockwise until it reads exactly 270°.
Proceed to the next step.
5. Rotate the compass clockwise until it reads exactly 0° again, and stop for at least 3 seconds.
6. Once calibrated, the CAL icon will disappear and the unit will return to normal mode. If this
does not occur, please repeat this procedure again. If successful, the unit will return to
normal mode.
5. Normal Mode
The default normal mode display is Time and Date. This mode consumes the least amount of energy,
and will always return to the Time and Date mode after 30 seconds of inactivity to save battery life.
Normal Modes:
Time/Date -> Altitude/Temperature -> High Altitude -> Measured Barometer/Sea-level Barometer ->
Compass/Direction
5.1 Time and Date Display
The default display mode is Time and Date. The time is the primary display and the date is the
secondary display, with the forecast icon and pressure trend at the top of the display, as shown in
Figure 3.
Press the MODE button to continue to the next display mode.
Figure 3
5.2 Altitude and Temperature Display and Altitude
Calibration
The altitude is the primary display and the temperature is the secondary display, with the forecast icon
and pressure trend at the top of the display, as shown in Figure 4.
Since the altimeter measures Pressure Altitude and not True Altitude, the altimeter must be calibrated
at a known altitude, whenever convenient (for example, at the beginning of a hike). Pressure Altitude
vs. True Altitude is discussed in Section 9.
To calibrate the altitude, while in the Altitude and Temperature Display Mode, press and hold the
Version 1.1
©Copyright 2011, Ambient LLC. All Rights Reserved.
Page 6
MODE button for 3 seconds.
The calibrated altitude x 1000 will begin flashing. Press the ALTI button to advance the calibrated
altitude x 1000 setting. Press the MODE button to continue.
The calibrated altitude x 100 will begin flashing. Press the ALTI button to advance the calibrated
altitude x 100 setting. Press the MODE button to continue.
The calibrated altitude x 10 will begin flashing. Press the ALTI button to advance the calibrated
altitude x 10 setting. Press the MODE button to continue.
The calibrated altitude x 1 will begin flashing. Press the ALTI button to advance the calibrated altitude
x 1 setting.
Press and hold the MODE button for 3 seconds to exit the altitude calibration mode.
Press the MODE button to continue to the next display mode.
Figure 4
5.3 High Altitude Display
The high altitude (since reset or calibration) is the primary display and the H (high) icon is the
secondary display, as shown in Figure 5. To reset the high altitude, press and hold the MODE button
for 3 seconds, and the high altitude will reset to the current altitude.
Press the MODE button to continue to the next display mode.
Version 1.1
©Copyright 2011, Ambient LLC. All Rights Reserved.
Page 7
Figure 5
5.4 Barometric Pressure Mode
The measured barometer (relative pressure) is the primary display and the sea-level pressure (absolute
pressure) is the secondary display, with the forecast icon and pressure trend at the top of the display, as
shown in Figure 4.
Press the MODE button to continue to the next display mode.
Figure 6
5.5 Compass Mode
The compass direction (in degrees) is the primary display and the 16-point cardinal direction (N, NNE,
NE, ENE, E, ESE, SE, SSE, S, SSW, SW, WSW, W, WNW, NW, NNW) is the secondary display, as
shown in Figure 7. A four point bearing is indicated at the circumference of the display, with the main
bearing indicator pointing north.
Press the MODE button to return to the time and date display mode.
Version 1.1
©Copyright 2011, Ambient LLC. All Rights Reserved.
Page 8
Figure 7
6. Altimeter Mode
To enter the ALTIMETER mode, while in the NORMAL mode, press the ALTI button. To exit the
ALTIMETER mode and enter the NORMAL mode, press the ALTI button again.
The altimeter mode will return to normal mode time display every hour to conserve battery life.
Altitude Modes:
Climb Altitude/Altitude -> Climb Altitude/Climb Rate
6.1 Climb Altitude
The climb altitude (the change in altitude since the last reset) is the primary display and the current
altitude is the secondary display, as shown in Figure 8.
To rest the climb altitude, press and hold the MODE button for 3 seconds, and the climb altitude will
reset to 0.
Figure 8
Press the MODE button to continue to the next display mode.
Version 1.1
©Copyright 2011, Ambient LLC. All Rights Reserved.
Page 9
6.2 Climb Rate
The climb altitude (the change in altitude since the last reset) is the primary display and the altitude
rate of change in the last minute (ft/min) is the secondary display, as shown in Figure 9.Figure 8 The
climb rate updates once per minute.
Figure 9
7. Backlight
To activate the backlight, press and hold the ALTI button for three seconds. The backlight will remain
on for 30 seconds of inactivity.
8. Low Battery Indicator
When the low battery indicator icon is displayed
, it is time to replace the battery.
9. Discussion of Features and Limitations
9.1 Weather Forecasting
The weather forecast or pressure tendency is based on the rate of change of barometric pressure. In
general, when the pressure increases, the weather improves (sunny to partly cloudy) and when the
pressure decreases, the weather degrades (cloudy to rain).
The weather forecast is an estimation or generalization of weather changes in the next 24 to 48 hours,
and varies from location to location. It is not an indication of current conditions. The tendency is
simply a tool for projecting weather conditions and is never to be relied upon as an accurate method to
predict the weather.
Barometric pressure is adversely affected by altitude and to a lesser extent, changes in weather
conditions. The weather forecasting tool is only useful at a fixed position and must be reset to the
current weather conditions if you change altitude. Thus, if you are hiking, climbing or driving, and
continuously changing altitude, the weather forecasting tool must be recalibrated.
9.2 Magnetic Declination
Magnetic declination is defined as the angle between magnetic north (the direction the north end of a
Version 1.1
©Copyright 2011, Ambient LLC. All Rights Reserved.
Page 10
compass needle points) and true north. Only a GPS can determine true north by knowing your exact
orientation on the earth. All digital compasses measure magnetic north.
The declination is positive when the magnetic north is east of true north. The declination is negative
when the magnetic north is west of true north. To determine the declination for your location, visit:
http://www.ngdc.noaa.gov/geomagmodels/Declination.jsp
For example, Phoenix, AZ produces the following result:
Declination = 10° 59' E changing by 0° 6' W/year (or +10 degrees 59 minutes changing –6 minutes
per year). To convert to decimal format:
Declination = 10° + 59’/60 (‘/°) = 10.98° (rounded to the nearest integer, Declination = 11°).
Enter +11 into the display. This will offset magnetic north by +11 degrees (or 11 degrees to the East)
to true north.
Note that the magnetic declination changes as a function of time for your location. In the above
example, the declination changes -6 minutes (or 0.10° per year, or about 1° every 10 years). Thus, the
time function is insignificant.
9.3 Temperature Changes
The temperature sensor is a resistive thermal device (RTD). As the temperature changes, the resistance
of the device changes and this resistance translates to temperature.
The RTD is inside the unit and subject to a thermal time constant (or the time it takes for the entire
display to reach a given temperature due to the mass of the display). Thus, rapid changes in
temperature may take several minutes to stabilize. If the display is close to your body, it will not
accurately measure the ambient temperature, and may take several minutes to stabilize when away
from your body warmth.
Thus, it is best to hang the display from the carbineer in the open air to accurately measure the
ambient temperature.
9.4 Pressure Altitude vs. True Altitude
Altimeters are often misunderstood because they do not measure your actual position on the earth
(true altitude) such as a GPS, but measure the air pressure and predict the altitude based on this
measurement. This is referred to as “Pressure Altitude”.
Pressure Altitude is adversely affected by the true altitude and to a lesser extent, changes in the
weather, often referred to as barometric pressure changes.
Thus, your Pressure Altitude can change without changing your position. These changes can be as
great as a thousand feet (the changes due to weather are more pronounced at higher altitude).
To offset the difference between Pressure Altitude and True Altitude, you must calibrate the device at a
known altitude, whenever convenient. For more information on altitude calibration refer to Section
5.2.
Version 1.1
©Copyright 2011, Ambient LLC. All Rights Reserved.
Page 11
9.5 Relative Pressure vs. Sea-level Pressure
Relative Pressure is the pressure measured at your location, and Sea-level Pressure is the pressure
compensated to sea-level.
To compare pressure conditions from one location to another, Meteorologists correct pressure to
sea-level conditions, removing the altitude affects.
Because the air pressure decreases as you rise in altitude, the sea-level corrected pressure (the pressure
your location would be at if located at sea-level) is generally higher than your measured pressure.
Thus, your pressure may read 28.62 inHg (969 hPa) at an altitude of 1000 feet (305 m), but the
corrected pressure is 30.00 inHg (1016 hPa). The standard sea-level pressure (the average sea-level
pressure around the world) is 29.92 inHg (1013 hPa).
Pressure conditions greater than 29.92 inHg (1013 hPa) are considered high pressure and pressure
conditions less than 29.92 inHg (1013 hPa) are considered low pressure.
This device calculates the sea-level barometric pressure based on the calibrated altitude described in
the previous section.
9.6 Digital Compass Measurement
The compass must be level to accurately measure bearing. This can be done by placing on a flat
surface (best), or in the palm of your hand. This is common with most digital compasses (some
compasses are tilt compensated, but are expensive).
10. Glossary of Terms
Term
Accuracy
Pressure Altitude
Magnetic Declination
Range
Relative Pressure
Measured Pressure
Resolution
Sea-level Pressure
Absolute Pressure
True Altitude
Version 1.1
Definition
Accuracy is defined as the ability of a measurement to match the actual
value of the quantity being measured.
Pressure Altitude is the altitude in the International Standard
Atmosphere (an atmospheric model of how the pressure changes over a
wide range of altitudes), calculated from the measured air pressure.
Magnetic declination is the angle between magnetic north (the direction
the north end of a compass needle points) and true north. The
declination is positive when the magnetic north is east of true north.
Range is defined as the amount or extent a value can be measured.
Relative pressure is the barometric pressure measured at your location.
The relative pressure is adversely affected by altitude, and to a lesser
extent, changes in the weather.
Resolution is defined as the number of significant digits (decimal
places) to which a value is being reliably measured.
Sea-level Pressure is the relative pressure measured at your location,
compensated to sea-level. To compare pressure conditions from one
location to another, meteorologists correct pressure to sea-level
conditions.
True altitude is the elevation above mean sea level. To measure true
altitude, you must know your exact position on the earth, as measured
by a GPS. An altimeter measures pressure altitude.
©Copyright 2011, Ambient LLC. All Rights Reserved.
Page 12
11. Specifications
Measurement
Altitude
Temperature
Barometer
Compass
Range
-2,296 to 29,500 feet
14 to 140 °F
8.86 to 32.49 inHg
(300 to 1100 mbar)
0 to 360°
Accuracy
± 65 ft (20 m)
± 2 °F (1°C)
± 0.04 inHg (1.5 mbar)
Resolution
3 ft (1 m)
0.1 °
0.01 inHg (0.1 mbar)
± 3°
1°
12. Other Specifications
Update Rate: 4 seconds
13. Troubleshooting Guide
If your question is not answered here, you can contact us as follows:
1. Email Support: [email protected]
2. Live Chat Support: www.ambientweather.com/chat.html (M-F 8am to 4pm Arizona Time)
3. Technical Support: 480-283-1644 (M-F 8am to 4pm Arizona Time)
Problem
The compass is not reading the proper
direction.
The forecast icon is not accurately
displaying the current weather or the
forecasted weather conditions.
The temperature is not accurate.
Version 1.1
Solution
1. The compass must be level to take a proper
reading.
2. Make sure the compass calibration procedure
has been followed each time a battery is
installed.
3. Make sure the magnetic declination has been
entered properly.
4. Move away from any electronic magnetic
interference sources, such as TVs or computers.
1. The weather station must run for several days to
trend barometric pressure.
2. The weather forecast is an estimation or
generalization of weather changes in the next 24
to 48 hours, and varies from location to location.
The tendency is simply a tool for projecting
weather conditions and is never to be relied
upon as an accurate method to predict the
weather.
3. If you change altitude, the forecast icon must be
reset to the current weather conditions. Altitude
affects have a significant impact on the
measured barometric pressure.
The RTD is inside the unit and subject to a thermal time
constant (or the time it takes for the entire display to
reach a given temperature due to the mass of the
display). Thus, rapid changes in temperature take several
minutes to be measured by the digital thermometer. If the
display is close to your body, it will not accurately
©Copyright 2011, Ambient LLC. All Rights Reserved.
Page 13
Problem
Solution
measure the ambient temperature, and may take several
minutes when away from your body warmth.
The altimeter changes at a fixed altitude.
Thus, it is best to hang the display from the carbineer in
the open air to accurately measure the ambient
temperature.
Altimeters are often misunderstood because they do not
measure your actual position on the earth (true altitude)
such as a GPS, but measure the air pressure and predict
the altitude based on this measurement. This is referred
to as Pressure Altitude.
Pressure Altitude is adversely affected by the altitude and
to a lesser extent, changes in the weather, often referred
to as barometric pressure changes.
The altimeter is inaccurate at a known
altitude.
The display reverts back to the date and
time.
The sea-level barometric pressure never
changes.
Thus, your Pressure Altitude can change without
changing your position. These changes can be as great as
a thousand feet (the changes due to weather are more
pronounced at higher altitude).
See solution above. Make sure you calibrate the altimeter
at a known altitude.
This is by design to save battery life. Other modes of
operation consume additional power, especially the
compass mode.
Unlike a weather station barometer, the sea-level
pressure is fixed when the altitude is calibrated and the
measured pressure fluctuates as a function of altitude and
weather conditions. To update the sea-level barometer,
calibrate the altimeter at a known altitude, and the
accurate sea-level barometric pressure will be displayed.
14. Accessories
The following software and hardware accessories are available for this weather station at
www.AmbientWeather.com .
Accessory
Ambient CR2032 3 Volt
Lithium Button Cell Battery
- One Battery
Image
Description
Standard CR2032 3 Volt Lithium Battery (1
battery)
15. Liability Disclaimer
Please help in the preservation of the environment and return used batteries to an authorized depot.
The electrical and electronic wastes contain hazardous substances. Disposal of electronic waste in
wild country and/or in unauthorized grounds strongly damages the environment.
Reading the “User manual” is highly recommended. The manufacturer and supplier cannot accept any
Version 1.1
©Copyright 2011, Ambient LLC. All Rights Reserved.
Page 14
responsibility for any incorrect readings and any consequences that occur should an inaccurate reading
take place.
This product is designed for personal use as indication of weather conditions. This product is not to be
used for medical purposes or for public information.
The specifications of this product may change without prior notice.
This product is not a toy. Keep out of the reach of children.
No part of this manual may be reproduced without written authorization of the manufacturer.
Ambient, LLC WILL NOT ASSUME LIABILITY FOR INCIDENTAL, CONSEQUENTIAL,
PUNITIVE, OR OTHER SIMILAR DAMAGES ASSOCIATED WITH THE OPERATION OR
MALFUNCTION OF THIS PRODUCT.
16. Warranty Information
Ambient, LLC provides a 1-year limited warranty on this product against manufacturing defects in
materials and workmanship.
This limited warranty begins on the original date of purchase, is valid only on products purchased and
only to the original purchaser of this product. To receive warranty service, the purchaser must contact
Ambient, LLC for problem determination and service procedures.
Warranty service can only be performed by Ambient, LLC. The original dated bill of sale must be
presented upon request as proof of purchase to Ambient, LLC.
Your Ambient, LLC warranty covers all defects in material and workmanship with the following
specified exceptions: (1) damage caused by accident, unreasonable use or neglect (lack of reasonable
and necessary maintenance); (2) damage resulting from failure to follow instructions contained in your
owner’s manual; (3) damage resulting from the performance of repairs or alterations by someone other
than an authorized Ambient, LLC authorized service center; (4) units used for other than home use (5)
applications and uses that this product was not intended.
This warranty covers only actual defects within the product itself, and does not cover the cost of
installation or removal from a fixed installation, normal set-up or adjustments, claims based on
misrepresentation by the seller or performance variations resulting from installation-related
circumstances.
Version 1.1
©Copyright 2011, Ambient LLC. All Rights Reserved.
Page 15