1
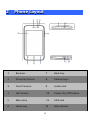
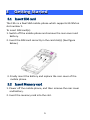
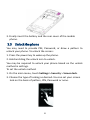
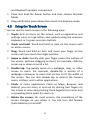
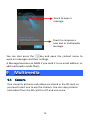
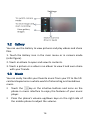
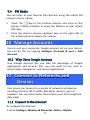
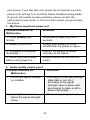
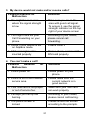
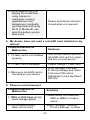
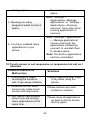
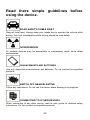
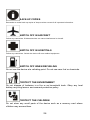
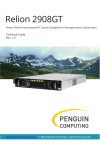
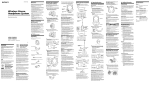
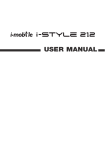
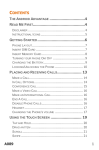
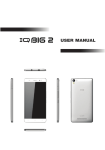
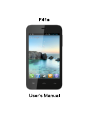
1 ALL RIGHTS RESERVED © 2013. All rights are reserved. No part of this document may be reproduced without permission. While all efforts have been made to ensure the accuracy of all contents in this User’s Manual, we assume no liability for errors or omissions or statements of any kind in this User’s Manual, whether such errors or omissions or statements are a result of negligence, accidents, or any other cause. The contents of this User’s Manual are subject to change without notice. Protect our environment! We strive to produce products in compliance with global environmental standards. Please consult your local authorities for proper disposal. Note: Specifications and information in this User ’s Manual are furnished for information only and are subject to change without prior notice. These should not be construed as a commitment or a certificate of technology. FLY mobile phones assumes no responsibility for any errors or omissions that may appear in this manual. 1 Contents 1 ALL RIGHTS RESERVED 1 2 Phone Layout 4 3 Getting Started 5 3.1 Insert SIM card ................................................................................................... 5 3.2 Insert Memory card.......................................................................................... 5 3.3 Unlock the phone .............................................................................................. 6 4 Placing and Receiving Calls 7 4.1 Make a Call........................................................................................................... 7 4.2 Make a Video Call ............................................................................................ 7 4.3 End a call ............................................................................................................... 7 4.4 Disable Phone Calls........................................................................................ 7 4.5 Using the Touch Screen ............................................................................... 8 4.6 Using the Phone’s Buttons.......................................................................... 9 4.7 Open and Close the Launcher ................................................................. 9 5 The Home Screen 10 5.1 Customize Home Screen .......................................................................... 10 5.1.1Add Widgets and icons to home screen................................................. 11 5.1.2Rearrange or Remove Widgets and Icons on Home Screen ........ 11 6 Working With Menus 12 6.1 Options Menus ................................................................................................ 12 6.2 Menu Icons ........................................................................................................ 12 7 Managing Notifications 13 7.1 Open the Notifications Panel .................................................................. 13 7.1.1Respond to Notifications ............................................................................... 14 7.1.2Close Notifications Panel.............................................................................. 14 7.2 Toolkits ................................................................................................................. 14 8 Messaging 14 9 Multimedia 15 9.1 Camera ................................................................................................................ 15 9.2 Gallery .................................................................................................................. 16 9.3 Music ..................................................................................................................... 16 2 9.4 FM Radio ............................................................................................................ 17 17 10 Manage Accounts 10.1Why Use a Google Account ................................................................... 17 11 Connect to Networks and Devices 17 11.1Connect to the Internet .............................................................................. 17 11.1.1Connect to Internet via your Phone ....................................................... 18 11.2Access Internet via Wi-Fi.......................................................................... 18 11.3Pair With Bluetooth Devices ................................................................... 18 11.4Install Secure Certificate from SD Card .......................................... 19 12 Applications 19 13 Troubleshooting 19 3 2 Phone Layout 1 Receiver 7 Back key 2 Proximity Sensor 8 Volume keys 3 Front Camera 9 Audio Jack 4 LCD Screen 10 Power On/ Off button 5 Menu key 11 USB Jack 6 Home key 12 4 Microphone 3 Getting Started 3.1 Insert SIM card The F41s is a Dual SIM mobile phone which supports 3G SIM on slot number 1. To insert SIM card(s): 1. Switch off the mobile phone and remove the rear cover and battery. 2. Insert the SIM card correctly in the card slot(s) (See figure below). 3. Finally insert the battery and replace the rear cover of the mobile phone. 3.2 Insert Memory card 1. Power off the mobile phone, and then remove the rear cover and battery. 2. Insert the memory card into the slot. 5 3. Finally insert the battery and the rear cover of the mobile phone. 3.3 Unlock the phone You may need to provide PIN, Password, or draw a pattern to unlock your phone. To unlock the screen: 1. Press the power key to wake up the phone. 2. Hold and drag the unlock icon to unlock. You may be required to unlock your phone based on the unlock method in settings. To set the unlock method: 1. On the main menu, touch Settings > Security > Screen lock. 3. Choose the type of locking as desired. You can set your screen lock on the basis of pattern, PIN, Password or none. 6 4 Placing and Receiving Calls You can dial a phone number or touch a number in your contacts. You can also place from the Call log or contacts. 4.1 Make a Call Tap the icon on main menu or the home screen to dial the desired number. Tap on any of the Phone, Call Logs, Contacts tabs to make a call. To dial an international number, touch and hold the 0 key to enter the Plus (+) symbol, and then enter the international country prefix, followed by the phone number. Tap on the contact to dial the number. Press the Volume Up/ Down keys on the right side to adjust the call volume. 4.2 Make a Video Call You need to have a 3G enabled SIM card to make a video call. Please contact your service provider for the same. Tap the icon on main menu or the home screen to dial the desired number. Tap on the Video Call option in the dialer to make the video call. 4.3 End a call During a call, touch the icon to end call. 4.4 Disable Phone Calls Some locations may require you to turn off your mobile, Wi-Fi, 7 and Bluetooth wireless connections. Press and hold the Power button and then choose Airplane Mode. Drag notification panel down then touch the Airplane mode. 4.5 Using the Touch Screen You can use the touch screen in the following ways: Touch: Acts on items on the screen, such as application and settings icons, to type letters and symbols using the onscreen keyboard, or to press onscreen buttons. Touch and hold: Touch and hold an item on the screen until an action occurs. Drag: Touch and hold an item and move your finger on the screen until you reach the target position. Swipe or slide: Quickly slide your finger across the surface of the screen, (without dragging an item). For example, slide the screen up or down to scroll a list. Double-tap: Tap quickly twice on a webpage, map, or other screen to zoom. For example, double-tap a section of a webpage in Browser to zoom that section to fit the width of the screen. You can also double-tap to control the Camera zoom, in Maps, and in other applications. Pinch: In some applications (Such as Maps, Browser, and Gallery) you can zoom in and out by placing two fingers on the screen at once and pinching them together (to zoom out) or spreading them apart (to zoom in). Rotate the screen: On most screens, the orientation of the screen changes as you rotate it. You can turn this feature (Auto Rotation) on and off. 8 4.6 Using the Phone’s Buttons The phone’s buttons and soft buttons offers a lot of functions and shortcuts. Button Press Press and hold Home key: Opens the Home screen. Opens recently used applications. Menu key: Opens a context menu related with current screen or Application. Opens shortcut to Wallpaper, Manage Apps, System Settings Back key: Opens the previous screen you were working on. 4.7 Open and Close the Launcher Touch the Launcher Icon to open the main menu. You can add an application icon to the Home screen by pressing and holding it until it vibrates and enters Home screen and the release your finger. Press Home key or Back icon to close the Launcher. 9 5 The Home Screen When you sign in, the home screen opens. The status bar shows the time, signal strength, battery status, and notification icons. Tap items on the Home screen to open them. Touch and hold an empty spot to change wallpaper. Touch the menu icons to open the menus on the screen such as home screen, main menu, call logs and so on. The main screen is your starting point to access all the features on your phone. Swipe left or right on the home screen to display the next home screen. Touch the main menu icon at the bottom of the screen to view all installed applications. 5.1 Customize Home Screen You can add applications, shortcuts, widgets, and other items to any part of the Home screen or change the wallpaper. 10 5.1.1 Add Widgets and icons to home screen Enter Launcher and long press and hold an application till the screen vibrates, and then release your finger hold. 5.1.2 Rearrange or Remove Widgets and Icons on Home Screen Long press and hold the widget or icon you want to move. Once the device vibrates, don't release your hold on the icon. Drag the widget or icon to a new location on the screen. Press and hold on an icon till the device vibrates, and drag the widgets or icon to remove! 11 6 Working With Menus The phone provides you with Context menus and Options menus for accessing the features in an intuitive way. 6.1 Options Menus Options menus contain tools that apply to specific items on the screen. You can open an option by touching and holding an item on the screen. Not all items have options menus. When you touch and hold some items on a screen, an Options menu opens. 6.2 Menu Icons You have the following menu icons to easily let you access its important features: Opens the dialer Opens contacts Opens the main menu Opens messaging Opens to webpage 12 7 Managing Notifications Notification icons inform you of new messages and events. When you receive a notification, its icon appears in the status bar, along with a summary that appears only briefly. 7.1 Open the Notifications Panel Drag the status bar down from the top of the screen as shown below. 13 The Notifications panel displays your network provider name and a list of your current notifications. 7.1.1 Respond to Notifications 1. Open the notification panel and touch a notification to respond to it. 2. What happens next depends on the notification. 7.1.2 Close Notifications Panel Drag the tab at the bottom of the Notifications panel to the top of the screen. Or just press the back button. The panel also closes when you touch a notification to respond to it. 7.2 Toolkits Open the Notifications panel and then tap on Toolkits to access and choose various tools available on your handset. 8 Messaging You can use Messaging to exchange text messages and multimedia messages with your friends. 14 Touch to open a message Touch to compose a new text or multimedia message. You can also press the key and open the context menu to work on messages and their settings. A Message becomes an MMS if you send it to an email address, or add multimedia media file(s). 9 Multimedia 9.1 Camera Your camera’s pictures and videos are stored in the SD card, so you must insert one to use the Camera. You can copy pictures and videos from the SD card to a PC and vice versa. 15 9.2 Gallery You can use the Gallery to view pictures and play videos and share files. 1. Touch the Gallery icon in the main menu or in camera mode (refer figure). 2. Touch an album to open and view its contents. 3. Touch a picture or a video in an album to view it and even share with your friends. 9.3 Music You can easily transfer your favorite music from your PC to the SD card and experience a whole world of interesting and melodious music. Touch the key or the intuitive buttons and icons on the phone in music interface to enjoy the features of your music player. Press the phone’s volume up/down keys on the right side of the mobile phone to adjust the volume. 16 9.4 FM Radio You can listen to your favorite FM channels using the inbuilt FM receiver of your phone. Touch the key or the intuitive buttons and icons on the phone in Radio interface to enjoy the features of your inbuilt FM radio. Press the phone’s volume up/down keys on the right side of the mobile phone to adjust the volume. 10 Manage Accounts You can set up a corporate, Google account etc on your device. You can do this by tapping Settings> Accounts & sync > Add Account: 10.1 Why Use a Google Account Your Google Account lets you take full advantage of Google applications and services that you may want to use, such as Gmail, Maps, Navigation, and various applications. 11 Connect to Networks and Devices Your phone can connect to a variety of networks and devices, including Internet, Wi-Fi, GPRS, Bluetooth, devices, such as headsets. You can also transfer files to/from your PC through the data cable. 11.1 Connect to the Internet To configure the Internet: 1. Go to Settings> Wireless & Networks >More > Mobile 17 Networks> Network Settings>Access point names. 2. Select the access point name or change the access point name for your Internet connectivity as provided by the service provider of your SIM card. By default, your network provider sends the access point name settings via SMS, or it comes with your SIM card. You may need to install these settings. After this, you can choose from the listed access point names. If the access point names are not listed by default, please contact your network provider for the same. 3. After you have selected or configured the access point name, go to Settings> SIM Management and enable Data Connection to enable Internet connection. 11.1.1 Connect to Internet via your Phone You can browse the Internet on your PC using your mobile phone. To do this: 1. Connect your mobile phone to your PC via the USB adaptor. 2. Go to Settings> Wireless & Networks> More> Tethering & portable hotspot and then touch USB Tethering. A prompt for installation will appear on your PC. Proceed as suggested. 11.2 Access Internet via Wi-Fi To browse the Internet via Wi-Fi: 1. Go to Menu> Settings> wireless & networks and then tap Wi-Fi. 2. Select the displayed Wi-Fi connections listed on the phone. 11.3 Pair With Bluetooth Devices 1. Go to Settings > Wireless & networks> Bluetooth to turn it on. Your phone scans and displays the Bluetooth devices in range. 2. Touch Bluetooth again, and your phone will scan the device 18 automatically. 3. Touch the ID of the other device in the list in Settings to pair them. If you are suggested with a passkey, enter, it in the suggested device. is successful, your phone connects to the device. 11.4 Install Secure Certificate from SD Card If your VPN or Wi-Fi Network relies on secure certificates, you must obtain the certificates and store them in your phone’s storage, before you can configure access to those VPN or Wi-Fi networks on your phone. You may need to download the certificates from a website. 1. Copy the certificate from your computer to the root of the SD card. 2. Touch Settings> Personal> Security. 3. Touch Install from SD card. 4. Touch the file name of the certificate to install. Only the names of certificates that you have not already installed on your phone are displayed. 5. If prompted, enter the certificate’s password and touch OK. 6. Enter a name for the certificate and touch OK. 12 Applications You phone comes with a host of applications to make your life easier and more convenient. Explore the various applications and the features that come with your F41s handset and enjoy the advantage. 13 Troubleshooting This section lists some problems that you might meet while using 19 your phone. If you feel that your phone do not operate normally, please reset settings first, and then follow Troubleshooting Guide. If you are still unable to solve problems, please contact the authorized service center or the store from where you purchased the phone. 1. My Phone would not power on? Possible Reasons for Malfunction Solutions 1. Press [Power] key shorter. Long press [Power] key over 3 seconds 2. Battery has run out. Charge your battery for a few minutes then try power on again. 3. The battery is installed incorrectly. Check if the battery is seated correctly on the device. 4. Abnormally using leads phone not to power on. Please contact the local service centre. 2. Audio quality seems poor? Possible Reasons for Malfunction Solutions 1. The current signal strength is unstable. You may be in the fast-moving state train or car, etc.), according to the signal strength, select a place with good signal to make a call to ensure call quality. 2. You might be in an area where the signal strength is low. Please move to open areas. 20 3. My device would not make and/or receive calls? Possible Reasons for Malfunction Solutions 1. You might be in an area where the signal strength is low. Make sure you are in the area with good cell signal. To ensure it, see the signal strength indicator on the top right of your device screen 2. You might have set your Call Forwarding on your phone. According to your needs, please cancel call forwarding. 3. Check if your device is set on Airplane mode. Please Undo it 4. SIM card might not be inserted properly Please check, and insert the SIM card properly. 4. You can’t make a call? Possible Reasons Malfunction for Solutions 1. Phone power off. Please power on your phone. 2. Phone is out of the network service area. Please make sure the current network is in good service. 3. Your SIM card is not proper or out of service fee. Make sure your SIM card can work properly. 4. Perhaps you set up call barring. According to your needs, please cancel call barring. 5. The phone screen is locked. Please unlock the screen according to the prompts. 21 5. I cannot hear and/or be heard from the other side? Possible Reasons for Malfunction Solutions 1. Call volume is low. Please raise the phone call volume. 2. Mute icon is pressed during the call Please deactivate the Mute function. 3. The signal is poor or unstable Please move to an open area or an area with good signal strength. 6. The call alert doesn’t ring when a call coming in? Possible Reasons for Malfunction Solutions 1. Incoming call alert is set as silent. Please re-set the incoming call alert as a sound alert. 2. The ring volume is set too low. Please increase the phone call volume. 3. You have set up call forwarding on your phone. Please cancel call forwarding. 7. Battery seems to drop really quickly. Possible Reasons for Malfunction Solutions 1. Battery power runs out fast. Please make sure your battery be charged in full before use 2. Battery is not good with the phone connection. Please install battery properly. 3. Perhaps the charger or battery is damaged. Please contact the nearest FLY Authorized Care Centre 22 4. Some features such as playing the media files, using camera or camcorder, running applications in the background, constantly syncing email and using Wi-Fi or Bluetooth, can drain the battery quickly than usual. Please keep these functions closed when not required. 8. My device does not read a microSD card installed in my device? Possible Reasons for Solutions Malfunction 1. T-Flash card is not installed properly. Turn off your device, pull out microSD card, put it on again and turn on your device. 2. T-Flash card is damaged. Please change T-Flash card. 3. Make sure microSD card is mounted on your device Go to Settings > SD card & device storage and check if Unmount SD card is highlighted or else tap Mount SD card 9. Phone is out of memory? Possible Reasons for Malfunction Solutions 1. MMS or SMS takes up too much storage space. Please delete the unwanted SMS or MMS to release space. 2. The browsing history takes up too much Select "Browser - Settings Privacy Settings - to clear 23 storage space. the cache to release space. Enter ―Settings – Applications—Manage applications‖ or ―Settings – Applications—Running services‖, force stop some running applications or services. 3. Running too many programs leads to lack of space. Enter ―Settings – Applications — Manage applications‖, choose and touch the applications installed by yourself, to uninstall them to release space. 4. You have installed many applications in your phone. Note: The built-in applications can’t be uninstalled. 10. Touch screen is not responsive or responsive but not as I intended Possible Reasons for Malfunction Solutions 1. If the screen or finger touching the screen is wet, it can cause a failure. Please make sure your finger is dry while using the phone. 2. Protective film on touch screen may make touch screen less responsive. Please remove any such protective screens. 3. Your device may become slow, if you are running many applications at the same time. Please close all applications, go back to Home screen and try again. 24 Read there simple guidelines before using the device. ROAD SAFETY COMES FIRST Obey all local laws, Always keep your hands free to operate the vehicle while driving. Your first consideration while driving should be road safety. INTERFERENCE All wireless devices may be susceptible to interference, which could affect performance. ENHANCEMENTS AND BATTERIES Use only approved enhancements and batteries. Do not connect incompatible products. SWITCH OFF NEAR BLASTING Follow any restrictions. Do not use the device where blasting is in progress. CONNECTING TO OTHER DEVICES When connecting to any other device, read its user guide for detailed safety instructions. Do not connect incompatible products. 25 BACK-UP COPIES Remember to make back-up copies of keep a written record of all important information. SWITCH OFF IN AIRCRAFT Follow any restrictions. Wireless devices can cause interference in aircraft. SWITCH OFF IN HOSPITALS Follow any restrictions. Switch the device off near medical equipment. SWITCH OFF WHEN REFUELING Do not use the device at a refueling point. Do not use near fuel or chemicals. PROTECT THE ENVIRONMENT Do not dispose of batteries in a fire or as household trash. Obey any local battery recycling laws or environment protection policy. PROTECT THE CHILDREN Do not store any small parts of the device such as a memory card where children may access them. 26 EMERGENCY CALLS Ensure the phone function of the device is switched on and in service. Enter the emergency number. Give your location. Do not end the call without permission. TECHNICAL SPECIFICATION GSM:850/900/1800/1900MHz WCDMA:900/2100MHz NETWORK DISPLAY SIZE 10.16cm BATTERY CAPACITY 1700mAh INPUT:AC 100-240V/50-60Hz OUTPUT:DC 5.0V/1000mAh 0.22W/kg 8.0MP AF+VGA CHARGER SPECIFICATION SAR VALUE CAMERA RESOLUTIONS 27