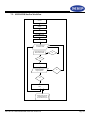
1
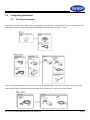
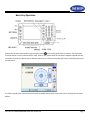
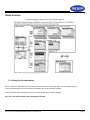
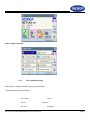
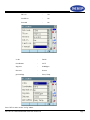
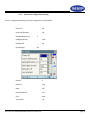
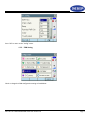
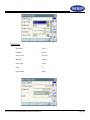
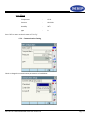
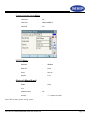
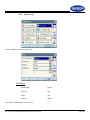
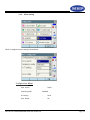
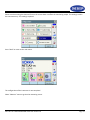
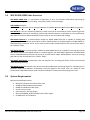
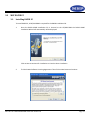
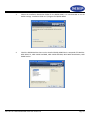
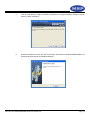
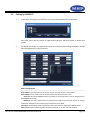
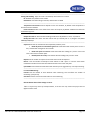
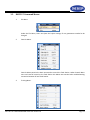
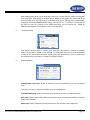
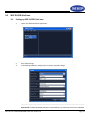
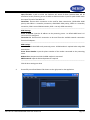
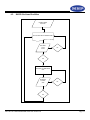
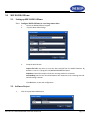
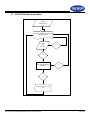
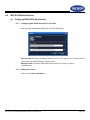
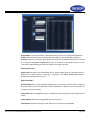
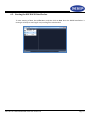
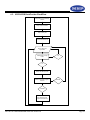
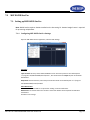
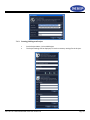
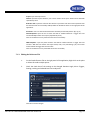
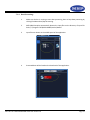
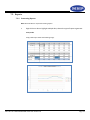
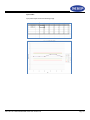
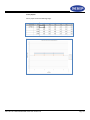
MSP RAPID ADMS Suite USER GUIDE
Monitoring Solution Providers Pte Ltd
33 Ubi Ave 3
Vertex #05-31
Singapore 408868
Tel: (65) 6747 9766 Fax: (65) 6458 0824
Email: [email protected]
Sales: [email protected]
DISCLAIMER
This document is Copyright © 2008 by the Monitoring Solution Providers Pte Ltd. MSP retains full copyright ownership, rights and protection in all m
aterial contained in this document. You may use this document for your own purposes. You may distribute this document to other persons provided
that you attribute the document as having been generated by MSP and that the document is available free of charge on the MSP WebPro Web site.
Though MSP believes reasonable efforts have been made to ensure the accuracy of the information contained in this document, it may include inacc
uracies or typographical errors and may be changed or updated without notice. It is intended for discussion and educational purposes only and is pro
vided "AS IS" WITHOUT WARRANTY OF ANY KIND AND RELIANCE ON ANY INFORMATION PRESENTED IS AT YOUR OWN RISK. In no event shall MSP be
liable for any direct, indirect, punitive, incidental, special, or consequential damages or damages
for loss of profits, revenue, data, down time, or use, arising out of or in any way connected with the use of this document or performance of any serv
ices, whether based on contract, tort, negligence, strict liability or otherwise. If you are dissatisfied with any portion of this document, or with any of
these terms of use, your sole and exclusive remedy is to discontinue using this document.
Doc. Ref. No.: MSP RAPID ADMS Suite User Guide v1.0
Table of Contents
Configuring Instrument ............................................................................................................................................. 3
1.0
1.1.
To Power Instrument ............................................................................................................................................. 3
1.2.
Setting On the Instrument ..................................................................................................................................... 5
1.2.1.
Obs. Condition Setting .................................................................................................................................. 6
1.2.2.
Instrument Configuration Setting .................................................................................................................. 8
1.2.3.
EDM Setting ................................................................................................................................................. 9
1.2.4.
Communication Setting ............................................................................................................................... 11
1.2.5.
Units Setting ............................................................................................................................................... 13
1.2.6.
Motor Setting .............................................................................................................................................. 14
1.0
MSP RAPID ADMS Suite Overview ..................................................................................................................... 18
2.0
System Requirements.............................................................................................................................................. 18
3.0
MSP RAPID PC ..................................................................................................................................................... 19
3.1.
Installing RAPID PC........................................................................................................................................... 19
3.2.
Setting Up RAPID PC ........................................................................................................................................ 22
3.3.
RAPIC PC Command Menus.............................................................................................................................. 24
3.4.
RAPID PC Monitoring Procedures ..................................................................................................................... 27
3.4.1.
How to Train Points: ................................................................................................................................... 27
3.4.2.
How to Start Monitoring: ............................................................................................................................ 27
3.5.
RAPID PC Shortcut keys .................................................................................................................................... 28
MSP RAPID SiteComs ........................................................................................................................................... 29
4.0
4.1.
Setting up MSP RAPID SiteComs ...................................................................................................................... 29
4.2.
RAPID SiteComs Workflow ............................................................................................................................... 31
MSP RAPID OffComs............................................................................................................................................ 32
5.0
5.1.
Setting up MSP RAPID OffComs ....................................................................................................................... 32
5.1.1.
Configure RAPID OffComs for receiving remote data ............................................................................... 32
5.2.
Add new Project.................................................................................................................................................. 32
5.3.
MSP RAPID OffComs Workflow....................................................................................................................... 34
6.0
6.1.
MSP RAPID DataChecker ...................................................................................................................................... 35
Setting up MSP RAPID DataChecker ................................................................................................................. 35
Doc. Ref. No.: MSP RAPID ADMS Suite User Guide v1.0
Page 1
6.1.1.
Configuring MSP RAPID DataChecker File Paths ..................................................................................... 35
6.1.2.
Adding new station ..................................................................................................................................... 35
6.2.
Starting the MSP RAPID DataChecker ............................................................................................................... 37
6.3.
MSP RAPID DataChecker WorkFlow ................................................................................................................ 38
MSP RAPID StarPro .............................................................................................................................................. 39
7.0
7.1.
Setting up MSP RAPID StarPro.......................................................................................................................... 39
7.1.1.
Configuring MSP RAPID StarPro Settings ................................................................................................. 39
7.1.2.
Creating/Adding new Project ...................................................................................................................... 40
7.1.3.
Editing the Reference File ........................................................................................................................... 41
7.1.4.
Data Processing: .......................................................................................................................................... 42
7.2.
Reports ................................................................................................................................................................ 44
7.2.1.
7.3.
8.0
8.1
Generating Reports ..................................................................................................................................... 44
MSP RAPID StarPro Workflow ......................................................................................................................... 48
Licensing ................................................................................................................................................................ 49
Licensing Key ..................................................................................................................................................... 49
Doc. Ref. No.: MSP RAPID ADMS Suite User Guide v1.0
Page 2
1.0
Configuring Instrument
1.1.
To Power Instrument
To configure the Instrument, power must be supplied to the Instrument for configuration. The user is able to power the
Instrument internally using the Internal Battery (BDC58) or external battery using the ‘Y cable’.
Take out the Power Converter EC117 Power unit (AC to DC output) together with the cables and connect the singular
cable to the NET/MS Instrument.Connect the power side of the EDC121 ‘Y cable’ to the power source.
Doc. Ref. No.: MSP RAPID ADMS Suite User Guide v1.0
Page 3
Basic Key Operation
Switch the Instrument ON manually, by pressing the button
on the front panel of the instrument. The Instrument
should be switch on at this moment with a ‘beep’ audio. If not, please check the connection diagram supplied with the
instrument or checks the power source. Slide the ‘pointer pen’ out from behind the right bottom of the display panel of
the Instrument.
It is always a good practice to level the instrument via bubble before switch on and then level it through the electronic
bubble.
Doc. Ref. No.: MSP RAPID ADMS Suite User Guide v1.0
Page 4
Mode Structure
For detail navigation, please refer to the Operator Manual
1.2. Setting On the Instrument
NET1-m, NET1m-II and NET1AX-m have factory default setting for monitoring. In the event that other types of
instrument are being used, the instrument parameters have to set manually as below.
User is advised to read through the Instrument’s User Manual prior to these settings.
Press “Esc” key until the Main menu is displayed as follows:
Doc. Ref. No.: MSP RAPID ADMS Suite User Guide v1.0
Page 5
Select “Config” from Menu.
1.2.1.
Obs. Condition Setting
Please check or change the following setting as listed below:
*Factory Default setting of NET1AX-m.
Dist. mode
Tilt crn.
-
Tilt error
Doc. Ref. No.: MSP RAPID ADMS Suite User Guide v1.0
S.Dist
Yes(H,V)
-
No Action
Page 6
Coll. crn.
-
Yes
C and R crn.
-
No
V manual
-
No
V. obs
-
Zenith
Coordinates
-
N-E-Z
Ang.reso.
-
0.0002gon
Dist.reso
-
0.1mm
ppm settings
-
Press, Temp.
Press “OK” to return to the “Config” Menu.
Doc. Ref. No.: MSP RAPID ADMS Suite User Guide v1.0
Page 7
1.2.2. Instrument Configuration Setting
Check or change the following instrument configuration as listed below:
Power off
-
No
Power Off (Remote)
-
No
Backlight(Recticle on)
-
2
Backlight(Normal)
-
Auto
Backlight off
-
No
Key Backlight
-
On
Recticle
-
3
EDM ALC
-
Free
Beep
-
Off
Remote PWR-On
-
Yes
Color
-
Auto
Touch Panel
-
On
Doc. Ref. No.: MSP RAPID ADMS Suite User Guide v1.0
Page 8
Press “OK” to return to the “Config” menu.
1.2.3. EDM Setting
Check or change the EDM configuration setting as listed below:
Doc. Ref. No.: MSP RAPID ADMS Suite User Guide v1.0
Page 9
EDM Menu
Dist.mode
-
Fine ‘S’
Reflector
-
Prism
Prism Const.
-
0.0 mm
Aperture
-
58 mm
Illum. hold
-
Light
Light
-
3
Light Pattern
-
Blink
Doc. Ref. No.: MSP RAPID ADMS Suite User Guide v1.0
Page 10
ppm Menu
Temperature
-
15 0C
Pressure
-
1013 hPa
Humidity
-
50 %
ppm
-
0
Press “OK” to return to the sub menu of “Config”.
1.2.4. Communication Setting
Check or change the communication parameters as listed below:
Doc. Ref. No.: MSP RAPID ADMS Suite User Guide v1.0
Page 11
Communication Setup Menu
Checksum
-
No
Controller
-
2WAY+REMOTE
Xon/Xoff
-
Yes
RS232C Menu
Baudrate
-
9600bps
Data bits
-
8 bits
Parity
-
Not set
Stop bit
-
1 bit
Mode
-
Slave
Link
-
Bluetooth Menu (if any)
Authentication
-
Passkey
Yes
-
**** option set 1234
Press “OK” to return to the “Config” menu.
Doc. Ref. No.: MSP RAPID ADMS Suite User Guide v1.0
Page 12
1.2.5.
Units Setting
Check or change the Unit as listed below:
Unit Menu
Température
-
Celcius
Pressure
-
hPa
Angle
-
Gon
Distance
-
Meter
Press “OK” to return to the “Config” menu.
Doc. Ref. No.: MSP RAPID ADMS Suite User Guide v1.0
Page 13
1.2.6.
Motor Setting
Check or change the motor setting as listed below:
Configuration Menu
Accu. search
Centering mode
-
Rapid
Standard
A.T.Setting
-
None
Accu. Rotate
-
10”
Doc. Ref. No.: MSP RAPID ADMS Suite User Guide v1.0
Page 14
Search Area Menu
Vertical
-
1.5
Horizontal
-
1.5
L
-
L3
H
-
H4
Shift
-
2
JOG Setting Menu
Press “OK” to return to the sub menu of “Config”.
Date & Time – Optional
Doc. Ref. No.: MSP RAPID ADMS Suite User Guide v1.0
Page 15
Please note that setting the Date and Time to the current does not affect the monitoring output. This setting is within
the instrument only. This setting is optional.
Press “Back” to return to the main menu.
The configuration of the instrument is now complete!
Select “Measure” menu to go into the measuring screen.
Doc. Ref. No.: MSP RAPID ADMS Suite User Guide v1.0
Page 16
Switch off the instrument manuallyby pressing both of these buttons on the front panel together.
Doc. Ref. No.: MSP RAPID ADMS Suite User Guide v1.0
Page 17
1.0
MSP RAPID ADMS Suite Overview
MSP RAPID ADMS Suite is a combination of application to carry out automatic deformation monitoring for
tunnels, viaduct, High / Low rise building, mining sites, DAMs, roads and bridges.
RAPID ADMS Stands for:
(RAPID) Remote Automatic Precise Intelligent Detector for (ADMS) Automatic Deformation Monitoring System
MSP RAPID PC is the core monitoring Software; it takes control of the Instrument for entire monitoring process.
Dictates start and end time for monitoring, location and method to observe in accordance to User requirements.
MSP RAPID PC measures data and tabulate results in easy to view and understand readings.
MSP RAPID SiteComs is a communication module for RAPID ADMS Suite that is capable of sending data
generated by RAPID ADMS from Site location to Office. RAPID SiteComs is installed together with MSP RAPID PC.
GMS/GPRS/UHF parameters can be set for communication media. RAPID SiteComs auto scan and send data in
the “Dataout” folder.
MSP RAPID OffComs is a communication module for RAPID ADMS Suite that is capable of receiving data sent by
MSP RAPID SiteComs. MSP RAPID OffComs is installed together with MSP RAPID DataChecker and MSP RAPID
StarPro. GMS/GPRS/UHF parameters can be set for communication media. RAPID OffComs auto scan incoming
data and save the received data in the “DataIn” folder.
MSP RAPID DataChecker automatically scans raw data from the incoming path folder to filter and eliminate
“bad” data for processing.
MSP RAPID StarPro automatically calls out the least square adjustment processing engine for calculation then it
generates reports and tabulates measurement data into graphical view which users can modify for their
customization. MSP RAPID Starpro sends out alarm notification via SMS, email and through alarm siren.
2.0
System Requirements
Minimum System Requirements
• Microsoft® Windows XP Professional or later
• 256MB of RAM (512MB recommended)
• 400GB of available hard-disk space
• At least 1 PCI Com Port
• USB 2.0 port for licensing dongle
• Minimum 800x600; Recommended 1,024 x 768 or higher
• CD-ROM drive (for installation)
Doc. Ref. No.: MSP RAPID ADMS Suite User Guide v1.0
Page 18
3.0
MSP RAPID PC
3.1.
Installing RAPID PC
To Install RAPID PC, A CD/DVD-ROM is required for the RAPID Installation CD.
1.
Once the RAPID ADMS Installation CD is inserted to the CD/DVD-ROM the RAPID ADMS
Installation Wizard will automatically will be displayed.
Click on Next to continue for installation or Cancel to abort installation
2.
Tick the button Software Licensing Agreement. Then Click on Next button to Continue
Doc. Ref. No.: MSP RAPID ADMS Suite User Guide v1.0
Page 19
3.
Choose the Installation Destination Folder for the RAPID ADMS, It is recommended to use the
default settings. Installation folder to C:\Program Files\RAPID ADMS
4.
Check the RAPID Modules that are to be installed. RAPID ADMS Suite is composed of 5 Modules:
MSP RAPID PC, MSP RAPID SiteCOMS, MSP RAPID OffCOMS, MSP RAPID DataChecker, MSP
RAPID StarPro.
Doc. Ref. No.: MSP RAPID ADMS Suite User Guide v1.0
Page 20
5.
Click on Install Button to begin installation, Back button to change installation settings or Cancel
button to abort installation.
6.
Once the Installation is done, click the Finish button. Shortcuts for the RAPID ADMS Modules are
automatically displayed on the Windows desktop.
Doc. Ref. No.: MSP RAPID ADMS Suite User Guide v1.0
Page 21
3.2.
Setting Up RAPID PC
1.
In the initial launching of the RAPID PC, the Project option windows will be displayed.
From here, Users have the option to Open existing project, Add new project or Delete new
Project.
2.
For adding new Project, It is required for the Users to set up Project Setting Parameters. Setting
up Project parameters is done only once.
Station Setting Options:
--------------------------------------------------------------------------------------------------------------------------------------------Project Name: Input the Project Name. Project may be consisting of Letters and Numbers.
Station Name: Set the station name, by default station name should start with “STN”
Serial Port: Set which COMPORT will the instrument be connected, Refer to the PC configuration for
the COMPORT numbering
Baud Rate: Sets the communication rate between the computer and the Total Station, PC and the
Total Station should have the same baud rate. Default baud rate is 9600.
Instrument: Choose which model of Total station to be used; Net1m-II, Net05, Net1, MS05A, MS1A.
Auto Launch: Choose whether the RAPID PC will automatically run in case of PC was rebooted.
Doc. Ref. No.: MSP RAPID ADMS Suite User Guide v1.0
Page 22
--------------------------------------------------------------------------------------------------------------------------------------------Easting and Northing: Input the X and Y coordinated, measurement is in meters
RL: Reduced Level, default value is 100m
Orientation: Used when doing a resection, default value is 0.0000
--------------------------------------------------------------------------------------------------------------------------------------Temperature and Pressure: Varies depends on the site condition, by default value temperature is
30°C and Pressure 1013hPA
Prism constants: Refers to the offset of the centre of the prism, by default -30.00mm for Reference
and Monitoring Prism
Output File Path: Set where the data readings will be saved. By default it is set to “C:\Dataout”
Backup File Path: Sets where the data will be back up. Default path is “C:\Program Files\RAPID
ADMS\Rapid\Backup”
--------------------------------------------------------------------------------------------------------------------------------------------Sequence: Set how the Total Station will sequentially reads the prism.
• Reads all points in F1 then back again in F2: Total Station will read all prisms on Face 1
first, and then will read again on Face 2 mode.
• Reads each point in F1 and F2: Total station will take reading on a prism in Face 1 and
Face 2 then move to another point.
• Read all points in F1 only: Total station will take readings only in Face 1 mode.
Repeats: Set the number on repeats for the Total station to do the sequence
Retries: Sets the number of attempts of Total Station to read a prism. In case the Total station
reached the number of retries the Total Station will then move to the next point.
Cycle Mode: Sets whether the Total Station will monitor by time triggered or by non-stop monitoring.
--------------------------------------------------------------------------------------------------------------------------------------For Interval Monitoring:
Interval: Sets the number of hours between each monitoring. This will affects the number of
monitoring cycles per day.
Start time: Sets the time for the Total Station to start monitoring.
--------------------------------------------------------------------------------------------------------------------------------------Click OK button when all the settings are done.
*Note: 1 Project may consist of multiple Stations, to do this User may create new project and set
different station name
Doc. Ref. No.: MSP RAPID ADMS Suite User Guide v1.0
Page 23
3.3.
RAPIC PC Command Menus
1.
File Menu:
Under the File Menu, Users can Open the Project settings for any parameters needed to be
changed.
2.
Controls Menu:
Controls Menu contains the basic commands to control the Total Station. Under Controls Menu
users can have full control to the Total Station this Menus are essential when troubleshooting
connection between PC and Total Station.
3.
Training Menu:
Doc. Ref. No.: MSP RAPID ADMS Suite User Guide v1.0
Page 24
When adding points/prisms to be monitored, Users may Train the points or Import Training data
from existing file. When doing a Training of prisms, RAPID PC will register the coordinates of the
prism and save all the training data into a file called Training File. Training File is Located under;
C:\Program Files\RAPID ADMS\RAPID\Training. Training Files is in *.ini format. It is required for
the users to copy the Training file for RAPID Processing. See the Section 6.0 - RAPID PC
Monitoring Procedures for the Steps on how to train the points.
4.
Orientation Menu
Total Station Re-Orientation is normally done whenever Total Station is moved or changed.
When a Total Station is placed or was changed, It is required for the Users to do Re-Orientation
in order for the Total Station to monitor known points. Also for Resection, Users are required to
do resection when Total Station is moved to a different location.
5.
Monitoring Menu
Enable/Disable Cycle Timer: Enable or Disable the timer countdown for the next monitoring
cycle.
Cycle timer is shown on the lower left side corner of the application.
Start/Stop Monitoring: Sends command to the Total Station to start or to stop monitoring.
Open Data: Opens a data reading from the selected cycle on the left panel. RAPID PC will open
tb3 file into a notepad.
Delete Cycle: Delete a data from the selected cycle on the left panel of the application.
Doc. Ref. No.: MSP RAPID ADMS Suite User Guide v1.0
Page 25
*Note:
Monitoring Data are
RAPID PC Raw data file name syntax:
STN#_PROJECTNAME_DD_MM_YYYY_Cycle_#_Epoch_#.rpd
Where:
STN#: Project Station Number
PROJECTNAME: Project name
DD: Date
MM: Month
YYYY: Year
Cycle_#: Monitoring Cycle
Epoch: Epoch File history
6.
View Menu:
On the View Menu, Users can see the Project Layout and can switch to Degrees view. See below
the example of Project Layout View.
Doc. Ref. No.: MSP RAPID ADMS Suite User Guide v1.0
Page 26
3.4.
RAPID PC Monitoring Procedures
Here are the Standard Procedures to be done when doing monitoring using RAPID PC.
1.
2.
3.
Setup Project Parameters
Train Prism Points (Done only on Initial setup)
Start Monitoring.
(Optional)
Re-Orientation / Re-Section
3.4.1. How to Train Points:
To do Training of Points, First Users have to manually point the Total Station to a specific Prism.
Users may not actually point to the center of the prism, because RAPID PC has the auto center
feature. This enables the Total station to auto center to the prism whenever it reads a prism.
After pointing to the prism, Users need to Click on Training Menu, then click on Add point (or
simply click F6).
By default, Prism name is XYZ001, XYZ002… consecutively. For the Reference Points, It should be
named with “REF”. By doing this RAPID PC can easily verify which are the reference points. Users
may still rename the point after training, by Going to Training Menu then Rename Point.
3.4.2. How to Start Monitoring:
When all the Points have been Trained, Users may Enable Cycle Timer or Start Monitoring
immediately. By enabling Cycle timer, RAPID PC will be on standby and wait to finish the counter
at the bottom left. By Starting the monitoring immediately, RAPID PC will automatically
commence the monitoring cycle.
Doc. Ref. No.: MSP RAPID ADMS Suite User Guide v1.0
Page 27
3.5.
RAPID PC Shortcut keys
RAPID PC Shortcut key list:
Edit Settings: Ctrl + F2
Exit: Ctrl + F4
Power On: F3
Power Off: F4
Guide Light On: Ctrl + F3
Guide Light Off: Ctrl + F4
Check Level: Ctrl + L
Check Face: Ctrl + F
Change Face: Ctrl + H
Take Reading: F10
Initialize Instrument: F11
Add Point: F6
Insert Point: F7
Retrain Point: F8
Rename Point: F2
Verify Point: F9
Delete Point: Del
Load Coordinate: Ctrl + D
Import Training: Ctrl + I
Doc. Ref. No.: MSP RAPID ADMS Suite User Guide v1.0
Re-Orientate: Ctrl + O
Resection: Ctrl + R
Reset Count: Ctrl + X
Enable Cycle Timer: Ctrl + S
Start Monitoring: Ctrl + M
Open Data File: F12
Delete Cycle: Shift + Del
Show Layout: Ctrl + V
Page 28
4.0
MSP RAPID SiteComs
4.1.
Setting up MSP RAPID SiteComs
1.
Launch the RAPID SiteComs Application.
2.
3.
Go to Edit>Settings.
In the Settings windows, configure the necessary required settings
---------------------------------------------------------------------------------------------------------------------------------------------
Auto Launch: Enables the RAPID SiteComs to automatically run whenever the PC have rebooted.
Doc. Ref. No.: MSP RAPID ADMS Suite User Guide v1.0
Page 29
Input File Path: A path to which the SiteComs will search for data. Detected data will be
transferred to the processing server via GPRS or GSM connection. Input File path should match
the output file path of the RAPID PC.
Connection: Choose which connection to be used for data transmission; (GPRS-GSM: GPRS
priority and GSM as a secondary connection; GSM-GPRS: GSM priority, GPRS as a secondary
connection, GSM –use on GSM connection, GPRS – use only GPRS connection)
---------------------------------------------------------------------------------------------------------------------------------------------
GPRS Settings:
Server IP Address: input the IP address on the processing server. As default MSP Server’s IP
116.12.193.5 is configured.
Connection ID: Choose which connection to be used from the available network connection
from the PC adapters.
---------------------------------------------------------------------------------------------------------------------------------------------
GSM Settings:
Note: GSM sends data SMS to the processing server. A GSM modem is required when using GSM
transmission.
Server Phone Number: Input the phone number of the modem connected to the processing
server.
Modem Port: Comport to which the GSM modem is connected.
SMS Password: Input the SIM card password if required.
---------------------------------------------------------------------------------------------------------------------------------------------
Click OK when settings are done
4.
Successfully transferred data will be shown on the right panel on the application.
Doc. Ref. No.: MSP RAPID ADMS Suite User Guide v1.0
Page 30
4.2.
RAPID SiteComs Workflow
Initialize RAPID
SiteComs
Scan for Raw data on DataOut Folder
Raw Data
(*.rpd)
found
No
Yes
Send Data via GSM/GPRS/
UHF
Sucessfully
Transmit
data
No
Yes
Doc. Ref. No.: MSP RAPID ADMS Suite User Guide v1.0
Page 31
5.0
MSP RAPID OffComs
5.1.
Setting up MSP RAPID OffComs
5.1.1. Configure RAPID OffComs for receiving remote data
1.
Launch the RAPID OffComs Program.
2.
Click File Menu>Edit Settings
3.
Setup the Out File Path
Output file Path: Set where to save the data received from the RAPID SiteComs. By
default it is set to “C:\\Program Files\RAPID ADMS\OffComs\Data”
GSM Port: Choose the Comport which the receiving modem is connected.
Call Handling: Set how the connected modem will responses to the incoming data call.
Default setting is Answer.
Click OK button to save the configuration.
5.2. Add new Project
1.
Click on Project Menu>Add Project
Doc. Ref. No.: MSP RAPID ADMS Suite User Guide v1.0
Page 32
Project Name: Project name should match the project name configured on RAPID PC and RAPID
SiteComs
Phone Number: For GSM connection, Phone number of the remote modem is required.
Click OK button to save the configuration.
Note: Added Projects are listed on the left panel of the window. Received data for a project will
be shown on the right panel of the window. Project statuses are indicated under Project names;
Once RAPID Offcoms detected a incoming data project status will then be changed to
connected.
Doc. Ref. No.: MSP RAPID ADMS Suite User Guide v1.0
Page 33
5.3. MSP RAPID OffComs Workflow
Initialize
RAPID OffComs
Scan for Incoming data transmission
via GSM/GRPS/UHF
Incoming
Data
Detected
No
Yes
Authentication/Handshaking
established
No
Yes
Store Data in the Output File
Path
Doc. Ref. No.: MSP RAPID ADMS Suite User Guide v1.0
Page 34
6.0
MSP RAPID DataChecker
6.1. Setting up MSP RAPID DataChecker
6.1.1. Configuring MSP RAPID DataChecker File Paths
Open the RAPID DataChecker Application. Click File>Edit Settings
Input File Path: Sets where the RAPID DataChecker will scan for .rpd files. This should match the
ouput folder of the RAPID Offcoms’ output file path.
Backup File Path: Sets where RAPID DataChecker will back up a copy of .rpd files.
Click OK button.
6.1.2. Adding new station
Click on Station Menu >Add Station
Doc. Ref. No.: MSP RAPID ADMS Suite User Guide v1.0
Page 35
Project Name: Input Project Name. It should match the project name configured on RAPID PC.
Station: Input the Station name. It should match the Station name configured on RAPID PC.
Training: Import the Training file generated by the RAPID PC. By default training files are located
at “C:\Program Files\RAPID ADMS\Rapid\training” of the Site PC. Training files may be in *.ini or
*.txt format. Imported training file will be shown on the right side panel.
Displacement Limits:
Output Path: Set where the checked data will be saved. DataIn folder of the RAPID StarPro is
preferred for RAPID StarPro processing; “C:\Program Files\RAPID ADMS\StarPro\Datain”.
Maximum of 3 output path can be set.
Other Commands:
File>Start/Stop: Start or Stop the RAPID Datachecker for processing. A Status label is located on
the lower left corner of the application. RAPID DataChecker is advised to be running 24/7 for
continuous processing of data.
Station>Edit: Edit the highlighted Project. Configuration and training file can be changed on this
option.
Station>Delete: Removes the highlighted Project from the list.
View>Refresh: Refresh the project’s view and clear the list of the processed data.
Doc. Ref. No.: MSP RAPID ADMS Suite User Guide v1.0
Page 36
6.2. Starting the MSP RAPID DataChecker
To start scanning of data, Go to File Menu, and then click on Start. Once the RAPID DataChecker is
running it will keep on scanning for any incoming files to be checked.
Doc. Ref. No.: MSP RAPID ADMS Suite User Guide v1.0
Page 37
6.3. MSP RAPID DataChecker WorkFlow
Setup Folder Input and Backup
File Path
Setup Project and Station
Import Training File
Start RAPID DataChecker
Scan for data in the
Input Folder
Data detected on Input
Folder
No
Yes
Backup data Backup Folder
Determine if the Data is good or
bad data
Bad data
Good Data
Save the data into the
Output File Path directory
Doc. Ref. No.: MSP RAPID ADMS Suite User Guide v1.0
Page 38
7.0
MSP RAPID StarPro
7.1. Setting up MSP RAPID StarPro
Note: RAPID StarPro requires StarNet Installed on the Processing PC. StarNet Dongle license is required
for processing multiple data.
7.1.1. Configuring MSP RAPID StarPro Settings
Open the MSP RAPID StarPro application; Click File>Edit Settings:
File Paths:
Input File Path: Directory where RAPID STARPRO scan for data to be processed. The default path is
“C:\Program Files\RAPID ADMS\StarPro\DataIn”, This should match the output file path of the RAPID
DataChecker.
OutputPath: Sets the directory where the processed data will be saved. Default path is “C:\Program
Files\RAPID ADMS\StarPro\DataOut”
Alarm Notification:
Admin Email: One email address is required for sending out Email notifications.
Modem Port: PC ComPort where the modem is connected. Modem will be required for SMS Alarm
notifications.
Click OK to save settings.
Doc. Ref. No.: MSP RAPID ADMS Suite User Guide v1.0
Page 39
7.1.2. Creating/Adding new Project
1.
2.
On the Project Menu, click on Add Project.
The Project Settings will be displayed, Fill out the necessary settings for the Project:
Doc. Ref. No.: MSP RAPID ADMS Suite User Guide v1.0
Page 40
Project: Input the Project Name.
Station: Input the Project’s Stations, one or more station can be input. Station names should be
separated by coma.
Reference File: Import the reference file. TB3 file or processed .PTS data can be imported. Once
the Reference file was successfully loaded, Reference file will be shown on the right panel of the
application.
Directions: Users can choose which directions should be processed by StarPro. (dx, dy, dz)
Email Recipients: Input the list of emails that will be notified whenever a trigger alert was
reached. Multiple emails can be input (separated by coma).
Click on Test Button to verify if the email can be sent successfully.
SMS Recipients: Input the phone numbers that will be notified wherever a trigger alert was
reached. SMS Alert will contain the Project Name, Date, Time, Monitoring cycle, Point name
which reached the trigger alert and the value.
Click on Test Button to verify if the SMS can be sent successfully.
7.1.3. Editing the Reference File
1.
On the listed reference file on the right panel of the application, Right click on the point
or Select All to edit multiple points.
2.
Check the check box of the settings to be changed. Rotation Angle, Alarm Triggers,
Easting, northing and reduced level can be adjusted.
Click OK to save the changes.
Doc. Ref. No.: MSP RAPID ADMS Suite User Guide v1.0
Page 41
7.1.4. Data Processing:
1.
Make sure StarPro is running to start data processing, Start or Stop data processing by
clicking File Menu>Start/Stop Processing.
2.
MSP RAPID StarpPro automatically detects the input files on the directory of Input File
Path (“C:\Program Files\RAPID ADMS\StarPro\DataIn”
3.
Input files are shown on the middle panel of the application.
4.
Processed data will be listed on the Data Panel of the application.
Doc. Ref. No.: MSP RAPID ADMS Suite User Guide v1.0
Page 42
Data that reached a trigger level will be highlighted. Green color for level 1, Orange for Level 2,
Red for level 3. Tabulated readings can be viewed by double clicking the data and will be opened
on Microsoft Excel.
Doc. Ref. No.: MSP RAPID ADMS Suite User Guide v1.0
Page 43
7.2. Reports
7.2.1. Generating Reports
Note: Microsoft Excel is required for viewing reports.
1.
Right click on a data or highlight multiple data, choose the type of report to generate:
Daily Profile:
Daily profile report shows the following image.
Doc. Ref. No.: MSP RAPID ADMS Suite User Guide v1.0
Page 44
Cycle Profile:
Cycle profile report shows the following image.
Doc. Ref. No.: MSP RAPID ADMS Suite User Guide v1.0
Page 45
History Report:
History report shows the following image.
Doc. Ref. No.: MSP RAPID ADMS Suite User Guide v1.0
Page 46
Generated Reports are listed on the right side panel of the application.
Doc. Ref. No.: MSP RAPID ADMS Suite User Guide v1.0
Page 47
7.3. MSP RAPID StarPro Workflow
Setup Input File Path / Output
File Path
Add and configure Project
Settings
Import Reference File
Input SMS and email
notification
Start RAPID StarPro
Scan for input file in
the Data In Folder
Data in detected in the
StarPro Data in folder
No
Yes
Call StarNet for Processing
Is StarNet Installed or
Dongle detected?
No
Yes
Generate output data into Dataout
folder
User Manually generate
Tabulated report from
choosen date and cycle
Doc. Ref. No.: MSP RAPID ADMS Suite User Guide v1.0
Page 48
8.0
Licensing
8.1
Licensing Key
MSP RAPID ADMS Suite is protected by a USB dongle key. MSP RAPID ADMS License package is included
at the MSP RAPID USB Dongle; the license package will determine which application in the MSP RAPID
ADMS Suite is activated. Without RAPID License dongle RAPID PC can only operate on demo mode. On
Demo mode users can only train up to 5 prisms and 1 round of cycle. Please contact your nearest
distributor to request for a hardware key.
Two type of RAPIDUSB Dongle key:
MSP RAPID USB Dongle key for Site: This contains License for MSP RAPID PC and MSP RAPID SiteComs.
MSP RAPID USB Dongle key for Office: This contains License for MSP RAPID OffComs, MSP RAPID
DataChecker, MSP RAPID StarPro.
Using USB Dongle License Key:
Launching RAPID ADMS Software without license, a notification window will be displayed.
Insert the RAPID USB Dongle key in order to use the full feature of Rapid PC. If RAPID PC is to run on
demo mode, click on cancel:
An option to the user will be displayed whether to continue on Demo mode or to exit application.
Note: Only RAPID PC can run on demo mode. MSP RAPID DataChecker, MSP RAPID SiteComs, MSP
RAPID OffComs, MSP RAPID StarPro cannot run on demo mode.
Doc. Ref. No.: MSP RAPID ADMS Suite User Guide v1.0
Page 49