1
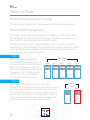
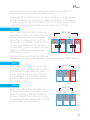
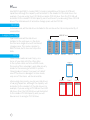
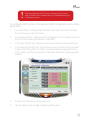
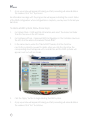
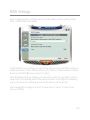
RAID SYSTEMS
SOFTWARE USER MANUAL
www.xcellongear.com
Contents
Basic Mode ������������������������������������������������������������������������������������������������������ 3
RAID and Disk Information ������������������������������������������������������������������������ 3
Event Log Viewer
�������������������������������������������������������������������������������������� 4
Basic RAID Configuration �������������������������������������������������������������������������� 4
Advanced Mode���������������������������������������������������������������������������������������������� 6
Email Notification and Event Settings �������������������������������������������������������������� 6
Advanced RAID Configuration�������������������������������������������������������������������� 6
Configure RAID system in Advanced Mode ���������������������������������������������� 9
Delete a RAID system ����������������������������������������������������������������������������� 10
Firmware Information������������������������������������������������������������������������������� 11
RAID Settings���������������������������������������������������������������������������������������������� 12
2
Basic Mode
RAID and Disk Information
This tab displays information about the current RAID mode and the hard disks installed
in the enclosure. The left-hand column displays a tree view with information about the
controllers and their connected RAID systems and disks. If you’re using a JBOD system,
the tree will display only the controller and the connected disks.
Click on an item in the tree for information such as storage capacity, status, model and
serial name.
The Disk Information window will display a pie chart with RAID information and
unreleased capacity. In the Disk Information window, you can click on Advanced
Information to view a pop up window with the disk’s SMART information.
3
Event Log Viewer
The Event Log Viewer displays a record of important issues relating to the RAID system.
View the log number, issued module, date, type, and a message about the issue. You
can also save the log as a .log (.txt) file or clear the log by clicking on the corresponding
buttons.
Basic RAID Configuration
This tab helps you configure or delete a RAID system for all the disks in the selected
controller. The top right table indicates RAID system number, RAID name, RAID level
(mode), capacity, and disk numbers. The bottom right bars display disk capacity, with
unreleased capacity in green. When configuring a new RAID system, the accessible
capacity will appear in red; when displaying an existing RAID system, it will appear in
another color, such as yellow or pink. When deleting a RAID system, the system to be
deleted will be displayed with a crosshatch pattern.
To configure or delete a RAID system, follow these steps:
1.
Go to Basic Mode > RAID and Disk Information, and select the desired controller from
the tree view in the left column.
!
Before configuring the RAID system, make sure to back up your
data. All data on the installed disk drives will be deleted during the
configuration process
2.
In the Basic Raid Configuration tab, under the Configure Raid column on the left, click
the radio button that corresponds to the RAID system you want to create. If you want
to delete your current RAID system, select “DELETE ALL RAID.”
3.
If desired, click the “Support Password” checkbox and enter a password in the
corresponding field. If you are deleting a RAID system and a password is required, enter
the password.
4
4.
Click “Apply” to begin creating or deleting the RAID system.
5.
A pop up window will appear, informing you that proceeding will erase all data in the
volumes. Click “Yes” to continue.
An information message with a progress bar will appear, indicating the current status of
the RAID configuration. When configuration is complete,you likely will need to need to
format your hard disks.
5
Advanced Mode
Email Notification and Event Settings
This feature is not yet supported. It will be available with future firmware updates.
Advanced RAID Configuration
In this mode, you can select specific disk drives to configure in a RAID system, rather
than configuring all of them in a single RAID system. For example, you can have two
disks in a RAID 1 system and three disks in a RAID 5 system.
The RAID mode options are 0, 1, Large (Span/Big), 3, Clone, 5, and 10. You can also
create a JBOD system by deleting the current RAID mode. For more information on RAID
modes, see below. We encourage you to familiarize yourself with the advantages of
each RAID mode before making a selection.
RAID 0
RAID 0
RAID 0 mode stripes data in blocks
across the disk drives installed in the
enclosure. This mode links all the drives
installed in the enclosure, so they can
function as a single drive with combined
storage space. So, if you are using five
100 GB drives, they will combine to
function as a single 500 GB drive.
RAID 1
500 GB Total
Disk 0
A1
A6
Disk 1
A2
A7
Disk 2
A3
A8
Disk 3
A4
A9
Disk 4
A5
A10
100 GB
100 GB
100 GB
100 GB
100 GB
RAID 1 mirrors the data in blocks on two disk-drives
installed in the enclosure, so the exact same data is stored on
both drives. Data integrity is more reliable in this mode than
in RAID 0 mode, although there is less accessible disk space
and the transfer speed is slower. Mirroring makes it easier to
recover lost data if one of the RAID drives is damaged. Only
one of the two drives is accessible in RAID 1 mode.
Key
Accessible
6
Not
Accessible
100 GB
Total
Disk 0
A1
A2
Disk 1
A1
A2
100 GB
100 GB
When two disks are inserted and the RAID mode switches are set to RAID 1/10
configuration, the enclosure will be set to RAID 1 mode.
When using RAID 0 and RAID 1 modes, you can use disk drives of varying capacities,
although the capacity will be limited to the smallest of the disk drives. For example,
if you are using a 100 GB and a 250 GB drive, then the 250 GB will be limited to the
smaller 100 GB capacity, and the total combined capacity will be 200 GB.
RAID 10
RAID 10
RAID 10 mode creates two RAID 1 mirrors, and
then a RAID 0 system to stripe data across them
in blocks. This mode, which requires four diskdrives, offers the striping of RAID 0 with the
full redundancy and reliability of RAID 1. In RAID
10 mode, you will have access to a combined
two-drive RAID 0 system. For example, if you are
using four 100 GB drives, you will have access to
a 200 GB RAID 0 system.
200 GB Total
Disk 0
A1
A3
Disk 1
A1
A3
Disk 2
A2
A4
Disk 3
A2
A4
100 GB
100 GB
100 GB
100 GB
When four disks are inserted and the RAID mode
switches are set to RAID 1/10 configuration, the enclosure will be set to RAID 10 mode.
RAID 3
RAID 3 stripes data in bytes across all the disk
drives installed in the enclosure, with one of the
drives dedicated for parity data. Parity makes
it easier to recover lost data if one of the RAID
drives is damaged. In this mode, the maximum
accessible capacity will be the total number of
drives, minus one drive.
RAID 3
200 GB Total
Disk 0
A1
B1
C1
Disk 1
A2
B2
C2
Disk 2
Ap
Bp
Cp
100 GB
100 GB
100 GB
RAID 5
RAID 5 stripes data in blocks, with parity, across
a minimum of three drives. This mode is similar to
RAID 0, but with parity data distributed among
the drives installed in the enclosure. In this mode,
the maximum accessible capacity will be the total
number of drives, minus one drive.
200 GB Total
Disk 0
A1
B1
Cp
Disk 1
A2
Bp
C1
Disk 2
Ap
B2
C2
100 GB
100 GB
100 GB
7
Like RAID 0 and RAID 1 modes, RAID 5 mode is compatible with drives of different
capacities, although the capacity will be limited to the smallest of the disk drives. For
example, if you are using two 100 GB drives and a 250 GB drive, then the 250 GB will
be limited to the smaller 100 GB capacity, and it will be as if you are using three 100 GB
drives. The total amount of accesible storage space will be 200 GB.
Normal
In Normal mode, all the disk drives installed in the enclosure function independently of
one another.
Large (Span/Big)
NORMAL
Span mode links all the disk drives
installed in the enclosure, so the disks
function as a single drive with combined
storage space. This mode is similar to
RAID 0 mode, but it does not stripe the
data.
Clone
500 GB Total
Disk 0
A1
A2
A3
A4
A5
100 GB
Clone mode creates an exact copy, or a
clone, of your disk onto the other disks
in the system. While not a true RAID mode,
this mode offers redundancy and data security
similar to the mirroring of a RAID 1 system.
Cloning makes it easier to recover lost data if
one of the drives is damaged. In clone mode,
only one of the drives will be accessible.
When using clone mode, you can use disk drives
of varying capacities, although the capacity will
be limited to the smallest of the disk drives. For
example, if you are using a 250 GB and two 500
GB drives, then the 500 GB drives will be limited
to the smaller 250 GB capacity, and you will
have access to a single 250 GB drive.
8
Disk 1
A6
A7
A8
A9
A10
100 GB
Disk 2
A11
A12
A13
A14
A15
100 GB
Clone
Disk 3
A16
A17
A18
A19
A20
100 GB
Disk 4
A21
A22
A23
100 GB
Disk 0
A1
250 GB
Disk 1
A1
Disk 2
A1
Disk 3
A1
250 GB
250 GB
250 GB
!
Before configuring the RAID system, make sure to back up your
data. All data on the installed disk drives will be deleted during the
configuration process
To configure a RAID system in the advanced RAID Configuration mode, follow
these steps:
1.
Go to Basic Mode > RAID and Disk Information, and select the desired controller
from the tree view in the left column.
2.
Go to Advanced Mode > Advanced RAID Configuration. In the Controller column on
the left, click the radio button labeled “Create RAID.”
3.
In the “Select a RAID type” dropdown menu below, select the desired RAID type.
4.
In the column on the right, click the check boxes next to the drives that you want
to add to this RAID system. The RAID system information will appear at the top
of this column with the system number, RAID name, RAID level, capacity, and disk
numbers.
5.
If desired, use the slider to decrease disk size.
6.
Click the apply button to begin creating the RAID system.
9
7.
A pop up window will appear, informing you that proceeding will erase all data in
the volumes. Click “Yes” to proceed.
An information message with the progress bar will appear, indicating the current status
of the RAID configuration. When configuration is complete, you may need to format your
hard disks.
To delete a RAID system, follow these steps:
1.
Go to Basic Mode > RAID and DIsk Information, and select the desired controller
from the tree view in the left column.
2.
Go to Advanced Mode > Advanced RAID Configuration. In the Controller column on
the left, click the radio button labeled “Delete RAID.”
3.
In the same column, under the “Delete RAID” header, click the check box
next to the system(s) you want to delete. When you click the check box, the
corresponding drives will appear with crosshatches, and the RAID systems will
appear in red text with an X mark.
4.
Click the “Apply” button to begin deleting the RAID system.
5.
A pop up window will appear, informing you that proceeding will erase all data in
the volumes. Click “Yes” to continue.
10
An information message with a progress bar will appear, indicating the current status
of the operation. When the RAID configuration is deleted, you may need to format your
hard disks.
Firmware Information
When firmware updates are available, you can update your Xcellon RAID System’s
firmware from this tab. The Tab displays the selected controller’s product name and
firmware version, as well as the manufacturer and flash number.
To update the firmware, follow these steps:
1.
When firmware is available, go to www.xcellongear.com to download the firmware
update.
2.
Open the Xcellon HW RAID Manager software.
3.
Go to Basic Mode > RAID and Disk Information and select the controller you want
to update.
4.
Go to Advanced Mode > Firmware Information.
5.
Click “Browse” to locate and select the firmware.
6.
Click “Update” to install the new firmware.
7.
A progress bar will appear onscreen to display the status of the update.
8.
After the firmware is successfully updated, a pop up box will appear, informing you
that you should restart your RAID system. Click “OK” to proceed.
9.
Safely eject your RAID system from your computer and reboot your Xcellon RAID
system.
11
RAID Settings
Before configuring these settings, select the desired RAID system by going to Basic
Mode > RAID and Disk Information.
In RAID Standby Timer Settings, you can set how long you want your RAID controller to
remain idle before it enters standby mode. Use the spinner to select a value in minutes
from 0 and 10,922 (182 hours or about 7.5 days).
Under RAID Rebuild Priority Settings, you can set the priority for your RAID system to
rebuild itself. The rebuilding affects the read/write speed, so the higher the rebuilding
priority, the slower the read/write speed. Use the slider to set the priority.
After changing the settings, click “Apply” to save them or “Cancel” to revert to the
previous settings.
GG1