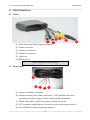
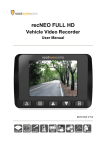
1
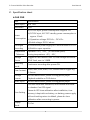
2CH Vehicle Video Recorder Operation Manuel 2015 SEP. V2.0 2-Channel Mobile Video Recorder User Manual Menu A. Packaging ........................................................................................................ 1 B. Characteristics: ................................................................................................ 2 C. Specification sheet .......................................................................................... 3 D. Product appearance ....................................................................................... 7 E. Installation of SD card..................................................................................... 8 F. Cable Installation ............................................................................................ 9 G. Installation diagram ...................................................................................... 11 H. IR remote control .......................................................................................... 13 I. Recording ...................................................................................................... 14 J. Live View: ....................................................................................................... 15 K. PC Player ........................................................................................................ 16 L. Data backup .................................................................................................. 18 M. Configuring the Memory Disk ...................................................................... 20 N. Google Map track playback ......................................................................... 22 O. Data Playback ................................................................................................ 23 P. Screenshot tool ............................................................................................. 26 Q. WiFi Connection ............................................................................................ 28 i 2-Channel Mobile Video Recorder User Manual Safety Precautions To Whom It May Concern Thanks for your patronage. Please contact your local dealer for any assistance. We will backup services via local dealers. Rights are reserved to upgrade software and hardware without notice beforehand. Please read this manual prior to use of this product. Installation Precautions Make sure power connections clear enough to you before installation. System installation is required professional installers and ventilation space. Please use recommended and genuine storage device. Please contact local dealers in case of service requirement. In Use Precautions Please keep the inner components off any solid or liquid. Please do not disassemble the equipment for warranty issue. Please contact local dealers or the manufacturer for prompt service. Please remove the battery if remote control keeps idle for quite a long while. The equipment best connects with ground wire in case of outdoor cameras connection or alarm I/O connection. This is to keep the DVR away from static electricity damage. ii 2-Channel Mobile Video Recorder User Manual Surrounding Please have the DVR under recommended temperature away from the sun and heating source. Please keep this equipment away from humid surrounding. Please keep this equipment away from smoke and dust. Please do not drop the equipment. Please keep this equipment in ventilation space. Please supply rated voltage and Amp. To the equipment. Please keep flammable objects away from the equipment. iii 2-Channel Mobile Video Recorder User Manual A. Packaging 1. Accessories Power cable Multi-functional OBD display (built with GPS and microphone) WiFi antenna Velcro tape IR remote controller Car camera x 2pcs 3.5M camera cable Driver CD Quick guide x 2pcs 2. Optional Accessory SD card reader SD card, 8GB or above, class 10 or above 3. Review Please review the package first. during delivery. The packaging material can resist impact Please remove the PE bag to make sure no damage on the housing. Finally make sure the screws are not loose. Front Panel and Rear Panel Keypad on the front panel and port on the rear panel are described in manual. Please make sure the model number on the label comes to the same as the model you purchase. Product labeling has significant meaning to after sale service. You will be asked to provide model number and serial number the time you contact our service team. 1 2-Channel Mobile Video Recorder User Manual B. Characteristics: 1. Aluminum casing make it durable and waterproof. 2. Small independent system, 2 channels video and 1 channel audio recording. 3. H.264 compression format, 720P video resolution. 4. Low power consumption and efficient heat dissipation, no build-in Lithium battery to prevent possible danger and heat explosion. 5. Devices starts recording automatically when engine is on, file is well formatted and saved securely with extension recording by super capacitor. 6. GPS tracking and G-sensor data is to displayed on PC player Carbox player on Google Map for up-to-date geographic information. 7. Build-in WiFi connection for mobile phone application to display, playback and backup file directly. 8. Made in Taiwan. 2 2-Channel Mobile Video Recorder User Manual C. Specification sheet CAR DVR Item Specification Video Input 2CH 720P Resolution 720P (a) DC12V input, power consumption is approx. 1A. Power Consumption (b) DC12V input, ACC OFF standby power consumption is approx. 30mA. (c) Operation voltage: DC10.0v ~ DC14.5v. (d) Initial voltage: DC11V above. Prolonged (a) Extensional power supply for 3 seconds after ACC OFF. Recording (b) Build-in super capacitor. Temperature Operation -20℃~60℃ ( In disclosed space) . Tolerance Storing temperature: -40℃~85℃. Storage Suggest to use SanDisk Class 10, 8GB storage and above Device SDHC Card, max. to 128GB. Recording mode Data Content Continuous recording after power ON. Video, date, time, audio, GPS, external alarm trigger log, G-Sensor. Storage Secured data format, please use suggested player. Format Playback available on DVR device. Audio Input Secured data format, please use suggested player. GPS time zone auto calibration, and initialize with buildin calendar if no GPS signal. Time Setting Please do GPS time calibration after installation, time memory is kept with car battery, no battery power supply will result setting return to default, please do time calibration after connecting to power. Display Mode TV-Out 3 2-Channel Mobile Video Recorder User Manual (a) Green light flashing: recording. (higher flashing OBD Indicator frequency for event recording). (b) Blue flashing: F/W updating. Red light on means device error. (c) Blue light: WiFi connection. (a) Power and signal input: i. Power input DC12V ii. ACC signal: power input range DC10.0v ~ DC14.5v。 iii. LAMP signal: power input range DC10.0v ~ DC14.5v for external alarm triggered event Input recording. (b) Video input: please protect with waterproof tape on connectors after cabling. (c) Other: GPS, speed, microphone audio input. (d) WiFi (e) Infrared remote control reception. (f) SD card socket. (a) Please install device by professional installation engineer; temporary installation is suggest to fixed with tape included; please take high attention from damaging motor oil and power supply. (b) Please keep device cabling from gasoline tube and oil tank; please install DVR when engine is off. (c) Please don’t use micro-SD adaptor as recording Explanation device, it may cause intermittent recording and unstable connect from driving vibration. (d) Please use tape to seal connector well after cabling in order to prevent cabling loosens and dirt, oil, water from entering. (e) All cabling should be installed with fuse protection. (f) DVR should be fixed well to prevent moving and causes device from damages. 4 2-Channel Mobile Video Recorder User Manual (g) GPS positioning precision is interfered by installation position and weather condition. (a) Camera video and signal may be electromagnetic interfered of installing on non-EMC certified vehicles. (b) Please use alcohol to clean cable connectors to eliminate dust, mud, oil, …etc. to ensure signal transmission and video quality. (c) NTSC or PAL frequency should be set according to local TV system. (d) The machine consumes micro electric current when standby. If the vehicle wouldn’t be used for long time, please remove DVR power to prevent Attention power consumption to car battery. User needs to do time calibration after reconnect the DVR to car battery. (e) Boot screen and OSD interface is subject to change according to software update or revision change without notice. (f) Please remove the card and set to lock-state to avoid being overwritten for important event or accident records. (g) Please shut off power before installing or removing cameras to protect from electric surge or short. (h) DVR shuts off when ACC power is off, and DVR time setting is rely on car battery. 5 2-Channel Mobile Video Recorder User Manual CAR CAMERA Power DC5V~DC12V ±10% input / Power Consumption 500mA Resolution Support NTSC / PAL , 30FPS @ 1280x720 Image Sensor 1/4” CMOS sensor View Angle H: 110° / V: 55° / D: 130° Lens 3.6mm (optional) Temperature Operation -20˚C ~ 60˚C ( In disclosed space) . Tolerance Storing temperature: -40˚C ~ 85˚C. Output terminal Size SMA harness plug 30x43x50mm Notes : The product specification is subject to change without prior notice. 6 2-Channel Mobile Video Recorder User Manual D. Product appearance Mobile DVR unit: SD card slot IR Receiver Power / Recording Lid screw Lid screw Error Indicator CAM1 CAM2 WiFi OBD (On Board Display) Microphone Error Power Recording GPS 7 2-Channel Mobile Video Recorder User Manual E. Installation of SD card SD card slot Dustproof screw Dustproof screw (1). Counterclockwise to unscrew the screw of dustproof lid to install/takeoff the SD card. (2). Please do SD card format/ restoration with attached player. Attention (1). Suggest to use SanDisk or Transcend SD card class 10, 4GB above. (2). Before using the memory disk, please format the disk first by using the software player in the CD-ROM. If not, device will automatically erase all data in the memory disk before recording. (3). To ensure recording quality, please do not use adapter card with Micro SD card. Doing so may lead to bad connection due to shock and vibration. (4). All memory disks have limited lifespan. Please regularly watch videos on PC and check the memory disk to ensure proper functioning. (5). Collision and vibration may cause SD card defective and result intermittent recording, please check data and backup file periodically. 8 2-Channel Mobile Video Recorder User Manual F. Cable Installation Cables 1 (1) Multi-functional OBD display connector 3 2 4 5 6 (2) Power connector (3) Camera 1 connector (4) Camera 2 connector (5) Video out (6) WiFi antenna Note: Please use LVDS camera Power cable a b c d e (a) Power connection: reception (b) Alarm recording (Grey cable): connect to +12V power to do event recording by alarm trigged. Can be used together with switch. (c) Power cable (Red): connect to power positive connector. (d) ACC activation cable (Brown): connect to motorcycle power switch (+). (e) Ground (Black): connect to power supply (-). 9 2-Channel Mobile Video Recorder User Manual OBD Microphone i t ERR PWR GPS REC (A) PWR (Green):power indication. (B) GPS (Blue):Flashing mean GPS 3D positioning searching. Consistent blue light on means 3D positioned successfully. (C) Microphone:Audio input. (D) REC (Green):Flashing means continuous recording. (E) ERR (Red): Error diagnosis, please check camera signal, OBD display, SD storage…status. WiFi Antenna 10 2-Channel Mobile Video Recorder User Manual G. Installation diagram Installation on motorcycle Attention (1). Please install this device with the help of professional technician to avoid damaging your vehicle. (2). For installation by none-technician, please use tapes instead of boring tools to avoid damaging the electrical and gasoline system. (3). For safety, switch off ignition before installation, and please keep away from gasoline pipeline and tank. (4). Before inserting wires through holes, temporarily wrap the terminal with tape to prevent bad connection from accumulated dirt or debris. (5). Tightly seal all electrical connection with tape to prevent loose connection or leak leaking to the connection. (6). Connect the power behind the key ignition and fuse (not directly to the vehicle battery) to avoid depleting the battery. (7). The device should be fixed to the vehicle. Tumbling inside the storage trunk will damage the device. (8). GPS positioning accuracy may be affected by the installation position, sun-screen or weather condition. 11 2-Channel Mobile Video Recorder User Manual DVR installation diagram (a) DC12V input is approx. 1A consumption; Standby power consumption when ACC OFF is 30mA。 (b) Operation electric pressure:DC10.0v ~ DC14.5v。 (c) Device initiate by power DC11v above. Red cable: DC (+) Brown cable: ACC power DC current Grey cable: positive DC power, for LAMP Black cable: Ground cable 12 2-Channel Mobile Video Recorder User Manual H. IR remote control Forced recording Split screen switch Audio recording switch Display menu Up / Down / Left / Right Confirm / Enter Fast forward Back forward Playback / Play Stop / Quit Pause Icon Function Split screen switch Description Single, Duo screen switch DVR saves record to protective area for record Forced Recording before and after event by pressing the emergency button. The protective area is reserved as 20% of total storage and prevent data from being overwritten. Audio recording Audio recording ON/OFF 13 2-Channel Mobile Video Recorder I. User Manual Recording 1. System initialization / Recording: System initializes within 30 seconds when power is on. PWR green light ON when system is rebooting. System starts to recording when REC green light is flashing. Light Indication: ● PWR/REC:GREEN on means device POWER is on, Flashing resembles recording. ● ERR:RED on means abnormal, please check possible reason such as camera signal, HUD display, SD card …etc. ● CAM 1:GREEN means in connection, RED means connection failed. ● CAM 2:GREEN means in connection, RED means connection failed. ● WiFi:BLUE means WiFi module standby, available for connection. 2. Shut off/ Stop recording Device offer prolonged 3 seconds recording after power off to ensure data is well stored; user can take out the SD card when indication is off. 14 2-Channel Mobile Video Recorder User Manual J. Live view: on top right, it means that both channel 1 (left) and 1. If the screen shows channel 2 (right) have video signal. A video input. shows the audio recording is shut off. 2. Event recording: when shows press icon indicates that one channel has no in LIVE mode mean normally recording, when on remote controller, it shows under manual recording. And when it shows on right side up to represent it is means G-Sensor triggered recording. 3. User can press to switch to channel 1, 2 on LIVE mode, as below image: CH1 image CH2 image CH1 and CH2 4. Press on the remote controller in LIVE mode to show firmware version : 5. Press on the remote controller to turn off audio recording ( will show on the screen). A icon indicates that audio recording is on. icon means either that the device is calculating coordinate or that there 6. A is no satellite signal. A icon means that GPS is ready. 15 2-Channel Mobile Video Recorder User Manual K. PC player Run the player software (included in the CD). ◎NOTE: The software requires Direct X version 9.0 or above. 1. Viewer Interface 7 1 2 3 4 10 6 8 9 1 CAM1 2 CAM2 3 Speed display 4 G sensor 5 Google Map / File list 6.7 Operation control interface 8 Volume control 9 Play speed 10 Time bar/ File mark 16 5 2-Channel Mobile Video Recorder User Manual 2. G SENSOR G sensor analyzer is to recording the vehicle moving information. G SENSOR (1) X:Left and right movement (2) Y:Front and rear movement (3) Z:Vertical movement Note:3 axis direction varies according to device posture of installation. 3. Control bar Start point of backup End point of backup Screenshot Open file File backup Device settings Tool box, memory card formatter, language setting. Previous file Stop Previous frame Play Back play Next frame Pause Next file 17 2-Channel Mobile Video Recorder User Manual L. Data backup Save data from SD card to PC or other device. Use PC player and click to enter backup interface: 1 3 4 2 5 Step1. Choose SD card source: Step2. Choose backup files Step3. Choose backup data format Data format: (1) SD card original format (RAW) RAW file *.sd (2) AVI Format (*.avi) Cam1, *.avi file Cam2 *.avi file 18 2-Channel Mobile Video Recorder User Manual Note: backup to memory card in original format, the format will be containing GPS latitude and longitude, speed, recorded data such as G-SENSOR, if the backup date in *.AVI format, it contains only video and audio, so back up in original format is recommended. Step4. Select the backup beginning time point Step5. Select the path and start backing up 19 2-Channel Mobile Video Recorder User Manual M. Configuring the Memory Disk Please insert SD card into card reader and launch player on your computer to do card formatting. Click on player to do setting: Choose disk 1 Video Format 2 Image Quality Select video recording resolution: 720P, D1 Select video picture quality: High / Normal / Low Setting the number of frames per 3 Number of second video camera recording: Images PAL (25,20,15,10,5) NTSC (30,20,15,10,5) 4 Identification message, can input Car machine car plate number or driver’s message name…etc. 20 2-Channel Mobile Video Recorder User Manual This feature can encrypt the memory card and to prevent unauthorized access. Password length allows to 15 characters. User have to key in password 5 for video playback, settings, Password memory card format after password Management is set. ★ Note: please keep password in safe and remembered place, SD card is accessible only when keyin correct password and no other way to unlock the file. Please manual adjust time when in 6 no GPS cover environment. Time Time Setting zone would automatically calibrated to GMT time when GPS connect. 7 Copy to SD Coly Player to SD card storage card player Use X-Y-Z axis vibration detection 8 G sensor to determine the collision and forced recording. Sensitivity: five levels: off / low / low 9 / normal / high / very high. Light Nighttime illumination can be set sensitivity based on sensitivity, set to low, medium, and high. 10 Sound Set audio record: OFF / ON Recording 21 2-Channel Mobile Video Recorder User Manual N. Google Map track playback If there’s GPS recording, user will be able to read driving path, direction, speed information when doing video playback. Tracking path 22 2-Channel Mobile Video Recorder User Manual O. Data Playback There’re two way to do video playback: 1) Playback via video out and 2) PC player playback. 1. On screen playback Click key on remote control in Live mode screen, it switches to playback mode event list like below; DVR stop recording when entering the playback page. Manual recording G-Sensor recording (1). Press the or button to select the footage in the list (2). Press the or button to select the previous or next page of footage. (3). After the desired footage is selected, press (4). To pause video, press or to play the video. . To resume playing, press (5). To stop playing and return to the playback list, press (6). To stop playback and return to live recording mode, press 23 again. 2-Channel Mobile Video Recorder User Manual 2. Playback on PC player Click to enter playback mode: 1 2 (1). Select the path of the memory disk or a backup file on the hard disk. (2). Double click the desired footage to play the file. 24 2-Channel Mobile Video Recorder (3). User Manual Image Snapshot User can take a snapshot of the current frame by pressing to save screenshot. The player will save the file to *.bmp format and open the destination folder: Snapped image is default saved to /Snapshot, user can enter image path. Data format is *.bmp 25 to set 2-Channel Mobile Video Recorder User Manual P. Screenshot tool Q1. When do user need to format SD card? When user uses brand new SD card, please format it before use. Q2. When do user have to restore SD card? If you want to repurpose the memory disk for other uses (e.g. for computer or digital camera), you need to restore the disk. All recorded data will be erased from the disk. Attention (1). Unlock SD card before formatting Unlock Lock (2). Please use “RUN AS ADMINISTRATOR”to format SD card. 26 2-Channel Mobile Video Recorder User Manual Q3. How to format/restore SD cards? (1). Put the SD card into a card reader and plug the card reader into your computer USB slot. (2). Play software , click to enter formatting tool. (3). Select memory card location, and choose "format" or "restore" memory card a. Select memory card b. Format memory card c. Restore memory card 27 2-Channel Mobile Video Recorder User Manual Q. WiFi Connection 1. Visit Google Play store and search for ”VacronPlayer ”and download. 2. Turn on WLAN name「SSID」,password 「12345678」 。 3. Run APP ”VacronPlayer”, click “Device list”then “Add”, key in a preferred device name. 4. Click on device name and choose “All Channel” to see LIVE VIEW 5. Function: Live view image shot, Live recording, Video playback, Video backup. Attention (1). There might be video transmission delay due to wireless transmission. (2). Please remember to restore WiFi setting to external network after using Vacron Player. 28 For more information Please visit VACRON website http://vvr.vacron.com Made in Taiwan