1
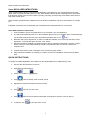
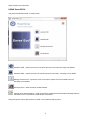
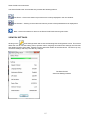
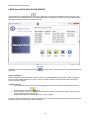
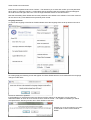
samaritan® PAD and PDU*
Saver EVO® User Instructions
* Not available in the USA.
Saver EVO® User Instructions
The information in this document is subject to change without notice and does not represent a commitment on
behalf of HeartSine Technologies Inc. No part of this manual may be reproduced or transmitted in any form or
by any means, electrical or mechanical, including photocopying and recording for any purpose without the
express written permission of HeartSine Technologies Inc.
Copyright© 2013 HeartSine Technologies Inc.
All rights reserved.
“samaritan” is a registered trade mark of HeartSine Technologies Inc.
“Saver EVO” and “SCOPE” are registered trademarks of HeartSine Technologies Inc.
All other trademarks and registered trademarks are the property of their respective owners.
Saver EVO® October 2013
HeartSine Technologies Ltd.
Canberra House
203 Airport Road West
Belfast
BT3 9ED
Northern Ireland
Telephone: +44 28 9093 9400 ● Fax: +44 28 9093 9401
Website: www.heartsine.com ● E-mail: [email protected]
English
H013-001-300-4
2
Saver EVO® User Instructions
Saver EVO® USER INTRUCTIONS
Saver EVO® software allows you to retrieve defibrillation event data from your samaritan® PAD (models
300P, 350P and 500P) and PDU Memory Card. Saver EVO® will also allow the management of event data
that has been saved to the PC with respect to printing, importing, and exporting event data to other Saver™
and Saver EVO® users.
Saver EVO® is provided with a software licence to allow the installation and use of the software on a single
PC.
Installation instructions are provided with the CD ROM and are duplicated here for convenience.
Saver EVO Installation Instructions
1. Insert installation CD into CD ROM drive on the computer it is to be installed on.
2. The CD will automatically start to run the installation program.(If your computer does not automatically
run the setup program browse to the CD ROM and double click on the ‘
’ icon).
3. Read the user licence agreement. In order to install this software you must accept the terms of this
agreement. To accept the terms click the “next” button.
4. Saver EVO® will be installed in its default location with its standard configuration. Click the “I agree”
button to accept. These default settings should not be altered unless you are an experienced
computer user.
5. If asked about device driver certification click “Continue anyway” button.
6. When software installation is complete, it is safe to remove the installation CD from the CD-ROM
drive.
QUICK INSTRUCTIONS
To retrieve recorded defibrillation event data from the samaritan® PAD or PDU Memory Card.
1. Connect the relevant device to the PC.
2. Open Saver EVO® software.
3. Click
button or
button.
4. Click
button to display a list of saved events.
5. Highlight the required recorded event from the list.
6. Click
7. Click
button to view the event.
button and enter patient information as required to save the event on the PC.
8. If required, click
to print the event record.
3
Saver EVO® User Instructions
USING Saver EVO®
The Saver EVO® Start screen is shown below.
samaritan PAD – Opens the menu for functions specific to the PAD. See Page 5 for details.
samaritan PDU – Opens the menu for functions specific to the PDU. See page 12 for details.
Manage saved events – Opens the menu for functions specific for events saved to the PC.
See Page 16 for details.
Exit Saver EVO – Exits the Saver EVO® software.
Change Saver EVO® Settings -- Change the Saver EVO® password and select language options.
Also allows user to view Saver EVO® revision information.
Using the specific menus above will be covered in more detail in later sections.
4
Saver EVO® User Instructions
USING Saver EVO® WITH THE samaritan® PAD
To use Saver EVO® with the samaritan® PAD you need to have the USB data cable that was supplied with
the PAD or the Saver EVO® software.
Using the USB data cable connect this to the samaritan® PAD and to the USB port on your PC. Open the
Saver EVO® software.
Clicking the
Samaritan PAD button will open the window shown below.
Saver EVO® PAD
Access Screen
PAD Data - Click on this button to retrieve event data from the PAD. See Page 6 for details.
Change PAD Settings - Click on this button to run diagnostic tests or change the configuration
(volume, language or time) on the samaritan® PAD. See page 8 for details.
Back - Click on this button to return to the Saver EVO® start screen.
5
Saver EVO® User Instructions
RETRIEVING EVENT DATA INFORMATION FROM THE samaritan® PAD
To retrieve defibrillation event data from the samaritan® PAD ensure that your samaritan® PAD is connected
to the PC and then click the
PAD Data button. This will search the memory of the
PAD and list all recorded events and display as shown below.
Saver EVO® PAD event log
list screen
Events shown in green text with a
symbol are events that have already been saved to the PC.
Save All - Clicking on the Save All button will cause all the events listed in the PAD event log to be
saved to the PC in a single file.
N.B. Events saved by this method cannot be retrieved for viewing by this version Saver EVO®. For retrieval of
events from this file, contact HeartSine Technologies customer support. To save events individually for
retrieval later please refer to the “Save” function in VIEWING EVENTS ON A samaritan® PAD on page 7.
View – Clicking on this button will cause the selected event to be displayed.
Erase – Clicking on this button will erase all events from the PAD event log. See page 8 for more
detailed advice on erasing data.
Back - Click on this button to return to the Saver EVO® PAD access screen.
6
Saver EVO® User Instructions
VIEWING EVENTS ON A samaritan® PAD
To view an event, highlight the event in the list and then click the View button
.
This will display the defibrillation event with the ECG trace and the event log in a single viewing
window.
The Saver EVO® PAD event
view window
You can now choose to save this displayed event to the PC by clicking the Save button
. Events saved
in this way can be retrieved and viewed in Saver EVO®. This provides options to enter information to be able
to identify the patient from the list of saved events on the PC. The details about the patient can consist of
alpha numeric characters and each field can be completed or left blank if desired.
The Saver EVO® PAD
Patient details window
7
Saver EVO® User Instructions
N.B. Once the defibrillation event data is saved to your PC this information cannot be changed.
The Saver EVO® event view window also provides the following buttons:
Print Event – Click on this button to print the event currently displayed in the view window.
Print Preview – Clicking on this button will cause a preview of the printed data to be displayed on
screen.
Back - Click on this button to return to the Saver EVO® PAD event log list screen.
ERASING MEMORY ON A samaritan® PAD
To erase the memory of a samaritan® PAD click the Erase button
As a caution Saver EVO® will ask you to enter your Password prior to the memory being erased. When the
correct password is entered the memory of the samaritan® PAD will be erased. For information on how to
change the default password please see CHANGING THE PASSWORD AND THE LANGUAGE IN Saver
EVO® on page 18.
Caution: HeartSine recommend that you download the complete PAD memory prior to erasing it. This
information should be stored safely for future reference.
It is recommended that when event data is retrieved from the samaritan® PAD and saved to the PC
that the events should be erased from the memory of the PAD. This will ensure that the complete
memory is available for recording the data from another defibrillation event.
CHANGING samaritan® PAD SETTINGS
The change PAD settings
follows;
button allows users to configure some features of the samaritan® PAD as
Check/Set time
Run diagnostic tests
In addition users with the relevant authority can change the following;
Volume
Language
Metronome sound enable/disable
Clicking on the
Change PAD settings button will access the following screen (see next page):
8
Saver EVO® User Instructions
Saver EVO®
Change PAD Settings
window
Check/Set PAD time – This button allows users to synchronise the time on the samaritan® PAD with
the time on their PC.
The Saver EVO®
Check/Set PAD Time window
Clicking the Synchronise button will set the time on the samaritan® PAD to the same time as the PC to which
it is connected.
Click the Close button to return to the Saver EVO® Change PAD Settings window.
9
Saver EVO® User Instructions
Run Diagnostic Tests – This button allows the user to run some basic tests to check that their
samaritan® PAD is functioning. The list of available diagnostic tests is accessed from a “drop down” menu as
shown below.
The Saver EVO® PAD
Diagnostic tests
window
SaverEVO will identify
the type of PAD device
attached (PAD300,
PAD300P, PAD350P or
PAD500P*) and will
display the appropriate
label illustrations to
guide the user during
tests.
Edit PAD Configuration – This button allows users to view the current volume, language and
metronome settings of the attached PAD device, as well as the version of software installed on it. The PAD
Configuration window (shown below) may be used to change the volume level, the language selection and
disable or enable the metronome sound. These changes can only be confirmed by entering the required
password when requested. For information on how to change the default password please see CHANGING
THE PASSWORD AND THE LANGUAGE IN Saver EVO® on page 18.
The Saver EVO®
Edit PAD Configuration window
For PAD devices with serial numbers without a letter or starting
with xxA, the choice of languages is limited to those that are
programmed into the device. For PAD devices with serial
numbers starting with xxC the choice of languages is limited by
the country in which the device was purchased.
Language options are accessed by a drop down menu.
* Not available in the USA
10
Saver EVO® User Instructions
If the language is changed please check that the confirmation window is displayed, as shown below. If this
message is not displayed after the programming has completed please contact your authorized HeartSine
distributor or HeartSine directly.
And check that the language has been set on the PAD by turning the device on and listening to the first
messages.
•
•
Adult patient/Child patient
Call for medical assistance
When you are sure that the correct language has been installed to your device, you may then switch the
device off.
11
Saver EVO® User Instructions
USING Saver EVO® WITH THE PDU*
To use Saver EVO® with the samaritan® PDU memory card, you must insert the card into a MMC/SD
compatible card reader that is either connected to or built into the PC that is running Saver EVO® . Please
note that it may take a few seconds, or even over a minute for your computer’s operating system to recognise
that a card is present in the card reader.
Click the
PDU button. This will open the sub menu window below.
PDU Data - Click on this button to retrieve event data from a PDU Memory card. See page 17 for
details.
PDU Settings - Click on this button to view configuration settings the samaritan® PDU Data-Pak™.
See page 19 for details.
Back - Click on this button to return to the Saver EVO® start screen.
* Not available in the USA
12
Saver EVO® User Instructions
RETRIEVE EVENT DATA FROM THE PDU™ MEMORY CARD
Ensure that the samaritan® PDU memory card is inserted into the SD/MMC card reader and click the
PDU Data button. This will list the events that are recorded on the Memory Card.
The Saver EVO®
PDU event log list
screen
Events with the clock symbol
are PDU self tests that have passed successfully.
Events shown in green text with a
symbol are events that have already been saved to the PC.
Save All – This button is disabled in PDU mode.
View – Clicking on this button will cause the selected event to be displayed. See page 18 for
details.
Erase – This button is disabled in PDU Mode.
Back - Click on this button to return to the Saver EVO® PDU access screen.
13
Saver EVO® User Instructions
VIEWING EVENTS STORED ON A PDU
To view an event, highlight the event in the list and then click the View button
.
This will display the defibrillation event with the ECG trace and the event log in a single viewing window:
The Saver EVO®
PDU event view
window
The user can now choose to save this displayed event to the PC by clicking the Save button
. This
provides options to enter information to be able to identify the patient. The details about the patient can consist
of alpha numeric characters and each field can be completed or left blank if desired.
The Saver EVO®
PDU Patient details
window
N.B. Once the defibrillation event data is saved to your PC this information cannot be changed.
14
Saver EVO® User Instructions
The Saver EVO® event view window also provides the following buttons:
Print Event – Click on this button to print the event currently displayed in the view window.
Print Preview – Clicking on this button will cause a preview of the printed data to be displayed on
screen.
Back - Click on this button to return to the Saver EVO® PAD event log list screen.
VIEW PDU SETTINGS.
Clicking on the
View Settings button will access the following PDU Configuration screen. This screen
allows the user to view the battery power, speaker volume, language and metronome settings, the CPR rate
and duration and the expiry date, software version and serial number of the PDU device. The user may only
view these settings and may not make any changes.
The Saver EVO®
View PDU Settings window
15
Saver EVO® User Instructions
USING Saver EVO® WITH SAVED EVENTS
The Manage saved events button
on the main screen of Saver EVO® allows users to review event
data that has been downloaded from the samaritan® PAD or PDU Memory Card and saved to the computer.
Clicking this button will open a window as follows;
Highlighting an event in the list and clicking
event log.
View will open the saved event to view the ECG data and
Export and Import
Saver EVO® has functions that allow users to send or receive defibrillation event data to other people who
have the Saver EVO® software. To send, or receive copies of saved events uses the Export and Import
functions of Saver EVO® .
To Export events.
1. From the Manage Saved events screen highlight the event or a number of events that you wish to
export and then click the
button.
2. The PC will ask for a location on the computer that you wish to save the export file, and also let you
choose a name for the exported file.
3. Click the Save button to save the file in the chosen location.
It is then possible to attach this file to an e-mail using your normal e-mail software and send the exported file
to another user who has the Saver EVO® software.
16
Saver EVO® User Instructions
Event data from Saver EVO® can only be viewed by another Saver EVO® user. The previous Saver™
software will not successfully import and display data from Saver EVO®
To Import events
To import events and view these on your PC the file that has been sent to you from another user of Saver™ or
Saver EVO® needs to be saved to a location on your PC.
1. From the Saver EVO® Manage Saved Events screen click the
button.
2. Browse to the location where the file was saved and click open.
3. The records will be added to the list of Saver EVO® files on your computer.
These can then be viewed by highlighting the event in the list and clicking the View button.
Saver EVO® will correctly import and display event data that has been exported from the previous
version of software called Saver™.
To delete saved events
Saved events can be erased from your computer memory by Saver EVO® . Events are erased individually by
selecting the event(s) to be erased (multiple events can be selected) by highlighting the relevant event.
When you have confirmed that only the events you wish to erase have been selected click on the
Erase button
. As a caution Saver EVO® will ask you to enter your Password prior to the memory
being erased. When the correct password is entered the memory of the selected events will be erased from
your computer.
Caution: Please ensure that only the events you want to erase have been selected prior to erasing. Once
erased from you computers memory events cannot be regenerated and all information will be lost.
17
Saver EVO® User Instructions
CHANGING THE PASSWORD AND THE LANGUAGE IN Saver EVO®
Saver EVO® has some functions that can only be changed or completed by entering a password. This allows
administrators of the software to restrict access to certain capabilities to authorised users. Saver EVO® is
shipped with the password set to the default “password”.
To change this password to one of your own choice you need to do the following;
From this main Saver EVO® screen click on the small
button. This will open the following window.
18
Saver EVO® User Instructions
Enter the current password and click “Confirm”. This will allow you to enter and confirm your new password.
Click “Apply” to make the change. A confirmation that the password was successfully changed will appear.
Click OK on this and again click “OK” in the Change Password window to exit this function.
Note that reinstalling Saver EVO® will reset the password to the default in the software. This action however
will not remove any event data that has previously been saved.
Language selection
To choose the language of the Saver EVO® software select the language from the drop down list and click
apply.
On clicking apply the following screen will appear and Saver EVO® will have to be restarted for the language
changes to take effect.
Check for Automatic Updates
If the Enable box is selected then each time Saver EVO® is started, it will attempt to connect with the
Heartsine website to check for more recent versions of Saver EVO® . If an update is available you will be
prompted with the following window when Saver EVO® is launched.
Choose Yes or No accordingly if you want
to download a newer version of Saver
EVO® .
19