1
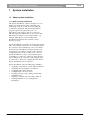
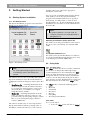
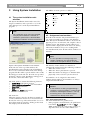
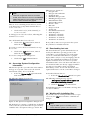
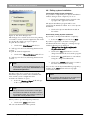
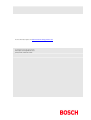
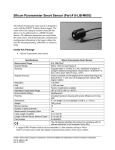
DCN Next Generation
System Installation
en Software User Manual
LBB 4185/00
About this manual
This user manual is divided into three chapters.
Chapters 1 and 2 provide background information
and chapters 3 provides detailed user information as
follows:
•
Chapter 1 - System Installation - containing a
brief overview of the Digital Congress Network
Next Generation, a summary of the application
modules available and an overview of the
functionality of the System Installation
application.
•
Chapter 2 - Getting Started - containing details of
how to start the System Installation application
from the Startup screen and a description of the
Help facility.
•
Chapter 3 - Using System Installation containing details about assigning and working
with seat numbers, configuring channels, printing,
working with installation files, and how to exit
System Installation.
Manual conventions
For clarity this user manual uses consistent styles,
symbols and typographical conventions. They are:
i
Note
General notes are contained within rules and
indicated with this symbol at the left margin.
Notes are used to draw attention to special
actions or information.
i
Caution
A caution is contained within rules and
indicated with this symbol at the left margin.
Cautions are used to draw attention to actions
or commands that could lead to a loss of
information or damage to equipment
i
Tip
A tip is contained within a box and indicated
with this symbol at the left margin. Tips are
used to provide supplementary information that
may make an action quicker or easier to carry
out.
•
An action (to be carried out by the user) is
shown with a larger round bullet mark.
Typographical conventions
The following typographical conventions (text styles)
are used in this manual:
•
Typed input - information to be typed in using
the keyboard is shown as:
Filename
•
Single key - input via a single key (or keys) on
the keyboard is shown as:
<enter>, <shift>, etc.
•
Multiple keys - input via a combination of keys
pressed together is shown as:
<ctrl>+<p>, <alt>+<f4>
•
Screen text - information that appears on screen
is shown as:
‘Choose Startup Modules:’
Hyperlinks
This manual is also available as a digital document in
the Adobe Portable Document Format (PDF). All
references to pages, figures, tables, etc. in this digital
document contain hyperlinks to the referenced location.
DCN Next Generation System Installation
Table of contents
1
1.1
1.1.1
2
2.1
2.1.1
2.2
2.2.1
2.2.2
2.2.3
2.2.4
2.2.5
2.2.6
2.2.7
2.2.8
3
3.1
3.2
3.2.1
3.3
3.3.1
3.3.2
3.3.3
3.4
3.5
3.6
3.7
3.8
System Installation ................................................... 4
About system installation....................................... 4
What is System Installation? ................................ 4
Getting Started............................................................ 5
Starting System Installation .................................. 5
The Startup screen ................................................. 5
Selecting an installation (and a names) file...... 5
The System Installation icon ................................ 5
Using Help ................................................................ 5
The Help menu......................................................... 5
Index ........................................................................... 5
Keyboard ................................................................... 6
Commands ............................................................... 6
Procedures ............................................................... 6
Glossary .................................................................... 6
Using Help ................................................................ 6
About.......................................................................... 7
Using System Installation ..................................... 8
The system installation main windows ............... 8
Assignment seat numbers..................................... 8
Accessing install mode.......................................... 8
Resetting the ‘Installed’ list .................................. 9
Assigning seat numbers to numberless units.. 9
Changing newly-assigned seat numbers........10
Inserting new seat numbers...............................10
Deleting an item on the ‘Installed’ list..............10
Changing the seat numbers of alreadyassigned units .......................................................11
Configuring channels and external contact ....11
Channel assignment.............................................11
External Contact ....................................................12
No Function ...........................................................12
Present....................................................................12
Fraud........................................................................12
Testing channels ...................................................12
Accessing System Configuration information 13
Downloading font sets .........................................13
Working with installation files.............................13
Creating a new installation file...........................14
Opening an existing installation file..................14
Saving an installation file.....................................14
Saving an installation file under a new name .14
Deleting an installation file..................................15
Printing.....................................................................15
Exiting system installation....................................16
Temporarily exiting System Installation............16
Permanently exiting System Installation ..........16
Bosch Security Systems B.V. | 2005 January | 9922 141 70462
en | 3
DCN Next Generation System Installation
1
System Installation
1.1 About system installation
1.1.1 What is System Installation?
The System Installation software module is one of a
family of modules designed for controlling and
monitoring conferences and discussions using the
contribution equipment. The System Installation
program registers the physical presence of
microphones and delegate units in a conference
hall and supply this information to the system. This
information is vital for certain other modules, e.g.
Synoptic Microphone Control. Without the
installation information these modules cannot
function properly.
System Installation is basically a preparation program.
Once all contribution units have been initialized from
the system (for more information, refer to the DCN
Next Generation Installation and User Instructions)
and assigned seat numbers, and the audio channels
configured and tested, there will be no need to use
System Installation for day-to-day monitoring and
controlling of a conference. However, if the physical
layout changes in the conference hall (delegate units
are removed or added, for example) then the data in
System Installation must be updated.
System Installation offers the following possibilities:
•
Assigning seat numbers to units without numbers.
•
Changing already-assigned seat numbers.
•
Configuring the audio channels.
•
Configuring the external contact.
•
Opening, closing, saving, editing and deleting
installation files.
•
Sending test signals down the audio channels.
•
Printing information concerning System
Installation.
Bosch Security Systems B.V. | 2005 January | 9922 141 70462
en | 4
DCN Next Generation System Installation
2
Getting Started
2.1 Starting System Installation
2.1.1 The Startup screen
The System Installation program is started from the
Startup screen (shown below).
en | 5
modules will not run without the appropriate
installation or names file.
You can specify an installation file from the Startup
main window, or from the System Installation
program. If an installation file has been specified
from Startup, it is still possible to work on other
installation files once in System Installation. System
Installation does not make use of the information in
the names file.
i
Note
If system installation is in install mode, all
conference activities are suspended (refer to
paragraph 3.2.1).
Selecting an installation (and a names) file
For details on selecting an installation (and a names)
file, please refer to the Startup user manual (LBB
4190).
The System Installation icon
For details on the System Installation icon and how
to start System Installation from Startup, please refer
to the Startup user manual (LBB 4190).
Figure 1 The Startup screen.
i
Note
For starting the Startup program from an icon
in the desktop, refer to the Startup user
manual.
The software uses two user-created files that contain
important information about the installed hardware
configuration and about delegates’ names. These files
are:
•
Installation file - containing information about
channel assignment and the numbers that have
been assigned to all microphones connected to
thesystem. These seat numbers are assigned
using this software module.
•
Names file - containing information about the
name, seat number and other conference and
personal details of participating delegates. Names
files are created using the Delegate Database
software (LBB 4180).
The software modules may be started up from the
Startup main window without specifying either an
installation or names file. However, some software
2.2 Using Help
2.2.1 The Help menu
The ‘Help’ menu in the title bar contains commands
for an on-screen help facility. This help facility
contains information on all commands in the ‘File’
menu, on which keyboard keys are functional, a
description of how to use the software, information
on how to use the help facility itself, plus an index
and a glossary of terms. All information contained in
this user manual is also found in the ‘Help’ facility.
The ‘Help’ facility contains the following options:
•
Index
•
Keyboard
•
Commands
•
Procedures
•
Glossary
•
Using Help
•
About System Installation.
2.2.2 Index
To access the index:
Bosch Security Systems B.V. | 2005 January | 9922 141 70462
•
Select the ‘Help’ menu and click on ‘Index’.
DCN Next Generation System Installation
A full list of subjects covered by the help facility is
given in alphabetical order. For more information on
any subject contained in the index:
•
en | 6
•
An on-screen page with the requested information
will appear.
Click on the required subject in the index.
An on-screen page with the requested information
will appear.
2.2.6 Glossary
To access the glossary:
•
2.2.3 Keyboard
This gives information on which keys on your
keyboard can be used with the software. This
includes using keys to activate menu items, to move
around in dialogue boxes, for short cuts, and to select
options from the main window. To access the
‘Keyboard’ help facility:
•
Select the ‘Help’ menu and click on
‘Keyboard’.
A list of different key types is given. For more
information on any key type contained in the list:
•
2.2.4 Commands
This gives information on all menu options, covering
the ‘File’, ‘Edit’, ‘View’, ‘Settings’ and ‘Help’ menus.
To access the ‘Commands’ help facility:
Select the ‘Help’ menu and click on
‘Commands’.
A list of menu groups is given. For more information
on any menu group contained in the list:
•
•
2.2.7 Using Help
This gives information on how to use the help facility.
To access the ‘Using Help’ facility:
•
•
Click on the required topic in the list.
A list of options for the selected topic is given. For
more information on any option contained in the list:
•
Click on the required option in the list.
An on-screen page with the requested information
will appear.
Click on the required menu group in the list.
Click on the required option in the list.
2.2.5 Procedures
This gives information on how to use the software.
To access the ‘Procedures’ help facility:
Select the ‘Help’ menu and click on
‘Procedures’.
A list of topics is given. For more information on any
topic contained in the list:
•
Select the ‘Help’ menu and click on ‘Using
Help’.
A list of topics is given. For more information on any
topic contained in the list:
An on-screen page with the requested information
will appear.
•
Click on the required subject in the index.
A window with the requested information will appear.
A list of options in the selected menu group is given.
For more information on any option contained in the
list:
•
Select the ‘Help’ menu and click on
‘Glossary’.
A list of terms used in the help facility is given in
alphabetical order. For more information on any
term contained in the glossary:
Click on the required key type in the list.
An on-screen page with the requested information
will appear.
•
Click on the required option in the list.
Click on the required topic in the list.
A list of options for the selected topic is given. For
more information on any option contained in the list:
Bosch Security Systems B.V. | 2005 January | 9922 141 70462
DCN Next Generation System Installation
2.2.8 About
This provides software release information. To
display the ‘About...’ window:
•
Select the ‘Help’ menu and click on ‘About
System Installation...’.
The following window appears:
Figure 2 The ‘About...’ window
To remove this window:
Click on the ‘OK’ push button.
Bosch Security Systems B.V. | 2005 January | 9922 141 70462
en | 7
DCN Next Generation System Installation
3
Using System Installation
3.1 The system installation main
windows
The System Installation main window is used to
assign seat numbers, and to provide access to the
other dialogue boxes of the System Installation
program.
i
Note
The contribution units cannot be initialized
using System Installation. For details of
initialization, please refer to the DCN Next
Generation Installation and User Instructions.
en | 8
The full list of menu options is as follows:
File
Settings
New…
Channel
Assignment…
System
Config!
Download
Font!
Open…
Help
Index…
Keyboard
Options…
Save
Commands
Save As…
Channel
Tests…
Procedures
Delete…
Glossary
Print…
Using Help
Exit
About…
3.2 Assignment seat numbers
From the main window of System Installation you
can assign seat numbers to delegate and chairman
units. The System Installation software checks for the
physical presence of such units, and compiles a list of
all units present. The number of units without seat
numbers will be displayed in front of the text ‘Unit(s)
without Seat Numbers’. If you are working with a
new installation file, then all units will be without seat
numbers.
i
Note
It is also possible to manually assign and
change contribution unit seat numbers by
means of the microphone button on the units.
Figure 3 The System Installation main window.
In the title bar at the top of this window, the
installation file name is displayed. If an installation
file was selected from the main menu of the Startup
program, this file will be opened and the name of this
file will appear in the title bar. If no file was specified
in Startup, only the word ‘Installation’ will appear in
the title bar, and no file will be open.
The main window contains the following elements:
•
‘Install Mode’ push button and text
•
‘Unit(s) without seat numbers’ text and number
•
‘Select Unit’ push button
•
‘Seat’ text box
•
‘Delete’ and ‘Insert’ push buttons
•
List box of installed seats
The menu bar
All menu options referred to in this user manual are
contained within the menu bar, located underneath
the title bar at the top of the main window. Access to
drop-down menus is gained by clicking on the menu
title, displayed in the menu bar.
The number of units without seat numbers is
automatically updated under the following conditions:
•
When the seat list is reset.
•
When the ‘Insert’ push button is pressed.
•
When the number of delegate or chairman units
physically connected to the system is altered.
Seat numbers can be assigned to units with or
without existing numbers. Seat numbers are always
assigned from install mode.
i
Caution
If seat numbers are being assigned during a
conference, all active modules - except System
Installation and Delegate Database - will stop
functioning, and no new modules may be
started from the Startup main menu.
3.2.1 Accessing install mode
The main window has two possible states:
•
If the program is in install mode, the push button
beneath the ‘Install Mode’ text will say ‘Stop’.
While in this mode all conferencing activities are
suspended. You can select units without seat
Bosch Security Systems B.V. | 2005 January | 9922 141 70462
DCN Next Generation System Installation
numbers and insert them into the ‘Installed’ list,
and remove seat numbers from the ‘Installed’ list.
You can also carry our channel assignments, and
access the ‘System Configuration’ window and
‘Help’ menu. Clicking on the ‘Stop’ push button
restarts conferencing activities, offers the option
of saving changes to the current installation file,
and causes the program to exit install mode.
If the program is not in install mode, the push
button beneath the ‘Install Mode’ text will say
‘Start’. You can create, retrieve, save, delete and
print installation files, and access the ‘System
Configuration’ window and ‘Help’ menu. You can
also enable the ‘Download Font!’ function.
•
Assigning seat numbers can only be carried out in
install mode. If you are not already in install mode:
•
Click on the ‘Start’ push button.
The following dialogue box appears:
en | 9
Figure 5 The ‘Reset Seat Numbers’ dialogue box.
To reset the ‘Installed’ list:
•
Click on the ‘Yes’ push button.
The seat numbers assigned to every unit on the list
will be removed, and the ‘Installed’ list will be empty.
The ‘Select Unit’ push button is enabled. The
‘Number of Unit(s) without seat numbers’ will be
updated.
If you do not want to reset the ‘Installed’ list:
•
Click on the ‘No’ push button. Installation
will continue.
When you exit the ‘Reset Seat Numbers’ dialogue box
you will be in install mode, and can therefore
proceed with assigning seat numbers.
Assigning seat numbers to numberless units
To assign seat numbers to all numberless units in the
hall you do not have to specify which unit you wish
to a assign a seat number to.
Figure 4 The ‘Warning’ dialogue box.
•
•
i
Click on the ‘Continue’ push button to
proceed.
•
i
Click on the ‘Cancel’ push button if you do
not wish to enter install mode.
Click on the ‘Select Unit’ push button.
Note
The select unit button is only enabled when
there are still units connected to the system
without seat numbers, or when a selection has
been made in the ‘Installed’ list box.
Note
Clicking on the ‘Cancel’ push button closes
the dialogue box without carrying out any
instructions specified in that dialogue box. This
applies to all dialogue boxes in System
Installation.
Resetting the ‘Installed’ list
If you click on the ‘Continue’ push button and there
are already units with seat numbers, the ‘Reset Seat
Numbers’ dialogue box appears. This allows you to
reset the ‘Installed’ list. Doing so removes all seat
numbers assigned to units, so all seat numbers will
have to be re-assigned.
Figure 6 The ‘Select Unit’ button and ‘Seat’ text box.
The program selects a unit in the hall without a seat
number. The LEDs and microphone of the selected
unit become active.
Bosch Security Systems B.V. | 2005 January | 9922 141 70462
DCN Next Generation System Installation
i
Note
en | 10
i
Tip
This selection is based on the installation code
of the units. As this code is not visible, the
selection may appear random.
In the ‘Seat’ text box below the ‘Select Unit’ push
button, a number will appear. This number consists
of four alphanumeric characters (numbers or letters).
This is the next available free seat number.
i
This button is only enabled when there is a seat
number to insert.
The system performs two checks on the new seat
number:
Validity. The seat number must consist of four
alphanumeric characters. If not, the following
message appears:
‘Invalid seat number’
•
Note
If you are using a new installation file this
number will always be ‘0001’.
i
Tip
You can also select a unit to receive a seat
number without using the ‘Select Unit’ push
button. This is done from the conference hall
itself, by pressing the microphone button on
the numberless unit.
Under normal conditions there is no need to change
the system-proposed seat number. It is, however,
possible to do so:
Changing newly-assigned seat numbers
This option allows you to change the seat number
proposed by the system:
•
Type the desired seat number over the
existing one.
•
Click on the arrow-shaped ‘Insert’ button.
i
Note
You can use the up and down arrows to the
right of the ‘Seat’ text box to scroll through the
available seat numbers.
i
Note
This number must be both valid and unique,
otherwise you will not be able to insert the seat
number into the ‘Installed’ list.
Inserting new seat numbers
Once the required seat number has been specified,
you must insert it into the ‘Installed’ list:
•
Click on the arrow-shaped ‘Insert’ push
button.
Click on the ‘OK’ push button. The message
disappears. Highlight the invalid seat number
by dragging the cursor across it, and then
type in a new seat number.
Uniqueness. If the seat number already exists, the
following message appears:
‘The seat number entered is already assigned
to another unit. Do you want to replace the
seat number?’
•
Click on the ‘Yes’ push button to replace the
seat number.
The message disappears. When you next select a unit,
the seat number you wish to replace will be removed
from the ‘Installed’ list and will appear in the ‘Seat’
box. Clicking on ‘Insert’ assigns this seat number to a
new unit.
•
Click on the ‘No’ push button to continue
without replacing the seat number.
The duplicate seat number in the ‘Seat’ box is
highlighted, and can be altered.
If the new seat number is both valid and unique, then
it will be inserted into the list box in the appropriate
place (all items in the list box are displayed in
numerical order, from 0001 to ZZZZ). The ‘Insert’
push button will be disabled.
Deleting an item on the ‘Installed’ list
This option allows you to remove an item from the
‘Installed’ list. Each item on this list is represented by
the four-character alphanumeric seat number
assigned to a unit. Deleting an item on this list
removes the seat number assigned to that unit. To do
so:
•
Click on the item in the list you wish to
delete.
•
Click on the ‘Delete’ push button.
The item will be deleted, the unit seat number
removed, and the ‘Number of Unit(s) without seat
numbers’ increased by one.
Bosch Security Systems B.V. | 2005 January | 9922 141 70462
DCN Next Generation System Installation
Changing the seat numbers of already-assigned
units
To do so:
•
•
i
In the ‘Installed’ list box, click on the name
of the unit whose number you wish to
change.
en | 11
i
Channel assignments can only be carried out
from install mode.
To access the channel assignments window (from
install mode):
Click on the ‘Select Unit’ push button.
Tip
Note
•
Select the ‘Settings’ menu and click on
‘Channel Assignments...’.
The following dialogue box appears:
You can also select a unit for seat number
changing without using the ‘Select Unit’ push
button. This is done from the conference hall
itself, by pressing the microphone button on
the appropriate unit.
In the ‘Seat’ text box, the seat number of the selected
unit will appear. To edit this number:
•
Type the new seat number over the old one.
•
Click on the arrow-shaped ‘Insert’ button.
If you have completed seat number assignments and
do not wish to configure audio channels:
•
Click on the ‘Stop’ button.
If you have made changes to the current installation
file, a warning message with the following text is
displayed:
‘Changes have been made to <filename>.
Do you want to save?’
•
Click on the ‘Yes’ push button to save the
changes to the current installation file before
exiting install mode.
•
Click on the ‘No’ push button to exit install
mode without saving changes to the current
installation file.
•
Click on the ‘Cancel’ push button to remain
in install mode.
3.3 Configuring channels and external
contact
3.3.1 Channel assignment
The System Installation program also allows you to
assign functions to the audio channels in the system.
There are a total of 32 audio channels (numbered 031), with the first channel always reserved for floor.
These channels can be divided up.
Figure 7 The ‘Channel Assignments’ dialogue box.
Channel assignments are carried out from this
window.
The breakdown of channels is as follows:
•
Channel 0 is permanently assigned to floor.
•
Channels 1 to 22 can be assigned to
interpretation.
•
Channels 23 to 26 can be assigned to intercom or
interpretation.
•
Channels 29 can be assigned to delegate
loudspeakers or interpretation.
•
Channel 30 can be assigned to intercom or
interpretation.
•
Channel 31 can be assigned to ring and busy
tones and interpretation.
Channels are assigned by moving the slider control
on the right of each scroll bar. Channel assignments
are mutually dependant and should be carried out
from left to right.
To assign channels:
Bosch Security Systems B.V. | 2005 January | 9922 141 70462
DCN Next Generation System Installation
•
Drag the ‘Interpret’ slider control to the
required position.
•
Repeat for ‘Intercom’.
The text occupying the lines assigned to
interpretations will change to ‘Interpret’.
Once all channel assignments have been carried out:
•
Click on the ‘OK’ push button.
The program returns to the main window. Any
changes made to channel assignments will only be
saved when you exit install mode (by clicking on the
‘Stop’ push button).
3.3.2 External Contact
In system installation the function of the external
contact of the Concentus and the DDI can be defined.
This contact is the same contact as used for the
intercom handset. Refer to the User and Installation
manual how to connect the external contact.
i
Note
en | 12
Fraud
All delegates have to press both the present key at
the delegate unit and simultaneously the fraud switch
before actually casting a vote. Only delegates that
pressed both keys simultaneously will count.
The function of fraud is that one delegate needs both
hands to cast a vote and therefore cannot vote
simultaneously at two delegate units.
3.3.3 Testing channels
This option allows you to send a test tone to one or
more channels.
i
Testing channels is not possible in install
mode.
i
•
Note
To test channels, no other application module
should be open.
To do so:
•
The external contact can only be setup from
install mode.
To setup the external contact functionality:
Note
Select the ‘Settings’ menu and click on
‘Channel Tests...’.
The following dialogue box will be displayed:
Select the ‘Settings’ menu and click on
‘Option...’.
The following window appears:
Figure 8 External contact Dialog
No Function
The external contact has no function
Present
The external contact replaces the present key of the
delegate unit. For example a fingerprint reader can
than be connected to the external contact to register
present.
All delegates have to activate the external contact
before actually casing a vote. Only delegates that
activated the external contact will count.
Figure 9 The ‘Channel Tests’ dialogue box.
Bosch Security Systems B.V. | 2005 January | 9922 141 70462
DCN Next Generation System Installation
en | 13
different types of units are:
Delegate Unit
•
Delegate Unit with LCD
•
Chairman Unit
•
DDI Dual Delegate Unit
•
DDI Single Delegate Unit
•
DDI Chairman Unit
•
Ambient Microphone
•
Entrance Unit
•
Exit Unit
•
Interpreter desk
•
Voting unit
•
Data Distribution Board
•
Audio Expander
•
Transmitter 4 channels
•
Transmitter 8 channels
•
Transmitter 16 channels
•
Transmitter 32 channels
•
i
Note
Channels assigned to intercom cannot be
tested, are therefore not active in the ‘Channel
Tests’ dialogue box. The numbers and check
boxes of these channels are grayed.
There is a box containing 32 check boxes, one for
each channel. To specify which channels have to
receive a test tone:
•
Click on the box(es) of the channel(s) to
receive a test tone.
A √will appear in each selected box, indicating that
channel is to be tested.
Once all channels have been selected:
•
Click on the ‘On’ radio button, situated
under the text ‘Generator’.
A test tone is sent to all selected channels. To stop
the test tone:
•
Click on the ‘Off’ radio button, situated
under the text ‘Generator’.
To save the settings in this dialogue box:
•
Click on the ‘OK’ command button.
3.4 Accessing System Configuration
information
This function provides you with a list of the number
and type of every unit connected to the Central
Control Unit (CCU). To access the list:
•
Select the ‘System Config!’ option from the
main menu bar.
The following dialogue box appears:
If any of these units are not present in the system
they will not be included in the list.
3.5 Downloading font sets
The ‘Download Font!’ option downloads font sets
used by the Windows operating system on the
control PC to correctly display texts on the LCD
screens of contribution units that have a graphic
display. This is only necessary for languages that do
not use the standard Western European and U.S.
alphabet. It must be done once for new systems.
Contribution units connected afterwards will need a
new download when not already equipped with the
new font set. You will be asked to download
immediately or later. A new font download is also
required if the font set of the control PC is changed.
To download the PC font set:
•
Select the ‘Download Font!’ menu bar option.
The following warning message appears:
‘All conference activities will be stopped and
reset when downloading is started’
•
Click on ‘Continue’ to download fonts.
Downloading may take several minutes for large font
sets such as Chinese.
3.6 Working with installation files
If you wish to use an existing installation file or open
a new one, the ‘File’ menu includes commands for
doing so.
Figure 10 The ‘System Configuration’ dialogue box.
The dialogue box contains a scrollable list of all units
connected to the system. Each unit is represented by
a number and a description of the type of unit. The
i
Bosch Security Systems B.V. | 2005 January | 9922 141 70462
Note
Only the ‘Exit’ option in the ‘File’ menu is
active when the system is in install mode.
DCN Next Generation System Installation
en | 14
The ‘File’ menu has commands for:
•
Opening a new installation file
•
Opening an existing installation file
•
Saving an installation file under its current name
•
Saving an installation file under a different name
•
Deleting an installation file
•
Printing
•
Exiting the System Installation program
i
Note
Exiting the System Installation program is
covered in ‘Exiting System Installation’ in
paragraph 3.8. Printing is covered in paragraph
3.7.
Creating a new installation file
To create a new installation file:
•
Select the ‘File’ menu and click on ‘New...’.
The following dialogue box appears:
Figure 11 The ‘New’ dialogue box
This dialogue box contains a text box for entering
the file name. When the ‘New’ dialogue box opens,
there is a text insertion point in the text box.
You can type a name up to 12 characters.
•
Type the desired installation file name in the
text box.
•
Click on the ‘OK’ push button.
Figure 12 The ‘Open’ dialogue box.
This dialogue box contains a list box for selecting the
installation file name. The name of the installation
file currently open is also displayed. When the ‘Open’
dialogue box opens, a list box appears with all
installation files currently available. If the list contains
more names than can be displayed, a scroll bar is
provided. To open an installation file:
•
Click on the ‘OK’ push button.
•
Select the ‘File’ menu and click on ‘Save’.
The current installation file will be saved.
Saving an installation file under a new name
This allows you to save the current installation file
under a different name. By doing so, the original file
remains unaltered and the modified file is saved
under the new name. To do so:
Click on the ‘OK’ push button. The dialogue
box returns and a valid name can be typed
in.
Opening an existing installation file
To open an existing installation file:
•
Click on the name in the list.
Saving an installation file
This allows you to save the current installation file.
To do so:
If a valid file name has been typed in, a new
installation file opens, whose name appears in the bar
at the top of the window. If you have typed in a file
name that already exists, a warning message with the
following text is displayed:
‘A file already exists with this name’
•
•
Select the ‘File’ menu and click on ‘Open...’.
The following dialogue box appears:
Bosch Security Systems B.V. | 2005 January | 9922 141 70462
•
Select the ‘File’ menu and click on ‘Save
As...’.
DCN Next Generation System Installation
The following dialogue box appears:
en | 15
The following dialogue box appears:
Figure 13 The ‘Save As’ dialogue box
This dialogue box contains a text line giving the
current name of the file and a text box for entering
the installation file name. When the ‘Save As’
dialogue box opens, a text insertion point is already
in the text box and you can type a name up to 12
characters long.
•
Type the new file name in the text box.
•
Click on the ‘OK’ push button.
If a valid file name has been typed in, it appears in
the title bar at the top of the window. If you have
typed an invalid filename (illegal characters), a
warning message with the following text is displayed:
‘Invalid filename’
•
Click on the ‘OK’ push button.
The dialogue box returns and a valid name can be
typed in.
If you have typed a filename that already exists in, a
warning message with the following text is displayed:
‘A file already exists with this name’
•
Click on the ‘OK’ push button.
Figure 14 The ‘Delete’ dialogue box.
This dialogue box contains a list box for selecting the
installation file to be deleted. If the list contains more
names than can be displayed, a scroll bar is provided.
To delete an installation file:
•
Click on the name in the list.
•
Click on the ‘Delete’ push button.
Another dialogue box will appear, with the text:
‘Are you sure you want to delete file
<filename>’
If you still want to continue:
•
The file is deleted and you return to the main
window.
i
Note
You cannot delete the currently active
installation file.
The dialogue box returns and a valid name can be
typed in.
Deleting an installation file
If you wish to delete a redundant installation file:
•
Select the ‘File’ menu and click on ‘Delete...’.
Click on the ‘OK’ push button.
3.7 Printing
It is possible to print a hard copy of the current
installation file. You can also specify certain
parameters relating to the printing of the dialogue
boxes.
i
Note
Printing is only possible when the system is not
in install mode.
To do so:
•
Bosch Security Systems B.V. | 2005 January | 9922 141 70462
Select the ‘File’ menu and click on ‘Print...’.
DCN Next Generation System Installation
The following dialogue box appears:
en | 16
3.8 Exiting system installation
Temporarily exiting System Installation
It is possible to temporarily leave System Installation
without closing it down completely. To do so:
•
Click on the minimize button situated at the
top right of the application window.
The System Installation program will become
iconized in the Windows taskbar. To re-enter System
Installation:
•
Figure 15 The ‘Print’ dialogue box.
This dialogue box contains check boxes for printing
seat numbers and/or channel assignments and a field
for entering the number of copies required.
To print all seat numbers:
•
Click on the ‘Seat Numbers’ check box.
A √ will appear in the box, indicating this function is
enabled.
To print all channel assignments:
•
Permanently exiting System Installation
If you wish to exit System Installation completely:
•
Note
If neither of the above options are selected, the
information printed consists of the installation file
name and the system configuration data.
To define the number of copies:
•
i
Click on the ‘Yes’ push button to save the
changed installation file and exit the program.
•
Click on the ‘No’ push button to exit without
saving the changed installation file.
•
Click on the ‘Cancel’ push button to return to
the main window without exiting.
You can also exit the System Installation program by
clicking on the ‘close’ button in the far top right
corner of the window.
i
Select the ‘Number of Copies’ field and type
in the required number.
Note
The up and down arrow buttons on the righthand side of this field can be used to scroll to
the required number. The maximum number of
copies that can be printed is nine.
When you have specified all print parameters:
•
•
Click on the ‘Channel Assignment’ check box.
These functions are not mutually exclusive, so it
is possible to specify both ‘Seat Numbers’ and
‘Channel Assignments.’
Select the ‘File’ menu and click on ‘Exit’.
If you have requested to exit before saving an
installation file that has changed, a warning message
with the following text is displayed:
‘Changes have been made to <filename>.
Do you want to save?’
A √ will appear in the box, indicating this function is
enabled.
i
Click on the System Installation module in
the taskbar.
Click on the ‘Print’ push button.
The selected information will be printed.
Bosch Security Systems B.V. | 2005 January | 9922 141 70462
Note
By closing the Startup program, all applications
including System Installation will close.
DCN Next Generation System Installation
Bosch Security Systems B.V. | 2005 January | 9922 141 70462
en | 17
DCN Next Generation System Installation
Bosch Security Systems B.V. | 2005 January | 9922 141 70462
en | 18
For more information please visit www.boschsecuritysystems.com
© 2005 Bosch Security Systems B.V.
Data subject to change without notice
January 2005 | 9922 141 70462