1
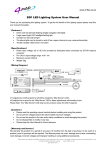
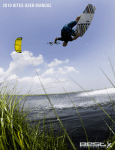
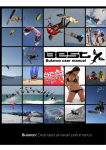
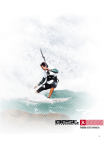
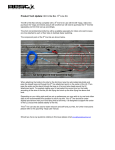
1
BEST KITEBOARDING
USER MANUAL
Thank you for purchasing a Best kite. Please read this manual carefully and in its entirety before using
your new Best kite.
WARNING
Kiteboarding/kitesurfing/snowkiting are extreme sports. They have numerous inherent risks and dangers,
and pose substantial risk of cuts, scrapes, bruises, broken bones, loss of limbs, loss of vision, paralysis,
and other serious, permanent and disabling injuries and death to the rider and others. Some of the
sources of these risks include but are not limited to:
•
•
•
•
•
•
•
•
Being lifted by the kite and then dropped or slammed into the ground, snow, trees, rocks,
buildings, piers, jetties and/or other structures or surfaces.
Being dropped or slammed into other people and/or property.
Contact with kite lines under tension, and/or watercraft.
Drowning.
Underwater conditions and/or objects such as sharp shells, broken glass, sand bars, shoals,
reefs, oyster beds, and/or concrete.
Contact with sea life such as sting rays, sharks, sea turtles, jelly fish, etc.
Weather conditions and/or changes in weather conditions such as increasing or decreasing wind,
waves, updrafts, lightning and/or water spouts.
Equipment performance. Kiteboarding is a new sport. Kiteboarding equipment and safety gear
are NOT 100% reliable. Safety designs and features are often new and unproven. Kites may
behave unfavorably and unpredictably. Lines can twist, tangle, or break, resulting in serious injury
and/or loss of control of the kite.
When using this product, you are responsible for your own safety and the safety of others around you.
Never use this product as a flying device. Never touch flying lines when the kite is in use.
RELEASE OF LIABILITY AND ASSUMPTION OF RISK
DO NOT USE THIS PRODUCT UNLESS YOU AGREE WITH THE
FOLLOWING TERMS AND CONDITIONS:
Before using this product, the purchaser/user has carefully reviewed, understood and agrees to comply
with the terms of this User Manual. Use of this product and any of its components involves certain
inherent risks, dangers and hazards, which can result in serious personal injury or death. The
purchaser/user of this product understands that the seller is not responsible for any damage to property
or injury caused by negligent operation of this product by the purchaser/user, and the purchaser/user
releases the seller from all such liability. In the event of your death or incapacity, this Agreement shall be
effective and binding upon your heirs, next of kin, executors, administrators, assigns and representatives.
The purchaser/user of this product expressly assumes the risk of any and all bodily injury, death and/or
liability which may result from the purchaser or user’s participation in kiteboarding. The purchaser/user
agrees to hold Ride Best, LLC harmless from any and all liability, and waive and release any and all
claims or potential claims against Ride Best, LLC and any of its respective agents, affiliates, subsidiaries,
employees, instructors, officers, directors, shareholders, suppliers and manufacturers in the event of any
such bodily injury or death which may result from the purchase and/or use of Ride Best LLC (d/b/a Best
Kiteboarding, LLC) products.
© 2008 RIDE BEST, LLC, d/b/a BEST KITEBOARDING, LLC
2
Waroo: Freeride SLE Kite
Introduction:
Best Kiteboarding would like to thank you for choosing the new 2009 Waroo. We guarantee this and all of
our products to be free from defects in materials and workmanship. All Best products are covered by our
Fair and Reasonable Timeframe warranty, which offers extended coverage beyond that provided by other
brands.
Best Kiteboarding has a dedicated, year-round R&D team comprised of our world-class technical staff
and pro-team riders. We never stop testing and we never stop improving our products.
The standard against which all other free-ride kites are judged, the ‘09 Waroo doesn’t just blur the lines
between new school and old school, wakestyle and freestyle: it erases them.
The Waroo’s huge depower, fast turning and easy handling help riders of all skill levels to progress faster,
further, and simply, have more fun kiteboarding.
The ‘09 Waroo comes with a revised VP2 bridle for perfect stability and ABC Custom Tuning for
confidence-inspiring versatility and ease of use. Our legendary Surf Tough build quality and original
Canopy Framing ensure your Waroo can withstand any abuse you throw at it.
For freeriding, the Waroo continues to offer the perfect balance of ease of use and accessible
performance. If your riding style includes a little bit of everything, then the Waroo is the perfect kite for
the way you ride.
Waroo: Do anything, Ride everywhere.
3
Waroo: Kite package
Your Waroo kite is delivered complete with the following items:
• Over–the-shoulder carry bag
• High-volume, dual-action pump with alloy shaft
• Bladder repair kit
• 2 replacement TE battens
• This user manual on CD
Waroo: Performance features and kite set up
When unpacking your Waroo for the first time, we recommend that you take some time to familiarize
yourself with the product and design features that make your kite unique. This will help you set up the kite
correctly the first time, ensuring you gain the maximum potential from its high-performance design.
VP2 Front Bridle Pulley System:
Best Kiteboarding's VP2 bridle system provides a 2:1 depower / bar travel ratio. This
allows the Waroo to provide full depower from reduced bar travel. Unlike older SLE
designs that rely on bar mounted pulleys there is no increased bar pressure associated
with the VP2 design.
VP2 is unique in that in addition to giving twice as much depower it also optimizes load
distribution between the wingtips and the center of the LE for a more rigid and stable kite, ensuring that
AOA changes have no effect on the stability of the kite.
The upper canopy section of the VP2 bridle highlighted in
RED left includes an additional pulley that improves the
relaunchability of the Waroo by allowing the kite to slide
under its bridle during relaunch.
When unpacking your kite for the first time, correctly lay out
the front bridle as shown in the image on the left. For
maximum performance and correct depower function, it is
important that the front bridle is free from twists and knots.
When correctly laid out, the VP2 section of your front bridle
should look exactly like the image on the left. Any twists in
the bridle can be removed by counter-twisting the lines where
they connect to the front flying lines. See last page for more details.
ABC Custom Tune Options:
ABC custom tune gives you the control to rig your kite to suit your personal riding style
preference and wind conditions.
With riders of all skill levels choosing the Waroo as their go-to freeride kite, we have
increased the range of adjustability provided by the ABC Custom Tune feature this
season at both ends of the scale.
Canopy Framing Technology:
Crashing your kite is a fact of life. The Waroo is the only freeride kite designed with the
ultimate reinforcement system, Canopy Framing Technology. The entire perimeter of
each canopy panel on the Waroo is supported with a continuously-curved reinforcement
4
zone. During a crash, this isolates the canopy from impact loads, delivering durability based on sound
engineering.
CFT is a unique approach to the tasks of distributing shock loads and effective transfer of TE tension
across the canopy of your kite. With CFT, a lightweight but incredibly strong ‘buffer zone’ is stitched into
the canopy sections and between the airframe and canopy. Due to the unique continuous curved shape
of CFT, impact energy is harmlessly circulated around the kite until completely dissipated.
Load Flex LE Seam:
The 09 Waroo LE seam is triple stitched with a full length webbing tape closure and
internally shielded by mark cloth tape.
The Load Flex seam design provides additional support to the leading edge, helping to
provide maximum strength and stability to your kite.
3D Kevlar Airframe:
All LE strut joints are laser cut, shaped and Kevlar tape reinforced. There is no better
way to connect the leading edge to the struts. Our construction yields the strongest and
lightest airframe possible which translates into added performance and maximum
durability.
Dacron Wingtip Panels:
Multi-layer Dacron wingtip panels distribute turning forces for unmatched responsiveness and enable selflaunching without risk of damage. Increased surface area at the wingtips gives greater turning agility,
while our curved wingtip profile improves aerodynamics and eliminates vortex-induced drag.
Kevlar Wingtip and LE Patches:
However and wherever you ride, your kite will come into contact with the ground at some
point. Our Kevlar reinforced LE and wingtip patches give maximum abrasion resistance
to protect your kite, even when self-launching in less than ideal situations.
Woven Spectra Serviceable Pulley Lines:
High strength wear-resistant 4mm braided abrasion-resistant pulley lines with precision Ronstan pulleys
provide friction-free depower action. Combined with our new VP2 bridle design, they deliver unbelievable
depower and wind range.
TE Battens:
Precision-tolerance fibreglass battens support the trailing edge canopy section and
smoothes the airflow over the trailing edge. Improved aerodynamics ensure faster
turning and silent maneuvering, while our smooth pocketed mark-cloth construction
delivers outrageous durability.
CFT Reinforced Trailing Edge:
Like all kites in our ‘08 range, the Waroo benefits from our exclusive CFT reinforced
trailing edge, which provides razor-sharp turning response and unmatched durability
compared to all other trailing edge construction techniques.
5
Surf-Tough Build Quality:
Our unique Canopy Framing Technology, LE Load Flex seam, fully taped canopy and 3D Kevlar Airframe
come together to deliver the most proven and trusted kite construction package in the industry. A kite
purchase is a considerable investment; with the legendary Best Kiteboarding build quality and warranty,
buying a Waroo will be the smartest investment you will make this year.
Waroo Performance Characteristics:
Setup Options and Pre-flight checks:
The Waroo is shipped with all bridle lines secured to the center strut valve-retaining Velcro. When you
receive your kite, unroll your Waroo and remove the foam valve protectors from the strut and LE bladders.
Next, detach the bridle lines from their traveling position on the center strut and separate the bridles into
left and right.
Front Lines: The front attachments are comprised of a leading edge bridle that terminates on both sides
with a closed loop (larks head) and replaceable center section that the VP2 pulleys travel on. Should
advanced signs of wear show on either the pulleys or bridle after extended use, contact your nearest
dealer for replacement parts.
When unpacking your kite for the first time, correctly lay out the front bridle as shown below. For
maximum performance and correct depower function, it is important that the front bridle is free from twists
and knots.
When correctly laid out, the VP2 section of your front bridle should look exactly as the image on the
bottom right. Any twists in the bridle can be removed by counter-twisting the lines where they connect to
the front flying lines. Any twists should be removed before attaching the flying lines.
Only attach your front flying lines to the knotted pigtail attached to the bottom pulley.
6
All pulleys run on abrasion-resistant woven spectra insert lines. This line is chosen specifically for its
flexibility and abrasion resistance. Due to the use of moving parts, it is recommended that you check the
smooth operation of the pulleys before each flight. The Spectra insert lines will need replacing from time
to time according to how often you ride and in what conditions. We recommend that you consider
changing your pulley insert lines once a season.
Any damage on the main bridle should be replaced immediately.
Rear Line Rigging: A-B-C Custom Tune
The rear flying-line attachments on the Waroo are comprised of two lines that join to form a short ‘V’
shaped bridle. The rear flying lines attach beneath this ‘V’ section to one of the four supplied knots. We
recommend that you start on the bottom knot and work your way up until the find the knot which best suits
your riding style.
The wingtips of the Waroo have three attachment points, A-B-C. Moving the rear bridle between the A-BC attachment points allows you to vary the turning speed, turning circle, depower rate and power delivery
of the kite to suit your preferred riding style. ABC Custom Tune set-up options are detailed below.
A-A: This setting has the tightest and fastest pivot turning style while delivering
the lightest bar pressure. Riders will find this particularly suited to killing the power
when big wave surfing and for extracting the maximum control for big air and huge
hang time.
A-B: This setting gives light bar pressure with a turning
feel midway between traction and pivot turning. Turning
speed remains very fast on this setting. The A-B setting
gives the most precise handling and crisp bar feedback.
We recommend this as the stock setting for any rider new
to the kite.
A-C: This is the mid-position set-up. A-C splits the ‘V’
bridle between the front-most and rear-most attachment
points. A-C offers an excellent combination of turning
speed, depower and bar feedback that is particularly suited to unhooked riding and
for extracting maximum control in high winds. Bar pressure is similar to the Yarga
in this set-up; turning speed remains fast, making this the ideal
freestyle/competition setting.
B-C: (not shown). Recommended for riders who want very heavy bar pressure and
the slowest turning kite; this setting is useful for old school no-whip wakestyle
tricks.
Swapping the rear V lines across the A-B-C connection points increases and
decreases the effective length of the rear lines.
A-A increases the rear line length by one knot. To compensate, attach one knot
closer to the kite.
A-B is the recommended stock setting. No need to use a different knot for this
position.
A-C shortens the rear line length by one knot. To compensate, attach the rear
lines one knot further away from the kite.
7
Pre-flight checks:
The rider should perform a thorough inspection of the kite, each time the kite is set up, and prior to
launching, to ensure that the kite has sustained no damage during use. Any damage should be repaired
by a professional kite or sail loft to ensure continued safety and usability.
It is worthwhile to inspect all flying line attachments, pigtails, pulleys and pulley insert lines before each
flight. Damage to any of these areas may render your kite unsafe to fly.
Self-launching the Waroo:
The Waroo can be self-launched from the beach like any other SLE kite.
Although the Waroo has line deflectors on the strut ends to ensure that flying lines
do not become entangled in the airframe, when self launching, make sure that the
front bridles (highlighted RED) are placed clear of the wingtips of the kite prior to
sanding down the wingtip.
Position your fully inflated kite, with the lines attached, at one edge of the wind
window. Your flying lines should run directly across the wind to your bar, which is
placed at the opposite edge of the wind window.
st
nd
Placing sand on the inside of the kite behind the 1 strut towards the 2 strut helps to keep the kite flat to
the wind until the wingtip has been folded over and secured with more sand. Fold the wingtip over on the
leading edge, and sand down the folded wingtip. Before going back to your bar to launch, wait at the kite
for a while to ensure you have placed enough sand on the kite to hold it down.
Return to your bar, which should be positioned across the wind, on the opposite side of the wind window
from your kite. Hook into the chickenloop, and take a second to check your lines visually one last time,
making sure that the center lines are connected to the front bridles, the outside lines are connected to the
back bridles, and that the front and back lines are not crossed over each other. With the bar firmly in your
grasp and the bar positioned at 50% depower position, pull the top of the bar towards you and step
backwards.
Pulling the bar back towards you and stepping backwards will flick the sand off the wingtip, releasing the
kite and allowing it to self launch. If it is possible to have someone experienced assist in the launch, this is always the
preferred method.
Assisted Landing of the Kite:
When landing your kite with an assistant, simply fly the kite to the edge of the window and down to
ground level slowly. Have your assistant take hold of the kite firmly in the middle of the leading edge.
8
Both you and your assistant should then walk towards each other to remove all tension from the flying
lines. Your assistant can either lay the kite down and sand the upper canopy, or hold the kite until you are
unhooked from the bar and safely able to take over the kite
Self Landing the Waroo: Front line OSR
To land your Waroo using the front-line OSR handles, depower the kite fully using the trim strap, undo the
bypass/handlepass leash carabineer on the chickenloop, then reach up and take hold of one of the front
line OSR handles.
When grabbing a front line OSR handle always ensure that the depower strap swivel is un-spun and that
the front lines are untwisted. With the OSR handle firmly in your hand reach down and unhook from the
kite, dropping the bar.
Once released onto a front-line OSR handle, the kite will fall to the ground in the downwind position.
Secure the grab handle to a solid object and work your way down the flying line to secure the kite.
Self Landing the Waroo: Rear line OSR
We always recommend that riders use the front line handles to land their kite if unassisted. The rear line handles are
primarily intended as back up safeties should you be unlucky enough to break a front line or be unable to untangle your
front flying lines.
You must detach the bypass/handlepass leash before attempting to land the kite via the rear line OSR
handles. Fly your kite to the side of the window leaving the kite at an angle of about fifteen degrees to the
ground, this equates to the lowest wingtip being about 5m from the ground.
With the kite at the edge of the window and the retaining Velcro on the OSR handle already loosened,
sheet-out, reach up and grab the lower of the two OSR handles. With the webbing loop firmly in your
grasp, unhook while holding onto the webbing handle and proceed to drop the bar. The Waroo will fly
slightly to the edge of the window, and then loop under itself, coming to rest on the beach in the dead
downwind position, facing into the wind with the leading edge facing up.
9
This method is only recommended if you have more than two line-lengths of downwind space and it is impractical to land
your kite using the front line OSR handles.
Water Relaunching the Waroo:
The Waroo has ‘built-in’ relaunch capability due to the curved shape of the wingtips and the geometry of
the VP2 bridle. With the kite’s leading edge down in the water, simply depower the kite via the trim strap,
then pull and hold either of the back lines to start the relaunch process.
The kite will taxi across the wind window, eventually rotate upwards into an upright position, and then
await relaunch, which is initiated by pulling back on the side of the bar that corresponds to the uppermost
wingtip. As the kite is relaunching off the water, be careful not to pull all the way in on the bar, which
could oversheet the kite and cause it to fall backwards into the water. Instead, as the kite begins to lift
from the water, push out on the bar a little and avoid oversheeting.
In lighter winds, it may be beneficial to use your board to create extra resistance to the pull of the kite, to
enable faster relaunch, and to speed the kite taking an upright position at the edge of the wind window.
Once in this position, simply adjust the bar and steer the kite, launching it upwards.
Hot launching:
With the kite resting on its trailing edge in the water, with its weight partly supported by the struts, it is
possible that the kite may accidentally ‘hot launch’ at some point downwind of you in the power zone. As
soon as the kite powers up, it is imperative that you push out on the bar and sheet out the kite, for frontline load only (otherwise you’ll be taken for a ride). The rear lines must not have any tension until the kite
is safely in the neutral zone, which, in this case would be overhead at the zenith.
Reverse launching:
When the kite is directly downwind of you, with LE resting on the (with the wingtips closer to you and the
c-shaped center of the kite farthest away from you), you can create a reverse draft using the rear lines on
the trailing edge, which causes the kite to hover up backwards. If both rear lines are pulled with even
tension, the kite will hover up, evenly balanced. If one rear line is released a few inches, the kite will spin
around in the opposite direction and start to redirect. In this case be prepared to flip the bar and sheet-out
the kite to reduce powering up the kite in a downwind position, and crashing it back into the water.
Both of these are advanced techniques and only recommended for experienced riders.
Wind Ranges:
The suggested wind range chart is to be used as a guide. Always
know your limits, and when in doubt, rig a smaller kite, if possible.
Wind speeds may vary according to where they are taken. Always
take a wind reading more than 100m past the nearest upwind object
to get an accurate maximum reading. If flying in the mountains,
10
always take a wind reading towards the highest point of land as wind accelerates up hill.
The wind ranges given overleaf are based on a 75kg rider and kitesurfing usage. For snowkiting and
landboarding the wind ranges will vary according to snow and surface conditions but will be 3-5 knots
lower for bottom end and 4-6 knots lower for top end. The lower wind range for any kite can be increased
by the use of a larger surface area or volume board. To estimate usable wind range for different weights,
assume that an additional 10kg/22lbs will cost you 3 knots of low end and improve your high-end by 3-5
knots. On a practical note, however, please realize that no amount of calculation and known variables
can make up for the fact that you simply need a certain amount of wind to fly a kite, regardless of kite size
in relation to all other factors.
Best Kiteboarding recommend than no rider ever attempts to kite in wind speeds exceeding 35 knots. If you cannot keep
your kite stable at wind speeds approaching the upper stated limits for each size kite, then please do not attempt to
exceed your skill level.
Waroo FAQ:
How should I care for my Waroo?
Inflate and deflate your kite with care. Follow proper inflation techniques and pack your kite when it is
completely deflated and dry. Do not pack wet and leave it for any length of time. Dye transfer may take
place on a kite that is packed away wet, and is not covered under warranty.
Do not leave the kite inflated and sitting in the wind unused for long periods of time, as this accelerates
wear to the canopy cloth. Inspect the kite periodically for small holes or tears and patch when detected to
eliminate costly repairs.
Can I use a bar from other kites on the Waroo?
Yes, however, certain precautions need to be taken into consideration when using other bars. It is best to
seek technical assistance before rigging a ‘non-Best bar’ to the kite.
The Waroo is designed to work perfectly with the 08/09 Best bar. Its extended travel allows for complete
depower of the kite, which is key to the improved safety of the Waroo over a ‘C’ shaped kite.
How hard should I pump my Waroo kite?
We recommend 9-10-PSI for the HP: smaller kites require slightly more inflation +.5 PSI and larger kites
up to .5 PSI less. An under-inflated kite will be problematic through the flight cycle and when re-launching.
Some riders have noted that in adverse wind conditions, inflating the kite slightly above the recommended
PSI has delivered further benefits in improved stability. This is particularly noticeable in the snow where
the cold air temperature may lead to a decrease in internal air pressure over time.
Due to the hugely increased risk of impact damage when flying on land, we recommend that
landboarders and snowkiters do not exceed the recommended inflation pressure of 10 PSI. Do not store
your Waroo with inflated struts inside a vehicle during the summer, as in-car temperatures can rise rapidly
leading to a catastrophic increase in strut pressure. We recommend that when storing the kite for any
period of time, all the valve plugs be removed from the valves. Also, do not leave the sticks on the struts
inside of the valves when storing the kite, as this could rupture the membrane valves.
What safety systems are built into the Waroo?
A Waroo flown with any 08/09 Best Bar has multiple redundant safety systems. First and foremost,
pushing the bar away and forcing it to slide up to the trim strap will depower the kite to its depower limit.
Unhooking the kite and dropping the bar when attached to the bypass leash ring will result in the same
maximum depower state being achieved.
Both rear and front flying lines are equipped with OSR handles on the 08 and 09 Best Bar. These can be
used to completely flag the kite out to a powerless position.
A suitable leash extension could also be clipped to the webbing handles for use on the water. Note: clip
only to the webbing handle; never clip directly into the stainless rings. Always ensure that the
retaining Velcro is unfastened before clipping into webbing handles. Failure to do so may compromise the
function of the safety system.
11
How do I rig my Waroo, and what attachment knots should I use?
The Waroo comes with four knots already tied on the bottom of the rear flying-line attachment ‘V’ bridle.
The Waroo is designed to work best for riders of average weight when the flying lines are attached to the
st
nd
1 or 2 knot from the bottom on the rear bridle and the rear bridle is attached to the kite in the AB
position. (Refer to earlier section on A-B-C set-up).
We recommend that you start with the bottom knot and work your way up until you find the knot that
works best for you.
Heavier riders, and riders looking to gain more power from their kites, may choose to use a knot closer to
the kites. We recommend that you experiment to find your preferred setting.
When attaching for the first time, please use the bottom knot on the bridle. If the kite’s handling and
turning is sluggish, then re-attach to the next knot up. Repeat this procedure until you have found the
perfect knot position for your arm reach and your preferred riding style. Please ensure that you do not
attach the lines too close to the kite and so that it is forced to backstall when you pull the bar in. For
maximum safety and efficiency, have a helper there to help launch and land your kite.
When the kite is trimmed correctly, you should be comfortable enough to steer the kite and still have
enough reach left to depower the kite by pushing the bar away from you. As an additional passive
depower adjustment, the trim strap allows further depowering on the fly.
If you intend on riding unhooked for performing tricks it is important that you trim your kite so it does not
back stall when unhooked. Always use the bottom knot. To check this once you think you have found
your preferred rear knot setting, unhook the chicken loop from your spreader bar and fly the kite
overhead. If the kite sits directly above you without backing down into the window, then you have the
perfect trim. If you find the kites wants to back down towards the beach, you have too much rear line
tension and the kite is oversheeted. To fix this, simply pull down on the depower strap in small increments
until the kite flies happily overhead with the bar unhooked.
Please note that flying unhooked is not recommended unless you are already comfortable with the
increased level of kite control required. Never try to asses the correct trim for unhooking in high winds and
never unhook without using a rated safety leash designed for this purpose.
How do I perform a self-rescue with my Waroo?
Opinions on the best method to self rescue vary. If you believe that you stand a good chance of being
seen with your kite and retrieved either by another kiter or by boat, then you may feel happier keeping
your kite fully inflated. An inflated kite is highly visible on the water and will act as a visual marker for any
potential rescue.
If the wind has switched to an offshore direction, having your kite inflated at this point will only drag you
further out to sea, so is not recommended in this instance that you leave your kite inflated. If you intend to
swim back to shore under your own power, then you need to pack down your kite as follows.
If possible, attach your leash to the webbing of an OSR handle, unhook, and let go of the bar, flagging the
kite onto the leashed line. In order to prevent the kite from accidentally repowering up, you’ll need to
make sure one line remains at least one kite span shorter than the other three lines. Being careful not to
get caught in the other lines, pull yourself to the bar, and wind the one line around the bar (at least the
span of the kite), to lock it off. Continue winding all four lines around the end posts, and when you get to
the end, make a loop in lines, twist the loop and hitch it around the closest bar end, pulling tight to secure.
With the lines wound in and any flying lines secure, release the LE deflate bladder and taking the kite by
the wingtips, roll it to the center, expelling air from the LE as you progress. Be careful that you do not
allow water to seep into the LE. Once the LE is deflated, re-secure the LE valve, secure the kite to your
board with your bar leash, and paddle back in.
How do I pack my Waroo?
For the quickest pack down, open the strut valves and deflate the LE and struts. Fold the kite in half from
wingtip to center and overlay the two halves of the kite. Roll the kite from wingtip to center strut along the
trailing edge, and then gently fold the kite from tip to tail into 3 using a Z shape, rather than rolling into a C
shape, before placing it in the bag. Don't try and fold your TE battens in half…
12
How do I replace worn bridles on my Waroo?
The Waroo front bridle has user-replaceable heavy duty inserts fitted at two points; within the VP2 bridle
section (detailed in grey), and also for the upper floating pulleys (detailed in red). Should these become
worn, simply undo the retaining loops at
either end and fix in place a replacement
set. It is recommended that you replace
both sides, left and right at the same time
even if only one side is showing wear.
Thread the lines through the pulleys
according to the diagram shown and
carefully cinch up the larkshead knots.
After replacing the VP2 bridle lines,
always ensure that you have someone to
assist you in launching the kite. With the
kite held into the wind by your assistant,
check the depower action of the front
bridle by moving the bar up and down.
Do not launch the kite if the depower does not
function correctly
Start by fastening the pulley line around
the front line attachment pigtail (short blue
section) with a larkshead knot. Then thread the line over and through the top VP2 pulley and then back
down through the lower pulley and out to wingtip bridle attachment. Always check the correct fitment of
replacement VP2 lines before flying the kite, and use an assisted launch to enable safe checking of the
depower system the first time you launch after refitting any bridle sections.
To replace the upper floating pulley line, simply un-loop both ends of the line shown in red, thread a new
line through the pulley and cinch up the retaining knots on each end.
Inflation:
Best Kiteboarding kites are shipped with a hand operated pump. We selected these pumps because it is very difficult to
over inflate the kite with a manual pump. Your Waroo should be inflated to between 10-11PSI.
Best Kiteboarding will not be responsible for any damage that occurs due to the use of a pressure hose/compressor when
inflating your kite
Where do I go for extra information on my Waroo?
Your local Best Kiteboarding retailer has been trained in all aspects of the products they sell and can help
you with any queries you may have regarding all Best Kiteboarding products. You may also contact Best
Kiteboarding customer support via our website. For any general questions about using Best Kiteboarding
products, or to chat with other kitesurfers and to find out all the latest info about everything Best
Kiteboarding, visit the website http://www.bestkiteboarding.com or log onto the online user forums at
http://forum.bestkiteboarding.com
Request for additional information and updates to the product manuals should be sent to
[email protected]
13