1
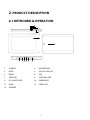
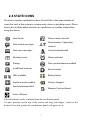
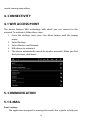
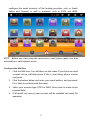
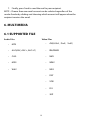
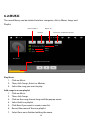
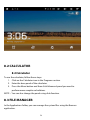
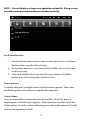
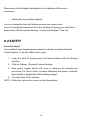
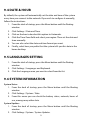
Content
1. PREFACE ..................................................................................................................................... 3
1.1 ACKNOWLEDGMENTS ........................................................................................................ 3
1.2 WARNINGS .............................................................................................................................. 3
2. PRODUCT DESCRIPTION ...................................................................................................... 5
2.1 KEYBOARD & OPERATION ................................................................................................. 5
2.2 ACCESSORIES INCLUDED ON THE PACK ....................................................................... 6
2.3 PREPARATION & USING ...................................................................................................... 6
2.4 STATE ICONS........................................................................................................................... 7
3. QUICK GUIDE............................................................................................................................ 8
3.1 TURN ON & OFF .................................................................................................................... 8
3.2 UNLOCK SCREEN .................................................................................................................. 8
3.3 USING THE TOUCH SCREEN .............................................................................................. 9
3.4 HOME SCREEN.................................................................................................................... 10
3.5 APPLICATION ACCESS ...................................................................................................... 12
3.6 USB CONNECTION ............................................................................................................ 13
3.7 MEMORY CARD .................................................................................................................. 13
3.8 ENTERING TEXT .................................................................................................................. 14
3.9 SECONDARY TOOLS.......................................................................................................... 15
4. CONNECTIVITY ..................................................................................................................... 16
4.1 WIFI ACCESS POINT........................................................................................................... 16
5. COMMUNICATION ............................................................................................................... 16
5.1 E-MAIL ................................................................................................................................... 16
6. MULTIMEDIA.......................................................................................................................... 19
6.1 SUPPORTED FILE ............................................................................................................... 19
6.2 MUSIC .................................................................................................................................... 20
6.3 VIDEO..................................................................................................................................... 21
6.4 HDMI ...................................................................................................................................... 21
6.5 PHOTO GALLERY ............................................................................................................... 21
7. NETWORK ............................................................................................................................... 23
7.1 BROWSER ............................................................................................................................. 23
1
8. OTHER APPLICATIONS........................................................................................................ 25
8.1 ALARM ................................................................................................................................... 25
8.2 CALCULATOR ...................................................................................................................... 26
8.3 FILE MANAGER ................................................................................................................... 26
9. BASIC INFORMATION.......................................................................................................... 28
9.1 SOUND & DISPLAY ............................................................................................................ 28
9.2 SAFETY .................................................................................................................................. 29
9.3 MEMORY CARD .................................................................................................................. 30
9.4 DATE & HOUR ..................................................................................................................... 31
9.5 LANGUAGES SETTING...................................................................................................... 31
9.6 SYSTEM INFORMATION ................................................................................................... 31
10. PROGRAMM INSTALLATION .......................................................................................... 32
10.1 INSTALLATION .................................................................................................................. 32
10.2 UNINSTALL ........................................................................................................................ 32
10.3 UPDATES ............................................................................................................................ 33
11. FAQ ......................................................................................................................................... 33
2
1. PREFACE
1.1 ACKNOWLEDGMENTS
Thank you for choosing our Tablet PC, also known as DIM (internal moving
device), which stands out for being easy to transport that will make you enjoy
your documents, movies, online content, images and touch screen
applications with high-resolution 800x480 px. Fast performance will thrill you
from everyone in a small device.
This manual will introduce you to some of its functions. Moreover, the
packaging contains important information, please keep it.
1.2 WARNINGS
Maintenance
• Please keep the product away from liquids and dust. Do not soak or steam
sources close to the device or charger. On the other hand, do not use the
device or charger if handled with wet hands may cause electric shock or cause
internal wear, the schools could cause system failure.
• Avoid violent shocks of the device on any surface. May cause serious damage
and even cause system failures could cause the battery to fire or even
explosion of the same.
• Do not subject the device to extreme temperatures or radical changes in it.
The life of the bacteria could be drastically curtailed or even damage it can
cause even a small fire or explosion.
• Do not strike, throw, bend or apply extreme forces on the device.
• Do not use unauthorized accessories; otherwise the warranty may void the
warranty. Use only the charger that came with the device.
1.3 SAFETY TIPS
Before you start using the device to read this information and then knowing
the same to their children if they are to use the device.
• Do not use the product under any circumstances while driving any vehicle.
• Do not connect the device where electromagnetic interference is not allowed,
3
such as, for example, hospitals or during takeoff or landing of aircraft. Please
follow the instructions provided by the staff in every situation.
• Do not under any circumstances open the device or its accessories.
• Please keep the device away from high power electromagnetic equipment.
The radiation emanating from them may erase the information stored on the
device.
• Do not use the device where there are flammable or explosive substances.
• Please do not allow children to use this device without adult supervision.
• Respect the privacy of those around you when using this device as well as
their legitimate rights and privacy.
• See and respect the specifications concerning the characteristics of USB,
otherwise it may damage the device or PC.
• Do not use the device in wet environments such as bathrooms and saunas.
The moisture could damage the device.
4
2. PRODUCT DESCRIPTION
2.1 KEYBOARD & OPERATION
2
3
4
5-6
1
13
7
8 9 10 11
12
1
CAMERA
2
MICROPHONE
3
RESET
4
ON/OFF/UNLOCK
5
MENU
6
EXIT
7
USB PORT
8
PORT MINI USB
9
DC ADAPTADOR
10
EARPHONES
11
HDMI
12
CARD SLOT
13
SPEAKER
5
ON
OFF
UNLOCK
-
Press this button briefly to turn on the system.
-
In terms of performance, long press this button to
display the dropdown menu shutdown options.
-
In working order, briefly press the button to lock /
unlock the screen.
MENU
EXIT
-
Press this button to display the menu.
-
Press the button to return to the previous screen or
return to the previous operation.
RESET
-
If the device is behaving abnormally or not
responding, press this button to reset the system.
2.2 ACCESSORIES INCLUDED ON THE PACK
1 x Tablet PC
1 x DC Adaptador
1 x Earphones
1 x USB Cable
1 x Manual
1 x Stylus
2.3 PREPARATION & USING
Fully charge the battery before first use of the product using the charger
provided in the package.
When the indicator turns red, it means that the charge has not yet been
completed while the green indicator confirms.
6
2.4 STATE ICONS
The device contains multiple functions. Proof of this is the large number of
icons that exist in the system to resume work, states, or pending events. Please
review this list here below and note its significance as it will be useful when
using the device.
New Emails
Silence mode activatd
New instant messages
Downloading / Uploading
content
New voice messages
Content downloaded
Pending events
Alarm activated
Playing
Data synchronization enabled
Insufficient memory
Extra Content
WIFI available
Battery Status
Airplane mode enabled
Devices charged
Synchronization failed
Memory Card not found
Active USB port
All notifications can be consulted from the notification panel.
To open, pressure on the top of the screen and drag your finger / stylus to the
bottom. Once this gesture the notifications panel will appear on it.
7
3. QUICK GUIDE
3.1 TURN ON & OFF
TURN ON
While the device off, press 2 seconds the power button. After that, the system
will start on.
Once it is completely system started, the screen lock. Press the Menu button to
unlock the system.
TURN OFF
To turn off the system, follow these steps:
1. Long press the off button until the Shutdown menu.
2. Off menu allows you to choose between 3 modes: silence, Aircraft and Off.
3. Select the Off mode.
3.2 UNLOCK SCREEN
Si no se utiliza el dispositivo durante un breve periodo de tiempo, la pantalla
se apagará automáticamente con el fin de ahorrar energía. Cuando desee
volver a utilizar el sistema, pulse el botón de Encendido para encender la
pantalla de nuevo, en la cual aparecerá la pantalla de bloqueo. Si vuelve a
apretar el botón de Encendido, la pantalla se volverá a apagar.
In the lock screen displays the following information:
8
The same can unlock the system or change the audio preferences, silencing in
system or reversing this action.
To unlock the screen, slide the lock icon up. On the contrary, to change the
audio options, slide the speaker icon down.
3.3 USING THE TOUCH SCREEN
There are many ways to interact with the touch screen to navigate, use
applications and games, search, etc.. with your tablet. Here you can find some of
them:
Click
The "Click" corresponds to the same features you would find on a PC. When
you want to select any item by briefly pressing environment interact over it.
Press
Depending on the duration of the pressure applied on the screen will produce
different results. If you perform a short press will take out the "click". If on the
other hand makes a lasting pressure on the screen, enter in the "Edit", which
may change the position of screen elements, provided that this option is
enabled, since not all interfaces allow editing.
Slide
Slide function is one that occurs when you press the screen and move in any
direction without separating from it.
Hold
Entering in the "Edit" explained above, you can drag the items you want by
pressing and sliding them over to where you want to fit.
Rotate
Turning the device, the screen image rotates with it to suit your needs. The
screen may be repositioned up to 4 different directions.
9
3.4 HOME SCREEN
The home screen is a link to all device functions. You can edit and add
shortcuts to your favorite applications, websites and music among many other
things such as customize the wallpaper.
Multiple Desktop
Sometimes it could be there are lots of multimedia content does not have
enough space in a single home screen. For this reason, the device allows you
to extend the home screen. To create new desktops, click on a blank space,
then slide quickly to extend the desktop to the left or right, having two desks
for each of the sides (2 right and 2 left).
Customizing the Home Screen
Add new widgets
1. Long pressing the desktop area is empty.
2. Then drop down menu appears on the accession of elements.
3. Select one of the options that appear in it depending on what you
10
want to add to the menu.
Change the wallpaper
1. Following the same steps described in the previous chapter, choose
the Wallpaper option in the menu.
2. Select an image or photo of your photo album. This image will appear
as wallpaper on your desktop to start.
Create folders
1. Following the same steps described in the previous chapter, choose
Folder from the menu.
2. In the Folders menu you can create a folder to save your files using the
drag or create a specific folder to recently used documents.
3. To rename a folder, click on it briefly. Will then open the folder. Once
inside the same press at length about the name. The editor opens the
folder name to enter the name that you find convenient.
NOTE .- You can also create folders by pressing the Menu button. Then a
window appears on the bottom of the screen. Click Add and then select the
Folder option.
Remove folders
11
To delete a folder, press long on the folder you want to delete until it appears
in the lower right corner a recycle bin. Finally, drag the folder to the icon and
press stop.
3.5 APPLICATION ACCESS
1. Slide the screen to the left to display the application menu.
2. If you want to return to the main screen slide the screen to the
right or press the Exit button.
12
3.6 USB CONNECTION
Configure the built-in storage memory
Before transferring data, you must configure the storage mode of your device.
1. Use the included USB cable in the package to connect the device to
your PC. Note that the notifications panel warning icon appears USB
connection.
2. Open the Notifications panel by sliding your finger / stylus from the
top of the screen down.
3. In the Notifications panel, click on the icon of the USB connection and
then enable it.
4. The USB connection is then enabled and ready for use.
3.7 MEMORY CARD
Copy files from the data memory card
You can transfer files from your PC and your device, such as music, photos,
applications, documents or films. To find your files, use the system browser.
Borrar documentos desde la tarjeta de memoria
13
1. Enter your device's Explorer and find the files you want to delete.
2. Long hold the file you want to delete. You will then see a menu
where you will have the option Delete.
3. Briefly press the Delete option.
NOTE .- Do not delete any files inside of the tablet, the device may stop
working.
Remove the memory card from the device
1. On the home page, press the Menu button and then click Settings
2. Drag down the settings menu and Liege, click on the SD card and the
computer's memory.
3. Click "Remove SD card"
3.8 ENTERING TEXT
How to use the screen keyboard
When you start a program or select the text editor may be necessary to
introduce some kind of text on your part. At that time, you get the default
keyboard Android operating system. Still, if their needs were not met by the
keyboard, the OS allows you to install other keyboards which will not be
provided under any circumstances by the device manufacturer.
To change the keyboard type, follow these steps:
1. From the desk of startup, press the Menu button and then select
Settings.
2. Click Languages and Keyboards.
3. A list of keyboards installed on the system in the Text Settings
section.
4. Select the keyboard you want.
14
Preinstalled keyboards
Delete characters
Case-sensitive Exchange
Spacebar
Symbols
Intro
3.9 SECONDARY TOOLS
Open recently used applications
The device has the multitasking function. This means that you can use several
applications at once, for example, listen to their favorite tunes while surfing
the internet. You can access the applications that are running in the
background long pressing Menu button then click on the choice of
applications.
To close an application, press at length on the desired application until a new
window and select Close Application.
Add new widgets
To add more useful tools for you, click on an empty space in any of the 5
desktops available until the popup menu and then press the Widget option.
You'll see a long list of options such as applications, music, photos, watch,
15
search, among many others.
4. CONNECTIVITY
4.1 WIFI ACCESS POINT
The device features WiFi technology with which you can connect to the
network. To activate it, follow these steps:
1. Once the desktop starts, press the Menu button until the popup
menu.
2. Select Settings.
3. Select Wireless and Network.
4. Wifi choose to activate it.
5. The device automatically search for wireless networks. When you find
that you want, click above.
5. COMMUNICATION
5.1 E-MAIL
Email settings
The application designed to manage the emails has a guide to help you
16
configure the email accounts of the leading providers such as Gmail,
Yahoo and Hotmail, as well as protocols such as POP3 and IMAP.
NOTE .- Before you start using the service has e-mail, please make sure that
network has a valid internet access.
Configure the Mail Box
1. Click the Mail icon. You will then see the inbox. If you have no email
account set up, will help guide. If this is your thing, please see the
next point.
2. Click the button below and enter your email address and password.
Press Next to continue with the setup.
3. Select your account type: POP3 or IMAP. Next, enter its name in the
required field.
4. If all details are correct, your account will be available and ready for
operation.
17
How to delete one email account
To delete email accounts on your device, follow these steps:
1. Enter the email section and click on the account to be deleted.
2. Press the Menu key and then press largely above the account you
want to delete.
3. You will see a floating menu, which should make the choice to erase.
Finally, press over the confirmation to verify your account to be
deleted.
4. Click above at length
Send E-Mail
1.
2.
3.
4.
5.
Enter your email address as indicated above.
Click the Inbox.
Press the Menu button until you see a floating menu.
Choose the option to write.
Enter the recipient's address and the text you want to send in the
appropriate fields.
6. You can attach files in emails by pressing the Menu button until a
menu appears qua floating. Then select Add attachment.
18
7. Finally, press Send to send the mail to your recipient.
NOTE .- If more than one email account can be selected regardless of the
sender Sender by clicking and choosing which account will appear when the
recipient receives the email.
6. MULTIMEDIA
6.1 SUPPORTED FILE
Audio Files
Video Files
-
MP3
-
AVI(H.264、DivX、XviD)
-
AAC(AAC, AAC+, AAC-LC)
-
RM/RMVB
-
OGG
-
MKV
-
MIDI
-
WMV
-
WAV
-
MP4
-
DAT
-
VOB
-
FLV
-
3GP
19
6.2 MUSIC
The sound library can be divided into four categories: Artist, Album, Songs and
Playlist.
Return to Menu
Repeat All
File format / Availability of letters
Random
Artist
Album
Song
Disc Cover
Reproduction Process Bar
Play Music
1. Click on Music.
2. Then, click Songs, Artists or Albums.
3. Select the song you want to play.
Add songs to a new playlist
1.
2.
3.
4.
5.
6.
7.
Click on Music.
Then, click Songs.
Click on the song chosen long until the popup menu.
Select Add to a playlist.
Click New if you want to create a new list.
Record the name of the new playlist
Select Save once finished editing the name.
20
Delete a playlist
1.
2.
3.
4.
Click on Music.
Then, click Songs.
Long press on the playlist chosen until the floating menu.
Select Delete.
6.3 VIDEO
1.
2.
3.
4.
5.
Click on Videos.
Among its list of videos from your memory card.
Click above to play.
If I had more of a player, choose which to run.
Playback starts.
6.4 HDMI
The acronym refers to the HDMI video interface with high resolution. Using a
standard cable to mini HDMI cable (not included in the pack), you can connect
your device to the next-generation TV to use as a mobile player so you can
enjoy all your content in it.
1. Turn on your device.
2. Connect the device to the TV using the above.
3. Click Settings / Audio & Display / Output / HDMI / HDTV output
resolution.
4. The multimedia content is displayed simultaneously on your screen
and the device.
6.5 PHOTO GALLERY
The application preinstalled on the system can automatically search and sort
your photos and videos on the memory card without the need for any
intermediate step. Moreover, in the Photo Gallery you can view, edit and set as
wallpaper images, or watching videos.
21
Watch Pictures
1. Select the folder you want to display that includes pictures.
2. Click the image to play and the system will automatically recognize
and play full screen. Note that due to the resolution of your images,
you may scale the image is not exactly to the shape of the screen.
3. If taca screen, an arrow appears around the image, which will serve to
advance to the next image. You can also use if you want the function
to change slide photography.
4. You can zoom in/out with the panel that appears when you touch the
screen or use your fingers to it.
5. If you want to rotate images, you can rotate the device itself in the
direction you want.
Edit Pictures
In the picture section, press the Menu button. In the can edit or create images
based on your needs.
• Slide Presentation
Press the Menu button and then click Display. All of the folder IMAGENERA
slidably will appear on your screen one by one. This is ideal if you want to
use your device as a digital photo frame.
• Share
1. When you are viewing a picture, press the Menu button and then click
Share.
2. The selected image will be sent via email to people you choose.
• Rotate
1. When you are viewing a picture, press the Menu button and then click
Rotate.
2. Click to the right or left to select the direction of rotation.
• Cut
1. When you are viewing a picture, press the Menu button and then click
Cut.
2. A box will appear above the picture. Set to define what area you want
cut.
22
3. Click Save to complete the operation.
4. If you want to abort the operation, click Back.
7. NETWORK
7.1 BROWSER
Homepage
The default search will appear in the logon screen natively.
Change Homepage Browser
If you wish, you can change the home screen of your browser so you can
quickly access your favorite web page. To do this follow these steps:
1. Click the browser.
2. Press the main menu to display a floating window of the same tools.
3. Select More / Settings / Home.
4. Enter the desired page and click Save to finish the process.
Visit Homepages
1. Click the browser.
2. Press the main menu to display a floating window of the same
tools.
23
3. Select Start. Address bar appears in which you can enter the
address you want to visit and use the touchpad.
4. You can also search online content using Desktop Widget start.
Zoom in/out pictures
After opening the desired web page, touch the screen to display the Zoom +
and Zoom -. In may extend or reduce the size of the page.
Search words on a webpage
1. When in the Finder, press the Menu button to bring up the browser
options.
2. Click More / Check page.
3. Enter words to search for in the text bar.
4. When you find the desired word will appear highlighted in green.
5. Click the arrow in the lookup column to go first to the last word in
case a repeat several times.
Favorites Manager
-
Adjustments to Bookmark
Once you are inside the browser, press the Menu button you click Favorites. To
add new bookmarks, select the Add Favorites.
24
-
Open Bookmark
Press the Menu button and click Favorites on the browser interface. Then, click
the bookmark you want to visit.
-
Edit My Bookmark
To edit bookmarks should go to the Favorites menu by pressing the Menu
button on the browser interface. Then, hold down long the favorite to edit
until the edit menu, where you can change the name and that has given the
bookmark as the URL.
8. OTHER APPLICATIONS
8.1 ALARM
To use the alarm function, follow these steps:
1. Click the clock icon in the Programs section.
2. Enter the program interface as shown in the image below.
3. As you can see, you will see 4 icons: Music, Alarm, Images and Start.
4. Click on the Alarm option from which you can adjust the start time
and the frequency thereof or deactivation.
25
8.2 CALCULATOR
8.2 Calculator
To use the calculator, follow these steps:
1. Click on the Calculator icon in the Programs section.
2. Enter the base panel of the calculator.
3. Press the Menu button and then click Advanced panel you need to
perform more complex calculations.
NOTE .- You can also change the panel using slide function.
8.3 FILE MANAGER
In the Applications folder, you can manage the system files using the Browser
application.
26
NOTE .- Do not delete or change any operating system file. Doing so may
cause the system to stop working or not done correctly.
Cut & Paste function
1. Once inside the browser, press may use the Copy, Paste, Cut, Delete,
Rename, New using the Menu button.
2. To use these features, so just select a file or folder, press Cut or Copy
to move or copy.
3. Click on the folder where you want to paste and press the Menu
button then select Operations and then Paste.
Delete pictures
To delete a file, press at length about it until the menu appears. Then select
the Delete option and confirm to complete the operation.
Create Folders
You can create folders to keep the order of your files. To do this, press at
length about it until the menu appears. Then select New and then select the
Folder option. Once this is done, allowing you to choose the name of it. Finally
confirm the operation to finish.
27
Quick Search
If you forget where you stored a file, you can search by quick search:
1. Open Explorer and pressing the Menu button, go to the floating
menu.
2. Select New and then select the Search option.
3. Displays a text field where you can type the name of the file you want
to locate.
9. BASIC INFORMATION
9.1 SOUND & DISPLAY
Volume adjust
From the desk of startup, press the Menu button then click the option
Settings / Sound and Display / Volume settings.
Notice tone settings
From the desk of startup, press the Menu button then click the option Settings
/ Sound & Screen / Tone notice. From here you can change the volume and
tone of reporting.
Screen sounds
You can configure the system to make a slight sound when you touch the
screen and typing. To set up this service, press the Menu button then click the
option Settings / Sound and Display / Sounds.
Display adjusts
-
Adjusting Brightness
From the desk of startup, press the Menu button then click the option Settings
/ Sound and Display / Brightness. Since the brightness settings you can
change the backlight.
28
Please note that the higher the brightness, the battery will have less
autonomy.
-
Setting the time display lighting
You can change the time will display on once you stop using it.
You can change this parameter from the desktop of startup, press the Menu
button then click the option Settings / Sound and Display / Time-out.
9.2 SAFETY
Parental Control
You can block some inappropriate content created by using the Parental
Control option. To do this, follow these steps:
1. From the desk of startup, press the Menu button until the floating
window.
2. Click on Settings / Parental Control settings.
3. Nine points appear which will serve as reference for drawing the
password. For them, draw a pattern following the points vertically,
horizontally or diagonally without lifting a finger.
4. Once finished, click Continue.
NOTE .- Follow the tips on the screen to draw the pattern.
29
9.3 MEMORY CARD
Free Space management
You can check the free space you have left on your device or memory card by
following these instructions:
1. From the desk of startup, press the Menu button until the floating
window.
2. Click Settings / Memory.
3. From this menu you can check the status of your memory card or the
device itself.
Safely remove the card
We strongly recommend that when you want to remove your memory card
from the device to preserve and not damage it. To do this, follow these
instructions:
1. From the desk of startup, press the Menu button until the floating window.
2. Click on Settings / System Memory and SD / SD Card Draw.
30
9.4 DATE & HOUR
By default, the system will automatically set the date and time of the system
every time you connect to the network. If you wish to configure it manually,
follow the instructions:
1. From the desk of startup, press the Menu button until the floating
window.
2. Click Settings / Date and Time.
3. Click on the box to deselect this option to Automatic.
4. Click the Time Zone field and select your region. Then set the date and
time manually.
5. You can also select the date and time format you want.
6. Finally, select how you prefer that the system tells you this data in the
home desktop.
9.5 LANGUAGES SETTING
1. From the desk of startup, press the Menu button until the floating
window.
2. Click Settings / Languages and Keyboard.
3. Click the Languages area you want to select from the list.
9.6 SYSTEM INFORMATION
System Status
1. From the desk of startup, press the Menu button until the floating
window.
2. Click Settings / System / State.
3. From this menu you can check the battery status, network, hours of
use, among many other data.
System Updates
1. From the desk of startup, press the Menu button until the floating
window.
2. Click Settings / System / System Updates.
31
3. If a new version, click download.
NOTE .- Remember to perform system updates you need to have network
access and enough space on the memory card.
Check System Firmware
1. From the desk of startup, press the Menu button until the floating
window.
2. Click Settings / System / About to check the firmware version, device
model, among other information.
10. PROGRAMM INSTALLATION
10.1 INSTALLATION
You can install third party applications on the system from the Internet and
install them automatically or copy to memory card and then install them.
1. In the applications section, select the App Installer to install from SD
card.
2. Click the application you want to install.
3. Confirm the installation *. apk file.
4. Follow the onscreen instructions and wait until the installation is
complete.
NOTE .- If you want to install applications, remember that the only format
supported by your system are files with the *. apk.
10.2 UNINSTALL
To uninstall applications, follow the instructions:
1. From the desk of startup, press the Menu button until the floating
window.
2. Click on Settings / Applications / Applications Manager.
3. This menu will display all the applications installed on the system.
4. Long press on which you want to delete and select Uninstall.
32
10.3 UPDATES
Very often, the developers decided to update the applications themselves
programmed. When one of your applications will be updated, it will appear in
the notification area, a notice of discharge. If you want to update the
application should only tighten up the same notice and application will begin
downloading.
11. FAQ
- Device starts very slowly
After important updates, the system may take 2 to 3 minutes to restart.
-Device does not connect to the WIFI network
Make sure the router is working properly.
Make sure it is not too far from the WIFI access point.
Be sure to enter the correct name and password for the access point.
- Devices is heated
If you are running many applications at once, or has long used the system, it
warms up a bit more than usual.
Another cause might have the brightness too high.
- Devices is behaving strangely
The installation of third-party applications can cause the system to
malfunction or not responding. If this happens, press the RESET button to
restore the system.
- E-mail accounts does not work
Make sure the Internet access point is functioning properly.
Make sure you have correctly configured email account.
Make sure the system is set to local time.
33