1
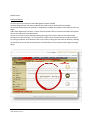
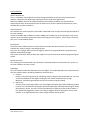
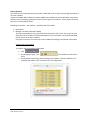
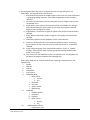
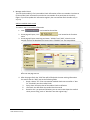
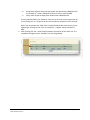
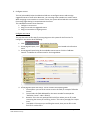
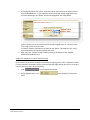
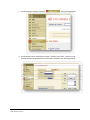
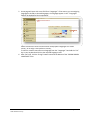
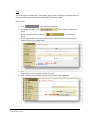
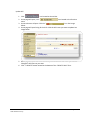
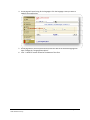
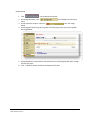
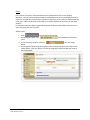
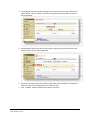
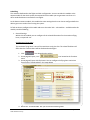
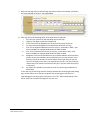
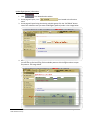
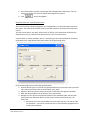
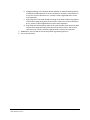
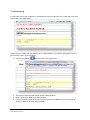
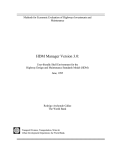
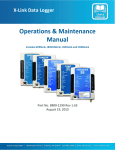
 eSolutions CMS User Manual eSolutions for Network Services
Table of Contents Introduction ................................................................................................................................................................... 4 What is web application? .......................................................................................................................................... 4 What is CMS? ............................................................................................................................................................ 4 Introduction to eSolutions CMS ................................................................................................................................ 4 What is eSolutions CMS? ...................................................................................................................................... 4 Technology ............................................................................................................................................................ 4 CMS Structure ....................................................................................................................................................... 6 System Navigation ............................................................................................................................................ 6 System Modules ............................................................................................................................................... 7 Head of department ..................................................................................................................................... 7 Human Resource .......................................................................................................................................... 7 Performance ................................................................................................................................................. 7 Quality Assurance ........................................................................................................................................ 7 Scheduling .................................................................................................................................................... 7 Patterns.................................................................................................................................................... 7 Day to Day ................................................................................................................................................ 7 System Modules ............................................................................................................................................................ 8 Head of department .................................................................................................................................................. 8 Dash board ............................................................................................................................................................ 8 Manage tasks ........................................................................................................................................................ 8 Assign tasks ........................................................................................................................................................... 8 Human Resource ....................................................................................................................................................... 9 Dash Board ............................................................................................................................................................ 9 Manage crew basic information (ISBD) ................................................................................................................ 9 Creating new crew member ............................................................................................................................. 9 Update existing Crew member information ................................................................................................... 12 Manage restrictions ............................................................................................................................................ 13 Manage medical check ....................................................................................................................................... 14 Add new medical check record ...................................................................................................................... 14 Edit existing medical check record ................................................................................................................. 16 Manage licenses and ID cards (Permits) ............................................................................................................. 17 Create new permit types ................................................................................................................................ 17 Update permit type ........................................................................................................................................ 18 Add New Permit ............................................................................................................................................. 19 Configure courses ............................................................................................................................................... 22 Configure new course ..................................................................................................................................... 22 Update course name ...................................................................................................................................... 23 Assign course to crew rank (Suggested Course) ............................................................................................. 24 Assign crew member to a course (Taken Courses) ......................................................................................... 25 Man Power (Add Crew to Aircraft type) ............................................................................................................. 28 Assign Crew to Aircraft Type .......................................................................................................................... 28 Standard Information ......................................................................................................................................... 29 Countries ........................................................................................................................................................ 29 Add new country ........................................................................................................................................ 29 Update Country Name ............................................................................................................................... 30 Cities ............................................................................................................................................................... 31 Add New City .............................................................................................................................................. 31 Update existing city .................................................................................................................................... 32 Assign Spoken Language ................................................................................................................................. 34 Assign spoken language to a country ......................................................................................................... 34 eSolutions for Network Services www.eSolutions.com.jo Page 2 of 61 Education ........................................................................................................................................................ 36 Add new education degree ........................................................................................................................ 36 Update education information .................................................................................................................. 36 Skills ................................................................................................................................................................ 38 Add new skill .............................................................................................................................................. 38 Update skill ................................................................................................................................................. 39 Languages ....................................................................................................................................................... 40 Add new language ...................................................................................................................................... 40 Update Language ....................................................................................................................................... 40 Groups ............................................................................................................................................................ 42 Add group ................................................................................................................................................... 42 Update Group............................................................................................................................................. 43 Ranks .............................................................................................................................................................. 44 Add new rank ............................................................................................................................................. 44 Update rank ............................................................................................................................................... 45 Scheduling ............................................................................................................................................................... 47 General Settings .................................................................................................................................................. 47 Set Maximum Flying Hours ............................................................................................................................. 47 Set Rest Periods .............................................................................................................................................. 48 Banking Settings ............................................................................................................................................. 49 Miscellaneous ................................................................................................................................................. 50 Configure Flights ................................................................................................................................................. 51 Add Schedule Group ....................................................................................................................................... 51 Update existing schedule group name ........................................................................................................... 52 Add new flights (Patterns) .............................................................................................................................. 53 Update flight (pattern) information ............................................................................................................... 57 Distribute Crew over Trips (Generate Lines) .................................................................................................. 58 Troubleshooting .......................................................................................................................................................... 60 eSolutions for Network Services www.eSolutions.com.jo Page 3 of 61 Introduction What is web application? A web application is an application that is accessed over a network such as the Internet or an intranet. The term may also mean a computer software application that is hosted in a browser‐controlled environment (e.g. ASP or coded in a browser‐supported language ‐ such as JavaScript, combined with a browser‐rendered markup language like HTML) and reliant on a common web browser to render the application executable. Web applications are popular due to the ubiquity of web browsers, and the convenience of using a web browser as a client, sometimes called a thin client. The ability to update and maintain web applications without distributing and installing software on potentially thousands of client computers is a key reason for their popularity, as is the inherent support for cross‐platform compatibility. Common web applications include webmail, online retail sales, online auctions, wikis and many other functions. What is CMS? A crew management system (CMS) is a fundamental part of a modern airliner's system,s. A CMS is a specialized computer system that automates a wide variety of crew information and distribution over flights. Introduction to eSolutions CMS What is eSolutions CMS? The eSolutions Crew Management System is a web enabled system that gives the authorized airlines stuff the ability to access the system from anywhere around the world with internet connection . The eSolutions system has been structured and built after a complete study on the existing crew systems and came to include them in one complete well structured system with very important add‐on features that made the new system more useful and powerful. Technology eSolutions CMS was build using a cutting edge technologies, these technologies gave the system the stability and the high performance it has over other crew management system. eSolutions CMS uses the following: 1. Microsoft .Net Framework 1.1 The .NET Framework is a software framework for Microsoft Windows operating systems. It includes a large library, and it supports several programming languages which allows language interoperability (each language can use code written in other languages). The .NET library is available to all the programming languages that .NET supports. The framework's Base Class Library provides user interface, data access, database connectivity, cryptography, web application development, numeric algorithms, and network communications. The class library is used by programmers, who combine it with their own code to produce applications. eSolutions for Network Services www.eSolutions.com.jo Page 4 of 61 Programs written for the .NET Framework execute in a software (as contrasted to hardware) environment, known as the Common Language Runtime (CLR). The CLR is an application virtual machine so that programmers need not consider the capabilities of the specific CPU that will execute the program. The CLR also provides other important services such as security, memory management, and exception handling. The class library and the CLR together constitute the .NET Framework. The .NET Framework is intended to be used by most new applications created for the Windows platform. 2. MS‐SQL 2005 DB Microsoft SQL Server is a relational model database server produced by Microsoft. Its primary query languages are T‐SQL and ANSI SQL. 3. Java Script JavaScript is an implementation of the ECMAScript language standard and is typically used to enable programmatic access to computational objects within a host environment. It can be characterized as a prototype‐based object‐oriented scripting language that is dynamic, weakly typed and has first‐class functions. It is also considered a functional programming language like Scheme and OCaml because it has closures and supports higher‐order functions. JavaScript is primarily used in the form of client‐side JavaScript, implemented as part of a web browser in order to provide enhanced user interfaces and dynamic websites. However, its use in applications outside web pages—for example in PDF‐documents, site‐specific browsers and desktop widgets—is also significant. 4. HTML HTML, which stands for HyperText Markup Language, is the predominant markup language for web pages. HTML is the basic building‐blocks of webpages. A markup language is a set of markup tags, and HTML uses markup tags to describe web pages. HTML is written in the form of HTML elements consisting of tags, enclosed in angle brackets (like <html>), within the web page content. HTML tags normally come in pairs like <h1> and </h1>. The first tag in a pair is the start tag, the second tag is the end tag (they are also called opening tags and closing tags). The purpose of a web browser is to read HTML documents and compose them into visual or audible web pages. The browser does not display the HTML tags, but uses the tags to interpret the content of the page. HTML elements form the building blocks of all websites. HTML allows images and objects to be embedded and can be used to create interactive forms. It provides a means to create structured documents by denoting structural semantics for text such as headings, paragraphs, lists, links, quotes and other items. It can embed scripts in languages such as JavaScript which affect the behavior of HTML webpages. Web browsers can also refer to Cascading Style Sheets (CSS) to define the appearance and layout of text and other material. The W3C, maintainer of both the HTML and the CSS standards, encourages the use of CSS over explicitly presentational HTML markup. eSolutions for Network Services www.eSolutions.com.jo Page 5 of 61 CMS Structure System Navigation: The front end of the new Online Crew Management System (OCMS) Has been designed upon the latest standards that made it easy to understand and navigate. All the major departments were placed or compound in a toolbar that appears at the top of all the inner pages. Under each department link there is a menu list that contains links for all the functionalities and options that can be made within that department. By that we insure the ease of navigation during the usage of the system. Most of the system usage procedures use the same logic. i.e. in most of the system screens authorized user can add new record by clicking the add link at the bottom of the screen ,edit by clicking the record title or delete by checking the check box in front of the record title then click the delete link at the bottom of the page. See image below. eSolutions for Network Services www.eSolutions.com.jo Page 6 of 61 System Modules: Head of department: This is a completely new module that used to manage and follow‐up the tasks and announcements posted or assigned to the department employee from the head of the department. Within this module there will be a delayed tasks box that notifies the HOD if any task passed the expected finish date, announcements box that contains a list of all the posted announcements, and a reminder box to place reminders in Human Resource: This module is the most important input module; authorized users can input and manage information of the crew members. Various of valuable add–on features has been added to this model such as the notification system that helps the users remembering important issues concerning the crew member , such as expiry of security pass ,visas , ID and medical checks . Performance: The performance module contains a pointer feature that helps the administration of the airliner to evaluate their crew by using the new weight system. Every term has a weight, either positive or negative, positive means good behavior and performance, negative means below average. This system comes with ability to adjust the weight of any term without the need of reprogramming the system. Quality Assurance: This module gives the authorized users the ability to upload procedures and manuals to the system, so the crew members can view it online. Scheduling: This is the output module that distributes crew over flights. This module depends on the data entered in all of the modules above. Scheduling module has two main parts. 1. Patterns Patterns is the planning part of the scheduling module. Using this part authorized user can enter all the essential data for the flights including the man power needed and the trip legs Moreover, periodically generated crew lines can be done using this module. 2. Day to Day. The Day to Day (rostering) module is the actual flight information part of the scheduling module. It has its own new features that help the operation department stuff keep monitoring the actual data promptly, by this; the users can find contradictions in flights and crew. Another feature is the replacement suggestion system, this features suggests the best replacement for any crew member at any flight based on the nature of flight and the banking system eSolutions for Network Services www.eSolutions.com.jo Page 7 of 61 System Modules Head of department This is a completely new module that used to manage and follow‐up the tasks and announcements posted or assigned to the department employee from the head of the department. Within this module there will be a delayed tasks box that notifies the HOD if any task passed the expected finish date, announcements box that contains a list of all the posted announcements, and a reminder box to place reminders in. Following are the links – sub modules – available under this module 1. Dash board: this function give the HOD the ability to monitor the crew lines and information. 2. Manage tasks.: this function is used to add, edit or delete tasks within a certain department .within this link the authorized user can set tasks to depend on the finishing of another task ,that insures the accuracy of the work flow within the department 3. Assign tasks: by using this function HOD can assign tasks to the employees within this department. Following is a sample of the screens of this module:
eSolutions for Network Services www.eSolutions.com.jo Page 8 of 61 Human Resource This module is the most important input module; authorized users can input and manage information of the crew members. Various of valuable add–on features has been added to this model such as the notification system that helps the users remembering important issues concerning the crew member , such as expiry of security pass ,visas , ID and medical checks . Following are the links – sub modules – available under this module 1. Dash Board 2. Manage crew basic information (ISBD) This links (sub modules) is for input all the basic information of the crew. This screen has new fields that can fill to obtain full information about every crew member .all the fields that filled will be used in all the other modules. Using this screen user can create new crew or update and existing crew member information. Creating new crew member To create a new crew member information 1. Click “
” icon located at the tool bar 2. A new page will open, click “
” icon located at the functions menu 3. A new page will open listing all the existing crew members. Click the “Add New” link located at the button of the crew names list. See image below. eSolutions for Network Services www.eSolutions.com.jo Page 9 of 61 4. A new page will open with a form. Using this form you can start filling the crew information. The required fields in this form are: i. BID: Bid ID field is used to fill the BID number of the crew. This value will be used in generating bidding crew lines. If this field not applicable to your company, then fill 0. ii. ID: Fill the crew ID number here. This ID is given by your company. You can ash the HR Dept’ for it. iii. Roster Name: roster name is the nick name of the crew member, for example Khalid Ahmad Hasan will have K.Hasan as the roster name. Roster name will appear in the crew flight lines charts. iv. English Name: Crew name in English as appear in the passport must be filled in this field. v. Arabic Name: Crew name in Arabic as appear in the passport must be filled in this field. vi. Nationality: Choose from the dropdown list the crew nationality vii. Status: this field specifies the crew member employment status. Usually you have to choose “Active”, but also you have other option such as “Suspended”, “Retired”. viii. Group: Select the group of the crew member withers a “Crew” or “Cockpit” member. Pilots must be under “Cockpit” group where Air Steward will come under “Crew” group. ix. Title: Select from the dropdown list the crew member rank. This dropdown list will display information related to the selected group. On the other hand you can fill other useful fields. Following is a description for the optional field. i.
Gender ii.
Mail Box iii.
CAA No. iv.
National No. v.
Crew Picture vi.
PERSONAL INFO i. Place of Birth 1. Country 2. City ii. Birth Date iii. Hire Date iv. Service Period v. Blood Group vii.
PASSPORT i. Passport Number ii. Issue Date iii. Exp Date iv. Place of Issue 1. Country 2. City viii.
EMPLOYMENT STATUS i. Employment Type eSolutions for Network Services www.eSolutions.com.jo Page 10 of 61 ix.
x.
xi.
xii.
xiii.
1. Contract 2. Employee ii. Turn Date iii. Date Of Contract iv. Date Of Expiry CAREER INFO. i. Date QUALIFICATIONS i. Degree ii. Specification iii. Last Uni. / Collage iv. Country v. Year of graduate vi. Language vii. Skills CONTACT INFO/ADDRESS i. (Inside Libya) 1. Area 2. Street No. 3. Building No. 4. Tel. 5. Mobile 6. E‐mail 7. P.O.Box ii. (Outside Libya) 1. Postal Address 2. Country 3. City 4. Tel 5. Mobile 6. E‐mail 7. P.O.Box PREFERRED CONTACT i. Name ii. Relation Ship iii. Country iv. Mobile v. City vi. E‐mail vii. Telephone Remarks eSolutions for Network Services www.eSolutions.com.jo Page 11 of 61 Update existing Crew member information To update existing crew member information 1. Follow step 1 and 2 of creating new crew member information 2. A new page will open listing all the existing crew members. Click the crew member name you want to update. 3. A new page will open with a pre‐filled form. You can change any field value, fields specification are the same of the creating new crew member information. eSolutions for Network Services www.eSolutions.com.jo Page 12 of 61 3. Manage restrictions This links (sub modules) is for input restrictions related to the crew members. eSolutions for Network Services www.eSolutions.com.jo Page 13 of 61 4. Manage medical check This links (sub modules) is for input medical check information of the crew member. You have to fill the medical check information to make the crew member fit to participate in the airline flights. If you fail to update this information regularly the crew member won’t be able to fly in any trip. Add new medical check record To create a new crew member information 1. Click “
” icon located at the tool bar 2. A new page will open, click “
” icon located at the functions menu 3. A new page will open containing two boxes. “SEARCH” and “ADD”, select the crew member ID from the dropdown list located at the “SEARCH” box. See image below. Wait until the page refresh. 4. After the page refresh the “ADD” box will be filled with the crew existing information. You notice that the “ADD” box has the following fields: i.
Result: choose “Fit” if the crew member medical check was successful or “Not Fit” if he didn’t pass the medical check. ii.
Expiry Date: the expiry date of the medical check certification iii.
Last Check: the date when the medical check occurred iv.
Remarks: this is an optional field where you can store notes about the medical check you are filling, such as “We don’t have the original copy” eSolutions for Network Services www.eSolutions.com.jo Page 14 of 61 5. Now click the “New” link at the end of the “ADD” box. See image below 6. Wait until the page refresh, after that start filling the fields in the “ADD” box. The required fields are: i.
Result ii.
Expiry Date iii.
Last Check Date Moreover, please note the date format is MM/DD/YYYY, for example, if the expiry date of the medical check is 31st January, 2008, then you have to fill in the expiry date as 01/31/2008 7. Finally, Click the “>ADD” button under the “Remarks” field to add the new record. The saved data will appear in the “HISTORY” box. See Image below. eSolutions for Network Services www.eSolutions.com.jo Page 15 of 61 Edit existing medical check record To update crew member medical information 1. Click “
” icon located at the tool bar 2. A new page will open, click “
” icon located at the functions menu 3. A new page will open containing two boxes. “SEARCH” and “ADD”, select the crew member ID from the dropdown list located at the “SEARCH” box. See image above in “Add new medical check record” point 3 4. After the page refresh the “ADD” box will be filled with the crew existing information. 5. Update any field you want – remember the date format is MM/DD/YYYY 6. Click the “> Update” button under the “Remarks” field. 7. Updated data will appear in the “HISTORY” box. eSolutions for Network Services www.eSolutions.com.jo Page 16 of 61 5. Manage licenses and ID cards (Permits) Within this link (sub modules) you can manage all the permits types needed by the crew to fly, such as the “ID Cards” and “Licenses” Under Permits you can 1. Create New permits types 2. Assign Permit to crew member Create new permit types It’s important to organize the permits in groups. eSolutions CMS gives you this ability via the permits sub module. To add new permit type do the following 1. Click “
” icon located at the tool bar 2. A new page will open, click “
” icon located at the functions menu 3. A new page will open listing the available permit types. Click the “Add new Permit” link at the bottom of the screen. See image below. 4. A new page will open with a form to fill. This form contains the following fields. i.
Name: the permit type name such as “ID Card”, “Licenses”. Name is a required field ii.
Description: you can fill any notes in this field to describe the permit type, such as “The ID Card is the card giving by the company for the crew member”. Description field is optional. eSolutions for Network Services www.eSolutions.com.jo Page 17 of 61 5. Click the “> ADD” button at the end the form to save data or “> Cancel” to ignore the changes. See image below Update permit type If you want to edit existing permit type information, do the following 1. Click “
” icon located at the tool bar 2. A new page will open, click “
” icon located at the functions menu 3. A new page will open listing the available permit types. Click the permit type name you want to edit. See Image below. eSolutions for Network Services www.eSolutions.com.jo Page 18 of 61 4. A new page will open with a pre‐filled form inside it. You can edit the information and then click the “> Update” button to update the information, or “> Cancel” to ignore changes. See Image below. Add New Permit Before you add a new permit information of a crew member you have to make sure that the permit type is already there, If it’s not then please follow the steps above of “Create new permit types”. The permit information are very important to the eSolutions CMS. Without the permit information the crew member can’t have flights. To add new permit, do the following: 1. Click “
2. A new page will open, click “
menu eSolutions for Network Services www.eSolutions.com.jo ” icon located at the tool bar ” icon located at the functions Page 19 of 61 3. A new sub menu will open. Click the “
below. ” icon. See image 4. A new page will open containing two boxes. “SEARCH” and “ADD”, select the crew member ID from the dropdown list located at the “SEARCH” box. See image below. 5. Wait until the page refresh, after that start filling the fields in the “ADD” box. The required fields are: i.
Code: this dropdown list includes the permit types name; select the permit type you are going to fill information related to it for the selected crow member. ii.
Serial: in this field fill the permit number. Every permit has to have a serial number; you can easily find this number on the official printed card of the permit. eSolutions for Network Services www.eSolutions.com.jo Page 20 of 61 iii.
Assign Date: the date the permit purchased. The date format is MM/DD/YYYY, for example 31st January, 2008 will be field in the form of 01/31/2008 Expiry Date: the permit expiry date. Date format is MM/DD/YYYY. iv.
The only optional filled is the “Remarks” filed, you can fill notes concerning the permit you are filling such as “The picture of the crew member at the permit card is not clear”. Now if you noticed that the “ADD” box is already filled with data, that’s mean you are updateing an existing record. In the next step click “> Update” button instead of “> ADD” 6. After finishing click the “> ADD” button located at the bottom of the “ADD” box. The saved data will appear at the “HISTORY” box. See image below. eSolutions for Network Services www.eSolutions.com.jo Page 21 of 61 6. Configure courses This link (sub‐module) helps the eSolutions CMS user to configure courses and to assign suggested courses to crew ranks. Moreover, you can assign crew member to a certain course. When assigning a crew member to a certain course, the system will exclude this crew member from taking flights during his commitment to the course. This sub‐Module contains three functions: 1. Configure a new course 2. Assign crew rank to a suggested course 3. Assign crew member to ingoing course Configure new course This step has to be the first step if you are going to use this system for the first time. To configure a new course do the following: 1. Click “
” icon located at the tool bar 2. A new page will open, click “
” icon located at the functions menu 3. A new page will open listing all the available courses names. Click the “Add New Courses” link below the courses name list. See image below. 4. A new page will open with a form. This for contains the following fields i.
Course Name: you can fill the course name in this field, for example “Refresher Course” ii.
Course Code: this field dedicated for the course number for example the “Refresher Course” code is “RS101” iii.
Remarks: This is the only optional field in this form where you can fill a note concerning the course you are filling, such as “This course just apply for Cockpit Crew” iv.
Total Mark: if the course you are filling has a mark, then you can fill it in this field. If it’s not then fill 0. eSolutions for Network Services www.eSolutions.com.jo Page 22 of 61 v.
Click “> ADD” button located at the bottom of the form to add course information to the data base, or you can click “> Cancel” button next to it to ignore the changes. See image below. Update course name If you want to update a course name that you already added before then do the following 1. Click “
” icon located at the tool bar 2. A new page will open, click “
” icon located at the functions menu 3. A new page will open listing all the available courses names. Click the course name you want to update. See image below. eSolutions for Network Services www.eSolutions.com.jo Page 23 of 61 4. A new page will open containing a form that already filled with the selected course data. You can change any field value, and then click at the “> Update” button at the bottom of the form Assign course to crew rank (Suggested Course) This is a useful feature in eSolutions CMS. It gives the system user the ability to plan the courses the crew member should take when reach for a certain rank. To assign course to crew rank do the following: 1. Click “
” icon located at the tool bar 2. A new page will open, click “
menu 3. A new sub menu will open. Click the “
eSolutions for Network Services www.eSolutions.com.jo ” icon. See image below. ” icon located at the functions Page 24 of 61 4. A new page will open with a form. Select the course name you want to assign ranks to from the dropdown list. If you selected a course name that already assigned to ranks, the ranks appearing in the “Ranks” box will be highlighted. See image below. Please note that this screen can be used to modify assigned ranks for a certain course, or to assign a new course to ranks. To select or unselect more than one rank from the “Ranks” box hold the “Ctrl” key in your keyboard and click at the required rank name. 5. After you finish, click the “Assign” button located at the bottom of the “ASSIGN SUGGESTED COURSES” form. Assign crew member to a course (Taken Courses) In this section you will learn to assign crew member to ingoing course. This is important because if a crew member is attended a course you should not take flights during the course. To assign a crew member to a course do the following 1. Click “
2. A new page will open, click “
menu eSolutions for Network Services www.eSolutions.com.jo ” icon located at the tool bar ” icon located at the functions Page 25 of 61 3. A new sub menu will open. Click the “
” icon. See image below. 4. A new page will open containing two boxes. “SEARCH” and “ADD”, select the crew member ID from the dropdown list located at the “SEARCH” box. See image below eSolutions for Network Services www.eSolutions.com.jo Page 26 of 61 5. Wait until the page refresh. In the “ADD” box you will find the following fields: i.
Code: this field lists the courses code. If you the crew member already toke the course the system will fill the other fields with the information already available, and in this case you are updating the record. ii.
From: the date the course starts. The date format is MM/DD/YYYY. For example 31st January, 2008 will be field in the form of 01/31/2008. iii.
To: the date the course ends. The date format is MM/DD/YYYY iv.
Result: the course result, weather the crew member passes or fails. If you are filling a new record select Success until the results appear. v.
Mark: the grade the crew member got from the course. If you are filling a new record or the course doesn’t has a mark then fill this field with 0. vi.
Remarks: this is an optional field, where you can fill notes concerning the record you are filling, for example “Crew member got the full mark” vii.
Location: this is another optional field. Fill the location where the course has been held, for example “Building #1, 2nd Street” viii.
City: the city where the course held. 6. Finally, after finish from filling or updating data, click “> ADD” button located at the bottom of the “ADD” box if you are filling a new record or “> UPDATE” if you are updating a record. 7. The results will appear in the “HISTORY” box. See image below Note that the “SUGGESTED COURSES” box always lists the suggested courses for the crew member as long he didn’t take it. After taking it the suggested course name will disappear from the “SUGGESTED COURSES” box. eSolutions for Network Services www.eSolutions.com.jo Page 27 of 61 7. Man Power (Add Crew to Aircraft type) Every crew member has to have a certification to fly in certain aircraft type. This Sub‐module gives you the ability to assign crew member to a certain aircraft type. Note that if you didn’t assign the crew member to an aircraft type, he will not have flights on that type. Assign Crew to Aircraft Type To assign a crew member to aircraft type, do the following 1. Click “
” icon located at the tool bar 2. A new page will open, click “
” icon located at the functions menu 3. A new page will open with two boxes “SEARCH” and “ADD”. ”, select the crew member ID from the dropdown list located at the “SEARCH” box. See image below 4. Wait until the page refresh. The “ADD” box you will find the following fields i.
Airplane Type: From this dropdown list select the aircraft type you want to assign the crew member to. If the crew member already has a permit for the selected aircraft type the other fields will be auto filled. ii.
Has permit: select “YES” if the crew member has permit to fly with or to serve in the selected aircraft type, or “NO” if has no permit. 5. Finally, after finish from filling or updating data, click “> ADD” button located at the bottom of the “ADD” box if you are filling a new record or “> UPDATE” if you are updating a record. 6. The results will appear in the “HISTORY” box. See image below eSolutions for Network Services www.eSolutions.com.jo Page 28 of 61 8. Standard Information This sub‐module contains the settings of the following 1. Countries 2. Education 3. Skills 4. Languages 5. Groups Countries Countries appear in lot of the system forms. Where ever you find a “Country” dropdown list, the system will read the countries you fill in the “Countries” section of the “Standard Info.” Sub‐
module. Under “Countries” section you can 1. Manage Cities 2. Assign Spoken languages to certain country Add new country To add new country, do the following: 1. Click “
” icon located at the tool bar 2. A new page will open, click “
” icon located at the functions menu 3. A new sub menu will open. Click the “
” icon. See image below. 4. A new page will open listing all the countries. Click “Add New Countries” link located under the bottom of the page. See image below. 5. A new page will open with a form with the following fields i.
Country Name: this field to fill country name such as “Libya” ii.
Country Code: this field to fill country short code such as “LY” iii.
Nationality: Fill the name of the nationality of the country such as “Libyan” iv.
Phone Code: fill the country phone code such as “+218” v.
Need Visa: check this field if the country you are filling needs a “Visa” eSolutions for Network Services www.eSolutions.com.jo Page 29 of 61 6. Click “> ADD” to save the country information. See image below Update Country Name Sometimes you need to update a country name, because of misspelling or any other reason. To update a country name do the following: 1. Click “
” icon located at the tool bar 2. A new page will open, click “
” icon located at the functions menu 3. A new sub menu will open. Click the “
” icon. See image below. 4. A new page will open listing all the countries. Click the country name you want to update. See image below. 5. A new page will open containing a pre filled form, change the required fields and then click “> Update” button located at the end of the form. For fields description see “Add new country” eSolutions for Network Services www.eSolutions.com.jo Page 30 of 61 Cities Cities are used in any city dropdown list in the system, but most important role for the cities is that it being used in the flight patterns. When a user is building a schedule the cities you enter here will appear to him, so it’s important that you fill all the cities your airline has a flight to. Add New City 1. Click “
” icon located at the tool bar 2. A new page will open, click “
” icon located at the functions menu 3. A new sub menu will open. Click the “
” icon. See image below. 4. A new page will open listing all the countries. Near the country name you find a link called “Cities” click it. See Image below. 5. A new page will open listing all the cities under the selected country. Click the “Add New City” link located at the bottom of the cities list. See Image below. eSolutions for Network Services www.eSolutions.com.jo Page 31 of 61 6. A new page will with a form with the following fields: i.
Country Name: a dropdown list of the available countries, select the country you want to add city under. ii.
City Name: type in the city name for example “Tripoli” iii.
City Code: fill in the short code of the city for example “TIP” iv.
City Phone Code: type in the city code that you use when call someone in that city for example “21” 7. After you finish click the “> ADD” button located at the bottom of the form. See image below Update existing city 1. Click “
2. A new page will open, click “
menu 3. A new sub menu will open. Click the “
below. eSolutions for Network Services www.eSolutions.com.jo ” icon located at the tool bar ” icon located at the functions ” icon. See image Page 32 of 61 4. A new page will open listing all the countries. Near the country name you find a link called “Cities” click it. See Image below. 5. A new page will open listing all the cities under the selected country. Click the city name you want to update. See Image below. 6. A new page will open with a pre‐filled form with the city information. Change the field you want and then click the “> UPDATE” button located at the bottom of the form. For fields information see “Add New City” eSolutions for Network Services www.eSolutions.com.jo Page 33 of 61 Assign Spoken Language When you want to assign a new spoken language for a country you have first make sure that you already added it form the “Languages” link –read “Add new language” When you assign a new language for a country, the system will read this field and match it with the spoken language for the crew members. If there is a match the crew member who is speaking this language will have a higher chance to be assigned to the flight heading to that country. To get full benefit of this feature you should make sure that the user filling the flight patterns for you airline fill the language fields located in the pattern screens. Assign spoken language to a country 1. Click “
” icon located at the tool bar 2. A new page will open, click “
” icon located at the functions menu 3. A new sub menu will open. Click the “
” icon. See image below. 4. A new page will open listing all the countries. Near the country name you find a link called “Cities”, next to it a link called “Assign Spoken Languages” click it. See Image below. eSolutions for Network Services www.eSolutions.com.jo Page 34 of 61 5. A new page will open with a one field form “Languages”. If the country you are assigning language has already a selected languages, the languages appear in the ““Languages” field will be highlighted. See image below. Please note that this screen can be used to modify spoken languages of a certain country, or to assign a new spoken to country. To select or unselect more than one language from the “Languages” box hold the “Ctrl” key in your keyboard and click at the required language name. 6. After you finish, click the “Assign” button located at the bottom of the “ASSIGN SPOKEN LANGUAGES” form. eSolutions for Network Services www.eSolutions.com.jo Page 35 of 61 Education This section of the “Standard Info.” Sub‐module, gives the user the ability to configure the educational degrees that you will find in the education field while filling the crew member “ISBD”. Add new education degree 1. Click “
” icon located at the tool bar 2. A new page will open, click “
” icon located at the functions menu 3. A new sub menu will open. Click the “
” icon. See image below. 4. A new page will open listing all the degrees. Click the “Add New Education” link located at the bottom of the education info list. See Image below. 5. A new page will open containing a one field form “Education Description”, fill this field in the degree name, for example “B.Sc.”. 6. Click “> ADD” button located at the bottom of the form. Update education information 1. Click “
2. A new page will open, click “
menu 3. A new sub menu will open. Click the “
below. eSolutions for Network Services www.eSolutions.com.jo ” icon located at the tool bar ” icon located at the functions ” icon. See image Page 36 of 61 4. A new page will open listing all the degrees. Click the education degree name you want to update. See Image below. 5. A new page will open with a pre‐filled form. Update the “Education Description” field, then click the “> UPDATE” button located at the bottom of the form eSolutions for Network Services www.eSolutions.com.jo Page 37 of 61 Skills This section of the “Standard Info.” Sub‐module, gives the user the ability to configure the skills that you will find in the skills field while filling the crew member “ISBD”. Add new skill 1. Click “
” icon located at the tool bar 2. A new page will open, click “
” icon located at the functions menu 3. A new sub menu will open. Click the “
” icon. See image below. 4. A new page will open listing all the skills. Click the “Add New Skill” link located at the bottom of the list. See Image below. 5. A new page will open with one field form, fill the “Skill Description” field with the name of the skill you are entering for example “First Aid”. 6. Click “> ADD” button located at the bottom of the form. See image below eSolutions for Network Services www.eSolutions.com.jo Page 38 of 61 Update skill 1. Click “
” icon located at the tool bar 2. A new page will open, click “
” icon located at the functions menu 3. A new sub menu will open. Click the “
” icon. See image below. 4. A new page will open listing all the skills. Click the skill name you want to update. See Image below. 5. A new page will open with a one field form pre‐filled with the skill name you selected. Change the skill name as you want. 6. Click “> UPDATE” button located at the bottom of the “UPDATE SKILL” form. eSolutions for Network Services www.eSolutions.com.jo Page 39 of 61 Languages This section you can add languages that will appear in the languages dropdown list all around the system. The languages added here is very essential for the system functionalities such as distributing the crew over the flights probably. Add new language 1. Click “
” icon located at the tool bar 2. A new page will open, click “
” icon located at the functions menu 3. A new sub menu will open. Click the “
” icon. See image below. 4. A new page will open listing all the languages. Click the “Add New Language” link located at the bottom of the list. See Image below. 5. A new page with a one field form will open. Fill the “Language Description” with the name language for example “Arabic”. 6. Click “> ADD” button located at the bottom of the form. Update Language 1. Click “
2. A new page will open, click “
menu 3. A new sub menu will open. Click the “
eSolutions for Network Services www.eSolutions.com.jo ” icon located at the tool bar ” icon located at the functions ” icon. See image below. Page 40 of 61 4. A new page will open listing all the languages. Click the language name you want to update. See Image below. 5. A new page with a one field pre‐filled form with the data of the selected language will open. Change the “Language Description”. 6. Click “> UPDATE” button located at the bottom of the form. eSolutions for Network Services www.eSolutions.com.jo Page 41 of 61 Groups This section control the crew members ranks. Ranks are organized under categories or “Groups”. Usually there are two groups 1. Cockpit 2. Crew The Cockpit group has the cockpit ranks under it such as “Captain”, while the Crew group has crew ranks under it such as “Air Steward”. The ranks filled here will be used by the users filling flight patterns. Add group 1. Click “
” icon located at the tool bar 2. A new page will open, click “
” icon located at the functions menu 3. A new sub menu will open. Click the “
” icon. See image below. 4. A new page will open listing all the groups. Click the “Add New Group” link located at the bottom of the list. See Image below. 5. A new page will open with a form. This form contains the following fields i.
Group Name: fill the name of the group you are going to enter for example “Crew” ii.
Description: this is an optional field where you can fill any note concerning the group you are filling, for example “This group for Security personnel” 6. Click “> ADD” button located at the bottom of the form. eSolutions for Network Services www.eSolutions.com.jo Page 42 of 61 Update Group 1. Click “
” icon located at the tool bar 2. A new page will open, click “
” icon located at the functions menu 3. A new sub menu will open. Click the “
” icon. See image below. 4. A new page will open listing all the groups. Click the group name you want to update. See Image below. 5. A new page with a pre‐filled form with the data of the selected group will open. Change the data you want. 6. Click “> UPDATE” button located at the bottom of the form. eSolutions for Network Services www.eSolutions.com.jo Page 43 of 61 Ranks Every airliner has ranks or titles that describe the responsibilities of the crew member. Moreover, every aircraft manufacture make recommendation for the crew number that can fly and serve any flight. Because all of that, eSolutions CMS gives you the ability to add and manage crew ranks. Inputs you do here will be used by the tables department when they fill the flight patterns. In eSolutions CMS ranks always organized by groups. So always before add a rank you have to select the group the rank lay under. Add new rank 1. Click “
” icon located at the tool bar 2. A new page will open, click “
” icon located at the functions menu 3. A new sub menu will open. Click the “
” icon. See image below. 4. A new page will open listing all the groups. Next to the group name you will find a link called “Ranks”. Click the “Ranks” link next to the group you want to add rank under it. See Image below. eSolutions for Network Services www.eSolutions.com.jo Page 44 of 61 5. A new page will open listing all the ranks under the group you selected. Click “Add New Rank” link located at the bottom of the ranks list. See Image below. 6. A new page will open with form, this form has the following fields i.
Group Name: select from the dropdown list the group name that this rank lay under. ii.
Ranks Name: Fill the rank name in this field for example “Air Steward” iii.
Rank Desc: this is an optional field where you can fill notes about the rank you are filling iv.
Rank Type: this is an optional checkbox. In some cases you may need another sub‐group for the ranks, if that the case check this checkbox, but normally this check box leaved unchecked. 7. Click the “> ADD” button located at the bottom of the form. Update rank 1. Click “
2. A new page will open, click “
menu 3. A new sub menu will open. Click the “
below. eSolutions for Network Services www.eSolutions.com.jo ” icon located at the tool bar ” icon located at the functions ” icon. See image Page 45 of 61 4. A new page will open listing all the groups. Next to the group name you will find a link called “Ranks”. Click the “Ranks” link next to the group you want to add rank under it. See Image below. 5. A new page will open listing all the ranks under the group you selected. Click the rank name you want to edit. See Image below. 6. A new form will open with a pre‐filled form with data of the selected rank. Change the fields you want. For fields description see “Add new rank” 7. Click “> Update” button located at the bottom of the form eSolutions for Network Services www.eSolutions.com.jo Page 46 of 61 Scheduling This module is dedicated to the flights and their configuration. You can consider this module as the output module for the whole system, because within this module you can generate crew lines or in other words distribute crew members over flights. As the Human resource module, this module has some settings that the user has to configure before be able to get correct results from running the system. To find out how to configure this module and to use the other links – sub modules – available under this module, read the following 1. General Settings Within this sub‐module you can configure all the related information for the maximum flying hours, rest periods…etc. Set Maximum Flying Hours The maximum flying hours is one of the restrictions set by the CAA. The values filled here will affect how the crew members will be distributed at the flights. 1. Click “
” icon located at the tool bar 2. A new page will open, click “
” icon located at the functions menu 3. A new page will open with four boxes. You can configure the flying hour restrictions from the box “FLYING HOURS”. See image below 4. Within the “FLYING HOURS” box you will find the following fields eSolutions for Network Services www.eSolutions.com.jo Page 47 of 61 i.
ii.
iii.
iv.
Max. per Week: fill the maximum total of flying hours the crew member can do for a single week 35 hours Max. per Month: fill the maximum total of hours the crew member can do for a single month. Usually the default value is 90 hours Max. per Quarter: fill the maximum total of hours the crew member can do for three months. Usually it’s 200 hours Max. per Year: fill the maximum total of hours the crew member can do for one year. Usually it’s 900 hours 5. Click the “
” button located at the bottom of the boxes. Set Rest Periods Her you can configure the rest periods that the crew member should take before assigned to a new trip. 1. Click “
” icon located at the tool bar 2. A new page will open, click “
” icon located at the functions menu 3. A new page will open with four boxes. You can configure the flying hour restrictions from the box “REST PERIOD”. See image below 4. Within the “REST PERIOD” box you will find the fields below. See image below i.
Fixed Hours: fill here the time in hours the crew member must rest after a trip ii.
Multiply Factor: iii.
Duty Time Plus: 5. Click the “
eSolutions for Network Services www.eSolutions.com.jo ” button located at the bottom of the boxes. Page 48 of 61 Banking Settings This banking system is a new feature in eSolutions CMS. By using this feature you can set number of flights of each category every generating period. The flight category can be set while filling the flight patterns. Category A is the best flights and category C is the worst type of flights. 1. Click “
” icon located at the tool bar 2. A new page will open, click “
” icon located at the functions menu 3. A new page will open with four boxes. You can configure the flying hour restrictions from the box “BANKING”. See image below 4. Within the “BANKING” box you will find the following fields i.
Type A: fill the number of category A flights the crew member has to do during the generating period ii.
Type B: fill the number of category B flights the crew member has to do during the generating period iii.
Type C: fill the number of category C flights the crew member has to do during the generating period iv.
Type D: fill the number of category C flights the crew member has to do during the generating period v.
Morning: fill the number of morning flights the crew member has to do during the generating period vi.
Evening: fill the number of evening flights the crew member has to do during the generating period 5. Click the “
eSolutions for Network Services www.eSolutions.com.jo ” button located at the bottom of the boxes. Page 49 of 61 Miscellaneous In this box you can set other settings related to crew limitations. 1. Click “
” icon located at the tool bar 2. A new page will open, click “
” icon located at the functions menu 3. A new page will open with four boxes. You can configure the flying hour restrictions from the box “MISCELLANEOUS”. See image below 4. Within the “MISCELLANEOUS” box you will find the following fields i.
OFF TACA Factor: ii.
Fly After Leave: time the crew member must wait in hours before be assigned to a flight after leave in hours iii.
TAFB per Month: average time away from base during the month. This field has to be calculated based in the airliner flights iv.
Max. Continues Leave days: maximum number of days the crew member can take in a leave 5. Click the “
” button located at the bottom of the boxes. eSolutions for Network Services www.eSolutions.com.jo Page 50 of 61 2. Configure Flights In this sub‐module you can configure the flights. Usually the flights called “Patterns”. Airliners have their patterns organized in two or more categories based in season. Add Schedule Group To add new schedule group ‐ where you can enter the patterns under ‐ do the following 1. Click “
” icon located at the tool bar 2. A new page will open, click “
” icon located at the functions menu 3. A new page will open listing the existing schedule group. Click the “Add New Schedule” link. See image below 4. A new page will open with one field form “Schedule Name”. Fill the name of the schedule group you want, for example “Summer” or “Winter” 5. Click “> ADD” button located at the bottom of the form eSolutions for Network Services www.eSolutions.com.jo Page 51 of 61 Update existing schedule group name 1. Click “
” icon located at the tool bar 2. A new page will open, click “
” icon located at the functions menu 3. A new page will open listing the existing schedule group. Click the schedule name you want to update. See image below 4. A new page will open with a pre‐filled form. You can update the schedule name. 5. Click the “> UPDATE” button located at the bottom of the form. eSolutions for Network Services www.eSolutions.com.jo Page 52 of 61 Add new flights (Patterns) After you fill the schedule group name you are ready to fill the flights (patterns) under it. Following are the steps 1. Click “
” icon located at the tool bar 2. A new page will open, click “
” icon located at the functions menu 3. A new page will open listing the existing schedule group. Click the “PATTERNS” button next to the schedule name you want to add flights (patterns) under it. See image below 4. A new page will open listing the patterns under the schedule name you selected. Click “Add new pattern” link. See image below eSolutions for Network Services www.eSolutions.com.jo Page 53 of 61 5. A new page will open with a form that contains the following fields i.
Schedule: from this dropdown select the schedule name this pattern related to. ii.
Flight Type: select the type of flight “Charter” or “Regular” iii.
Rest Day: days the crew member must have as a rest after the flight iv.
Valid This group contains the dates the pattern is valid within i. From: the starting date of this pattern – date format is MM/DD/YYYY ii. To: the ending date of this pattern – date format is MM/DD/YYYY v.
Days: this group list the week days. Check the checkbox under the weekday when this pattern will occur. For example if this pattern occurs every Tuesday and Wednesday, check the checkboxes under Tue and Wed. vi.
Category: every pattern as to come under a category. Category system helps to rank the trips. If the trip is with high TAFB and start in Morning so it would be a category A trip, because everyone would love to take it. On the other hand, if the trip is an overnight trip with low FA and TAFB then it would be a category D flight. vii.
Nature: Select “Round Trip” ‐> R.T, “Lay Over” ‐> L.O, or “Night Stop” ‐> N.S viii.
Time: The time of day the flight will take place. You can select “Morning” if it’s in the day time or “Evening” if it’s at the evening time. ix.
Enter Number of Sectors: Sectors means legs plus the rest days away from base. So in this field you can type in the number of legs the flight has. For example AMM ‐> NY ‐> AMM will has 2 legs and 2 rest days. So you fill 4 in this field 6. Click “
” button next “Enter Number of Sectors”. See image below eSolutions for Network Services www.eSolutions.com.jo Page 54 of 61 7. Wait until the page refresh. Note the legs rows will be equal to the number you filled in the “Enter Number of Sectors”. See image below 8. Each leg row has the following fields. All of those fields are required. i.
Air Craft Type: select from the drop down the aircraft type ii.
Flight No.: the flight number for example 128 iii.
From: select from the dropdown list the airport this trip will start from iv.
To: select from the dropdown list the destination airport for this Leg v.
ETD.: Fill the estimated departure time for this trip – preferably in GMT – time format HH:MM, for example 06:00 PM will be filled as 18:00 vi.
ETA.: Fill the estimated arrival time for this trip – preferably in GMT – time format HH:MM, for example 06:00 PM will be filled as 18:00 vii.
Manpower: Each aircraft manufacturer has a recommendation of the minimum number of the crew members who can efficiently serve in their aircraft. In this filled you can fill the number of crew members of each rank who you need to server in this flight. If the rank is not required then just fill 0. You may find crew ranks that are not used in the select Aircraft type, in this case make sure to fill 0 in that ranks. viii.
DH: Select this checkbox if you want the crew in a certain leg considered as a Dead Head. In case the trip you are filling contains rest days between the starting leg and the ending leg in certain station, then you have to specify this by entering the rest place as a separated leg for each day crew will stay there. The “ETD.” will be 00:00 and the “ETA.” will be 23:59. You should fill the Flight No. 0 in this case. eSolutions for Network Services www.eSolutions.com.jo Page 55 of 61 9. At the “Languages” box located at the bottom of the page you will find three columns each contain two fields. See image below i.
Select Languages: this dropdown list contains the languages configured in the system. By selected the language name you are telling the system that you need a crew member(s) who speak this language to be at this flight. ii.
Text field: the text field next to the select language dropdown allows you to enter how many crew members you need at that flight who speaks the selected language. Note that those fields are optional so you can fill all of them, one of them, or fill nothing to any of them. 10. Finally click the “> ADD” button located under the row legs box. See image below. eSolutions for Network Services www.eSolutions.com.jo Page 56 of 61 Update flight (pattern) information 1. Click “
” icon located at the tool bar 2. A new page will open, click “
” icon located at the functions menu 3. A new page will open listing the existing schedule group. Click the “PATTERNS” button next to the schedule name you want to add flights (patterns) under it. See image below 4. A new page will open listing the patterns under the schedule name you selected. Click you will find a green box listing all the available patterns click the flight number to open the patterns. See image below eSolutions for Network Services www.eSolutions.com.jo Page 57 of 61 5. A pre‐filled screen will open containing all the selected pattern information. You can change any field or you can even add or delete legs for the pattern. 6. Click “
” to save the updates Distribute Crew over Trips (Generate Lines) This is the final step in the planning phase. This step depends in all the information entered to the system. The result of this step will show if your data entered in all the previous steps were correct. This step can be done in two ways, either online or offline. In this manual we will discuss the offline process only, this because the online process is still in its beta version. A special utility is usually installed in one PC. This utility gives the authorized person the ability to generate lines. Image below shows the interface of the generating utility In the interface above you will find the following fields 1. Scenario Name: type in a name for the generated Scenario, these means that you make more than one scenario until the result satisfy your needs 2. Approve: when the scenario results satisfy your needs then click approve checkbox 3. Date: the date boundaries of the scenario, from date to date 4. Weights: this one of the most powerful feature of the eSolutions CMS. You have four main factors that affect the decision of the system of who to pick for the trip. The factors are: a. Rest Hours: time the crew member has to rest until next trip – but not to make any limitation – you can fill a value from 0 to 1, where 0 means neglected and 1 means most important. eSolutions for Network Services www.eSolutions.com.jo Page 58 of 61 b. Category Banking: in this field you decide whether to make the banking feature of eSolutions CMS important or not for you decision to place a crew member in a trip. You can fill a value from 0 to 1, where 0 means neglected and 1 means most important. c. Avg. Flying Hours: this field related to making all the crew members flying hours close to the average flying hours of the airliners crews. You can fill a value from 0 to 1, where 0 means neglected and 1 means most important. d. Avg. TAFB: this field related to make all the crew members time away from base close to the average time away from base of the airliners crews. You can fill a value from 0 to 1, where 0 means neglected and 1 means most important. 5. RUN button: click this button to start the process of generating the trips 6. Exit: to exit the utility eSolutions for Network Services www.eSolutions.com.jo Page 59 of 61 Troubleshooting In some cases you my got a page with a yellow box and lot of strange text. That’s mean that you have a certain error. See image below. Usually the error means that you didn’t fill all the required fields or you filled a wrong date format. To get rid of this screen, do the following: 1. Click the back button “
” of the browser. See image below 2. The form you was filling will re‐open with the data you filled 3. Make sure that you filled all the required data 4. If the form contains date fields make sure that the format is MM/DD/YYYY. For example 31st January, 2008 must be filled as 01/31/2008 eSolutions for Network Services www.eSolutions.com.jo Page 60 of 61 If still the steps above didn’t solve the problem, then you have to contact your system administrator, and please make sure to address the following 1. Page name you where filling 2. Fields value you entered eSolutions for Network Services www.eSolutions.com.jo Page 61 of 61