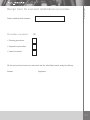
1
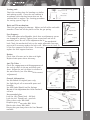
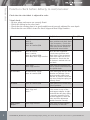
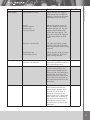
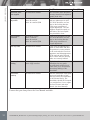
REFURBISMENT MANUAL for manuAL WHEELCHAIRS
The future is about taking care of the environment.
The future is about taking care of the environment
Alu Rehab are working to reduce pollution throughout the process of production from the
raw material, through development, to manufacture, waste management to refurbishment.
The Netti III Comfort is the first Wheelchair to have been passed through EPD (Environmental Product Declaration), reducing effect on environment and energy consumption from
manufacture to freight.
Thank you for choosing a product from
All Netti Wheelchairs are tested at TüV Product Service GmbH in Germany following the European
Standard EN:12183:1999. Netti wheelchairs are tested and approved to crash test ISO/FDIS 7176/19
A
2
alu rehab AS_Bedriftsveien 23_NO-4353 Klepp stasjon_Norway_Tel. +47 51 78 62 20_Fax +47 51 78 62 21_www.alurehab.com
Index
Index
This Manual is divided into a three step procedure detailing servicing and
refurbishment of the Wheelchair.
Cleaning procedure
– Wheelchair
page 4
– Seating system
page 4
Preparation of Netti Wheelchair for refurbishment
– Frame
page 5
– Wheel
page 5
– Arm Rest
page 6
– Back Rest unit
page 6
– Push Handles / Push Bow
page 6
– Head Support
page 6
– Seating Unit
page 7
– Back and Tilt mechanism
page 7
– Foot Support
page 7
– Brakes
page7
– Anti Tip Tubes
page 7
– General Information
page 7
Function Control
page 8
Receipt Form - paper
page 11
3
Cleaning procedure
Cleaning procedure for Wheelchair
1.Remove back cushion, seat cushion, high adjustable push handles and arm support
before washing.
2. Clean back and seat cushion according to instruction (see table below).
3.Use machine cleaning or jet water washing to clean the wheelchair.
4. If jet water washing avoid pointing directly at bearings, quick release, gas
springs and labels.
5.Use soft soap and degreasing agent where necessary.
6.Rinse wash using clean water to remove soap and degreasant.
7. Dry the wheelchair prior to greasing and preparation.
8.Use methylated spirit to remove any excess dirt or grease.
Cleaning procedure for Seating system
Read cleaning instruction label on cushions and covers for parts not in this table.
UNO Seat
Vital Base Sit
Vital Base Venti
Vital Base
Active (+)
Vital Base
Royal (+)
SEAT CUSHIONS
CORE
Wash
Hand wash 40ºC
Hand wash 40ºC
Hand wash 40ºC
Hand wash 40ºC
Hand wash 40ºC
Disinfection
Virkon S
Autoclave 105ºC
Virkon S
Autoclave 105ºC
Virkon S
Autoclave 105ºC
Virkon S
Autoclave 105ºC
Virkon S
Autoclave 105ºC
Drying
Shake (clench)
Air dry standing
Shake (clench)
Air dry standing
Shake (clench)
Air dry standing
Shake (clench)
Air dry standing
Shake clench)
Air dry standing
PROTECTION
COVER
Not standard
Not standard
Wash
Machine wash 95ºC
Wipe with soap
Machine wash 95ºC
Wipe with soap
Machine wash
95ºC
Wipe with soap
Drying
Spin-dry / Air-dry
Do Not Tumble
Dry
Spin-dry / Air-dry
Do Not Tumble
Dry
Spin-dry / Air-dry
Do Not Tumble
Dry
BACK REST CUSHIONS
OUTER COVER
4
Wash
Machine wash
60ºC
Machine wash
60ºC
Machine wash
60ºC
Machine wash
60ºC
Machine wash
60ºC
Drying
Tumble Dry max
85ºC
Tumble Dry max
85ºC
Drying tumbler
max 85ºC
Spin-dry / Air-dry
Spin-dry / Air-dry
Do not tumble dry
Do not tumble dry
CORE
All Alu Rehab Back Rest Cushions are processed in the same way.
Wash
No wash
Desinfection
Autoklave 105ºC, Virkon S.
Drying
Shake (clench), Air Dry vertical.
OUTER COVER
Back Cushions are delivered with Clima Therm or Mars cover and are processed in the same way.
Wash
Mashine wash 60ºC.
Drying
Clima Therm: Spin-dry, Air Dry, do not tumble dry . Mars: Spin-dry, Air Dry, Tumble Dry max 85ºC.
alu rehab AS_Bedriftsveien 23_NO-4353 Klepp stasjon_Norway_Tel. +47 51 78 62 20_Fax +47 51 78 62 21_www.alurehab.com
Before working on the wheelchair it is advisable to place the wheelchair on a raised table
or bench giving a comfortable and correct position and avoiding any unnecessary lift. Use
recomended tools and refer to the User Manual.
Clean the Wheelchair - see Cleaning Procedure - Page 4, difficult stains remaining after the
cleaning process can be removed with methylated spirit.
Preparation procedure
Preparation procedure
For Oiling or Greasing - remove cushions, head support, foot supports, main wheels, front
castors, arm supports and any other accessories, and tilt the wheelchair rearwards on to
the anti tip tubes.
Frame :
Check the frame for deformations, breakages, damage, abrasions, and missing screws, bolts
and nuts, worn parts must be replaced, and oiled if necessary.
Main Wheel:
Main wheels and push rims can be cleaned with soapy
water or methylated spirit. Clean the rims and check
tyres for damage and cracks, replace if necessary. Oil
the quick release/main wheel axle, check that the quick
release locks the main wheel when mounted on the
Wheelchair. To check that the main wheel is properly
attached to the wheel hub release finger pressure from
the end button and pull the main wheel.
Front Castors and Front Forks:
Clean the front forks with methylated spirit, oil the
quick release axle and check for play. If there is play in
the quick release axle, remove, clean with methylated
spirit and apply Thread Lock glue to secure the front
fork within the bearing house. For correct manoeuvering check that the bearing house is mounted vertical
in relation to the ground (see User Manual for further
details).
Dismantle the front castors from the front forks for
cleaning with methylated spirit and check for play in
the bearing. Replace the front castors if worn. Check
that the quick release locks the front castor when
mounted on the wheelchair (see User Manual for futher
details).
Push ring
Quick release
Main wheel
Bearing house
Eccentric bolt
Ball race
Quick release
Front fork
Front castors
Wheel axle
Bearing
house
alu rehab AS_Bedriftsveien 23_NO-4353 Klepp stasjon_Norway_Tel. +47 51 78 62 20_Fax +47 51 78 62 21_www.alurehab.com
5
Preparation procedure
Arm Supports:
Check that the lock track is cleaned and oiled with silicon spray. Ensure that the position screw is mounted and in the correct position.
Check that the arm support pads are mounted with two screws on
each side, check the screws are tight. Place the arm support in the
cleaned arm support bracket, move the arm support pads forwards
and rearwards slowly while screwing the lock screw inwards. When
play in the arm supports has been removed, tighten the nut.
Arm
support
pads
Arm
support
bracket
Lock
groove
Position
screw
Adjustable
drawback
Arm Support Netti 4U CED:
Ensure that the lock and release mechanism works. Check depth/
length displacement of the arm support pads, tighten the screw in
the arm support pads.
Depth shift
lock
Back Rest unit:
Check velcro back for damage in sewing and lock. If necessary clean
the velcro. Tighten the straps. Clean the cushions in accordance with
label instructions.
Push Handles :
Check the push handles for wear
and damage, replace the handgrips if necessary. Ensure that
the security screw is fitted.
Check that the shelter studding
in the plastic bracket is not de
formed.
Grip
Push bow
If the cleaning routine has not been followed and driving handles/hand grips have been incorrectly cleaned,
replace with new.
Head support:
Check the head support is clean and that there are no abrasions
or tears. Replace the head support if the wheelchair is for a
new user. Oil screws and wheels. Check and replace handles and
wheels if necessary.
Push bow
Back rest
cushion
Velco back
Security screw
Push Bow:
Check all screws and fastening points. Remove loose screws,
clean with methylated spirit and re-fit using Thread Lock glue,
(full locking). Check that the tilt and back release handles are
marked with correct symbols. Replace adjusting handles and
wheels if necessary.
6
Release mechanism
Position lock
Push bow
Head support bracket
Position lock
Release handle
Velcro back
Push bow Netti 4U comfort|CED
Adjust handle
alu rehab AS_Bedriftsveien 23_NO-4353 Klepp stasjon_Norway_Tel. +47 51 78 62 20_Fax +47 51 78 62 21_www.alurehab.com
Piston rod
Cable transfers
Swing element
Back and Tilt mechanism:
Check the gas springs for damage. Adjust and oil cables and cable
transfers. Clean and oil the piston rod on the gas spring.
Lock cone
Prepareation procedure
Seating unit:
Check the seating plate for breakage or similar
and missing screws. Clean the seat cushion in
accordance with cleaning instructions on the
cushion label or replace. See cleaning procedure
for seating system, Page 4).
Adjustment bar
Foot Support:
Check and adjust wheel/handles, check that no adjustment screws
are damaged or missing. Tighten loose screws/nuts and oil all
moveable parts. Do not oil the adjustment bar in the mechanical
lock. Check the mechanical lock on the angle adjustable foot supports and if necessary replace the lock cone. Remove and check fit
of the foot supports to the frame. If necessary
Brake handle
replace the foot support brackets.
Foot plate
Brake handle
Brake shoe
Brakes:
Check that all screws are in place and tight.
Replace brake parts where necessary.
Anti Tip Tubes :
Check the engagement and disengagement of
the anti tip tubes in the up and down positions. Adjust the anti tip tubes in relation to
the main wheels, (see User Manual for correct
adjustment).
General information:
Use Alu Rehab AS original parts only.
Use light bicycle oil on moveable parts and
bearings.
Use HHS Lube (Wurth) on Gas Springs.
Do not oil the adjustment bar in the mechanical lock.
Recommended glue:
Lock-lite 2701 Thread Lock - full lock.
Lock-tita 243 Thread Lock - part lock.
Silver colour code: RAL 9007
Graphite grey colour code: RAL 7024
Black code colour: RAL 9005
Ensure that you always have the User Manual
available
Brake shoe
Clamp
Clamp
Plastic holder
Profile tube
Lock pin
Lock pin
Spring
Lock washer
Spring
Plastic plug
Anti tip Netti 4U comfort|CED
Plastic wheel
Anti tip with pedal
Netti 4U comfort|CED
Plastic clamp
Plastic holder
Spring
Lock washer
Anti tip other wheelchairs
Plastic wheel
alu rehab AS_Bedriftsveien 23_NO-4353 Klepp stasjon_Norway_Tel. +47 51 78 62 20_Fax +47 51 78 62 21_www.alurehab.com
7
Function check
8
Function check before delivery to user/customer
Check that the wheelchair is adjusted in order.
Visual check:
– All pins, plugs and screws are correctly fitted.
– Check the sewing in the velcro back.
– Check that the seating plate is in good condition and correctly adjusted for seat depth.
– Check that the seat cloth is intact for Netti Svipp and Netti Svipp comfort .
Function
Model
Test/check
Tilt
Netti III comfort,
Netti II,
Netti Mini,
Netti 4U comfort|CED
Move the tilt functions in both
outer positions and check there
is free movement. Check that
cables run free of obstructions.
Check that the tilt function is
marked with correct labels.
Back regulation
Netti III comfort,
Netti I comfort,
Netti 4U comfort|CED,
Netti Mini, Netti Svipp comfort
Move the back regulation
in both outer positions and
check there is free movement.
Check that cables run free of
obstructions. Check that the
tilt fuction is marked with correct labels
Stiffening stay
Netti Svipp,
Netti Svipp comfort
Check that the stiffening stay
can be opened and locked with
the cylinder bush.
Push handles
All wheelchairs, except
Netti 4U comfort|CED
Check hand grips are free from
abrasion and damage. Check
driving handles adjust freely
and lock in position. Check the
stop screw and plate spring are
correctly fitted.
Push bow
Netti 4U comfort|CED
Check push bow is secure and
locks in position.
Head support
All wheelchairs, except
Netti Svipp and
Netti I
Check that the small set screw
in the center on top of the
head support adapter is tightened and that the plate spring
is correctly mounted. Check
the head support is clean and
intact and that adjustment
handles function correctly.
Head support
adapter
Netti Svipp comfort
Check that the head support
fits correctly on and off.
Done/OK
alu rehab AS_Bedriftsveien 23_NO-4353 Klepp stasjon_Norway_Tel. +47 51 78 62 20_Fax +47 51 78 62 21_www.alurehab.com
Model
Test/check
Arm support
All wheelchair models
Check that the arm support
pads match and are adjusted
similarly. Check that the upper
adjustment locks correctly.
Netti I,
Netti I comfort,
Netti II and
Netti III comfort
Adjust the plastic screws in
the arm support bracket and
tighten the lock nut, the arm
support should slide easily
within the arm support. The
stop screw should be adjusted
to the same height on both
sides.
Netti 4U comfort|CED
The slide mechanism should
operate easily. Check that the
arm support locks when swung
forward.
Netti Svipp and
Netti Svipp comfort
Check that the cloth protector
locates within the lock track
when swung forward.
Bearing housing
All models except
Netti 4U comfort|CED
Ensure the bearing housing is
adjusted in position vertical to
the horizontal ground.
Front castors
All wheelchair models
The front castors should lock
in the secure position, the
quick release should operate
freely on and off. Check there
is minimum free play in the
quick release lock. Check both
front castors are mounted in
the same hole position on the
front forks.
Main wheel
All wheelchair models
Check that the main wheels
lock securely and that the
quick release operates freely
on and off. Check there is
minimum free play in the
quick release lock. Check both
main wheels are mounted in
the same hole position in the
wheelframe bracket. There
should be no free play in the
push rims.
Done/OK
alu rehab AS_Bedriftsveien 23_NO-4353 Klepp stasjon_Norway_Tel. +47 51 78 62 20_Fax +47 51 78 62 21_www.alurehab.com
Function control
Function
9
Function control
Function
Models
Test/Check
Extension piece
foot support
All wheelchair models
The extension piece should be
securely fastened and adjusted
equally both sides.
Foot support angle
adjustable
Netti I comfort,
Netti III comfort,
Netti 4U comfort|CED
Check lock into desired angle
and easy placement on and
off. There should be no free
play in the locking bracket.
Check easy movement of
length adjustment. The calf
supports should be equal on
both sides. The knee upholstery should be clean.
Foot support
universal
All models, except
Netti I comfort,
Netti III comfort,
Netti 4U comfort|CED
Check easy placement on and
off. There should be no free
play in the locking bracket.
Check easy movement of
length adjustment.
Anti tip tubes
All wheelchair models
Check that the adjustment is
equal on both sides and that
the position is correct relative
to the main wheels. Check engagement and disengagement
of the anti tip tubes up and
down. Check that the anti tip
tubes are correctly labeled.
Cross bar/
folding
Netti Svipp,
Netti Svipp comfort
Check that the cross bar
will adjust for easy pushing and check position lock.
Check there is no obstruction
preventing folding of the
wheelchair.
Directional
stability
All wheelchair models
Push the wheelchair with equal
power on both sides of the
push bar, allow the wheelchair
to roll forward freely. The
wheelchair should roll forwards
in a straight line, if not, adjust
the front castors and main
wheels, (see User Manual).
Done/OK
Ensure that you always have the User Manual available.
10
alu rehab AS_Bedriftsveien 23_NO-4353 Klepp stasjon_Norway_Tel. +47 51 78 62 20_Fax +47 51 78 62 21_www.alurehab.com
Frame number/serial number:
Procedure executed
Receipt form
Receipt form for executed refurbishment procedure
OK
• Cleaning procedure
• Preparation procedure
• Function control
All the points above have been executed and the wheelchair made ready for delivery
Datum: Signature:
alu rehab AS_Bedriftsveien 23_NO-4353 Klepp stasjon_Norway_Tel. +47 51 78 62 20_Fax +47 51 78 62 21_www.alurehab.com
11
MANUFACTURER
Layout: Grafica Hundsnes
alu rehab AS
Bedriftsveien 23
NO-4353 Klepp stasjon
Norway
Tel. +47 51 78 62 20
Fax +47 51 78 62 21
[email protected]
www.alurehab.com