1
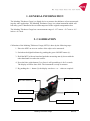
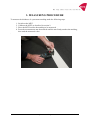
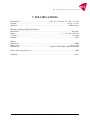
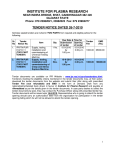
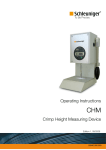
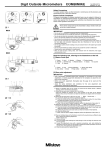
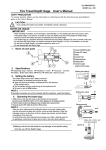
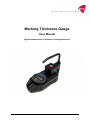
Marking Thickness Gauge
User Manual
Digital measurement of pavement marking thickness
Marking Thickness Gauge
DELTA
DISCLAIMER
The information contained in this document is subject to change
without notice.
DELTA LIGHT & OPTICS MAKES NO
WARRANTY OF ANY KIND WITH REGARD
TO THIS MATERIAL, INCLUDING, BUT
NOT
LIMITED
TO,
THE
IMPLIED
WARRANTIES OF MERCHANTABILITY
AND FITNESS FOR A PARTICULAR
PURPOSE. DELTA LIGHT & OPTICS
SHALL NOT BE LIABLE FOR ERRORS
CONTAINED
HEREIN
OR
FOR
INCIDENTAL
OR
CONSEQUENTIAL
DAMAGES IN CONNECTION WITH THE
FURNISHING, PERFORMANCE OR USE
OF THIS MATERIAL.
Caution: Changes / modifications not approved by the
responsible party could void the user’s authority to operate
the equipment.
Rev. December 2014
Marking Thickness Gauge
DELTA
TABLE OF CONTENTS
1. General information
2. Calibration
3. Measurement procedure
4. Battery replacement
5. Interface – data transfer
6. Delivery
7. Specifications
Marking Thickness Gauge
DELTA
1. GENERAL INFORMATION
The Marking Thickness Gauge is a digital devise to measure the thickness of pavement markings dry after application. The Marking Thickness Gauge is a robust instrument which will
last many years if handled with care and transported in the original transportation box.
The Marking Thickness Gauge has a measurement range of -12.7 mm to +12.7 mm or -0.5
inch to +0.5 inch.
2. CALIBRATION
Calibration of the Marking Thickness Gauge (MTG) is done by the following steps:
1. Place the MTG on an even surface of the object to be measured.
2. Switch on the digital indicator by pushing the green ON/OFF button (1).
3. Hold the MTG with one hand and push the measuring arm (4) down with the
other hand until it reaches the surface.
4. Press the blue origin button (2) as far as it will go and keep it for 2 seconds.
The display will now show 0.00. The instrument is ready to measure.
5. By pushing the +/- button (3) the display can show + or – values as required.
Measuring arm (4)
ON/OFF button (1)
Origin button (2)
+/- button (3)
Battery compartment
Interface connection
Marking Thickness Gauge
DELTA
3. MEASURING PROCEDURE
To measure the thickness of a pavement marking make the following steps.
1.
2.
3.
4.
Switch on the MTG.
Calibrate the MTG as described in section 2.
Place the MTG besides the marking to be measured.
Press the measurement arm downwards until the arm firmly touches the marking,
then read the measured value.
.
Marking Thickness Gauge
DELTA
4. BATTERY REPLACEMENT
The MTG uses a silver oxide battery (SR44)
1. Remove the battery holder by using a screwdriver or the like
2. Remove the current battery
3. Set a new battery into the holder with its positive (+) side facing the front
4. Set the battery holder into its original position
5. INTERFACE – DATA TRANSFER
Information to be provided.
6. DELIVERY
The following parts are contained in the Marking Thickness Gauge delivery:
* 1 Marking Thickness Gauge
* 1 Transportationn box
* 1 User manual
During carriage the MTG is to be handled with proper care. DELTA recommends to transport
and store the instrument in the original transportation box. If the instrument should be damaged, contact DELTA or one of our authorised dealers for assistance.
Marking Thickness Gauge
DELTA
7. SPECIFICATIONS
Dimensions …………………….................................180 x 70 x 130 mm / 7.1 x 2.8 x 5.1 inch
Weight ……………………………………………………………………….....950 gr / 2.1 lbs
Material ………………………………………………………………………….Stainless steel
Mitutoyo Absolute Digimatic Indicator
Resolution …………………………………………………………………………….0.01 mm
Range …………………………………………………………………...+/- 12.7 mm / 0.5 inch
Accuracy ………………………………………………………………………………0.02 mm
Display……………………………………………………………………………………..LED
Battery
Battery ID ..………………………………………………………………………………..SR44
Battery type ……………………………………………………………………….. silver oxide
Battery life…………………………………………….Approx. 20.000 hours under normal use
Dust / water protection level………………………………………………………………..IP42
Warranty…………………………………………………………………………………2 years
Marking Thickness Gauge
DELTA