1
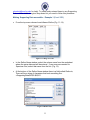
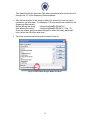
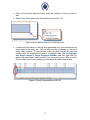
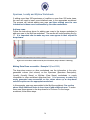
Morphbank Data Entry
Workbook User Manual v 3
1
Contributors to the Morphbank Data Entry
Workbook User Manual:
Wilfredo Blanco
Robert Bruhn
Matt Buffington
Cynthia Gaitros
David Gaitros
Neelima Jammigumpula
Karolina Maneva-Jakimoska
Austin Mast
Debbie Paul
Greg Riccardi
Fredrik Ronquist
Katja Seltmann
Steve Winner
2
circumstances, users enter text in the Information Withheld column of the
Locality sheet to tell users how to obtain the withheld data if needed.
Before entering data into the workbook, please gather the following information…
•
A Morphbank Account – Please acquire a Morphbank username and
password prior to submitting the workbook (via the login screen at
www.morphbank.net > Tools > Login > Request user account or by
contacting Morphbank at [email protected]). If the user does not
have an account before submitting the workbook, one will be generated at
that time.
•
General information about your image collection including: the Morphbank
contributor (person with authority to release the images to the public),
release date, Morphbank group to which the images should be attributed
and a project link (if one exists) to which the images are related.
•
Locality details including: continent/ocean, country, locality description
(region, province, county and place), and latitude/longitude data if
available.
•
Information about the specimen and the parties involved in the collection
of it including: basis-of-record, sex, developmental stage, form,
preparation type, number of individuals collected or observed, type status,
family, collector’s name, date collected, locality.
•
Taxonomic name data for the specimens needs to be checked in the
Morphbank database and names not in the Morphbank system will need
to be added via the web, this spreadsheet or a name upload sheet if many
names need adding. (Contact [email protected]).
o Use NameQuery to check taxon names extant in the database:
http://www.morphbank.net/Help/nameMatch/
•
Information about the view of the specimen in an image including:
specimen part, view angle, imaging technique, preparation technique,
developmental stage, sex, form, and name of the highest taxon to which
this view is applicable.
•
Images in the collection and information pertaining to them including:
specimen description, view name, copyright contact, photographer and
image file name to be uploaded. The images sent to Morphbank must be
one of the following image types:
1.
Bitmap [.bmp]
2.
Joint photographic experts group [.jpeg, jpg]
3.
Tag information file format [.tiff])
4
--tiff images are best saved as RGB color and NOT indexed color,
or CMYK color mode, or grayscale.
--tiff images generated from a Philips SEM system need to be
modified to appear correctly in Morphbank. See warning note
below.
Photoshop (psd) images should be flattened and saved as one of the image
file types above.
WARNING: Philips SEM users
Image Display Problem:
Philips SEM machines utilize non-square shaped pixels so when the
images are outside of Philips software they are distorted slightly.
To Fix:
The images need to be resized from 1424X968 to 1424X1064 for high
resolution images and 712X484 to 712X532 for standard resolution.
Philips has a small conversion program called XL-Stretch or images
can be resized manually with image manipulation software such as
Photoshop.
Note:
We suggest all applicable data fields be completed. This improves
the reliability and accuracy of data searches within the Morphbank
database.
Additionally, great care should be taken to make sure all entries are
as complete and precise as possible. Inaccurate workbook pages
require corrections, which will mean delays in importing the data to
the database. Numerous inaccuracies in the submitted workbook
may result in its return to the submitter for review and correction.
5
Data Entry Strategies:
•
Organization folder- It is helpful to place all the images that will be
uploaded to Morphbank together in a folder on your machine. The
organization of the images in this folder influences the order of the
image data input into the Excel spreadsheet. Having these images
organized efficiently beforehand (e.g. images relating to the same
taxon or the same body structure, etc.) simplifies data entry.
Figure 1 Anatomy of a Workbook Page
•
Order of data entry - Once taxon names are checked and all other
data is located and ready for entry, open the Excel file and click on
the Excel spreadsheet tab that corresponds to the area of the
workbook you would like to propagate (see Fig 1). The preferred
order for entering data into the Morphbank workbook is
ImageCollection,
Locality,
SpecimenTaxonData,
Specimen,
MyView, Images, ExternalLinks and the Supporting Data page as
needed.
•
Entering image collection data - Select the ImageCollection tab
first to enter general information about the collection of images.
6
•
Entering locality data - After entering ImageCollection data, proceed to
the Locality tab and fill in all applicable fields. These fields are linked to
fields in other tabs so you will only have to enter unique Locality data
once. Make sure any data for Locality coordinates are in the degrees
decimalized format given in the examples in the Locality section of this
manual. There are many online resources for translating degrees to
decimal. One example is http://www.jeeep.com/details/coord/.
•
Entering specimen taxon data - After entering the Locality data enter all
taxon names associated with the specimens and images to be uploaded.
Each distinct taxon name only needs to be entered once. If names at rank
higher than genus need adding to Morphbank, there are options other
than the spreadsheet. Names at rank of Suborder or lower can be added
via the web interface. In the event names of rank higher than suborder
need adding, contact [email protected]
•
Entering specimen data - After entering the Specimen Taxon Data,
proceed to the Specimen tab. As in Locality, fields in this worksheet are
linked to drop-down menus in other tabs. Drop-down menus are provided
for many of the specimen fields. If an option you would like to input is
not provided in the drop-down menu, proceed to Supporting Data tab
and modify the contents of the category as necessary.
o Notice that Locality is a field here; this field links to the data entered
in the Locality worksheet. Choose the locality that suits the
particular specimen you are working with (this is the reason why
you filled in the locality data first). If you have a lot of different taxa
(which you may), this tab is eventually going to have a great deal of
data associated with it!
•
Entering view data - Next visit the MyView tab. This worksheet is split
into two parts. In the top part users can choose a view from a drop-down
list of existing views in Morphbank. Check to see that the views needed
are listed. If the views currently in the spreadsheet are not suitable, add
new views using the second part (bottom half) of this worksheet.
•
Entering image data - Next proceed to the Images worksheet. This is the
heart of the whole process, and quite possibly may be the place you
spend the most time. Under Specimen Description, choose from the dropdown menu the specimen descriptor of the images you are going to input.
This links to the data in the Specimen worksheet, and that is why the
Specimen data is populated first. Magnification, Copyright Information and
Image File Name all have to be manually entered. MyView Name, is a
drop-down field, and is linked to the MyView worksheet. Make sure that
the views needed in the drop-down list. If view data was entered in
7
the previous step and it is not on the list, a mistake was made on the
MyView Worksheet. A final suggestion for this tab is in regards to the
Image File Name; if data entered here is incorrect, it is impossible for
Morphbank to link the metadata (specimen, locality, etc.) with an image.
The image filename given in the spreadsheet must match EXACTLY with
the image filename you upload to Morphbank (to the website, to the ftp
site or via CD/DVD). For best practice, the filename of the image must
NOT contain spaces. The filename may_contain_underscores. If both
uppercase and lowercase letters are used in a given filename, these must
be the same in the spreadsheet.
•
Entering link data - This is the final step in the population of the
Morphbank workbook. This worksheet is optional and is for those users
who want to cite more links to the entered data (Specimen, Image,
Locality or View). Note that the ImageCollection worksheet has 3 possible
URLs (1 institution link and 2 project links) that are associated with all
images and specimens in the workbook if the fields are used.
Note: If changes are made to the location information you must
manually update the changes to the specimen and image information.
If changes are made to the MyView sheet, the My View choices on the
Image worksheet have to be reselected from the drop-down. Changes
made in one area of the workbook are not automatically reflected in
other areas in the workbook.
.
8
Image Collection:
The ImageCollection worksheet allows you to provide general information about
your collection of images. Fill out this worksheet first.
Figure 2 Image Collection Worksheet
Contributor (Full Name) (required)
Enter the first name and last name only of the contributor of the images. In
Morphbank the contributor is a person with a Morphbank account who
possesses the authority to release the images to the public. Obtain an
account at www.morphbank.net (click Tools > Login > Request new account)
Contributor (Username) (required)
The contributor must be a Morphbank account holder. Once the account is
set up, the user has a Morphbank Username and password.
Submitter (Full Name) (required)
Enter the first name and last name only of the person who prepared this
workbook and submitted it to Morphbank for upload. A Submitter must be a
Morphbank user. The Submitter may or may not be the same as the
Contributor. Obtain an account at www.morphbank.net (click Tools > Login >
Request new account)
9
Release Date (required) (yyyy-mm-dd)
Enter the release date for the images if the images are not for immediate
release to the public. The release date can be at most, five years from the
date of inclusion of the images in Morphbank. If you have different sets of
images with different release dates, please create a separate Excel file for
each image set.
Group (required)
Enter the Morphbank Group name to which the images should be attributed. If
the images are not for immediate release, they can still be viewed and
modified by the members of this Morphbank Group. If you are Group
Coordinator of this group, you can add any Morphbank user to this group.
Contact Morphbank at [email protected] if you need a new Morphbank
group. If you have different sets of images you want to associate with other
Morphbank groups, create a separate Excel file for each image set.
Institution Name
Provide an institution name (if applicable) for an institution associated with the
data in the workbook. This field provides the label for an external link given in
the next field.
Institution Link
Provide a link in http:// format to the above named institution. This link to the
institution will be added as an external link to all the image and specimen
records created as a result of the provided data for upload.
Project Name
Provide a project name (if applicable) associated with the data in the
workbook. This field provides the label for an external link given in the next
field.
Project Link
Provide a link in http:// format to the above named project. This link will be
added as an external link to all the image and specimen records created as a
result of the provided data for upload.
Project Name
Provide a second project name (if applicable/desired) associated with the
data in the workbook. This field provides the label for an external link given in
the next field.
Project Link
Provide a link in http:// format to the second project named above. This link
will be added as an external link to all the image and specimen records
created as a result of the provided data for upload.
10
Images:
The Images worksheet should be the last worksheet filled out. This is the heart
of the data entry process and may take the most time. The Images worksheet
records information about the images in the collection. This worksheet has five
columns (B – F) to populate and 2 new optional columns (G, H). The explanation
of how to populate them is given below.
Figure 3 Images Worksheet
Image Sequence Number
A number that corresponds to the order of input made in the Images
worksheet. This column is auto-generated. Do not change it.
Specimen Description (required)
Choose a specimen description from the drop-down list, which is autogenerated from the Specimen worksheet. If necessary, go to the Specimen
worksheet to add new specimen entries. If there is more than one image for a
given specimen, we recommend that you enter these images sequentially so
they can easily be linked to the same specimen record. However, this is not
strictly necessary, as long as you link all of the images to the correct
specimen record. Note that the Specimen Description drop-down list only
contains an abbreviated description of each specimen. If you have similar
entries in the Specimen worksheet, make sure that you link each image to the
right specimen entry. The easiest way to do this is to make sure that the first
11
number in the Specimen Description, the specimen sequence number in the
Specimen worksheet, is correct.
My View Name (required)
Select the View describing the image from the drop-down list. The content of
the drop-down list is taken from the View worksheet. The pre-specified views
in the View worksheet are those contained in the Morphbank system when
the workbook was last updated by the Morphbank group. One workbook
features views pertinent to Animalia, the other has Plantae views. If you need
to add one or more new views to describe your images, simply add rows to
the bottom half of the View worksheet. Your new view will be available to all
users of Morphbank after your data have been uploaded to the system. When
choosing a view name from the drop-down list, please note that the list is
sorted alphabetically on specimen part, so match this first before looking at
the other data defining the view. If the view data was entered in the previous
step and it is not on the list, a mistake was made on the View worksheet.
Care needs to be taken to ensure any new View options are properly linked to
the Images tab.
If you would like help to create a custom version of the workbook with a
given set of views, contact [email protected].
Magnification
Enter a positive decimal number that corresponds to the magnification of the
image. The magnification is calculated by dividing the size of an object as it
appears on the image (when the image is rendered at normal or native size
[100 %]) by the actual size of the object. Example: if the leg of the specimen
is 0.5 mm long and on the image it appears to be 20 mm long, the
magnification is 20/0.5 =40. If possible, specify the magnification for all
images, particularly if you do not have a scale bar in them. This is a numeric
field, no text characters, (Example: 20 is permitted, not 20x).
Copyright Info (required)
Enter the name(s) of the person(s)/organization who owns the copyright of
the image or who could give a user of the Morphbank system information
about the image copyright. Include the person’s Morphbank username and/or
email if possible. This information makes it easier for anyone interested in
contacting someone regarding copyright.
Example: Janice Doe [email protected]
Image File Name (required)
Enter the exact name of the image file corresponding to this entry in the
worksheet. If data entered here is incorrect, it will be impossible for
Morphbank to link the metadata (specimen, locality, etc.) with an image. The
12
format should be image_name.image_type. Image type can be jpeg, gif, tif,
bmp, etc. The specified file names must exactly match the file names for the
images delivered with the Excel workbook. Do not leave blanks in the image
file name, use_underscores to name the images with more intuitive names.
Please put all images in the same folder.
Note that if the images are .tiff, it is best is if the colorspace is RGB and
not CMYK or grayscale.
Photographer
(Column G) Free text field to enter the name/s of any photographer/s. Please
separate multiple names by commas. This is a new field in v 3 of Morphbank.
eol (set = to 1 or 0)
(Column H) Morphbank is an eol collaborator and by default, images in
Morphbank are harvested for display at eol. Note well: images only go to eol
after they become public in Morphbank. Sometimes, a Contributor’s images
may already be at eol, or a given set of images may not be suitable for eol. In
this case, enter a 0 (zero) in this field. Enter 1 for images to go to eol as soon
as they are public.
Note: This worksheet has 250 initialized rows for data. If more rows are
needed, see the Additional Notes section of this manual for instruction
on inserting additional rows. If more than 300 rows are needed, split the
data set into a separate workbook.
13
MyView:
The MyView worksheet has 10 columns and consists of two parts. In the first
section the submitter can choose an existing Morphbank view from the drop-down
list (located in the first column, MyView Name), the rest of the columns will be
automatically populated based on the previous choice. Do not change them. If the
needed view is not provided in the MyView Name list, proceed to the second part
of this sheet and create the needed views by populating each of the column cells
(C – J, required).
Figure 4 MyView Worksheet Columns A-J
View sequence number
A number that corresponds to the order of input made in the MyView
worksheet. This column is auto-generated. Do not change it.
My View Name (required)
Column B in the top-half of this worksheet has a drop-down with existing views
in Morphbank. Select the desired view from Column B and do not alter
columns C – J (on the top half of the worksheet).
If views needed are not there, create new views on the bottom half of
the workbook using columns C – J (as described next).
Specimen Part (required)
Enter/choose from the drop-down list the name of the specimen part
presented by the view (i.e. what specimen part is featured in the image). If the
specimen part is not in the drop-down list you can add it through the
Supporting Data worksheet by adding a new entry to the Specimen Part
column there.
View Angle (required)
Enter/choose from the drop-down list a description of the view angle that
corresponds to the view. View Angle is from the viewpoint of the camera with
respect to the object being imaged. You can add new values to the drop-down
list by adding a new entry to the View Angle column in the Supporting Data
worksheet.
Imaging Technique (required)
Enter/choose from the drop-down list the imaging technique used for this view.
If the imaging technique used is not in the list you can add the value by adding
a new entry to the Imaging Technique column in the Supporting Data
worksheet.
Preparation Technique (required)
Enter/choose from the drop-down list the imaging preparation technique used
for the view. This field captures data about the preparation done to the
specimen (if any) in order capture the image(s). If the image preparation
technique used is not in the list you can add the value by adding a new entry
to the Imaging Preparation Technique column in the Supporting Data
worksheet.
Developmental Stage (required) (dw=lifeStage)
Enter/choose from the drop-down list the developmental stage of the
specimen presented in the view. The stage you select should be the same as
the stage entered in the Specimen worksheet for the specimens in the images
to which you plan to apply this view. Example: If you enter “adult” as the
developmental stage for the view, you cannot apply this view to an image of a
“larva”, if you need to apply a similar view to a larva, you need to create a new
view entry.
15
Sex (required) (dwc)
Choose one option from the drop-down list. The option you choose may or
may not be one you entered in the Sex column in the Specimen worksheet for
the specimens in the images to which you plan to apply this view. For
example, if a Specimen is a hermaphrodite, a given image of that specimen
may show the male or female part of the organism.
Form (required)
Choose one option from the drop-down list. The option you choose should be
the same as the one you enter in the Form column in the Specimen worksheet
for the specimens in the images to which you plan to apply this view.
Examples: queen, worker, exposed. You may choose indeterminate if the view
does not apply to a specific morphological form, in which case you can apply
the view to images of specimens of any morphological form.
View Applicable to Taxon (required)
Enter the name of the highest taxon to which this view is applicable. It is
possible for a view to be applicable outside of the user’s immediate taxon of
interest. For example, the view name of lateral habitus, when photographing a
wasp, is relevant for Insecta but it can also be applied to Arthropoda,
Hexapoda, and perhaps Animalia. The user should decide the highest
possible applicable taxon in which they have confidence that the
terminology for that view is relevant. In this case, lateral habitus may be
useful as a view name through Hexapoda, but may not necessarily apply to
images of the side view of all animals. This information is required.
Note: This worksheet has 30 rows for existing views to be chosen and
200 more for new views to be created. If more rows are needed, see the
Additional Notes section of this manual for instructions on inserting
additional rows.
Be sure not to use the same view twice by only applying a “slight
change”. If almost the same view is needed (even if only one field is
different), create a separate view. On the Image sheet, never change the
existing view which was chosen for some other image. The result will
affect the upload by omitting some of the images that will now appear
with invalid views.
16
SpecimenTaxonData:
All taxonomic names used in this upload need to be entered in this sheet. Check
the database for names before filling in the SpecimenTaxonData worksheet.
To check just a few names, login to the website at http://www.morphbank.net >
header menu > tools > submit > taxon name. This opens Taxon Search. Enter the
taxon name and click to search, and if not found, be sure to check if the parent is
in Morphbank or not.
If more than 20 or so names need checking, use the Name Query feature instead.
Login to Morphbank and go to > help > namequery. With this search feature, copy
and paste in a list of names to be searched. The output is divided into: names
found / names not found, and is available for download in csv format. Use this
information to construct a list of names to fill out this worksheet.
1. If a taxon name is a) already in Morphbank and b) only in Morphbank one
time, then
• The only columns necessary to fill in for that name are Family (column
A) and Scientific Name String (column H) which is the taxon name
exactly as it appears in Morphbank (without the author/year).
• Note the Family column helps to resolve parentage in cases where a
genus name exists in more than one Kingdom.
2. If a taxon name is not in Morphbank, check the parents of that taxon name to
see if the higher rank names are in the database.
• For example, if the species taxon name desired is not in Morphbank,
but the Genus is, the worksheet needs only one line of data to add that
name (see examples).
• If the Genus and species are not in Morphbank, then one row of the
worksheet adds the Genus, the next row, the child (species), and so on.
3. Parentage for a new taxon name to be added to Morphbank is given in
columns A – G.
To add large numbers of names, at the rank of Genus or lower, the
SpecimenTaxonData sheet is efficient. Ideally, the SpecimenTaxonData
worksheet needs to be completed after the ImageCollection and Locality
worksheets. This worksheet can also be used on its own for the purpose of
only adding names to Morphbank.
To add 30 names or less at the rank suborder or lower, it may be more efficient
to use the Morphbank web-interface to add the needed taxon names. If names
need to be added above the suborder rank, contact [email protected]
17
Figure S Specimen Taxon Data Worksheet Columns A-O
Parentage must be indicated at each rank where the child is new to
Morphbank. The parents must already be in Morphbank. When adding a child to
parents already in Morphbank, one row (entry) for that name is sufficient.
Columns A – G indicate parentage for the Scientific Name given in column H.
Example 1: Beauprea gracilis is not in Morphbank, the genus Beauprea is in
Morphbank. To add the child gracilis to the Genus Beauprea, fill out the Excel
Spreadsheet as follows:
Figure S1 Specimen Taxon Data – Add a child
Family (required)
Enter the Family name here as it appears in the database.
Genus, Subgenus, Specific epithet, ssp., var., forma (required if)…
Use these columns when needed to indicate parent of taxon name in column
H. If the taxon rank of name in column H is a subspecies then (at least)
columns A, B, and D (Family, Genus and Specific epithet) are filled out as
parents of name in column H.
18
Scientific Name String (required)
Enter the scientific name here as it is to appear in the database.
Taxon Author, Year (optional)
Enter this information (if known) as it is to appear in the database. No need to
add it at all if taxon name is already in Morphbank as desired. The software
finds the only possible match via the string of text in column H
(ScientificNameString). If the author/year is entered for a name existing in
Morphbank, it too, must match exactly as it appears in Morphbank or the name
with author/year goes into the database again.
Morphbank Publication Id (optional)
In Morphbank, log-in > select group > submit > publication. Enter the
publication data (if known) for the taxon name, click submit, note the
publication id and enter it in the spreadsheet. Note for any given taxon name,
the journal it was published in may already be in Morphbank. Check the
Publications in Morphbank before filling out the worksheet. If it’s already there,
note the id and enter it in the workbook.
Publication Pages (optional)
If known, enter the page number/s where the name appears in the publication.
Names may be added to Morphbank without complete publication data.
Trade Designation Names (optional)
For cultivar purposes, use this field to enter a cultivar's Trade Name.
Nomenclatural Code (required only if a cultivar name is added).
If known, enter the nomenclatural code the taxon name follows such as: ICBN,
ICZN, ICNCP or other appropriate code. If name to be added is a cultivar,
this field must read ICNCP.
Name Source (optional)
If taxon name data is gathered from another taxonomic name server database,
enter that information here such as: TROPICOS, IPNI, uBio, World Spider
Catalog, etc.
Note well for Morphbank Publication Id – If using this field, it greatly assists the
workflow if one adds all the needed publications to Morphbank before filling out
the worksheet.
Names may be added to Morphbank without complete publication data.
Fields lettered I – O are optional with one exception. If adding a cultivar name,
column M (Nomenclatural Code) must read: ICNCP.
19
Example 2: adding typical names in kingdom Animalia.
Figure S2 Sample Animalia - Specimen Taxon Data
In the screen shot above, a user wants to add a genus under the Vespidae family.
A search of Morphbank reveals this genus name is not in the database. By
placing Vespidae in the Family column, NewGenus in column H is added to
Morphbank as a child of Vespidae.
Next, a subgenus is added under the NewGenus. Note that in order for the
software to understand the name is a subgenus, it must be in parentheses. In row
4, the species is added.
A different species is added in row 5, same genus. And in row 6 the first
subspecies is added. Note that the specific epithet of the species is placed in
column D (specific epithet). Columns A, B and D here with Vespidae NewGenus
newspeciesepithet indicate the parent of the new subspecies name in column H.
Rows 9 – 13 show how to add sp names (temporary names).
20
Example 3: adding typical names in the kingdom Plantae.
Figure S3 Sample Plantae - Specimen Taxon Data – Add children
Figure S3 gives examples for how to add various types of names at various ranks.
The rows have been highlighted for clarity.
In row 2, a NewGenus is added under the family Malvaceae. Row 3 shows a new
Subgenus added under the NewGenus. Notice the (Subgenus) must be in
parentheses.
21
A new species is added in row 4 under the (Subgenus). Note for these rows how
the columns A, B, and C are the parents of the children in column H.
In rows 5 – 8, a new species, subspecies, variety and form are added. The rank
indicators must be ssp., var., f. if you wish to nest them as they are here in order
for them to insert correctly. Again, note how the parentage is indicated (parsed) in
columns A – F for rows 5 – 8.
Subspecies can be added without indicators, as in row 9, but no lower rank
names can be added under it.
Temporary names using sp or sp. may be added as shown in rows 10 and 11.
Adding cultivar names is illustrated in rows 12 and 13. ICNCP must appear in
column M for these names to insert as cultivars.
Rows 14 – 19 show how names are added that have rank qualifiers. In these
examples, the rank qualifier prefixes are aff, cf, near, and ?. Notice they have no
dots after them. In row 24, a rank qualifier suffix, sensu lato appears.
Hybrid names are shown in rows 20 – 24.
22
Specimen:
The Specimen worksheet is associated with the Specimen table in the Morphbank
database. The data entered here should provide information about the specimen
and the parties involved in the collection of it. This worksheet has 24 columns.
Below is an explanation of how to populate each one of them.
Figure 5 Specimen Worksheet Columns A - X
Specimen Sequence Number
This column is auto-generated. It is a number that corresponds to the order of
input made in the Specimen worksheet. Do not change it. This number will be
used to make a relation in the workbook between the data for a given
specimen and the images associated with that specimen.
Scientific Name (required)
Choose the taxon name for your specimen from the drop-down. The taxon
names in this drop-down come from the SpecimenTaxonData worksheet.
Basis of Record (required) (dwc)
Choose one of the options from the drop-down list. Current choices are:
Observation, Living Organism, Specimen, Germplasm/Seed. If additional
options are needed, please contact Morphbank at [email protected]. The
list of options is based on the Darwin Core standard
Sex (required) (dwc)
Choose one of the options from the drop-down list. The list contains a set of
terms based on community consensus: Male, Female, Hermaphrodite,
Indeterminate (if the specimen was examined but the sex could not be
determined), Unknown (if the specimen was not examined for its sex or if the
sex is not applicable to a particular specimen), Transitional (if the specimen is
23
between sexes, like sequential hermaphrodites). If additional options are
needed, please contact Morphbank at [email protected]. The list of
options is based on the Darwin Core standard
Developmental Stage (required) (dwc=lifeStage)
Enter/choose from the drop-down list the developmental stage of the
specimen. If the stage that you need to specify is not on the list you can
update the list by making a new entry in the Developmental Stage column in
the Supporting Data worksheet. After that, the new stage will appear at the
end of the drop-down list for Developmental Stage.
Form (required)
Enter/choose a description of the morphotype of the specimen. Examples:
queen, worker, exposed. Use “Indeterminate” if you do not wish to apply a
specific morphotype designation to the specimen. If your specimen is of a
morphotype that is not part of the drop-down list, you can update the list by
making a new entry in the Form column in the Supporting Data worksheet.
After that, the new form will appear at the end of the drop-down list.
Information about the Supporting Data worksheet is provided at the end of this
manual.
Preparation Type (dwc=preparations)
Enter the type of specimen preparation, if applicable. This is the preparation of
the whole specimen, before incorporation into the collection. (Examples
include “Pressed and Dried” and “70% ethanol”.)
Number of Individuals (dwc=individualCount)
Enter the number of individuals that were collected / observed. This is the
number of individuals in the lot or container representing the specimen record.
Type Status (required) (dwc=typeStatus)
From the drop-down list, choose the type status of the specimen. If the Type
Status you need to specify is not on the list you can update the list by making
a new entry in the Type Status column in the Supporting Data worksheet. After
that, the new type status should appear at the end of the list. The type status
indicates the kind of nomenclatural type that a specimen represents. The type
status should refer to the name given to the specimen in the next few columns.
The Morphbank system can store any number of determinations and type
designations for a specimen; contact Morphbank at [email protected] if
some of your specimens require more than a single type designation or
determination.
Determined By (dwc=identifiedBy)
Enter the name(s) of person(s) who determined the taxonomic category of the
specimen. Add the names separated by a comma.
24
Date Determined (dwc=dateIdentified)
Enter the date when the specimen was determined. Use the format: yyyy-mmdd. If the day is unknown enter yyyy-mm-00, or if the month is unknown enter
yyyy-00-00. (Make sure the date is current or a past date.)
Determination Notes (dwc=identificationRemarks)
Enter any notes related to the determination of the specimen.
Institution Code (suggested) (dwc=institutionCode)
Enter the code for the institution to which the collection belongs.
Collection Code (suggested) (dwc=collectionCode)
Enter a unique alphanumeric value which identifies the collection to which the
specimen belongs. Make sure that all codes used in this column are also given
on the Image Collection worksheet together with the full name and address of
the collections.
Catalog Number (suggested) (dwc=catalogNumber)
Enter a unique alphanumeric value which identifies the specimen record within
the collection. It is recommended that this value provides a key by which the
actual specimen can be identified. If a biological specimen (individual
organism) is represented by several collection items, for instance representing
various types of preparation, this value should identify the individual collection
item.
Previous Catalog Number (dwc=otherCatalogNumbers)
Enter a previous catalogue number if the specimen was earlier identified by
another catalog number in the current catalog or at/in another
institution/catalog. A fully qualified catalog number is preceded by Institution
Code and Collection Code with a space separating each sub element.
Referencing a previous catalog number does not imply that a record for the
referenced item is or is not present in the corresponding catalog, or even that
the referenced catalog still exists. (This category pertains mainly to museums
or personal collections.)
Related Catalog Item
Enter a fully qualified identifier of a related catalog item (a reference to another
specimen). A fully qualified identifier consists of Institution Code, Collection
Code and Catalog Number, with a space separating each of the three sub
elements.
Relationship Type
Enter a string (named value) that specifies the relationship between the
specimen and the related catalog item. Example of possible values include:
“parasite of”, “epiphyte on”, “progeny of” etc.
25
Collection Number (suggested) (dwc=recordNumber)
Enter an identifying number (a string) which was applied to the specimen at
the time of collection/observation by the collector. This number links different
parts/preparations of a single specimen and field notes with the specimen.
Collector’s Name (suggested) (dwc=recordedBy)
If known, enter the name(s) of the collector(s) responsible for collection of the
specimen or taking the observation. Separate each collector’s name with a
comma. (Example: John Smith, Jane Doe).
Date Collected
Enter the date when the specimen was collected. The date format should be
yyyy-mm-dd. If the day is unknown enter yyyy-mm-00 or if the month is
unknown enter yyyy-00-00.
Locality (required)
Enter the locality from which the specimen was collected. This column is a
drop-down list that comes from data entered in the Locality worksheet. Each
item in the drop-down list contains the locality sequence number followed by
the locality description. To populate this column, first enter the data in the
Locality worksheet and then choose the appropriate option from the dropdown list. If the locality is Unknown, create a locality on the Locality
worksheet where ContinentOcean, Country and Locality Description all
read: Unknown.
Notes (dwc=occurrenceRemarks)
A free text field to enter additional notes related to the specimen record.
(Specimen notes might include voucher label information (i.e. DNA,
anatomical, etc.) about a specimen or other information such as the duration
of the collection/trapping sessions noting a range of dates the process took
place.)
Specimen Description
This column is auto generated. Do not change it. It provides the drop-down list
in the Image worksheet and so it makes the link between images and
associated specimens. The field is a concatenation of specimen sequence
number / genus /species /sex /date collected /locality.
Note: This worksheet has 250 initialized rows for data. If more rows are
needed, see the Additional Notes section of this manual for instructions
on inserting additional rows.
26
Locality:
After completing the Image Collection worksheet proceed to the Locality
tab. These fields are linked to fields in other tabs so you will only have to
enter unique locality data once. Make sure data for locality coordinates are
in the decimal form given in the examples for Latitude and Longitude in this
section. The Locality worksheet should contain detailed information about
the localities where the specimens were collected. The information entered
in this worksheet provides the drop-down list in the Specimen worksheet.
Explanation of how to populate each of its 14 columns is provided below.
Figure 6 Locality Worksheet Columns A-F
Locality sequence number
A number that corresponds to the order of input made in the Locality
worksheet. This column is auto-generated. Do not change it.
Continent Ocean (required)
Choose the continent or ocean where the specimen was collected from the
drop-down list. If you need to enter a continent/ocean not provided in the list
you can make a new entry in the ContinentOcean column in the Supporting
Data worksheet. After this, the new entry should appear at the end of the list.
Country (required)
Choose one country /political unit from where the specimen was collected. The
drop-down list contains names of currently recognized countries. If you need
to add new entries to this list, please contact Morphbank at
27
[email protected]. For old specimens, we recommend that the original
country of collection, if applicable, is added to the Locality Description column
and that the Country column is used to provide the current political unit for the
locality, if this is possible to determine.
Locality Description (required)
Enter the name of the Region/Province/County/Place and displacement from
this name (if applicable) from which the specimen was collected. Examples:
“FL Tallahassee, Apalachicola National Forest”, “FL St George Island”. The
locality description should correspond to label data where possible.
Latitude (dwc=decimalLatitude)
Enter the latitude of the locality in degrees decimal format, for example,
40.446195, -79.948862. Note that (+) is understood. Convert minutes and
seconds to a decimal part, if applicable. The number entered should be
between 0.0000 and 90.0000. Conversion websites exist that convert degrees
to decimal. (One example site is http://www.jeeep.com/details/coord/).
Longitude (dwc=decimalLongitude)
Enter the longitude of the locality in degrees decimal format, for example,
40.446195, -79.948862. Note that (+) is understood. Convert minutes and
seconds to a decimal part, if applicable. The number entered should be
between 0.0000 and 180.0000. Conversion websites exist that convert
degrees to decimal. (One such site is http://www.jeeep.com/details/coord/).
Figure 7 Locality Worksheet Columns G-M
Coordinate Precision (dwc=coordinatePrecision)
Enter an estimate of how tightly the longitude and latitude of the collecting
locality was specified. Express the precision as a distance, in meters, that
corresponds to a radius around the latitude-longitude coordinates. Leave the
field blank if the precision is unknown, cannot be established or is not
applicable.
Minimum Elevation (dwc=minimumElevationInMeters)
Enter the minimum elevation of the locality in meters above (positive) or below
(negative) sea level.
28
Maximum Elevation (dwc=maximumElevationInMeters)
Enter the maximum elevation of the locality in meters above (positive) or
below (negative) sea level.
Minimum Depth (dwc=minimumDepthInMeters)
Enter the minimum depth of the locality in meters below the surface of the
water where the collection was made. All material collected for this specimen
record should be at least this deep. Use positive number for below the surface
and negative for above.
Maximum Depth (dwc=maximumDepthInMeters)
Enter the maximum depth of the locality in meters below the surface of the
water where the collection was made. All material collected for this specimen
record should be at most this deep. Use positive number for below the surface
and negative for above.
Locality Name
This column is auto generated. Do not change it. The content of it is a
concatenation of locality sequence number and locality description. This
column is made for easy look up of localities in the Specimen worksheet.
Information Withheld (dwc=informationWithheld)
This column needs to be populated only when locality data is withheld. You
may provide a reason for withholding information (example: endangered
species) and a contact person who has the authority to release this
information to a given group of users.
Note: This worksheet has 250 initialized rows for data. If more rows are
needed, see the Additional Notes section of this manual for instructions on
inserting additional rows.
29
External Links:
The External links worksheet is optional and populated last. Use this option to
link the deposited images to any external link like other databases, NCBI
accession numbers, location maps etc. Links may be associated with any
Morphbank table, so they can appear in the SpecimenRecord, ImageRecord,
LocationRecord or ViewRecord tables. This worksheet has 6 columns.
Figure 8 External Links
Object Type (required only if this sheet is used)
Choose from the drop-down list the Object Type for which you want to create
a link. The choices are: Specimen, View, Image and Locality. Note well: if
the same institution and/or project link is to be added to all the Specimens
and Images, this is done easily with the first worksheet, Image Collection.
This External Links worksheet allows unique links to specific objects.
Type Description for External Link (required only if this sheet is used)
Choose from the drop-down list the Type Description for External Link. The
choices in this column will change to match the Object type selected. For
example: If an Object Type of Specimen, View or Locality is selected, the
Type Description choices will contain the description field from that
associated worksheet (Specimen-will contain the description field from the
Specimen Worksheet, View-will contain the description field from the View
Worksheet etc.) .If an Object Type of Image is selected, the Type Description
choice will be the image_file name.
Type of External Link (required only if this sheet is used)
Choose the Type of External Link from the drop-down list. The choices are
Google map for Locality object and GenBank for Specimen object. For adding
new types of external links like University collections, refer to the Supporting
Data worksheet and add the desired entry.
Label for External Link (required only if this sheet is used)
Type a short descriptive label. The label is the name of the link that appears
on the Morphbank page. Appropriate labels would include the name of the
institution that the link is going back to or the name of the gene region that is
linking to an accession number. Examples: Google Map, CO1, AMNH.
External Link (required only if this sheet is used)
Provide the exact name of the external link (URL). The accuracy of the
provided data will be crucial for a proper linking from/to Morphbank. Users
are responsible for maintaining their own links i.e. replacing, updating, or
correcting outdated, incorrect or otherwise broken links. This can be done
through the Morphbank web interface (Edit/External Links) after the images
are uploaded to Morphbank.
External Link Notes (optional)
This is a free text entry to further describe the usage of the link. An example
would be to make a comment about an institution that is being linked to.
NOTE: Be sure to have an object created before adding an external link. If
any changes are made to the spread sheet, it is necessary to re-choose the
description to which the external link is associated with.
31
Supporting Data:
The Supporting Data worksheet provides the data for the dropdown lists that can
be updated: Specimen Part, View Angle, Preparation Technique, Imaging
Technique, Continent Ocean, Developmental Stage, Form, Type Status and
Type of External Link. Each of the columns can be updated by just entering the
desired value in the first empty cell of that column.
Figure 9 Supporting Data Worksheet Columns A-D
Figure 10 Supporting Data Worksheet Columns D-H
In this worksheet, only a limited number of extra entries can be made in any
particular column because some extra cells have been preformatted to be
included in the resulting drop-down. For Specimen Part there are 100 initialized
cells for extra entries, for all other columns there are 20 cells for extra entries. If
you need to add more than the pre-formatted number of extra cells, it is
necessary to update the drop-down definitions so new values show up as dropdown selection options on the appropriate worksheet. (Please feel free to contact
32
[email protected] for help). To make newly entered items in any Supporting
Data column visible in a given drop-down list you need to follow this procedure:
Making Supporting Data accessible – Example 1 (Excel 2003)
•
From the top menu choose Insert>Name>Define (Fig. 11-14).
Figure 11 Adding extra cells
•
In the Define Name window, select the column name from the worksheet
where the extra data was/will be entered. If new rows are needed for
Specimen Part, select that name from the list. (Fig. 12).
•
At the bottom of the Define Name window there is a field called Refers to;
There will be a string of characters that look something like:
=SupportingData!$A:$2:$A$101.
Figure 12 Define Name
33
This indicates that the Specimen Part data is associated with column A row 2
through row 101 of the Supporting Data worksheet.
•
Alter the last number in this string to reflect the value of the last row that is
needed for the extra data. For example, if 10 extra entries are needed for the
Supporting Data column
Before altering the string:
=SupportingData!$A:$2:$A$101
After altering the string:
=SupportingData!$A:$2:$A$111 (Fig. 13).
Once the number string has been changed to reflect the newly generated
rows, select the OK button and close.
•
Ten more specimen parts may now be added to the list.
Figure 13 Alter Number String to Reflect New Rows
34
Hint (Excel 2007)
The same task of updating the drop-down definitions is done by going to
Formulas, (Defined Names Section), Name Manager. Click to open Name
Manager reveals:
Figure 14 Name Manager (Excel 2007)
Change the column number in the Refers to field (see above) or click the Edit
button and update the column number there. The result is the same.
35
Additional Notes:
Inserting new rows into the worksheets
The Specimen, Locality and Image worksheets have 250 initialized rows while
MyView has 30 rows to be populated from a drop-down list and 200 rows for
creating new views. If you need to add more entries for auto generated columns,
columns that reference columns from other sheets and display drop-down list,
follow this procedure:
Images Worksheet: If more than 250 images are to be entered, the user will
need to add more initialized rows to the images worksheet. Add the new rows,
using row 250 as shown, before putting any data in row 250.
To Add new rows:
•
Select all of the cells in the last auto generated row (last row that can contain
data) by clicking on the cell in column “A” of the last initialized row and
dragging to column “F” of that row. The row will now be highlighted. (Fig. 15)
Figure 15 Highlight the Last Row of Cells
•
Move the mouse to the right lower corner of that last cell of the row you just
selected (where the dot is). The cursor will be shaped like a Plus “+” sign.
36
•
•
Click on the dot and drag the cursor down the number of rows you wish to
add.
Select Copy Cells option from the drop-down menu (Fig. 16).
Figure 14 Click on indicated symbol to reveal drop-down list
•
If there was information in the last auto generated row, that information has
been copied to the new rows. You can write over the information or remove it
using “clear contents.” To remove data, select and drag over all the rows and
columns with the unwanted information to highlight them (Do not highlight
and delete column A, Image Sequence Number) and then right click (or
apple click) and select “clear contents” from the pop-up menu. Clear contents
removes data, but not the underlying formatting that creates drop-downs.
Figure 15 Newly Generated Rows 251-255
37
Specimen, Locality and MyView Worksheets
If adding more than 250 specimens or localities or more than 200 extra views,
the user will need to insert more initialized rows to the appropriate worksheet.
The process will include adding new rows and then making sure the new
information in those rows is accessible by the other worksheets.
Add new rows:
Follow the instructions above for adding new rows to the images worksheet to
add new rows to the MyView worksheet. The results will look something like fig.
17. It is important now to make any new rows appear in their respective
drop-downs.
Figure 16 Ten New Rows Added to the MyView Worksheet (Only Columns F-J Showing)
Making Extra Rows accessible – Example 2 (Excel 2003)
The drop-down menus on other worksheets use the information in the autogenerated column (last column) on the Specimen (Specimen Description),
Locality (Locality Name) or MyView (View Name) worksheets to supply
information to other worksheet drop-down lists. It is necessary to make any
newly generated rows accessible so the values show up as drop-down
selection options on the appropriate worksheet.
In this example, new rows were added to the MyView worksheet. See section
above titled Additional Notes to learn how to add additional rows. To make
these new Views appear in the drop-down list of Column C in the Image
worksheet, follow these steps.
38
•
From the top menu choose Insert>Name>Define (Fig.18).
Figure 18 Top of Page Menu Insert>Name>Define
•
In the Define Name window, select the auto-generated column name from the
worksheet where the new rows where generated. If new rows were added to
the Specimen worksheet select SpecimenDescription. If new rows were
added to the Locality worksheet select LocalityName. If new rows were added
to the MyView worksheet select ViewName (Fig 19).
Figure 19 Define Name Menu
39
•
At the bottom of the Define Name window there is a field called Refers to;
There will be a string of characters that look something like:=View!$2:$J$301.
This indicates that the name ViewName is associated with column J row 2
through column J row 301 of the MyView worksheet. Alter the last number in
this string to reflect the value of the last row that was added. For example, if
you added 10 new rows the string would look like: =View!$2:$J$311 (Fig. 20).
•
Once the number string has been changed to reflect the newly generated
rows, select the OK button and close.
Figure 17 Definition Changed to Reflect the 10 New Rows
40
Hint (Excel 2007) In Excel 2007, the same task of updating the drop-down
definitions is done by going to Formulas, (Defined Names Section), Name
Manager. Click to open Name Manager reveals:
Figure 21 Definition Changed to Reflect the 10 New Rows
Change the column number in the Refers to field (see above) or click the Edit
button and update the column number there. The result is the same.
41
How to Save and Deliver the Files:
For each image set with different release dates create separate folders. Name
each folder as desired, for example: ImageCollection1, ImageCollection2, etc.
Inside each folder, place the excel sheet named mb3_yourfilename.xls and all
associated images. Be sure to have the correct image file names as they appear
in mb3_yourfilename.xls. You can deliver your data to Morphbank three ways:
1. Save all image collection files on a CD and send to Morphbank by land
mail. (See contacts section of this manual, next). Make sure to keep a
backup copy for yourself and send with proper postage and protection.
Please include a business phone number and contact information so you
can be contacted by Morphbank.
2. Provide the name of your directory/repository from where we can directly
download mb3_yourfilename.xls and the corresponding images. You
should also set a time slot of when we can do the file transfer. Be aware
that during this time slot your data will be publicly accessible.
3. Morphbank provides an ftp upload service as an alternative to mailing
CDs/DVDs. Registered Morphbank users may email
[email protected] for an ftp upload username, password, and server
hostname. Although you should be familiar with ftp, only minimal
experience is necessary to use this service. The Morphbank server may
be accessed by using secure shell terminal, command line or any graphic
ftp program.
Once a Morphbank administrator has sent account information, users may
begin uploading. Be sure to use ftp (file transfer protocol), or sftp as
instructed by someone from [email protected]. There is no limit on
the number of files uploaded at one time. Once the images are on the
server, notify [email protected] of the completion; include a message
requesting that the account remain open if needed. If the account is not
requested to remain open, Morphbank will delete the files off the server
once they have been received and the account password changed.
This service may be used once or many times depending on the users
specific needs.
4. Morphbank is currently working on designing a web interface for users to
upload their data and images directly from these forms. When this option
is online – data is uploaded first to a test server and any errors reported.
Once the data enters correctly, it is uploaded to the production server.
42
Note: If errors are found within your Excel workbook they will be
commented and the workbook will be returned for corrections.
Please include a business hours phone number so one of the
Morphbank team can contact you.
Contact Information:
Questions or Comments
Morphbank Administration
[email protected]
Deborah Paul
[email protected]
Contacts
Morphbank Administration
[email protected]
Land Mail Address
Morphbank Group
c/o Deborah Paul
Mail Code 4120
Florida State University
Tallahassee, FL 32306-4120
43