1
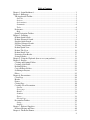
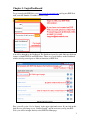
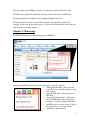
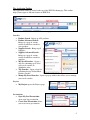
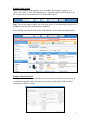
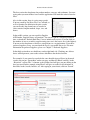
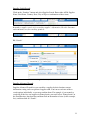
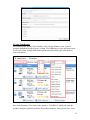
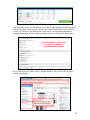
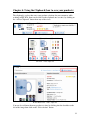
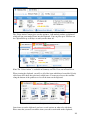
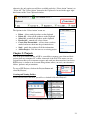
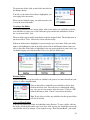
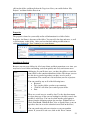
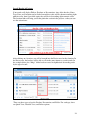
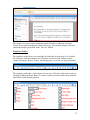
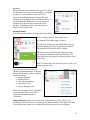
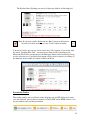
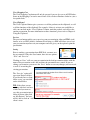
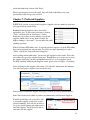
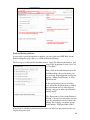
User Manual
V.3 08/12/10
Table of Contents
Chapter 1: Login/Dashboard............................................................................................... 3
Chapter 2: Homepage ......................................................................................................... 4
The Application Toolbar................................................................................................. 5
Searches ...................................................................................................................... 5
Projects ....................................................................................................................... 5
Presentations............................................................................................................... 5
Community .................................................................................................................. 6
Tools............................................................................................................................ 6
Preferences ...................................................................................................................... 6
Help............................................................................................................................. 7
Quick Navigation Toolbar .............................................................................................. 7
Chapter 3: Searching........................................................................................................... 8
Product Quick Search ..................................................................................................... 9
Product Advanced Search ............................................................................................... 9
Supplier Quick Search .................................................................................................. 11
Supplier Advanced Search............................................................................................ 11
Viewing Your Results................................................................................................... 12
Product Quick View...................................................................................................... 14
Product Tile View ......................................................................................................... 14
Product Detail View...................................................................................................... 15
Narrowing Your Results ............................................................................................... 17
Saving Searches ............................................................................................................ 18
Chapter 4: Using the Clipboard (how to save your products) .......................................... 19
Chapter 5: Projects............................................................................................................ 21
Creating and Naming Folders ....................................................................................... 21
Creating a Sub Folder ................................................................................................... 22
Deleting Folders............................................................................................................ 22
Copy and Paste Folders................................................................................................. 22
Searching in Projects..................................................................................................... 23
Filters ............................................................................................................................ 25
Chapter 6: Presentations ................................................................................................... 26
Cover Page .................................................................................................................... 26
Header ........................................................................................................................... 28
Footer ............................................................................................................................ 29
Closing Page ................................................................................................................. 30
Creating a New Presentation......................................................................................... 30
Layouts...................................................................................................................... 31
Cover page ................................................................................................................ 31
Header....................................................................................................................... 31
Products .................................................................................................................... 32
Footer........................................................................................................................ 34
Closing Page............................................................................................................. 35
Presentation Toolbar ..................................................................................................... 36
Saving........................................................................................................................ 37
Sending...................................................................................................................... 38
Chapter 7: Preferred Suppliers.......................................................................................... 39
Preferred Pricing and Notes .......................................................................................... 40
Chapter 8: The Event Planner ........................................................................................... 42
2
Chapter 1: Login/Dashboard
To get started with ESP Web, go to http://espweb.asicentral.com and log into ESP Web
with your ASI Number, Username, and Password.
You will be brought to the Dashboard. The Dashboard provides quick links into different
features of both ESP Web and ESP Orders. There are several features on the Dashboard
which can help you navigate to different functions of ESP Web.
ESP Web Dashboard Page
First, you will see the “Set As Startup” in the upper right hand corner. If you click on this
link, the text will change to say “Default Startup” and the next time you log into ESP
Web, you will be brought directly to the ESP Web Homepage.
3
The icon with the word bubbles is where you can click to submit feedback to ASI.
Clicking on the application quick link will bring you into that feature of ESP Web.
The question mark icon explains what the application quick link does.
The film strip icon is where you can click to watch a video about the feature. For
example, if you click on the video icon for “Create A New Presentation”, then video will
focus on how to do a presentation.
Chapter 2: Homepage
The ESP Web Homepage is the starting page for ESP Web.
ESP Web Homepage
Clicking on the ESP Admin (Gold icon) will provide you with 3 options:
“Manage My Account” takes you to the
page where you can make changes to your
user account
“Log Off ESP Web” will log you out of
ESP Web.
“Log Off All Applications” will log you
out of all ESP applications at once. For
example, if you are working in ESP Web
and ESP Orders, you can use the “Log Off
All Applications” to log out of both
applications simultaneously.
4
The Application Toolbar
The application toolbar is located at the top of the ESP Web homepage. This toolbar
helps you navigate to different features in ESP Web.
ESP Web Homepage
Searches
Product Search - Brings up ALL products
Product Advanced SearchBrings up a page of various
criteria on which to search for
your products.
Supplier Search - Brings up all
Suppliers.
Supplier Advanced Search Brings up a page of various
criteria on which to search for
suppliers.
My Saved Searches - Opens a
drop list containing up to 20 of
your saved searches in
Alphabetic order.
Top Searches - Opens a drop list
containing the top 20 distributor
Product searches.
Mange My Saved Searches - Opens a pop-up window that allows you to manage
your saved searches.
Projects
My Projects opens the Projects page.
Presentations
Open My Last Presentation
opens your last presentation.
Create New Presentation allows
you create a new presentation.
5
Community
ASI Central takes you to
www.asicentral.com
Tim Andrews Blog, takes you to his
blog.
The ASI Social Network, ASI
Facebook, ASI YouTube, and ASI
Twitter will take you to the internet
website.
Tools
Preferences is an area where you can
set up default preferences for ESP Web.
Submit Feedback allows you to submit
feedback to ASI by allowing you to send
an e-mail to [email protected].
Preferences
The preferences options are:
Preferences
Show Net Cost: The Show Net Cost checkbox controls the display of Net Cost
and Profit in ESP Web. When the checkbox is marked, Net Cost and Profit will
display; when the check mark is removed, Net Cost and Profit will be hidden.
Show Supplier Information: The Show Supplier Information checkbox controls
the display of Supplier Company and Contact information in ESP Web. When the
checkbox is marked, Supplier information will display; when the check mark is
removed, Supplier information will be hidden and Supplier Search will be
inaccessible.
6
Help
Product Default Sort By: allows you to set up a default sort for your products
by: price (low to high, high to low), cost (low to high, high to low), Profit, ASI
Number, Supplier Name, Supplier Rating, Preferred Rank, Product name, Product
Number, Confirmed Product, or New product.
Preferred Suppliers – Custom Rank Name: Here you can assign a name to
each of the Preferred Suppliers you want to rank (Rank 1 is the highest). For
further information on how to set up Preferred Suppliers, please refer Chapter
Seven: Preferred Suppliers.
FAQ's: Takes you to ESP Web’s
interactive help page.
Training Videos: Takes you to links to
Training Videos. Listed by subject.
Product Support: Takes you to a page
where you can contact Product Support,
access training videos, review FAQs and
register for instructor led classes.
Contact Us: Opens an e-mail allowing you to submit questions/comments.
Quick Navigation Toolbar
The Quick Navigation will help you access different areas quickly and easily!
Find Products
Product Quick Search
Product Advanced Search
Find Suppliers
Supplier Quick Search
Supplier Advanced Search
Education
ASI Education (Education about the
promotional products industry)
Access the training videos for ESP Web
Community
Tim Andrews’ Blog
ASI Social Network
ASI Facebook
ASI YouTube
ASI Twitter
ASI Company
ASI Central
ASI Store (For purchasing ASI services)
Administration
ASI Online Account Manager (Manage
your company account with ASI)
7
Event Planner
The Event Planner is a sales generating tool to help you create more business, develop
new ideas and impress your clients. This feature makes it easy to respond instantly to
client requests. For more information on Ideas/Event Planner please refer to Chapter 8:
The Event Planner in this manual.
News
This section contains Counselor® Top News from The Voice of The Industry.
To read a news item, click on the heading that you would like to read. The
links show in blue and the date it was published displays next to it.
This process will take you to www.asicentral.com where the news item is
located.
Chapter 3: Searching
Searching in ESP Web uses “guided navigation”. Guided navigation means you can type
in one or more keywords, then use the menu to the left to narrow down your results.
There are several ways to search in ESP Web. You can use the Product Quick Search,
Product Advanced Search, Supplier Search, or Supplier Advanced Search.
Quick Search Bar – ESP Web Homepage
8
Product Quick Search
Enter the description of the product you are searching. For example, typing in “zip”,
“hood”, and “fleece”. Add “price from/price to” if you wish, but you do not have to. In
the example below, the search will be for $10 to $20 list price.
Note: You can use both or simply one of the price boxes. If you wanted all products up to
$20.00, just put the dollar amount in the second box.
After entering your criteria, click on the Search button to start looking through products.
Product Summary View
Product Advanced Search
Clicking on Advanced Search will allow you to search for a product by keyword (this is
essentially the Quick Search), but you can also put in specific criteria. The advanced
search page is in three sections.
9
Product Advanced Search
The first section has dropdowns for product number, category, and tradename. Just start
typing what you want in these boxes and the application will match the criteria letter for
letter.
Also, in this section, there is a price range search.
You can search by List Price, Net Cost, or Profit, as
well as Quantity. In addition to the price search,
you can use the drop down boxes to search for
color, material, imprint method, shape, size, and
theme.
In the middle section, you can search by Supplier
ASI Number, Supplier Name, or Linename. You can also put in a standard production
time, or check the “Include Rush Time” box to include rush services. You can click on
the number of stars to search by supplier rating (one star is the lowest, five is the highest).
You can use the dropdowns to choose a state/province or a region/country. If you have
preferred suppliers set up, you can check the level(s) you would like to use. For more
information on preferred suppliers, please see Chapter 7: Preferred Suppliers.
In the third section there are checkboxes on the right hand side. Checking one of these
boxes will help narrow your results to those which have the checked criteria.
For example, if you wanted to search for the same hooded zippered fleece in advanced
search, you can put “Sweatshirts” under category, and then use Hood* and Zip* in the
“Keywords” section. The * is known as the wildcard and will give you any ending on the
base root word. In this example, using Hood* will give us results for all variations of
hood like: hoods, hoodie, hoodies, etc. After typing in your criteria, click on “Search”.
ESP Web - Product Advanced Search Page
10
Supplier Quick Search
Click on the “Searches” button and select Supplier Search. Enter either ASI #, Supplier
Name, Line Name, Country, State, City or Zip or a combination of these items.
Remember, supplier search is for searching supplier’s information, like their linenames
and tradenames, not for searching products.
Quick Search Bar – ESP Web Homepage
Hit “Search”
Supplier Summary View
Supplier Advanced Search
Supplier Advanced Search lets you search for a supplier by their location, contact
information, rating, and even preferred supplier rank. You can use each one of these
search options individually, or you may combine them. For example, if you wanted to
search for all the five star suppliers in Pennsylvania, you could select “Pennsylvania” in
the State/Province dropdown box and then click on the number of stars (in this example,
five), and then click on “Search”.
11
Supplier Advanced Search
Viewing Your Results
The default results display is the Summary View. On the Summary view, you can
navigate through the results by page, viewing 25 to 100 items per page and choose how
to sort your results. Simply click on the option you want and the page will refresh to
show your choice.
Product Summary View
Also in the Summary View, there is the option to “View Prices” which will open the
product’s full price grid directly below the product summary. After you click on “View
12
Prices” and the grid opens below the product, the button will change to say “Hide
Prices”. You can click on the “Hide Prices” button to not show the price grid.
ESP Web Summary View
Summary View shows a picture of the item, list price, net cost, supplier information,
product name, and a summary of the item.
Summary View
There are several features which can help you when viewing an item.
The summary view image is a thumbnail image, but you can just
hold your mouse on the camera icon to view a large image.
Click on the product image in the Summary View to get to
Product Quick View.
13
Product Quick View
In the Product Quick
View you will see:
Supplier Information
Full Description
Larger image
Full Price Grid
To view more
information, click on the
“View Details” button at
the bottom.
Product Tile View
Another way to see your results is by the Tile view. Here, the products are tiled on the
screen with images, ASI numbers and first quantity list price.
Tile View
14
You can still view the
large image by holding
your mouse over the
camera icon.
You will see the
supplier’s ASI number
and the first quantity
pricing.
You are also able to add
to clipboard by clicking
on the clipboard icon.
You can also use the
details button to go to the
Detail View.
Product Detail View
The detail view will show you all the information about that item. In the detail view,
there are several sections. The first section you will see is the Product Description which
will display the product
images, product
number, product name,
full description,
tradename (if available)
and catalog information
(you can click on the
catalog icon to view the
page). To the right of
the product description,
you will see the
supplier information
including production
time, FOB point,
marketing policy, and
any applicable product safety warnings.
Below these two sections, you will see the price grid. This price grid will show base
product prices. If there is only one price for the product, there will be only one grid
located here. However, if the product has more than one base price, for example, if there
is the option for a 10 working day product time and a 3 working day production time,
there will be two price grids in the one product!
15
Under the price grid(s) you will be able to view the product attributes. Product Attributes
include size, shape, color, material, and product options. Within the Product Attributes
section, you can also see production time, rush services, all imprinting information,
shipping information, and any additional charges that are associated with the product.
Also, in the detail view, there is the “Configure Product” area, where you can specify
criteria for a product.
Product Detail View
16
Narrowing Your Results
After you have done a search, you can narrow your results down even further. With ESP
Web, you can use the guided navigation to do this quickly and easily.
From the results page, there is a section titled “Narrow
Results”. The Narrow Results displays all of the data fields
that can be specified to narrow your results.
Open the field by clicking on the triangle next to the field.
Clicking a narrow results topic will open the subset of the field
below it:
As you can see with color, the
subsets are not specific, are
grouped by shade. To narrow
the results further, click on the
shades, in this example, blue
shades.
Clicking on “blue shades” will
open the different subsets of
blue within the search:
You can then click on a type of blue to narrow your
products down to that specific shade and look through
those products. This way, rather than trying to match what
the supplier has called the color (navy, navy blue, dark
navy blue); you have access to all the products in that color
field through a few easy clicks!
Note - when selecting any “narrowing result” criteria, the actual numbers of items that
will display are shown in parenthesis.
17
If you find that you have narrowed the criteria too deeply, you
are able to remove some of your search by clicking on the X in
“Your Selected Criteria” area.
You can also click on the X next to the “Clear All” to remove
all of the search terms.
You also have the option to save the search by clicking on the
“Save Search” link.
Saving Searches
For searches that you perform often, there is the “Save Search” button, which enables you
to save your search. This means that all the selected criteria will be saved and you can
access it at a later date. ESP Web gives you the option to save any product or supplier
search (up to 20 different searches). To save a search, use one of the searching methods
discussed above, then, from the results page, click on the “Save Search” link.
Product Summary View
Then, the “Manage Saved
Searches” window will open. The
name of the search will default to
your search criteria, but you can
rename the search if you like. For
example, this search is called “blue
ceramic mug”, but it can easily be
changed to “Blue Mugs –
7/22/2010”. Then, click on “Save”.
To access saved searches in the future, you can click on the “Searches” button on the
application toolbar and click on “My Saved Searches” to see the searches you have
saved. Other searching options in this menu include “My Recent Searches” which will
show your last 20 searches. Also, there are the “Top 20 Searches”, which are the top 20
keyword searches done by ALL users of ESP Web over the last 7 days.
18
Chapter 4: Using the Clipboard (how to save your products)
The clipboard is a place that stores your product selections for your customers while
working in ESP Web. Items can be added to the clipboard one at a time, by clicking on
the “Add to Clipboard” button from any of the views.
Summary View – Add to Clipboard
Tile View – Add to Clipboard
Product Detail View – Add to Clipboard
You can also add more than one product at a time by clicking into the checkbox to the
left of the image then click on the “Select Action” button.
19
The “Select Action” button gives you the option to “Add marked products to clipboard”
which will put your marked items onto the clipboard. You can place up to 250 items on
the Clipboard for up to 90 days or until you take them off.
Note: The “Select Action” is available in Summary and Tile View, not in Detail View.
When viewing the clipboard, you will see all of the items which have been added. Newly
added items will show after previously added items. You may need to use the scrollbar
along the bottom of the products to view all the items on the clipboard.
Clipboard
Once items are on the clipboard, you have several options on what to do with them.
Please note that you need to mark the items you want to work with on the clipboard,
20
otherwise, the only option you will have available under the “Select Action” button is to
“Select All”. The “Select Action” button for the Clipboard is located in the upper right
hand corner of the View Clipboard window.
The Options in the “Select Action” menu are:
Delete – delete marked products on the clipboard
Delete All – delete all the products on the clipboard
Select All – mark all the products on the clipboard
Deselect All – unmark any selected items
Create New Presentation – add any items you have
marked and move them into the presentation area
Send – emails the product will all the information
Add to Project – adds the items to an existing project
Chapter 5: Projects
One of the great added benefits of ESP is your ability to manage your client and their
projects from any computer, PC or Mac, connected to the Web. This means you can
respond faster than ever to customer requests and work just about anywhere you desire.
ESP Projects is similar to an electronic filing cabinet where you store your customer’s
folders, products and presentations.
To access ESP Projects, click on the Projects Button and
select My Projects.
Creating and Naming Folders
When you first access this area, you will see a default folder titled Project 1.
Explanation of Project Icons
21
To rename the folder, click on the folder, then click on
the Rename button.
You will see the name of the folder is highlighted, just
start typing in the new name.
When you are finished typing, just click anywhere else
to save the new folder name.
Creating a Sub Folder
To create a sub folder to an existing folder, click on the folder you would like to add the
new sub folder to. Once you see the folder turn green and become underlined, click on
the “create new folder” icon.
The new folder appears under immediately under the original folder. The default name of
any new folder is “New” followed by a date and time stamp.
If the new folder name is highlighted, you can simply type a new name. If the new folder
name is not highlighted, click on the folder, then click on the Rename button. Once you
will see the name of the folder is highlighted, just start typing in the new name. Once you
are finished typing, just click anywhere else to save the new folder name.
Deleting Folders
If you no longer need a project folder or subfolder, the process to remove them from your
projects is rather straightforward.
Click on the folder or subfolder you would like to delete, then
click on the delete icon. You will receive a notification asking
you “Are you sure you want to delete this item?” Click on “OK”
to finish deleting or click “Cancel” to not delete the folder.
Note: If you delete a folder, any subfolders for that project folder
will also be deleted.
Copy and Paste Folders
You can copy and paste folders and subfolders in the Projects. To copy a folder, click on
the folder, and then click on the copy icon. Next, click on area you would like to paste the
copied folder into. For example, if you wanted to copy “First National Bank”, you would
22
click on the folder, and then click on the Copy icon. Next, you would click on “My
Projects” and then click the Paste icon.
Note: If you copy a folder that has subfolders, the subfolders will be copied as well.
Properties
The properties frame lets you modify and/or add information for a folder. In the
Properties, the Name is the name of the folder. You can add a due date and notes, as well
as add customer to this folder. After you have finished making modifications or
additions, click on the “Save” button to save your changes.
My Projects - Properties
Searching in Projects
Because you can create folders for all of your clients and their promotions, over time, you
may have a lot of folders and finding your client quickly and easily can become more
challenging. In your Projects area, you have the ability to search for
your folders or the content within those folders. This means you can
use this box to search for products you have saved as well as
presentations. The search box is located below your list of projects.
You can search by any or all of the following items:
Keyword
Type (such as folder, product or presentation),
“Look In” will allow you search a project folder.
Date
There are several ways to search by date. Use the dropdown menu
to select what type of date you are looking for, the date created, date
modified, or due date. You can also click into the radio button to
choose from the following options for your date: Within The Last
Week, Past Month, Within the Past Year, or Specify Dates (you can
type these dates in or use the calendar icon to click on the dates)
You can search using only one criterion, or you can combine
criteria. If you need to start over, click on the “Reset” button.
23
Search Results in Projects
Your results will display Folders, Products or Presentations. Any of the headers: Name,
Type, Date, and Location can be clicked on and the results will be shown ascending alpha
numeric order, then if you click again, they will be in descending alpha numeric order.
The location links will bring you to that particular section in the projects so that you can
use the action items.
Projects – Search Results Window
After clicking on a location, you will be brought into the Project area for that location. In
the Project area, the headers will be able to sort in the same manner as search results. In
the example below, the “Mugs” folder has been sorted in alphabetical descending order
by the type of result.
Projects View
There are three types of results: Product, Presentation, and Folder. For each type, there
are Quick View, Detailed View, and Delete options.
24
Projects View
For Presentations, there is an additional action item to edit and send.
Filters
Filters help you to narrow the results. You can filter by Name, Type, or Date. Using the
filters is a very convenient way to find projects when you have a long list of results. If
you start typing in the client’s name, the results below will match letter by letter. This is
why when “F” was typed above; both First National Bank and Franklin High School
appeared as choices.
The reset
icon clears
any criteria
you entered.
Toolbar
The toolbar in the Projects area includes View Clipboard and Select Action.
25
The View Clipboard and Select Action buttons in the projects area functions the same as
in the product results section. For information on how to use the clipboard, please refer to
Chapter 4: Using the Clipboard.
Chapter 6: Presentations
ESP Presentations combine the flexibility of Word and PowerPoint with email to create
an incredibly effective marketing tool. Completely customizable, ESP Presentations are
one of the best ways to brand your company while generating leads and sales.
To get to this location from the ESP Web
Homepage, click on the “Presentations” button on
the application toolbar and select “Create a New
Presentation”.
Once you are in the
Presentation area; click on the
“Templates & Layouts” tab.
You are now ready to start
setting up custom features. Set
up your Cover Pages, Headers,
Footers and Closing Pages for
your Presentation first, so you can easily add your custom information while building
your Presentation.
Cover Page
ESP Web comes with four sample cover
pages. Sample cover pages can used at any
time in a presentation and modified in the
presentation. The General Text Cover,
Opportunity Cover, Our Conversation Cover,
and Sales Cover are available for you to
customize for your own use. If you do not
want to use one of the templates, you do not
have to. You can click on the “Add New”
button and type any text you like.
To make changes to one of these pages, click
on the name of it. You will see the template open in the “Templates” area.
26
The sample cover pages can be modified using the Templates toolbar but cannot be
deleted. If you want to modify our default cover page, you can make changes, then just
rename the template, then click on the “Save As” button.
Templates Toolbar
The templates toolbar allows you to modify the look and feel of the page. It is available
for ALL pages in the Presentation area. Therefore, you can use this toolbar to create
custom cover pages, headers, footers, and closing pages; as well as use any presentation!
Presentations - Templates Toolbar
The templates toolbar has a lot of options for you to use. The most of the icons work very
similarly to Microsoft Word. Below is a chart of each icon on the toolbar and its function.
Spell check is built into the program.
Presentation – Templates Toolbar – Explanation of Icons
27
Whether you have clicked on the “Add New” button and are creating a cover letter from a
blank template, or modifying one of the templates, you will need to save your work. Once
you have completed the cover page, give it a name and click on the “Save As” button at
the below the Templates & Layouts tab.
Presentations – Templates & Layouts
Header
The Header is used to brand your presentation with your company logo. We do provide
you with a sample Header. The sample header can be modified using the Templates
toolbar. We recommend you create your custom header from our template. Just make the
changes you want, then just rename the template, then click on the “Save As” button.
Templates & Layouts – Header
Just like with the cover letter, you can use the toolbar to modify your header,
including uploading your own logo/image and positioning it. To upload your
own image, click on the image manager icon.
The Presentation Image Manager box will open.
This is where previously uploaded images will
be stored and where you can upload new
images. The image needs to be no larger than
200KB and in a .jpg, gif, or .png format.
Click on “Attach File” to browse your computer
for the image file. Once you have located the
28
file, click on it, then click on “Open”. You will see the image in the Available Images
section. You can use the “View” link to preview the image and then click on the “Insert
Image” to add it to your header.
Presentation Templates and Layouts - Header Section
Once the image is in your header, you can click on the corners to resize it and
use the position tool to move your logo to another area in the header.
Note: The position tool behaves differently depending on the browser.
You can also replace the sample text with your own information. The information does
not have to be in the format that is provided; it can be anything you want! For example,
header below was set up from the sample template. Then, give it a name and click on the
“Save As” button to save it as an available header.
Footer
We do provide you with a sample Footer. The sample
footer can be modified using the Templates toolbar. The
process of adding a new footer or modifying the sample
is the same used with the header.
Note: Footers have two special icons:
Add the date
Add page numbers
29
Closing Page
We do provide you with a sample Closing Page. The sample closing page can be
modified using the Templates toolbar. The process of adding a new closing page or
modifying the sample is the same used with the cover pages.
Creating a New Presentation
Now that you have created cover letters, headers, footers, and closing pages, you are
ready to begin creating presentations. If you do not already have items saved on your
clipboard, you will need to search for items you like and add them to the clipboard. For
more information on how to do this, please refer to Chapter 3: Searching and Chapter 4:
Using the Clipboard.
If you already have items on your clipboard to
use, you can go to Presentations from the
application toolbar and click on “Create New
Presentation”.
The Presentations area will open to the Presentation tab and you are ready to add
products.
To add products, click on the “View Clipboard” button, mark the products you would like
to use and then use the “Select Action” button to “Add to Current Presentation”.
30
Now that you have added the products into the
presentation, you can begin to personalize the
presentation by using the options in the customize box.
Layouts
You can select how many products you want on a
single page. You can have one, two, or three products
per page.
Cover page
You have the option to show a cover page as the first page of
your presentation. To add a cover page, check the box to the
left of the words cover page. You can either use the Sample
cover page or one that you created.
Header
You have the option to show a header at the top of the pages of
your presentations. To add a header, check the box to the left of
the word Header.
You can either use the Sample header or select
one that you created from the drop down menu.
You will have three options about how to
display your header:
Show the Header on all pages,
All pages EXCEPT the first page (if you have
a cover page, that will be the first page)
All pages EXCEPT the last page (if you have
a closing page, that will be the last page).
Once you have decided where you want your header to show, click on the “Select” button
at the bottom and your header will appear on the presentation.
31
Products
The products in the presentation will appear in a list on
the customize area. You can make changes to multiple
products at a time, products can be selected or
deselected by holding down the Control Key and
clicking on the product. Selected products will have a
green background. Within this area, you can move
products up or down in the presentation, delete
products, modifying pricing, select data fields to
display, and deselect items.
Moving Products
You can move the products by using the arrow buttons.
In this example, there are three mugs in the
presentation. The middle mug is selected.
The up arrow would move the middle mug to the top
position, making it the first mug in the presentation.
The mug that was first will now be second.
The down arrow would move the mug down in the
presentation, making it the third and final item. The
mug which was previously last will now be the second
to last item.
Note: You must move one item one space at a time, you
cannot drag and drop.
Also, attached to each product is a
smaller customization menu. Using the
triangle button for the product, you have
up to five options:
Jump to Product
Product Details
Select Product Image
Select Price Grid
Add to Shopping Cart
Note: Not all options will be applicable
for all products. Please refer to the
option for information about its
availability.
Jump to Product enables you to go directly to that product to edit it. This is very
beneficial when the product is several pages into the presentation. This option will only
be available if the product is on a different page than the one you are working on.
32
Product Details will open the ESP Web Detail View for that product in a separate
window or tab. You can review or even copy and paste any information from the Detail
page into the presentation. This option is available on all products.
Select Product Image enables you to choose from the images provided by the supplier.
This option will be available for products where the supplier has provided additional
images.
Select Price Grid enables you to select which price grid you would like to use if the
product has more than one base price. For example, there might be two price grids
because the item might cost more for a specific color or size. You can use this option to
select which pricing you would like to use. This option will be available if the product
has more that one base price.
Add to Shopping Cart (only for ESP Orders users) enables you to add the product
directly from your presentation into the Shopping Cart for ESP Orders.
Deleting Products
To delete an item from the presentation, select the product, and then click on “X”
icon. Deleting a product from a presentation does not remove it from the
clipboard.
Price Calculator
The price calculator allows you to modify pricing for one product or all products in the
presentation. To do this, select the product (or hold the CTRL key on your keyboard and
select multiple products) that you would like to modify.
Click the Calculator Icon to open the Price Calculator.
On this new window, you will notice that Selected Products is in bold type, but you can
click on the radio button for All
Product if you want these changes to
apply every product in the
presentation.
You can adjust list pricing by a
percentage by clicking in the radio
button and typing in a percentage.
Or, you can add or subtract a fixed
amount or percentage to (or from) the
list price or net cost. Just click in the
radio buttons and type in the values
you want to use.
You can also use the check boxes to
round to two decimal places or show
higher quantity price grids first. If you
need to reset the prices, click on the
“Resent to Original Price” button. You
33
can also click on Cancel if you do not want to make changes, or you clicked into this box
by accident. If you are satisfied with your changes, just click the “Apply” for your
changes to take effect. The product pricing will be adjusted and your screen will refresh
back to the Presentation.
Note: Remember, these changes apply to the list price on the presentation.
Product Data Fields
The data field icon enables you to choose the fields that appear on your presentation. To
do this, select the product (or hold the CTRL key on your keyboard and select multiple
products) that you would like to modify.
Click on the data field icon to access the checkbox list.
On this new window, you will notice that Selected Products is in bold type, but you can
click on the radio button for All Product
if you want these changes to apply every
product in the presentation. The data
field contains the list of all the data
fields available for products. To show a
data field, click in the box next to it. To
hide a field, make sure there is no check
in the box next to it. You can also click
on Cancel if you do not want to make
changes, or you clicked into this box by
accident. If you are satisfied with your
selections, click the “Apply” button at
the bottom for your changes to take
effect.
While you cannot set defaults, the
computer remembers what fields you
had checked in the previous
presentation. Therefore, even though the
program will open to defaults, to get your custom selected fields to show; click on the
data field icon, and then click the “Apply” button at the bottom.
Note: If a data field is not available on a selected product, that field will be grayed out on
the data field list pop-up page.
Clear Selection
The clear selection applies when you have more than one product in your
presentation. If you selected an item by accident or have an item selected you do
not want selected, just click on the clear selection icon.
Footer
You have the option to show a footer at the bottom of your
presentation. To add a footer, check the box to the left of the
word Footer.
34
You can either use the Sample header or
select one that you created from the drop
down menu. You will have three options
about where to display your footer:
All pages,
All pages EXCEPT the first page (if
you have a cover page, that will be the
first page)
All pages EXCEPT the last page (if you have a closing page, that will be the last page)
Closing Page
You have the option to show a closing page as the last page
of your presentation. To add a closing page, check the box
to the left of the word Cover Page.
When you click on the closing page
checkbox, a dialog box that allows you to
select a closing will be displayed. You can
select the closing page you want to use
from the drop down menu. You have the
option to insert (via paste) any text or
images on the closing page. The closing
page will not exceed one page.
Presentation Changes
Making changes in the presentation is as easy as clicking and typing. You can use all the
functions of the templates toolbar to make changes to the information for every product.
For example, if you wanted the product safety warnings to stand out for a specific
product, you can highlight the text you would like to change, then click on the font color
icon from toolbar, then click on the color you want to use. To change the size, use the
size dropdown and click on the size you want to use. To bold, click on the “Bold” icon.
35
The Product Safety Warnings are now in a 16px font, bolded, and in bright red.
Note: If you need to undo, do not use the “Back” button on the browser.
If you need to undo an action, use the “Undo” button in toolbar.
You can also delete any text you do not want to have. For example, if you do not want
the words “Quantity/Price Grid”, you can remove them just like removing text in
Microsoft Word. In the example below, the Backspace button on the keyboard is being
used to delete the text. Using the Delete button will also work to remove text. Many of
the functions of the toolbar are similar to Microsoft Word.
Presentation Toolbar
This toolbar enables you to add items to the shopping cart (for ESP Orders users only),
view the clipboard, preview the presentation (as both a PDF and in HTML format), save
the presentation, and send the presentation.
36
View Shopping Cart
The View Shopping Cart button will only be present if you are also a user of ESP Orders.
Items on the Shopping Cart can be moved into a Sales Order or Purchase Order in a just a
few quick clicks.
View Clipboard
The View Clipboard button gives you access to all the products on the clipboard, as well
as all the functions of the clipboard. For example, if there is an item you would like to
add, you can click on the “View Clipboard” button, mark the product, and add it to the
current presentation. For more information on these functions, please refer to Chapter 4:
Using the Clipboard.
Preview
The preview button enables you to preview your presentation in either an HTML (web)
format, or in as a PDF (Adobe) document. Previewing as a PDF will allows you to save
your presentation anywhere on your computer and also gives you the option to print the
presentation.
Saving
Prior to sending a presentation from ESP Web, you must save
the presentation. Under the Save button, there are two options:
“Save” and “Save As”.
Clicking on “Save” will save your presentation in the draft presentation folder, with the
name of the presentation as the date and time the presentation was started. If you are
editing a presentation, you can use the “Save” button to save any changes you have made,
as well as overwriting the
existing presentation.
The “Save As” option will
open your Projects folders.
If you already have a client
folder set up, you can click
on the client folder.
TIP: If the client you are
working with does not have
a folder and you want to
save this presentation into a
folder for them, right click
on “My Projects” and you
will be able to click on “Add”. A new folder will be added and you can type in the
client’s name.
37
You will be able to rename the presentation, for example, rather than having it called
“Presentation 7/29/2010 1:50:10 PM”, you can type in “Blue Ceramic Mugs”.
Then click on “Save” at the bottom.
Note: A presentation will be
automatically saved every 10 minutes
and be stored in your Draft
Presentations folder.
By using the Projects to save your
presentation, you are saving to the ESP
Web server. Therefore, if you need to
access any saved information from a
different location, just log into ESP
Web and all saved information will be
available to you.
Sending
After you have saved the presentation, click on the “Send” button. You can send the
presentation to your clients as either an HTML link or a PDF link. Both of these options
will be available, regardless of what type of email you use.
There are two types of emails, program based and internet based. An easy way to tell
which one you are using is to look at how you log in. If you double click on an icon on
your desktop and your mail messages are there, you are using a program based email.
Example of email programs are: Microsoft Office Outlook, Outlook Express, or
Windows Mail.
If you go to the internet, then log into
your email, you are using an internet
based email. Examples of internet
based emails are Yahoo, GMail,
Comcast, or MSN.
With a program based email, when
you click on send, ESP Web will make
a call to your default mail program and
then display the e-mail. The body of
the email will contain a link to the
presentation.
If you are using an internet based
email, just copy the links to the
presentation and paste them into an
open email message.
To copy, highlight the link, right click,
select “Copy”, then open your email
38
and in the blank body section, click “Paste”.
When your customer receives the email, they will click on the link to view your
presentation in the file type you selected.
Chapter 7: Preferred Suppliers
In ESP Web, you can set up preferred suppliers. Suppliers who are marked as preferred
will appear first in search results.
Ranking Preferred Suppliers can be done in the
preferences area. To access the preferences, click on
“Tools” and then click on “Preferences”. In the
Preferences area, there are five rankings of preferred
suppliers which can be set up. In the example, the
highest ranking is “Awesome”. You can name the ranks
anything you want.
Note: For former ESP Online users, if you had preferred suppliers set up in ESP Online,
they can be imported, but only one time. To use the one time importing tool, under
“Tools” click on the “Import Preferred Suppliers”.
After creating custom rank names, you need to add suppliers to these ranks. To do this,
you will need to get to the supplier detail page. Though there are several ways to access
the supplier detail page, the most straightforward way to is to do a supplier search.
For help searching with using the Supplier search, please refer to Chapter 3: Searching.
After searching for the supplier, click on the “View Details” button from the summary
view (the same process applies if you are in tile view).
Once you have reached the supplier detail page, click on the Tab for Preferred/Notes.
Note: This tab may be disabled if you have an administrator for Preferred Suppliers.
In the Preferred/Notes tab, you will be able
to assign this supplier to any level of your
preferred rankings. You will also be able to
set up any special pricing you might receive
from that supplier. You will also be able to
enter notes for this supplier.
39
Preferred Pricing and Notes
If you receive special pricing from a supplier, you can set this up in ESP Web. On the
Preferred Suppliers page, there is a section for Preferred Pricing.
The first step is to click into the checkbox next to “Apply the following discount to” and
then use the dropdown to select “Net Cost”
or “List Price”.
Then, click on the radio button next to the
field that reflects the special pricing you
are receiving. Each dropdown box has two
options: “Minus Fixed Percent” or “Plus
Fixed Percent”.
If the special pricing you are receiving
does not fit into the given choices, click in
the radio button next to “Other Special
Pricing” and type in what your individual
pricing entails.
The “Exceptions or Notes about Preferred
Pricing” is an open text box where you can
type any information you need about your
pricing. For example, exceptions or note
could include: “EQP good until 9/2011”.
Note: Profit is calculated on Preferred Price instead of Net Cost and preferred prices are
displayed on price grids.
40
In addition to setting up preferred pricing, you can also include notes about the suppliers.
There are three different levels of notes: My Notes, Shared Notes, and Corporate Notes.
“My Notes” are notes that you can type in for
your own reference and will only show in your
ESP Web. You can click in the checkbox to
“Share My Notes” to make your notes shared.
“Shared Notes” are notes that have been
entered by users and can be viewed by
everyone under the company’s ASI number.
“Corporate Notes” can only be entered by the
corporate/company administrator.
Once you are finished marking a supplier as
preferred, assigning preferred pricing, or
typing in notes, click on the “Save” button at
the bottom. Preferred suppliers (and any data
you have added for them) will show in ESP
Web within about 15-20 minutes.
After designating a supplier as preferred, you will see your settings throughout the
different views in ESP. Preferred Prices are displayed on Product Detail price grids. The
preferred ranking and notes will follow the supplier information through all the different
views in ESP Web: Product Summary View, Product Tile View, Product Detail View,
Supplier Summary View, and Supplier Detail View. The preferred pricing will be
included in every price grid available for all products from that supplier.
ESP Web Product Summary View
41
Chapter 8: The Event Planner
The Event Planner can help generate higher sales, develop new ideas, and impress your
clients. It contains sets of products that you can browse when looking for ideas. These
sets are "event" or "idea" oriented covering major distributor programs like golf outings,
safety initiatives, and school programs. Program ideas and advice from ASI's magazine
editors are provided with each event.
Click on the arrows to
scroll through the list of
events available. Then,
click on the event topic of
your choice. A new
window launches with
products, a video and the
steps it takes to begin that
event.
There is an audio/video in upper right corner, with the steps listed below. Three price
tiers are available to meet the budget of every client. There are 3 tabs with Least Costly,
Mid-range, and High-End items. If you mouse over the picture of the products, they open
in a larger pop-out window. Also, there is a price range listed with the products.
You can create a presentation very easily from the planner. Click the link at the bottom
(or the “Send to Presentation” button in upper right hand corner) and the presentation will
open.
The Event Planner
covers major
distributor programs
like golf outings,
safety initiatives, and
school programs.
Events are created in
one click and easily
modified with
additional products. It
also includes program
ideas and advice from
ASI's magazine
editors. Additionally,
there are three price
tiers available for
each event to meet the
budget of every
client.
42