1
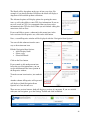
User Manual
1
Table of Contents
Chapter 1 – Accessing the ESP Websites Administration Area ..................................................... 4
Chapter 2 - Building Your Site ....................................................................................................... 5
Section A: Set Up Your Site ....................................................................................................... 6
Section B: Upload Your Logo ..................................................................................................... 6
Section C: Company Info ............................................................................................................ 7
Section D: Select Template & Color ........................................................................................... 8
Section E: Choose Your Font ...................................................................................................... 9
Section F: Advanced Options...................................................................................................... 9
Section G: Introductory Text and About Us Page..................................................................... 12
Section H: Industry News, Video and Events ........................................................................... 12
Chapter 3 – Navigating the ESP Website Administration Area ................................................... 13
The Application Toolbar ........................................................................................................... 13
The Site Toolbar ........................................................................................................................ 14
The Management Toolbar ......................................................................................................... 14
Chapter 4 – My Dashboard ........................................................................................................... 15
Info Requests ............................................................................................................................. 15
Google© Analytics .................................................................................................................... 16
Visitor Activity Reports ............................................................................................................ 16
Chapter 5 - Design Studio ............................................................................................................. 17
Your Logo ................................................................................................................................. 17
Templates and Colors ................................................................................................................ 18
Fonts .......................................................................................................................................... 20
Banners ...................................................................................................................................... 20
Product Collections ................................................................................................................... 25
News and Video ........................................................................................................................ 28
Product of the Day..................................................................................................................... 31
Site Navigation .......................................................................................................................... 34
Introductory Text....................................................................................................................... 36
Pages.......................................................................................................................................... 37
Advanced Design ...................................................................................................................... 38
Manage Pages ........................................................................................................................ 38
Site Navigation (Advanced) .................................................................................................. 41
Manage Artwork .................................................................................................................... 43
Edit the Style Sheet................................................................................................................ 45
Chapter 6 – Features ..................................................................................................................... 45
Select-A-Search ......................................................................................................................... 45
Media Library............................................................................................................................ 47
Coupon Manager ....................................................................................................................... 49
Custom Products ....................................................................................................................... 50
Content Library ......................................................................................................................... 53
Exclusion Lists .............................................................................................................................. 54
Chapter 7 – Marketing Tips .......................................................................................................... 54
Chapter 8 – Site Settings ............................................................................................................... 55
Site Summary Tab ..................................................................................................................... 55
2
Info Tab ..................................................................................................................................... 55
Meta Tags Tab ........................................................................................................................... 57
Display Options Tab.................................................................................................................. 57
Domains Tab ............................................................................................................................. 58
Analytics Tab ............................................................................................................................ 59
eCommerce Tab ........................................................................................................................ 59
Site Password Tab ..................................................................................................................... 62
Exclusions Tab .......................................................................................................................... 62
3
Chapter 1 – Accessing the ESP Websites Administration Area
Open your internet browser and type: espweb.asicentral.com in the address bar.
Enter your ASI#, Username and Password then click “Log in”. To remain logged in on your
computer, simply select the “Remember ASI #/ Username” field. Your ASI number and
Username will be automatically filled in the next time you go to ESP Websites.
If you have forgotten your username, click the “Forgot
Username” link in the “Need Assistance” section below the
log in fields. A pop-up window will open. Enter your email
address and your Username will be immediately emailed to
you.
There are two ways to recover your password. The first way
to retrieve your password is to click on the “Forgot your
Password link, which will open a pop-up window. Answer the
security questions programmed during your initial set up.
Then, for security reasons, enter your zip code. Your
password will be emailed to you.
The second way to recall your password is to click on the
Password Hint link. “Password Hint” will display a hint you
set up when you created your account to help you to
remember your password. The hint will display below the
Remember ASI#/Username checkbox.
After you have entered your ASI number, Username, and Password, click on the Log In button.
After logging in, you will see the Dashboard, where all of the application for which you have a
license will be displayed. To gain access to ESP Websites from here, click on the “Manage ESP
Websites” link in the ESP Websites Admin section.
4
If you are automatically brought into ESP Web from the Dashboard, you can access the ESP
Websites Admin by clicking on the My Applications button and selecting ESP Websites Admin
from the dropdown.
Chapter 2 - Building Your Site
When you are initially creating your site, you have two options. You can use the quick launch or
you can follow the site builder steps. Both methods will result in a fully functioning site.
Whether you are using the Quick Launch or all three steps, the starting procedure is the same.
In the “Getting Started” section, click on Start Here to begin building your site.
5
Section A: Set Up Your Site
In Section A, Set Up Your Site, you can create your site address (domain name) and site title in
the “Set up Your Site” Section. Do not include “www” in the site address.
Section B: Upload Your Logo
You can add your company logo by clicking the “browse” button in the “Upload Company
Logo” section. The Media Manager will open and you can select an image. If the image you
would like to use is not yet in the Media Manger, click on the “Upload Files” button and browse
your computer for an image.
After the image has uploaded, hover on it and click “Select File”.
6
You will see a preview of your image in the Logo Preview window.
If you do not have a company logo, type your company name into the last field in this section. A
preview of your typeset logo will appear in the Logo Preview window.
Section C: Company Info
In the Company Info section, you can enter your company information, such as your Company
name, address, and contact information. There is a dropdown for available addresses, which will
enable you to use an address entered by any user in your company. Select an address or enter
your information, and then use the checkboxes to select which information you would like to
display live on your site.
Note: You must enter a phone number and email, even if you choose not to display them on your
site.
7
In Section C, you can also add your social media
links.
Click into the “Social Networking” area and
copy/paste links into appropriate fields.
You can add social networking links for: Facebook,
Pinterest, Twitter, LinkedIn, YouTube, Google+,
Flickr or Your blog.
At this point, if you feel you are ready to get your
site up and running, click on the Quick Launch
button. A preview of your site will open. In the upper
right corner of the preview, there is the Publish button.
The Publish button will make your site available to the
world.
If you would like to make further customizations to your site before launching it, click on the
Next Step button.
Section D: Select Template & Color
There are many templates available, each sporting a variety of features and colors. To find just
the right template for your company, you can use the “Narrow Template Selection” to select a
template that has the features you would like.
Use the dropdown to select the size of the logo you would like to have: Traditional or Large.
Then, choose the template type: All or Industry. Next, check the box next to video, social feed,
Google map and left navigation for each feature you would like to have included on your site.
Then, you can select from the remaining templates by hovering on a color swatch to see a
preview of the template in that color; or, click on the color to select the template in that color.
8
Click Save when you are finished.
Section E: Choose Your Font
In this section, you can use the dropdown to select the font you would like to use on your site.
Section F: Advanced Options
This section allows you to customize your ESP Website with different home page content
including: Banners, News and Video, Newsletter Signup and Product Collections.
9
The Banners area enables you to select from two options:
• “Show no banners on my site”. This option will not display any banners on your site.
•
“I want to choose the banners that appear on my site”. This option will enable you to
select which banners will be displayed on your site. Use the dropdown to select Large
Banner or Small Banner.
The file sizes for banners are:
• A large banner is 914 pixels wide x 218 pixels high
• A small banner is 914 pixels wide x108 pixels high
If you select the second option, “I want to choose the banners that appear on my site”, you will
be able to select and organize the banners that will be displayed on your site. These banners need
to be created before they can be added. For more information on how to create banners, please
review Chapter 5 – Design Studio, the Banners section.
After banners are available, drag and down banners from the
Available Banners area into the Banner Loader. After you have
added up to four banners, you can re-order them in the banner loader.
There are two ways to do this:
• Drag and drop the banners into order by clicking on the plus
symbol (located in the upper left corner of that banner).
•
Click on a banner and then use the up/down arrows to move it
to the desired position.
10
To remove a banner from the banner loader, click on the banner and select remove.
Note: Banners may take up to 10 minutes to display on your site once added to the Banner
Loader.
The Product Collections area enables you to select from two options:
• “I don't want to select a Product Collection. Let the system automatically create a
collection of my top 100 products in ESP.” This option enables your ESP Website to
automatically create and display a product collection from your top 100 products in ESP.
If you have less than 100 products in ESP, all of your products up to 100 will be included
in this set.
• “I want to display the following Product Collection on my home page”. This option
enables you to select the Product Collection to be displayed on your home page. Just
click on the Product Collection from the available list. In order for a product collection to
be available in the list, you will need to create it first in the Product Collections area. For
more information on how to do this, please review Chapter 5 – Design Studio, the
Product Collections section.
The News and Video area enables you to select Editorial Feed and Video Content to be displayed
on your site. For Editorial Feed, there are two options:
• Allow news articles to be delivered to my home page.
• No thanks. I don’t want to feature news articles on my home page
For video content, there are three options:
• Allow client-safe video content to be added to my ESP Website home page and updated
automatically.
• I want to feature my own video content on my home page. This option will enable you to
paste a URL to a YouTube video of your choice.
• No thanks, I don’t want to feature video content on my home page.
The Newsletter Signup area enables you to select whether to allow your customer receive a
monthly, client-safe newsletter from ESP Websites. There are two options in this section:
• Allow customers to sign up for a client-safe newsletter that will be delivered to their
email inbox monthly.
11
•
I don’t want customers to be able to sign up to receive a newsletter.
When you have finished making your selections; click
on the “Last Step” button.
Section G: Introductory Text and About Us Page
In this section, you can add a headline and text to be displayed on the home page. You can also
customize the information in the About Us Page by typing in the About Us section.
Section H: Industry News, Video and Events
In this section, you can choose to enhance your ESP Website by adding a customer friendly page
of promotional industry information. There are two options in this section:
• Yes, I want to feature a page just for Industry News, Video and Events.
• No Thanks. I don’t want to feature a page of Industry News, Video and Events on my
ESP Website.
12
When you are finished making your selections; click on
the “Preview Site” button.
The preview will open and enable you to view your complete site before it goes live. After
looking over your site, if you need to make further changes, click on the Go Back button or click
on “Publish” if you are ready to go live.
Chapter 3 – Navigating the ESP Website Administration Area
After you have published your site, you are able to make changes at any time. To access the ESP
Websites admin, log into ESP Web, then select ESP Websites Admin under My Applications.
On the ESP Websites Admin Home page, there are three toolbars: The Application Toolbar, The
Site Toolbar and the Management Toolbar. Let’s look at each in detail.
The Application Toolbar
The Account Toolbar contains four sections:
• A text greeting: “Hello, FIRST_NAME”
•
My Applications: Enables you to access other applications for which you have a license,
such as ESP Updates, ESP Web for Suppliers, etc.
13
•
My Account: Provides access to the Manage My Account area where you can update
your user account, as well as the access to the log off options.
•
Help: Links to the FAQs for ESP Websites, Product Support and the License Agreement
you signed electronically when you first logged in.
The Site Toolbar
The Site Toolbar contains four sections:
•
My ESP Website dropdown menu: Displays all your current ESP Websites/Purchase
New license option. You must select a site from this dropdown for the rest of the links on
this toolbar to become active if you have more than one site.
•
View Live: Displays your site as a client would see it.
•
Preview: Displays a preview of your site. This means if you have made changes to your
site and have not published, you will want to use the Preview link to see how any changes
to your site will look after you the site has been published.
•
Publish: Makes any changes you have made in the administrative section of your site
live.
The Management Toolbar
The Management Tool Bar contains six sections
• Home: This button will return you the ESP Websites Admin home page. You can also
click on the ESP Websites logo in the upper left hand corner. The Home section contains
“Top News” which is powered by Counselor® magazine. Next to “Top News”, there is
the “Get Started” section, where you can set up a new ESP Website. Below the “Top
News” and “Get Started” sections are the video tutorials. The four tutorials are available
24 hours a day, seven days a week to help you manage your site. At the bottom of the
Home section, there are links to four areas:
o Have Questions – Click on Product Support for assistance from our Product
Support department or click on Feedback to ask a question or make a suggestion.
o ASI Store – Click on any of the links to view information regarding purchasing
that application.
o Community – ASI’s social media links.
o Company – Information about ASI, recent press releases, job opportunities and
how to contact us.
14
•
My Dashboard: This is your ESP Websites information hub. In this section, you will have
access to customer information, receive company info requests, orders, Google
Analytics© and Visitor Activity Reports. For more information on this area, please
review Chapter 4 – My Dashboard.
•
Design Studio: This section is where you can edit the look and feel of your site, as well as
customize the content and various sections. In this section, you can upload a company
logo, as well as edit your site’s template, color, or site font. You can also manage your
site’s navigation, home page text, content, and company information. This section is also
where you are able to customize certain sections of your site, such as the Product of the
Day, Custom Products, and Coupon Manager. This is also the section where you can
access the Advanced Design options. For more information on this area, please review
Chapter 5 – Design Studio
•
Features: In this section, you can create and manage Select-A-Searches, the Media
Library, the Coupon Manager, Custom Products, the Content Library and Exclusion
Lists. For more information on this area, please review Chapter 6 – Features.
•
Marketing Tips: This section enables you to access tip for your social media, email
marketing, and advertising ideas from industry experts. For more information on this
area, please review Chapter 7 – Marketing Tips.
•
Settings: Access to all of the settings tabs on your site. These settings enable you to
maintain and update your site’s administrative information. For more information on the
Site Settings, please review Chapter 8 – Site Settings.
Chapter 4 – My Dashboard
To access the My Dashboard area, log into your ESP Website™ admin. Then, select your site
from the ESP Websites dropdown menu and click on My Dashboard from the Management
Toolbar.
Info Requests
Visitors to your site can place requests for information on a particular product. You can view
requests for information placed by visitors to your site in the Info Requests area.
15
You will be able to view the visitors’ company name, email, phone number, the date they need
the product, the status of the request, the name of your site, and the Action Items. In the Action
Items, you can click “Edit” to view the Info Request Details (this will open below the Manage
Info Requests section).
In the Info Request Details area, you will able to view all of the information that was entered in
the information request. You can click on the “Product Info ID” link to view the Product Detail
page. You can also change the status of the info request by clicking on the Status dropdown. The
status of an info request can be: New, In Progress, or Completed. After you have made your
selection, click on Save to save your changes.
Google© Analytics
This area will bring you directly to the Google© Analytics Official Website. If you already have
an account, you can sign in to your account here to view your web traffic information.
If you do not have a Google© Analytics account, you can create one by clicking on the “Create
an account” button on the Google© Analytics home page. For more information on using
Google© Analytics, please review the “Help” section on their official website.
After creating an account, you will need to go to settings to enable Google© Analytics on your
site. For information on how to do this, please review Chapter 8 – Site Settings, Analytics Tab
section.
Visitor Activity Reports
In this section, you can view information regarding various features on your site and how often
they are being used. Select a month and a site using the dropdowns provided.
16
Use the links on the left side to view information for that function. The available functions are:
Searches and Keywords, Product Views and Shares, Featured Product Sets (Product Collections),
Product of the Day and Banner.
Note: If a feature is not active on your site, it will not be available in the links on the left.
Chapter 5 - Design Studio
To access the Design Studio area, log into your ESP Website™ admin. Then, select your site
from the ESP Websites dropdown menu and click on Design Studio from the Management
Toolbar.
Your Logo
In the Your Logo section, you will be able to
upload a new logo for your site. Click on the
Browse button in the Upload Your Logo section.
The Media Manager will open and you can select
an image. If the image you would like to use is not
yet in the Media Manger, click on the “Upload Files” button and browse your computer for an
image.
After the image has uploaded, hover on it and click “Select File”.
17
You will see a preview of your image in the Logo Preview window.
If you do not have a company logo, type your company name into the last field in this section. A
preview of your typeset logo will appear in the Logo Preview window. Click Save when you are
finished.
Templates and Colors
Use the dropdown to select the size of the logo you would like to have: Traditional or Large.
Then, choose the template type: All or Industry. Next, check the box next to video, social feed,
Google map and left navigation for each feature you would like to have included on your site.
18
When changing the template, you will receive a warning that states: “By chosing a new site
template, any customizations made to your home page will be reset to system defaults and will
need to be re-applied. Do you wish to proceed with changing your site template?”
If you select Yes, your template will be changed and you will need to re-apply any
customizations you had made. If you select Cancel, your template will not be changed and your
customizations will remain on your home page.
19
Fonts
In the Fonts section, you can use the dropdown to select the font you would like to use on your
site. Click on Save when you are finished.
Banners
The Banners area enables you to select from two options:
• “Show no banners on my site”. This option will not display any banners on your site.
•
“I want to choose the banners that appear on my site”. This option will enable you to
select which banners will be displayed on your site. Use the dropdown to select Large
Banner or Small Banner. Then, drag up to four banners from the Available Banners
section into the Banner Loader.
20
The file sizes for banners are:
• A large banner is 914 pixels wide x 218 pixels high
• A small banner is 914 pixels wide x108 pixels high
If you select the third option, “I want to choose the banners that appear on my site”, you will be
able to select and organize the banners that will be displayed on your site.
After you have added up to four banners, you can re-order them in the banner loader.
21
There are two ways to do this:
• Drag and drop the banners into order by clicking on the plus
symbol (located in the upper left corner of that banner).
•
Click on a banner and then use the up/down arrows to move
it to the desired position.
To remove a banner from the banner loader, click on the banner and
select remove.
To upload custom banners, scroll down to the banner upload area.
Here, you will be able to upload an image to use as a banner.
Images should correspond with the banner size. The maximum file size is 150KB and .JPG,
.PNG, and .GIF are acceptable formats. If you have an image ready to use that fits these
requirements, click on the Upload Banner Image button.
Then, select the banner size and click on the Browse button.
Browse your computer and locate the image you would like
to use. Select it and click on the Open button.
Now, you will need to set up the Click-Through-Designation
for this banner.
22
There are three Click-Through Destination options available:
• Product Detail Page – this option enables you to link to the product detail page of an
individual product. To link the banner to a product detail page, the product will need to
be on your Clipboard. Select the “Product Detail Page” dropdown and choose the
product.
To get a product onto the Clipboard, click on the Add Product To Clipboard button.
Then, search for the product. When you locate it, click on the Add to Clipboard link.
Next, click on the Return to [Design Studio – Banners] link.
Now, in the Banner Uplaod area, select Product Detail Page and select the product that
you added to the Clipboard. Click on Add in the Action area to finish this banner.
23
•
Select-A-Search – this option enables you to link your banner directly to a Select-ASearch. You can select from your already created Select-A-Searches or create one in this
area.
To create a new Select-A-Search to link to the banner, click “Create New Select-ASearch”.
Do a search within your products. Then, when you are satisfied with the search results,
click on the Save Search button in the “Your Searched Terms” box.
You will be prompted to name your Select-A-Search. Type a name in the box, then click
on the Save link.
Then, click on the Return to [Design Studio – Banners] link.
24
Now, in the Banner Upload area, select Select-A-Searches and choose the Select-ASearch you created from the dropdown. Click on Add in the Action area to finish this
banner.
•
URL – this option enables you to type or paste a URL for your banner to be directed to.
Just select URL and type the web address (ex: http://www.asicentral.com). Click on Add
in the Action area to finish this banner.
After you have finished setting up your banner, it will be appear in the Available Banners area.
When you are ready to post your banner, simply drag and drop into the Banner Loader.
Product Collections
Product Collections are customized sets of products you can feature on your home page. In the
Product Collections area, you can select a pre-existing product collection to be displayed on your
home page or manage the product collections.
There are two tabs in Product Collections area: Home Page Setup and Manage Product
Collections.
On the Home Page Setup tab, you can select to display a Product Collection on your home page
by selecting “I want to display the following Product Collection on my home page” and then
clicking on one product collection from the available list.
•
“I don't want to select a Product Collection. Let the system automatically create a
collection of my top 100 products in ESP.” This option enables your ESP Website to
25
•
automatically create and display a product collection from your top 100 products in ESP.
If you have less than 100 products in ESP, all of your products up to 100 will be included
in this set.
“I want to display the following Product Collection on my home page”. This option
enables you to select the Product Collection to be displayed on your home page.
If you need to build a product collection, click on the Manage Product Collections tab. Then,
click on the “Create a New Product Collection” button.
Then, enter your search criteria and click “Go”. Once you have found products you want to
include, mark the items you want to include and select “Marked Items”.
26
Note: To save products for later use and continue searching click, “Add Marked Items to
Clipboard” and then continue searching. After all of the products you would like to use are on
the Clipboard, click on the “Select Action” button in the Clipboard and then click on “Create a
New Product Collection” from the menu.
In the Properties box (on the right), check “Active” to make
your product collection live.
Then, type a name for this product collection.
You also have the option to add a description by typing into
the description box.
Use the dropdown to select a level: Company, Personal
Shared, or Personal. For more information on these levels,
please review Appendix A: Levels in the ESP Admin.
Lastly, you can select to have a default image for this
product collection by clicking on a product image from the
available images.
You are also able to click on the “or Select From Image
Library” link and upload a new image or use an image from
the Media Manager.
After you have completed filling out the Properties area,
click on the Save button.
After creating a product collection, it will be available in the product collection management
area. The options in this area are: Edit, Search or Copy.
The Edit link will make the properties area to the right editable. You can make any changes to
the Properties that you would like. To delete a product collection, select it from the listing, then
in the properties area, click on the Delete button.
27
Edit will also display the Products within the Product Collection below the product collection
management area.
In the Products in the Product Collection section, you can mark products and then click on the
Select Action button to manage them. The Select Action button enables you to:
• Delete – Delete marked products
• Delete All – Deletes all products
• Select All – Mark all products
• Deselect All – Unmarks all marked products
• Add to Clipboard – Add products from the product collection to the clipboard.
• Upload Image – Replace the default image for a product (you must mark the product and
can only use this option on one product at a time)
• Create New Presentation – Use products from this product collection to create a
presentation in ESP Web.
The Search link in the product collection management area enables you to add products into the
product collection. You can repeat the same basic searching steps as when you created your
product collection, except that instead of selecting “Create a New Product Collection”, select
“Add to Current Product Collection”. The “More” dropdown shows two options: Copy and
Delete. Copy will make a copy of the product collection. Delete will delete the product
collection. For assistance adding the product collection to your site, please review Chapter 5 –
Design Studio, the Advanced Design section.
News and Video
The News and Video area enables you to select Editorial Feed and Video Content to be displayed
on your site. There are two tabs in this area: Home Page and Industry Page.
On the Home Page tab, there are two main options: Editorial Feed and Video Content. The
selections you make here will be added to your home page.
For Editorial Feed, there are two options:
• Allow news articles to be delivered to my home page.
• No thanks. I don’t want to feature news articles on my home page
28
For video content, there are three options:
• Allow client-safe video content to be added to my ESP Website home page and updated
automatically.
• I want to feature my own video content on my home page. This option will enable you to
paste a URL to a YouTube video of your choice (ex: http://www.asicentral.com). Just
type/paste the URL into the available box.
• No thanks, I don’t want to feature video content on my home page.
When you are finished making your selections, click on Save.
In the second tab, Industry Page, there are two sections.
The first section, Industry News, Video and Events is where you can choose to enhance your
ESP Website by adding a customer friendly page of promotional industry information. You can
choose to allow news articles or select no thanks. Click on the Save button for this section when
you have finished making your selections.
This section, Video Content, enables you to select the video content of your Industry News,
Video and Events page. There are two options:
• Let the System choose the videos on my Industry News, Videos, and Events page.
• Let me customize the video content on my Industry News, Videos, and Events page.
29
If you select to customize the video content, you can type or paste the URL for the video in the
URL box. Then, enter a headline. Lastly, click on the Add link.
Now, the video will be available in the Available Videos area.
You can have up to 50 videos in the selected videos area.
30
Product of the Day
The Product of the Day section is where you can select to have a specific product or a rotation of
specific products available directly on your home page. In the Product of the Day section, there
are two tabs: Setup and List of Schedules.
Setup is where you can select the options for your Product of the Day. In the Setup tab, there are
two options:
• Let the system choose a Product of the Day Automatically
• I want to select my own Products of the Day.
If you select “I want to select my own Products of the Day”, the options to help you use a
Product of the Day schedule will appear. You can select the schedule you would like to use from
the dropdown and then click Apply. If you need to edit an existing schedule, select it from the
dropdown and click on the “Edit Schedule(s)” button. If you need to create a new schedule,
click on the “Create New Schedule” button.
To create a new Product of the Day schedule, click on the “Create New Schedule” button. A
pop-up window will open.
Type the Schedule Name, select a
level from the dropdown, and check
the Active box (For more information
on these levels, please review
Appendix A: Levels in the ESP
Admin).
Click on Save after you have entered
this information.
31
Now, you will need to put products into this schedule. Click on the List of Schedules tab, then, in
Schedules section, locate the schedule you just created and click on the Edit link in the Actions
area. In the Scheduling Properties box, click on Schedule Products.
A new tab, Edit Schedule, will open and now you will be able to add products. Products can be
added from the Clipboard.
If you do have not already saved the products to the Clipboard, click on the Search for Products
button. To add a single product, search for the product you would like to use, mark it, and then
click on the Marked Items button. Select “Add to Current Product of the Day Schedule” from the
dropdown.
To add multiple products, search for a product and mark it. Then, click on the Marked Items
button and select “Add marked items to Clipboard” option.
32
Repeat this process until you have added all of the products you would like to work with onto
your Clipboard. Then, click on the Clipboard, mark the products you would like to use and select
“Add to Current Product of the Day schedule” from the dropdown.
After adding the products to the Product of the Day Schedule area, click on the edit link under
actions to set a start and end date.
To the right, a preview will be displayed. Directly below the preview will be the Scheduling
Properties box. Here, you can enter a start date (date you would like the Product of the Day to
begin showing on your site) and an end date (date you would like the Product of the Day to stop
showing on your site).
To set up a start date, click into the Start Date box and select a
date from the calendar. To set up an end date, click into the
End Date box and select a date from the calendar.
Then, click on the Save Properties button. Repeat this process
for all additional products to build a full Product of the Day
schedule.
If the product had already been scheduled and you would no
longer like it to be part of the schedule, click on the
“Unschedule Item” button. You can also delete a product by
clicking on the “Delete Product” button.
33
Now, the Product will show with its start and end dates in the Product of the Day Schedule area.
Site Navigation
There are two site navigation areas in the Design Studio, one is directly under Design Studio and
the other is in the Advanced Design options. This section will focus on the site navigation
located directly under the Design Studio. In this section, you can edit your existing site
navigation menus. If you need to create a new menu, please review Chapter 5 – Design Studio,
the Advanced Design section.
To edit an existing menu, use the Select a Menu dropdown to choose which menu you would like
to edit. Top is the default navigation menu for your site.
After selecting the menu you would like to edit, click on a menu item to edit its properties or
add to it. Next, select a menu item. Please note that “Home” and “Product Search” are static
and cannot be edited. In the example below, “More” is selected. The menu item will display in
the Properties column. The Properties column is where we can edit the display name (the name
of the menu item that will be displayed on
your site), the type of item, and the details.
There are several different types of items.
The types available in the dropdown are:
• Event
• URL
• Pages
• MailTo
• Product Collections
• Select-A-Searches
• Text
• Top Searches
34
The Detail will be dependent on the type of item you select. For
example, if you choose Product Collection, the detail will display a
dropdown of all available product collections.
The Advanced options will display options for opening the menu
item, as well as the ability to enter CSS class information. If you are
not well versed in CSS, it is recommended that you do not enter
information in the CSS class field. When you are finished editing this
menu item, click on Save.
If you would like to create a submenu for this menu item, in the
lower section of the Properties area, click on the Add button.
Now, a second Properties window will be displayed with the “Navigation Item Options”.
You can edit this submenu item the same
way as the main menu item.
Edit the Navigation Item Options:
• Add a Display Name
• Select a type
• Select/Add Detail
Click on the Save button.
If you wanted to add another menu item
below the new Navigation Item, you can
use the Add button in the lower portion of
the Properties window.
To make a menu item inactive, just uncheck
it.
Another column of Properties will open and
will display a blank Navigation Items
Options area. Just edit and save.
There are two preview buttons; both will display a preview of your menu. If you are satisfied
with your site navigation, go to the Settings Toolbar and click on Publish.
35
Once this menu has been published, this is what it will look like on your site:
Introductory Text
The Introductory Text area is where you update the text that is shown on your home page. You
can just type a headline and text, then click on the Save button.
There is a toolbar across the top of the text area.
Here is a breakdown of the text toolbar from top left to bottom right:
36
Below the text area, you can also click on the HTML button to edit the HTML coding of your
Introductory Text.
Pages
The Pages area is where you can create additional pages for your site. Your site will
automatically create a default About Us page. In this area, you can edit the About Us page by
typing new text, using the toolbar or switching to HTML mode. When you are finished making
your changes, click on the Save button at the bottom.
You can use the Create New Page button in the upper right hand corner to begin creating your
own custom page for your site. After clicking on the button, you need enter a Display Name. The
Display Name will be an extension of your URL (ex: abcpromos.espwebsites.com/DisplayName)
and therefore cannot contain spaces. Then, enter your text and customize it using the toolbar.
Then, click on Save.
37
You will then need to add your page to your navigation. For more information on how to do this,
please review Chapter 5 – Design Studio, Site Navigation or Chapter 5 – Design Studio,
Advanced Design – Site Navigation.
Advanced Design
The Advanced Design area is where you can apply features to make them live on your site. There
are four options available in the Advanced Design section: Manage Pages, Site Navigation,
Manage Artwork and Edit the Style Sheet. When you try to access any portion of the Advanced
Design, a warning stating:
Modifications made to your ESP Website using Advanced Design tools could cause
standard Design Studio tools to no longer apply to certain features and functionality on
your ESP Website. In some circumstances, you might need to reset your site and use
SiteBuilder again. Additionally, any edits made to your site using Advanced Design tools
will be lost if you decide to change your site template.
Manage Pages
The Manage Pages section enables you to add, edit, copy and delete the pages of your site. Also,
this is where you can add features to your pages. There are two tabs in the Manage Pages
section: Manage Pages and Edit Page. The Preview link will display a preview of the page. The
“More” dropdown is where you can copy or delete a page.
38
To create a new page, click on the Create New Page button at the bottom of the Manage Pages
area.
You will need to enter a Page Name, Page Title, and
Page Layout.
A Page Name is the extension for this page from the
site’s URL. For example:
abcpromos.espwebsite.com/AboutUs”.
The Page Title is the text that appears in the browser bar. For example:
When you finished entering this information, click on the Create Page button.
When you click on the Edit link in the Manage Pages area, the properties of that page will open
in the Properties area.
The Properties section is where you can update the Page
Name and the Page Title.
You can check the Default Page box to make this your
default page. Your default page is what displays when
your site is accessed.
There are Page Layouts available. You can see a preview
of each layout. Click on it to select it.
The Meta Description and Meta Keywords boxes are
where you can enter individual meta tags for this page.
Generally, meta tags consist of three fields: title,
description, and keywords. The title and description of
your site will be displayed on a search engine’s results
page. They need to be coherent and concise.
Keywords, on the other hand, will not be seen and are
only for the search engine’s background ranking
processes. In this section, you can enter multiple
keywords separated by commas. For example: promo
products, imprinted products, promo items, imprinted
items, etc.
When you are finished customizing the properties of your
page, click on the Save Properties button.
39
The next tab, Edit Page, is where you can customize the content of your pages. The Edit Page
section displays your page in terms of modules and zones. Essentially, the feature you would like
to have on your page is a module (Select-A-Search, Product Collectin, Text, etc.). The place on
your site that you would like the module to display is a zone. The zones are broken down into
sections: Header, Main and Footer.
The first step is to use the Select Page dropdown menu to select the page you would like to edit.
You can drag a module to a zone and then configure it. For example, if we wanted to add
Editorial Content to our Homepage, we could do so by dragging the Module on the left and
dropping it into the zone of the page.
Then, after dragging and dropping the module into the zone, you will need to configure that
module. The configuration options will vary depending on the module’s capabilities. In the
example above, Editorial Content will
need to be configured.
When the module is dropped into the
zone, the module settings window will
automatically open. For Editorial Content,
you will need to specify a Market Group
and a Category. For example, Automotive
and News.
After clicking Save, the module is added
to the page.
Now, the module has been added to the page. To edit a module, you can do so at any time. There
are two constant edit options: Global/Non-Global and Remove. Global/Non-Global refers to
whether the module should be in that location on the page for all of the pages on your site. Any
module that is set as Global will appear on every page of your site in that position, such as a
header. Non-Global modules will only appear in their location on the page to which they have
40
been added. For example, the Editorial Content that was added to the Home page will only
display on the Home page. It will not appear anywhere else on the site. Most modules will have a
Settings link which enables you to edit the settings for that module. Some modules will contain
an Edit link which enables you to edit the information for that module.
More than one module can be added to a zone and modules can be dragged and dropped from
one zone to another. There is no save button in this area. All changes are automatically saved. To
make these changes live, click on the Publish link in the Settings menu.
Site Navigation (Advanced)
The Site Navigation area in the Advanced Design section is where you can build new navigation
menu, as well as edit or delete existing navigation menus. To create a New Menu, click on the
“Create a New Menu” button.
Then, configure the new menu by:
•
•
•
•
Selecting whether you want to create a new menu or
copy an existing one.
Naming the menu (ex: Side).
Selecting whether you would like this menu to be
horizonral or vertical.
Clicking on the “Create Menu” button when you are
finished.
Now, begin building your menu by clicking on the Add button in the Menu section on the left.
41
The Properties column is where we can edit the display name (the name of the menu item that
will be displayed on your site), the type of item, and the details.
There are several different types of items. The types available in
the dropdown are:
• Event
• URL
• Pages
• MailTo
• Product Collections
• Select-A-Searches
• Text
• Top Searches
The Detail will be dependent on the type of item you select. For
example, if you choose Product Collection, the detail will display
a dropdown of all available product collections. In the example
to the right, the type is Text, therefore, no detail is necessary and
the field can be left blank.
The Advanced options will display options for opening the menu
item, as well as the ability to enter CSS class information. If you
are not well versed in CSS, it is recommended that you do not
enter information in the CSS class field.
When you are finished editing this menu item, click on Save.
If you would like to create a submenu for this menu item, in the lower section of the Properties
area, click on the Add button.
Now, a second Properties window will be displayed with the “Navigation Item Options”. You
can edit this submenu item the same way as the main menu item. Edit the Navigation Item
Options:
• Add a Display Name
• Select a type
• Select/Add Detail
Click on the Save button.
If you wanted to add another menu item below the new Navigation Item, you can use the Add
button in the lower portion of the Properties window.
Below is an example of how a menu item with sub menus would appear in the Advanced Site
Navigation area.
The highlighted sections correspond with where you will be able to edit those menu items.
42
The numbers in for the menu and navigation items indicate where they will be in the menu. In
the example above, Stress Relievers is first, then Medical, then Doctors, Nurses, Health and
Fitness. Therefore, then site navigation menu is:
1. Stress Relievers
2. Medical
3. Doctors
Nurses
Health and Fitness
To make a menu item inactive, just uncheck it.
There are two preview buttons; both will display a preview of your menu. If you are satisfied
with your site navigation, go to the Advanced Design, Manage Pages section and add the
Navigation module to a zone on your site. Then, publish your site to make the menu live and
active on your site.
Manage Artwork
In this area, you can upload logos/images as designated approved artwork which can be used
when customers are placing orders. To add artwork into this seciton, click on the “Upload
Artwork” button.
43
Then, you can select from available files in your Media Manager. If you need to upload a file,
click on the Upload Files button in the Media Manager.
Then, hover on the file, hover over “Options” and click on “Select File”.
Now, the artwork is available for use in the Approved Artwork area.
44
Edit the Style Sheet
This option will bring you into the CSS of your site. It is strongly recommended that if you are
not well versed in CSS that you do not make changes in this area.
Chapter 6 – Features
The Features menu is where you can create features to use on your site. In this section, there are
six options: Select-A-Searches, Media Library, Coupon Manager, Custom Products, Content
Library and Exclusion Lists. You can create these features here, but remember, you will need to
go into the Advanced Design to apply these modules to your pages.
Select-A-Search
A Select-A-Search is essentially a search that is already done. For example, if you are a supplier
of mugs, you can create a Select-A-Search devoted to just your ceramic mugs. This way, visitors
to your site do not have to search for ceramic mugs; they can simply click on the link to view the
available ceramic mugs.
45
To create a Select-A-Search, click on the “Create New Select-A-Search” button in the Select-ASearches area.
Do a search for products (ex: Automotive Items or Ceramic Mugs). Then, when you are satisfied
with the search results, click on the Save Search button in the “Your Searched Terms” box.
You will be prompted to name your Select-A-Search. Type a name in the box, then click on the
Save link.
46
Now, you can continue to search, save and create Select-A-Searches. If you are ready to return to
the Select-A-Searches area, click on the Return to [Features - Select-A-Searches] link.
Your newly created Select-A-Search(es) will now be added to the Select-A-Searches area.
In the Select-A-Searches area, you can edit, preview and delete your Select-A-Searches. Clicking
on the Edit link will open the Select-A-Search in an editable state on the right, in the Properties
area. In the Properties section, you can edit the name of the Select-A-Search by typing in the
Name box. You can also click on any image in the Image area to designate a default image for
this Select-A-Search.
Then, you will want to check this Select-A-Search as active so it can be added to pages and/or
site navigation. For more information on how to add a Select-A-Search to your site navigation,
please review Chapter 5 – Design Studio, Site Navigation or Chapter 5 – Design Studio,
Advanced Design - Site Navigation.
Media Library
The Media Library will contain all of the various media for use on your site. To add media into
the Media Library, click “Upload Media” located in the bottom right corner of the Library Items
section.
47
Then, you can select from available files in your Media Manager. If you need to upload a file,
click on the Upload Files button in the Media Manager.
Then, hover on the file, hover over “Options” and click on “Select File”.
48
The file will then be added to your Media Library. You can edit, copy
or delete files in the Library Items area.
When you click on Edit, the Properties section on the left will show
the editable options.
You can edit the name, image type, and level. For more information on
levels in the Library Items area, plaese review Appendix A: Levels in
the ESP Admin.
Click on the Save Properties button when you are finished editing.
Coupon Manager
You can set up coupon codes that can be entered on your site. To create a new coupon, click the
“Create New Coupon” button.
First, type a name for your coupon in the
Coupon Name field.
Then, you need to add a Coupon Code, which
is the code user can input during checkout to
redeem this coupon.
You can enter a description if you desire. You
then must select a start date, end date, coupon
amount and order minimum.
When you are finished entering this
information, click on the “Create Coupon”
button.
The coupon will then be added to the Coupon
Manager. In the Coupon Manager, you can
edit, copy or delete existing coupons.
49
To edit an existing coupon, you can click on the Edit link in the Action section. The Properties
section will open to the right of the Coupon Manager. You can edit all of the same fields as when
creating a new coupon.
When you are finished, click on the “Save Properties” button.
Custom Products
Custom Products are products which you can create from a completely blank template.
Note: Creating a custom product on your ESP Website will not add that product to ESP. It will
only be added to your website. To add a product to the ESP listings, please create it in ESP
Updates. Products added in ESP Updates will be available for use on your ESP Website.
To create a new custom product, click on the “Create New Custom Product” in the Custom
Products area.
When creating a custom product, there are five required fields. These fields are: Product Name,
Pricing, Summary, Product Description and Category.
50
There are five total sections in which you can enter data. Pricing is required and should be added
in the Pricing section.
Product
Description
Product
Attributes
General
Information
Imprinting
Information
Packaging/
Shipping
Product Name*
Product Number*
Product Image
Summary*
Description*
Category*
Color
Material
Size
Shape
Product Options
Production Time
Rush Time
Country of
Origin
Safety Warnings
Imprint Method
Imprint Charges
Imprint Color
Imprint Size
Additional
Colors/Locations
Imprint Options
Packaging
FOB/Shipping
Point
Shipping Weight
*Required
To add information into a field in the Product Attributes, General Information, Imprinting
Information or Packaging/Shipping areas, you will need to click on the “Add” link below the
51
feature you wish to include. In the example below, there is an imprint size. The imprint size was
added by clicking on the “Add Imprint Size” link and then selecting the values from the
dropdown available. As you can see, sizes are available in both fractional and decimal. Some
fields will enable you to add details about the value. In the example below, the detail for each
imprint size indicates where it will be added on the product.
You can also add a secondary value (dependency) to the main value. For example, if you need to
add an imprint charge, it must be dependent on another value. Therefore, to add an imprint
charge, you will first need to add another field, like imprint method. Add the imprint method first
and then click on the icon to add a secondary value (dependency).
You can also add pricing to the value (for example, different prices for different sizes) or you can
use the X to delete the value.
The Quick Link menu is located to the left of the product editing area. You can click on any of
the Quick Links at any time to be brought directly to that section
of the product. After entering all of information for your product,
click on the Save Update button to save your changes. “Save
Update” will only save work and not publish to your site.
If you are ready to publish (make your product live on your site),
you can click on the Save and Publish button. After publishing,
the product will need to go through an overnight data load. It will
not appear until the next day. If you have created a custom
product, please refrain from editing it until the next day.
You can cancel the update at any time by clicking on the “Cancel
Update” button. If you click on “Cancel Update”, none of your
changes will be saved. The “Preview Update” button will display
your product as customers will see it. You can use the “Add To
Product Collection” button to make this product active in a
Product Collection. After saving the product, it will be available
in the Custom Products area.
To duplicate a custom product, use the dropdown next to the
“Edit” link, select “Copy”. To delete a custom product, use the
same dropdown and select “Delete”.
52
Content Library
The Content Library is where you can build and house information for use on your site. In this
section, you can click on the “Add New Content” button and then build a content page. In the
Library items area, you can use the links in the Actions area to edit, view, copy or delete content
from the library (the copy and delete options are available in the “More” dropdown).
Then enter the content you would like to have. After you have completed entering your content,
you will need to enter the properties of the content, such as the Title, Categories, Markets, Level
and Release Date. For more information on levels, please review Appendix A: Levels in the ESP
Admin.
After you have completed your content page, click on Save.
53
Exclusion Lists
The exclusion lists area is where you can create lists of products that can be designated as
excluded products on your site. In the Exclusion Lists area, you can use the links in the Actions
column to edit an exclusion list, search for more products to add or use the “More” dropdown to
copy or delete an existing exclusion list. To create a new exclusion list, click on the “Create an
Exclusion List” button. When creating a new exclusion list, you will first need to enter the
properties. You will need to enter a name, can enter a description (description is optional), then
choose a level and check the “Active” box. Click on Save when you are finished. After clicking
on Save, your new exclusion list will be added to the Exclusion List area. Click on the Search
link in the Actions column to begin a search for items to exclude from your website. After you
have completed your search, mark the items you would like to exclude from your site. You can
mark up to 100 items at a time. After you have marked the items, click on the Marked Items
dropdown. Here, you can select to add the marked products to an existing list, to the current list,
or create a new list. When you are finished adding to your list(s), click on the Return to [Features
– Exclusion Lists] link. To make an exclusion list apply to your site, please review Chapter 8 –
Site Settings, Exclusions Tab.
Chapter 7 – Marketing Tips
The Marketing Tips section of the Management toolbar enables you to learn more about search
engine optimization (SEO) as well as internet marketing. There are several sections in the
Marketing Tips area. These sections are:
• Social Media
• Email Marketing
• Search Engine Marketing
• Material Kit
• Announcing Your New Site
Each of these options is aimed at making your website as successful as possible.
54
Chapter 8 – Site Settings
To access site settings, log into your ESP Website™ admin. Then, select your site from the ESP
Websites dropdown menu and click on “Settings” from the Settings toolbar.
Site Summary Tab
In this section, you are able to view your ESP Website site title, domain, language(s), analytics,
status, type, and last published date. The Domain for your site is a clickable link that will open
your site in a new window.
If you would like to restore your site to its default settings, click the “Reset Site” button.
Info Tab
In this section, there are three areas of information you can update. The first section is the Set Up
Your Site section. Here, you are able to edit your site title, site email, site owner’s name and site
owner’s email. If you would like the information displayed on your site, check the Display on
my site box.
After making changes in this section, click on the Save button.
In the Enter Your Company Info section, you can enter your company information, such as your
Company name, address, and contact information.
There is a dropdown for available addresses, which will enable you to use an address entered by
any user in your company.
55
Select an address or enter your information, and then use the checkboxes to select which
information you would like to display live on your site. After you have finished making changes,
click on the Save Address button in this area.
Note: You must enter a phone number and email, even if you choose not to display them on your
site.
The last section in the Info tab is the Company Social Networking Links area. In the Company
Social Networking Links area, you
can copy and paste links into
appropriate fields.
You can add links for:
• Facebook
• Pinterest
• Twitter
• LinkedIn
• YouTube
• Google+
• Flickr
• Your blog
Click on Save after entering the URL.
56
Meta Tags Tab
In this section, you can update your site description and keywords by typing your desired text in
the respective box and then clicking on the Save button.
Display Options Tab
You can control what can be viewed on your ESP Website™ by first clicking “Settings” then
selecting the “Display Options” tab.
Check the fields you would like to be visible when your site is live (unchecked fields will be
hidden). The available checkboxes are:
•
•
•
•
•
Show ASI Number
Show Price
Show Product Number
Show Request For Information Button
Show Request For more information
after POA (Product Option Assistant)
•
•
•
•
•
Search ASI Number
Search Price
Search Linename
Search within
Default Sort
The Product Option Assistant dropdown to select whether to use the Basic Version or skip this
option (It is recommend that if the shopping cart is enabled you use the Basic Version).
57
The section for Virtual Samples enables you to have all Virtual Sample-enabled products to
display with the Supplier’s original product image or display with a logo from your Image
Library (Media Manager). It is located below the checkboxes.
When you are satisfied with your selections; click “Save”.
Domains Tab
Your site comes with a default web address, which you can edit. To edit your domain name,
click on the Edit link under Actions and then type your new domain name.
To add a domain name, click on the “Add New ESP Website Address or Custom Domain”
button. Then, type your new domain name into the field and save. If you select to use a standard
ESP Website address, “.espwebsite.com” will automatically be added to the name you enter. If
you have selected to use a custom domain, you do not need to type “www”, just type the domain
name – for example: ABCpromo.com. You will need to do a redirect to point your custom
domain to your ESP Website. You will need to contact your domain host (GoDaddy, Network
Solutions, etc.) and have them redirect the domain name by pointing the A record to the provided
IP address (199.0.184.165). You can redirect up to four (4) domain names.
Analytics Tab
You can enable your Google Analytics© account to track data from your ESP Website. Check
the “Enable Google Analytics” box, type or paste your Google Analytics account number into
the text box, and then click on Save.
eCommerce Tab
There are five sections in the eCommerce tab: Payment Processing Options, Other Charge
Options, Coupon & Points Options, Order Confirmation Options and Artwork Options. Let’s
begin with the Payment Processing Options. The eCommerce for ESP Websites is powered by
PromoPayment.
If you would like to accept credit card and e-check payments you must have a PromoPayment
Account.
To sign-up for PromoPayment, click on the “Enroll Today” banner in the Payment Processing
Center and create a PromoPayment account.
You can also contact PromoPayment by logging onto www.asicentral.com/promopayment, or
calling (800) 220-8611.
After you set up your
PromoPayment account you will
receive a security key.
After you have received this key,
return to the “eCommerce” tab
and select “I Want to Accept
Payments on My Site”. Check the
“Credit Card” and “Electronic
Payment” boxes.
Next, enable deposits and add a
dollar amount or percentage in the
deposit field.
Lastly, select which credit cards
you accept and enter or paste in
your PromoPayment Security
Key.
If you wish to use PayPalTM, you
can select “PayPal” as the type of
payment and then enter your
PayPalTM Account ID.
Now let’s move to the Other Charge Options section. In this section, you can set shipping
charges and sales tax to be applied at checkout.
To enable your shipping charge method, select
from:
• Fixed Amount (flat rate)
• Percentage
• No Shipping Charges
Then, enter the value in the respective box.
If you are entering a percentage, the Min and
Max are the amount of the order to which the
percentage should be applied. For example, a
10% shipping charge will apply to all orders
totaling $100 to $1000 dollars.
To enable sales tax, select yes and enter the
percentage.
The next section, Coupons & Points Options is
where you can choose to accept coupons or create
company points.
To enable coupons, select “Accept Coupons” to
enable this option. For more information on
setting up Coupons, please review the Features – Coupons section.
To enable company points, select “Accept Company Points”.
Then, choose a name for this reward program in the given field and define a two letter abbreviate
for the points title (example: Company Points = CP). You will need to set a ratio for points based
on a $1 (USD). For example, if 1 point equals $1, type “1” into the Points Exchange Rate box or
if 5 point equals $1, type “5” into the Points Exchange Rate box.
The fourth section, Order Confirmation Options, is where you can edit the text of the outgoing
order confirmation emails.
You can also select to which user account you
would like orders placed through your ESP
Website to go.
You can select a user to receive order
confirmations or allow an alternate email
address to receive order confirmations.
For example, if your company had a central
order manager, you could enter their email
address in the Alternative E-mail Account Setup box.
The Submit Order Content section is where you can edit the text that is shown on confirmation
emails. The Thank You Page text will be displayed as a web page after your customer has
completed checkout. The E-mail text will be included in the email that is sent to your customer
after they have placed an order through your ESP Website.
The E-mail Disclaimer text is also included in the order confirmation email.
Note: Your ESP Website will automatically have standard, default text available in these fields.
The Submit Payment Content is the page and e-mail that are generated after your customer has
entered a payment.
The Thank You Page text will be displayed as a web page after your customer has completed
their payment.
The E-mail text will be included in the email that is sent to your customer after they have
completed making their payment.
The final section of the eCommerce tab is the Artwork Options. In this section, you can choose
to enable artwork so customers can upload their artwork or use approved artwork.
The “use uploaded artwork” option
would enable customers to import their
logo to the order.
The “use approved artwork” option
would only allow logos that are
currently uploaded to your site to be
used.
When you are finished making changes in any section of the eCommerce tab, click on the Save
button.
Site Password Tab
You can set up a password that visitors to your site must type before they will be able to enter
your site. The Password Prompt Text will be displayed above the password box. You can
personalize this text for your company. To enable this feature, check the “Enable Password
Protection” box, edit “Password Prompt Text” (optional), and then type the password for your
site in the password box. Click on Save when you are finished.
Exclusions Tab
You are able to exclude lists of products from your ESP Website. For more information on
setting up these lists, please review the Chapter 6 - Features – Exclusion Lists section.
If you need further assistance, please contact ASI Product Support
at 800-546-1350, prompt 6 or email [email protected].