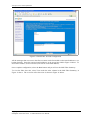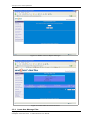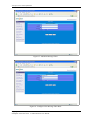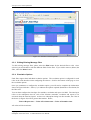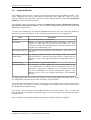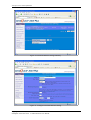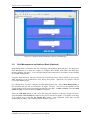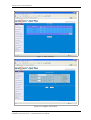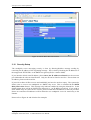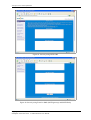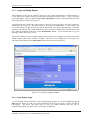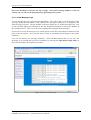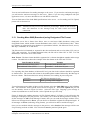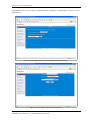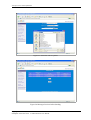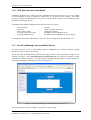
1
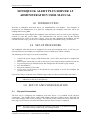
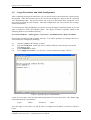
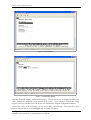
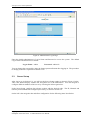
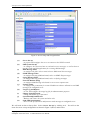
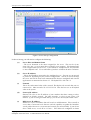
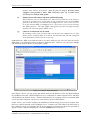
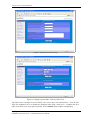
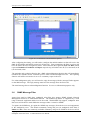
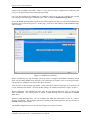
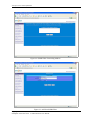
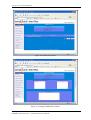
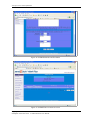
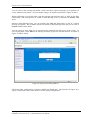
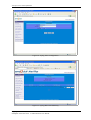
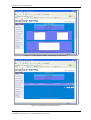
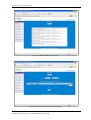
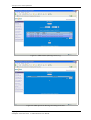
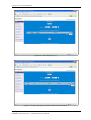
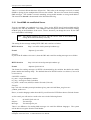
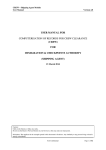
Strictly Private and Confidential SendQuick Alert Plus Server 1.5 Licensing Agreement and User Manual Prepared by TalariaX Pte Ltd No. 11 Howard Road #04-00 Tat Hong Industrial Building Singapore 369583 Tel: +65 6280 2881 Fax: +65 6280 6882 E-mail: [email protected] Web: www.talariax.com Copyright2002-2006, TalariaX Pte Ltd SendQuick Alert Plus Server 1.5 Administration User Manual 1 Strictly Private and Confidential SendQuick Alert Server Software License Agreement For SOFTWARE PRODUCT, content and software information marked with © TalariaX or © TalariaX Pte Ltd the following license agreement applies to you: This is a legal agreement between you, the end user or user corporation, and TalariaX Pte Ltd, Singapore. By purchasing and starting (power-up) the appliance server with the sendQuick software (SOFTWARE PRODUCT) installed in the appliance, you agreed to be bound by the terms of this agreement. If you do not agree to the terms of this agreement, promptly stop the start-up process by shutting down the system and return the product package to the place you obtained it for a full refund (subject to relevant terms and conditions for refund) provided the product package is in its original condition. 1. Grant of license TalariaX Pte Ltd grants you the right to use one copy of the enclosed SOFTWARE PRODUCT - the SOFTWARE - on a single appliance server that it is being installed in by TalariaX. The SOFTWARE is in use on a computer when it is loaded into memory or installed into permanent memory of that computer. This license is attached with the hardware (appliance) that was originally installed by TalariaX. This license does not permit or allow or warrant any rights to redistribute, duplicate, compile, reverse compile or any acts that will remove or seek to remove the SOFTWARE from the original appliance that it was installed in. The effort for the above stated actions include both software or hardware related including but not exclusive to hard disk duplication, network transfer, network duplicate or any acts that may cause the removal of the SOFTWARE from the original storage position. Any of such acts stated herein shall amount to a breach of the copyright and this licensing agreement and is punishable by the Court of Law in Singapore and your respective countries. Duplication, copying or whatsoever acts or intent pertaining to remove the SOFTWARE from this appliance is strictly prohibited. 2. Additional grant of license In addition to the rights granted in Section 1, TalariaX Pte Ltd grants you a nonexclusive right to use the SOFTWARE in the appliance by an unlimited number of users or application servers to send messages to an unlimited number of recipients. 3. Copyright This software is owned by TalariaX Pte Ltd or its suppliers and is protected by Singapore and international copyright laws and treaties. Therefore you must treat the SOFTWARE like any other copyrighted material. Except that if the SOFTWARE is not copy protected you may either make one copy of the SOFTWARE solely for backup purpose or transfer the SOFTWARE to a single hard disk provided that you keep the original for backup or archive purposes. You may not copy the product manuals or any written material accompanying the SOFTWARE. Some of the components that support the SOFTWARE are owned by independent owners and developers. The copyrights of these components are owned by their respective owners and developers and TalariaX does not claim to own or develop these components. 4. Other restrictions You may not rent or lease the SOFTWARE, but you may transfer your rights under this license agreement on a permanent basis if you transfer all copies of the SOFTWARE with the Appliance hardware and all written material, and if the recipient agrees to the terms of this agreement. Copyright2002-2006, TalariaX Pte Ltd SendQuick Alert Plus Server 1.5 Administration User Manual 2 Strictly Private and Confidential You may not reverse engineer, de-compile or disassemble the SOFTWARE and any such acts and intent is considered a violation of copyright law in Singapore and your respective countries. Limited warranty TalariaX Pte Ltd warrants that the SOFTWARE will perform substantially in accordance with the accompanying product manual(s) or the online manual for a period of 365 days from the purchase date. This limited warranty period also applies to the hardware (appliance) and the GSM modem. TalariaX reserves the right to amend the limited warranty period without prior notice. Customer remedies TalariaX Pte Ltd entire liability and your exclusive remedy shall be, at TalariaX Pte Ltd’s option, either a return of the price paid or repair or replacement of the SOFTWARE that does not meet the limited warranty and which is returned with a copy of your receipt The limited warranty is void if failure of the SOFTWARE has resulted from accident, abuse or misapplication by the user/licensee. Any replacement SOFTWARE will be warranted for the remainder of the original warranty period but at least for 30 days. No other warranties To the maximum extent permitted by applicable law, TalariaX Pte Ltd disclaims all other warranties, either express of implied, including but not limited to implied warranties of merchantability and fitness for a particular purpose, with respect to the SOFTWARE, hardware, the accompanying product manual(s) and written materials. The limited warranty contained herein gives you specific legal rights. No liability for consequential damage To the maximum extent permitted by applicable law, TalariaX Pte Ltd and its suppliers shall not be liable for any other damages whatsoever (including, without limitation, damages for loss of business profits, business interruption, loss of business information, infringement of local regulation, or other pecuniary loss) arising out of the use of or inability to use this SOFTWARE PRODUCT, even if TalariaX Pte Ltd has been advised of the possibility of such damages. In any case, TalariaX Pte Ltd’s entire liability under any provisions of this agreement shall be limited to the amount actually paid by you for this SOFTWARE. TalariaX cannot guarantee that messages sent by using TalariaX's SOFTWARE PRODUCTs for wireless (SMS) messaging reach their addressees. Neither can TalariaX guarantee that the SOFTWARE PRODUCT receives all messages through the used mobile equipment they have been sent to. TalariaX is not liable for any consequential damages arising from the fact that messages tried to send by sendQuick Appliance Server products do not reach their target addressees (mobile phones, pagers) or that messages sent to the mobile equipment used with the SOFTWARE PRODUCT will be recognized and read by the SOFTWARE PRODUCT. For any clarifications, please contact: TalariaX Pte Ltd No. 11 Howard Road #04-00 Tat Hong Industrial Building Singapore 369583 Tel: 65 – 6280 2881 Fax: 65 – 6280 6882 E-mail: [email protected] Web: www.talariax.com Copyright2002-2006, TalariaX Pte Ltd SendQuick Alert Plus Server 1.5 Administration User Manual 3 Strictly Private and Confidential sendQuick Alert Plus Server 1.0 User Manual TABLE OF CONTENTS 1.0 INTRODUCTION.......................................................................................................... 5 2.0 SET-UP PROCEDURE................................................................................................. 5 3.0 SET-UP AND CONFIGURATION...............................................................................5 3.1 Physical Connections......................................................................................... 5 3.2 Log-in Procedures and Initial Configuration......................................................6 3.3 Server Set-up...................................................................................................... 8 3.4 SMS System Set-up..........................................................................................13 3.5 Mail Message Filter..........................................................................................16 3.6 SNMP Message Filter...................................................................................... 22 3.7 Syslog Message Filter...................................................................................... 27 3.8 Network Monitor..............................................................................................31 3.9 Shift Management and Address Book (Optional)............................................ 33 3.10 Security Setup................................................................................................ 36 3.11 Logs and Usage Report.................................................................................. 38 3.12 Send SMS via sendQuick Server................................................................... 43 3.13 Sending Mass SMS (Broadcast) using Designated File Format.................... 44 3.14 Sending Messages to Overseas Mobile Numbers.......................................... 47 3.15 Receive SMS via sendQuick Server...............................................................47 3.16 POP User Account in sendQuick................................................................... 48 3.17 Send Test Message from sendQuick Server...................................................48 3.18 Change Administrator’s Password................................................................. 49 3.19 System Backup, Restore and Diagnostic........................................................49 3.20 Log-out from the System................................................................................53 4.0 SHUTDOWN AND REBOOT..................................................................................... 54 5.0 TROUBLE SHOOTING.............................................................................................. 55 Copyright2002-2006, TalariaX Pte Ltd SendQuick Alert Plus Server 1.5 Administration User Manual 4 Strictly Private and Confidential SENDQUICK ALERT PLUS SERVER 1.5 ADMINISTRATION USER MANUAL 1.0 INTRODUCTION Welcome to sendQuick Alert Plus Server 1.0 Administration User Manual. This document is prepared for the administrator, as a guide for configuring the sendQuick Alert Plus Server for sending and receiving SMS. The Administrator will configure the sendQuick Alert Plus Server for it to work in your company’s network to send and receive SMS. The Administrator will need to work on the network configuration first, which is the Server Set-up. Once you had configured the IP address and the relevant network set-up, you can access sendQuick from any workstations using a web browser. 2.0 SET-UP PROCEDURE The sendQuick Alert Plus Server is designed to be set-up and configured easily. It will save you time and resources and enable your corporation to have a SMS server within 5 minutes. The following are the steps to set-up the system fully. 1. Connect the power supply, GSM modem and a serial cable (null modem is supplied the system 2. Power-up the system and you will see the log-in screen using the hyper terminal on your PC 3. Log-in using the hyper terminal screen and configure the IP relevant to your network 4. Save the IP address 5. Plug in the ethernet (LAN) cable 6. Access using a web browser to the IP and you can continue to access and configure the system as in section 3.2. You will be ready to send and receive SMS messages when you have performed the steps above. Note: Get assistance from your system administrator if you do not have the IP addresses for the server and gateway. 3.0 SET-UP AND CONFIGURATION 3.1 Physical Connections The first step in configuring the sendQuick Alert Plus Server is to establish all the physical connections. This includes power cable, GSM modem connection (USB or serial), SIM card and serial (null modem) cable to your PC/laptop. The ethernet (LAN) connection will be connected at a later stage (we will advise you in this document) after the Server Set-up is completed. Note: We suggest that you connect the ethernet (LAN) later as the default IP setting (192.168.1.8) may conflict with your existing network. Copyright2002-2006, TalariaX Pte Ltd SendQuick Alert Plus Server 1.5 Administration User Manual 5 Strictly Private and Confidential 3.2 Log-in Procedures and Initial Configuration After completing the physical connections, you can power-up the system and let the system activate the program. After the activation process, the server will prompt for a login on the PC connected via a Null Modem cable. This process allows you to log-in to the system and to change the server IP to an IP acceptable by your company. After this configuration, you can access the server using a normal web browser. To view the menu using Null Modem, you need to activate the Hyper Terminal program on your PC (that is connected via the Null Modem cable). The Hyper Terminal is typically found on the following folder in your Windows directory. Go to Start Windows > All Programs > Accessories > Communications > Hyper Terminal Select Hyper Terminal and the program will start. You will be prompted to configure the access. You will need to configure the following: (a) (b) (c) (d) Allocate a Name to the setting, eg, Alert. Select the COM Port. Select any of the available COM port which may be used by the Null Modem cable. Set the Baud Rate to 9600. Select Apply and Connect. You will see a screen as depicted in Figure 1 below. Figure 1: System Log-in via Null Modem At the cursor location, enter the login name and password to access the system. The default login namd and password is given below: Login : admin Password: sqroot Once the login is successful, you will be able to configure the IP address as shown in Figure 2 below. Copyright2002-2006, TalariaX Pte Ltd SendQuick Alert Plus Server 1.5 Administration User Manual 6 Strictly Private and Confidential Figure 2: Set IP address Figure 3: Confirm IP address Insert the desired IP address, Netmask and Gateway. Use the arrow keys to navigate and insert the value. Follow the instruction at the bottom of the screen. Once complete, activate the setting (Figure 3) and you can then access the system via web browser using the configured IP address. Connect the server to the LAN and you can access using a web browser. Enter the IP on your browser and you will see a second Log-in page as shown in Figure 4. Copyright2002-2006, TalariaX Pte Ltd SendQuick Alert Plus Server 1.5 Administration User Manual 7 Strictly Private and Confidential Figure 4: Administrator Log-in Page Enter the default Administrator’s Log-in Name and Password to access the system. The default Log-in Name and Password is as below: Log-in Name: admin Password: admin123 You can change the password by using the change password button after logging-in. The procedure to change password is explained in Section 3.14. 3.3 Server Set-up After log-in (as in Section 3.2), you will see the Server Setup setting as shown in Figure 3 below. This is the default display with the left navigation bar as the Main Menu. You can navigate to configure different modules of the server by selecting the left navigation bar. In the Server Setup, configure the relevant sections with the desired value. The IP, Netmask and Gateway IP would had been configured previously, as shown in section 3.2. On the left is the navigation bar and allow configuration for the following items listed below. Copyright2002-2006, TalariaX Pte Ltd SendQuick Alert Plus Server 1.5 Administration User Manual 8 Strictly Private and Confidential Figure 5: Server Setup and Navigation Bar (a) (b) (c) (d) (e) (f) (g) (h) (i) (j) (k) Server Set-up - to prepare and configure the server to connect to the TCPIP network SMS System Set-up - to configure the system on how to send and receive messages, as well as how to interface with external application for receiving SMS messages Mail Message Filter - to configure the filter rules to send selective SMS /email alert messages SNMP Message Filter - to configure alerting (SMS and email) rules via SNMP Trap messages Syslog Message Filter - to configure alerting (SMS and email) rules via Syslog messages Network Monitor (Ping) - to configure SMS alerting rules based on server non response time Security Setup - to configure the permission for certain IP addresses that are allowed to send SMS messages for sendQuick server Usage Log and Reports - to view and configure the usage log-file for administration purposes Change Login Password - change the default log-in password System Backup and Restore - Backup and restore the system and alert rules Send SMS Specifications - these are the specifications and format to send messages to sendQuick server. We will work on Server Set-up first. Select ‘Server Set-up’ by clicking on it. You will see the items for server set-up configuration as shown in Figure 5 (above) and 6 below. Copyright2002-2006, TalariaX Pte Ltd SendQuick Alert Plus Server 1.5 Administration User Manual 9 Strictly Private and Confidential Figure 6: Server Set-up Configuration In Server Set-up, you will need to configure the following: (a) Server Host and Domain Name - The server hostname is the name assigned for the server. This can be of any name, like ‘sms’, or use a name that is related to your company. The domain name is the assigned name for the server. If the domain is 'sendquick.com', the full name is 'sms.sendquick.com'. Use a valid name if you have a DNS to do name resolution. (b) Server IP Address - This is the IP address assigned to the sendQuick server. You can use an internal or public IP, depending on your network configuration. This IP is used to identify the server and will be used in all communications between sendQuick and external applications as mentioned in Section 3.5. The default IP is 192.168.1.8. (c) Netmask This is the subnet mask value of the network. This defines the network that you are connected to. Most networks use 255.255.255.0. This has been set as the default value in the system. (d) Gateway IP Address Gateway IP refers to the IP address of your machine that does routing to other machines in another network. For most networks, it refers to your router’s IP address. If you are using an ADSL dial-up, you can use the IP of the ADSL router. (e) DNS Server IP Address DNS Server refers to machines that will resolve a valid hostname. This is usually a server that is connected to the Internet with the capability to update the hostname via the public Internet or via an internal network (for internal DNS). If you do not have a DNS server, set the IP to 127.0.0.1. This allows the sendQuick to obtain Copyright2002-2006, TalariaX Pte Ltd SendQuick Alert Plus Server 1.5 Administration User Manual 10 Strictly Private and Confidential updates from Internet periodically. Note: If you are using a firewall, please configure your firewall to allow UDP connection (port 53) as DNS server (127.0.0.1) uses UDP for data update. (f) Email Gateway IP Address and Static SMTP IP Routing Email Gateway refers to the SMTP server that will send email out to the Internet. If you have an email server in your office or you are allowed to use an email SMTP gateway on the Internet, use that IP in the sendQuick server. Else, insert 127.0.0.1 to use the internal SMTP in sendQuick server. (See section 3.7 on security on using this SMTP gateway). The static SMTP routing allows specific incoming messages domain to be routed to specific SMTP server. (g) Check to use Hostname for all emails By checking on this field, all emails that sent out from the sendQuick server (like failure notice, incoming SMS, etc) will bear the Hostname that you had configured in the Hostname section in the Server Set-Up. SendQuick has a DNS server built-in (refer to (e) above when you use 127.0.0.1) that can resolve DNS name. It is designed to resolve a single (1) hostname only. However, you can create multiple sub-domain if desired. Please see the Figure 7 below: Figure 7: Configure DNS Hostname From Figure 7 above, you can specify the domain name for the DNS to resolve, the Mail Exchange IP (sendQuick Alert has a built-in SMTP server) to sendQuick or another external server and other sub-domain for the DNS to resolve. With this DNS feature, the company will have an internal DNS service for name resolution. However, it is not meant to resolve all hostnames. In this section, you can also configure the additional network setting of you wish to connect more than one (2 more) networks to the sendQuick server. Connect your LAN cable to the LAN ports in the sendQuick server and configure the IP for the respective networks on the spaces provided in Figure 8. Once complete configuration, select the Submit button to activate it. Copyright2002-2006, TalariaX Pte Ltd SendQuick Alert Plus Server 1.5 Administration User Manual 11 Strictly Private and Confidential Figure 8: Optional Network Setting Figure 9: Configure System Date, Time and Time Zone The final item to configure in Server Setup is the server date, time and timezone. You can also allow the sendQuick server to update the sendQuick time using a time server. Complete the IP or URL of the time server in the space provided. Select Submit when complete configuration. Copyright2002-2006, TalariaX Pte Ltd SendQuick Alert Plus Server 1.5 Administration User Manual 12 Strictly Private and Confidential When you have completed the server set-up, select the ‘Save Setting’ button. The server setting will be saved into the system with the new IP address provided. However, this does not activate the server with the new IP address. To activate, you will need to select the ‘Activate Setting’ button. After activation, you will be prompted to login to the system again. Activation ensures the changes to be in force. 3.4 SMS System Set-up SMS System Set-up refers to how the modem is connected and how the sendQuick server interacts with your applications, for sending and receiving SMS. There are 8 main items that need to be configured. They are: (i) Modem connection and message format (for e-mail) The default modem setting (COM) is USB. This enables a plug-n-play experience for modem setup. Select the number of modems (1, 2 or more) depending on your modem port license. Set to NONE if you do not wish to use the modem (some of the modem usage information is documented in Q5.8 in Troushooting). Then, select how the e-mail to SMS message is sent (with sender’s address, subject matter or message body) as well as the number of SMS per e-mail message, if the message is longer than 160 characters. If it is longer than 160 characters, it will be truncated and sent as multiple SMS if you select to send more than 1 SMS per e-mail. You have the option to send Long SMS format, if selected. (ii) SMS to Email Function The administrator can Enable the SMS to Email service by checking on the box provided. This will allow all users to send email via the SMS message. The format to send is: EM<space>Recipient Email Address<space>Message Content. Send this SMS (in the format stated) to your SIM card number attached to the server. This SMS message will be converted to an email message and sent to the intended recipient. (iii) Service Activation/Deactivation The administrator can Enable and Disable the services (E-mail to SMS and HTTPto-SMS) if required. This can be used as a form of security and control measure. (iv) Error SMS Messages Handling When there is an error SMS message or if the message is not sent, the sendQuick Appliance will inform the sender via HTTP or E-mail. Please specify the HTTP URL address or e-mail address for this purpose. (v) Modem Language This is to set the GSM modem to receive the messages in the desired language. Currently, sendQuick only support 4 language types (ASCII, Simplified Chinese -GB2312, Traditional Chinese-BIG5 and Thai language). Please select the language that you wish. (vi) Received SMS Messages Handling When there is a SMS message received by the server (incoming SMS message), the sendQuick Appliance will inform the recipient via HTTP or E-mail. Please specify the HTTP URL address or e-mail address for this purpose. (vii) Mobile Number Prefix Copyright2002-2006, TalariaX Pte Ltd SendQuick Alert Plus Server 1.5 Administration User Manual 13 Strictly Private and Confidential This information is to insert the local prefix for your country code, which will not be usually required for sending local SMS. This prefix item is important for the proper functioning of the escalation feature. (viii) View Modem Status This section will indicate whether the GSM modem is connected and detected by sendQuick Alert server. If connected, the SMSC number will be shown. This is shown in Figure 12 below. Note: When you switch between USB and Serial connection and vice versa, please remember to shutdown the server, connect the relevant modem and restart the server. You need to restart the server as sendQuick may not be able to detect the modem properly. This is more evident in the USB modem. For receiving messages (either Error or SMS Response Messages) you can use both HTTP Post/Get and E-mail methods. The error HTTP string will be as follow: http://<failure_url>?mno=91234567&txt=Hello+World&status=F Where: mno -- the mobile phone number txt -- the text message status – F (failure) The Received Messages (SMS Response) string is explained in Section 3.10 below. Fill in the information in the spaces provided as shown in Figure 10 and 11 below. Note: You have to fill in all items in the SMS System Set-up. If you do not wish to use any particular function, use NA in the space provided. Copyright2002-2006, TalariaX Pte Ltd SendQuick Alert Plus Server 1.5 Administration User Manual 14 Strictly Private and Confidential Figure 10: SMS System Setup and Configuration Figure 11: SMS System Set-up (Continue) Copyright2002-2006, TalariaX Pte Ltd SendQuick Alert Plus Server 1.5 Administration User Manual 15 Strictly Private and Confidential Figure 12: Modem Status When everything is completed, select Save Setting button and the data will be updated with the new configuration. However, this does not activate the server with the new configuration yet. To activate, you will need to select the ‘Activate Setting’ button when presented. 3.5 Mail Message Filter Select the Mail Message Filter (in the Navigation Menu) and the Message Filter Summary will be shown (in Figure 13). The Message Filter section need to be configured carefully to provide the right rules for SMS alert. It is fine if you configure the Message Filter on a later stage as it has no impact on the operation of sendQuick system. The Message Filter will be useful for the selective sending of alert messages using SMS. 3.5.1 Message Filter Summary and Email Configuration The email summary list all the message filters that had been created in the system. You can create as many message filters as required. In Figure 13 below, there is a button for creating multiple email address in the sendQuick system, to receive alert messages for filtering. Select on the Email Address button (in Figure 13) and Figure 14 with configuration option will be shown. You can also configure the time buffer that will ignore any repeated messages during the buffer period (Figure 15 below). Copyright2002-2006, TalariaX Pte Ltd SendQuick Alert Plus Server 1.5 Administration User Manual 16 Strictly Private and Confidential Figure 13: Message Filter Summary The configurable email addresses are used for sending alert messages from your firewall, anti-virus, IDS/IDP, UPS and others, to these email addresses. All messages that were sent to these addresses will be filtered in accordance to the message filter rules. Hence, all the rules created will be applied to all these email addresses. The purpose of these email addresses is to offer the flexibility for users to forward alert messages to common email addresses, that can be created by the users. All types of usernames can be created, except for default and monitor, that had been reserved by the system. Just enter the desired email address user names in the space provided. For more addresses, just enter them on the next line. All addresses will end with the IP address or the domain name of the sendQuick server. If the sendQuick server has an IP of 192.168.1.8 or a server name of sms.com.sg, then the email addresses created will be as follow (if the email username is alarm): [email protected] or [email protected] Copyright2002-2006, TalariaX Pte Ltd SendQuick Alert Plus Server 1.5 Administration User Manual 17 Strictly Private and Confidential Figure 14: Email Filter Account Configuration All the messages that were sent to the filter accounts can be forwarded to other email addresses, as a backup function. Insert the required email addresses in the spaced provided in Figure 14 above. To insert more address, use the next line (one line for each email address). Once complete configuration, select the Save button and you will see the Mail Filter Summary. To view the filter alert rule, select View under the Alert column in the Mail Filter Summary, in Figure 13 above. The overview of the alert rules is shown in Figure 16 below. Copyright2002-2006, TalariaX Pte Ltd SendQuick Alert Plus Server 1.5 Administration User Manual 18 Strictly Private and Confidential Figure 15: Buffer Time for Repeat Messages Figure 16: Email Filter Account Overview 3.5.2 Create New Message Filter Copyright2002-2006, TalariaX Pte Ltd SendQuick Alert Plus Server 1.5 Administration User Manual 19 Strictly Private and Confidential The administrator can create new message filters by selecting the Create button on the Message Filter Summary Listing (in Figure 13). The interface to add a new filter is shown in Figure 17 below. The filter works by checking on the three attributes of an email message. They are the Sender email address (FROM field), Subject field and Message body content. There is a checkbox on the side of the field name. If the desired field name is required for filtering, just check the box. Then, fill in the required content that will be used to filter the messages. You can select more than one checkbox and determine the relationship as AND (All) and OR (Any) relationship. Hence, the SMS alert will be sent only if the criteria are fulfilled. The filtering engine is based on matching the exact words or character and the phrase filled in the space provided, for each relevant field. Since the matching is based on words or characters and phrase, it will record a confirmed match as long as the word (or character) and phrase appear in the selecting field. Example, if the Subject field is entered with 'error message' the various scenarios is illustrated below: Sentence Match Status Reasons There is an error in the system message No Though the words 'error' and 'message' appears in the sentence, they are individual words and not a phrase. This is a system error No Only the word 'error' occur and not the whole phrase There is an error message from system 1 Yes The whole phrase 'error message' appear in the sentence. Once the system had matched the relevant words (or characters) and phrase, it will send the SMS messages to the mobile numbers address as indicated in the Mobile Number to Receive SMS field (Figure 18 and 19). You can insert more than one mobile number, by inserting the mobile numbers in the next line. To send to overseas numbers, please include the '+' and country code, followed by the mobile number. (Example, +60126234567 for Malaysian number). For Email to SMS, the message content in the SMS alert message is the original incoming email content. However, if you wish to send the SMS with a preconfigured message, enter the desired message in the Alert Message. Text box. The message is limited to 160 characters. If the text box is empty, the system will send the email message content of the email alert message (Figure 19). The message length and other content of the email alert message (that will be sent via SMS if the message alert checkbox is not selected) will be determined in the SMS System Setup under the multiple SMS per email and other functions in the set-up section. Please refer to the SMS System Setup in the manual for more information. Copyright2002-2006, TalariaX Pte Ltd SendQuick Alert Plus Server 1.5 Administration User Manual 20 Strictly Private and Confidential Figure 17: Add New Message Filter Figure 18: Configure New Message Filter Rule Copyright2002-2006, TalariaX Pte Ltd SendQuick Alert Plus Server 1.5 Administration User Manual 21 Strictly Private and Confidential Figure 19: Add New Alertee Options 3.5.3 Editing Existing Message Filter To edit existing message filter, please select the Edit button for the desired filter to edit. Once selected, you will be able to edit the different fields for the filter. If you wish to remove (delete) the filter, select the Delete button. 3.5.4 Escalation Options Each filter support their individual escalation options. The escalation option is configured for each rules in the same interface when configuring the alertees. Scroll to the bottom of the page to view the escalation options. Once you commence to configure the escalation option, you will need to complete the information shown in Figure 20 below. Select (√ ) to indicate the options required (Reminder or Escalation) for the filter rule. You can then configure the time lapse for reminder, escalation and report via SMS. The time lapse refers to the subsequent time for each of the function (reminder, escalation and report) to be activated when the time has lapsed. As these are subsequent timing one after another, the value in the boxes (in Figure 20) will be greater than another. Hence, Value of Report time > Value of Escalation time > Value of Reminder time All values will be in minutes. Copyright2002-2006, TalariaX Pte Ltd SendQuick Alert Plus Server 1.5 Administration User Manual 22 Strictly Private and Confidential Figure 20: Set Reminder and Escalation Options After configuring the timing, you will need to configure the mobile numbers as that will receive the SMS for Escalation and Report respectively (Figure 20). Upon completion, the filter overview will have all details shown as in Figure 16 below. You will notice the Legend for R, E and RPT (which represent Reminder, Escalation and Report respectively) will either have Y (Yes/Activated) or N (not activated) value. The reminder and escalation function has a SMS acknowledgement function that will immediately terminate the reminder and/or escalation process when an acknowledgment occur. The reporting function will still be activated as it serves as a summary report to the user. For acknowledgement reply, user will need to reply the message with the message ID that appears on the SMS message. The reply message must have the message ID as the first word. The email message has no acknowledgement function. It serves as information purposes only. 3.6 SNMP Message Filter Apart from email to SMS alert, sendQuick Alert Plus also support SNMP (Simple Network Management Protocol) to SMS/Email function. The SNMP trap feature is supported by a wide range of network equipment and devices in the world. With SNMP Trap support, sendQuick Alert Plus users will be able to send SMS alert messages either via email or SNMP. To capture the SNMP trap, just point the SNMP trap messages (from the devices and equipments) to the sendQuick server. The default community setting and port (in sendQuick Alert Plus) is Public and 162. These are commonly available community and port for SNMP in all devices and is Copyright2002-2006, TalariaX Pte Ltd SendQuick Alert Plus Server 1.5 Administration User Manual 23 Strictly Private and Confidential supported by sendQuick Alert Plus. Hence, if your devices need to configure the community and port, just configure based on the information provided. Once you had configure the SNMP trap to sendQuick Alert server, you can configure the relevant trap messages that will trigger a SMS message. This is called the SNMP Message Filter. Select the SNMP Message Filter option on the left navigation bar and you will see the SNMP Filter Summary page as shown (Figure 21). In this page, you will see the summary of the SNMP message filters (if any). Figure 21: SNMP Filter Summary Before configuring any trap messages, you may wish to configure the SNMP Forwarding which allow all incoming SNMP Trap messages to be forwarded to another server as Syslog messages. The interface to configure is as shown in Figure 22 below. You can also set the message time buffer, which will allow repeated messages to be ignored if it occurs within the time buffer. The time buffer setting is in minutes and similar to Figure 15 above. When configuring a new SNMP Trap filter, enter the relevant data and select ALL or ANY for the filter relationship. The actual process is similar to Mail Message Filter as illustrated in Section 3.5.2 above. Similar to Mail Message Filter, you can configure the SMS and Email alerts as well as a custom message for alerting. The escalation options are similar to Mail Message Filter and you can refer to Section 3.5.4 for more details. The SNMP configuratio process are shown in Figure 23 to Figure 27 below. Copyright2002-2006, TalariaX Pte Ltd SendQuick Alert Plus Server 1.5 Administration User Manual 24 Strictly Private and Confidential Figure 22: SNMP Filter Forwarding Address Figure 23: Add New SNMP Filter Copyright2002-2006, TalariaX Pte Ltd SendQuick Alert Plus Server 1.5 Administration User Manual 25 Strictly Private and Confidential Figure 24: SNMP Filter Details Figure 25: Configure SNMP Filter Alertees Copyright2002-2006, TalariaX Pte Ltd SendQuick Alert Plus Server 1.5 Administration User Manual 26 Strictly Private and Confidential Figure 26: SNMP Reminder and Escalation Figure 27: SNMP Filter Account Overview Copyright2002-2006, TalariaX Pte Ltd SendQuick Alert Plus Server 1.5 Administration User Manual 27 Strictly Private and Confidential You can create as many filter rule as required and is limited by the disk space of the system. To edit a SNMP Rule, select Edit on the message summary (Figure 21) and you can proceed with the editing of the rules. 3.7 Syslog Message Filter sendQuick Alert Plus also support Syslog to SMS/Email function. The Syslog feature is supported by a wide range of network equipment and devices in the world. With Syslog and SNMP Trap, sendQuick Alert Plus users will be able to send SMS alert messages either via email, SNMP or Syslog. To capture the Syslog, just point the Syslog messages (from the devices and equipments) to the sendQuick server. The default port (in sendQuick Alert Plus) for Syslog is 514. Once you had configure the Syslog to sendQuick server, you can configure the relevant messages that will trigger a SMS message. This is called the Syslog Message Filter. Select the Syslog Message Filter option on the left navigation bar and you will see the Syslog Filter Summary page as shown (Figure 28). In this page, you will see the summary of the Syslog message filters (if any). Figure 28: Syslog Filter Summary Before configuring any Syslog messages, you may wish to configure the Syslog Forwarding which allow all incoming Syslog Trap messages to be forwarded to another server as Syslog messages. The interface to configure is as shown in Figure 29 below. Copyright2002-2006, TalariaX Pte Ltd SendQuick Alert Plus Server 1.5 Administration User Manual 28 Strictly Private and Confidential You can also set the message time buffer, which will allow repeated messages to be ignored if it occurs within the time buffer. The time buffer setting is in minutes and similar to Figure 15 above. When configuring a new Syslog filter, enter the relevant data and select ALL or ANY for the filter relationship. The actual process is similar to Mail Message Filter as illustrated in Section 3.5.2 above. Similar to Mail Message Filter, you can configure the SMS and Email alerts as well as a custom message for alerting. The escalation options are similar to Mail Message Filter and you can refer to Section 3.5.4 for more details. You can create as many filter rule as required and is limited by the disk space of the system. To edit a Syslog Rule, select Edit on the message summary (Figure 28) and the interface is similar to Figure 30 will be shown. Figure 29: Syslog Forwarding Address The Syslog filter configuration is similar to SNNP and Email rules. The interface in Figure 30 to Figure 33 documents some of the interface for the Syslog configurations. Copyright2002-2006, TalariaX Pte Ltd SendQuick Alert Plus Server 1.5 Administration User Manual 29 Strictly Private and Confidential Figure 30: Syslog Filter Configuration Figure 31: Syslog Rule Alert Summary Copyright2002-2006, TalariaX Pte Ltd SendQuick Alert Plus Server 1.5 Administration User Manual 30 Strictly Private and Confidential Figure 32: Syslog Mobile Number and Message Configuration Figure 33: Syslog Filter Account Overview Copyright2002-2006, TalariaX Pte Ltd SendQuick Alert Plus Server 1.5 Administration User Manual 31 Strictly Private and Confidential 3.8 Network Monitor The sendQuick Alert Plus has a simple server monitoring function using ICMP Ping feature. This allows sendQuick Alert Plus to ping another machine and send a SMS alert if there is no server response within the specified time. Select the Network Monitor button and the Network Monitor Summary is shown in Figure 34 below. You will notice there is an option to configure the Monitoring Frequency, Monitoring Frequency Upon Failure and Total Test Packets. These are global configurations and will affect all the Ping Monitoring configurations. To create a new monitoring rule, select the Create button and you can create a new Ping monitor as shown in Figure 35 and 36 below. Enter the following information for the configuration: Item Description IP address This is the IP address to be monitored Alert Mode Whether to receive the SMS alert Once or continuous. Once is to receive one SMS only even if the function continues to Ping. Continuous setting will send SMS whenever the Ping response is not complete, for each checking cycle Monitoring Frequency The frequency (interval) between each Ping test. This value is in minutes. Monitoring Frequency The frequency (interval) between each Ping test when a test failure (upon failure) had been detected. Customer may prefer to have a smaller value (in minutes) to allow a more regular (frequent) checking when there is a failure. Total Test Ping This is the total test packets for each test. Server Status Alert This function is to allow sendQuick to send an alert (SMS) message to the administrator, to indicate that the sendQuick server is still functioning. This can be configured to be on a certain time of the day (time in HH:MM) or in hourly manner(00-59 minutes). The message will be sent to the recipient indicated in the monitoring function. We would suggest that you set the interval longer to avoid a high traffic load to the server. If you are comfortable, an interval of more than 10 minutes will be advisable. Then, enter the mobile number as well as the message to be sent to the users in the space provided. For the message, you can use a variable, by including the term xIPx in the message to denote insert the IP address in the SMS message. You can also create a message to send (SMS) when the server is back online. This is to ensure that the recipient will be informed if the SMS message was a created not due to server failure but due to network latency. Once completed, select the Save button and the network monitor setting is configured. Copyright2002-2006, TalariaX Pte Ltd SendQuick Alert Plus Server 1.5 Administration User Manual 32 Strictly Private and Confidential Figure 34: Network Monitor Setting Summary Figure 35: Configure Network Monitor Setting Copyright2002-2006, TalariaX Pte Ltd SendQuick Alert Plus Server 1.5 Administration User Manual 33 Strictly Private and Confidential Figure 36: Configure Network Monitor Alertees and Messages 3.9 Shift Management and Address Book (Optional) Shift Management is a function that will work along with the Phone Book function. The purpose of Shift Management is to allow the company to configure the schedule (time table) and which days that the schedule will apply. Users (in Phone Book) can be allocated in accordance to the schedule in the Shift Management. Using the shift allocation, only users defined in the shift hours/days will be alerted (or will receive SMS messages) if the notifications occur during that period. Otherwise, the alertees will not receive the SMS message. For configuration, you must configure the Shirt Management first. Select Shift Management on the left menu and you will see an interface in Figure 37 below. You will see the summary of the various shifts as well as the time and days defined for each shift. To Edit or Delete, select the Shift Name (to edit) or select the shoft for Delete, if required. Select the Add Shift button to add a new shift using the interface as shown in Figure 38 below. Insert the Start and End Time and indicate the various days that it applies. If it applies on all days or no specific days, select the No Specific Day option. Once completed, select Save and the defined shift be added. The summary will be shown in Figure 37. Copyright2002-2006, TalariaX Pte Ltd SendQuick Alert Plus Server 1.5 Administration User Manual 34 Strictly Private and Confidential Figure 37: Shift Summary Figure 38: Configure a New Shift Copyright2002-2006, TalariaX Pte Ltd SendQuick Alert Plus Server 1.5 Administration User Manual 35 Strictly Private and Confidential After configuring the shifts, you need the create the alertee list in the Phone Book. By creating the alertees in the Phone Book, you can insert the alertees information when creating the alerting rules. In addition, the phone numbers management is easier as the administrator will just need to manage the list in the Phone Book. Select the Phone Book option from the left menu bar and the Phone Book Summary is shown in Figure 39 below. The Name, Mobile Number, Email, Group and Shift Allocated will be shown. To edit, select Edit button and edit the data. To delete, select the Delete Option and select the Delete button. There is an option to view addressees in the particula group only. This option is found on the top right hand corner, indicating the group names or All. Figure 40 illustrates the various fields to add a new record. Select Create in Figure 39 and the interface in Figure 40 is shown. Enter the various records. Select the desired group or enter the field in User Group > New to create a new group. Once the fields are entered, select Submit and the record will be created in the Phone Book. You can create as many records in the Phone Book if required. Figure 39: Phone Book Summary Copyright2002-2006, TalariaX Pte Ltd SendQuick Alert Plus Server 1.5 Administration User Manual 36 Strictly Private and Confidential Figure 40: Phone Book Record Creation 3.10 Security Setup The sendQuick server messaging security is done by allowing/disallow message sending by restricting the IP address of the originating message. This is done by blocking the IP addresses of the unapproved HTTP URLs or the SMTP host gateway IP (for e-mail to SMS). If you intend to block some IP address, please insert the IP addresses allowed into the text area provided under the relevant classification. Only one IP can be listed on one line. If more than one IP address, please use the next line. If you wish to allow all IPs to access and send SMS, just leave the text box empty. The system also allows users or server to use sendQuick as a SMTP relay server. This is controlled in the SMTP Relay Host Allow feature. This message relay had been enabled by using the allowed list. In the default status, there will be no SMTP relay allowed (i.e., no IP address specified). If you wish to allow SMTP relay for some servers or users, please include their IP addresses in the box provided. Please save and these IP addresses will be allowed to use sendQuick server for email relay to the Internet. Please refer to Figure 41 and 42 below for examples. Copyright2002-2006, TalariaX Pte Ltd SendQuick Alert Plus Server 1.5 Administration User Manual 37 Strictly Private and Confidential Figure 41: Security using HTTP URL Figure 42: Security using E-mail to SMS (SMTP gateway) and SMTP Relay Copyright2002-2006, TalariaX Pte Ltd SendQuick Alert Plus Server 1.5 Administration User Manual 38 Strictly Private and Confidential 3.11 Logs and Usage Report The sendQuick server has an extensive log file for the system administrator or MIS manager to review the system, trouble shooting and the actual usage (load) of the system. To go to the Logs and Usage Report, select the button (Logs and Usage Report) from the Navigation Menu and the main log interface is shown in Figure 43. You will notice the various logs in the systems. The first section (in Figure 42) is the system log, followed by the Usage Log. The third section is the Usage Log Maintenance. In this section, you can set the number of days that the log will be kept before if is deleted automatically. With this automatic log deletion, the system administrator does not need to maintain the message and system logs, making sendQuick Alert Plus a zero maintenance server. If you decided not to log any messages, set the days log to zero '0'. The system administrator can configure for the message logs to be emailed to an email account on a routine manner, either daily, weekly or monthly. The time can be configured as well (Figure 43). The final section indicates the email address that will receive the message log. Figure 43: Log and Usage Report Menu 3.11.1 View System Logs To view the logs, select the button on the Logs Main Page (Figure 43). Select the Server Log and Mail Log (in Figure 43) and you will be presented with the logs as shown in Figure 44 and 45 respectively. The Server and Mail Logs are used for trouble shooting only and will be automatically purged on a daily basis to avoid log accumulation. Copyright2002-2006, TalariaX Pte Ltd SendQuick Alert Plus Server 1.5 Administration User Manual 39 Strictly Private and Confidential Do not be alarmed if you notice the log is empty. Just send a message (SMS) to create an activity and you will see the transaction logs appearing in the system. 3.11.2 View Message Logs To view the message logs, select the logs individually. You will be able to see the logs for all the messages (SMS) received (Inbox), sent (Outbox), the messages awaiting to be sent (Queue) and failed messages (Unsent). The log interface is shown in Figure 46, 47, 48 and 49 respectively. The system will only display the messages for the day, though the messages are still in the database in the sendQuick server. This is to avoid a slow loading time to display all the messages. If you wish to review the messages for a certain period, use the date search function found in all the logs (except for Queue). Once you had done a search, it will display the messages for the period requested. You can also back-up the messages manually. Select the Save button and you can save the messages to an external disk (your local computer) by selecting the right button (right click) on the mouse and follow the instruction provided. Figure 44: Server Activity Log Copyright2002-2006, TalariaX Pte Ltd SendQuick Alert Plus Server 1.5 Administration User Manual 40 Strictly Private and Confidential Figure 45: SMTP (Email) Activity Log Figure 46: SMS Inbox (Message Received) Log Copyright2002-2006, TalariaX Pte Ltd SendQuick Alert Plus Server 1.5 Administration User Manual 41 Strictly Private and Confidential Figure 47: SMS Outbox (Message Sent) Log Figure 48: SMS Queue for Message Awaiting to be Sent Copyright2002-2006, TalariaX Pte Ltd SendQuick Alert Plus Server 1.5 Administration User Manual 42 Strictly Private and Confidential Figure 49: Unsent Messages Log Figure 50: Log for Messages Not Sent as SMS Alert (Discarded) Copyright2002-2006, TalariaX Pte Ltd SendQuick Alert Plus Server 1.5 Administration User Manual 43 Strictly Private and Confidential There is a section in Discarded Alerts (Figure 50). This refers to the messages received (via email, SNMP or Syslog) by the sendQuick but was not sent as SMS. The are a few reasons for not sending SMS messages. This include a non-rule matching, wrong mobile number or wrong email address. The reasons for discard is documented in the Discarded Alert log. 3.12 Send SMS via sendQuick Server You can send SMS via sendQuick in 3 ways. They are the HTTP Post, E-mail-to-SMS and File Upload (CSV and Tab Delimited). The sendQuick Alert had preset the HTTP and E-mail sending methods tying to the IP address of the server. Hence, whenever you change the server IP, the URL and e-mail address will change. Note: You should configure the Server with the correct fixed IP and should not change them unless absolutely necessary. The setting for the message sending HTTP URL and e-mail are as follow: HTTP Post/Get http://<serverIP>/cmd/system/api/sendsms.cgi E-mail <hpnum>@<serverIP> Example: If you set the IP address 192.168.1.8, then the URL and e-mail for sending messages are as follow: HTTP Post/Get http://192.168.1.8/cmd/system/api/sendsms.cgi E-mail <hpnum>@192.168.1.8 The format for sending messages via HTTP is determined by the variables that define the mobile phone number and message body. The defined format for HTTP Post/Get is as below (if server IP is 192.168.1.8). CGI/HTTP variables: tar_num -- target (handphone) number tar_msg -- message to send via modem tar_mode – mode=text (ASCII) or mode=Unicode (Unicode) Example: http://192.168.1.8/cmd/system/api/sendsms.cgi?tar_num=91234567&tar_msg=how are you&tar_mode=text Hence, to send in languages other than ASCII, you will need to HTTP Post them as Unicode format. As for e-mail, you will need to e-mail to the server in the following format. To : Subject : Message: [email protected] Test message Test message for you. There is no difference for sending SMS messages via email for different languages. The system will be able to recognize from the email header. Copyright2002-2006, TalariaX Pte Ltd SendQuick Alert Plus Server 1.5 Administration User Manual 44 Strictly Private and Confidential You can use both formats for sending messages to the server. If you need to send many messages, you will need to send more messages to the server. Hence, if you are using sendQuick with your application server, it is more advisable to use with HTTP connection. You can find some of the Send SMS Specifications in the server. As for sending via File Upload, please refer to Section 3.12 Note: All SMS can only receive 160 characters per message. Please do not use more than 160 characters in the message body for both e-mail and HTTP connection. 3.13 Sending Mass SMS (Broadcast) using Designated File Format SendQuick server has a feature that allows users to send mass SMS (broadcast) using some designated format, which include Comma Delimited value (CSV) or Tab Delimited value. These two formats are supported by most database or spreadsheet software, like Microsoft Excel, Access, MS SQL, GoldMine, ACT! and others. The files need to be formatted (or exported in the relevant format) and saved as either CSV (.csv) or TXT (.txt) extensions. For Comma Delimited value, the file can be either CSV or TXT. For Tab Delimited, it will need to be in TXT format. Data Format: The data format should be segmented in 2 columns: handphone number and message content. The table below shows the example of the data format in the CSV and TXT file. Data Format in the Files Comma Delimited Value (CSV) Tab Delimited Value (TXT) Example 91234567,hello how are you? 91234567 hello how are you? For exporting data from database or Microsoft Excel, your data in the software should be organized as shown below. The extreme left column is the mobile phone number followed by the Message in the next column. This format had to be strictly followed, else resulting in processing error. 96367680 96189556 Hi! This is a message for you Hello, greetings from Singapore To send messages using either of these two file formats, select the Send SMS item on the left Menu Bar. You will notice a File Upload item as shown in Figure 51. Select File Upload and you will see the interface shown in Figure 52 below. Select the File Type, Language (your message is written in) and Browse to select the file. Select Upload once you are ready. Figure 53 depicts the sending messages via File Upload method. In Figure 54, you will notice the messages are displayed for your preview. This allows you to check the messages before sending. If all the messages are OK (under Message Format), then you can send the messages without errors. If there are messages that are Error, you can choose to amend the original file and upload again. If all messages are Error (indicating wrong format), you will not be able to send the messages. Once you are satisfied with the messages in the preview, select Send and the messages will be sent for processing and sent as SMS. You can select Cancel to perform Upload again. Copyright2002-2006, TalariaX Pte Ltd SendQuick Alert Plus Server 1.5 Administration User Manual 45 Strictly Private and Confidential This feature allows you to export data from database and others to send SMS to all users at one single process. Figure 51: Send SMS Option for File Upload and Direct Sending Figure 52: Selecting the File format for Upload Copyright2002-2006, TalariaX Pte Ltd SendQuick Alert Plus Server 1.5 Administration User Manual 46 Strictly Private and Confidential Figure 53: Select the File to Upload Figure 54: Messages Preview before Sending Copyright2002-2006, TalariaX Pte Ltd SendQuick Alert Plus Server 1.5 Administration User Manual 47 Strictly Private and Confidential 3.14 Sending Messages to Overseas Mobile Numbers SendQuick Appliance Server supports sending SMS to overseas users. This is network (or SIM) dependent. This means that your SIM card and mobile network must be able to send to an overseas number directly using the SIM card. For sending via email to SMS, start the email address with (+)(country code). Hence, if you are a using the server in Singapore and intend to send to Malaysia, your email will look like: [email protected] where +60 is the added country code for overseas (international) SMS. If you are using HTTP method, the (+) and country code need to be added to the mobile phone (tar_num) field. The hex-value for (+) is %2B for HTTP method. 3.15 Receive SMS via sendQuick Server After you have defined the receive SMS path and method (for your application server to receive the replied SMS) in Section 3.4 above, you will need to configure your applications to accept the messages in the following format and predefined variables. These format and variables are predefined by sendQuick and cannot be changed. It defines the way that your applications are able to recognise the information sent from sendQuick. Please refer to the format below for the HTTP and E-mail communication methods. Example of http response from the server: http://<response_url>?mno=91234567&txt=Testing&dtm=02/06/10,14:19:18&charset=GB2312 Where: mno -- the mobile phone number txt -- the text message dtm -- the date and time of the SMS received. charset – language character set As for e-mail, the received SMS message will be sent to the e-mail as specified in Section 3.4. An example of the received e-mail is as below. From : Date : To : Subject : [email protected] Monday, June 10, 2002 2:31 PM [email protected] <[email protected]> SMS From 91234567 Sender: 91234567 Timestamp: 02/06/10,14:32:54+32 Message: Test You will need to configure your back-end system and applications to receive the messages in the format mentioned above. Copyright2002-2006, TalariaX Pte Ltd SendQuick Alert Plus Server 1.5 Administration User Manual 48 Strictly Private and Confidential 3.16 POP User Account in sendQuick sendQuick Appliance has a built-in and pre-configured POP account user for easy access, single user environment or when an alternative e-mail server is not present in the network. This POP account will allow the administrator or any user to use this POP account to receive SMS by using the SMS-to-email reply option. The default and standard configuration for this POP user is as follow: POP username Password POP e-mail account Incoming (POP) mail server Outgoing (SMTP) server : : : : : popuser popuser (default password) popuser@localhost IP address of the sendQuick server IP address of the sendQuick server (or others) To change the password for the POP user account, refer to Change Password in Section 3.17. 3.17 Send Test Message from sendQuick Server To ensure that the server is functioning properly, sendQuick has a built-in message sending interface for you to send a test message. Please select the Send SMS button on the left bar and you will see the screen shown in Figure 50 in Section 3.12 above. Select Send Messages Via Web Form and you will see an interface to send messages as in Figure 55 below. You can select the languages that you wish to send the message as shown in the language selection box as shown in Figure 50. Figure 55: Send SMS Message from sendQuick Alert Server Once the message is sent successfully, you will see a success page. Copyright2002-2006, TalariaX Pte Ltd SendQuick Alert Plus Server 1.5 Administration User Manual 49 Strictly Private and Confidential 3.18 Change Administrator’s Password You are advised to change the password and keep this password in a safe place. To change the password, select Change Password from the Navigation Menu and you will see the interface as shown in Figure 56 below. You can change the Administrator's Web Access password, POP Account password and Console Login password. Enter your new password and confirm the new password. Select Change Password and your password will be changed. Figure 56: Change Password 3.19 System Backup, Restore and Diagnostic You can backup the system configuration and the alert rules in the sendQuick server. To activate, select the System Backup and Diagnostic button in the Navigation Menu and you will see an interface as shown in Figure 57 below. Select the Backup System Configuration or Create System Diagnostic if you wish to backup the items or create diagnostic respectively. Once selected (the Start button), the file create process will commence and will take a few minutes. Do not close the browser as the process is still functioning. Once the process completed, you will need to save the backup/diagnostic files in an external media (hard disk) in another machine (which can be your local access machine). This is illustrated on Figure 57, 58, 59 and 60 respectively. Copyright2002-2006, TalariaX Pte Ltd SendQuick Alert Plus Server 1.5 Administration User Manual 50 Strictly Private and Confidential You will notice that sendQuick backup files are named in accordance to the 'filetype_date' with an extension '.enc' for the system configuration. This is a proprietary format for sendQuick and can be used for sendQuick only. The files can be a few MB large (especially the Diagnostic file) and you may need to be patient with the process. Please use the same file when you restore the configuration or alert rules respective. Select the Restore and choose the file from your local disk media. This is illustrated in Figure 61 below. Figure 57: Backup and Restore Menu Copyright2002-2006, TalariaX Pte Ltd SendQuick Alert Plus Server 1.5 Administration User Manual 51 Strictly Private and Confidential Figure 58: File Generation in Process Figure 59: Save the File Copyright2002-2006, TalariaX Pte Ltd SendQuick Alert Plus Server 1.5 Administration User Manual 52 Strictly Private and Confidential Figure 60: Save to the Local Disk Figure 61: Upload and Restore the Configuration & Patches Copyright2002-2006, TalariaX Pte Ltd SendQuick Alert Plus Server 1.5 Administration User Manual 53 Strictly Private and Confidential The process to backup the configuration and filter rules is a orudent step to allow the company to restore these information, if required. The Diagnostic file is useful for troubleshooting. If you encounter any problem with sendQuick, it is recommended to generate a diagnostic file and email to TalariaX. We will be able to review the issues faced in the Diagnostic file and make troubleshooting easier. Once the repair or amendment is made, TalariaX will send a new patch file while can be uploaded to the system via the Restore function (Figure 61). Once confirmed, the sendQuick system will be updated with the new program/patch. 3.20 Log-out from the System To log-out, just select the log-out button from the navigation menu on the top right hand corner. You will see a successful log-out message once you had logged out. Copyright2002-2006, TalariaX Pte Ltd SendQuick Alert Plus Server 1.5 Administration User Manual 54 Strictly Private and Confidential 4.0 SHUTDOWN AND REBOOT You are advised not to shutdown or reboot the sendQuick server unless necessary. However, if you need to reboot or shutdown the server you can either do a web based shutdown/reboot or from the LCD display on the server. To shutdown or reboot from the web, just select the relevant button on the top right hand corner navigation button. This is shown in Figure 62 below. For LCD shutdown, this needs to be done manually and explained below. Figure 62: Shutdown and Restart Navigation Bar and Confirmation Message Using the LCD, follow the following instructions: (i) You can select the options by pressing the UP arrow or DOWN arrow keys on the LCD (as in Figure 63 below) (ii) Select until you see either SHUTDOWN SYSTEM? Or REBOOT SYSTEM?. The normal mode, the message is SENDQUICK ALERT+. (iii) Once you had decided to either Shutdown or Reboot and selected the correct options, select the ENTER button. The system will shutdown or reboot. If Shutdown, it will display a POWER OFF button and you can power off at the back of the system (iv) Use the ESC (escape) button if you need to go back to normal mode. ESC ENTER Figure 63: LCD Navigation Button Copyright2002-2006, TalariaX Pte Ltd SendQuick Alert Plus Server 1.5 Administration User Manual 55 Strictly Private and Confidential 5.0 TROUBLE SHOOTING You may encounter some common problems when using sendQuick Server. This section serves to address these common problems and how to overcome them. 5.1 I cannot access the web interface of the sendQuick server from my browser. What should I do? There could be a problem with the LAN cable, IP address or network routing. Try to ping the sendQuick server. If no response, check the LAN cable connection and your network routing setting. If required, reboot the system and try again. 5.2 I have done all the set-up. I tried to SMS via the web interface as explained in section 3.16 but no SMS was received. Why? You could be facing the following problems: (i) Modem connection is not properly attached or attached to the wrong COM port (ii) The SIM card is not placed properly or not working. Try with another SIM card. (iii) The GSM modem is not switched-on 5.3 I set all the configuration in the server set-up accordingly but I still cannot send e-mail to SMS from my e-mail software. Why? There may be a few reasons for this. We will review the possible reasons accordingly. (i) The physical network connection may be faulty. Try to ensure that the network cable is plugged-in properly and do not use an old cable. Once the cable is fine, then, (ii) Try to ‘ping’ the sendQuick Server from a remote machine. If there is no reply, there are some problems with the network or connection. Please check. If you get a ping reply, then, (iii) Check your e-mail server setting. Your mail server may not be supporting the email address for SMS as it does not contain a valid DNS or name server (when you use an IP). You need to configure a static mail routing in your e-mail server. You can also try by changing the SMTP server in your e-mail client configuration to the IP address of sendQuick Server. If it works after you change the SMTP server, then it is a problem with your e-mail server concerning the mail routing information. Contact your administrator for assistance. (iv) Your modem connection could be loose. Try to fasten the modem (especially the USB version) and restart the server if necessary. Restart using hard reboot. 5.4 I cannot access the sendQuick Server from my local PC even though it is already in the network and some of my other colleagues can use it. Why? This could happen if there exist some sub-networks in your company’s network. You may need to check with your system administrator and ensure that the router allows the different networks to send data to each other. 5.5 I realised that the server only provides for one e-mail and one HTTP response. How do I allow SMS enquiries to more than one applications at one instant? The sendQuick server is designed as a ‘black-box’ solution for sending and receiving SMS. We understand that most of our customers would want to interact with more than one server. In order to make things easy for all, we designed a single response URL and e-mail to make sendQuick very easy to configure and hassle free. To connect to multiple applications, you just need to develop a simple script to process the replies from sendQuick (either HTTP or e-mail) and make your own distribution to d the respective applications. This can be done by setting unique codes (keyword) for each SMS when they were sent to sendQuick and processed by your script. In this way, you will not have any constraints on any number of application servers that can use sendQuick. Copyright2002-2006, TalariaX Pte Ltd SendQuick Alert Plus Server 1.5 Administration User Manual 56 Strictly Private and Confidential 5.6 I am getting email alerts on my administrator email account stating that the modem is not found or having problem. What should I do? The sendQuick server is designed as a 24x7 system with a built-in self checking mechanism to the modem and SIM card availability. Hence, if there is any failure to detect the modem or SIM, it will generate an error message and email to the administrators email account. If the error messages is not frequent (that is, the alert message is occassional and not continuous for every second), there is no cause for alarm. Instances that may cause this problem is when there is an intermittent weakness in the GSM network or the system cannot find modem at that point of time. However, if the error message in continuous (for every second) and still happening at the point when you read the messages, then there is an indication that there is some modem or SIM problem with the system (see question 5.7). 5.7 I am getting continuous alert messages stating that there is no modem and the alert message is occurring every second or I cannot send SMS despite able to access the system via web interface. What is the solution? If either of the above happened, there could be a problem with the GSM network, SIM card or GSM modem. Troubleshoot by checking the following areas: – check that the SIM card is still in service or there is sufficient credit (for prepaid card) by calling (dialling) the SIM card number and you should hear a dialling tone (indicates it is normal). – Check that the GSM modem is properly connected and the LED indicator is blinking (normal). If the LED is not blinking (continuous light), either the SIM is not working, fail to connect to GSM network or modem not properly connected. – You can try by remove and then plug in the modem again – Remove and insert the SIM card again. Please make sure the GSM modem cover is properly covered. 5.8 The system is not sending SMS. What are the troubleshooting steps? If you cannot send SMS from your applications, there are a few possibilities. Do the following actions to determine the possible point of failure. i) Ping the sendQuick server and see if there is a response. If yes, try step (ii). If not response, check your network connection to sendQuick server or to your application server. You may wish to access the sendQuick using the direct console access. If you cannot access or you see an error message on the console, contact TalariaX for technical support. ii) Access sendQuick using the web browser. If yes, try step (iii). If you cannot browse the server, try to access via the console. If you cannot access or you see an error message on the console, contact TalariaX for technical support. iii) Use the browser access, go to Send SMS section and send a test SMS message to your self. Check the modem status and log file to ensure messages are processed and sent. If you receive the SMS sent, then the problem lies with the application server. If you did not receive a SMS message, there could be a problem with the SIM card or GSM modem. iv) Check that the SIM card has sufficient credit (for prepaid) or that the GSM modem is blinking. You can try to remove and reinsert the SIM or to unplug and replug the modem into the USB/serial slot. If all fails, contact TalariaX for technical support. v) Check that the modem is connected and the LED light is blinking. If not, there could be a problem with the modem or SIM card. Remove and plug in the modem again. Please ensure that your SIM card has no SIM lock (PIN) function. Copyright2002-2006, TalariaX Pte Ltd SendQuick Alert Plus Server 1.5 Administration User Manual 57