1
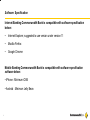
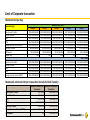
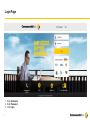
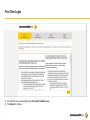
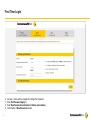
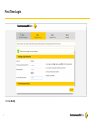
User Manual Book
of Commonwealth Bank
Corporate Internet Banking
Welcome to CommAccess,
Online Banking.
Commonwealth
Bank
Enjoy the convenience and benefits of transacting via our CommAccess, Internet and Mobile Banking
services presented by Commonwealth Bank of Indonesia which provides easiness for you to access
your account and perform banking transactions 24 hours a day, whenever and wherever you are.
The improvements of CommAccess features and services will keep continuing provides you easiness
and comfort in doing the transaction. Now you can transfer with Realtime method , Bill Payment,
Mutual Funds Top Up and Redeem, SMS Token and many more feature in Internet Banking or Mobile
Banking. You can also get complete information regarding your account, including mutual funds
account and loan accounts via CommAccess.
If you have any difficulties in accessing CommAccess service, you can contact our nearest branch, or
send an email to [email protected], or contact Call CommBank 1500030 to local
access, or (6221) 1500030 for overseas.
Contents
• Software Specification
• Limit and fee of Corporate Transaction
• Login & Change Password
• Account
• Transfers
• Transaction Activities
• Authorization Flow
• Bill Payment
• Bulk File
• Admin Function
• Cheque Book Request
• Forget Password
Software Specification
Internet Banking Commonwealth Bank is compatible with software specification
below :
•
Internet Explorer, suggested to use version under version 11
•
Mozilla Firefox
•
Google Chrome
Mobile Banking Commonwealth Bank is compatible with software specification
software below:
• iPhone : Minimum iOS6
• Android : Minimum Jelly Bean
4
Limit of Corporate transaction
Maximum limit per day
Own Account Transfer
Internal Transfer
SKN
RTGS
Foreign Currency Transfer (SWIFT)
Real Time Transfer
Bill Payment
Mutual Fund
Group A
IDR 2.500.000.000
IDR 2.500.000.000
IDR 2.500.000.000
IDR 2.500.000.000
IDR 2.500.000.000
IDR 100.000.000
IDR 25.000.000
N/A
Group B
IDR 10.000.000.000
IDR 10.000.000.000
IDR 2.500.000.000
IDR 10.000.000.000
IDR 10.000.000.000
IDR 100.000.000
IDR 25.000.000
N/A
Maximum Daily Limit
Group C
Group D*
IDR 50.000.000.000
IDR 75.000.000.000
IDR 50.000.000.000
IDR 75.000.000.000
IDR 2.500.000.000
IDR 2.500.000.000
IDR 50.000.000.000
IDR 100.000.000.000
IDR 50.000.000.000
IDR 75.000.000.000
IDR 100.000.000
IDR 100.000.000
IDR 25.000.000
IDR 25.000.000
N/A
N/A
Own Account Transfer
Internal Transfer
SKN
RTGS
Foreign Currency Transfer (SWIFT)
IDR 2.500.000.000
IDR 2.500.000.000
IDR 2.500.000.000
IDR 2.500.000.000
IDR 2.500.000.000
IDR 10.000.000.000
IDR 10.000.000.000
IDR 2.500.000.000
IDR 10.000.000.000
IDR 10.000.000.000
IDR 50.000.000.000
IDR 50.000.000.000
IDR 2.500.000.000
IDR 50.000.000.000
IDR 50.000.000.000
Transaction Type
Maximum & minimum limit per transaction (include for Bulk Transfer)
Own Account Transfer
Internal Transfer
SKN
RTGS
Real Time Transfer
Foreign Currency Transfer (SWIFT)
Bill Payment
5
Minimum Amount per
Maximum Amount per
Transaction
Transaction
IDR 10,000
As per daily limit
IDR 10,000
As per daily limit
IDR 100,000
As per daily limit
IDR500,000,001
As per daily limit
IDR 500,000
IDR 25,000,000
Equivalent IDR10,000
As per daily limit
N/A
As per daily limit
IDR 75.000.000.000
IDR 75.000.000.000
IDR 2.500.000.000
IDR 100.000.000.000
IDR 75.000.000.000
Group E*
IDR 100.000.000.000
IDR 100.000.000.000
IDR 2.500.000.000
IDR 200.000.000.000
IDR 100.000.000.000
IDR 100.000.000
IDR 25.000.000
N/A
Bulk Transfer
IDR 100.000.000.000
IDR 100.000.000.000
IDR 2.500.000.000
IDR 200.000.000.000
IDR 100.000.000.000
Transaction fee for Corporate
SKN
RTGS
IDR 30,000
SWIFT – Cable Fee
IDR 50,000
SWIFT – Involve Exchange
IDR 0
SWIFT – No Exchange
USD 10
SWIFT – Full Amount
USD 20
SWIFT – Value Today
USD 15
Bulk Transfer Fee
6
IDR 5,000
0
Real Time Transfer (online)
IDR 0
Standing Instruction
IDR 0
LOGIN
Login Page
1. Enter Username
2. Enter Password
3. Click Login
8
First Time Login
4. For first time login, users will display the Term and Conditions page.
5. Clik Accept to continue
9
First Time Login
6.
7.
8.
9.
10
On step 2, Users will be requested to change the Password
Enter Old Password (Apply 1)
Enter New Password (combination of letters and numbers)
Confirmation of New Password entered
First Time Login
10. Click Modify
11
First Time Login
11. On step 3, users will be requested to enter Security Question
12. Choose the available question on Security Question field and write down the answer on Answer field
13. Click Save
12
First Time Login
14. On step 4, click Continue to finish the process
13
First Time Login
15. The successful notification will show up on screen. Please do relogin on click button to enter the Internet Banking
14
First Time Login
16. After relogin to Internet Banking, screen will show the home screen of the new Internet Banking
15
ACCOUNTS
Account Summary (1/2)
1. Select Accounts and then Account Summary
17
Account Summary (2/2)
2. Screen will show user summary portfolio
18
Account Activity
1. Select Accounts and then Account Activity
2. Select account on Select Account field
3. Screen will show your account activities
19
Account Statement (1/2)
1. Select Accounts and then Account Statement
2. Select the account you want to see the reports by clicking the account number on Account Number column
20
Account Statement (2/2)
3. Screen will show the reports of selected account.
21
Account Details(1/3)
1. Select Account Details and then Account
2. Select the account number on Select Account then click Submit
22
Account Details(2/3)
3. Screen will show the details of requested account
23
TRANSFERS
Domestic Funds Transfer
1. Select Transfer and then Domestic Transfer
25
Domestic Funds Transfer
2. Select Source Account
3. Enter User Refence (transfer reference) if needed.
4. Click Play to see total available amount
26
Domestic Funds Transfer
5. On Beneficiary Bank Details, select Transfer Methode, ex: SKN
6. Users can search the beneficiary bank by clicking the icon Search
27
Domestic Funds Transfer
7. Enter the beneficiary bank on Bank Name and then click Search.
8. The results will show, click the selected bank.
9. Click Select Bank.
28
Domestic Funds Transfer
10.Fill the Beneficiary Details on Beneficiary Account and Beneficiary Name field
11.On Payment Details, fill the amount on Transfer Amount
12.Fill the Narrative column for required information
13.If the details already correct, click Initiate
29
Domestic Funds Transfer
14. Click Confirm to continue
15. Click Modify to any changes
30
Domestic Funds Transfer
16. Enter the Transaction Password from Token
17. Click Submit
31
Domestic Funds Transfer
18. Click E-Receipt to get E-Receipt
19. Click Ok to end the process
32
Foreign Currency Transfer
1. Select Transfers and then Foreign Currency Transfer
33
Foreign Currency Transfer
2. Enter User Reference if needed
3. Select Source Account
4. Click Play to show available amount in account
34
Foreign Currency Transfer
5. On Beneficiary Details, enter Beneficiary Name or click Search then select Beneficiary Name to transfer.
6. Fill Beneficiary Account Number
7. Fill Beneficiary Email (optional)
35
Foreign Currency Transfer
8. On field Beneficiary Bank Details, fill the SWIFT Code
9. Fill BSB Code (only for Bank places in Australia)
36
Foreign Currency Transfer
10. Enter Transfer Amount
11. Select Transfer Currency to transfer
12. Tick Deal Code and enter the Deal Code for special Exchange Rate and click GO
13. Select Transfer Now if the transaction will be execute on the same day
14. Select Transfer Later if the transaction will be execute on the next day or special day then select the date to transfer
37
Foreign Currency Transfer
15. On field Other Details, fill Payment Details
16. On filed Correspondence Charge, select the party who will be charge for correspondence fee
38
Foreign Currency Transfer
17. On field Cross Currency Details, if the transaction using two different currency please fill the LHBU Purpose Code and
Document Type
18. If the details already correct, click button Initiate
39
Foreign Currency Transfer
19. Click Confirm to continue
20. Click Modify to any changes
40
Foreign Currency Transfer
21. Enter Transaction Password from Token
22. Click Submit
41
Foreign Currency Transfer
23. The transaction is ready to be authorized
42
Foreign Currency Transfer
24. Click E-Receipt to get E-Receipt
25. Click Ok to end the process
43
TRANSFER MENU
STANDING INSTRUCTION
Create Standing Instruction
45
1.
2.
3.
4.
5.
Select Transfer and then Internal/External Transfer, fill all the details transfer.
On Payment Details tick Transfer Periodically to create standing instruction
Select period on SI Execution Frequency
Select first date payment on First Execution Date field
Select last date payment on Expiry Date field
Create Standing Instruction
6. Re-check the filled details for Standing Instruction
7. Click Modify to change the details or click Confirm to continue
46
Create Standing Instruction
8. Fill the Digipass Code from Token or SMS Token
9. Click Submit to continue
47
Create Standing Instruction
10. The Standing Instruction (periodic transfer) has successfully created
48
Create Standing Instruction
11. Select Print or Download or E-mail to get the e-receipt
49
Standing Instruction View
1. SelectTransfers and then click Standing Instruction
50
Standing Instruction View
2.
3.
4.
5.
6.
51
Select account on Source Account
Select method of transaction Transfer Type
Select transaction time during on First Execution Date From & First Execution Date To
Screen will show summary of Standing Instruction created
Double click on Reference Number to see details
Standing Instruction View
7. Screen will show details of Standing Instruction created
52
Standing Instruction Cancellation
1. Select Transfers and then Standing Instruction Cancellation
53
Standing Instruction Cancellation
2. Screen will show details of Standing Instruction created.
3. Double click on Reference Number to see details
54
Standing Instruction Cancellation
4. Re-check details filled of Standing Instruction
5. Click Modify to change details or click Confirm to continue
55
Standing Instruction Cancellation
6. Transaction Standing Instruction has successfully deleted
56
TRANSFER MENU
BULK TRANSACTION
Bulk File Upload
1. Select Transfers and then Bulk File Upload
58
Bulk File Upload
2.
3.
4.
5.
59
Select Bulk Identifier
Select file to upload by click Browse
Click Initiate
Or click Clear to cancle the details
Bulk File Upload
6. Enter Transaction Password from Token
7. Click Submit
60
Bulk File Upload
8. Bulk upload is successfully initiated
9. Click Ok to end the process
61
Bulk Transaction Status
1. Select Transfers and then click Bulk File View
62
Bulk Transaction Status
2.
3.
4.
5.
63
Select Bulk Transaction Identifier and fill File Reference Number to show
Click “Search”
Screen will show the data
Click file reference or file name to show
Bulk Transaction Status
6. On field Status will show each transaction status
• Under Process, Accepted, Pending for Execution
: transaction being process
• Completed, Rejected
: End of status
7. Click Record reference Number to show History of File
64
Bulk Transaction Status
65
8. System will show all processing transaction status
• Received
: The transaction was accepted by bank systems
• Pre Processed
: The transaction was recognized by bank systems
• Authorized
: The transaction was authorized by bank system
• Processed
: The transaction is being processed by bank system
• Completed
: The transaction has been done
View Debited Status on Customer Account
1. Select Account and then click Account Activity
66
View Debited Status on Customer Account
2. Select account on Select Account field
3. Click “Submit”
4. System will show all summary of account activities. On debit field will show details amount debited from account.
67
Generate Bulk File (Domestic)
a
b
c
d
e
f
g
h
i
j
k
a. Select “Payroll” or“Payment”. For sure, the Source Account, the Currency, and Effective Date must be same
for each bulk transfer.
b. Fill the file name
c. Fill with transfer method (SKN/RTGS/TRF)
d. Fill with the source account number
e. Fill with amount transaction
f. Fill with the currency
g. Fill with date of transaction
h. Fill the beneficiary name
i. Fill with beneficiary account
j. Fill with beneficiary bank
k. Fill with beneficiary bank type (conventional/Syariah/Unit Usaha Syariah)
68
Generate Bulk File (Domestic)
l
l.
m-p
q.
r.
69
m
n
o
Fill with beneficiary email address
Fill with payment description (max 35 characters for each column)
Fill with description for sender
Fill with description for beneficiary
p
q
r
Generate Bulk File (Domestic)
s
s. After all column be filled, click “Click to Generate File”
Note :
For internal transfer (between Commonwealth Bank) and Domestic Transfer (to other Bank in Indonesia) the file will
generate with TWO file, which are File Transfer Internal and File Transfer Domestic. Both file must be uploaded
one by one.
70
Generate Bulk File (Domestic)
t
u
t. Fill the name of file on File Name field
u. Click “Save”
71
Generate Bulk File (Domestic)
v
v. Screen will show a message that indicates the file has been saved. Then click OK
w. Process will continue to Bulk Upload on Internet Banking
72
Generate Bulk File (International)
a
b
c
d
e
f
g
h
i
j
a. Select “Payroll” or“Payment”. For sure, the Source Account, the Currency, and Effective Date must be same
for each bulk transfer.
b. Fill the file name
c. Fill with the source account number
d. Fill with amount transaction
e. Fill with the currency
f. Fill with “Y” if the transaction will execute on the same day or “N” if the transaction will execute not in the same
day
g. Fill with date of transaction
h. Fill the beneficiary name
i. Fill with beneficiary account
j. Fill with beneficiary bank
73
Generate Bulk File (International)
k
l
k.
l.
m.
n.
o.
p.
q.
r.
s.
74
m
n
Fill with the BSB Number
Fill with beneficiary email address
Fill with LLD code
Fill with beneficiary bank category
Fill with Transactor Relationship
Fill with Correspondence Charge (Full Amount/Normal)
Fill with LHBU code
Fill with document type support
Fill with other document type support
o
p
q
r
s
Generate Bulk File (International)
t
t. Fill with description for sender
u. Fill with description for beneficiary
75
u
Generate Bulk File (International)
v
v. After all column be filled, click “Click to Generate File”
76
Generate Bulk File (International)
w
x
w. Fill the name of file on File Name field
x. Click “Save”
77
Generate Bulk File (International)
y
y. System will show the notification of successfully file saved. And then click OK
z. Process will continue to Bulk Upload on Internet Banking
78
TRANSFER MENU
BENEFICIARY MAINTENANCE
Beneficiary Maintenance
1. Select Transfer and then Beneficiary Maintenance
80
Beneficiary Maintenance
*Domestic Account Transfer
2. On Transaction Type select Domestic Account Transfer and click Create Beneficiary Template
81
Beneficiary Maintenance
*Domestic Account Transfer
3. Fill Beneficiary Name and Beneficiary Email
4. On Beneficiary bank Details fill the Beneficiary Account and Transfer Method
5. Enter the beneficiary Bank by clicking the Search icon and select the Bank name, it will automatically show the beneficiary Bank Address
and City also.
6. Click add
82
Beneficiary Maintenance
*Domestic Account Transfer
7. Click Confirm to continue or Modify to any changes.
83
Beneficiary Maintenance
*Domestic Account Transfer
8. The screen will show a message of successful notification, and then click OK
84
Beneficiary Maintenance
*Internal Account Transfer
2. On Transaction Type select Internal Account Transfer and click Create Beneficiary Template
85
Beneficiary Maintenance
*Internal Account Transfer
2. Enter the beneficiary account number on Beneficiary Account, then tap to Beneficiary Name, and automatically the
beneficiary name will show s up
3. Enter the beneficiary email address on Beneficiary Email
4. Click Add
86
Beneficiary Maintenance
*Internal Account Transfer
5. Click Confirm to continue or Modify to any changes
87
Beneficiary Maintenance
*Internal Account Transfer
6. The screen will show a message of successful notification, and then click OK
88
Beneficiary Maintenance
*Internasional Account Transfer
2. On Transaction Type select International Account Transfer and click Create Beneficiary Template
89
Beneficiary Maintenance
*Internasional Account Transfer
2. Enter the Beneficiary Name and Beneficiary Email
3. On Beneficiary Bank Details enter the Beneficiary Account and SWIFT Code (use the Search icon) select the code/Bank ,the
Bank Name and Bank Address will automatically shows up
4. Click Add to continue or Back to previous
90
Beneficiary Maintenance
*Internasional Account Transfer
5. Click confirm to continue or Modify to any changes
91
Beneficiary Maintenance
*Internasional Account Transfer
6. The screen will show a message of successful notification, and then click OK
92
TRANSFER MENU
PENDING TRANSFER
Pending Transfer (1/2)
1. Select Transfer and then Pending Transfer
94
Pending Transfer (2/2)
2. Screen will show the pending transfer transaction (if any), if there is no pending transfer, screen will show a pop up message
as above
95
AUTHORIZATION FLOW
Authorization Flow
1. Select Transaction Activities and then View Initiated Transaction
97
Authorization Flow
2. Select Transaction To Authorize
3. Select the Transaction Type that will be authorized
4. And click Initiated
98
Authorization Flow
5. Click Ebanking Reference No to see the transaction detail
99
Authorization Flow
6.
7.
8.
9.
100
Click Authorize to authorization
Click Reject to cancel transaction
Click Send To Modify to any changes
Click Back to previous
Authorization Flow
10. Click Authorize to authorization
11. Click Back to previous
101
Authorization Flow
12. Enter Transaction Password from Token
13. Click Submit
102
Authorization Flow
14. Click E-Receipt to get E-Receipt
15. Click Ok to end the process
103
Authorization Flow
16. Select Print or Download or E-mail to get the e-receipt
104
Authorization Flow
17. Enter with User ID Releaser, select Transaction Activities then click Transactions Status
105
Authorization Flow
18. Select Transaction To Authorize
19. Select Transaction Type
20. And click Semi Authorized
106
Authorization Flow
21. Click Ebanking Reference No to show the details transaction that authorized
107
Authorization Flow
22. Click Authorize to authorization
23. Click Reject to cancel the transaction
24. Click Send To Modify to any changes
25. Click Back to previous
108
Authorization Flow
26. Enter Transaction Password from Token
27. ClickSubmit
109
Authorization Flow
28. Click E-Receipt to get E-Receipt
29. Click Ok to end the process
110
Authorization Flow
30. Select Print or Download or E-mail to get the e-receipt
111
TRANSFER MENU
BILL PAYMENT
Bill Payment Transaction Types
113
Bill Payment
1. Select Transfers and then Bill Payment
114
Bill Payment
2. On Biller Details, fill the Bill Payment Type with kind of payment that will be paid, for example Mobile Vouchers
3. Select Bill Provider (the parties who will receive the payments), ex : XL-Xplor
4. Select Relationship Number (numbers which provided by the Bill Provider), ex : 081906062556, then click submit
115
Bill Payment
5. Select the debited account to pay the payment on Source Account
6. Select Voucher Denomination, it’s the amount that will be debit from user account, for example user buy Mobile Voucher IDR 100,000
then IDR 100,000 will be debited from the account .
7. Click Submit to continue
8. Click Back to previous
116
Bill Payment
9. If the details is correct, click Confirm to continue
10. Click Back to previous
117
Bill Payment
11. Enter Transaction Password from Token
12. Click Submit
118
Bill Payment
13. Click Ok to end the process
119
TRANSACTION ACTIVITIES
Transaction Status (1/3)
1. Select Transaction Activities and then Transactions Status
121
Transaction Status (2/3)
2. Select Initiated Transaction then double click on Status to see the details trasnaction
122
Transaction Status (3/3)
3. Screen will show the details transaction
123
ADMIN FUNCTION
Account Setup
(To Set the Account Access For Each User)
1. Select Account Setup
2. Fill the Customer ID
3. Click Search
125
Account Setup
(To Set the Account Access For Each User)
4. Screen will show the data of your criteria
5. Click “Select”
126
Account Setup
((To Set the Account Access For Each User)
6. Click Transaction
127
Account Setup
((To Set the Account Access For Each User)
7. Tick the facilities that given to User
8. Click Submit
128
Account Setup
(To Set the Account Access For Each User)
9. Click Confirm
129
Account Setup
(To Set the Account Access For Each User)
10. Click Ok
130
Manage Rules
(To Set Rules and Transaction for Each User)
1.
2.
3.
4.
131
Click Manage Autorisations
Click Manage Rules
Click Create to make new rules
Click View/Modify to see/change the details created
Manage Rules
(To Set Rules and Transaction for Each User)
5. Fill Maker with user ID
6. Select Customer ID
7. Select the Transaction Type to set the kind of transaction
8. Select Branch to set the destination Branch
9. Select Account ID to set the account number
10. Select the Currency
132
11. On Amount From set the minimum value of transaction.
12. On Amount To , set the maximal value of transaction
13. Tick Authorization Required, if authorization is required
14. On List ID, fill with the User ID who will authorize the transaction.
15. Click Create
Manage Rules
(To Set Rules and Transaction for Each User)
16. Click Confirm
133
Manage Rules
(Menentukan Peran dan Transaksi untuk setiap User)
17. Click Ok
134
SERVICES
My Profile – Change User ID & Set Favorite
1. Select Services and then My Profile – Change User ID & Set Favorite
136
My Profile – Change User ID
2. Fill the new User ID on Specify New User ID
3. Select Set as Favorite
4. Click Set Preference
137
My Profile – Change User ID
5. Please re-check the details
6. Click Confirm
138
My Profile – Change User ID
7. The new User ID is successfully created
8. Click OK
9. For next please use the new User ID to Login
139
My Profile – Change Security Question
1. Select Services and then My Profile – Change Security Question
140
My Profile – Change Security Question
141
2.
3.
4.
5.
Select Security Question 1
Set your answer
Select Security Question 2
Set your answer, and then click Save
My Profile – Change Security Question
6. Verify your change of Security Questions
7. Click Confirm continue or Modify to change the details
142
My Profile – Change Security Question
8. Your Security Questions have successfully modified, click OK to end the process.
143
Cheque Book Request
1. Select Services and then Request Cheque Book
144
Cheque Book Request
2.
3.
4.
5.
6.
145
Select the Account that will be requested the cheque book
Select Cheque Book Type
The number of sheets will automatically be filled in Cheque Book Option
Select Mode of Delivery, Bank City and Branch Bank to deliver the cheque requested
Click Submit
Cheque Book Request
7.
146
Please cross check the detail. Click Confirm to continue or Modify to any changes
Cheque Book Request
8.
147
Click E-Receipt to get the receipt
Cheque Book Request
9. Click Print or Download or Email to get the receipt.
10. Click OK to end the process
148
Exchange Rate Inquiry
1. Shows current rate exchange position
149
Mailbox – Contact Commonwealth Bank
1. Select Compose Message to send a message to Commonwealth Bank
2. Select the subject of email on Select the subject of this message
3. Enter the message to send
150
FORGET PASSWORD
Forget Password
1. If you are forget your password of Internet Banking click “Forget your Password”
152
Forget Password
2. Enter the User ID
3. Click Submit
153
Forget Password
4. Enter the OTP code that sent to your handphone
5. Click Submit
154
Forget Password
6. Enter the answer of your security question
7. Click Submit
155
Forget Password
8. Tick “Change Password”
9. Enter the new password, and then confirm the new password
10. Click Submit
156
Forget Password
11. Screen will show a confirmation if the transaction was successfully created
157
Contact Us For More Info
158
Commonwealth Bank Presentation Title / Confidential