1
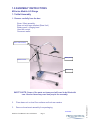
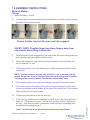
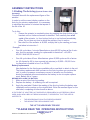
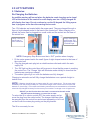
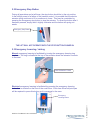
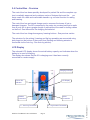
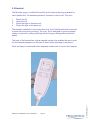
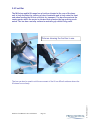
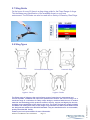
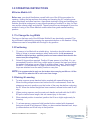
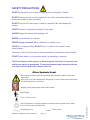
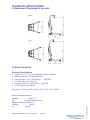
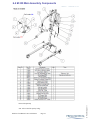
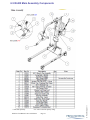
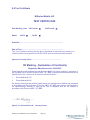
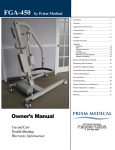
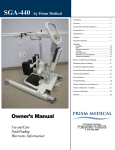
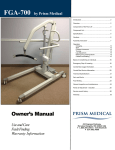
M Series Mobile Lift User Manual Toll Free: 1-800-265-0677(CN) e-mail: [email protected] M-Series User Manual—Rev 10JAN2012 Page 1-866-891-6502(US) website: www.prismmedicalltd.com © Prism Medical 2011 45 Progress Parkway, Maryland Heights, MO 63043, USA 1.0 Assembly Instructions 1.1 Initial Assembly 1.2 Setting the Actu-Log (Optional Feature Sold Separately) 3 5 2.0 Lift Features 2.1 Batteries - Re-Charging 2.2 Emergency Stop Button 2.3 Emergency Lowering / Raising 2.4 Control Box - Overview 2.5 Handset 2.6 Kick / Tip Bar 2.7 Sling Guide 2.8 Sling Types 6 7 7 8 9 10 11 11 3.0 Operating instructions 3.1 To Change the Leg Width 3.2 Positioning 3.3 Raising & Lowering 12 12 12 4.0 Safety precautions 4.1 Do’s & Don’ts 13 5.0 Safety Checks 5.1 Daily Check List 5.2 Warning Notes 15 15 6.0 Technical Specification 6.1 Dimensions & Weights 6.2 Maximum lifting Height & leg width 6.3 Electrical detail 6.4 M-400 Main Assembly Components 6.5 M-330 Main Assembly Components 16 17 17 18 19 7.0 Troubleshooing / Maintenance 7.1 Troubleshooing 7.2 Service / Maintenance 7.3 Cleaning & Sterilisation 20 20 20 8.0 Test certificate 21 9.0 Guarantee 22 10.0 Testing and service record 10.1 Initial Information 10.2 Service record History 23 24 M-Series User Manual—Rev 10JAN2012 Page 2 © Prism Medical 2011 Table of Contents - M-Series Mobile Lift Range 1.0 ASSEMBLY INSTRUCTIONS M-Series Mobile Lift Range 1.1 Initial Assembly 1. Remove carefully from the box: Boom / Mast assembly Base unit with legs attached (Base Unit) Battery pack / charging lead Hand set control Document wallet Boom / Mast assembly Battery Pack Handset Control Base Unit 2. Place base unit on level floor surface and lock rear casters. 3. Remove boom/mast assembly from packaging Continued…. M-Series User Manual—Rev 10JAN2012 Page 3 © Prism Medical 2011 SAFETY NOTE: Some of the parts are heavy and will need to be lifted with care. Heavier items may need two people for assembly. 1.0 ASSEMBLY INSTRUCTIONS M-Series Mobile Range 1.1 Initial Assembly—Cont’d 4. Carefully take boom/mast assembly and slide bottom of mast into base socket as shown in the pictures below. Ensure that the mast is fully down and fully engaged* SAFETY NOTE: Possible finger trap. Keep fingers away from end of mast when fitting to base unit 5. When the mast is fully engaged into the base locate the mast locking knob and side securing knob and tighten by hand firmly. 6. Check the emergency stop button (red button) located on the controller is in the out position (i.e. out) 7. Fit the hand control unit to the hand control socket located on the base of the control unit. 8. Fit the battery pack to the control box making sure that it clicks into position 9. Fit the Actu-log onto the bracket of the lift and insert the jack plug of the Actulog into the actuator socket located at the base of the control box. The indicator label will identify the correct socket 10. Plug the actuator jack plug into the Actu-log 11. If the Actu-log details are not completed on the Actu-log, the Actu-log has not been set. Therefore you need to Set the Actu-log (see section—Setting the Act-log). If the Actu-log label is completed, check the Actu-log reading does not exceed the reading in box C Note: The Actu-log is an optional feature that can be purchased M-Series User Manual—Rev 10JAN2012 Page 4 © Prism Medical 2011 NOTE: The hand control unit can only be fitted in one orientation into its socket. Do not use force to introduce the hand control plug into its socket. The plug when correctly inserted should be pushed firmly home ASSEMBLY INSTRUCTIONS 1.2 Setting The Actu-log (Optional Feature Sold Separately) Complete box with the replacement figure of the actuator. In order to set the correct display number on the Actu-log for actuator replacement, it is necessary to calculate the number of minutes that equate to the life of the lift. To do this:1. Ensure the actuator is completely down by pressing the down button on the handset until no further movement is detected. Then carefully time a full cycle of the actuator, i.e. from bottom limit up to top limit and immediately down. Do not time any time in which the actuator is not in motion. 2. The safe life of the actuator is 40,000, multiply this by the reading you have just taken in instruction 1. Example: One full cycle takes 1 minute. Manufacturer gives 40,000 cycles as life of actuator. Actu-log actuator reading for replacement is therefore 1 x 40,000 = 40,000. Write 40,000 in box C One full cycle takes 45 sec. Manufacturer gives 40,000 cycles as life of actuator. 45 divided by 60 (to turn seconds into minutes) x 40,000 = 30,000. Actulog therefore is marked in box C as 30,000. Battery replacement New batteries for the Actulog are available with a new label to attach to the unit The battery replacement date is shown on the Actu-log when you receive the unit. In order to preserve a continuous record of actuator use, the battery should be replaced at the service before the battery is due to require replacement. Battery life is 3 years. BEFORE REPLACING THE BATTERY, 1. 2. 3. Make a note of the Actu-log reading. Replace the battery - A soldering iron will be required. Apply the new label. Deduct the reading of the Actu-log before the battery was replaced from the number on the original label. Write the resultant figure on the new label, completing all other boxes as above. IN THE EVENT OF A BATTERY NOT SUPPLIED BY PRISM MEDICAL (OR FREEWAY) BEING USED, AND A NEW LABEL NOT BEING AVAILABLE, IT IS ESSENTIAL THAT THE USER IS ALERTED TO THE NEW READING FOR ACTUATOR REPLACEMENT THE NEW BATTERY REPLACEMENT DATE THE LIFT IS NOW READY FOR USE **PLEASE READ THE OPERATING INSTRUCTIONS CAREFULLY** M-Series User Manual—Rev 10JAN2012 Page 5 © Prism Medical 2011 2.0 LIFT FEATURES 2.1 Batteries: Re-Charging the Batteries An audible warning will sound when the batteries need charging and a visual LCD at the bottom of the control box will display one bar. A fully charged lift will display four bars. Do not continue to use the lift beyond the lifting operation in progress at the time the warning first sounds. Two 12V batteries are located within the power pack. They are charged through a figure of eight shaped socket in the base of the control unit. When charging is required, the mains lead is plugged into a wall outlet and the socket into the base of the control box. Fitting / removing mains lead to / from Control Box Image showing the green power ’ON’ light and the amber ’CHARGE’ light NOTE: Emergency Stop Button must be in ‘OUT’ position when charging 1. Fit the mains power lead to the small figure of eight shaped socket in the base of the control unit 2. Plug the charged main plug into a suitable mains outlet and switch the main supply ON 3. The ‘ON’ light on the control box will be green to show that the power is reaching the control box. The ‘Charge’ light will illuminate amber initially to show that the batteries are receiving a charge. 4. The amber light will go out once the batteries are fully charged. Charging is automatic and will fully charge the batteries over a period of eight to twelve hours NOTE: Batteries should be kept on charge when lift is not in general use. This ensures ready availability of lift and prolongs battery life. The internal charger in the control box will not allow the batteries to ‘overcharge’. In accordance with battery manufacturers recommendations, all batteries should be fully charged for twenty four hours every four months if in storage or not in regular use. DO NOT use the lift when the mains lead is connected to the wall socket DO NOT expose the battery or control box to water The lift is now ready for use. M-Series User Manual—Rev 10JAN2012 Page 6 © Prism Medical 2011 To return the lift to service, switch OFF the mains supply and remove the plug from the socket outlet. The charger lead can either be removed from the control box and stored separately or left in sit on the lift with the mains plug resting on the plug bracket . 2.2 Emergency Stop Button During all operations and at all times, the stop button should be in the out position. In the unlikely event of a failure of the handset control, it is possible that the electric actuator either continues to lift or continues to lower. This may be overridden by pressing the Emergency stop button to stop the actuator. To re-set the button after it has been pressed, simply twist it slightly clockwise and the button will spring outwards. Emergency Stop Button THE LIFT WILL NOT OPERATE WITH THE STOP BUTTON PUSHED IN 2.3 Emergency Lowering / raising Manual emergency lowering is facilitated by turning the emergency lowering ring clockwise. The ring is situated at the top of the actuator where the actuator connects to the mast. Twist Clockwise to Lower Electrical emergency lowering is facilitated by pressing the emergency lowering button that is situated on the front of the control box. A thin item like a ball point pen will be required to press this button as it is recessed in the case. M-Series User Manual—Rev 10JAN2012 Page 7 © Prism Medical 2011 Emergency Lowering Button 2.4 Control Box - Overview The control box has been specially developed for patient lifts and the complete system is medically approved and contains a series of features that meet the patients needs for a safe and comfortable transfer e.g. soft start function for raising and lowering. The control box has an integral charger and so removes the issues of lost or damaged chargers. The lift is connected to the mains via a mains lead that is made from a curly flex to give a greater length of cable without the need for trailing cables on the floor. See the section ‘Re-charging the batteries’ The control box has Integral emergency lowering buttons - See previous section. The actuators for the raising / lowering and the leg spreading are connected using jack plugs into the bottom of the control box (Raising and lowering actuator is connected via the Actu-log - See Actu-log section). LCD Display The onboard LCD display shows the actual battery capacity and indicates when the battery is in need of charging. The display also shows that the lift is charging once it has been correctly connected to a mains supply. Charging Indicator Power ‘ON’ Indicator LCD Display Mains Connection L1 - Actu-Log Connection M-Series User Manual—Rev 10JAN2012 L2 - Leg Actuator Connection Page 8 © Prism Medical 2011 Handset Connection 2.5 Handset The M-series range of mobile lifts benefit from the latest technology available for use in patient lifts. The handset operates 4 functions on the lift unit. They are:1. 2. 3. 4. Raises the lift Lowers the lift Opens the legs on the base unit Closes the legs on the base unit The handset is attached to the control box via a ‘curly’ flexible cable that is secured in place with a bayonet type fitting. The ‘curly’ flex is designed to give the greatest number of options for carer positioning without having a trailing cable around the patient. The back of the handset has a large magnetic section that enables the user to position the handset anywhere on the mast or boom whilst attending to the patient. M-Series User Manual—Rev 10JAN2012 Page 9 © Prism Medical 2011 Clear and easy to understand button diagrams enable ease of use for the caregiver. 2.6 Foot Bar The M-Series mobile lift range has a foot bar situated at the rear of the base unit to help facilitate the clearing of door thresholds and to help raise the front end when loading the lift into a vehicle for transport. The bar also protects the casing under which the motor is situated that operates the leg opening mechanism. The bar has a not slip surface to maintain grip whilst being used. Pictures showing the foot bar in use. M-Series User Manual—Rev 10JAN2012 Page 10 © Prism Medical 2011 The bar can also be used to aid the movement of the lift on difficult surfaces where the lift doesn't move freely. 2.7 Sling Guide On the boom of every lift there is a sling sizing guide for the Prism Range of slings. This facilitates easy identification of the available slings in a multi use environment. The M-Series can also be used with a variety of Waverley Glen Slings. 2.8 Sling Types Universal C/W Head Support Hygiene - Velcro Hammock Sling Hygiene - Buckle The Prism range of slings are the result of many years of experience in assessment and clinical expertise, combined with input from professional workers and users of slings. As a result the range is a collection of subtly unique designs, combined with the use of modern materials and technology which produces comfort, security, support and dignity for the user, and aids correct application of the sling by the carer. The range of slings are equally suitable for Mobile and Ceiling track lifts. All our slings are produced in the UK or North America and are designed and tested to the ISO10535 standard. They are manufactured in an accountable, quality controlled ISO facility. Contact your local representative for more information M-Series User Manual—Rev 10JAN2012 Page 11 © Prism Medical 2011 Universal Sling 3.0 OPERATING INSTRUCTIONS M-Series Mobile Lift Before use, you should familiarise yourself with use of the lift the procedure for opening / closing the leg sections and raising and lowering the lift, including emergency stop/lower and raise functions. Appropriate training in lifting and handling procedures should be undergone by any person operating a mobile lift or sling, for their own and the clients safety and comfort. These instructions are designed to cover the method of using of the Prism Medical mobile rather than good manual handling practice. 3.1 To Change the Leg Width The legs on the base unit of the M-Series Mobile lift are electrically operated. The leg positioned is adjusted by pressing the appropriate button on the handset. Lifting manoeuvres can be completed with the legs in any position. 3.2 Positioning 1. Fit person to be lifted with a suitable sling. Instruction should be taken in the fitting of slings to ensure maximum safety and comfort. A full assessment should be carried out by a qualified person and carers should be trained in the correct use.(See sling safety) 2. Select lift leg position required. Position lift near person to be lifted. It is recommended to position the lift on a slight angle to prevent the legs from hitting the patient. Assuming you are lifting on a level surface “never“ use the brakes on the lift. This allows the lift to align its self before lifting. Ensure ALL sling loops are attached over the safety hooks on carry bar. NOTE It is recommended to only use the brakes when carrying out lifts on / off the floor OR for when the lift is not in use & on charge. 3. To raise a person press handset button marked with upward facing arrow. When the sling straps become taut before the lift is commenced, check the straps are secure in position over the hooks of the carry bar before continuing the lift. When the desired height has been reached, release button and lift will stop. 4. When moving a person use the mast push handle and walk with the lift NEVER pull or twist at arms length, this can cause injury to the carer. 5. When desired position is reached, position the lift on a slight angle ready for lowering. 6. To a lower person, press and hold handset button marked with downward facing arrow and lift will descend. When you have reached desired level, simply release button and lift will stop in that position. M-Series User Manual—Rev 10JAN2012 Page 12 © Prism Medical 2011 3.3 Raising & Lowering 4.0 SAFETY PRECAUTIONS 4.1 Do’s and Don'ts Please read and follow the safety precautions listed below. The operation and the use of the Prism Medical M-series Mobile Lift is straightforward. These basic safety precautions will help make lifting operations easy and trouble free. ALWAYS plan your lifting operations before commencing. ALWAYS carry out the DAILY CHECK LIST (next section) before using the lift. ALWAYS read this manual and familiarise yourself with the operating control and safety features of the lift before lifting a patient. DO NOT use a sling unless it is recommended for use with the lift. ALWAYS check the sling is suitable for the particular patient and is of the correct size and capacity. NEVER use a sling which is frayed or damaged. ALWAYS fit the sling according to the instructions in the user manual. ALWAYS check that the safe working load of the lift is suitable for the weight of the patient. ALWAYS carry out lifting according to the instructions in the user manual. NEVER disconnect or bypass a control or safety feature because is seems easier to operate the lift. NEVER force an operating or safety control. Forcing will only strain or damage the lift and may compromise safety. DO NOT lift a patient whilst the brakes on the rear castor are in the on position (unless lifting from the floor). NEVER attempt to manoeuvre the lift by pushing or pulling on the mast, boom or patient as the lift may become unstable and may tilt and tip over. ALWAYS Push and Pull the lift by using the handle provided. ALWAYS lower the patient to the lowest comfortable position before transfers. If moving the patient over short distances, ensure that the patient is at the lowest position possible to help maintain the lift’s stability. DO NOT push a loaded lift at speeds which exceed a slow walking pace. DO NOT move sideways with the lift. Continued M-Series User Manual—Rev 10JAN2012 Page 13 © Prism Medical 2011 Transport position for safe handling during transport with the lift: Move Forward of Backward with Handle provided. SAFETY PRECAUTIONS DO NOT push the lift over uneven or rough ground, particularly if loaded. DO NOT attempt to push or pull a loaded lift over a floor obstruction which the casters are unable to ride over easily. DO NOT bump the lift down steps, loaded or unloaded, this will damage the casters. DO NOT attempt to negotiate a loaded lift on a slope. ALWAYS apply the brakes when parking a lift. NEVER use mobile lifts in a shower. NEVER charge an electric lift in a bathroom or shower room. YOUR lift is for patient lifting. DO NOT use it, or allow it to be used, for any other purpose. The base of the lift must be kept as wide as possible to maintain its overall stability. DO NOT place hand s on the actuator while it is extending or lowering. The lift has features which improve its electromagnetic immunity but immnunity from interference cannot be guaranteed. For best performance keep transmitting devices (cell phones & hand held radios) away from the lift. Other Symbols Used: This symbols is used to point out instructions and information related to work place safety where injury may occur if the information is disregarded or ignored. Follow these instructions, be careful and attentive at all times. Warning symbol against pinch point on the actuator. Body Weight Class II Equipment - electrical equipment in which protection against electric shock does not rely on basic insulation only. Direct current Alternating current M-Series User Manual—Rev 10JAN2012 Page 14 © Prism Medical 2011 T YPE B APPLIED PART 5.0 SAFETY CHECK LIST The following checks are those recommended by Prism Medical and are supplementary to requirements that may be applicable for current Lifting and Handling and other health and Safety regulations. 5.1 Daily Check List: The following checks should be carried out daily before using the lift: Make sure the lift moves freely on its casters Make sure that leg opening and closing is functions correctly Check the spreader bar for free movement in all directions and that it is securely attached to the boom Examine the sling hooks on the spreader bar for excessive wear Raise and lower the lift by operating the handset if the lift makes a bleeping sound DO NOT USE as it needs to be charged Ensure the lift is off charge before use and all leads are fully engaged into their sockets Make sure the mast is fully engaged and the locking nut is fully tightened Examine slings for fraying or other damage. DO NOT use sling with fraying or damage to the suspension straps or tears in the body of the sling 5.2 Warning Notes Your M-Series Lift lift has been manufactured and tested to exceed BS EN 10535:2006 1. ALL LIFTS are less stable on sloping surfaces. A 5-degree slope is the maximum permitted and then only with great care. 2. ALL LIFTS are less stable when the load is at maximum height. 3. ALL LIFTS are less stable when the load is swinging. 4. ALL LIFTS are dangerous to the person being carried when used recklessly or pushed at speed. 5. DO NOT allow water to enter hand set or battery control box or use the lift outside in wet conditions. M-Series User Manual—Rev 10JAN2012 Page 15 © Prism Medical 2011 This does not mean that it can be used without care. ALL OPERATORS should have read the operating instructions and appreciate this warning section. 6.0 TECHNICAL SPECIFICATION 6.1 Dimensions & Weights M330 M400 330 lbs 400 400lbs lbs mm M330 M330 M400 Kg M-Series User Manual—Rev 10JAN2012 Page 16 © Prism Medical 2011 Normal Operating Conditions: Temperature: 10-40 ºC Relative Humidity: 30-75% RH Atmospheric Pressure: 700 to 1060 hPa Shipping/Storage Conditions: Temperature: -40 to +70ºC Relative Humidity: 10-100% RH Atmospheric Pressure: 500 to 1060 hPa TECHNICAL SPECIFICATION 6.2 Maximum lifting Height & leg width M330 M400 6.3 Electrical detail Electrical Specifications Batteries – 2 x 12 volt rechargeable sealed lead acid Battery capacity – 2.9 ampere hours 50/60Hz Charger Input - U ln: 100-240Vac I ln: Max 400 mA, 37-53 VA @ 0.8A Charger Output –27.4/29.0Vdc U Out: 24Vdc, max 250VA Electric shock protectionCharger Class 11 Lift Internal Power Source Degree of Shock protection Charger Type B Lift Type B M-Series User Manual—Rev 10JAN2012 Page 17 © Prism Medical 2011 Duty Cycle: 10% use, 90% rest Int.:(10%, Max 2 min./18min) 6.4 M-330 Main Assembly Components * “150” refers to the lift capacity in Kg. M-Series User Manual—Rev 10JAN2012 Page 18 © Prism Medical 2011 * Item sold separately 6.5 M-400 Main Assembly Components * item sold separately “175” refers to the lift capacity in Kg. M-Series User Manual—Rev 10JAN2012 Page 19 © Prism Medical 2011 * 7.0 Troubleshooing / Maintenance 7.1 Troubleshooing If the lift will not operate: ENSURE THE BATTERY IS CHARGED AND THAT IT IS ATTACHED CORRECTLY TO THE CONTROL BOX ENSURE THAT STOP BUTTON IS IN THE OUT POSITION. MAKE SURE THE CHARGING LEAD IS DISCONNECTED FROM THE MAINS POWER SUPPLY CHECK THE HANDSET LEAD HAS NOT BEEN PULLED FROM THE CONTROL BOX SOCKET OR WIRES DAMAGED CHECK THE ACTUATOR LEAD IS FIRMLY CONNECTED INTO THE ACTU-LOG’S SOCKET AND THE LEAD IS CORRECTLY INSERTED IN THE CONTROL BOX. 7.3 Cleaning, Disinfection and Sterilisation The M-Series lift has an anti-microbial coating. This does not replace the need to clean and maintain the lift unit. Routine cleaning: the exterior of the lift can be wiped over with a damp cloth containing a mild soap solution. Disinfection and Sterilisation: the exterior of the lift should only be, disinfected and sterilised using Isopropyl alcohol. Dampen a cloth with isopropyl alcohol and wipe down the entire exterior of lift. DO NOT USE ABRASIVE MATERIALS DO NOT IMMERSE THE LIFT UNIT. M-Series User Manual—Rev 10JAN2012 Page 20 © Prism Medical 2011 If the above checks prove unsuccessful, contact the service department of your nearest PRISM MEDICAL APPROVED AGENT 7.2 Service / Maintenance Any works performed on the M-series mobile lift must be in accordance with the specifications detailed in the test requirements of ISO10535. 8.0 Test Certificate M-Series Mobile Lift TEST CERTIFICATE Safe Working Load: 330 Pounds 400 Pounds Model: M-330 M-400 Serial No: …………………………………………………………………….. Date of Test:………………………………………………………………….. This Test Certificate confirms that the above numbered lift has been fully tested in accordance with the tests specified in BS EN 10535 and has conformed fully therewith. Signature of Testing Officer …………………………………………………… CE Marking - Declaration of Conformity Registered Manufacturer No: CA003907 Prism Medical hereby declares that the M-Series Mobile Lift range meets the provisions of the European Union Council Directive 2007 / 47 / EEC concerning medical devices and are classified as Class 1 devices in accordance with that Directive. Prism Medical M-330 Prism Medical M-400 We hereby certify that the products listed above are manufactured, labelled and packaged in accordance with the provisions of Directive 2007 / 47 / EEC and conform in all aspects to the specification(s) relevant to them at the time of despatch and are CE marked in accordance with Directive 2007 / 47 / EEC . Signed : For Prism Medical UK - Freeway Division M-Series User Manual—Rev 10JAN2012 Page 21 © Prism Medical 2011 …………………………………….. 9.0 Guarantee The M-Series Mobile Lift Range GUARANTEE This lift has been carefully manufactured in Great Britain or US to exceed all relevant British and American Standards. Particular attention and care has been exercised in all stages of design and build. Quality control throughout manufacture is to the highest standards and we are proud to guarantee this quality product. When used correctly, and serviced in accordance with recommendations, this lift will give many years of trouble free service. Prism Medical will, subject only to the conditions set out below, replace free of charge all mechanical parts found to be defective due to manufacturers defect for a period of twenty four months from the date of purchase. CONDITIONS (To be observed to preserve the warranty) 1. 2. 3. 4. 5. The equipment must be used at all times in accordance with the instructions provided. The equipment must be serviced at intervals of not more than twelve months* by a Prism Medical approved service agents. The dates of service must be recorded in the service record contained in this log book. Damage occurring owing to misuse, abuse or accidental damage is not covered. Batteries are restricted to a 90 day warranty from Date of Purchase. M-Series User Manual—Rev 10JAN2012 Page 22 © Prism Medical 2011 *where applicable, a six monthly inspection 10.0 Service Record History 10.1 Initial Information Complete the following section on Purchase and Service Information as soon as this equipment is supplied. Use the service record history to record to any completed service and repairs. Ensure that the service record is signed and dated each time it is used. Be sure to have this piece of equipment serviced on a regular basis (6 monthly where applicable). PURCHASE INFORMATION: Product Name: Prism Medical M-Series Mobile Lift Model: M330 M400 Date of Purchase: __________________ Serial#: ________________________ Purchased From: ____________________________________________________ Address: ___________________________________________________________ City: _____________________________ Postal Code: __________________ Telephone No: __________________________ Comments: SERVICE INFORMATION: Contact the following company for service: Company: __________________________________________________________ Address: __________________________________________________________ City: ______________________________ Postal Code: _______________ Comments: M-Series User Manual—Rev 10JAN2012 Page 23 © Prism Medical 2011 Telephone No: __________________________ 10.2 Service Record History Date: _______________________ Service Type: □ Periodic Inspection Complete this section after each service, repair inspection and/or maintenance. Photocopy additional pages as required. Time: ________________________ □ Monthly Inspection Completed By: _________________________ □ 6 Month Inspection □ Repair □ Yearly Inspection □ Other:_________ _____________________________ Printed Name Signature Company: _____________________________________________________________ Remarks & Action Taken: Date: _______________________ Service Type: □ Periodic Inspection Time: ________________________ □ Monthly Inspection Completed By: _________________________ □ 6 Month Inspection □ Repair □ Yearly Inspection □ Other:_________ _____________________________ Printed Name Signature Company: _____________________________________________________________ Remarks & Action Taken: Date: _______________________ Service Type: □ Periodic Inspection Time: ________________________ □ Monthly Inspection Completed By: _________________________ □ 6 Month Inspection □ Repair □ Yearly Inspection □ Other:_________ _____________________________ Printed Name Signature Company: _____________________________________________________________ Remarks & Action Taken: Date: _______________________ Service Type: □ Periodic Inspection Time: ________________________ □ Monthly Inspection Completed By: _________________________ □ 6 Month Inspection □ Repair □ Yearly Inspection □ Other:_________ _____________________________ Printed Name Signature Company: _____________________________________________________________ Remarks & Action Taken: Date: _______________________ Service Type: □ Periodic Inspection Time: ________________________ □ Monthly Inspection Completed By: _________________________ □ 6 Month Inspection □ Repair □ Yearly Inspection □ Other:_________ _____________________________ Printed Name Signature Company: _____________________________________________________________ Remarks & Action Taken: Service Type: □ Periodic Inspection Time: ________________________ □ Monthly Inspection Completed By: _________________________ □ 6 Month Inspection □ Repair □ Yearly Inspection □ Other:_________ _____________________________ Printed Name Signature Company: _____________________________________________________________ Remarks & Action Taken: M-Series User Manual—Rev 10JAN2012 Page 24 © Prism Medical 2011 Date: _______________________ Service Record History Date: _______________________ Service Type: □ Periodic Inspection Complete this section after each service, repair inspection and/or maintenance. Photocopy additional pages as required. Time: ________________________ □ Monthly Inspection Completed By: _________________________ □ 6 Month Inspection □ Repair □ Yearly Inspection □ Other:_________ _____________________________ Printed Name Signature Company: _____________________________________________________________ Remarks & Action Taken: Date: _______________________ Service Type: □ Periodic Inspection Time: ________________________ □ Monthly Inspection Completed By: _________________________ □ 6 Month Inspection □ Repair □ Yearly Inspection □ Other:_________ _____________________________ Printed Name Signature Company: _____________________________________________________________ Remarks & Action Taken: Date: _______________________ Service Type: □ Periodic Inspection Time: ________________________ □ Monthly Inspection Completed By: _________________________ □ 6 Month Inspection □ Repair □ Yearly Inspection □ Other:_________ _____________________________ Printed Name Signature Company: _____________________________________________________________ Remarks & Action Taken: Date: _______________________ Service Type: □ Periodic Inspection Time: ________________________ □ Monthly Inspection Completed By: _________________________ □ 6 Month Inspection □ Repair □ Yearly Inspection □ Other:_________ _____________________________ Printed Name Signature Company: _____________________________________________________________ Remarks & Action Taken: Date: _______________________ Service Type: □ Periodic Inspection Time: ________________________ □ Monthly Inspection Completed By: _________________________ □ 6 Month Inspection □ Repair □ Yearly Inspection □ Other:_________ _____________________________ Printed Name Signature Company: _____________________________________________________________ Remarks & Action Taken: Service Type: □ Periodic Inspection Time: ________________________ □ Monthly Inspection Completed By: _________________________ □ 6 Month Inspection □ Repair □ Yearly Inspection □ Other:_________ _____________________________ Printed Name Signature Company: _____________________________________________________________ Remarks & Action Taken: M-Series User Manual—Rev 10JAN2012 Page 25 © Prism Medical 2011 Date: _______________________ Service Record History Date: _______________________ Service Type: □ Periodic Inspection Complete this section after each service, repair inspection and/or maintenance. Photocopy additional pages as required. Time: ________________________ □ Monthly Inspection Completed By: _________________________ □ 6 Month Inspection □ Repair □ Yearly Inspection □ Other:_________ _____________________________ Printed Name Signature Company: _____________________________________________________________ Remarks & Action Taken: Date: _______________________ Service Type: □ Periodic Inspection Time: ________________________ □ Monthly Inspection Completed By: _________________________ □ 6 Month Inspection □ Repair □ Yearly Inspection □ Other:_________ _____________________________ Printed Name Signature Company: _____________________________________________________________ Remarks & Action Taken: Date: _______________________ Service Type: □ Periodic Inspection Time: ________________________ □ Monthly Inspection Completed By: _________________________ □ 6 Month Inspection □ Repair □ Yearly Inspection □ Other:_________ _____________________________ Printed Name Signature Company: _____________________________________________________________ Remarks & Action Taken: Date: _______________________ Service Type: □ Periodic Inspection Time: ________________________ □ Monthly Inspection Completed By: _________________________ □ 6 Month Inspection □ Repair □ Yearly Inspection □ Other:_________ _____________________________ Printed Name Signature Company: _____________________________________________________________ Remarks & Action Taken: Date: _______________________ Service Type: □ Periodic Inspection Time: ________________________ □ Monthly Inspection Completed By: _________________________ □ 6 Month Inspection □ Repair □ Yearly Inspection □ Other:_________ _____________________________ Printed Name Signature Company: _____________________________________________________________ Remarks & Action Taken: Service Type: □ Periodic Inspection Time: ________________________ □ Monthly Inspection Completed By: _________________________ □ 6 Month Inspection □ Repair □ Yearly Inspection □ Other:_________ _____________________________ Printed Name Signature Company: _____________________________________________________________ Remarks & Action Taken: M-Series User Manual—Rev 10JAN2012 Page 26 © Prism Medical 2011 Date: _______________________ Service Record History Date: _______________________ Service Type: □ Periodic Inspection Complete this section after each service, repair inspection and/or maintenance. Photocopy additional pages as required. Time: ________________________ □ Monthly Inspection Completed By: _________________________ □ 6 Month Inspection □ Repair □ Yearly Inspection □ Other:_________ _____________________________ Printed Name Signature Company: _____________________________________________________________ Remarks & Action Taken: Date: _______________________ Service Type: □ Periodic Inspection Time: ________________________ □ Monthly Inspection Completed By: _________________________ □ 6 Month Inspection □ Repair □ Yearly Inspection □ Other:_________ _____________________________ Printed Name Signature Company: _____________________________________________________________ Remarks & Action Taken: Date: _______________________ Service Type: □ Periodic Inspection Time: ________________________ □ Monthly Inspection Completed By: _________________________ □ 6 Month Inspection □ Repair □ Yearly Inspection □ Other:_________ _____________________________ Printed Name Signature Company: _____________________________________________________________ Remarks & Action Taken: Date: _______________________ Service Type: □ Periodic Inspection Time: ________________________ □ Monthly Inspection Completed By: _________________________ □ 6 Month Inspection □ Repair □ Yearly Inspection □ Other:_________ _____________________________ Printed Name Signature Company: _____________________________________________________________ Remarks & Action Taken: Date: _______________________ Service Type: □ Periodic Inspection Time: ________________________ □ Monthly Inspection Completed By: _________________________ □ 6 Month Inspection □ Repair □ Yearly Inspection □ Other:_________ _____________________________ Printed Name Signature Company: _____________________________________________________________ Remarks & Action Taken: Service Type: □ Periodic Inspection Time: ________________________ □ Monthly Inspection Completed By: _________________________ □ 6 Month Inspection □ Repair □ Yearly Inspection □ Other:_________ _____________________________ Printed Name Signature Company: _____________________________________________________________ Remarks & Action Taken: M-Series User Manual—Rev 10JAN2012 Page 27 © Prism Medical 2011 Date: _______________________ M-Series User Manual—Rev 10JAN2012 Page 28 © Prism Medical 2011 NOTES Disclaimer While every effort has been made to ensure the accuracy of information contained in this user manual, no liability can be accepted by Prism Medical for any errors or omissions. Prism Medical operates a policy of continuous improvement. Specifications and other data are subject to change without notice. Toll Free: 1-800-265-0677(CN) e-mail: [email protected] M-Series User Manual—Rev 10JAN2012 Page 29 1-866-891-6502(US) website: www.prismmedicalltd.com © Prism Medical 2011 45 Progress Parkway, Maryland Heights, MO 63043, USA