1
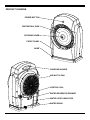
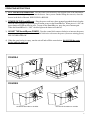
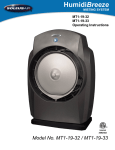
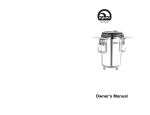
Thanks for shopping with Improvements! Portable Misting System Item #448929 To order, call 1-800-642-2112 West Chester, OH 45069 0613 If you have questions regarding this product, call 1-800-642-2112 Mon.-Fri. 9:00-5:00 EST (Ohio) and ask for our product specialists, or e-mail: [email protected] See many more products on the Internet! www.ImprovementsCatalog.com If you have any questions regarding this product, call 1-800-642-2112 and ask for our product specialists (Mon.-Fri. 9:00-5:00 EST) or e-mail: Thank you for choosing a Soleus Air HumidiBreeze Misting System. This owner’s manual will provide you with valuable information necessary for the proper care and maintenance of your new product. Please take a few moments to thoroughly read the instructions and familiarize yourself with all the operational aspects of your new Soleus Air HumidiBreeze. For your own records, please attach a copy of your sales receipt to this manual. Also, write the store name/location, date purchased, and serial number below: Store Name: ____________________________________________________ Location: ______________________________________________________ Date Purchased: _________________________________________________ Serial Number (located on back of unit): ______________________________ IMPORTANT INSTRUCTIONS Before installing and using your HumidiBreeze, please read this owner’s manual carefully. Store this manual in a safe place for future reference. 1) Always place the unit on a level surface. 2) Never use or store gasoline or other flammable vapor or liquid near this unit unless instructed by this manual. 3) Maintain at least 10 inches (25 cm) clearance space around this unit. Do not block or cover air inlet or outlet grilles. 4) The unit must be connected to a correctly grounded power supply. 5) Do not start or stop the unit by inserting or pulling out the power plug. 6) Do not use an adapter plug or extension cord. 7) Do not use the unit in the immediate surroundings of a bath, a shower or a swimming pool. 8) Do not insert anything into the air outlet. Do not obstruct air inlet or outlet grills unless instructed by this manual. 9) Do not let children play near this unit. 10) Always inspect the cord for signs of damage before use. If the power cord is damaged, it must be replaced by the manufacturer or a qualified service technician. 11) When cleaning the unit, always turn the unit off and unplug the power cord. 2 PACKAGE CONTENTS HumidiBreeze Misting System Operating Instructions SPECIFICATIONS • Noise level is measured at a distance of 3.28 ft away from the front of the unit, when the unit is in cooling mode. • Power consumption is measured when the fan runs at the highest speed setting. • These specifications are for reference only. For actual data, please refer to the rating label on the back of the unit. • If the environment temperature is higher than the max operating temperature or lower than the minimum operating temperature, the unit may not work properly. DISCLAIMER ALL INFORMATION AND THE TECHNICAL SPECIFICATIONS PRESENTED IN THIS USER’S MANUAL ARE THE PRESENTATION OF THE MANUFACTURER. SOLEUS INTERNATIONAL HAS NOT CONDUCTED INDEPENDENT TEST TO THE INFORMATION AND THE SPECIFICATIONS PRESENTED HEREWITHIN. MODEL MT1-19-33 Humidifying Capacity 19 Gallons per Day Water Tank Size 1 Gallon Power Consumption 70 Watts Air Flow Volume 353 CFM / 600m3/h Power Source Sound Pressure Level Weight 120 V / 60 HZ <55 db(A) 20.8 lbs Dimensions (WxDxH) 16.5”x10”x23.5” WARNING: This fan is for use on 120 volts. The cord has a plug as shown in A. An adapter as shown in C is available for connecting three-blade grounding-type plugs to two-slot receptacles. The grounding lug extending from the adapter must be connected to a permanent ground such as a properly grounded outlet box. The adapter should not be used if a three-slot grounded receptacle is available. DO NOT DEFEAT THE SAFETY PURPOSE OF THE GROUNDED PLUG. 3 PRODUCT DIAGRAM POWER BUTTON CENTRIFUGAL DISK SECURING KNOB FRONT PANEL BASE CARRYING HANDLE AIR INLET & FAN CONTROL DIAL WATER RESERVOIR DRAWER WATER LEVEL INDICATOR WATER DRAIN 4 OPERATING INSTRUCTIONS 1) FILL THE WATER RESERVOIR - Pull the water reservoir drawer out from the back of the unit and fill the water reservoir by pouring water into the drawer. Once you are finished filling the reservoir, close the drawer in the back of the unit. SEE FIGURE A BELOW. 2) POWER ON THE HumidiBreeze - Plug the power cord into a three pronged grounded electrical outlet. Once the unit is plugged in, press the power button to turn on the HumidiBreeze. When power is “ON” the power button will light up blue in color. To turn off the HumidiBreeze, press the power button again. When the HumidiBreeze is “OFF” the blue light on the button will shut off. 3) ADJUST THE HumidiBreeze POWER - Turn the control dial counter-clockwise to increase the power (increases misting power) Turn the control dial clockwise to decrease the power (decreases misting power). SEE FIGURE B BELOW. 4) When the water bucket is empty, turn the unit off and refill the water bucket. DO NOT fill the water bucket while the unit is on. FIGURE A FIGURE B INCREASE HumidiBreeze POWER DECREASE HumidiBreeze POWER 5 TROUBLESHOOING Problem Possible Reason Solution No Power Plug in power cord to grounded three pronged outlet Bad Electrical Outlet Repair or change outlets Cooling control valve is set too low Turn the control dial counter-clockwise to increase power. Water Tank is Empty Fill Water Reservoir Cooling control valve is set too low Turn the control dial counter-clockwise to increase power. Not Working Little or No Water Mist Low Misting Power Not Enough Airflow Low voltage coming from electrical outlet Low voltage coming from electrical outlet Repair or change outlets Repair or change outlets MAINTENANCE Note: Make sure power is off and the power cord is not plugged into an electrical outlet prior to performing any maintenance on the unit. 1. Unplug the unit and let it cool completely. 2. To keep the product clean, the outer shell may be cleaned with a soft, damp cloth. You may use a mild detergent if necessary. After cleaning, dry the unit with a soft cloth. CAUTION: DO NOT let liquid enter the product. 3. DO NOT use alcohol, gasoline, abrasive powders, furniture polish, or rough brushes to clean the product. This may cause damage or deterioration to the surface of the product. 4. DO NOT immerse the product in water. 5. If the unit is wet, wait until the unit is completely dry before use. STORAGE 1. Drain all of the water from the water reservoir. SEE FIGURE C. 2. Store the product in a cool, dry location when not in use. Repack the unit in the original packaging to prevent dust and dirt buildup. FIGURE C 6