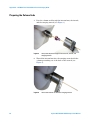
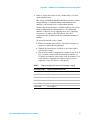
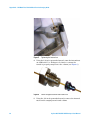
1
Agilent GC/MS/MS
Pesticides and
Environmental Pollutants
(P&EP) Analyzer
User Manual
Agilent Technologies
Notices
© Agilent Technologies, Inc. 2015
Warranty
No part of this manual may be reproduced
in any form or by any means (including
electronic storage and retrieval or translation into a foreign language) without prior
agreement and written consent from
Agilent Technologies, Inc. as governed by
United States and international copyright
laws.
The material contained in this document is provided “as is,” and is subject to being changed, without notice,
in future editions. Further, to the maximum extent permitted by applicable
law, Agilent disclaims all warranties,
either express or implied, with regard
to this manual and any information
contained herein, including but not
limited to the implied warranties of
merchantability and fitness for a particular purpose. Agilent shall not be
liable for errors or for incidental or
consequential damages in connection
with the furnishing, use, or performance of this document or of any
information contained herein. Should
Agilent and the user have a separate
written agreement with warranty
terms covering the material in this
document that conflict with these
terms, the warranty terms in the separate agreement shall control.
Manual Part Number
G3445-90030
Edition
Second edition, June 2015
Printed in USA
Agilent Technologies, Inc.
2850 Centerville Road
Wilmington, DE 19808-1610 USA
Technology Licenses
The hardware and/or software described in
this document are furnished under a
license and may be used or copied only in
accordance with the terms of such license.
Restricted Rights Legend
If software is for use in the performance of
a U.S. Government prime contract or subcontract, Software is delivered and
licensed as “Commercial computer software” as defined in DFAR 252.227-7014
(June 1995), or as a “commercial item” as
defined in FAR 2.101(a) or as “Restricted
computer software” as defined in FAR
52.227-19 (June 1987) or any equivalent
agency regulation or contract clause. Use,
duplication or disclosure of Software is
subject to Agilent Technologies’ standard
commercial license terms, and non-DOD
Departments and Agencies of the U.S.
Government will receive no greater than
Restricted Rights as defined in FAR
52.227-19(c)(1-2) (June 1987). U.S. Government users will receive no greater than
Limited Rights as defined in FAR 52.227-14
(June 1987) or DFAR 252.227-7015 (b)(2)
(November 1995), as applicable in any
technical data.
Safety Notices
CAUTION
A CAUTION notice denotes a
hazard. It calls attention to an operating procedure, practice, or the
like that, if not correctly performed
or adhered to, could result in
damage to the product or loss of
important data. Do not proceed
beyond a CAUTION notice until the
indicated conditions are fully
understood and met.
WA R N I N G
A WARNING notice denotes a
hazard. It calls attention to an
operating procedure, practice, or
the like that, if not correctly performed or adhered to, could result
in personal injury or death. Do not
proceed beyond a WARNING
notice until the indicated conditions are fully understood and met.
Contents
Introduction
Analyzer Configurations
6
Where to Find More Information about Using your Pesticide Analyzer
What’s on the Specials Factory Information CD ROM
See Also
8
10
12
Operations
Relocking the Data Acquisition Method
Running the Checkout Sample
16
Reviewing Data and Generating a Report
Columns and Supplies
Troubleshooting
14
18
19
21
Appendix A – UltiMetal Plus Flexible Metal Ferrules Swaging Guide
Parts Supplied
25
Tools Required
25
Preparing the Column Ends
26
Swaging Quality Inspection
29
Agilent GC/MS/MS P&EP Analyzer User Manual
3
4
Agilent GC/MS/MS P&EP Analyzer User Manual
Agilent GC/MS/MS Pesticides and Environmental Pollutants (P&EP) Analyzer
User Manual
1
Introduction
Analyzer Configurations 6
Where to Find More Information about Using your Pesticide Analyzer
What’s on the Specials Factory Information CD ROM 10
Agilent Technologies
8
5
Introduction
Analyzer Configurations
Identifying and quantifying dozens (or hundreds) of pesticides
or organic pollutants in a wide range of fruit, vegetable, or
environmental samples is a complex task. The Agilent
GC/MS/MS Analyzer is a complete system that is factory
configured and chemically tested to quickly identify a broad
range of commonly analyzed pesticide and pollutant residues
with ultimate sensitivity. The Analyzer comes with a Multiple
Reaction Monitoring (MRM) database (p/n G9250AA, rev.
A.1.01) that includes information for over 1000 pesticides and
organic pollutants.
The Analyzer is configured with Agilent’s proprietary Capillary
Flow Technology, to provide rugged, reliable GC column
backflushing. Backflushing the GC column shortens run times,
extends column life, reduces chemical background noise,
provides consistent retention times and spectra, and helps keep
the MS ionization source clean. A Multi-Mode Inlet (MMI)
provides the flexibility to inject samples in cold, hot, or
solvent-vent modes allowing operators to optimize injection
volumes to maximize mass on column.
NOTE
A split/splitless UI inlet option is available for laboratories that do not
require maximal limit of detection (LOD) performance (Option #114).
Each Analyzer system is tested using a 17-compound mixture
and retention times for analysis locked at the factory.
Four hardware configurations are available:
G3445B-#411: Flexible Constant Pressure (CP) method: 40-min
run, 30 m column x 0.5 m restrictor, post column backflush.
G3445B-#415: Fast CP method: 20-min run, 15 m column x
0.5 m restrictor, post column backflush.
6
Agilent GC/MS/MS P&EP Analyzer User Manual
Introduction
G3445B-#412: Fast Constant Flow (CF) method: 20-min run,
15 m column x 15 m column, mid column backflush.
Full screening CF method: 40-min run, 15 m column x 15 m
column, mid-column backflush.
G3445B-#414: Selective CF method: 20-min, 5 m column x 15 m
column, mid column backflush.
NOTE
Notes for Analyzer option # 414:
The #414 option is configured with a 240 V GC oven to allow for the rapid
temperature rates in the oven and inlet programs).
Add an additional 2 minutes hold time to extend the GC analytical run for
late eluters (i.e. Imibenconazol, Cinidon-ethyl, Propaquizafop, Temephos,
and Fluthiacet-methyl).
The 2-mm dimpled liner (p/n 5190-2297) aids in minimizing column
contamination due to non-volatile matrix deposits being retained on the
dimples of the liner.
Your Analyzer was configured and checked at the factory to
ensure that your system is ready to run samples of value to your
operation immediately after installation in your lab. The factory
test results for your Analyzer can be found on the Specials
Factory Information CD/DVD that shipped with your
instrument.
Agilent GC/MS/MS P&EP Analyzer User Manual
7
Introduction
Where to Find More Information about Using your Pesticide Analyzer
MRM Database DVD (G9250AA)
The Pesticides and Environmental Pollutants MRM Database
(G9250AA rev. A.1.01) now incorporates a new User Interface
to provide a more streamlined approach to building a
customizable Target List. From this list, the user interface then
uses the information selected from the Database to develop an
MRM acquisition method or MRM quantitation method.
This exclusive 1074-compound MRM Database is included with
your Analyzer as a separate DVD. The Database DVD also
includes a few different documents and guides that outline the
utility and operation of the Database.
The G9250AA Rev. A.1.01 User Manual (G9250AA-90000.pdf)
provides a tutorial of the new User Interface (see Figure 1 on
page 9) that includes the following functions:
• Building a Target Compound List
• Developing an MRM Table
• Exporting the MRM data to the CLA for acquisition
optimization
• Developing a Quant Method
• Previous Functionality of the database
8
Agilent GC/MS/MS P&EP Analyzer User Manual
Introduction
Figure 1
The P&EP MRM Database new User Interface Home Screen
Control Panel
Application Notes and publications
You can find more information about pesticide analysis in the
application notes and publications included with your Specials
Factory Information CD ROM.
Alternatively, visit: http://www.chem.agilent.com/ and select
the “Literature Library” under the Quick Links.
QuEChERS extraction procedures and ready-to-use kits
The QuEChERS extraction procedure for pesticide residues in
fruits and vegetables is being used by labs around the world. For
a training video, references, and ready-to-use kits for
performing QuEChERS extractions, go to the following Agilent
web site:
http://quechersselectiontool.chem.agilent.com/
Alternatively, visit: http://www.chem.agilent.com/ and type
QuEChERS into the search field.
Agilent GC/MS/MS P&EP Analyzer User Manual
9
Introduction
What’s on the Specials Factory Information CD ROM
Your Pesticide Analyzer comes with a CD that contains the
following information specific to your Analyzer Configuration:
Analytical methods
• The GC/MS/MS checkout methods:
• 411_checkout_PCSL.M
• 412_checkout_PCSL.M
• 414_checkout_SV.M
• 415_checkout_PCSL.M
(These methods are either a pulsed-cold-splitless or a
solvent-vent MRM method with 17 analytes and is
retention time locked at the factory.)
NOTE
Another GC/MS/MS method is included as a reference
(415_checkout_HSL.m). This is a hot-splitless MRM method with 17
analytes and is NOT retention time locked at the factory.
• The GC/MS/MS general pesticide analysis methods:
• Pulsed_cold_splitless.M
• Hot_splitless.M
• 414_SV.M
• 415_PCSL.M or 415_HSL.M
NOTE
If you do not have a MultiMode Inlet (MMI) installed, you should use the
hot-splitless method (Hot_splitless.m) instead of the pulsed-cold-splitless
method for the inert split/splitless inlet.
• The signal-to-noise data analysis methods:
• 411_signal-to-noise.M
• 412_signal-to-noise.M
• 414_signal-to-noise.M
• 415_signal-to-noise.M
Copy the Factory Methods and Test Results to the Hard Drive
D:\MassHunter\GCMS\1\ Method.
10
Agilent GC/MS/MS P&EP Analyzer User Manual
Introduction
NOTE
Edit the Msdchem.ini file in the C:\GCMS\msexe folder to show, for
example: _METHFILE$=411_checkout_PCSL.m, so this method will be
loaded as you bring up the 7000 acquisition software, without going
through Method Resolution.
NOTE
The qqqacqmethod.xml file in each method folder has all the MRM
transitions for the method.
Data files and reports
• Checkout sample data files:
• 411_checkout_PCSL_1µL.D
• 412_checkout_PCSL_1µL.D
• 414_checkout_SV_1µL.D
• 415_checkout_PCSL_1µL.D
Copy the checkout data file from the Specials Factory
Information CD ROM to D:\MassHunter\GCMS\1\Data.
• Report, QuantReport_ESTD_ResultsSummary.xlsx,
obtained at the factory for a 1-µL injection of the 100 ppb
GC/MS/MS Analyzer Checkout Sample (p/n 5190-0494)
Reference materials
• Agilent Application Notes that discuss pesticide analysis
• A copy of this User Manual
• Corresponding technical guides and tutorials
• A list of target pesticides
(G9250AA_pesticide_MRM_database_compound_list.pdf)
MRM database and Excel spreadsheet
• The G9250AA (rev. A.1.01) Pesticides and Environmental
Pollutants MRM database
• The Excel spreadsheet (RT_locking_calculator.xlsx) for
calculating the proper inlet flow to relock the Chlorpyrifos
Methyl peak for the method of choice is still included for
optional use
Agilent GC/MS/MS P&EP Analyzer User Manual
11
Introduction
See Also
Document files:
• MRM Database G9250AA Rev. A.1.01 Help file:
G9250AA_Help.pdf
• MRM Database G9250AA Rev. A.1.01 ReadMe file:
G9250AA_ReadMe.pdf
• MRM Database G9250AA Rev. A.1.01 Quick Start Guide:
G9250-90010.pdf
• MRM Database G9250AA Rev. A.1.01 User Manual:
G9250-90000.pdf
• The Pesticides and Environmental Pollutants (P&EP)
GC/MS/MS 3.0 Application Note: 5991-4419EN.pdf
Tutorial video:
Adding Compounds (Adding Compounds.MP4; located on
G2950AA MRM Database DVD)
12
Agilent GC/MS/MS P&EP Analyzer User Manual
Agilent GC/MS/MS Pesticides and Environmental Pollutants (P&EP) Analyzer
User Manual
2
Operations
Relocking the Data Acquisition Method 14
Running the Checkout Sample 16
Reviewing Data and Generating a Report 18
Columns and Supplies 19
Troubleshooting 21
Agilent Technologies
13
Operations
Relocking the Data Acquisition Method
Mass Hunter GC-MS Acquisition software Rev. B.07.00 SP2, or
later, can perform the automated Retention Time Locking (RTL)
calibration for constant flow methods.
With the release of the P&EP 3.0, the automated Retention Time
Locking (RTL) calibration process includes both RT Locking for
both constant pressure (CP) and constant flow (CF) methods.
NOTE
The RT_locking_calculator.xlsx is being supplied with the Analyzer
CD/DVD for informative purposes only. The calculator spreadsheet does
not need to be used for relocking the method and has not been used during
the instrument checkout in the factory.
Relocking
Following replacement or trimming of the GC column, Agilent
recommends that you relock you analyzer method to eliminate
the need for time segment adjustments in your acquisition
method.
14
1
To relock a method, select Relock Method… from the
GC/MS/MS data acquisition Method menu and enter the
required information to start a run. The target retention
time for the Chlorpyrifos Methyl peak is 16.593, 9.143, 8.524,
or 8.297 minute. See Table 1 on page 17 for corresponding
methods and retention times.
2
Follow the steps to obtain the lock pressure/flow.
3
Enter the lock pressure/flow from the above relocking
process into your acquisition methods.
4
Save the method with the new locked pressure/flow.
Agilent GC/MS/MS P&EP Analyzer User Manual
Operations
NOTE
The use of RT_locking_calculator.xlsx is not needed with current GC/MS
Acquisition software; but it is still supplied for informative purposes. If
used:
1
Obtain the RTLOCK data files in Method (.M) folder.
2
Write down the retention times and pressures/flows of
Chlorpyrifos Methyl (transition ion(s) 208,93).
3
Record the retention time and pressure/flow of data file that
was just obtained. (For the flow calculations, use Column 1
to set the RTs).
4
Enter the recorded values into their respected cells in the
calculator. (Note: make sure the “Desired Locking RT” is
accurate for the method of choice; see Table 1 on page 17.)
5
Enter the calculated locking RT pressure/flow into the
Method for column 1. (Note: for a constant flow method, the
column 2 flow setting = column 1 + 0.2 mL/min)
Auto Retention Time Locking (RTL)
This Analyzer’s Chromatographic analysis is retention time
locked at the factory.
The retention time of the Analyzer can be automatically locked
using either a full-scan method or an MRM method.
To lock a method, select Acquire RTLock Calibration Data… from the
GC/MS/MS data acquisition Method menu.
The system will automatically make 5 injections with varying
inlet pressures or flows to change the retention time of a
locking compound.
If you are using an MRM method, make sure the locking
compound transitions are in all the time segments where the
peak will show up due to the adjustment of inlet pressure or
flow.
Specify acquired ion(s) from scan (125,286) or MRM (208,93) in
the RTL process if the locking compound is Chlorpyrifos Methyl.
Agilent GC/MS/MS P&EP Analyzer User Manual
15
Operations
Running the Checkout Sample
At the factory, your system was chemically tested by making
1-µL injections of a 100 ppb 17 compound checkout standard.
The Specials Factory Information CD ROM contains a copy of
the exact method used during factory checkout:
• 411_checkout_PCSL.M
• 412_checkout_PCSL.M
• 414_checkout_SV.M
• 415_checkout_PCSL.M
Chromatography for your specific method was retention time
locked (RTL) at the factory. At installation, Agilent’s service
engineer will verify chromatographic performance and relock
the method.
The Analyzer Checkout Sample contains 17 pesticides shown in
Table 1. The concentration of each pesticide is 100 ppb
(100 pg/µL) in acetone. Please note that most of the pesticides
used to make up this sample were >97% pure, meaning that
there are some small impurities or isomers of the major
components may be present.
To run the checkout sample:
1
Load the specified checkout method:
• 411_checkout_PCSL.M
• 412_checkout_PCSL.M
• 414_checkout_SV.M
• 415_checkout_PCSL.M
2
Make a 1-µL Injection of the 100-ppb Checkout Sample
(p/n 5190-0494).
3
Name the Data File:
• 411_checkout_PCSL_1µL.D
• 412_checkout_PCSL_1µL.D
• 414_checkout_SV_1µL.D
• 415_checkout_PCSL_1µL.D
4
16
Save the files in D:\MassHunter\GCMS\1\Data.
Agilent GC/MS/MS P&EP Analyzer User Manual
Operations
Table 1
Pesticides contained in the 100 pg/µL checkout sample (p/n 5190-0494)
Retention Time (min)
Name
CAS #
Opt # 411
~40 min
Opt #412
~40 min
~20 min
Opt # 414
Opt # 415
~20 min
~20 min
Dichlorvos
62-73-7
5.831
6.188
4.679
4.032
2.915
Mevinphos
7786-34-7
7.595
9.070
5.610
4.845
3.803
Ethalfluralin
55283-68-6
11.283
13.590
7.139
6.383
5.654
Trifluralin
1582-09-8
11.637
13.945
7.247
6.511
5.831
Atrazine
1912-24-9
13.159
15.321
7.887
7.149
6.576
Chlorpyrifos Methyl
(Locking Compound)
5598-13-0
16.593
18.110
9.143
8.524
8.297
Heptachlor
76-44-8
16.796
18.299
9.339
8.663
8.387
Malathion
121-75-5
18.800
19.654
9.729
9.289
9.404
Dieldrin
60-57-1
23.870
23.391
11.717
11.438
11.940
p,p'-DDE
72-55-9
24.021
23.418
11.612
11.441
12.018
Hexazinone
51235-04-2
27.385
26.665
13.195
13.349
13.703
Propargite
2312-35-8
27.725
27.033
13.318
13.572
13.876
Mirex
2385-85-5
29.835
29.633
14.872
14.624
14.944
Fenarimol
60168-88-9
30.403
30.320
15.084
14.831
15.237
Coumaphos
56-72-4
31.667
31.979
15.853
15.410
15.871
Etofenprox (Ethofenprox) 80844-07-1
33.203
33.912
16.777
16.245
16.650
Deltamethrin
36.001
36.506
18.117
17.582
18.048
52918-63-5
Agilent GC/MS/MS P&EP Analyzer User Manual
17
Operations
Reviewing Data and Generating a Report
1
Open MassHunter Qualitative Analysis (Qual).
2
Select File > Open Data File… to load the data file:
• 411_checkout_PCSL_1µL.D
• 412_checkout_PCSL_1µL.D
• 414_checkout_SV_1µL.D
• 415_checkout_PCSL_1µL.D
3
Select Method > Open… to load the signal-to-noise method:
• 411_signal-to-noise.M
• 412_signal-to-noise.M
• 414_signal-to-noise.M
• 415_signal-to-noise.M
NOTE
18
4
Select Actions > Run the Worklist Actions.
5
Open the PDF report in the Reports folder within the data
file folder. If all signal-to-noise ratios (of Mirex) are greater
than 2500, this system is ready for running samples.
6
Compare your report with the factory report for the
checkout sample generated for this specific Analyzer. The
results from the factory are on the Specials Factory
Information CD ROM.
Relock the method if the Chlorpyrifos Methyl peak is more than
± 0.015 minute different than the method's locking compound retention
time of 16.593, 9.143, 8.524, or 8.297 minute (see Table 1 on page 17 for
corresponding methods and retention times). See “Relocking the Data
Acquisition Method” on page 14.
Agilent GC/MS/MS P&EP Analyzer User Manual
Operations
Columns and Supplies
Table 2
Columns and column accessories
Description
Part number
installed
extra
Siltek deactivated Fused Silica 5 m x 0.15 mm,
flow restrictor (# 411 and # 415 Analyzers)
160-7626-5
0.7 m
4.3 m
Agilent J&W HP-5ms Ultra Inert GC Column,
30 m × 0.25 mm × 0.25 µm (# 411 Analyzer)
19091S-433 UI
1
0
Agilent J&W HP-5ms Ultra Inert GC Column,
15 m × 0.25 mm × 0.25 µm (# 414 and # 415 Analyzers)
19091S-431 UI
1
0
Agilent J&W HP-5ms Ultra Inert GC Column,
15 m × 0.25 mm × 0.25 µm (# 412 Analyzer)
19091S-431 UI
2
0
Agilent J&W HP-5ms Ultra Inert GC Column,
5 m × 0.25 mm × 0.25 µm (# 414 Analyzer)
G3903-61005
1
0
Column ferrule, MMI, graphite (10/pkg)
5080-8853
1
1 pkg
Column nut, GC capillary (2/pkg)
5181-8830
1
1
Swaging nut for MS interface
OR
Column nut for MS interface
G2855-20555
1
0
05988-20066
1
0
MS interface ferrule (15% graphite/85% Vespel) 0.25 mm
(10/pkg)
5062-3508
1
1 pkg
Inlet liner (4-mm Ultra Inert liner, Splitless, single taper, wool
– hot splitless injections)
5190-2293
1
0
Inlet liner (2-mm Ultra Inert liner, Splitless, single taper,
dimpled – cold splitless injections)
5190-2297
1
0
O-ring, inlet liner, non-stick (10/pkg)
5188-5365
1
1 pkg
Septum, advanced green (50/pkg)
5183-4759
1
1 pkg
GC inlet and instrument supplies
Agilent GC/MS/MS P&EP Analyzer User Manual
19
Operations
Table 2
Columns and column accessories (continued)
Description
Part number
installed
extra
Big universal trap for helium purification
RMSH-2
2
0
Universal/External split vent trap (includes 3 cartridges)
RDT-1020
0
0
Split Vent Trap PM kit
5188-6495
0
0
Internal nut for capillary flow device
(installed on purged ultimate union)
G2855-20530
2
2 (plugs)
Flexible metal ferrule, UltiMetal Plus, 0.4 mm id, for 0.1 to
0.25 mm ID (10/pkg)
G3188-27501
2
1 pkg
1/16-inch Brass Swagelok tee
0100-0680
1
0
Bleed line, 0.0625-in OD × 0.010-in ID × 100 cm, 316SS tubing 0100-2354
1
0
Bleed tee ferrule, 1/16-inch Vespel (10/pkg)
0100-1329
3
7 pieces
Column installation tool
G1099-20030
0
1
Capillary tubing cutter (4/pkg)
5181-8836
0
1
Pesticide analyzer checkout sample
(17 pesticides at 100 pg/µL each in acetone)
5190-0494
0
1
QuEChERS EN method sample pack
5982-7000
0
1
QuEChERS AOAC method sample pack
5982-7005
0
1
Backflush and capillary flow device supplies
Useful tools and chemical standards
Sample preparation
Additional QuEChERS extraction supplies at
www.agilent.com/chem/quechers.
20
Agilent GC/MS/MS P&EP Analyzer User Manual
Operations
Troubleshooting
Use existing Data files to Lock
If you have acquired all calibration runs and there was a
problem of picking up the integrated peak, etc., you can
simulate the retention time locking process without rerunning
the complete RTL data set:
1
Load the method.
2
Use Qual to evaluate all data files inside the RTLOCK folder,
select 1-2 representative ions of the locking compound.
3
Make sure the locking compound EIC can be properly
integrated.
4
In command line type: acqlock 1,1 (there is a space before
1,1).
5
You will see normal RTL message box and also the message
that previous RTL datafiles will be lost. This command
simulated the locking process and you should answer Yes. It
will use existing data files in the evaluation.
6
Next, you should see normal locking screens, complete these
and the method is locked.
If you want to relock the method by using an existing data file,
you can simulate this as well:
1
Load the method.
2
Make sure that data file name and folder is assigned in run
method screen.
3
In command line type: acqlock 2,1. Before executing the
command, make sure that the method is loaded and data file
name and data path are entered properly.
4
You will see normal relock windows and following these
compete the locking.
Agilent GC/MS/MS P&EP Analyzer User Manual
21
Operations
Auto RTL failed
Incomplete RTL Calibration information
Ion signals too weak – MassHunter cannot integrate them
Use MassHunter Qual to examine all 5 locking data files inside
the method folder. Use > 1 ppm standards or set a higher
electron multiplier Gain value if the ion signals are weak.
The r2 value is less than 0.95
Use MassHunter Qual to examine all 5 locking data files inside
the method folder. Make sure the locking compound exists in all
5 runs. If not, make sure the locking compound transitions exist
in all relevant time segments.
The ions entered for MassHunter identification are incorrect
Use MassHunter Qual to review the RTL data files and identify
the ions acquired and then execute acqlock 1,1 in GC/MS/MS
Acquisition command line to lock. This command will reprocess
the 5 previously collected data files.
More troubleshooting
Complaint: files take up a lot of space
Remember that every data file includes the acquisition method;
so if the method is locked, each data file also includes the six
calibration files.
Workaround:
• Backup the D:/masshunter/gcms/1/hst.ini file
• Open the original hst.ini file in the notepad and modify
following line
• [copymethod]
• enabled=0
• Save the hst.ini file
• Method is not saved under the data files anymore
If instrument is reconfigured, this file is overwritten.
22
Agilent GC/MS/MS P&EP Analyzer User Manual
Operations
The GC never comes ready or the sequence halted
Make sure all pressure setpoints can be reached or are properly
ignored.
Fix all leaks, increase gas supply pressure, and configure the
purged ultimate union to Ignore Ready = True.
Checking for leaks
Checking air leaks at MS transfer line connection
Spray the MS transfer line nut with a fluorinated aerosol duster,
for example, Miller-Stephenson MS-222N Aero-Duster, and look
for ions 69 and 83 from 1,1,1,2-Tetrafluoroethane, CAS
811-97-2.
Leak free connections
UltiMetal Plus Flexible Ferrules provide a leak-free seal using
less torque, reducing column breakage, and are treated with
UltiMetal Plus deactivation for an inert flow path.
See also
• Flexible Metal Ferrule Touchless Package Video Wide
opening and new dial pack design allows Touchless
installation as column is threaded through ferrule easily
http://www.chem.agilent.com/en-US/products-services/Part
s-Supplies/Chromatography-Spectrometry/GC-and-GC-MS/
UltiMetal-Plus-Flexible-Metal-Ferrules/Pages/PackageInstru
ctions.aspx
• Flexible Metal Ferrule Column Connections Video
http://www.chem.agilent.com/en-US/products-services/Part
s-Supplies/Chromatography-Spectrometry/GC-and-GC-MS/
UltiMetal-Plus-Flexible-Metal-Ferrules/Pages/flexiferrulepr
eswag.aspx or http://youtu.be/3GkmiVvydeI
This video demonstrates column connections using the Agilent
Ultimetal Plus Flexible Metal Ferrules.
Three steps are presented:
1
Pre-swaging.
2
Column trimming and quality inspection.
3
Connecting to capillary flow devices.
Agilent GC/MS/MS P&EP Analyzer User Manual
23
Operations
24
Agilent GC/MS/MS P&EP Analyzer User Manual
Agilent GC/MS/MS Pesticides and Environmental Pollutants (P&EP) Analyzer
User Manual
Appendix A – UltiMetal Plus Flexible
Metal Ferrules Swaging Guide
Parts Supplied
The available UltiMetal Plus Flexible Metal ferrule packages are
listed in Table 3 and Figure 2.
Table 3
Available UltiMetal Plus Flexible Metal ferrule packages
Item
Part number
Ferrule description
1
G3188-27501
0.1 – 0.25 mm column id, 10/pk
2
G3188-27502
0.32 mm column id, 10/pk
3
G3188-27503
0.45 – 0.53 mm column id, 10/pk
4
G3188-27504
Plug, 10/pk
5
G3188-27505
0.25 – 0.32 mm UltiMetal column id, 10/pk
6
G3188-27506
0.53 mm UltiMetal column id, 10/pk
1
2
Figure 2
3
4
5
6
UltiMetal Plus Flexible Metal ferrules
Each UltiMetal Plus Flexible Metal ferrule part number is
uniquely designed to prevent inventory mix-ups, and to help
you find the ferrule you need quickly. Color variations between
ferrules are a normal result of the UltiMetal coating.
Tools Required
• Two 1/4-inch open-end wrenches
• Column cutting tool
• Swaging wrench
Agilent Technologies
25
Appendix A – UltiMetal Plus Flexible Metal Ferrules Swaging Guide
Preparing the Column Ends
1
Pass the column end through the internal nut, the ferrule,
and the swaging wrench (see Figure 3).
Figure 3
2
Thread the internal nut into the swaging wrench with the
column protruding out of the back of the wrench (see
Figure 4).
Figure 4
26
Thread the column through the internal nut, ferrule, and
swaging wrench
Thread the internal nut onto the swaging wrench
Agilent GC/MS/MS P&EP Analyzer User Manual
Appendix A – UltiMetal Plus Flexible Metal Ferrules Swaging Guide
3
Begin to swage the ferrule to the column using a 1/4-inch
open-ended wrench.
The design of UltiMetal Plus Flexible Metal ferrules reduces
the probability of column breakage and minimizes the
damage to the thread of the corresponding fittings.
Unlike other ferrule designs, a reliable leak-free seal is best
made by tightening the internal nut to a recommended
number of degrees, not by applying more force. Applying
excessive force will not provide a better seal. Also,
compressing the flexible ferrule less minimizes damage to
fittings.
To swage the ferrule to the column:
a Find your ferrule type in Table 4 and note the range of
degrees to tighten the internal nut.
b Tighten the internal nut clockwise to the lower end of
your ferrule’s range.
c Check if the ferrule is gripping the column. If yes, stop. If
not, continue to tighten the internal nut in small 5- to
15-degree increments. Check after each increment to see
if the ferrule is gripping the column. Stop as soon as
gripping occurs (see Figure 5 on page 28).
Table 4
Degrees to tighten the internal nut for proper swaging
Ferrule part number
Degrees to tighten internal nut
G3188-27501
50 – 100 degrees
G3188-27502
30 – 70 degrees
G3188-27503
20 – 50 degrees
G3188-27504
60 degrees
G3188-27505
40 – 90 degrees
G3188-27506
20 – 50 degrees
Agilent GC/MS/MS P&EP Analyzer User Manual
27
Appendix A – UltiMetal Plus Flexible Metal Ferrules Swaging Guide
Figure 5
4
Using the 1/4-inch open-ended wrench, turn the internal nut
an additional 15 to 20 degrees clockwise to ensure the
ferrule is properly swaged onto the column (see Figure 6).
Figure 6
5
28
Tightening the internal nut
Ferrule swaged to column and internal nut
Using the 1/4-inch open-ended wrench, remove the internal
nut from the swaging wrench and column.
Agilent GC/MS/MS P&EP Analyzer User Manual
Appendix A – UltiMetal Plus Flexible Metal Ferrules Swaging Guide
6
Using the column cutter, trim the column at the small end of
the ferrule leaving approximately 0.3 mm of the column
extending from the ferrule (Figure 7). The minimum size of
the column head extending from the ferrule is 0.1 mm and
the maximum is 0.5 mm. It is important to have 0.5 mm or
less column head to prevent column conflict in the union.
Figure 7
Properly-trimmed column and ferrule
Swaging Quality Inspection
Figure 8 shows both an incorrect and correct swaging
symmetry.
Incorrect
Figure 8
Correct
Incorrect and correct swaging symmetry
If your column and ferrule look like the incorrect example in
Figure 8 above, it is possible that your swaging wrench is
defective or worn out. Try swaging with a new wrench or new
nut.
Agilent GC/MS/MS P&EP Analyzer User Manual
29
Appendix A – UltiMetal Plus Flexible Metal Ferrules Swaging Guide
30
Agilent GC/MS/MS P&EP Analyzer User Manual
Agilent Technologies
© Agilent Technologies, Inc.
Printed in USA, June 2015