1
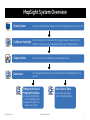
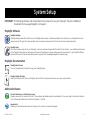
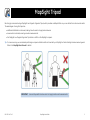
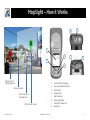
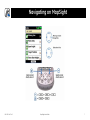
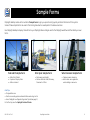
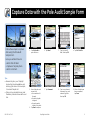
user guide
MapSight
Thank you for purchasing this GE product.
In keeping with the GE ecomagination initiative, please consider the option to recycle
the packaging material and donate or recycle any product you are no longer using.
To read more about GE’s ecomagination commitment, visit:
www.ge.com/ecomagination
Copyright © 2014 IKEGPS LTD.
620-02810
MS-102-14-07-4.3
Introduction
MapSight™ is a location-based measuring solution that will greatly increase your productivity when undertaking utility asset management surveys and
related measurements.
With your MapSight solution you can quickly:
• Collect geo-located pole photos
• Measure wire span heights, even across busy roads
• Determine wires clearances from vegetation or buildings
• Make accurate attachment height measurements on
captured photos
This document will guide you through:
• Setting up your MapSight system
• Making in-field measurements tasks
• Transferring data from the MapSight device to your PC
• Measuring attachment heights from a photo
• Outputting data in industry standard file formats
What’s in the Box
• MapSight device with on-board measuring tools
– Target Position, 3-Shot Height, Missing Line, Span Height, Tree
Assessment, Local Point
– Photo Only
– TrueSize photos (if purchased)
• MapSight desktop for
– data management, custom forms, report generation
– photo measurements (if TrueSize photos are purchased)
•Accessories
– USB Cable, International Charger, 2 Batteries, 8GB SDHC Card,
Screen Protector
– Hardcase, Softcase, Travel Charger, Vehicle Charger, Glare
Shield
– Low-Magnetic Signature Tripod
•Documentation
– MapSight Fieldcraft Guide
– MapSight User Guide
WARNING!
Text set off in this manner indicates that failure to follow directions could result in user injury or unexpected data results.
IMPORTANT: Text set off in this manner indicates that failure to follow directions could result in damage to equipment or loss of information.
Note:
Text set off in this manner indicates information that may be useful to the operation of your MapSight device.
ActiveSync, Excel, Internet Explorer, Microsoft, Outlook, PowerPoint, Visual Studio, Windows, Windows
Media, Windows Mobile, Windows Mobile Device Center, Windows XP, Windows Vista, Windows 7, and the
Windows logo are trademarks or registered trademarks of Microsoft Corporation in the United States and/
or other countries.
The Bluetooth® word mark is owned by the Bluetooth SIG, Inc. and any use of such marks by ikeGPS Ltd. is
under license.
Acrobat and Reader are registered trademarks of Adobe Systems Incorporated in the United States and/or
other countries.
The names of actual companies and products mentioned herein may be the trademarks of their respective
owners.
Copyright © 2013 ikeGPS. All rights reserved.
is a trademark of General Electric Company
and is under license by ikeGPS LTD
42 Adelaide Road, Wellington 6021, New Zealand
• 1-year Hardware Warranty, Software Maintenance &
Support
MS-102-14-07-4.3
MapSight User Guide
2
MapSight System Overview
Setup System
Download and install the software from the MapSight website onto your PC.
Configure
MapSight
Use the sample forms (located in the MapSight desktop ‘Sample Forms’
folder) or create your own, and deploy these to your MapSight device.
Capture Data
Measure objects in the field with your MapSight device.
Download
Use MapSight desktop to download the files from the MapSight device to
your PC.
Measure photos in
MapSight desktop
View Report Data
Create and view report
data in MapSight desktop.
• Measure attachments
from a MapSight photo.
• Regenerate reports to
review your results.
MS-102-14-07-4.3
MapSight User Guide
3
System Setup
IMPORTANT: The following software and documentation are required to use your MapSight. They are available as
downloads from www.gemapsight.com/support.
MapSight Software
MapSight desktop
MapSight desktop makes file transfer from your MapSight device simple. Customise and deploy forms directly to your MapSight device and
generate various file types from captured data. Make accurate pole measurements from photos and save marked-up photos.
MapSight tools
The on-board measuring tools for your MapSight. Your device has been shipped with the latest factory software - your installed version shows
on the MapSight device main screen. However the team at MapSight are regularly making product improvements. To get the latest software
releases with new tools, features and enhancements, regularly visit the www.gemapsight.com/support page.
MapSight Documentation
MapSight User Manual
The most comprehensive A-Z guide to using your MapSight device.
MapSight Fieldcraft Guide
How to get the best results from your MapSight, tips and tricks to improve performance, accuracy, and productivity
Additional Software
Microsoft ActiveSync or Mobile Device Center
Programs necessary for connection to the PC. Some systems will already have these preloaded. If not, you will need to install one (ActiveSync
for XP or Windows Mobile Device Center for Windows 8, 7 or Vista).
Google Earth
Desktop your data and measurements by clicking on their location on aerial photographs.
MS-102-14-07-4.3
MapSight User Guide
4
MapSight Tripod
We strongly recommend using a MapSight Low Magnetic Signature Tripod, which provides a stable platform so you can obtain the most accurate results.
The advantages of using this tripod are:
• additional stabilization is achieved, making it much easier to target poles and wires.
• movement is minimized, ensuring accurate measurements.
• the MapSight Low Magnetic Signature Tripod has no effect on the MapSight compass.
Tip: To ensure accuracy, we recommend performing a compass calibration after air travel with your MapSight or before starting intensive measuring work.
Refer to the MapSight User Manual for details.
IMPORTANT: A normal tripod will introduce errors in target position and measurements.
MS-102-14-07-4.3
MapSight User Guide
5
MapSight – How it Works
5
6
1
3
2
7
8
4
GPS location of
MapSight Device
1.
2.
3.
4.
5.
6.
7.
8.
Distance to pole
Photo is taken at
the same time
GPS location of pole
MS-102-14-07-4.3
MapSight User Guide
Touchscreen/LCD display
Four-way directional button
Enter button
Power button
Digital camera
Laser rangefinder
USB data transfer port
Power port
6
Navigating on MapSight
MS-102-14-07-4.3
MapSight User Guide
7
Sample Forms
MapSight desktop comes with a number of Sample Forms to get you up and running quickly and learn the basics of the system.
Some of these sample forms are used in this training document as examples for the below scenarios.
Use MapSight desktop to deploy these forms to your MapSight device and get used to the MapSight workflow and then build your own
forms.
Pole Audit Sample Form
Wire Span Sample Form
Wire Clearance Sample Form
• Add a Pole ID label
• Capture a full pole photo
• Add a comment
• Add a wire span height
• Add an attribute: Road, Driveway,
Pavement or Other.
• Measure a wire clearance
• Add a class: wire-vegetation,
wire-building or wire-wire
Field Tips
• Charge before use.
• Practice on nearby poles and assets before venturing too far.
• Use a MapSight Low Magnetic Signature Tripod (see page 5).
For further tips, see the MapSight Fieldcraft Guide.
MS-102-14-07-4.3
MapSight User Guide
8
Capture Data with the Pole Audit Sample Form
Follow these steps to capture
data using the Pole Audit
Sample Form.
1.Tap Pole Audit to
open this form.
2.Tap Label.
3. Type in a pole ID
label, then tap OK.
4.Tap Full Pole Pic.
5. Aim at the pole and
ensure that:
• the crosshairs hit
the pole,
• the vertical guide
is aligned,
• the entire pole is
visible in the photo.
6.Tap Next to capture.
7.Tap Comment.
8. Type in any relevant
comments, e.g. pole
material, type, etc.,
then tap OK.
9. When all tasks have
been completed,
tap Save.
Here you will learn how to:
• Add a Pole ID label
• Capture a full pole photo
• Add a comment.
Tips:
• Rename the job in your MapSight
by selecting the yellow Job box and
entering a job name. In this example,
it is named ‘Sample Job’.
• Tasks can be completed in any order.
Mandatory tasks are shown with a red
star.
MS-102-14-07-4.3
MapSight User Guide
9
Capture Data with the Wire Span Sample Form
Follow these steps to capture
data using the Wire Span
Sample Form.
1.Tap Wire Span to
open this form.
2.Tap Span Height.
3. Aim your MapSight
at a wire, wait for
the crosshair guide
to turn green, then
tap Next
4. Follow the onscreen
arrows to find the
base point directly
below the targeted
wire point. Once
arrows disappear,
tap Next to capture
the ground point.
5. Aim the camera
so that it captures
the entire overlaid
measurement and
tap Next to capture
the photo.
6.Tap Class.
7. Select from the
available options,
then tap OK.
8. When all tasks have
been completed,
tap Save.
Here you will learn how to:
• Add a wire span height
• Add an attribute: Road,
Driveway, Pavement or
Other.
Tip:
Rename the job in your MapSight
by selecting the yellow Job box and
entering a job name. In this example, it is
named ‘Sample Job’.
MS-102-14-07-4.3
MapSight User Guide
10
Capture Data with the Wire Clearance Sample Form
Follow these steps to capture
data using the Wire Clearance
Sample Form.
1.Tap Wire Clearance
to open this form.
2.Tap Wire Clearance.
Here you will learn how to:
• Measure a wire clearance
• Add a class: wire-vegetation,
wire-building or wire-wire.
3. Set the start point
by aiming at a point
on a building, then
tap Next.
4. Aim at the desired
end point on the
wire, then tap Next.
7. Select from the
available wire
clearance options,
then tap OK.
8. When all tasks have
been completed,
tap Save.
Tip: To find the minimum
distance, observe
the Length
readout while
moving the laser
along the wire.
Tips:
• Rename the job in your MapSight
by selecting the yellow Job box and
entering a job name. In this example,
it is named ‘Sample Job’.
• Use the green back (left) arrow to go
back a step.
5. Aim the camera
so that it captures
the entire overlaid
measurement, then
tap Next to capture
the photo.
MS-102-14-07-4.3
6.Tap Class.
MapSight User Guide
11
Download Files from MapSight to PC
1. Plug in the USB and power cables.
3. Start MapSight desktop.
4. Click the Reports tab,
then click Import Job.
2. Wait for Windows to discover MapSight.
• Windows should automatically find
MapSight on plugging in the USB
cable, however if your PC fails to
find the device it may be necessary
to download additional Microsoft
Windows connection software –
either Windows Mobile Device Center
or Windows ActiveSync. See www.
gemapsight.com/support.
• If using Windows Mobile Device
Center, click Connect without setting
up your device.
5. Check the job you want to
import, then click OK.
The data will be
downloaded to the folder
specified in MapsSight
desktop Tools g Settings.
MS-102-14-07-4.3
MapSight User Guide
12
Generate Reports in MapSight desktop
1
2
Generating Reports
1. Locate your job in the Imported Jobs panel.
2. Select the desired file format and click on the desired report.
MapSight desktop automatically:
• generates the folder structure for the current job within the MapSight desktop data folder.
•creates Generated Reports based on the configuration settings in Tools g Settings g Reports, or manually using the Generate Reports buttons.
MS-102-14-07-4.3
MapSight User Guide
13
Report Data
Spreadsheet (or
database import)
CSV Format
Google Earth (KMZ)
Format
In the Reports tab of MapSight
desktop, double-click on the
.kmz file.
Double-click the .csv file to view
as a spreadsheet.
By clicking on the Pole icon
in Google Earth, you can view
the associated JPG photo
along with other captured
data.
Note: To include pole attachment data, simply regenerate the reports after performing your measurements.
MS-102-14-07-4.3
MapSight User Guide
14
Report Data
Adobe PDF Format
In the Reports tab of MapSight
desktop, double-click on the
.pdf file.
GeoPDF (TWZ) Format
Double click the .twz file to create a
GeoMark for viewing in a GeoPDF.
By clicking on the arrow in
the GeoPDF you can view
the associated JPG photo.
Note: To include pole attachment data, simply regenerate the reports after performing your measurements.
MS-102-14-07-4.3
MapSight User Guide
15
Report Data
FieldSmart View
SHP format (Shapefiles)
This feature is for those users
of GE’s MapFrame FieldSmart
product.
Please contact
[email protected] if you
would like to learn more about
this feature.
In the Reports tab of MapSight
desktop, double-click on the
.shp file.
By clicking on the icon, you can
view the associated attribute
information from the shapefile.
Note: To include pole attachment data, simply regenerate the reports after performing your measurements.
MS-102-14-07-4.3
MapSight User Guide
16
Measuring in MapSight desktop
Note: Photo measuring capability is only available to customers with a TrueSize photo license.
• MapSight desktop software enables you to effectively measure the heights and widths of pole
attachments from your MapSight photos.
• Use the TrueSize photo included in your sample data to measure pole attachments.
• Open MapSight desktop and click on Reports g Sample Job g TrueSize Pole and click on a photo.
MS-102-14-07-4.3
MapSight User Guide
17
Measuring Photos in MapSight desktop
MapSight desktop Measurement Icons
1.
2.
3.
4.
5.
Set the tip of the pole
Set the ground level
Measure attachment heights
Add labels to the photo
Adjust line color
MS-102-14-07-4.3
6.
7.
8.
9.
10.
1
2
3
4
5
6
7
8
9
10
Zoom In
Zoom Out
Desktop original extent
Delete all
Save measurements to photo
MapSight User Guide
18
Measuring Attachment Heights in MapSight desktop
1
1
3
1
5
1
4
1
2
1
6
MapSight desktop Height Measuring
1.
2.
3.
4.
5.
6.
Set the tip of the pole.
Set the ground level.
Measure attachment heights.
If needed, add labels to the photo.
If needed, change the line color.
Save measurements to photo.
MS-102-14-07-4.3
Tips:
• Zoom in and out by holding the Ctrl key and scrolling the mouse wheel.
• Pan around the photo by holding the left mouse button down and dragging.
• To delete a single measurement, select it and then press the Delete key.
MapSight User Guide
19
Measuring Attachment Widths in MapSight desktop
1
2
1
5
1
3
1
4
1
1
6
MapSight desktop Width Measuring
1.
2.
3.
Click on an attachment height.
Select
.
Click on the left side of pole.
Use the arrows keys to move
the calliper to the edge.
MS-102-14-07-4.3
4. Click on the right side of pole. Use the arrow keys to move the calliper to the edge.
5. Click the check box.
6. Save measurements to photo.
MapSight User Guide
20
Completed Measurements in MapSight desktop
Tip: Regenerate your reports to include your newly measured photo.
MS-102-14-07-4.3
MapSight User Guide
21
Custom Forms
By customizing your workflow using MapSight desktop, speed up and get the best results for your application.
For information on how to create custom forms, refer to the MapSight desktop User Manual.
If you have any difficulties using MapSight software or need further information, please go to www.gemapsight.com/support for assistance.
is a trademark of General Electric Company
and is under license by ikeGPS LTD
42 Adelaide Road, Wellington 6021, New Zealand
MS-102-14-07-4.3
MapSight User Guide
22