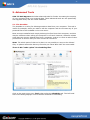
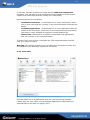
1
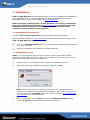
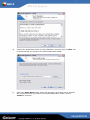
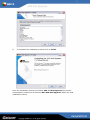
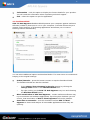
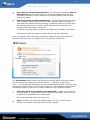
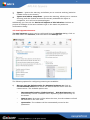
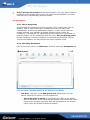
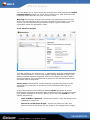
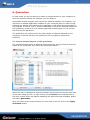
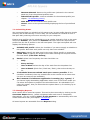
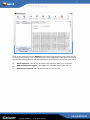
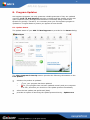
AVG 7.5 Anti-Spyware
User Manual
Document revision 75.7 (27.3.2007)
Licenced by GRISOFT, Ltd. All rights reserved.
Copyright (c) 2006 Anti-Malware Development, a.s. All rights reserved.
All other trademarks are property of their respective owners.
2
Contents
1. Introduction........................................................................................... 4
1.1. AVG 7.5 Anti-Spyware Program Principles ............................................. 4
1.2. Detection Technologies and Levels of Protection .................................... 5
1.3. Operating Systems Supported............................................................. 5
1.4. Minimum hardware requirements ........................................................ 5
2. Installation ............................................................................................ 6
2.1. Installation File Download................................................................... 6
2.2. Installation Process ........................................................................... 6
3. Program Activation ................................................................................ 9
3.1. Trial Version Download ...................................................................... 9
3.2. Switching to Full Version .................................................................... 9
4. Configuration ....................................................................................... 11
4.1. System tray icon functions ................................................................11
4.2. Resident Shield ................................................................................12
4.3. Anti-Spyware Scanner ......................................................................14
4.4. Reports...........................................................................................16
4.5. Exceptions ......................................................................................17
4.6. Advanced Anti-Spy Configuration........................................................18
4.7. Internet Connection Settings .............................................................23
5. Advanced Tools .................................................................................... 25
5.1. File Shredder ...................................................................................25
5.2. System Analysis...............................................................................27
6. Quarantine ........................................................................................... 32
6.1. Moving Suspect Objects to the Quarantine ...........................................32
6.2. Managing the Quarantine ..................................................................33
7. Scanning and Reports .......................................................................... 34
7.1. Scan Profiles ...................................................................................35
7.2. Scheduling Scans .............................................................................36
7.3. Managing Reports ............................................................................36
8. Program Updates ................................................................................. 38
8.1. Update Status..................................................................................38
8.2. Update Set Up .................................................................................39
9. FAQ and Technical Support .................................................................. 41
3
9.1. Online Help .....................................................................................41
9.2. Frequently Asked Questions...............................................................41
9.3. Technical Support ............................................................................41
4
1. Introduction
The AVG 7.5 Anti-Spyware user manual offers a comprehensive overview of all
tasks and detection technologies provided by AVG 7.5 Anti-Spyware.
1.1. AVG 7.5 Anti-Spyware Program Principles
1.1.1. Prevention
Ideally, you should prevent spyware and other malware from intruding onto
your computer. Currently, the most common source of infection is websites
with potentially dangerous content. Other methods of transmission, such as
via e-mail or transmission by worms and viruses are also prevalent. The most
important protection is to use an always-on background scanner, such as
Resident Shield that scans your applications in the background as you run
them.
1.1.2. Regular Updating
Due to the frequency that new malware and spyware are created, it is
essential to keep your AVG 7.5 Anti-Spyware fully up-to-date. Both program
updates, and essential spyware definition updates should be downloaded
regularly. AVG 7.5 Anti-Spyware allows you to schedule such updates and
also update on demand.
1.1.3. Scan on Demand
There is also the potential risk that malware has been transmitted to your
computer prior to AVG 7.5 Anti-Spyware installation, or that you have
neglected to keep your AVG 7.5 Anti-Spyware up-to-date with the latest
database and program updates. For this reason, AVG 7.5 Anti-Spyware
allows you to fully scan your computer for malware/spyware using the
scanning feature. It also detects 'sleeping and non-dangerous' malware, i.e.
malware that has been downloaded but not yet activated.
1.1.4. Scheduled Scanning
Regular scheduled scanning of the entire computer can further enhance
security. The AVG 7.5 Anti-Spyware allows full scheduling of scans.
1.1.5. Malware/Spyware Removal
It is important to note that some (but not all) malware can be removed from
the computer.
1.1.6. Quarantine
Suspect malware can be safely locked away in the AVG 7.5 Anti-Spyware
quarantine. Here the malware is stored in an encrypted format so that it
cannot function or do any harm to your computer.
5
1.2. Detection Technologies and Levels of Protection
AVG 7.5 Anti-Spyware uses the following technologies to detect
malware/spyware:
z
Scanning - searching for specific patterns that are characteristic of
spyware/malware.
z
Heuristic analysis - dynamic emulation of the scanned object’s instructions
in a virtual computer environment.
z
Generic detection - detection of instructions characteristic of the given
malware or group of malware
Where just a single technology might fall short of detecting or identifying malware,
AVG 7.5 Anti-Spyware combines several technologies to ensure that your
computer is protected.
1.3. Operating Systems Supported
AVG 7.5 Anti-Spyware is intended to protect workstations with the following
operating systems:
z
Windows 2000 Professional SP4 + Security Rollup Pack
z
Windows XP Professional SP2
z
Windows XP Home SP2
1.4. Minimum hardware requirements
Minimum hardware requirements for AVG 7.5 Anti-Spyware are as follows:
z
Intel Pentium CPU 300 MHz
z
70 MB of free hard drive space (for installation purposes)
z
64 MB of RAM memory
6
2. Installation
AVG 7.5 Anti-Spyware can be installed either from the installation file available on
your installation CD, or you can download the latest installation file from the
download section of the Grisoft website at www.grisoft.com.
Before you start installing AVG 7.5 Anti-Spyware, we strongly recommend
that you visit the Grisoft website at www.grisoft.com to check for the latest
installation file. This way you can be sure that you install the latest
available version of AVG 7.5 Anti-Spyware.
2.1. Installation File Download
To install AVG 7.5 Anti-Spyware from the Internet, follow these steps:
Visit the Grisoft website at www.grisoft.com and download the latest version of the
AVG 7.5 Anti-Spyware installation package.
z
Click on the Download Now button, to download the installation file and save
it on your local disk.
z
Start the installation by executing the downloaded file.
2.2. Installation Process
Note: It is recommended that you close all other running applications before
starting the installation process for AVG 7.5 Anti-Spyware; including other security
applications that might block the installation.
a)
Double-click on the installation file to begin the installation process.
b)
Select the preferred installation language, then click on OK.
Note: You can change the language anytime later once the application is
installed. To change the language after installation, right-click the system tray
icon and select the Language menu item. Refer to chapter 4.1. System tray
icon functions for more information.
c)
When setup begins click on Next to view the License Agreement dialog.
Click on I Agree to accept license terms and conditions.
7
d)
Choose the destination folder for the installation, and then click on Next. We
recommend that you keep to the default destination folder.
e)
Select the Start Menu folder where the program's shortcuts will be located.
We recommend that you keep to the default destination folder. Click on
Install to continue.
8
f)
To complete the installation process click on Finish.
Once the installation process is finished, AVG 7.5 Anti-Spyware will launch
automatically (unless you de-selected Run AVG Anti-Spyware 7.5 in the final
installation screen).
9
3. Program Activation
3.1. Trial Version Download
From Grisoft website at www.grisoft.com you can only download the trial version of
AVG 7.5 Anti-Spyware. After the installation, this trial version will run for 30 days
- containing all the extensions of the full version.
Within these 30 days you have to register the program (using your license number)
to activate the full version of AVG 7.5 Anti-Spyware. At the end of the trial period,
the full version extensions will be deactivated and the program will turn into a
feature-limited freeware version (if you did not activate the product).
The purchased license number can be entered at any time.
3.2. Switching to Full Version
In the Status dialog pay attention to the Your license section.
Within the 30-day trial period the section defines your program as a trial version,
which is exactly the same as the full version, but with no support or premium
updating available:
To be able to use all features of the full version of AVG 7.5 Anti-Spyware, you
need to purchase the full version online from the Grisoft website at
www.grisoft.com.
10
If you have already purchased the full version and received your license number,
click the Enter license code option to open a new window where you can register
your license number - enter your license code into the respective field and confirm
by pressing the OK button:
Having registered your license code, your program switches to the full version with
all premium support and updates available:
11
4. Configuration
After you have successfully installed AVG 7.5 Anti-Spyware on your computer, the
AVG 7.5 Anti-Spyware icon will appear on your windows desktop. Double-click the
icon to launch the AVG 7.5 Anti-Spyware interface. From here, you can configure
all aspects of the application.
4.1. System tray icon functions
Once the application is started, you can see a small orange or silver icon in the
system tray, indicating that it is running. By right-clicking on the tray icon, a
context menu will popup:
The following options are available:
z
Hide main window/Show main window - click this option to hide or show
the main application screen.
z
Run online update - this option will show up the Program update dialog
and automatically start the updating process. Refer to chapter 8. Program
Updates for more details.
z
Scan memory - this option will open the Scanner dialog and automatically
start scanning of your system memory. Refer to chapter 7. Scanning and
reports for further information.
z
Resident Shield - check this item to enable or disable the Resident Shield.
The icon will change its color to silver when the Resident shield is turned off,
and remain orange, when it is on and working.
z
Automatic Updates - check this option to let AVG 7.5 Anti-Spyware
automatically handle the update process.
z
Start with Windows - check this item if you prefer AVG 7.5 Anti-Spyware
to be launched every time your Windows operating system is started.
z
Language - click this option to choose the application language. It contains a
sub-menu with a list of languages. Selecting a new language requires an
application restart.
12
z
Information - click this option to display the license details for your product.
You will need this information when requesting technical support..
z
Exit - select this option to quit the application.
4.2. Resident Shield
AVG 7.5 Anti-Spyware Resident Shield protects your computer against malicious
software (malware) that tries to run on your computer. It checks files as they are
opened, scans memory of all starting applications and allows you to remove
tracking cookies automatically.
You can select additional options as described below. For most users we recommend
keeping to the original settings.
z
Active/Inactive - press this button to start or stop the Resident Shield.
The Resident Shield can also be switched:
o
In the Status/Your Computer's Security section by clicking the
Change state button in the Resident Shield row.
o
By right-clicking on the AVG 7.5 Anti-Spyware tray icon and choosing
the Resident Shield option.
z
Block termination of AVG Anti-Spyware - certain malicious software may
try to terminate anti-malware applications. By ticking this checkbox you will
ensure, that termination of AVG 7.5 Anti-Spyware will not be possible.
z
Scan files on execution - tick this checkbox to allow AVG 7.5 AntiSpyware to detect and analyze all executable applications when they are
opening.
13
z
Scan memory of starting applications - by ticking this checkbox, AVG 7.5
Anti-Spyware will the scan memory of all executed applications and can
therefore in contrary to other products even detect malware that has been
heavily encrypted.
z
Remove tracking cookies automatically - removes tracking cookies from
your computer. Tracking cookies are usually saved by certain web sites to
your hard drive during Internet browsing. A tracking cookie can contain web
site-specific preferences or similar useful information, but also archived
shopping cart information, user ID etc.
Therefore removing tracking cookies is not absolutely necessary in all cases.
Currently only Internet Explorer, Mozilla and Firefox are supported.
Once a suspicious file is detected, the Resident Shield will notify you about the
possible threat and offer you options on how to proceed with the file.
The Information dialog informs you about the process during which the suspect
file was detected (it could be a type of malware, i.e. spyware, trojan horse,
virus,…), it also provides information on the detected object location, and may even
identify the infection type (if it is a known infection). The dialog also offers several
operating buttons you can use for further treatment of the suspicious object:
z
Clean and move to quarantine (recommended) – allows you to heal the
infected object, if a cure for this kind of infection is available, and move it to
quarantine for possible further examination.
We recommend this option for most users.
z
Clean - allows you to heal the infected object, if a cure for this kind of
infection is available. Otherwise the file will be deleted.
14
z
Ignore – ignores the warning, and allows you to continue working (and also
forbids access to the threat).
z
Ignore and add to exceptions – ignores the warning, allows you to continue
working (and also forbids access to the threat) and adds the object to
exceptions, so it will not be detected again.
Additionally you can tick the Use for all objects of this infection checkbox to
process all findings of the same malware type in the same way without a
confirmation dialog.
4.3. Anti-Spyware Scanner
The anti-spyware scanner can be configured from the Settings dialog. Click on
the main menu icon Scanner, and then select the Settings tab.
The following options for configuring scanning are available:
a)
How to act? Set default action for detected malware to: Click on
recommended actions then select the desired default action from the
context menu. The available options are:
o
Recommended actions (default value): - AVG Anti-Spyware will
automatically choose a suitable action depending upon the severity of
the threat.
o
Ignore once: No action will be taken this time, but the malware will still
be detected on the next scan.
o
Quarantine: The malware will be automatically moved to the
quarantine.
15
b)
c)
d)
o
Delete: The malware will be automatically deleted
o
Add to exceptions: The malware will be automatically added to the list
of exceptions. This option is not recommended!
How to scan? Here you can define the scanning methods to be used. The
possible options are:
o
Scan for malware that is attached to other files (Binder): Select
this checkbox if you want the scanner to scan for malware that is
attached to other files, such as a trojan program that is attached to a
legitimate program and executes when you open the legitimate program.
o
Scan inside archives and setup files (ZIP, RAR, CAB, …): Select
this checkbox if you want the scanner to scan all supported types of
archives.
o
Use heuristic analysis to detect unknown malware: Select this
checkbox to use heuristic analysis.
o
Scan inside compressed executables (UPX, petite, FSG, …): Select
this checkbox if you want the scanner to scan inside compressed
executable files.
o
Scan in NTFS Alternate Data Streams: Select this checkbox if you
want the scanner to scan inside hidden NTFS data streams. In NTFS, a
file consists of different data streams (real data and security
information). There can also be alternate data streams holding other
data (which is invisible to the user), e.g. a backdoor can hide inside
these alternate data streams.
Possibly unwanted software Select the other types of malware that you
want the scanner to detect. The possible options are:
o
Scan for adware: Select if you would like the scanner to detect adware,
(programs that receive and display advertising from an adserver).
o
Scan for tracking-cookies: Select if you would like the scanner to
detect tracking cookies, (these cookies are files stored on your computer
to help websites track your Internet browsing habits).
o
Scan for riskware: Select if you would like the scanner to detect
riskware, (programs that can be a potential risk to the user, such as
remote administration utilities).
o
Scan for dialers: Select if you would like the scanner to detect dialers,
(programs that dial up premium-rate phone numbers from your
computer modem).
What to scan? The default recommended option here is to scan all files, but
you can select to scan files by extension type. The options are as follows:
o
Scan every file: All file types will be scanned.
o
Choose files by extension: The scanner will only detect files with the
given extensions. The list of extensions to scan will automatically include
most common file types. You can manage the list of extensions using the
following buttons:
-
Add extension: Type an extension into the textbox then click on the
Add extension button to add the new extension to the existing list.
16
-
Set to default: Will reset the list of extensions to the default list.
-
Remove extension: Removes the selected extension from the list.
Note: This option applies to types of file and not to file location. The location
of files/folders to scan is defined in a scan profile (see chapter 7.1 Scan
Profiles).
4.4. Reports
AVG Anti-Spyware can generate reports for scans and also for other actions such
as file shredding, (see chapter 7.3 Managing Reports). Reports can be generated
manually or automatically as follows:
Click on the main menu icon Scanner, and then select the Settings tab. On the
right-hand side of the dialog, the Reports section offers the following options:
z
Automatically generate report after every scan: Select this option if you
wish every scan result to be stored.
z
Automatically generate report for scheduled scans: Will store scan
results only for scheduled scans. Note that you can still save reports for
manual scans by clicking on the Save Scan Report button, (which is
displayed after each scan is completed).
z
Do not automatically generate reports: Select this option if you do not
want any scan results to be automatically stored. Note that you can still save
reports for manual scans by clicking on the Save Scan Report button, (which
is displayed after each scan is completed).
17
z
Only if threats were found: Select this checkbox if you only want results to
be stored where threats were found. This option will be disabled if you have
selected not to automatically generate reports.
4.5. Exceptions
4.5.1. About Exceptions
Not all malware is unwelcome on the computer (this is particularly true for
adware), and so when scanning for malware this has to be taken into
consideration. Did the user deliberately install it, or did it install itself via
stealth methods. Anti-malware programs therefore have to allow for
exceptions, (a mechanism for identifying specific malware as "permitted" so
that the scanner will not repeatedly warn the user). AVG 7.5 Anti-Spyware
has the capability to create exceptions, so that selected programs, such as
your favorite adware, can be exempt from future malware scans.
4.5.2. Managing Exceptions
Click on the main menu icon Infections, and then select the Exceptions tab.
Here you have 3 possible buttons at the bottom of the dialog:
o
Add Rule - will open a new Add ignore rule dialog where you can
specify which file to ignore. The two options are:
-
Ignore by name of threat: If you specify the name of the threat,
then all instances of this threat will be ignored. This means that if two
copies of the program exist then both will be ignored by the scanner
(even if they are located in different folders).
18
-
Ignore file/path: Here you can browse for the exact file/folder that
you wish to exclude from scans. If you select a folder then all files
contained in that folder will also be excluded from scans.
o
Edit Rule - will open an Edit ignore rule dialog where you can edit the
selected rule.
o
Delete Rule - will delete the selected rule without any further warning.
4.6. Advanced Anti-Spy Configuration
For most users we recommend to keep the Show only recommended settings
checkbox ticked (default setting). Only uncheck this checkbox if you want to also
change advanced settings. The recommended settings are marked with an
asterisk*.
4.6.1. Error reporting
o
Disable Microsoft Windows Error Reporting Service
Disables error reporting for services and applications running in nonstandard environments. This service is responsible for the box that pops
up wanting you to report an application error or system crash to
Microsoft. Tick this checkbox to disable the function.
o
Disable Microsoft Office 2003 Error Reporting Service
Microsoft Office 2003 includes a tool that collects information
automatically whenever an Office application crashes and allows users to
send a report directly to Microsoft. Tick this checkbox to disable this
function.
19
o
Disable Microsoft Office XP Error Reporting Service
Microsoft Office XP includes a tool that collects information automatically
whenever an Office application crashes and allows users to send a report
directly to Microsoft. Tick this checkbox to disable this function.
4.6.2. Internet Explorer
o
Disable Check for Updates*
Internet Explorer automatically downloads and applies updates as
default. To disable this feature, tick the checkbox.
Changing this option is not recommended!
o
Disable scheduled Updates*
Tick the checkbox to disable scheduled updates of Internet Explorer.
Changing this option is not recommended!
o
Disable built-in Windows Authentication
Disable Internet Explorer user identification, (so that the user is not
automatically identified while browsing).
o
Set max. HTTP connections to 10
Tick the checkbox to set the maximum possible number of HTTP protocol
connections to ten.
o
Disable JavaScript
Tick the checkbox to disallow Internet Explorer from executing
JavaScript code.
o
Disable ActiveX Controls
ActiveX Controls are small programs that are also a set of rules for how
applications should share information, (which can be automatically
downloaded and executed by an Internet browser). ActiveX controls may
have full access to the MS Windows operating system. Therefore they
are a possible security threat. Tick this checkbox to prevent Internet
Explorer from executing ActiveX controls.
o
Disable Internet Explorer error reports*
Tick the checkbox to disallow Internet Explorer from generating error
reports.
Changing this option is not recommended!
o
Erase cache on quit*
Once you tick this checkbox, Internet Explorer will automatically erase
cached files every time you close the program.
Changing this option is not recommended!
20
4.6.3. Windows Media Player
o
Disable Media Player to acquire content-licenses automatically
Windows Media Player is able to automatically download content-licenses
for certain multimedia files. To disable this function, tick this checkbox.
o
Disable Media Player automatic updates*
Once you tick this checkbox, Windows Media Player will no longer
automatically update.
Changing this option is not recommended!
o
Don't add played media to the Media Library
Tick this checkbox if you do not want Windows Media Player to add your
played media to the Media Library.
o
Disable online metadata retrieval
Windows Media Player automatically downloads metadata (i.e. detailed
information about albums) once an Audio-CD or other media is inserted.
To disable this function, check the checkbox.
o
Disable usage tracking
Tick this checkbox if you do not want Windows Media Player to send
usage-statistics to Microsoft.
o
Don't save data in Most Recent Used
The Most Recently used list contains names of files with their location,
that have been recently executed. Some users might be willing to disable
this saving feature.
o
Don't start Media Player on Media sites
If you prefer not to use Windows Media Player as a default player for
Internet multimedia files in your Web browser, tick this checkbox.
o
Allow removing Media Player
Tick this checkbox to enable option for removing Windows Media Player
in the Start/Settings/Control Panel/Add or Remove Programs.
o
Disallow scripts to be executed
Windows Media Player can process different programming scripts. As this
can be easily misused by intruders, by disabling this function you can
prevent a number of security exploits. To disable this function, tick the
checkbox.
4.6.4. Microsoft Messenger
o
Don't start Microsoft Messenger with Outlook Express
Microsoft Messenger can be started from Outlook Express. To disable
this, simply tick the checkbox.
o
Disable Microsoft Messenger Autostart
21
Microsoft Messenger is automatically started during Windows startup (as
default). To disable the autostart, tick this checkbox.
4.6.5. Miscellaneous
o
Explorer: Disable Remote Help
Remote Assistance provides a way for you to get the help you might
need from someone else when you run into problems with your
computer. To disable access to your computer with Remote Assistance,
tick this checkbox.
o
Set RegDone to 1
Once this checkbox is ticked, the Windows operating system will stop
asking you to register online.
o
Disable balloon-tips*
Tick this checkbox to disable the balloon-tips in the system tray. Please
note that you will have to restart your computer if you change this
option.
Changing this option is not recommended!
o
Erase Pagefile/Swapfile on shutdown*
Tick this checkbox to delete Swap files every time you shutdown your
Windows operating system. A swap file is an area on your hard disk,
usually hidden, that is used as virtual memory.
Changing this option is not recommended!
o
Enable fast shutdown*
Tick this checkbox to increase the shutdown speed of Windows.
Changing this option is not recommended!
o
Hides your computer from "My Network Places" on other systems
Tick this checkbox to hide your computer from My Network Places on
other systems. In other words, your computer should not be visible for
other people in the network.
o
Deny Regedit/Regedit32 execution*
Tick this checkbox to disallow the running of Regedit and Regedit32
system utilties.
Changing this option is not recommended!
o
Disable Windows Scripting Host
Windows Script Host is an ActiveX scripting host providing an
environment for the execution of scripts using one of several scripting
engines or languages, such as VBScript. As this might be a potential
security risk, you can disable this feature by ticking the checkbox.
22
o
Disable showing the last user on login
Tick this checkbox to disable showing the last user name that logged on
your computer.
o
Show .lnk file extensions
Shows .lnk file extensions in Windows Explorer. Note that your computer
has to be restarted if you change this option.
o
Show .pif file extensions
Shows .pif file extensions in Windows Explorer. Note that your computer
has to be restarted if you change this option.
o
Show .scf file extensions
Shows .scf file extensions in Windows Explorer. Note that your computer
has to be restarted if you change this option.
o
Show .url file extensions
Shows .url file extensions in Windows Explorer. Note that your computer
has to be restarted if you change this option.
o
Disable CD/DVD autostart
Tick this checkbox to disable CD/DVD autostart when you insert a new
CD or DVD into your CD-ROM (DVD-ROM) device. Note that your
computer has to be restarted if you change this option.
o
Erase Recent Documents History
The Windows operating system stores a list of recently opened files by
default. Tick the checkbox to disable this feature. Note that your
computer has to be restarted if you change this option.
o
Show known file extensions
The Windows operating system hides extensions of known file types by
default. For some users it is more convenient to see the extensions in
Windows Explorer. To enable this feature, check the checkbox. Note that
your computer has to be restarted if you change this option.
o
Don't report Microsoft about infection
Tick this checkbox to disable Malicious Software Removal Tools from
reporting infections to Microsoft.
4.6.6. Services
o
Disable error reporting service
Tick this checkbox to disable the Windows error reporting service, which
is responsible for sending error-reports to Microsoft.
o
Disable time synchronization services
Windows XP and related operating systems are able to synchronize your
computer's clock time online over the Internet. To disable this feature,
simply tick the checkbox.
23
o
Disable Scheduled Tasks Service*
Tick this checkbox to disable the Scheduled Tasks Service. This service is
used to start applications at a scheduled time.
Changing this option is not recommended!
o
Disable Universal Plug 'n' Play Service
If you are not using Internet Connection Sharing, it is recommended to
disable the Universal Plug and Play service since it has had some serious
security issues in the past.
o
Disable the Windows Messenger Service
The Windows operating system includes a system notification service,
called Messenger Service, which is sometimes used to present pop-up
advertisements to users. To disable this service, tick the checkbox.
o
Disable Firewall/Connection Sharing*
Tick this checkbox to disable Firewall and Connection Sharing features.
Please note that the Firewall usually protects your computer against
intrusion from Internet and it should not be stopped.
Changing this option is not recommended!
4.6.7. Expert Options
o
Disable licdll.dll (Part of WPA)*
Tick this checkbox to disable licdll.dll. This library is a part of Windows
Product Activation (WPA) used to active your Windows operating system.
Changing this option is not recommended!
o
Deregister the "Registration Wizard Control"*
Tick this checkbox to disable the possibility to checking your registration
data.
Changing this option is not recommended!
4.7. Internet Connection Settings
If you use a proxy server to connect to the Internet, then it will be necessary to
specify the proxy server settings so that AVG 7.5 Anti-Spyware can access the
Internet for updates.
Note: If you do not use a proxy server connection then do not modify these
settings.
24
Click on the main menu icon Update to view the Update dialog. Proxy server
settings are specified in the Settings section on the right-hand side of the dialog.
Select the checkbox Use proxy, to enable further settings to be configurable. The
following settings will then be available:
z
Type: Select the type of connection HTTP/Socks4 for the proxy server.
z
Host: Enter the hostname for the connection.
z
Port: Enter the port number for the connection.
z
Authenticate on proxy: (only available for HTTP type of connections). If
authentication is required for the proxy server, select the checkbox
Authenticate on proxy, and then enter the required username and
password.
25
5. Advanced Tools
AVG 7.5 Anti-Spyware includes advanced tools for further increasing the security
of your computer and your personal data. These advanced tools are not specifically
anti-spyware tools, but are useful additions.
5.1. File Shredder
The shredder is a utility for deleting sensitive data from your computer. This tool is
useful for example, when you wish to sell the computer and do not want any of your
personal files to be available to the new owner.
Most users are satisfied with simply deleting the files from their computer, and this
may be sufficient when selling the computer to a friend. However, software utilities
exist that can recover deleted files from a computer, and so it is wise to take further
precautions to ensure that your files cannot be recovered.
Note: The whole point of this tool is that it is not possible to recover the deleted
files, so please remember that any files that you shred WILL NOT be recoverable.
There is NO "undo option" for shredding files.
Click on the main menu icon Tools, then select the Shredder tab. The left-hand
side of the dialog displays a list of all files selected for shredding.
26
5.1.1. Operating Buttons
The Shredder tab opens with the following operating buttons available:
o
Add: Will open a dialog where you can browse for file(s)/folder(s) to add
to the list. Note that if you select a folder, then ALL contents of the
folder will also be added to the list.
o
Remove: Removes the selected files(s)/folder(s) from the list.
o
Remove All: Removes all files(s)/folder(s) from the list.
5.1.2. Shredding Level
On the right-hand side of the dialog you can select the "shredding level". This
defines the security level for the shredding process, (how difficult it would be
to try and recover the files). The three options are:
o
Fast Mode: The selected files will be over-written once, so that any
ordinary undelete tool cannot recover them.
o
Secure Mode: The selected files will be over-written four times, so that
more advanced undelete tools cannot recover them.
o
Paranoid Mode: The selected files will be over-written ten times, so
that even professional undelete tools cannot recover them.
5.1.3. Deletion Confirmation
When you press the Start button, you will be prompted to confirm deletion.
Once all selected files have been deleted, the following two buttons will be
displayed:
o
Save Report: Will create a report for the shredding action. The report
will be accessible from the Reports dialog (see chapter 7.3 Managing
Reports).
o
Delete more files…: Will return to the Shredder dialog where you can
shred more files.
27
5.2. System Analysis
5.2.1. Processes
This tab contains a list of Processes (i.e. running applications) that are
currently active on your computer. The list contains several columns:
o
Process name - Indicates a name of the running process.
o
Path - Indicates a physical path to the running process.
o
Window - if applicable indicates application Window name.
o
Internet - Indicates if the running process also connects to the Internet.
Possible values are Yes or No.
o
Service - Shows if the running process is a service. Possible values are
Yes or No.
o
PID - Process Identification Number is a Windows internal Process
identifier that uniquely identifies the Process.
You can select one or more applications (by holding the CTRL keyboard button
and clicking the left mouse button on the desired rows) and then terminate
them by pressing the Terminate application(s) button.
Warning: We strongly suggest not to terminate any applications, unless you
are absolutely sure that they represent a real threat.
28
5.2.2. Connections
This tab contains a list of currently active connections. The list contains the
following columns:
o
Application - indicates the name of the application that is related to the
connection. This column is only available on systems running Windows
XP.
o
Protocol - indicates the transmission protocol type that is used for the
connection.
-
TCP - is the protocol used in conjunction with Internet Protocol (IP)
to transmit information over the Internet.
-
UDP - An alternative to TCP protocol.
o
Local address - indicates the IP address of the local computer and the
port number that is being used.
o
Remote address - indicates the IP address of the remote computer and
the port number that it is being connected to. If possible, it will also look
up the hostname of the remote computer.
o
State - indicates the most probably current state. This includes:
-
Connected
-
Server should close
-
Listen
-
Active close finished
-
Passive close
-
Active close
29
To list only external connections, simply tick the Hide local connections
checkbox. This will hide all local connections (local loopback or some system
related local connections that are usually not a real threat).
Operating buttons are as follows:
o
Terminate Connection - to terminate one or more connections, select
one or more rows that are currently in the connected state and press this
button.
o
Terminate Application - to terminate one or more applications that are
related to the connection, select one or more rows and press this button.
This button is only available on systems running Windows XP.
Please note: Sometimes it is possible to terminate only applications
that are currently in the connected state!
To select more rows at once, hold down the CTRL keyboard button and left
click your mouse to select.
Warning: We strongly suggest not to terminate any connections, unless you
are absolutely sure that they represent a real threat.
5.2.3. Auto-Start
This tab shows list of all applications that are executed during Windows
system start-up. Very often, several malware applications add themselves
automatically to the start-up registry entry.
30
You can delete one or more entries by selecting them and pressing the Delete
selected item(s) button. To select more rows at once, hold down the CTRL
keyboard button and left click your mouse to select.
Warning: We strongly suggest not to delete any applications from the list,
unless you are absolutely sure that they represent a real threat. If you are
unsure, use the Internet and you favorite search engine to find more
information about the application name.
5.2.4. Browser Plugins
This tab contains a list of plug-ins (i.e. applications) that are installed inside
your Internet Browser. This list may contain regular application plug-ins as
well as potential malware programs. Click on an object in the list to obtain
more information. Plug-ins listed with a green icon are usually known and it
should be safe to keep them.
Please note: Unfortunately certain malware programs can pretend to be
something else, therefore it cannot be 100% guaranteed that they are
harmless.
In the Technical part of the object's details, CLSID represents a unique
identification tag that is associated with an ActiveX or OLE 2.0 object created
by a specific component or server. When you left-click the CLSID link, two
options will show up:
o
Copy CLSID to clipboard - choose this option to copy the string to the
clipboard for future use.
o
Search for CLSID with Google - choose this option to open your
Internet browser and search for the string in the Google search engine.
31
After obtaining more information on the plug-in you should be able to
decide whether the object should be removed or not.
You can delete one or more entries by selecting them from the list and
pressing the Remove object(s) button. To select more rows at once, hold
down the CTRL keyboard button and left click your mouse to select.
Warning: We strongly suggest not to delete any plug-ins from the list, unless
you are absolutely sure that they represent a real threat. If you are unsure,
use the Internet and you favorite search engine to find more information
about the plug-in name.
5.2.5. LSP Viewer
This tab shows a list of Layered Service Providers (LSP).
A Layered Service Provider (LSP) is a system driver linked into the networking
services of the Windows operating system. It has access to all data entering
and leaving the computer, including the ability to modify this data. Some LSPs
are necessary to allow Windows to connect you to other computers, including
the Internet. However, certain malware applications may also install
themselves as an LSP, thus having access to all data your computer transmits.
Therefore, this review may help you to check all possible LSP threats.
It is also sometimes possible to repair broken LSPs (for example when the file
has been removed but the registry entries remain untouched). A new button
for fixing the issue is displayed once a repairable LSP is discovered.
To include Windows LSP in the list, uncheck the Hide Windows LSP
checkbox.
32
6. Quarantine
In most cases you will not have any reason to keep malware on your computer so,
when the scanner detects the malware, you can delete it.
Sometimes another program may require the detected malware. For instance, you
may have an adware application installed on your computer that you wish to keep.
Deleting any adware files related to this application could affect the functionality of
the program. In such a case, it would be advisable to move the detected malware to
the quarantine, and then if your adware application malfunctions you can recover
the file from the quarantine.
The quarantine is a useful tool for the safe storage of malware detected on the
computer, as all files stored in the quarantine are encrypted to make them
harmless.
6.1. Moving Suspect Objects to the Quarantine
If a suspect/infected object is detected during scanning, and you wish to move the
object to the quarantine, then follow the instructions below:
When the scan is complete all detected malware will be listed on the left-hand side
of the Scan dialog. By left- or right-clicking on the Action of the selected item in
the list a context menu will appear displaying the optional actions available. Select
the action Quarantine.
Once you have set the required action for each item in the list, click on the Apply
all actions button.
33
6.2. Managing the Quarantine
Files stored in the quarantine can be deleted or restored as required. To access the
quarantine dialog, click on the main menu icon Infections, then select the
Quarantine tab.
The dialog displays a list of all items stored in the quarantine, including the
following information:
z
Origin: Displays the full file path to the location where the malware was
found.
z
Infected with: Displays the malware identity.
z
Risk: Display the level of risk that the malware causes.
z
Date: Displays the date that the object was moved to the quarantine.
Below the list the following control buttons are displayed:
z
Remove finally: Will permanently delete the selected objects. This operation
cannot be undone.
z
Restore: Will restore the selected objects to their original location.
z
Select All: Selects all items in the list.
z
Invert Selection: Selects all unselected items and deselects all selected
items in the list.
34
7. Scanning and Reports
One of the main features of AVG 7.5 Anti-Spyware is on-demand scanning. Ondemand scans are designed to scan various parts of your computer whenever
suspicion of possible malware infection arises. It is strongly recommended that you
carry out such scans regularly, even if you think that no malware is present on your
computer. The recommended period for complete system scanning is approximately
once a week.
Click on the main menu icon Scanner, then select the Scan tab.
The following scans are available by default:
z
Complete System Scan: Scans all hard drives of the computer and also
scans the memory and the windows registry.
z
Fast System Scan: Scans the most vulnerable parts of your system such as
the memory, windows registry, windows directory, and the cookie folder.
z
Registry Scan: Scans the windows registry.
z
Memory Scan: Scans the memory for active threats.
z
Custom Scan: Create a customized scan profile (see chapter 7.1 Scan
Profiles). These customized scans can be configured to scan selected areas of
your computer and can also be scheduled for regular scanning (see chapter
7.2 Scheduling Scans). Other predefined scans cannot be scheduled
Note: Configuring aspects of scanning such as file types to be scanned, and
malware types to be detected, can all be done from the Settings tab, (see chapter
4.3 Anti-Spyware Scanner for details on configuration options).
35
7.1. Scan Profiles
If you would like to schedule regular scans, then you must first create a scan
profile. Click on the main menu icon Scanner, and then select the Scan tab. Now
click on the Custom Scan option.
7.1.1. Creating a Profile
Here you have the following options in the left-hand panel:
o
Add Profile: Will create a new profile in the Profiles list above. You can
choose a name for the new profile.
o
Rename Profile: Rename the selected profile.
o
Remove Profile: Delete the selected profile without any further
warning.
7.1.2. Configuring a Profile
Once you have created a profile you can configure it using the following
buttons from the right-hand panel:
o
Add Registry: Include the windows registry in the selected profile's
scan.
o
Add Memory: Include the computer's memory in the selected profile's
scan.
o
Add Files/Folder: Include specific files/folders in the selected profile's
scan.
36
o
Remove Selected: Remove the profile item (selected in the central
panel list) from the selected profile's scan.
o
Schedule this profile: create a schedule for the selected profile (see
chapter 7.2 Scheduling Scans).
o
Scan Now: Run the selected scan profile now.
o
Cancel: return to the previous dialog displaying the list of pre-defined
scans.
7.2. Scheduling Scans
We recommend that you schedule a full system scan (a scan profile that also checks
memory and all hard drives) to occur daily. As new malware is released at such a
fast pace daily scanning will ensure security for your computer.
Existing scan profiles can be scheduled to run at regular intervals. Click on the main
menu icon Scanner, then select the Schedule tab. Now select the required scan
profile from the list of profiles in the left-hand panel. The right-hand panel will now
display the following options:
z
Schedule this profile: Select the checkbox if you want to apply a schedule to
this profile. Note that each profile can only have one schedule.
z
Start time: Specify the start time for the scan. Either specify an exact time
(Fixed Time) or specify the length of time after starting the computer before
the scan starts (Time after Startup).
z
Period: Select how frequently the scan should be run:
o
Daily
o
Every 2nd Day
o
Once a Week: Select the day of the week from the dropdown list.
o
Once a Month: (Each first / Each last / Each), then select the day 0131.
z
If scheduled time was missed catch up as soon as possible: If this
checkbox is selected, then any missed scan we be carried out at a later time
(as soon as resources are available).
z
Don’t execute if a fullscreen application is running (e.g. a game): If
you have a highly-demanding application which runs in full-screen mode you
can select this option to postpone the scheduled scan. It is advisable if you
select this option, that you also select the option above it, for catching up on
missed scans.
7.3. Managing Reports
Scan results can be saved as reports. This can be done manually by clicking on the
Save Scan Report button, (which is displayed after each scan is completed).
Alternatively, you can configure AVG 7.5 Anti-Spyware to automatically save scan
results after each scan (see chapter 4.4 Reports).
All saved reports are accessible from the Reports dialog.
37
Click on the main menu icon Reports, then select the required report from the list
in the left-hand panel. The selected report will be displayed in the right-hand panel
and the following 3 buttons will become active at the bottom of the left-hand panel:
z
Save report as: Allows you to export the selected report into a text file.
z
Remove selected report: Will delete the selected report from the list.
z
Remove all reports: Will delete all reports from the list
38
8. Program Updates
Anti-spyware programs can only guarantee reliable protection if they are updated
regularly. AVG 7.5 Anti-Spyware provides a reliable and fast update service with
quick response times. New spyware threats are continually being created and
spread very quickly. Therefore, it is necessary that your anti-spyware program is
updated on a regular basis to protect you against all new threats.
8.1. Update Status
The update status of your AVG 7.5 Anti-Spyware is provided in the Status dialog:
The Your Computer's Security section provides the following information on the
Last Update:
z
whether the product is updated:
o
o
yes, your program has been updated
no, your program has not been updated recently and your computer
is at risk; therefore you should run the update process immediately
z
when the last update was performed (date)
z
provides an option of launching the update process directly - Update now
39
8.2. Update Set Up
Specific parameters of the update process of your AVG 7.5 Anti-Spyware
program can be set up within the Update dialog (click the main menu icon
Update):
The dialog is divided into four major sections:
z
Current Status
If there is an update process currently running (launched manually or
automatically), the progress bar provides an overview of its progress. The visual
information is accompanied by a text specification on the respective process
running.
The update related status information in this section defines the update availability,
with the following possibilities:
o
Ready for update - this indicates that the program is ready to check for
an update. Click on the Start update button to start the update process.
o
No update was available - the program has checked for the presence
of new update files and has not found any; no new update files were
issued since you last launched the program update;
o
Update successful - information provided after an update process has
been completed successfully.
40
z
Manual update
The Manual update section of this dialog offers the possibility of launching an
update manually when the need arises. Generally, it is recommended to
schedule your updates automatically (see the next section) but a situation
may occur when it is critical to have the latest update files available and then
you may want to launch the update manually. Simply click the Start update
button; the update process will display in the above described Current Status
section.
z
Automatic update
The option of automatic update scheduling is only available in the AVG 7.5
Anti-Spyware full version. If this section is not activated in your program,
you may need to register your license number (see chapter 3.2 Switching to
Full Version) in order to be allowed to use the entire range of the full version's
features.
In the full version, the automatic update option is set up in the program by
default. The specifications are as follows:
z
o
Download and install updates automatically - the program will
automatically check for new update files and download and install them
on your computer when any are available; the check will be performed at
the time interval you have specified (see the paragraph below). If for
some reason you want to disable this function (not recommended),
uncheck the respective check box.
o
Show notification when an update is installed automatically - an
automatic notification window will be displayed after the update process
is completed successfully. You may disable this function by un-checking
the respective check box.
o
Update interval - from the drop down menu select the time period that
best suits your needs: the program will perform an automatic update
check at the defined intervals.
Settings
The Settings section of this dialog deals with the detailed configuration of the
Internet connection used for the update download. Here You need to specify
your proxy server parameters (if using a proxy server). However, this
configuration is described in details in chapter 4.7 Internet Connection
Settings.
41
9. FAQ and Technical Support
9.1. Online Help
In case you are unsure about the meaning of a specific program dialog or its item,
you may want to consult the online help. Click the main menu Help icon in the
program to look-up the relevant information:
9.2. Frequently Asked Questions
Should you experience any problems with your installation of AVG 7.5 AntiSpyware, whether sales related or technical, please refer to the FAQ section of the
Grisoft website at www.grisoft.com.
9.3. Technical Support
If you do not succeed in finding help in the FAQ list, you may want to contact the
AVG technical support department using the online form located on the Grisoft
website at www.grisoft.com.
In the web form please fill in all required information in the respective text fields,
i.e. provide your e-mail address and an exact description of the problem you have
encountered. Within the problem description please do not forget to include the
following important information: your operating system version, Internet Service
Provider (ISP), or additional installed security software (Firewall, Anti-Virus, …) in
your query. This helps a lot to reduce response times.
Optionally, you can attach a specific file (e.g. diagnostic log file) or a screenshot to
your report.