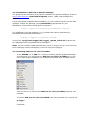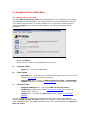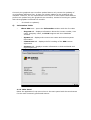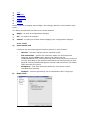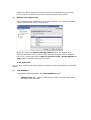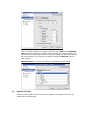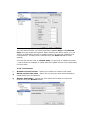
1
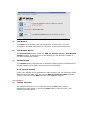
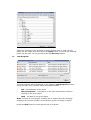
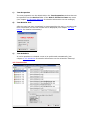
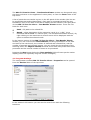
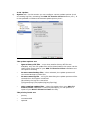
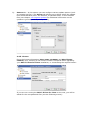
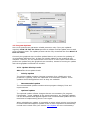
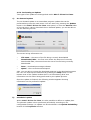
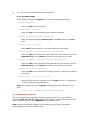
AVG 7.5 Free for Linux
User Manual
Document revision 75.2 (26.8.2008)
Copyright AVG Technologies, s.r.o. All rights reserved.
This product uses RSA Data Security, Inc. MD5 Message-Digest Algorithm, Copyright (c) 1991-2, RSA
Data Security, Inc. Created 1991.
This product uses code from C-SaCzech library, Copyright (c) 1996-2001 Jaromir Dolecek
<[email protected]>
This product uses compression library zlib, Copyright (c) 1995-2002 Jean-loup Gailly and Mark Adler
This product uses libtar library, Copyright (c) 1998-2003 University of Illinois Board of Trustees,
Copyright (c) 1998-2003 Mark D. Roth
This product uses compression library libbzip2, Copyright (c) 1996-2002 Julian R Seward
This product uses XML parser library expat, Copyright (c) 1998, 1999 James Clark
This product uses library libcurl, Copyright (c) 1996 - 2003, Daniel Stenberg, <[email protected]>
This product includes Flex software developed by the University of California, Berkeley and its
contributors, Copyright (c) 1993 The Regents of the University of California
This product uses Mailshell SpamCompiler, copyright (c) 2006 Mailshell
All other trademarks are property of their respective owners.
2
Contents
1. Introduction........................................................................................... 4
2. Before Installation ................................................................................. 5
2.1. Prerequisites .................................................................................... 5
2.2. Additional Prerequisites for the Graphical User Interface ......................... 5
2.3. Installation Package .......................................................................... 5
3. Installation and Launch ......................................................................... 6
3.1. Distributions Currently Supported ........................................................ 6
3.2. The Installation Process ..................................................................... 7
3.3. Product Registration .......................................................................... 7
3.4. Installation of GUI from a Specific Package: .......................................... 8
3.5. Launching AVG Free for Linux/FreeBSD ................................................ 8
4. Graphical User Interface ........................................................................ 9
4.1. Introduction to the GUI ...................................................................... 9
4.1.1. Top Menu ............................................................................... 9
4.1.2. Main Panel .............................................................................10
4.1.3. Bottom Section ......................................................................11
4.2. Testing ...........................................................................................11
4.3. Test Results ....................................................................................13
4.4. Program Settings .............................................................................14
4.4.1. Tests ....................................................................................15
4.4.2. Scheduler ..............................................................................16
4.4.3. Test Results ...........................................................................18
4.4.4. Update ..................................................................................19
4.4.5. License .................................................................................20
4.5. Program Updates .............................................................................21
4.5.1. Update Priority Levels .............................................................21
4.5.2. Performing an Update .............................................................22
5. Standalone Command Line Modules ..................................................... 24
5.1. AVGSCAN Command.........................................................................24
5.1.1. Example Usage ......................................................................27
5.2. AVGUPDATE Command .....................................................................27
5.3. On-access Scanner ...........................................................................30
5.4. Service Signals ................................................................................32
6. Configuration File................................................................................. 34
6.1. AvgCommon....................................................................................34
6.2. On-Access Scanner Configuration .......................................................35
6.3. E-mail Scanning Configuration (AvgDaemon) .......................................36
3
6.4. AvgUpdate ......................................................................................37
7. AVG Quarantine ................................................................................... 39
7.1. avgqrtctl Quarantine Control Utility .....................................................39
7.1.1. Usage ...................................................................................39
7.1.2. Options .................................................................................39
7.1.3. Output ..................................................................................40
8. FAQ ...................................................................................................... 41
4
1. Introduction
z
This User Manual is the full documentation describing AVG 7.5 Free for
Linux.
a)
AVG 7.5 Free for Linux Features
AVG 7.5 Free for Linux provides comprehensive and reliable protection
against viruses for Linux powered machines. It offers many features, such as
scheduled and on-demand scanning of folders, files, and common archive
types for possible virus infection. You can also perform a scheduled or ondemand update of your AVG either from the Internet or from local update
sources.
b)
AVG 7.5 Free for Linux – Graphical User Interface
AVG 7.5 Free for Linux allows you to take advantage of all AVG system
functions within the comfortable and well-arranged graphical user interface.
For normal AVG users, on workstations and home computers, it is
recommended to use only the graphical interface. The graphical user interface
is both efficient and simple, and it can be used even by inexperienced Linux
system users.
c)
AVG 7.5 Free for Linux – Command Line Modules
Powerful standalone command line modules are included in all editions of AVG
7.5 Free for Linux. You can perform all possible on-demand file system tests
and updates using these modules. They can be also utilized within for example
the cron utility in order to schedule a regular automatic test or update.
Note: The use of command line modules is strictly recommended for proficient
Linux users that have significant experience with Linux administration from
command line and console interfaces!
5
2. Before Installation
2.1. Prerequisites
Before installing AVG 7.5 Free for Linux, you must verify that your system meets
the following requirements:
a)
Libraries
The following libraries are required in order to ensure the AVG 7.5 Free for
Linux kernel can be installed and run properly:
o
b)
libc.so.6 (Linux)
DAZUKO Kernel Module
The DAZUKO kernel module is necessary for the proper function of AVG 7.5
Free for Linux on-access scanner. Please use the latest stable version of
DAZUKO - available for free at http://www.dazuko.org (see chapter 5.3 Onaccess Scanner for detailed information on this topic).
2.2. Additional Prerequisites for the Graphical User Interface
a)
Python Language Interpreter
In order to ensure the graphical user interface will be available, verify that the
system is provided with the Python language interpreter. Python versions 2.2
and higher are currently supported. You can check your Python version using
the python -V command in your terminal. In most current Linux distributions
the Python language interpreter is included by default. If this is not the case,
you will have to download the required version for free from
http://www.python.org and install it following the instructions included in the
installation package for your Linux distribution.
b)
Python Modules
The AVG 7.5 Free for Linux graphical user interface is implemented using
PyGTK widgets: verify that the system is provided with the PyGTK Python
module; versions 2.0 and higher are currently supported. Also, the libglade
and pygtk-libglade libraries versions 2.0 and higher must be installed on your
computer. Again, all these modules and libraries are standard parts of most
current Linux distributions. If you do not have the required PyGTK module or
pygtk-libglade library version, you can download them from
http://www.pygtk.org for free and install them, following the instructions
included in the installation package for your Linux distribution. The libglade
library can be downloaded and installed in the same manner from
http://glade.gnome.org.
2.3. Installation Package
AVG 7.5 Free for Linux installation packages are available on the installation CD in
the form of RPM or deb packages for various Linux distributions. You can also
download the latest appropriate package version from http://www.avg.com,
Download/Programs section.
6
3. Installation and Launch
The AVG Free for Linux/FreeBSD installation packages are provided in the form
of RPM files for Linux/FreeBSD distributions supporting the RPM Package Manager
utility.
z
For installation from the RPM file, use the following command in your shell
(accessible for example using the xterm application within your X window
system).
# rpm -i avg75afl(distribution)-r{release}-a{vdb
version}.i386.rpm
z
For installation from the .deb file, use the following command in your shell
(accessible for example using the xterm application within your X window
system).
# dpkg -i avg75fld-r{release}-a{vdb version}.i386.deb
Note: The program files of the AVG 7.5 Free for Linux versions 11 and older are
installed into the /usr/local/lib/avg7 directory. Even if you perform the full
update of older version of your AVG, the directory structure remains the same
(ensuring the backwards compatibility). However, all essential components of AVG
7.5 Free for Linux are always updated properly to offer you the maximum security
and reliability.
The versions 12 and newer are comprehensively installed into the /opt/grisoft
directory. Symbolic links are created in various system directories, leading to the
/opt/grisoft directory subtree. If you want to upgrade the old directory structure,
you must completely reinstall your AVG 7.5 Free for Linux. Note that in this
documentation is always described the preferred newer location of AVG 7.5 Free
for Linux installation!
In the installation packages' names:
z
the distribution stands for the linux distribution used (see 3.1 Distributions
Currently Supported)
z
the release stands for the minor version number of AVG 7.5 Free for Linux.
z
the vdb_version string stands for the AVG 7.5 Free for Linux internal virus
database specification number.
3.1. Distributions Currently Supported
Distribution
Installation package
Mandrake Linux,
Mandriva
avg75flm-r{version}-a{version of avi}.i386.rpm
Red Hat, Fedora Core,
Red Flag
avg75flr-r{version}-a{version of avi}.i386.rpm
SuSE
avg75fls-r{version}-a{version of avi}.i386.rpm
7
Debian, Ubuntu, and
other distributions
using the Debian
packaging system
avg75fld-r{version}-a{version of avi}.i386.deb
3.2. The Installation Process
The installation process will automatically determine all features of your
system and will perform the proper installation of AVG 7.5 Free for Linux on
your computer. Performing installation from the packages mentioned in the
table above also installs the AVG 7.5 Free for Linux command line modules.
(See section 5 Standalone Command Line Modules for detailed information on
this topic).
At the end of the installation, you will be prompted to enter some additional
license information to ensure that it will be correctly displayed in the graphical
user interface. Launch the following script in your shell:
# /opt/grisoft/avggui/bin/avggui_update_licinfo.sh
You have to run this script as root. To find out whether you are logged in as
root use the command
$ whoami
If the answer is 'root', everything is all right. If not, use the
$ su
command and apply the superuser password to change your identity to the
root.
Note: The fact you are logged in as root is usually indicated by the '#'
character at the beginning of your prompt. Normal user identity is indicated by
the '$' character.
3.3. Product Registration
After the installation process you need to register your AVG 7.5 Free for
Linux unless it has been registered already during the installation process;
this applies to special packages for AVG 7.5 Free for Linux vendor partners.
The registration can be performed by launching one of the following
commands in your shell (see chapter 5.1 AVGSCAN Command for more
details).
$ avgscan -register
$ avgscan -register <your license number>
Alternatively, the registration can be performed using the graphical user
interface as root (see chapter 4.4.5 License).
8
3.4. Installation of GUI from a Specific Package:
The graphical user interface (GUI) can be installed from specific packages, found at
http://www.avg.com, Download/Programs section. (RPM, deb packages are
available).
If your distribution supports RPM installation, you can install the GUI from the RPM
package. Choose the package (string distribution) appropriate for your
distribution. Download the latest rpm and install it:
# rpm -i avggui-1.0-{release}_{distribution}.i386.rpm
For installation from deb package (i.e. on Debian and Ubuntu distributions):
Download latest package and install it:
# dpkg -i avggui-1.0-{release}.i386.deb
Launch the /opt/grisoft/avggui/bin/avggui_update_licinfo.sh script as root
for updating license information after installation.
Note: You can configure PAM authentication (used in avggui run by a non-root user
when changing license information) in the file /etc/pam.d/avggui.
3.5. Launching AVG Free for Linux/FreeBSD
In the GNOME 2.x or KDE 3.x.x versions of these popular graphical desktop
environments, you should see an AVG Free for Linux/FreeBSD icon in the
menu after proper installation (an example screenshot from the KDE menu):
Click on the icon to launch the AVG Free for Linux/FreeBSD graphical user
interface.
To launch AVG Free for Linux/FreeBSD from the command line, execute the
$ avggui
command.
9
4. Graphical User Interface
4.1. Introduction to the GUI
The item AVG 7.5 Free for Linux should be added into your desktop menu system
automatically during installation. Its location depends on the distribution used and
your desktop environment. It is also possible to run it from the console with the
command avggui. After launching the program, the following window will be
displayed:
4.1.1. Top Menu
There are four folders in the application’s top menu:
a)
Program Folder
o
b)
c)
Quit item – closes the application.
Tests Folder
o
Run test item - launches the on-demand file system anti-virus scan (see
chapter 4.2 Testing for details on testing).
o
Test results item - opens the AVG 7.5 Free for Linux – Test Results
Viewer window (see chapter 4.3 Test Results for details on test results).
Service Folder
o
Program settings item - opens the AVG 7.5 Free for Linux –
Properties window (see chapter 4.4 Program Settings for details on
configuration options).
o
Update item - launches the AVG update (see chapter 4.5 Program
Updates
Anti-virus systems can guarantee reliable protection only if they are updated
regularly. AVG 7.5 Free for Linux provides a reliable and fast update service with
quick response times. The update process can be fully controlled also from AVG 7.5
Free for Linux.
10
Currently the graphical user interface update feature only covers the updating of
virus/malware definition files. It does not include updates to the graphical user
interface. However, for non experienced Linux user it is much more comfortable to
perform an update using the graphical user interface, instead of running an update
with the avgupdate command line module.
o
d)
for details on updates).
Information Folder
o
About AVG item - opens the Information window with the four tabs:
-
Program tab - displays information about the License number, User
name, Company name, and AVG Program and Virus database
versions
-
System tab - displays the current user name and various system
information
-
License text tab - displays the full wording of the AVG License
Agreement
-
Contacts tab - displays contact information to AVG worldwide and
regional partners
4.1.2. Main Panel
Below the application’s top menu there is the main panel with shortcut buttons
for the most commonly performed actions:
11
a)
Test Button
The Test button launches the on-demand file system scan. The text
description provides information on the most recently performed test.
b)
Test Results Button
The Test Results button opens the AVG 7.5 Free for Linux – Test Results
Viewer window. Presented next to the button you will find the number of
currently saved test results.
c)
Update Button
The Update button launches the on-demand update process. Information on
the last update performed is provided next to the button.
4.1.3. Bottom Section
At the very bottom of the application’s main window you can find three fields
with the AVG copyright info, the current AVG 7.5 Free for Linux program
version, and the current AVG internal virus database version.
4.2. Testing
a)
Testing Interface
On-demand tests can be run using the shortcut Test button on the
application’s main panel, or from the Tests folder in the top menu. The
following window opens:
12
Select the locations to be scanned in the file system tree or enter the full
paths into the upper text field. Press the Apply button to include the selected
paths into the test. To run the test press the Start test button.
b)
Test Progress
The test progress will be displayed in the following Test progress window;
there are three main sections within this dialog window:
o
File – identification of the object
o
Result/Infection – information on the test result and/or infection
relating to the given object
o
Path – full path of the given object
Note: Clicking on continuously scrolling list of reports stops the scrolling.
Dragging the vertical scrollbar to the bottom sets the scrolling on again.
Press the Stop button to interrupt the test in progress.
13
c)
Test Properties
The test properties can be edited within the Test Properties window that can
be opened from the Service folder of the AVG 7.5 Free for Linux top menu
(see chapter 4.4 Program Settings for detailed information on test settings).
d)
Test Results Info
After the test has been completed (or interrupted by the user), a window with
brief information on the test results will be displayed (see chapter 4.3 Test
Results for detailed information).
e)
Test Schedule
It is also possible to schedule a test to be performed automatically (see
chapter 4.4.2 Scheduler for detailed information on the Scheduler features).
4.3. Test Results
14
The AVG 7.5 Free for Linux – Test Results Viewer window can be opened using
the shortcut button on the application’s main panel, or from the Tests folder of the
top menu:
A list of particular test results is given in the left panel of this window (the list can
be sorted date ascending/descending). Each item is accompanied with the test
timestamp. Click on an item in this list to display the test results in the right panel
of the AVG 7.5 Free for Linux – Test Results Viewer window. There are two
fields for each item:
z
Path – full path to the related file
z
Result – short description of the respective result (e.g. 'is OK', 'Virus
identified VIRUS NAME' or 'Cannot open; not checked! Permission denied'). By
right-clicking on the listed item a context menu will be displayed with the
option to delete the selected result.
In the bottom section of the AVG 7.5 Free for Linux – Test Results Viewer
window, you can overview the Test statistics providing information on the date
and time of the test launch, the number of scanned and infected files, and the
number of scanned and infected sectors. You can check also the progress of the
scanning within the Objects viewed field that shows how many items have been
processed and the overall number of items to be processed.
Pressing the Stop button below the Test statistics field will interrupt the results
display (useful for especially long test results messages).
4.4. Program Settings
The configuration window AVG 7.5 Free for Linux – Properties can be opened
from the Service folder of the top menu:
In the window’s left section you can see the control tree with the following
branches:
15
z
Test
z
Scheduler
z
Test results
z
Update
z
License
Select a section to display and configure the settings options in the window’s right
panel.
The dialog window also provides three control buttons:
z
Apply – to save all configuration changes
z
OK – to confirm all changes
z
Cancel - to close the window without applying the configuration changes
4.4.1. Tests
a)
Scan Details Tab
Configure the test scanning performance settings in four sections:
b)
o
General - heuristic analysis can be switched on/off
o
File extensions - specific file extension masks can be selected for
scanning, and the AVG engine Smart scan feature can be
enabled/disabled here; smart scanning means that the files are scanned
not only according to the specified extensions but also according to their
physical content (possibly dangerous internal code structures) no matter
what extension they have
o
Exceptions - files with extensions defined in this section will be
excluded from scanning
o
Archives - archives processing can be switched on/off in the group
Report Tab
16
Switch on/off the reporting of various events encountered during the scan.
These reports are written to the file containing specific test results.
c)
Default Scan Objects Tab
Select locations and objects to be scanned by default. The objects and paths
can be selected from the file system tree:
When you select the Use this test by default option, the objects and
locations selected in this window will be scanned whenever the on-demand
test is run. This means that no AVG 7.5 Free for Linux – Select Objects to
Test window will open after the test launch.
4.4.2. Scheduler
You can also schedule tests and updates to be performed automatically at specified
times.
a)
Test Schedule
Two tabs are displayed within the Test schedule branch:
o
When to test tab – switch on/off periodic tests, and select time when
the test will be launched:
17
You can select whether you want to perform tests daily or on selected
days using the respective options. When selecting the latter option, you
can choose on what days of week or month exactly you want the tests to
be executed then. The day-time is defined using the Start at field for
both options.
o
b)
What to test tab – select the objects and locations to be tested:
Update Schedule
Switch on/off periodic check for Internet updates, and select time when an
update will be performed:
18
You can select whether you want to perform updates daily or on selected
days using the respective options. When selecting the latter option, you can
choose on what days of week or month exactly you want the updates to be
executed then. The day-time is defined using the Start at field for both
options.
You can also set the time of random delay (in minutes) of update execution
– this is useful for example in cases when the update source is not responding
for some time.
4.4.3. Test Results
z
Number of saved results - specify the number of results to be saved
z
Delete results older than - define for how long the test results should be
saved before they are deleted
z
Results destination – specify the test results file location or select the
location using the Browse button
19
4.4.4. Update
a)
Options tab – In this section you can configure various update options (such
as creating log files, restarting the AVG 7.5 Free for Linux daemons, etc.). It
is also possible to indicate the desired update priority level:
The update options are:
o
Ignore binary diff files – even when smaller binary diff files are
available, only the full update files will be downloaded; this option can be
useful when some parts of your AVG 7.5 Free for Linux installation are
corrupted or missing
o
Do not create backup files – when selected, the update process will
not create backups of older files
o
Do not create log file – no log file describing the update process will be
created when this option is selected
(By default, the log file is stored as
/opt/grisoft/avg7/var/update/log/avg7upd.log)
o
Only complete update files – select this option when your AVG 7.5
Free for Linux installation is seriously damaged; you can perform a
repair of your AVG 7.5 Free for Linux this way
The priority levels are:
o
priority
o
recommended
o
optional
20
b)
Source tab – In this section you can configure various update options (such
as creating log files). The Source tab allows you to define where the update
files should be taken from: the Internet, a specified folder, or from defined
files (see chapter 4.5 Program Updates for additional information on the
updates in general, and on priority levels).
4.4.5. License
Enter the license information (User name, Company and New license
number) here. Entering a new license number is required when upgrading
your AVG 7.5 Free for Linux installation, or reactivating the expired license:
xxx-xxx-xxx-xxx-xxx
If you are not running the AVG 7.5 Free for Linux as the root, you will be
asked for the root password first (see the following screen):
21
xxx-xxx-xxx-xxx-xxx
4.5. Program Updates
Anti-virus systems can guarantee reliable protection only if they are updated
regularly. AVG 7.5 Free for Linux provides a reliable and fast update service with
quick response times. The update process can be fully controlled also from AVG 7.5
Free for Linux.
Currently the graphical user interface update feature only covers the updating of
virus/malware definition files. It does not include updates to the graphical user
interface. However, for non experienced Linux user it is much more comfortable to
perform an update using the graphical user interface, instead of running an update
with the avgupdate command line module.
4.5.1. Update Priority Levels
AVG offers three update levels:
o
Priority update
The priority update contains changes necessary for a reliable anti-virus
protection. Typically, these are important virus definition updates. These
updates should be applied as soon as they are available.
o
Recommended update
The recommended update contains various program changes, fixes and
improvements.
o
Optional update
The optional update reflects changes that are not necessary for program
functionality – texts, updates of the setup component, etc. Optional updates
can be downloaded and applied together with recommended updates but the
timeliness of implementing them is not urgent.
When scheduling an update, it is possible to select which priority level should
be downloaded and applied. Update levels of lower importance automatically
include more critical ones (see section 4.4.4 Update for more information).
22
4.5.2. Performing an Update
Two types of an update are distinguished within AVG 7.5 Free for Linux:
a)
On demand update
The on demand update is an immediate program update that can be
performed any time the need arises. You can start it by pressing the Update
button in the AVG 7.5 Free for Linux main panel; or from the Service folder
of the top menu. Having launched the on demand update, you will be able to
see the following screen:
The screen brings information on:
o
File name – the name of the file being currently downloaded
o
Downloaded/Size – the first item shows the amount of currently
downloaded data; the second one the size of the file being currently
downloaded
o
Done – download percentage indicator
o
Speed – the current download speed
Also, you are able to review the download progress in the download progress
bar. You can interrupt the download by pressing the Stop button. In the
bottom area of the update window there is a field showing brief text
information on the action being performed by the update process.
Once the update is finished, the following window appears showing
information on the performed update:
b)
Scheduled update
Within AVG 7.5 Free for Linux it is also possible to define an update plan.
The planned update is then performed periodically according to the
configuration settings. An update can be scheduled in the Update Scheduling
branch of the Properties window.
23
You can review the performed update information in the update log file
avg7upd.log that is to be found in the opt/grisoft/avg7/var/update/log
directory (see chapter 4.4.4 Update for detailed information on the scheduled
update settings).
24
5. Standalone Command Line Modules
As a part of the AVG 7.5 Free for Linux internal structure, several command line
configurable and executable modules are included in the installation package.
Although all the essential AVG 7.5 Free for Linux features can be easily controlled
using the graphical user interface, some details can be exploited only from the
command line, or configured only in the AVG 7.5 Free for Linux configuration file.
Note: The command line modules are designed for proficient Linux system users
with strong command line and console interfaces experience! However, these
modules offer ultimate configuration and scanning options useful especially for
system administrators.
5.1. AVGSCAN Command
The avgscan command is intended to perform various on-demand tests. Its
performance is comprehensively controlled by the command line parameters. The
general syntax of the command is
$ avgscan [options] [path|paths]
The [path|paths] string stands for a single path or multiple paths to be scanned.
The multiple paths are given in a list separated by the space character; a single
object can be also given to be processed by the scanner. When no options are
specified, a generic scan is performed for the given path(s).
Note: Although the avgscan command itself can manage only the on-demand test,
you can also use it to create scheduled tests by incorporating the cron Linux system
utility. See the manual pages (man [cron|crontab]) or the respective documentation
for detailed information.
The options for the avgscan command and their descriptions are given in the
following table:
Parameter
Description
-scan
Simple generic scan of the given objects and/or locations.
-heur
Switches on the heuristic analysis.
-exclude
[PATH|PATHS]
Excludes a particular path or paths from the scan; the
path(s) to be excluded must be given right after this option,
and separated by the space character.
-@ FILE
Specifies the command file with parameters to be processed
by the avgscan program; the file name must be given right
after this option, and separated by the space character.
25
Parameter
Description
-ext=<ext_mask>
Explicit specification of file extensions to be scanned in the
form of
-ext=<ext_mask>, where the <ext_mask> string stands for
the extension definition (for example “*”, ”jpg” , etc.). When
entering multiple file extensions, they should be separated
by a semicolon.
Explicit specification of file extensions not to be scanned in
noext=<ext_mask> the form of
-noext=<ext_mask>, where the <ext_mask> string stands
for the extension definition (for example “*”, ”jpg”, etc.).
-smart
Switches on the smart scan testing feature.
-arc
Switches on scanning of archives (common archive file types
like ZIP, GZIP, BZIP2 and others are supported).
-rt
Switches on scanning of run-time compressed objects.
-clean
Switches on the automatic healing of infected files.
-arcw
Reports archives encountered during scanning.
-rtw
Reports run-time compressions encountered during
scanning.
-macrow
Reports macros encountered during scanning.
-pwdw
Reports password-protected files encountered during
scanning.
-changew
Reports changes encountered during scanning.
-ignlocked
Makes the scanner ignore locked files.
-register [LICENSE] Registers AVG 7.5 Free for Linux. It is necessary to enter
the valid license number either on the command line right
after the -register option (separated by the space character),
or later when prompted after the command execution
without license given on the command line.
26
Parameter
Description
-report FILE
Reports messages about the test progress and results to the
specified file; the file name must be given right after this
option, and separated by the space character; when the
specified file already exists, it will be overwritten.
-repappend FILE
Reports messages about the test progress and results to the
specified file; the file name must be given right after this
option, and separated by the space character; in reverse to
the previous option, an existing file can be used to append
the information to the end of the file; when a new file is
specified, it will be created.
-repok
Switches on reporting of uninfected files ‘is OK’.
-stoplevel N
Pauses when an erroneous state is encountered during
scanning. Requires the integer argument N defining the
internal code of a state in which the scan shall be paused.
-h, --help
Prints a brief overview of the program's options and usage.
-pup
Results in the detection of “potentially unwanted programs”
within the scanning. Potentially unwanted program can be
for example spy-ware or other possibly insecure programs.
Note: If you launch the avgscan command with the –clean parameter, AVG will
attempt to heal all infected files automatically. When the healing is successful, a
$VAULT$.AVG folder is created (unless it exists already) in the home directory of
the user who performed the test. The infected files are moved into this directory
then, whereas the cleaned files remain in their original locations. Note the infected
files are stored in a special AVG format, ensuring they are absolutely harmless for
your system!
Return values of avgscan program are:
z
0 – no errors
z
1 – the test was interrupted by user
z
2 – an error occurred during the test (e.g. cannot open file event)
z
3 – file system changes detected
z
4 – a suspect object found by heuristic analysis
z
5 – a virus found by heuristic analysis
z
6 – a particular virus was found
z
7 – an active virus found in memory
z
8 – corruption of some of the AVG 7.5 Free for Linux command line
components
27
z
10 – an archive contains password protected files
5.1.1. Example Usage
Some typical examples of avgscan use with brief explanations follow:
$ avgscan /home/user
scans the user's home directory
$ avgscan -heur /home/user
scans the user's home directory using heuristic analysis
$ avgscan /home/user/bin/run_something.sh
scans the single file run_something.sh in the bin directory of user's
home
$ avgscan -repok /home/user
scans user's home directory, reporting uninfected files as OK
$ avgscan -report ~/reports/report001.avg /home/user
scans the user's home directory and reports the test results into the file
report001.avg in the reports directory in the actual user's home
$ avgscan -repappend ~/reports/report001.avg /home/user
scans the user's home directory and appends the test results to the file
report001.avg in the reports directory in the actual user's home
$ avgscan -arc -repok /home/user
scans the user's home directory including archives, reporting uninfected
files as OK
$ avgscan -ext=* -rt -arc -heur /home
scans the files with any extension in the /home directory, including the
run time compressions and archives
Note: For online help on the avgscan command type the following in your
shell.
$ man -l /opt/grisoft/avg7/man/man1/avgscan.1.gz
5.2. AVGUPDATE Command
Anti-virus systems can guarantee reliable protection only if they are updated
regularly. AVG 7.5 Free for Linux provides a reliable and fast update service with
quick response times via the avgupdate command line utility.
AVG offers three different update levels (update levels of lower importance
automatically include more critical ones):
28
z
Priority update
The priority update contains changes necessary for reliable anti-virus
protection. Typically, these are important virus definition updates. These
updates should be applied as soon as they are available.
z
Recommended update
The recommended update contains various program changes, fixes and
improvements.
z
Optional update
The optional update reflects changes that are not necessary for program
functionality – texts, updates of the setup component, etc. Optional updates
can be downloaded and applied together with recommended updates but the
timeliness of implementing them is not urgent.
The avgupdate command is a tool for complex control over the on-demand update
process. The update in general can be performed by launching this command. The
update properties are controlled using the command options, which are listed in the
table below. General syntax of the command is:
$ avgupdate [options] [path|list]
The [path|list] string stands for the path of the explicitly given update files (or for
the list of these update files separated by the space character).
Note: Although the avgupdate command itself can manage only the on-demand
update, you can also use it to create scheduled updates by incorporating the cron
Linux system utility. See the manual pages (man [cron|crontab]) or the respective
documentation for detailed information.
The options for the avgupdate command are described in the following table:
Parameter
Description
-o, --online
Performs an online update from the Internet; the location
where the update files are downloaded from is specified in the
AVG configuration file.
(See section 6 Configuration File for detailed information.).
-f, --offline
Performs an offline update from the location specified in the
given path or list (as described in the beginning of this
paragraph).
-s, --antispam
Update the Anti-Spam database by sending a command to the
AVG daemon. AVG daemon downloads new Anti-Spam
database and reloads it for running daemons.
29
Parameter
Description
-d, --download
Only downloads update files without applying them; the
download directory is specified in the AVG configuration file.
(See section 6 Configuration File for detailed information.)
-p, --priority NUM Specifies the priority of an update explicitly; the possible
priority numbers are:
2 – priority update
3 – recommended update
4 – optional update
-c, --config FILE
Forces use of a configuration file other than the default one
(/etc/avg.conf). The filename (with the specified path if
necessary) is given by the FILE argument.
-i, --no-diff
Even when smaller binary diff files are available, only the full
update files will be downloaded; this option can be useful
when some parts of your AVG 7.5 Free for Linux installation
are corrupted or missing.
-b, --no-backup
When this option is selected the update process will not create
backups of older files.
-n, --no-progress
avgupdate does not display update progress information after
selecting this option.
-l, --no-log
No log file describing the update process will be created when
this option is selected (by default, the log file is stored as
/opt/grisoft/avg7/var/update/log/avg7upd.log).
-a, --no-daemons When this option is selected, the AVG 7.5 Free for Linux
daemons will not be restarted following the update; for some
server systems this option can help in avoiding problems with
the incorrect restart of daemons.
-m, --complete
Select this option when your AVG 7.5 Free for Linux
installation is seriously damaged to repair it.
-r, --restore
Restores the previous version of the whole AVG 7.5 Free for
Linux (before the last update was performed).
-v, --version
Displays the program version.
30
Parameter
Description
-h, --help
Prints a brief overview of the program's options and usage.
Return values of avgupdate program are:
z
0 – no errors occurred during the update
z
1 – nothing new to update
z
2 – an error occurred during the update
Some typical examples of avgupdate use with brief explanations follow:
z
$ avgupdate -o
the simple online update
z
$ avgupdate -f /tmp/avg/updfiles
performs the update from the files in the /tmp/avg/udpfiles local directory
z
$ avgupdate -o -p 4
performs the optional online update
z
$ avgupdate -o -c /home/user/conf/avg/avg.conf
performs the online update according to the configuration file avg.conf
located in the /home/user/conf/avg/ local directory
z
$ avgupdate -o -l -m
performs the online update: downloads and applies the complete update file,
and writes no information into the log file
Note: For online help on the avgupdate command type
$ man -l /opt/grisoft/avg7/man/man1/avgupdate.1.gz
in your shell.
5.3. On-access Scanner
The DAZUKO kernel interface for file access control must be inserted as a module
into your kernel in order to enable the on-access scanning using the AVG 7.5 Free
for Linux engine. You can download the latest version of DAZUKO at
http://www.dazuko.org. It is recommended to download the latest version available
especially if you are running the kernel of major version 2.6 (or higher)!
To install the DAZUKO kernel module, follow these instructions:
a)
Get your Kernel Source Code
It is highly recommended to build and install a kernel from the actual kernel
sources first. Then it is certain that the kernel source code you use to build
DAZUKO matches the running kernel. Many Linux distributions provide
31
packages with the kernel source code. If you do not plan building a completely
new customized kernel, make sure you install the proper kernel source
packages for your distribution.
Note: If you do not have any experience with building the Linux kernel, you
should not attempt to install DAZUKO unless you get some information and
practice in hacking the Linux kernel internals!
b)
Compile DAZUKO
Once the source code for your running kernel is available, you can build
DAZUKO. You can download the latest version of DAZUKO at
http://www.dazuko.org. Unpack the downloaded file using the following
command and switch to the unpacked directory.
$ tar –xvzf dazuko-{version}.tar.gz
Edit the configure file and change the 0 value to 1 for the
ON_CLOSE_MODIFIED parameter in the MAIN section. Generate a Makefile
by running the following command in the directory with the DAZUKO source
files.
$ ./configure
This will determine the features of your system needing to be specified in the
generated Makefile.
Then you can compile DAZUKO with the
$ make
command. This will create the device driver as well as a couple of example
programs. Under Linux 2.2-2.4 the device driver is named dazuko.o. Under
Linux 2.6 it is named dazuko.ko.
c)
Insert DAZUKO
Having compiled DAZUKO successfully, the final step is to insert the module
into the kernel.
Note: The process of inserting a kernel module may vary according to the
particular Linux distribution. Refer to your distribution documentation to
resolve possible problems. Also, there can be some differences according to
various versions of DAZUKO. Refer to the detailed DAZUKO documentation at
http://www.dazuko.org.
Create the device node for DAZUKO. This can be done executing the following
command as the root, (supposing that the device major number is 254 for this
example).
# mknod -m 600 /dev/dazuko c 254 0
# chown root:root /dev/dazuko
Also, you have to copy the module (the dazuko.o or dazuko.ko file) to the
/lib/modules/src/kernel/char directory.
32
Create a link to module by adding the following line to the /etc/modules.conf
file.
alias char-major-254 dazuko
Insert the module as the root by executing on of the following commands
# /sbin/insmod/ dazuko.o
or
#/sbin/insmod dazuko.ko
for Linux 2.2-2.4 or Linux 2.6 kernels respectively.
To check if the module has been loaded use the
$ cat /proc/modules or $ lsmod | grep dazuko
command. If you see 'dazuko' string along with its device major number
(usually 254) in the list of modules, it is successfully installed and inserted.
Note: If you get any warnings or error messages during the above described
process, something may be wrong with your kernel source code or
configuration. Please refer to the DAZUKO FAQ page at
http://www.dazuko.org for detailed information and possible fixes.
Once the DAZUKO module is installed and inserted, the AVG 7.5 Free for
Linux daemons responsible for the on-access scanning will be fully functional.
You need to make sure the daemons are running and restart them if they have
been stopped (refer to the following paragraph to see how to do this).
Configuration of on-access scanning daemon(s) is done via the file /etc/avg.conf,
described in chapter 5.3 On-access Scanner.
5.4. Service Signals
On-access scanning daemons are controlled within common AVG 7.5 Free for
Linux services. The services can be comprehensively managed by sending them a
signal at once via the following command (on most systems):
# /etc/init.d/avgd [start|stop|restart|reload|status|condrestart]
On Slackware use:
# /etc/rc.d/rc.avgd [start|stop|restart|reload|status|condrestart]
The options in the square brackets represent the possible signals that can be sent to
the AVG 7.5 Free for Linux daemons:
z
start – starts the daemons
z
stop – stops the daemons
z
restart – restarts the daemons
z
reload – forces the daemons to reload the internal virus database
33
z
status – shows the status of the daemons
z
condrestart – conditionally restarts the daemons
Note: You can only control the AVG 7.5 Free for Linux daemons as root this way!
The on-access scanning performance can be configured using the common AVG 7.5
Free for Linux configuration file. (See chapter 6 Configuration File for detailed
information.)
34
6. Configuration File
The common configuration of AVG 7.5 Free for Linux command line modules, email scanner, and update process is covered in the avg.conf file, usually located in
the /opt/grisoft/avg7/etc directory. The general syntax of the configuration file
is described as follows:
...
# comments
[<section_name>]
<parameter_name> = <value1> <value2>
<parameter_name> = <value3> # comments
...
[<yet_another_section>]
<parameter_for_this_section> = <its_value>
...
The '#' character indicates a comment – the rest of the line following this character
is ignored and will not be processed.
The square brackets ('[' and ']' characters) enclose a section name. All entries
following the section specification until another section specification (or end of file)
are considered as configuration options related to the respective section.
The entries for each section consist of the parameter name and its value (or
values) specified after the '=' character. The values can be either numeric (integer)
or strings. The numeric 1/0 values usually represent enabling/disabling of the
respective feature specified by the parameter name.
Multiple values for one parameter can be separated by white space characters (for
example space, tabulator, etc.) or by a new line (the parameter name must be
given again in this case).
If you are logged in as root, you can change the parameter values directly in the
configuration file avg.conf using any plain text editor (e.g. vi, vim, pico, joe, gedit,
emacs, jed, jedit, ed, …).
The configuration file consists of four sections.
6.1. AvgCommon
Configuration of the common features of AVG 7.5 Free for Linux memory resident
services (daemons) in general:
z
runtimeCompression – scanning of files with runtime compression; possible
values are 0 or 1; the default value is 1 (runtime compression scanning
enabled)
35
z
heuristicAnalysis – using of heuristic analysis scanning; possible values are
0 or 1, the default value is 0 (heuristic analysis disabled)
z
pupAnalysis – when set to 1, “potentially unwanted programs” are detected
within the on-access scanning; the default is 0 (no detection)
z
processesArchives – scanning of archives; possible values are 0 or 1; the
default value is 0 (archives scanning disabled)
z
syslogFacility – specification of facility used by syslog daemon (refer to the
syslog.conf manual pages for detailed information on the syslog features);
possible values are literal string types; the default value is daemon
z
reportPasswordProtectedFiles – reporting of password protected files;
possible values are 0 or 1, the default value is 0 (reporting disabled)
z
reportMacros – reporting of macro structures in the scanned files; possible
values are 0 or 1, the default value is 0 (reporting disabled)
z
reportLockedFiles – reporting of locked files; possible values are 0 or 1, the
default value is 0 (reporting disabled)
z
quarantineDirectory - Directory with AVG Quarantine. default value =
/opt/grisoft/avg7/var/
6.2. On-Access Scanner Configuration
The main configuration for the on-access scanning daemon(s) is located in
/etc/avg.conf (/usr/local/etc/rc.d/avg.conf for FreeBSD). The following can be
specified:
z
includePath – the list of paths to be scanned by the on-access scanner (at
least one path is required); possible values are strings according to the path
specification syntax; the default value is /mnt
z
excludePath – the list of paths to be ignored by the on-access scanner;
possible values are strings according to the path specification syntax; the
default value is /proc
z
numOfDaemons – the number of on-access scanning preforked daemons;
possible values are non-negative integers from 0 to 10; the default value is 2
(because of possible multiple access to the same file). Specifying the number
as 0 will disable on-access scanning.
z
scanOnOpen – scan files when they are being opened; possible values are 0
or 1; the default value is 1 (scan files upon opening). This is the
recommended setting.
z
scanOnClose– scan files when they are being closed; possible values are 0 or
1; the default value is 0 (do not scan files upon closing).
z
scanOnExec – scan files when they are being executed; possible values are 0
or 1; the default value is 0 (do not scan files upon executing).
z
scanOnCloseModified – scan files when they are being closed if they have
been modified; possible values are 0 or 1; the default value is 1 (scan
modified files upon closing).
z
excludeFileSuffix – the list of file suffixes ignored by the on-access scanner;
possible values are strings according to suffix specification syntax, example
values: .jpg .gif; the default value is none.
36
z
onVirusAction - specify what action to take when a virus is detected. Possible
values are:
0 - do nothing (default)
1 - move file into quarantine
2 - try to heal file
6.3. E-mail Scanning Configuration (AvgDaemon)
Configuration of the AVG 7.5 Free for Linux e-mail scanning daemon(s):
z
port – port number the daemon listens on; possible values are positive
integers (preferably assigned to unused ports); the default value is 55555
z
unixSocketName – the name of the Unix socket used for the e-mail scanning
daemon communication purposes; the default value is /tmp/avg.sock
z
address – local IP address the daemon is bound to – should be the same as
the local address of your e-mail server; possible values are numerical strings
according to the IP address decimal representation syntax; the default value is
127.0.0.1
z
numOfDaemons – the number of daemons; possible values are non-negative
integers, the default value is 2; specifying the number to 0 will disable the
daemon.
z
smtpAddress - Address of SMTP server used for sending notifications, in case
of using of Postfix also the address of delivering queue. default value =
localhost
z
smtpPort - Port number of SMTP server. default value = 10025
z
enableAntispam - Enable antispam engine. values: 0 - disable, 1 - enable
default value = 0
z
antispamConfigDir - Location of antispam configuration directory. default
value = /opt/grisoft/avg7/etc/antispam
z
spamLevel - Threshold defining spam score regarded as spam (genrally,
lower threshold means higher spam catch rate but also higher probability of
false positives, for details see antispam engine documentation). values: 1 - 99
default value: 70
z
onVirusAction - Action to be taken in case of virus detection. Possible values
are:
z
-
0 - do nothing
-
2 - remove infected attachment of message
-
3 - move message into quarantine
-
4 - drop the message
onSpamAction - Action to be taken in case of spam detection. default value
= 0. Possible values are:
-
0 - do nothing
-
4 - drop the message
37
z
enableAttachmentFiltering - Turn on/off attachment filtering. Values: 0 off, 1 - on default value = 0
z
filterOutAllDocuments - Turn on/off removal of all document attachments
from mail (which are by default: DO? /XL? /VBX /RTF /PP? /POT /MDA /MDB
/XML ). Values: 0 - off, 1 - on default value = 0
z
filterOutAllExecutable - Turn on/off removal of all executable file
attachments from mail. Values: 0 - off, 1 - on default value = 0
z
filterOutAllFilesWithExtension - removal all attachments with the given
extensions from mail (no default value). Example Values: DOC MP3
z
enableCertification - Turn on/off mail certification. Values: 0 - off, 1 - on
default value = 0
z
enableVirusSubjectCertification - Turn on/off mail subject certification for
virus. values: 0 - off, 1 - on default value = 0
z
enableSpamSubjectCertification - Turn on/off mail subject certification for
spam. values: 0 - off, 1 - on default value = 0
z
virusSubjectCertifyText - Text value for mail subject certification for virus.
z
spamSubjectCertifyText - Text value for mail subject certification for spam.
z
enableNotification - Turn on/off mail notification. values: 0 - off, 1 - on
default value: 0
z
notifySender - Notify the original sender when virus was detected. values: 0
- no, 1 - yes default value: 0 (strongly recommended)
z
notifyRecipients - Notify the original recipients when virus was detected.
values: 0 - no, 1 - yes default value: 0 (recommended)
z
notifyAddresses - Recipients of notification. default value: ""
z
notifyFrom - Sender of notification. default value: ""
z
notifyTemplate - Template file with notification text (in eml format). The
following macros found in the text are expanded:
-
$FROM$ -from where the notification appears to come from
-
$RECIPIENTS$ - original mail recipients
-
$SENDER$ - original mail sender
-
$VIRUSES$ - multiline list of detected viruses
6.4. AvgUpdate
Configuration of the avgupdate module:
z
location – the location where the update will be performed from; possible
values are strings according to the general URL; the default value is
http://www.avg.com/softw/70/update
z
proxy – specification of the proxy server; possible values are strings in the
form of host:port, where host is the address of a proxy server (decimal or
alphanumeric address notation, e.g. 192.168.100.99 or proxy.myserver.com)
and port is the numeric specification of respective port; to disable the proxy
server leave the default off value
38
z
proxyLogin – specification of the proxy user, enabled only when the proxy
option is enabled as well; possible values are strings in the form of
user:password, for example frog:swamp; to disable this feature leave the
default off value
z
backupDir – the location of the backup directory that is used for storing the
backup data before performing the update itself; possible values are strings
according to the path specification syntax; the default value is
/opt/grisoft/avg7/var/update/backup
z
preinstallDir – the location of the directory that is used for storing the update
data before installing them (the directory is cleared after completing the
update); possible values are strings according to the path specification syntax,
the default value is
/opt/grisoft/avg7/var/update/preinstall
z
downloadDir – the location of the directory that is used for storing the
downloaded update files (unless the avgupdate '-d' command line option is
specified, the directory is cleared after finishing the update); possible values
are strings according to the path specification syntax; the default value is
/opt/grisoft/avg7/var/update/download
z
logFile – the location of the update log file; possible values are strings
according to the path specification syntax; by default
/opt/grisoft/avg7/var/update/log/avg7upd.log
z
logLevel – the update logging level; possible values are integer numbers from
1 to 3 (the default value is 1):
z
o
1 – lowest logging level, only the update start/finish information is
recorded
o
2 – medium logging level, some more information on various update
phases is recorded
o
3 – maximum logging level, detailed information on all update phases is
recorded (useful when an update fails for some unknown reason)
timeout – specification of the maximum time the download can take (in
seconds); possible values are non-negative integers; the default value is 0 (no
limitation posed upon the downloading time)
39
7. AVG Quarantine
AVG quarantine is a repostiory where infected e-mails or files can be moved to for
further processing (this can be set as action to be taken on virus detection in the
configuration file /opt/grisoft/avg7/etc/avg.conf, where the location of the
quarantine can be changed too).
7.1. avgqrtctl Quarantine Control Utility
For basic management of the quarantine, there is the utility avgqrtctl, which
enables listing (in a specified order), deleting, or restoring files from the quarantine.
Files can be specified using regular expressions.
7.1.1. Usage
avgqrtctl −l [regexps] [−q path] [−H] [−S [F|O|V|S|C|D]]
avgqrtctl −d [regexps] [−q path] [-i]
avgqrtctl −r [regexps] [−q path] [-i]
avgqrtctl −h | −V
7.1.2. Options
−l, −-list regexps
List files matching regular expressions regexps
stored in quarantine. Files can be sorted using
option -S and header can be set to be repeated
every 25 lines using option -H. See section 7.1.3
Output for description of information printed
about each listed file.
−r, −-restore regexps
Restore files matching regular expressions
regexps stored in quarantine to their original
filename and destination. Existing files are
overwritten quietly unless option -i is set on.
−d, −-delete regexps
Delete files matching regular expressions regexps
from quarantine. Confirmation will be required if
the option -i is set on.
−i, −-interactive
regexps
Require confirmation in case of overwriting of
existing file (option −r) or deleting of a file
(option −d).
−q, −-qrtloc path
Location of quarantine file.
−S, −-sort [order]
Specify order of files listed from quarantine.
Possible values of order are:
-
F sort by filename
-
O sort by original filename
-
V sort by virus name
40
-
S sort by size
-
C sort by file change time
-
D sort by time of insertion into
quarantine
−H, −-headers
When listing files from quarantine, repeat header
every 25 lines.
−V, −-version
Display avgqrtctl version.
−h, −-help
Display command line help for avgqrtctl.
7.1.3. Output
This section describes the information avgqrtctl prints for each file listed from
quarantine.
MODIF TIME time of last file modification
INSERT TIME time of insertion of file into quarantine
VIRUS NAME name of detected virus
FILE SIZE size of file
FILE PATH original path to file
41
8. FAQ
The FAQ section of the AVG Free website (http://free.avg.com) provides answers
to most issues that you may encounter while using AVG Free for Linux/FreeBSD.
Unfortunately, no technical support is available for users of any free version of AVG.