1
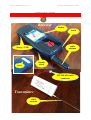
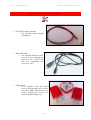
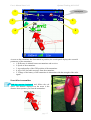
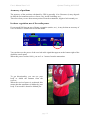
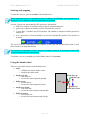
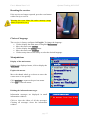
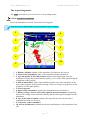
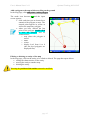
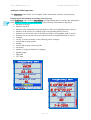
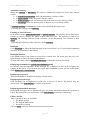
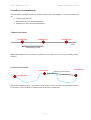
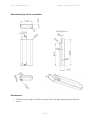
User's Manual Icare2 v1.1
Optimal Tracking 08/10/2015
USER'S MANUAL ICARE2 V1.1
Icare2 has been specially designed to locate flying aircraft (aeromodelling, drones, etc.).
It is completely autonomous, can be used everywhere and requires no network. Its use does
not involve any financial cost.
Particular attention has been paid to locating the distant landing point. When the model
descends, the Icare2 transmitter sends its position very frequently, before touching ground.
The radio range, when the transmitter is in flight, is considerably longer than when it is on the
ground. We thus know the position of the model just before the landing, even before going
out to search for it.
All the parameters of the transmitter can be set from the receiver which allows you to
configure Icare2 according to your own needs. It is possible simply to search for your model
or follow the model in real time.
The Icare2 transmitter has no built-in battery, which allows you to choose your mode of
supply. It is possible to connect it to a battery already in the model or add a specific battery.
page 1
User's Manual Icare2 v1.1
Optimal Tracking 08/10/2015
CONTENTS
1
IMPORTANT SAFETY INSTRUCTIONS………….……. 3
2
DECLARATION OF CONFORMITY WARRANTY…… 4
3
PRESENTATION................................................................... 5
4
NECESSARY EQUIPMENT………………………………. 6
5
PRINCIPLE OF OPERATION……………….…………… 8
6
QUICKSTART……………………………………...………. 11
7
TIPS AND TRICKS FOR USE………………..…………… 17
8
AUTONOMY OF THE TRANSMITTER…………..…….. 22
9
USE OF THE RECEIVER………...……………………….. 23
10 USE OF THE TRANSMITTER…………………………… 52
11 CONNECTING TO A PC, ICARE2 MANAGER…….….. 57
12 SPECIFICATIONS…………………………………………. 64
page 2
User's Manual Icare2 v1.1
Optimal Tracking 08/10/2015
1 IMPORTANT SAFETY INSTRUCTIONS
Optimal Tracking cannot be held liable for any direct or indirect damage, for any
injury, drowning, abduction, disappearance or death affecting a person, animal or
object.
Do not operate the Icare2 system while driving.
Park your vehicle before using the system.
Turn off your Icare2 in aircraft.
Icare2 may cause interference with aircraft systems.
Turn off your Icare2 in close proximity to any electronic medical equipment.
Medical electrical equipment is sensitive to radio waves.
Specific regulations
Observe the special regulations in force in the place where you are. Check that the use of
Icare2 is not prohibited.
Water tightness
Only the transmitter of Icare2 is waterproof (to short duration immersion at the surface of the
water). Keep the receiver dry.
Charging the receiver
To recharge the receiver battery, connect the receiver to a USB port to international standards.
Opening the product
The receiver must not be opened because any incorrect handling could lead to the explosion
of the battery or some other hazard. Therefore, only an authorized service technician may
open the unit.
Do not dispose of the unit in a fire and do not use in areas with a risk of explosion.
The battery could explode.
Do not throw away the unit just anywhere.
If you want to dispose of the unit you must:
• return it to your dealer.
• entrust it to a proper waste dump.
• return it to Optimal Tracking.
page 3
User's Manual Icare2 v1.1
Optimal Tracking 08/10/2015
2 DECLARATION OF CONFORMITY AND WARRANTY
Declaration of conformity
We, Optimal Tracking, hereby declare under our sole responsibility that the Icare2 product conforms to the following European standards:
Radio:
Radio:
E.M.C.:
Electrical safety:
Health:
EN 300 220-2 (V2.1.2)
EN 300 440-2 (V1.2.2)
EN 301 489-3 (V1.4.1)
EN 60950-1 (2006)
EN 50371 (2002)
The receiver falls under Class 2 according to the EN 300 220-2 standard.
Guarantee
The term, “Product,” refers to all products made by Optimal Tracking described in this document.
Optimal Tracking guarantees the Product against any material or construction defects under normal operating conditions, for a period of 1
year starting from the date of purchase. The original purchase invoice or register receipt, indicating the Product purchase date, constitutes
proof of purchase date. All software supplied with the Product, including firmware, are supplied “as-is.” Optimal Tracking does not
guarantee that the function of these software programs will be uninterrupted or free from errors, or that these software programs will meet
your needs.
If you make a claim under this Guarantee, Optimal Tracking may, at its discretion, repair or replace all or part of the defective Product
covered by the Guarantee with new or refurbished products or parts. If Optimal Tracking decides to use refurbished parts or products, these
will have the same characteristics or performance as new products.
All parts removed or products replaced under the Guarantee become the property of Optimal Tracking.
This Guarantee does not apply:
•
if the Product was damaged or rendered defective following a use of the Product not compliant with the use for which it was
designed, particularly including use not compliant with the user manual supplied with the Product, or any other misuse or
negligence by the Product user.
•
if the Product was modified, notably through the use of products not manufactured or sold by Optimal Tracking
•
if the Product was repaired by someone not affiliated with Optimal Tracking, or a service provider approved by Optimal
Tracking.
•
in the event an inappropriate shipping method or packaging is used when returning the Product to Optimal Tracking or to a
service provider approved by Optimal Tracking.
•
to lost or damaged software, data, or removable storage media. Optimal Tracking may decide to replace the Product sent in under
the guarantee with a refurbished product of the same quality, resulting in your inability to access the data stored in your original
Product.
OPTIMAL TRACKING EXCLUDES ANY OTHER GUARANTEE, EXPRESS OR IMPLICIT, AND NOTABLY ANY IMPLICIT
GUARANTEE OF MERCHANTABILITY OR SUITABILITY FOR A PARTICULAR USE. IN NO CASE MAY OPTIMAL TRACKING
BE HELD LIABLE FOR PARTICULAR OR INDIRECT ANCILLARY DAMAGES, NOTABLY LOSS OF INCOME, PROFIT, OR
DATA, OR PERIODS OF IMMOBILIZATION, REGARDLESS OF WHETHER THE REQUEST FOR LIABILITY IS CONTRACTUAL,
CRIMINAL, OR FOUNDED ON A GUARANTEE, IF IT IS FOUNDED ON THE USE OF FUNCTION OF THE PRODUCT OR ANY
SOFTWARE SUPPLIED BY OPTIMAL TRACKING WITH THE PRODUCT, EVEN IF OPTIMAL TRACKING HAS BEEN
INFORMED OF THE POSSIBILITY OF SUCH DAMAGES.
By making a claim under this Guarantee, you acknowledge that the distribution and, depending on availability, the replacement of the
Product in accordance with and within the limits of this Guarantee, constitute your sole and unique recourse with regard to Optimal Tracking
under this Guarantee in the event of a defect of the Product covered by this Guarantee.
Optimal Tracking
360 chemin de Pauli
13760 Saint Cannat - France
Tel: +33 (0) 4 42 38 05 32
www.optimaltracking.com
The information contained in this document is subject to change without notice. Optimal Tracking reserves the right to change or improve
its products and to make modifications to this content without prior warning. To get the latest updates of this document, please refer to
www.optimaltracking.com.
The brand names mentioned in this manual are the property of their owners.
page 4
User's Manual Icare2 v1.1
Optimal Tracking 08/10/2015
3 PRESENTATION
Receiver
display
torch
radio
antenna
charge / USB
thumb
wheel
reset
JST-ZH-02 female
connector
Transmitter
radio
antenna
page 5
User's Manual Icare2 v1.1
Optimal Tracking 08/10/2015
4 NECESSARY EQUIPMENT
• JST-ZM-02 male connector
o It is available on the Optimal
Tracking site.
• Mini USB cable
o It is supplied with the Icare2
receiver. It is for charging the
battery in the receiver but
also for connecting the
receiver to a PC.
•
USB charger
o It is supplied with the Icare2
receiver and recharges the receiver.
Any other USB connection can be
used to recharge the receiver: PC,
cigarette lighter adapter, etc.
page 6
User's Manual Icare2 v1.1
Optimal Tracking 08/10/2015
• Battery
o The Icare2 transmitter can be
powered by any rechargeable or
non-rechargeable battery of 3.3 to
5.5 volts that can deliver a peak
of 500mA. The ideal is to
connect the transmitter to a
rechargeable lithium battery.
Refer
to
the
chapter
AUTONOMY
OF
THE
TRANSMITTER page 22 for
the choice of the battery.
• PC under Windows XP/Vista/Windows 7/Windows 8
o Useful only to view the position of the transmitters on Google Earth, to transfer
maps or back up trajectories. Refer to the chapter CONNECTING TO A PC,
ICARE2 MANAGER page 57 for more details.
• Icare2 Manager, viewing software on PC
o It can be downloaded from the Optimal Tracking site.
page 7
User's Manual Icare2 v1.1
Optimal Tracking 08/10/2015
5 PRINCIPLE OF OPERATION
Satellites
GPS/GLONASS
Position
sent
by radio
• The transmitter and receiver each compute their position based on the information
received from the GPS and GLONASS satellites.
• The transmitter sends its position to the receiver by radio.
• The receiver calculates the course and the relative distance of the transmitter.
page 8
User's Manual Icare2 v1.1
Optimal Tracking 08/10/2015
Periodicity of transmissions
The transmitter regularly sends its position to the receiver according to 3 criteria which can be
set:
• Temporal periodicity.
• Movement since the last transmission.
• Altitude loss since the last transmission.
Temporal periodicity
transmission
transmission
transmission
time
Transmission period
When the transmitter moves slowly, a position is sent to the receiver every N seconds (30 by
default).
Criterion of movement
transmission Criterion of movement
transmission
transmission
When the transmitter moves, a position is sent to the receiver as soon as the transmitter moves
by N meters (50 by default) in relation with to the last position sent.
page 9
User's Manual Icare2 v1.1
Optimal Tracking 08/10/2015
Criterion of altitude loss
transmission
Criterion of altitude loss
transmission
When the transmitter descends, a position is sent to the receiver as soon as the transmitter has
lost N meters of altitude (10 by default) in relation with to the last position sent.
This enables you to know the landing point of the model precisely, even if it is out of radio
range after landing.
Indeed, when the transmitter is above ground level, the radio range is much greater.
Settings
All parameters related to the periodicity of transmission can be modified (see page 56).
It is also possible to choose the radio channel among a list of 10 channels. The receiver
receives the positions of all the transmitters on its channel.
Viewing modes
There are several viewing modes (see page 27). The most used is the mode search for
transmitter.
page 10
User's Manual Icare2 v1.1
Optimal Tracking 08/10/2015
6 QUICKSTART
Recharging the receiver battery
Connect the receiver to the charger via the
USB cable:
• Maximum charging time:
approximately 3 hours.
• Charging: the LED flashes every 2
seconds.
• Charge done: the LED flashes twice
per second.
Positioning and power of the transmitter
Be outdoors with a good view of the sky.
The upper part of the
transmitter must be in
the open air and not
covered.
It is advisable to place
the transmitter
vertical.
Connect the
transmitter to its
supply.
A blue LED lights up
for a few seconds.
page 11
User's Manual Icare2 v1.1
Optimal Tracking 08/10/2015
Starting the receiver
Press the thumb wheel for one second.
Choice of language
•
•
•
•
First use
Click on the thumb wheel to display the main menu.
Move the cursor onto settings and then click.
Move the cursor on language.
Click as many times as necessary to select the language.
Waiting for positioning of the receiver
• Be outdoors with a good view of the sky.
• Wait until you have at least 3 green bars. Your position is determined.
First use
Calibration of the compass
As soon as the receiver determines its
position, the procedure for calibrating the
compass starts.
Hold the receiver horizontal, click, turn
around about 4 times for 20 seconds while
holding the unit horizontally.
For a good calibration, it is important to
stay away from objects that generate a
magnetic field (vehicles, etc.) and keep the
receiver horizontal.
At the end of the calibration, the True North
setting menu starts, see page 13.
page 12
User's Manual Icare2 v1.1
Optimal Tracking 08/10/2015
Handling the thumb wheel
To access the main menu, click the thumb wheel.
In the absence of the menu, turning the thumb wheel up or down activates the zoom on the
screen.
In the presence of the menu, turning the thumb wheel up or down enables you to navigate in
the menu.
Top
• Zoom in
• Move menu cursor up
Click
• Main menu
• navigation
thumb
wheel
Bottom
• Zoom out
• Move menu cursor down
First use
Set the time
• Go to the menu settings / UTC time diff.
• Enter the time zone in hours and hundredths of hours in relation to the universal time
(UTC) (In France, 2.00 in summer time and 1.00 in winter time).
True North setting
First use
The magnetic declination is, at a given point on the surface of the
earth, the angle formed between the direction of the geographic
North Pole and the magnetic north pole. This angle is counted
positively towards the east and negatively towards the west.
Click true North setting
You have now 3 ways to define the true North:
• Enter the value of the declination, positive towards the east
and negative toward the west. The value can be found on the
site www.magnetic-declination.com for each point of the
globe.
• If you know the direction of the True North, point the
receiver in this direction and click on point true North.
• If you see an Icare2 transmitter located more than 100
meters, point in the direction of this transmitter and click on
point transmitter. This is the best solution.
page 13
User's Manual Icare2 v1.1
Choosing a transmitter name
•
•
•
•
•
•
Optimal Tracking 08/10/2015
First use
Go to the transmitters menu.
Click on the serial number of your transmitter.
Click on name.
Enter the name you want to assign to your transmitter.
Validate.
Click save.
Choice of display mode
The ideal mode to locate your transmitter is the mode search for your transmitter.
If you use your receiver for the first time, it will switch automatically into this mode as soon
as a radio message is sent by your transmitter.
If this is not the case:
• Click on mode / search for transmitter.
• In the list of transmitters, click on the line corresponding with your transmitter.
Waiting for positioning of the transmitter
Search panel
The search panel flashes for as long as the transmitter is not able to determine its position.
The message Transmitter positioning in progress appears on the panel.
page 14
User's Manual Icare2 v1.1
Optimal Tracking 08/10/2015
Search panel
1
3
2
4
5
As soon as the transmitter has determined its position, the search panel displays the essential
parameters of the transmitter:
• 1: Difference in altitude between transmitter and receiver.
• 2: Speed of the transmitter.
• 3: Age and quality of the GPS position of the transmitter.
• 4: Age of the last radio message from the transmitter.
• 5: Voltage of the battery of the transmitter in alternation with the strength of the radio
signal.
Search for transmitter
Hold the receiver horizontal and follow the red
arrow. The distance displayed on the arrow is the
distance that separates you from the transmitter.
page 15
User's Manual Icare2 v1.1
Optimal Tracking 08/10/2015
Improving radio reception
To improve radio reception when the
transmitter is far away, you can take the
receiver to a high place with the antenna
vertical.
It is also wise to go onto a high and clear
point, to better receive the transmitter
position message.
Shutdown of devices
The receiver shuts down by pressing the thumb wheel for 3 seconds.
The transmitter stops by disconnecting its power supply.
page 16
User's Manual Icare2 v1.1
Optimal Tracking 08/10/2015
7 TIPS AND TRICKS FOR USE
Waiting for positioning of the transmitter and the receiver
Search panel
It is possible to search for the transmitter only when transmitter and receiver have determined
their position.
Wait for the search panel to stop flashing.
The positioning of the transmitter or receiver requires 1 to 3 minutes depending on the view
of the sky they have.
When starting the receiver?
To take full advantage of the Icare2 capabilities, it is recommended to start the receiver before
starting a flight. Thus, the receiver stores permanently the positions of the transmitter. If the
receiver is not turned on and that your model land very far, you will have no recorded position
of the transmitter.
page 17
User's Manual Icare2 v1.1
Optimal Tracking 08/10/2015
How to hold the receiver?
During all the navigation operations, the receiver must be held
horizontally so that the compass can accurately determine the
direction of the receiver in relation to the north.
However, if the transmitter is located far away or is
hidden by obstacles (buildings, hills, etc.), you are
advised to keep the receiver as high as possible with
the antenna vertical until you receive a position
message from the transmitter (indicated by an audible
message). The reception is thus improved.
Where to place the transmitter
The upper part of the transmitter
must be in the open air and not
covered.
It is advisable to place the
transmitter vertical.
Increasing the range of the system
When the transmitter is far away, or the obstacles are located
between the transmitter and receiver, it is advisable to go to a
high and clear point, to get better reception of the transmitter
position message.
page 18
User's Manual Icare2 v1.1
Optimal Tracking 08/10/2015
Accuracy of positions
The accuracy of the positions calculated by GPS is generally 10 to 20 meters (it may degrade
in difficult environments such as a forest, city, inside a building, etc.).
Therefore when you are about twenty meters from the transmitter, begin to look around you.
In dense vegetation, use of the radio power
If your model fell into an area of dense vegetation (maize, etc.), it may be that an accuracy of
10 to 20 meters is insufficient to find the model.
You can then use the power of the received radio signal that appears at the bottom right of the
dark blue search panel.
When this power reaches 100%, you are 2 or 3 meters from the transmitter.
To get directionality, you can use your
body to shield the antenna from the
receiver.
When the received power is weakened, this
means that the transmitter is hidden by your
body. Your model is therefore behind you.
page 19
User's Manual Icare2 v1.1
Optimal Tracking 08/10/2015
Poor reception of GPS signals
At the time of landing, it may be that the transmitter does not receive the GPS signals well:
• Transmitter immersed in the water.
• Model turned over in the mud.
• Model stored indoors by a person.
• Etc...
In this case, in search for transmitter mode, you will see a double arrow on the screen:
• The red arrow indicates the current position of the transmitter, but with poor accuracy
since the GPS signal is bad.
• The green arrow indicates the last precise position of the transmitter. It is therefore
normally the landing point of the model. If the model has been stored indoors, this
position is the point of entry into the building.
Using several transmitters simultaneously
Several transmitters can be used simultaneously and can even use the same radio channel
thanks to the radio message collision detection system.
Each receiver receives the positions of all the transmitters on the same channel. The radio
channel of the receiver and transmitter can be set (see pages 47 and 56).
page 20
User's Manual Icare2 v1.1
Optimal Tracking 08/10/2015
Recalibrating the compass
The earth's magnetic field varies depending on the place and the environment. It is therefore
advisable to recalibrate the compass from time to time. A message is sent when the
recalibration is desirable. To recalibrate, see page 47.
Defining True North
To set the True North, the best way is to point an Icare2 transmitter located more than 100
meters:
• Click on settings/true North setting
• Point the transmitter and click on point transmitter
Behaviour of the compass according to the speed
At low speed (below 10 km/h), for all display modes using the compass, the display of the
screen depends on the direction of the receiver. The top of the screen corresponds with what
is on the front of the receiver. The icon of the compass course is .
Beyond this speed, the display is turned according to your direction of travel. The top of the
screen corresponds with the place where you are going. The icon of the compass course is
.
replaces the indication of the course
At low speed, if the receiver is not horizontal, the icon
in the bottom icon bar to advise you to keep the receiver horizontal.
Cleaning the trajectories
The trajectories of the receiver and the transmitters lengthen each time they are used.
Remember to clean them from time to time.
page 21
User's Manual Icare2 v1.1
Optimal Tracking 08/10/2015
8 AUTONOMY OF THE TRANSMITTER
The autonomy of the transmitter depends on many factors:
• The frequency of transmitting positions.
• The movement of the transmitter.
• The desired GPS accuracy of positions.
The transmitter consumes less when it does not move. Consequently, the consumption
strongly depends on the movement of the transmitter.
Autonomy according to the capacity of the battery
Little movement
(5 min per hour)
Default
transmitter
settings
Default
transmitter
settings except 60
seconds send
period
160 mAh: 9 hours
Slow permanent
movement
(< 10 km/h)
160 mAh: 4 hours
Fast permanent
movement
(> 10 km/h)
160 mAh: 2 to 4 hours
240 mAh: 14 hours
240 mAh: 6 hours
240 mAh: 3 to 6 hours
350 mAh: 20 hours
160 mAh: 13 hours
350 mAh: 8 hours
350 mAh: 4 to 8 hours
240 mAh: 20 hours
Identical to the upper
box
Identical to the upper
box
350 mAh: 29 hours
These measurements have been made with Lithium Polymer batteries:
• Battery 160 mAh: weight 1.5 grams.
• Battery 240 mAh: weight 4.6 grams.
• Battery 350 mAh: weight 6.9 grams.
The autonomy can be increased by slightly degrading the accuracy of the GPS positions. For
example, going from 15 meters to 20 meters.
Recommendations
Battery of more than 1000 mAh
Battery of 240 to 1000 mAh
Battery of less than 240 mAh
Everything is allowed. You can choose the period of
sending you want. You have the possibility to obtain
real time monitoring of the model.
The default settings are a good compromise.
You can:
- increase the sending period up to 60 seconds
- reduce the GPS accuracy to 20 meters
page 22
User's Manual Icare2 v1.1
Optimal Tracking 08/10/2015
9 USE OF THE RECEIVER
Recharging the battery
Before using for the first time, fully charge the receiver.
Connect the receiver to the Mini-USB
cable. Connect the Mini-USB cable to the
supplied charger or any other USB socket.
Receiver on standby
• Maximum charging time:
approximately 3 hours.
• Charging: the LED flashes every 2
seconds.
• Charge done: the LED flashes
twice per second.
Receiver running
• Slower charge.
• Charge indicated by an icon to the left of the lower strip.
The autonomy of the fully charged receiver is about 14 hours (at 20°C).
Because of the magnetic field created by the charger, the course calculated by the compass
may be wrong during the charge.
First use
• Start the receiver (press 1 second on the thumb wheel).
• Choose the language of the menus (see page 25).
• Initialization of the position, the compass and time:
o Place the receiver outdoors for a few minutes, with a good view of the sky, so
that the receiver can determine its GPS position.
o Once the position is determined, the calibration menu of the compass is
displayed.
o Hold the receiver horizontal, click, turn around about 4 times for 20 seconds
while holding the unit horizontally. The compass is now calibrated (see page
47).
o Set True North (can be done later) (see page 48).
o Set the time in settings / UTC time diff. by defining the time offset from UTC
(offset defined in hours and hundredths of an hour) (see page 48).
page 23
User's Manual Icare2 v1.1
Optimal Tracking 08/10/2015
Starting and stopping
To start the receiver, press 1 second on the thumb wheel.
Before using the receiver in navigation, place it outdoors, horizontally, with a good view of
the sky for 1 to 3 minutes so that it can determine its position.
At least 3 green bars mean that the GPS position is determined.
• blue bars: number of satellites being acquired, position unknown.
• green bars: number of satellites used to calculate the position.
• 3 green bars: 3 satellites used, 2D position. The altitude is unknown and the position is
inaccurate.
• 4 or 5 green bars: at least 4 satellites are used to calculate the position. The position is
accurate.
The receiver can be used without GPS reception. In this case, the last known position is used.
Some features are then deactivated.
To search for a transmitter, reach a point or to follow a route, it is necessary to have GPS
reception, namely at least 3 green bars.
To put the receiver on standby, press the thumb wheel for 3 seconds.
Using the thumb wheel
There are 5 possible actions on the thumb wheel:
• click:
o validates the choice under cursor.
o displays the main menu.
• all the way up:
o fast zoom-in.
o moves the cursor upwards quickly.
• half-way up:
o slow zoom-in.
o moves the cursor upwards slowly.
• all the way down:
o fast zoom-out.
o moves the cursor downwards quickly.
• half-way down:
o slow zoom-out.
o moves the cursor downwards slowly.
page 24
all the way up
half-way up
click
thumb
wheel
half-way
all thedown
way down
User's Manual Icare2 v1.1
Optimal Tracking 08/10/2015
Resetting the receiver
If the receiver no longer responds, press the reset button
with a fine tip to reset it.
Warning, the reset clears the entire memory (maps,
alarms, trajectories, etc.).
Choice of language
The receiver is factory configured in English. To change the language:
• Click to display the main menu in English (Main menu).
• Move the cursor onto settings.
• Click to display the settings menu.
• Move the cursor onto language.
• Click as many times as necessary to select the desired language.
Manipulations
Display of the main menu
If there is no displayed menu, click to display the
main menu.
Explore the menus
Move the thumb wheel up or down to move the
cursor more or less quickly.
Click previous to return to the previous menu.
Click exit to close all menus.
Deleting the information messages
Information messages are displayed in small
information windows:
Click to clear the oldest of all the messages.
Clearing all messages clears the information
window.
page 25
User's Manual Icare2 v1.1
Optimal Tracking 08/10/2015
Stopping audio messages
Click to stop all audio messages.
Zoom
If there are no menus, use the thumb wheel to zoom the display:
• Thumb wheel upwards: zoom in onto the displayed area.
• Thumb wheel downwards: zoom out from the displayed area.
Receiving a message from a transmitter
Each time a position message is received from a transmitter, a short sound is emitted by the
receiver.
The reception icon blinks for a few seconds and indicates the quality of the reception (from 0
to 5).
In search for transmitter mode, the receiver emits a sound only when the transmitter being
searched for sends its position.
page 26
User's Manual Icare2 v1.1
Optimal Tracking 08/10/2015
The 6 operating modes
The mode menu allows you to select one of 6 operating modes.
1-Mode search for transmitter
Select the transmitter to search. The search screen appears.
Place the receiver horizontally for good operation of the compass.
1
6
2
7
3
8
9
4
10
5
• 1: Relative Altitude: altitude of the transmitter in relation to the receiver.
• 2: Name of the transmitter: name of the transmitter being searched for.
• 3: Age and quality of the GPS position: indicates the elapsed time since the
transmitter went by this position and the quality (1 to 5) of the GPS signal during the
calculation of this position.
• 4: Disk of uncertainty: limit of the probable location area of the transmitter at the
time of the reception of the position message. This area is larger in proportion to the
weakness of GPS signal quality.
• 5: Your trajectory.
• 6: Speed of the transmitter: speed of the transmitter being searched for.
• 7: Battery voltage / Power of the radio signal from the transmitter: alternating
between the voltage of the transmitter battery and the radio signal strength from the
transmitter.
• 8: Age of the radio reception: indicates the elapsed time since the last time a
transmitter position was received.
• 9: Trajectory of the transmitter.
• 10: Arrow and distance: indicate the direction and distance of the transmitter from
you.
page 27
User's Manual Icare2 v1.1
Optimal Tracking 08/10/2015
Always check the age of the GPS position. If it is too large, this means that the transmitter has
not calculated the position for a long time.
If the receiver or the transmitter has not determined its position, the search panel flashes and
indicates that positioning is in progress.
If the automatic centring option is enabled (menu settings/centring), the zoom is
continuously adjusted so that the transmitter appears in the screen. This option can be
deactivated.
In dense vegetation, use of the radio power
If your model fell into an area of dense vegetation (maize, etc.), it may be that an accuracy of
10 to 20 meters is insufficient to find the model.
You can then use the power of the received radio signal that appears at the bottom right of the
dark blue search panel.
When this power reaches 100%, you are 2 or 3 meters from the transmitter.
To get directionality, you can use your
body to shield the antenna from the
receiver.
When the received power is weakened, this
means that the transmitter is hidden by your
body. Your model is therefore behind you.
page 28
User's Manual Icare2 v1.1
Optimal Tracking 08/10/2015
Poor reception of GPS signals
At the time of landing, it may be that the transmitter does not receive the GPS signals well:
• Transmitter immersed in the water.
• Model turned over in the mud.
• Model stored indoors by a person.
• Etc...
In this case, in search for transmitter mode, you will see a double arrow on the screen:
• The red arrow indicates the current position of the transmitter, but with poor accuracy
since the GPS signal is bad.
• The green arrow indicates the last precise position of the transmitter. It is therefore
normally the landing point of the model. If the model has been stored indoors, this
position is the point of entry into the building.
page 29
User's Manual Icare2 v1.1
Optimal Tracking 08/10/2015
2-Mode reach a point
Select the map in which the point to reach is recorded.
Select the point to reach.
The search screen appears.
Place the receiver horizontally for good operation of the compass.
• Arrow and distance: indicate the direction and distance of the point to be reached
from you.
• Checkered Flag: it points to the point to reach.
If the automatic centring option is enabled (menu settings/centring), the zoom is
continuously adjusted so that the point to reach appears in the screen. This option can be
deactivated.
page 30
User's Manual Icare2 v1.1
Optimal Tracking 08/10/2015
3-Mode follow a route
Select the map in which the line to follow is recorded.
Select the line to follow.
A glance of the line appears. Then choose in which direction you want to follow the line:
• direct or
• opposite
The following screen appears.
Place the receiver horizontally for good operation of the compass.
3
4
1
5
2
• 1: nearest point of the route to you.
• 2: Arrow: it shows your deviation in relation to the route and the direction to follow,
once on the route.
• 3: Deviation from the route: indicates the distance to the nearest point of the route.
• 4: Travel distance: alternates between:
o distance to travel on the route until the end of the route.
o distance to travel on the route until the next point of the route.
• 5: Ball with a checkered flag on it: indicates alternately:
o the end of the route.
o the next point of the route.
If the automatic centring option is enabled (menu settings/centring), the zoom is
continuously adjusted so that the nearest point to you appears in the screen. This option can be
deactivated.
page 31
User's Manual Icare2 v1.1
Optimal Tracking 08/10/2015
4-Mode see and go
This mode enables you to:
• Aim at a remote point and reach it.
• Define a running course and not to deviate from it.
You need to define:
• the use:
o hiking: only the course and the distance are required.
o free flight: in addition to the course and the distance, the wind speed is required to
scale the aiming axis depending on the time of flight of the model.
• type of entry:
o keyboard: the value of the course must be entered.
o aiming: the value of the course is defined by the internal compass by turning the
receiver to the aiming direction.
• the distance: distance of the point to reach. If you do not seek to reach a particular
point, enter a large distance value. The axis to follow will have a length that is equal to
this distance.
• the wind speed: only for free flight use. It is used to scale the axis to follow
depending on the flight time of the model. Thus, if you have aimed at the landing
point of the model and its flight time is 3 minutes, it is enough to go to the graduation
3 minutes from the axis to find the model.
If you choose to enter the course by aiming, angle the antenna of the receiver in the chosen
axis and click validate.
Otherwise, enter the course manually and then validate.
After validation, the next screen appears.
Place the receiver horizontally for good operation of the compass.
page 32
User's Manual Icare2 v1.1
Optimal Tracking 08/10/2015
4
1
2
5
3
6
• 1: Axis to follow.
• 2: Arrow: it shows your deviation in relation to the axis and the direction of the axis.
• 3: Flight time and distance: when used in free flight, indicate the flight time and the
distance travelled by the model, whether it landed on the closest point of the axis to
you.
• 4: Travel distance: distance to travel on the axis up to the end of the axis.
• 5: Nearest point of the axis to you.
• 6: Deviation from the axis: indicates the distance to the nearest point of the axis.
• Checkered flag: indicates the end of the axis.
If you want to change the mode, then return to the see and go mode while retaining the same
axis, select the last see and go mode.
In addition, if you want to change the settings of the see and go menu (wind speed, etc.)
while keeping the same axis, go to the settings/settings see and go menu.
If the automatic centring option is enabled (menu settings/centring), the zoom is
continuously adjusted so that the nearest axis point to you appears in the screen. This option
can be deactivated.
page 33
User's Manual Icare2 v1.1
Optimal Tracking 08/10/2015
5-Mode global fixed North
In this mode, the compass has no further effect. The displayed view is turned with the north at
the top.
The view can be moved by the thumb wheel or centred on any geographical entity.
For that, go to the center the view menu:
• Full centring: frames the view so that everything is displayed (trajectories, maps,
transmitters, etc.).
• horizontal move: the view is moved to the right or left by rotation of the thumb
wheel.
• vertical move: the view is moved downwards or upwards by rotation of the thumb
wheel.
• focus on ...: centre the view on the chosen entity.
6-Mode global compass
The displayed view is centred on you. The compass is used to direct the display.
page 34
User's Manual Icare2 v1.1
Optimal Tracking 08/10/2015
Description of the display
deactivations
(sound, etc.)
map display
transmitters
alarms
available
memory
transmitter
reception quality
operating mode
computer
connection
circle of
uncertainty
current scale
modification
transmitter
position
transmitter
name
scale
circle
transmitter
autonomy
active map
entity
transmitter
position age
reference
position
transmitter
trajectory
your position
your trajectory
battery status
or charge
compass
heading
time
GPS reception
your altitude
Upper icon bar
• operating mode: indicates in what mode the receiver is located.
• available memory: shows free memory space in green.
• deactivations: successively displays the deactivated functions among sound, vibrator
and light alarm.
• map display: indicates whether a map is active.
• transmitter alarms: indicates that a transmitter has triggered an alarm.
• transmitter reception quality: indicates (0 to 5) the quality of reception of the last
message from a transmitter. A single bar or no bars indicate that the signal is low, and
that the transmitter may soon be out of range.
• computer connection: indicates that the receiver is connected to the USB port of a
computer.
page 35
User's Manual Icare2 v1.1
Optimal Tracking 08/10/2015
Lower icon bar
• battery status or charge: indicates the battery autonomy of the receiver. Under
charge, a symbol of connection is displayed.
• time: indicates the time based on UTC and the user-defined offset from UTC time.
• GPS reception quality: the blue bars designate the number of satellites being
acquired, and the green bars show the number of satellites used for the calculation of
the position. Good accuracy requires at least 4 green bars (4 satellites used for the
position calculation).
• altitude: designates the altitude of the receiver above sea level.
• compass heading:
o below 10 km/h and horizontal receiver, designates the course pointed by the
antenna.
o above 10 km/h, designates the course in which you are moving.
o below 10 km/h and unit not horizontal.
Central area
• your position:
o fixed: your position is accurate.
o alternately flashing: your position is unknown.
•
•
•
•
•
your trajectory: it is continuously saved. It is possible to display it or not, to change
its characteristics (colour, thickness, distance between its points, frequency of
recording, etc. see page 50).
reference position: depending on the operating mode, the reference can be in the
middle, at the top or at the bottom of the screen. For example, for all search modes, it
is floating to widen the search space. It is possible to deactivate the floating character
of the reference (see page 49).
active map entities: all points, lines and polygons of the active map are displayed. It
is possible to deactivate the display of their name (see page 50).
circles of uncertainties: they limit the probable area of location of each transmitter.
transmitter position:
…
o fixed: means that the position of the transmitter is known.
o Alternately flashing: transmitter position unknown.
…
•
•
•
o
flashing: alarms from the transmitter.
transmitter name: a name that you can define is associated with each transmitter. By
default this name is defined by "sn" followed by the serial number of the transmitter.
autonomy of the transmitter: this display allows you to watch the autonomy of the
transmitter.
transmitter position age: indicates the time elapsed since the transmitter went by this
position.
page 36
User's Manual Icare2 v1.1
•
•
Optimal Tracking 08/10/2015
transmitter trajectory: it is continuously saved. It is possible to display it or not, to
change its characteristics (colour, thickness, distance between its points, etc. see page
50).
current scale modification: during the zoom, indicates the width of the displayed
area.
When the transmitter moves, the position indicated on the screen is not the current position of
the transmitter. It is the position the transmitter had N seconds ago. N is the age of the
position (displayed to the right of the symbol representing the transmitter). In a few cases, this
age may be great:
• the transmitter no longer has GPS reception (transmitter inside a building, a cave,
etc.).
• the transmitter has been stopped.
• the transmitter is out of range.
• etc.
It is therefore important always to watch this age because the position can be very old.
Automatic centring
If the automatic centring option is enabled (menu settings/centring), the zoom is
continuously adjusted in the search and follow modes (see page 49).
Keyboard
For entering, a keyboard emulation is
displayed.
•
•
•
•
•
The thumb wheel is used to move
along the keys.
alternates between lowercase and
uppercase letters.
deletes the last character.
validates the entry.
cancels the entry.
.
page 37
User's Manual Icare2 v1.1
Optimal Tracking 08/10/2015
Transmitters
The transmitters menu allows you to change all the display settings of the transmitters, to
erase their trajectores and display the information related to each transmitter.
The list of all transmitters having already sent a message to the receiver is displayed. Click on
one of these transmitters to display or modify its settings.
Renaming the transmitter
In the transmitter page, click name and enter a new name. By default the name of each
transmitter is defined by "sn" followed by the serial number of the transmitter.
Changing the symbol representing the transmitter
In the transmitter page, click symbol to scroll through all the choices.
Changing the colour of the transmitter
In the transmitter page, click colour to scroll through all the choices. Some symbols are of
fixed colour. The trajectory of the transmitter uses the user-defined colour.
Saving the modifications concerning the name, symbol or the colour
In the transmitter page, click save.
Removing the transmitter from the list
In the transmitter page, click remove.
Clearing the transmitter trajectory
In the transmitter page, click clear trajectory.
page 38
User's Manual Icare2 v1.1
Optimal Tracking 08/10/2015
Displaying all information concerning a transmitter
In the transmitter page, click information. Use the thumb wheel to explore the information
table. Click to return to the previous menu. The following information is displayed:
• emergencies.
• reception and position age.
• battery energy.
• distance to the receiver.
• course.
• speeds.
• altitude (current, elevation, graph, overlapping, etc.).
• duration and length of the trajectory.
• GPS position and information.
• radio signal quality information.
• radio channel.
page 39
User's Manual Icare2 v1.1
Optimal Tracking 08/10/2015
Maps
The maps menu is for creating, supplementing or modifying maps.
A map is a set of points, lines and polygons to be displayed simultaneously. Several maps can
be defined but only one can be displayed at a time. This map will be called the active map.
The points, lines and polygons of the maps can be used:
• simply to be displayed and find one's way better.
• to define area alarms.
• for navigation (point to reach or route to follow).
There are two ways to create a map:
• by moving on the ground and by saving the geometric entities. The advantage of this
method is not needing any other equipment. The disadvantage is the time spent
moving.
• by typing on the screen, on Google Earth or another software package, all the entities
of the map and then download them into the receiver. However, this quick and
pleasant method requires the use of a computer (see page 62).
Creating a new map
In the maps page, click add a map. Then
enter its name and its possibly active character
and then click save. The new map is empty.
Selecting a map
The list of all the maps saved in the receiver is
displayed. One of these maps may be active. It
is preceded by the symbol.
Click on one of these maps to display or
modify its content.
Renaming the map
In the map page, click name and enter a new
name.
Changing the visibility of the map
In the map page, click active. Only one map
can be active, namely the one displayed on the
screen.
page 40
User's Manual Icare2 v1.1
Optimal Tracking 08/10/2015
Saving the changes of name or visibility
In the map page, click save.
Deleting the map
In the map page, click remove.
Adding a point corresponding with your position on the map
In the map page, click add point..../add a point.
The mode icon becomes
and the input
screen appears.
• click when you are located on the
point to enter. The entered point
appears in yellow.
• If you click again, the new position
overwrites the previous one.
• when you are sure of your entry,
double click to save the point and
its characteristics:
o map where the point is
stored
o name
o symbol
o colour (some symbols are of
fixed colour)
o colour (some symbols are of
fixed size)
Add a line to the map whilst travelling along it on the ground
In the map page, click add point..../add a line.
The mode icon becomes
and the input
screen appears.
• click each time you are located on a
point of the line to enter. The
entered point appears in yellow as
well as the temporary line.
• when you have entered the last
point of the line, double click to
save the line and its characteristics:
o map where the line is stored
o name
o plot type
o colour
o thickness
o line closed or not
page 41
User's Manual Icare2 v1.1
Optimal Tracking 08/10/2015
Add a polygon to the map whilst travelling on the ground
In the map page, click add point..../add a polygon.
The mode icon becomes
and the input
screen appears.
• click each time you are located on a
summit of the polygon to enter. The
entered point appears in yellow as
well as the temporary polygon.
• when you have entered the last
point of the polygon, double click
to save the polygon and its
characteristics:
o map where the polygon is
stored
o name
o colour
o display level from 0 to 8
(the low-level polygons are
displayed first)
Editing or deleting an entity of the map
In the map page, click on the entity to be edited or deleted. The page that opens allows:
• editing the characteristics of the entity.
• moving the entity to another map.
• deleting the entity.
Warning, the position of the entities cannot be modified.
page 42
User's Manual Icare2 v1.1
Optimal Tracking 08/10/2015
Alarms
The alarms menu enables you to create or modify alarms.
An alarm can detect abnormal behaviour of one or more transmitters.
There are 10 types of alarms that can be set by the user:
• no news from a transmitter for a certain time.
• transmitter too far away from the receiver.
• transmitter outside a polygon.
• transmitter in a polygon.
• transmitter too close to a point.
• transmitter too far away from a point.
• transmitter too close to a line.
• transmitter too far away from a line.
• transmitter too close to a polygon.
• transmitter too far away from a polygon.
The alarms can be defined on a transmitter or on all transmitters.
The combination of all these alarms allows an effective supervision of the transmitters:
• detection of excessive distance (risk of being out of range).
• detection of transmitter out of range (no news).
• detection of leaving a mandatory area.
• detection of entry into a prohibited area.
• detection of imminent hazard.
• etc.
Creating a new alarm
In the alarms page, click create an alarm. Then
enter:
• its name.
• the transmitter which the alarm applies or
the application to all transmitters.
• the type of alarm.
• depending on the type of alarm:
o the maximum or minimum distances.
o the maximum time without news.
o the geographical entity and the map in
which it is located.
Then click save.
Editing an alarm
In the list of alarms from the alarms page, click on the alarm you want to modify. The page
that opens is identical to the page for creating a new alarm. You can modify all the settings of
the alarm.
page 43
User's Manual Icare2 v1.1
Optimal Tracking 08/10/2015
Deleting an alarm
In the list of alarms on the alarms page, click on the alarm you want to delete, then click
on remove.
Reception of an alarm
Each time an alarm is triggered:
• an audible alarm is launched for 20 seconds.
• the vibrator is switched on for 20 seconds.
• the LED flashes for 20 seconds.
• an information message is displayed to explain the alarm.
• a symbol describing the type of alarm flashes in the upper icon bar.
• a symbol describing the alarm flashes on the position of the transmitter.
The symbols are:
• area alarm:
•
no news:
To stop the sound alarm, vibrator and flashing lights, click a first time on the thumb wheel.
To clear the information message, click again.
If the receiver is connected to the USB port of a computer and the real-time following in
Google Earth is activated, an audible alarm is triggered by the computer and an alarm
symbol appears in Google Earth on the position of the transmitter.
Audible alarm, vibrator or flashing LED can be disabled (see page 50).
page 44
User's Manual Icare2 v1.1
Optimal Tracking 08/10/2015
Analysis of the trajectory
The trajectory menu allows you to display all the information related to your trajectory.
Displaying all information concerning your trajectory
In the trajectory page, click on information. Use the thumb wheel to explore the information
table. Click to return to the previous menu. The following information is displayed:
• duration of the trip.
• distance travelled.
• distance to the transmitter being searched for (if the corresponding mode is active).
• distance of the point to be reached (if the corresponding mode is active).
• distance to travel on the route to be followed (if the corresponding mode is active).
• distance to travel on the axis to be followed (if the corresponding mode is active).
• compass.
• overlay of search symbols or fast following on the compass.
• current and average speeds.
• altitude.
• current and average vertical speeds.
• elevations.
• positive or negative altitude overlapping.
• altitude graph.
• GPS data
• UTC date.
page 45
User's Manual Icare2 v1.1
Optimal Tracking 08/10/2015
Resetting the trajectory
In the trajectory page, click on clear trajectory. All the trajectory counters are then reset
(times, distances travelled, averages, elevations, overlapping, etc.).
Saving the trajectory in a map
It is advantageous to record your trajectory in a map in several cases:
• before resetting the trajectory in order to keep a backup.
• to make a return on its path.
• for automatically creating a zone for the alarms.
Click save in a map, select the map and the display characteristics and then click save.
Torch
The torch lights up your way, which can be useful for a night search. It consumes little and
can therefore stay lit for a long time.
Switching on the torch
In the main menu page, click on turn on flashlight.
Switching off the torch
In the main menu page, click on turn off flashlight.
page 46
User's Manual Icare2 v1.1
Optimal Tracking 08/10/2015
Settings
The settings menu allows you:
• the choice of language.
• the choice of the radio channel.
• the setting of the transmitters.
• the choice of display settings.
• the calibration of the compass.
• to set the True North.
• to set the time.
• the choice of the system of units.
• the deactivation of alarms.
• to enter the name of the unit.
• to view the contents of the memory.
• access to advanced settings.
Choice of language
Click language until the desired language is displayed.
Choosing the radio channel
It is possible to choose among 10 channels. The receiver receives the positions of all the
transmitters on the same radio channel.
Setting the transmitters
The operating settings of a transmitter can be modified from a receiver (see page 56).
Calibrating the compass
The compass must be recalibrated regularly (once a
week) or for each long travel (over 1,000 km). A
message is sent when a recalibration is necessary.
However, if you think the compass is giving incorrect
information, start a calibration.
Don't forget that the magnetic declination - the
difference between true north and magnetic north, must
be entered for correct operation of the compass.
Click on compass calibration and follow the displayed
instructions. Hold the receiver horizontal, click, turn
around about 4 times for 20 seconds while holding the
receiver horizontally.
For a good calibration, it is important to stay away from
objects that generate a magnetic field (vehicles, etc.) and
keep the receiver horizontal.
page 47
User's Manual Icare2 v1.1
Optimal Tracking 08/10/2015
True North setting
The magnetic declination is, at a given point on the surface of
the earth, the angle formed between the direction of the
geographic North Pole and the magnetic north pole. This angle
is counted positively towards the east and negatively towards the
west. The axis of rotation of the earth defines the geographic
poles. The axis of the earth's magnetic field defines the magnetic
poles. These two axes do not coincide and the magnetic north
pole is distinct from the geographic North Pole. This explains
that the magnetic declination varies from one point to another on
the surface of the earth. It also varies in time because the axis of
the earth's magnetic field changes over time due to movements
of the earth's core.
Click true North setting
You have now 3 ways to define the true North:
• Enter the value of the declination, positive towards the east
and negative toward the west. The value can be found on the
site www.magnetic-declination.com for each point of the
globe.
• If you know the direction of the True North, point the
receiver in this direction and click on point true North.
• If you see an Icare2 transmitter located more than 100
meters, point in the direction of this transmitter and click on
point transmitter. This is the best solution.
Time zone
The GPS reception allows the
receiver
to
determine
the
"coordinated universal time"
(UTC) very accurately. The
coordinated universal time is a time
scale adopted as the basis of
international civil time by most
countries of the globe.
It is therefore necessary to enter
your time zone in relation to this
universal time.
Click UTC time diff. and enter the
time zone expressed in hours and
hundredths of an hour
(1.50 means 1 hour and 30 minutes).
page 48
User's Manual Icare2 v1.1
Optimal Tracking 08/10/2015
Automatic centring
When the centring is automatic, the zoom is continuously adjusted to keep some entities
visible:
• in search for transmitter mode, the transmitter is always visible.
• in reach a point mode, the point is always visible.
• in follow a route mode, the nearest point of the route to you is always visible.
• in see and go mode, the nearest point of the axis to you is always visible.
If manual centring is selected, the zoom can be modified only by the user.
To modify the centring, click centring.
Floating or fixed reference
In all modes, except global fixed north and global compass, the reference moves from top to
bottom in order to enlarge the space of most interest to you. The reference is said to be
floating. The floating character of the reference can be deactivated. The reference is then
fixed.
To modify the behaviour of the reference, click reference.
Backlight
Click backlight to adjust the light intensity of the screen from 1 to 9. Lowering the brightness
increases the autonomy of the battery.
Backlight duration
If the thumb wheel is not turned or pressed for a certain time, the screen goes into very lowlight intensity to lower the power consumption.
To adjust this time, click on backlight duration to obtain the desired time delay.
Displaying transmitters in search for transmitter mode
By default, only the transmitter being searched for is displayed in this mode to lighten the
content on the screen. If you want to see all the other transmitters when you are in this mode,
click display all ... search mode.
Displaying trajectories
This option enables or disables the display of trajectories.
Displaying help messages
Help messages can be displayed to guide you in the use of Icare2. By default, they are
deactivated. Click help display to activate or deactivate.
Displaying information messages
Information messages can be displayed to give you better information about the operation of
Icare2. By default, they are deactivated. Click info display to activate or deactivate.
Choice of units
Three systems of units are available:
• the metric system.
• the English land system.
• the nautical system.
Click on units until you obtain the desired system of units.
page 49
User's Manual Icare2 v1.1
Optimal Tracking 08/10/2015
Modifying the receiver trajectory
Click on receiver trajectory to modify the trajectory of the receiver.
You can then modify:
• maximum points: the maximum number of points forming the trajectory.
• length of segments: the distance between two consecutive points of the trajectory.
• periodicity: the delay between two consecutive savings in the trajectory.
• type: the type of line used to draw the trajectory.
• colour: the colour of the trajectory.
• thickness: the thickness of the trajectory.
Modifying the trajectories of the transmitters
Click transmitters trajectories to change the trajectories of the transmitters.
You can then modify:
• maximum points: the maximum number of points forming the trajectory.
• length of segments: the distance between two consecutive points of the trajectory.
• type: the type of line used to draw the trajectory.
• thickness: the thickness of the trajectory.
The colour of the trajectory of a transmitter is the colour defined in the transmitters menu.
Display the name of the entities of the maps
It is possible to deactivate the display of the names of the entities of the maps to clarify the
display. To do this click display the names of map entities.
Deactivating the sound, the audible alarm, the vibrator and the light alarm
The sounds generated when starting, stopping, clicks, etc. can be deactivated by clicking on
sound.
Audible alarms can be deactivated by clicking on sound alarm.
The vibrator can be deactivated by clicking on vibrator.
The light alarm (flashing LED) can be disabled by clicking on flashlight alarm.
These deactivations are viewed in the upper icon bar.
Modifying the settings of the see and go mode
By clicking on settings "see and go", it is possible, whilst maintaining the following axis, to
change some settings of see and go mode (see page 33):
• use.
• distance.
• wind speed.
This makes it possible, for example, to correct the wind speed after having entered the axis to
follow.
Defining the receiver name
It is possible to assign a name to the receiver. To change the name, click name of the unit
and enter the desired name.
page 50
User's Manual Icare2 v1.1
Optimal Tracking 08/10/2015
Viewing the used memory
By clicking on memory used, you have access to:
• the memory used by the system.
• the memory used by the data from the transmitters.
• the memory used by your trajectory.
• the memory used by the maps.
• the free memory.
• the numbers of transmitters, maps, points, lines, polygons and alarms.
• the name of the receiver.
This page allows good visibility of the occupation of the memory.
To exit the page, click.
Viewing advanced settings
By clicking on advanced, you have access to:
• The age and distance of the most recent calibration of the compass.
• Other useful parameters only for technical support.
To exit the page, click.
Returning to factory settings
It is possible to return to all the factory settings by clicking on return to factory defaults.
page 51
User's Manual Icare2 v1.1
Optimal Tracking 08/10/2015
10 USE OF THE TRANSMITTER
Positioning
The upper part of the transmitter must be in the open air and not covered. It is advisable to
place the transmitter vertical.
Power supply
The transmitter can be powered by any rechargeable or non-rechargeable battery of 3.3 to 5.5
volts that can deliver a peak of 500 mA.
The ideal is to connect the transmitter to a rechargeable lithium battery.
If your model already has a battery, you can connect to it. You can also use a specific battery.
To determine the potential autonomy, refer to the chapter AUTONOMY OF THE
TRANSMITTER page 22.
page 52
User's Manual Icare2 v1.1
Optimal Tracking 08/10/2015
Starting the transmitter
The transmitter starts as soon as it is connected and signals this by the blue LED.
Meaning of the LEDs
LEDs lit up
Continuous blue
Quick flashing blue
Flashing blue
Flashing red
Flashing yellow
Flashing green
Slow flashing red
Slow flashing blue
Slow flashing yellow
Slow flashing yellow/red
Slow flashing yellow/blue
Meaning
Starting the transmitter
Receiver possibly waiting
for setting
Sending a position
Battery voltage too low
( < 3.5v)
GPS signal too low
Normal operation,
everything is OK.
Radio error 1. Appears in
the event of electronic
failure.
GPS error 2. Appears in
the event of electronic
failure.
Radio error 3. Appears in
the event of electronic
failure.
Radio error 4. Appears in
the event of electronic
failure.
Radio error 5. Appears in
the event of electronic
failure.
Duration/period
5 seconds
10 seconds
0.1 seconds
0.1 second every 10 seconds
0.1 second every 10 seconds
0.1 second every 10 seconds
20 seconds
20 seconds
20 seconds
20 seconds
20 seconds
Start period
As soon as it is connected, the transmitter seeks to determine its position on the basis of the
information it receives from the satellites.
During this period, which may last for a few minutes, the period of sending messages is 1
minute.
If the receiver is in the search mode for your transmitter, the search panel flashes and
indicates that the transmitter is being positioned.
The quality of the GPS signal (SNR = signal to noise ratio) is also indicated.
Once the transmitter has determined its position, the search panel stops flashing.
This research phase is energy-intensive. Therefore, do not connect the transmitter if you are
not outdoors, otherwise you will drain the battery for nothing.
page 53
User's Manual Icare2 v1.1
Optimal Tracking 08/10/2015
Periodicity of transmissions
The transmitter regularly sends its position to the receiver according to 3 criteria which can be
set:
• Temporal periodicity.
• Movement since the last transmission.
• Altitude loss since the last transmission.
Temporal periodicity
transmission
transmission
transmission
time
Transmission period
When the transmitter moves slowly, a position is sent to the receiver every N seconds (30 by
default).
Criterion of movement
transmission
Criterion of movement
transmission
transmission
When the transmitter moves, a position is sent to the receiver as soon as the transmitter moves
by N meters (50 by default) in relation with to the last position sent.
page 54
User's Manual Icare2 v1.1
Optimal Tracking 08/10/2015
Criterion of altitude loss
transmission
Criterion of altitude loss
transmission
When the transmitter descends, a position is sent to the receiver as soon as the transmitter has
lost N meters of altitude (10 by default) in relation with to the last position sent.
This enables you to know the landing point of the model precisely, even if it is out of radio
range after landing.
Indeed, when the transmitter is above ground level, the radio range is much greater.
Channels
It is possible to choose the radio channel of the transmitter among 10 channels (see page 56).
A receiver can receive only the positions from transmitters with the same channel.
Operating modes
Starting
Stationary mode
Movement mode
Low consumption mode
Stopping
- Not yet positioning.
- A radio message sent every 1 minute.
- The transmitter does not move and reduces
its consumption.
- The transmitter moves.
Battery voltage low (< 3.3v)
- One radio message per minute.
- Position recalculated every 10 minutes.
- Total stop (voltage < 3.0v).
The transmitter automatically switches from one mode to the other depending on the context.
Note that below 3.3v, it goes into low consumption mode, and below 3.0v it shuts down.
page 55
User's Manual Icare2 v1.1
Optimal Tracking 08/10/2015
Water tightness
The transmitter is waterproof to short duration immersion at the surface of the water.
Setting the transmitter
Many operating settings of the transmitter can be modified:
• Radio channel.
• Transmission period.
• Spacing between two successive positions sent.
• Loss of altitude between two successive transmissions.
• Horizontal accuracy desired.
• Maximum speed in stationary mode.
To modify these settings:
• Go to the settings/transm.settings menu.
• Select the serial number of the transmitter.
• Select the desired settings.
• Start the transmitter by connecting it to its power supply.
• When the transmitter flashes blue, click send to transm.
• The message setting successful is displayed.
If the setting was not successful, the causes can be:
• You have specified a wrong serial number.
• The transmitter does not flash in blue at the time of sending the request.
To reread the settings of a transmitter, follow the same procedure but, at the end, click read
the settings.
The message successful reading appears and the various lines of the menu take the values of
the read settings.
page 56
User's Manual Icare2 v1.1
Optimal Tracking 08/10/2015
11 CONNECTING TO A PC, ICARE2 MANAGER
Connection to a PC is by the USB port and requires the installation of Icare2 Manager.
Icare2 Manager is free software for:
• following in real time on Google Earth:
o the positions, trajectories and alarms of the transmitters.
o the position and trajectory of the receiver.
• downloading maps into the receiver.
• backing up the contents of the receiver on the computer.
Icare2 Manager operates on XP, VISTA, Windows 7 and Windows 8.
In addition to Icare2 Manager, you can install for free:
• Google Earth for real-time monitoring and the creation of maps.
• GpsBabel for the conversion of any GPS format to or from Google Earth.
Installing Icare2 Manager
The computer must be connected to the Internet.
Step 1: downloading Icare2 Manager (essential)
• Download from the site www.optimaltracking.com the file
"install_icare2_manager v1.1". It is a compressed file (ZIP file).
• Unzip the file with a utility such as WinZip.
• Go to the directory "install_icare2_manager v1.1".
• Run "setup.exe".
• Follow the usual installation instructions in Windows.
• The software will classify with the following parameters:
o Editor: Optimal Tracking
o Name: Icare2 Manager
Step 2: installing the USB driver (essential)
• Windows 7 or 8 operating system:
o connect the receiver to the computer using the supplied USB cable.
o The USB driver is installed automatically.
• VISTA operating system:
o connect the receiver to the computer using the supplied USB cable.
o a "New hardware detected" window appears.
o select "Locate and install driver software".
o Click "Continue" if Windows asks you an authorization to install the driver.
o the driver is then automatically found by "Windows Update", and this may
take a few minutes.
page 57
User's Manual Icare2 v1.1
Optimal Tracking 08/10/2015
again, a "New hardware detected" window appears.
select "Locate and install driver software".
Click "Continue" if Windows asks you an authorization to install the driver.
"Windows Update" again searches for the driver, and this may take a few
minutes.
o the message "The device driver software has been installed correctly"
appears. The driver installation is complete.
o
o
o
o
• XP operating system:
o download the USB driver for your operating system on http:
//www.ftdichip.com/Drivers/VCP.htm.
o extract the downloaded directory with WinZip (if you do not have WinZip you
can download one from the Internet).
o connect the receiver to the computer using the supplied USB cable.
o follow the instructions by requesting a manual installation and indicating that
the USB driver is located in the downloaded directory.
Step 3: free installation of Google Earth (recommended)
• go to the site www.earth.google.com.
• click on "download Google Earth".
• follow the instructions provided by the site and run the installation programme.
Step 4: free installation of GpsBabel (optional)
• go to the website www.gpsbabel.org/download.html.
• download the most recent version of GpsBabel.
• follow the instructions provided by the site and run the installation programme.
Step 5: configuration of Google Earth (essential)
• In Google Earth click "Tools/Options/General" and check in the frame
"Management of KML errors" that the option "Accept all data not recognized in
silent mode" is checked. If this is not the case, check the option and click on "Apply".
page 58
User's Manual Icare2 v1.1
Optimal Tracking 08/10/2015
Using Icare2 Manager
Connecting the receiver
•
•
•
Connect the receiver to a USB port of your computer using the supplied USB cable.
If the receiver is off, switch it on.
Launch Icare2 Manager.
Icare2 Manager automatically connects to the receiver. If this is not the case, disconnect and
reconnect the USB cable and click Start. A message connected to Icare (virtual port, etc.)
is displayed.
If you want to end the connection, click Stop.
page 59
User's Manual Icare2 v1.1
Optimal Tracking 08/10/2015
Do not disconnect the receiver without having ended the connection in advance because it
may disrupt any new connection. In this case, it is preferable to run Icare2 Manager again.
Configuring Icare2 Manager
Click the symbol
The settings window opens:
You can choose:
• The language.
• The full name of the command to run GpsBabel. For example, "C:\Program
Files\GPSBabel\gpsbabelfe.exe" if GPSBabel is installed in C:\Program
Files\GPSBabel and if the program is named gpsbabelfe.exe.
• The period for refreshing the real time following in Google Earth (2 seconds by
default).
• The period separating the readings of the receiver in real time following (1 second by
default).
• The period between running the real time following and displaying data in Google
Earth (15 seconds by default).
•
For slow computers, it may be useful to increase the refreshing period and the period
between the readings. Put the values on about 3 to 5 seconds.
page 60
User's Manual Icare2 v1.1
Optimal Tracking 08/10/2015
Viewing altitudes
If you are interested in 3D movement, click altitudes viewed. All the trajectories and
positions are then 3D. Otherwise, trajectories and positions are projected at the level of the
ground.
Click with extrusion to view the altitudes and the projections on the ground at the same time.
Each 3D trace is then connected to the ground to view its altitude better.
Following in real time on Google Earth
Before starting the real time following, you must decide if you want to use a camera
follower. Almost all allow you to monitor a unit or all entities continuously displayed by
holding them in the centre of the screen.
If you opt for a camera follower, click on camera follower before launching the real-time
following. Subsequently, it will be possible for you, at any time during the real time
following:
• To choose the entity to follow (transmitter, receiver, global following).
• To choose the distance and direction of the follow camera (distance, course, tilt).
Click launch to start the real-time following on Google Earth.
page 61
User's Manual Icare2 v1.1
Optimal Tracking 08/10/2015
Google Earth starts and displays in real time:
• positions and trajectories of running transmitters.
• position and trajectory of the receiver.
• the entities of the active map.
• the time, altitude and speed of all the points of the trajectories.
• the status of the batteries of the various units.
• the alarm symbols of transmitters.
If an alarm is triggered, a symbol appears on the position of the transmitter that triggers the
alarm. Simultaneously, a ringtone is triggered by Icare2 Manager. To stop it, click stop
alarm.
During the real time following, you can change the viewing parameters with Icare2
Manager.
To end the real time following, exit Google Earth.
Backing up the contents of the receiver
•
•
•
click backup.
choose a directory where the backup is stored.
click OK.
The receiver emits a succession of beeps, and then a file named "Icare save (date and time)"
is created in the directory you chose.
Icare2 Manager then asks you if you want to view the content of the backup in Google
Earth.
The backup file is in KML format (the format of Google Earth) and contains:
• the trajectories of all transmitters.
• the trajectory of the receiver.
• all the maps stored in the receiver..
Loading maps
In a KML format file (the format of Google Earth), assemble all points, lines, and polygons
you want to load into the receiver. To do this, you can:
• build these entities in Google Earth very quickly using the mouse:
o create a folder in Google Earth (right click on temporary places).
o go into this folder (click on folder).
o create points, lines and polygons.
o save the folder in a KML format file (right click on the folder and save the
place under ).
o specify that you want the the KML format and not the KMZ one.
• import maps from other software or another device and convert with GpsBabel.
page 62
User's Manual Icare2 v1.1
Optimal Tracking 08/10/2015
When the KML format file containing the entities to transfer is ready:
• click loading.
• select the KML format file.
• click open.
The receiver emits a succession of beeps and then a new map is created in the receiver. It
bears the name of the document contained in the KML file (almost all the name of the KML
file if the file has been saved by Google Earth).
Conversion
To be able to communicate with almost all GPS software and devices, Icare2 Manager gives
access to GpsBabel:
• Click convert.
• GpsBabel starts.
• you can then choose for the input and output:
o the GPS device or the file format.
o multiple options.
GpsBabel gives you access to most of the hiking software packages and most of the GPS
devices on the market.
Alarms
Icare2 Manager displays the number of alarms received from the transmitters. At each
alarm, a ringtone is launched. It can be stopped by clicking on stop alarm.
page 63
User's Manual Icare2 v1.1
Optimal Tracking 08/10/2015
12 SPECIFICATIONS
Specifications
General
Radio range (ground level, open terrain)
Radio range (transmitter in flight)
Operating temperature range
Charging temperature range
3 kilometers
More than 10 kilometers
-10°C to 55°C
0°C to 45°C
Receiver
Dimensions not including antenna
Weight
Power supply
Autonomy (at 20°C)
Duration of the charge (at 20°C)
GPS
Resolution of the electronic compass
Accuracy of the electronic compass
Size of the screen
Resolution of the screen
Type of screen
Computer interface
Mapping memory
Sound
Vibrator
Night torch
Radio receiver sensitivity
Water tightness
115 x 56 x 22 mm
105 grams
Battery Lithium Polymer 1250 mAh 3.7 Volts
14 hours
3 hours
Very high GPS/GLONASS sensitivity
±1 degree
±5 degrees
32 x 40 mm
176 x 220 pixels
Transmissive TFT 65000 colours
USB 2.0
512 kB
Magnetic transducer
Yes
High brightness LED
-118 dBm
none
Transmitter
Dimensions not including antenna
Weight
Power supply
GPS
Water tightness
Radio transmission frequency
Radio transmission power
Occupation of the radio band
37 x 16 x 6 mm
4.8 grams
2.7 to 5.5v 500 mA peak
Very high GPS/GLONASS sensitivity
Immersion at the surface of short duration
867.9875 + n*0.025 MHz
n = radio channel (from 57 to 66).
500 mW
Less than 1% of the time
page 64
User's Manual Icare2 v1.1
Optimal Tracking 08/10/2015
Mechanical plan of the transmitter
Maintenance
•
Clean the screen with a soft cloth or a glass cloth. Any other material may scratch the
screen.
page 65