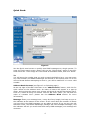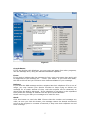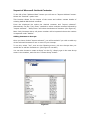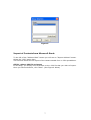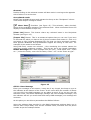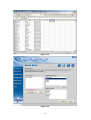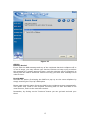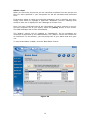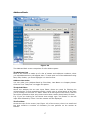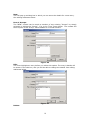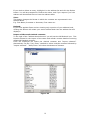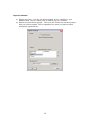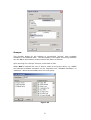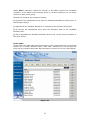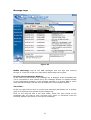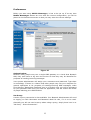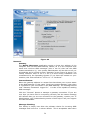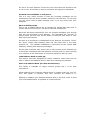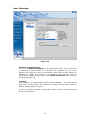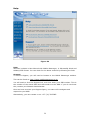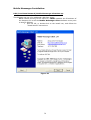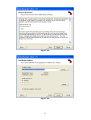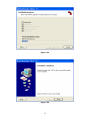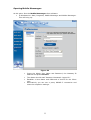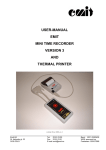
1
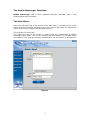
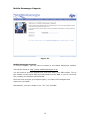
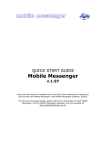
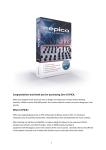
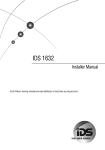
USER MANUAL
Mobile Messenger
v.1.97
Table of Contents
Chapter
Page
1.
Vision
1.
2.
What is SMS?
2.
3.
The Mobile Messenger interface
3.
4.
Main Menu
3.
5.
Quick Send
4.
6.
Import of Outlook Contacts
6.
7.
Import from .CSV File
7.
8.
Creating .CSV Files
10.
9.
Batch Send
11.
10.
Address Book
17.
11.
Message Logs
23.
12.
Preferences
25.
13.
Help
29.
14.
Mobile Messenger installation
30.
15.
Opening Mobile Messenger
33.
16.
Support
34.
Mobile Messenger Vision:
Our Vision is one where we forge a convergence of SMS development with
all forms of high-tech communication, creating a synergy with a simple
goal in mind: User friendly, cost effective, Global and cutting-edge
communication solutions.
1
What is SMS?
The Short Message Service (SMS) is the ability to send and receive text messages
to and from mobile telephones, PDA (Personal Digital Assistant) and PC's. The
text can be comprised of words, numbers or an alphanumeric combination of the
two. Each short message is limited to 160 characters when using Latin alphabets
and 70 characters in length when non-Latin alphabets such as Arabic and Chinese
are used.
SMS is one of the oldest features of digital cellphones. Literally all GSM cellphones
support it, which makes it so useful. Couple this with the fact that is easy to use,
and is becoming increasingly more user-friendly to access on cellphones; it
makes SMS a very powerful method of communication.
SMS was created as part of the GSM (Global System for Mobile Communication)
Phase 1 Standard. The first short message is believed to have been sent in
December 1992 from a Personal Computer (PC) to a mobile phone on the
Vodafone GSM network in the UK. The initial application was as a means of voice
mail notification but from a humble beginning SMS is fast becoming a
communication standard in its own right.
Capabilities of SMS:
SMS is a very versatile protocol; in its most basic form it can transfer short
messages between GSM devices (usually cellphones), but it also has the
capability to shift small amounts of raw data, and this is used in picture
messaging, ring tone sending and advanced applications such as GPS systems
which are used in navigation.
Limitations of SMS:
The only real limitation of SMS is the size of each message - 160 characters. This
is overcome by sending many messages one after each other if this is required,
and they are re-assembled on the target cellphone when they arrive.
What Operating System can Mobile Messenger use?
Mobile Messenger has been developed to run on the Microsoft Operating System.
A great deal of R & D has gone into ensuring that Mobile Messenger is compatible
with:
• XP
• 2000
• ME
• 98
Microsoft NT is not supported as an Operating System as there are certain issues
that can not be resolved.
2
The Mobile Messenger Interface:
Mobile Messenger uses a fairly standard Windows interface, with a few
enhancements where needed.
The Main Menu:
Down the left-hand side of the screen is the Main Menu; it contains a list of the
major program functions. Clicking on any one of these will cause the right-hand
side of the screen to display that program function.
The Program Function Pane
The right-hand side of the screen is where most the functionality in Mobile
Messenger takes place. The screen changes with the selection in the Main Menu
(see below). Each program function is described in its own section in this Manual.
Figure 1
3
Quick Send:
Figure 2
Use the Quick send screen to quickly send SMS messages to a single person. To
enter the Quick send screen, simply click on the "Quick Send" option in the lefthand menu bar. Then simply fill in the fields as described below, and click "Send".
To:
You will enter the number that you wish to send the SMS to here; you may enter
any valid number and Mobile Messenger will decode it and ensure that it is in the
correct format before attempting to send it; you will be notified if it is not a valid
number.
Address Book shortcut (see Figure 3 on following page):
At the top right of the To: field there is an “address book” button; click this for
quick access to the address book. An index of letters will appear in a pop-up
menu, and moving the mouse over a letter will show all entries that belong there.
Click on a name to bring its number into the To: field. (Note: you can edit the
order of contacts here: please see the Address Book section for more
information)
Message: Enter your message here; it may be of any length, but keep an eye on
the indicator at the bottom of the screen. It will count down the number of letters
you have left in the SMS message you are about to send. If you go over the 160
character mark, the Mobile Messenger package will send multiple messages, and
the indicator will tell you at all times how many SMS messages your message will
consume.
4
Figure 3
Copy & Paste:
If you are familiar with Windows, you may copy and paste from other programs,
into the Message area, using the standard Windows clipboard.
From:
If you wish to indicate who the message is from, enter your name here and it will
be appended to the message as " – From: your name". If you leave this blank,
this will be left off and you will have more letters available for your message.
Delivery:
If you send the SMS message and the recipient has their cellphone off or is out of
range, you may instruct your Service Provider to keep trying to deliver the
message for a certain amount of time, until the recipient can be contacted, at
which point the SMS is delivered. If the cellphone is not active in the stipulated
time period the message is deleted from the queue at the Network.
Select how long you wish your message to be valid for here.
Send:
Click this button to send the SMS. Ensure that the number and message are
valid, as once you click this button, the message cannot be altered and should
arrive at the recipient in a matter of seconds, if they have their cellphone on and
have coverage.
5
Import of Microsoft Outlook Contacts:
To the left of the “Address Book” button you will see an “Import Address” button.
Select the “Outlook” option here.
This function allows for the import of the name and cellular contact details of
existing default MS Outlook contacts.
From the displayed list select the desired contacts and “import selected”.
Alternatively use the “Ctrl, Enter” method to select multiple contacts followed by
“import selected”. “Shift, Enter” will select simultaneous contacts. (See Figure 4)
Note: Only Contacts with a cell phone number will be imported where the number
is captured under “Mobile”.
Adding Contacts to Groups:
Once you have clicked “import selected”, you will be asked if you wish to add any
of the selected Contacts to one or more of your Groups.
To so this, select “Yes”, and on the following screen, tick the Groups that you
would like to add the Contacts to. (See Figure 5 overleaf)
You can also choose to create a Group “on the fly”. Simply type in the new Group
name in the textbox, and click the “Create Group” button.
Figure 4
6
Figure 5
Import of Contacts from Microsoft Excel:
To the left of the “Address Book” button you will see an “Import Address” button.
Select the “CSV” option here.
This function allows for the import of the contact details from a .CSV spreadsheet.
STEP 1. Select .CSV File to import
In this Step, you simply need to browse to the .CSV file that you wish to Import.
Once you have selected it, click “Next”. (See Figure 6 below)
7
Figure 6
STEP 2. Select .CSV File to import
In this Step, you need to match up the columns in your .CSV file to the Mobile
Messenger Address Book columns.
Mobile Messenger will, be default, use the first Contact in your list to do this, as
an example. Then, from each drop down menu, select the appropriate column.
E.g.: for First Name, choose “Jane”.
You can also chose not to import any data for a column, by selecting the “ignore”
option, for that column.
You will also see a check box to the right, labelled: “Local Numbers”. If you tick
this, it will import all the contacts cell numbers as being from the country that
you have specified under “Preferences / User Interface” (See Page 31)
Once you have matched up the columns correctly, click “Next”. (See Figure 7
below)
8
Figure 7
STEP 3. Finish Import
Mobile Messenger will now import your .CSV file and all the contacts therein, into
your Address Book. (See Figure 7 overleaf)
Figure 8
9
Creating .CSV Files:
.CSV Files are simply comma delimited files, and they can be easily created in
Microsoft Excel. Simply open Excel, and add your contacts as you would when
working in Excel normally.
Note you can only have one contact per row, e.g.: First Name, Last Name, Cell
number, E-mail address.
To save the file as a .CSV file:
1. Save the file as type “CSV (Comma Delimited)” (See Figure 8)
2. With the next two pop up messages, simply click “OK” and “Yes”
respectively. (See Figures 9 and 10)
Figure 9
Figure 10
Figure 11
10
Batch Send:
Figure 12
The Batch Send is a very powerful feature of Mobile Messenger. It is presented in
“Wizard” form, with 4 parts to the process, which are detailed below. Once you
have entered all the required information on one of the screens, you may click on
the "Next" button at the bottom of the screen to continue or the next sequential
number at the top. If you realise that you have made a mistake, then you may
click "Back" to go back, or simply click on the number of the step you wish to go
to, at the top of the screen.
STEP 1. Select Recipients
The Select Recipients screen has two panes on it; the left is your address book,
including groups, and the right is where a list of all the recipients that you have
selected appears. Between these are four buttons:
[->] moves the highlighted entry from the left (Address List) to the right
(Recipients) box.
[->>] moves all entries from the Address List to the Recipients box.
[<-] removes the highlighted entry from the Recipients box and puts it back in
the Address List box.
[<<-] clears the Recipients box and re-populates the Address List with all the
items in your address book.
11
Shortcut:
Double-clicking on the selected contact will also result in moving to the opposite
side of where it is at the time.
Group Batch sends:
Select from Available Groups and migrate the Group to the “Recipients” column.
Then follow steps 2 through 4 below.
[þ Show Users] Checkbox (see figure 12): This selection, when checked,
shows all the available contacts in the address book. When unchecked forces the
display of the available Groups only.
[Clear List] Button: This button clears any selected items in the Recipients
window (see Figure 12).
[Import File] Button: This is an advanced option that you can use if you have
an external file which you have a list of phone numbers and names in. Click on it
and select a CSV (Comma-Separated File) file that you have previously created.
Most popular databases and spreadsheets support the saving of CSV files. An
example of this would be as follows:
Using MS Excel, create two columns – One containing the contact names the
other the contact cellphone number. This list can be of any length (remember
Mobile Messenger has a 600 message limit per hour). Next select “File”; “Save
as…”; select the folder; enter the file name; select “.csv” as the “Save as type”.
Figure 13
STEP 2. Enter Message
Enter your message in this screen; it may be of any length, but keep an eye on
the indicator at the bottom of the screen. It will count down the number of letters
you have left in the SMS message you are about to send. If you go over the 160
character mark, the Mobile Messenger package will send multiple messages, and
the indicator will tell you at all times how many SMS messages your message will
consume.
At this point you are able to personalise the SMS as follows:
Using the address data provided in the Mobile Messenger address book one is
able to draw unique data, such as the contacts name, surname and cell phone
number as per the example below:
12
Figure 14
In the example the author has written “Hi” then selected the “First name” field
from the “Available Merge Items” by pressing the “Insert” button.
Once the complete message has been created the author must press the “Check
Merge” button as this check for message length and validity.
As per the example below, one is able to import a saved CSV file (see Figure 15)
and merge the data found is the respective columns.
Figure 9 clearly
demonstrated how <col1> has drawn the data from the first column of the
spreadsheet in a simple process.
This is a highly powerful tool as one is not only able to personalise the SMS but
transmit variable data such as account status, portfolio value, next appointment
time and date etc.
13
Figure 15
Figure 16
14
Figure 17
STEP 3.
Delivery Period
If you send the SMS message and any of the recipients has their cellphone off or
is out of range, you may instruct your Service Provider to keep trying to deliver
the message for a certain amount of time, until the recipient can be contacted, at
which point the SMS is delivered. Select how long you wish each message to be
valid for here.
Pop Up SMS
One has the option of selecting the SMS’s to pop up on the users cellphone by
simply checking the “Pop Up” SMS option
Please note that this option forces the SMS to the recipients screen automatically.
This option may result in the recipient not being able to save this SMS in the
usual manner, and is to be used with caution.
Remember, by clicking on the “Previous” button you can go back and edit your
Send.
15
STEP 4. Send
When you first enter this screen, all the individual recipients from the groups and
files you have specified in your Recipients list will be calculated and presented
here.
If the author wants to check the individual messages, prior to sending, then they
simply need select or highlight a particular “Recipient” and the message that
would be sent out is displayed in the “Message to be sent” box.
Once you have confirmed that all the information you have entered is correct,
and the recipients are as you expect, select the [Send] button on this screen.
The SMS messages will be sent immediately.
The "Status" column will be updated to "Dispatched". As the messages are
confirmed as delivered by the GSM Network, the "Status" column will reflect this
as “Delivered”. In this manner, you may keep track of your batch send as it goes
out.
To send a New Batch of SMS, click the “New Batch” button.
Figure 18
16
Address Book:
Figure 19
The Address Book screen comprises of a few distinct parts:
The Address List:
Most of the screen is made up of a list of names and cellphone numbers; when
you add addresses they will appear here. To work with one of the addresses using
New, Edit, Delete, you must highlight it in this list first.
Address List Order:
You can order your Address Book by First Nam, Last Name or Company Name.
Click the Text “Last,First” to toggle this option.
The Quick Filter:
Above the address list are two input fields; these are used for filtering the
columns below. To find something quickly, simply type in a few letters of the item
you're looking for and click on "Filter" which is on the right of the screen, and the
list will be updated to show only those entries that contain those letters in them.
E.g. If you are looking for Joe Brown then simply type “Joe Brown” in the left
input field followed by “Filter” and the contact will be displayed.
The Tool Bar:
Across the top of the screen (see Figure 19) of the screen, there is a small tool
bar that contains a number of functions you can perform on the entries as
follows:
17
New:
This will pop up a dialog box in which you can enter the details for a new entry.
See editing addresses below.
Part of Groups:
The “NEW” contact can be made a member of any existing “Groups” by simply
selecting or ticking the “Group”. E.g. is the “Test” group below. The contact will
then be part of the “Group” and available as a normal contact.
Figure 20
Edit:
You must highlight an entry before you select this option. The entry's details will
be shown in the edit box, and you will be able to change the details. See editing
addresses below.
Delete:
Figure 21
18
If you wish to delete an entry, highlight it in the address list and click the Delete
button. You will be prompted to confirm the action, and if you respond "yes" the
address will be deleted forever from the address book.
View:
This button changes the format in which the contacts are represented in the
Address Book.
E.g. First Name, Surname or Surname, First name etc..
Refresh:
If you have applied filters and are viewing only a portion of your address book,
clicking this button will reload your entire address book into the address list and
display it.
Import of Microsoft Outlook contacts:
To the right of the “address book shortcut” you will see the MS Outlook icon. This
function allows for the import of the name and cellular contact details of existing
default MS Outlook contacts.
From the displayed list select the desired contacts and “import selected”.
Alternatively use the “Ctrl, Enter” method to select multiple contacts followed by
“import selected”. “Shift, Enter” will select simultaneous contacts.
Figure 22
19
Export Contacts:
a) Export everyone - You can use this to export all your contacts in your
address book. This is a handy way of backing up your contacts.
b) Export only from these groups – Here you can choose the relevant groups
that you need to export. This is especially nice when you want to send
someone a particular list.
20
Groups:
This function allows for the building of pre-defined “Groups” from available
members in the address book. The functionality is the same as moving members
into the Batch Send section of this manual and works as follows:
Upon entering the “Groups” function, select Add or Edit.
Where Add is selected the user is able to create a new group name, e.g. SALES
and selected available members can be migrated from “Available Members” to
“Members” where said members form the new group.
Figure 23
21
Where Edit is selected, choose the “Group” to be edited, select from “available
members” to be added to the existing group or remove members you no longer
wish to be part of the group.
Members or contacts are moved as follows:
[<] removes the highlighted entry from the Available Members box and puts it in
the Members Group.
[<<] adds all the Available Members or contacts to the Members Group box.
[>] removes the highlighted entry from the Members back to the Available
Members box.
[>>] re-populates the Available Members with all the current Group members in
the given Group.
Index Tabs:
Found down the right hand side of the active screen, these tabs work in the same
manner as a normal address book's index tabs. Selecting any of the tabs will
bring up only contacts that start with the letter(s) shown on the tab. (See Below)
Figure 24
22
Message Logs:
Figure 25
Mobile Messenger logs all the SMS messages that are sent and received
through it. From this screen you may search and browse the log files.
The Log List and Message Window:
In the centre of the screen is the message log. It displays all the messages that
you've requested to view. Below this is the message window. It displays details
on the highlighted message; if the selected message is a Picture SMS or some
other special message, this will also be displayed in the message window.
Time Filter:
At the top-right of the screen is a drop-down selection that allows you to quickly
jump to a particular time period of the message log.
Click on the drop-list and it will drop down; select the time period of the
messages that you wish to view, and then click "Sent" or "Received" from the
functions palette (see below) to view those messages.
23
The Functions Palette:
The message log is fairly interactive, you can tell it what entries you wish to view
and once viewing them, you can generate actions with the entries. The available
functions are found across the top of the active screen as follows:
Sent:
Uses the time period filter (see above) and shows all SMS messages that you
have sent in that time period.
Inbox:
Uses the time period filter (see above) and shows all SMS messages that you
have received in that time period.
Reply:
You must have a message highlighted in the Message List before selecting this
function. You will automatically be taken to the Quick Send screen, where the
number of the person who sent you the SMS will be placed in the "To:" field, and
their message in the "Message:" field. See the Quick Send help for more details.
Forward:
You must have a message highlighted in the Message List before selecting this
function. You will be taken to the Quick Send screen, and the SMS message text
will be placed in the "Message:" field. You need only select a new number in the
"To:" field to send this message to someone else.
Refresh:
Click this button to re-read the list of messages from the SMS Gateway, if any
new messages have been sent or received while you have been viewing the log,
they will appear in the list now.
24
Preferences:
Before you start using Mobile Messenger, it has to be set up. If at any time
Mobile Messenger detects an error with the current configuration, you will be
placed in the Preferences screen so that you may enter the correct settings.
Figure 27
Authentication:
Because many people may use a single SMS gateway on a Local Area Network
LAN, they each have to log onto the service so that they may be identified for
purposes of sending/receiving messages.
Your system administrator will assign you a username and password. Type them
in accordingly. If there is a chance that other people may use your computer for
general operations or for purposes of sending/receiving SMS messages, make
sure that the "Remember Password" box is un-ticked, then you will be prompted
for your password each time you start the application; this will reduce the threat
of people abusing your SMS facilities.
Use Proxy:
A socks 5 proxy connection is also available. Your Network Administrator will need
to supply you with Username and Password detail for this, if it is to be used.
Generally you will not need to worry about using a proxy; simply leave it as is on
“No Proxy – Direct Connection”.
25
Figure 28
Network:
Gateway
The Mobile Messenger application needs to know the address of the
computer that has the SMS Gateway loaded, as it is this computer that
sends and receives SMS messages (this is the PC that has the GSM
modem attached to it). Your system administrator will be able to tell you
this address and it is filled in under “Gateway” as per Figure 21 above. You
usually shouldn't have to fill it in as it is done during installation and
remembered by the Operating System. If you have the modem on your
machine, this value should be "127.0.0.1" or “localhost”.
Connect Button:
Below the gateway address is a status line that shows your current status
to the SMS gateway. If this reads “Could not contact Gateway” then there
is a problem in your connection to the SMS Gateway. The message should
read "Gateway Contacted. Logged In." in order to be capable of sending
SMS messages.
Click the "Connect" button to attempt a gateway connection. If you are
sure that you have filled in everything correctly and the status message
still reflects that you are not connected to the gateway, consult your IT
Administrator, the Troubleshooting section of this help or call your support
line where available.
Message Checking:
This facility is simply how often the software checks for incoming SMS
messages and is set to a 1 minute default. This is acceptable when there
26
are 20 to 30 users however if there are 100 users then this should be set
to 15 or even 30 minutes in order to minimise the impact on bandwidth.
Forward received SMS’s to cell phone:
This is a very useful function in that any incoming messages can be
forwarded to the cell phone number inserted in the text box. In this way
you will never miss an SMS message even if you are away from your
computer.
Work in Offline mode:
This is not a default feature but is intended for people that may work in
remote offices of from home, via dial-up Internet connectivity.
Once this has been selected the user can compile messages even though
they are not connected to the Internet. The messages are “queued” or
stored locally till such time as the author is ready to send them or next
dials-up to the Internet.
As soon as a connection is established to the Internet, the author “clicks”
the “Sync” button that displays down the left hand side in the main
function list. The software establishes a connection to the remote SMS
Gateway, sending and retrieving messages.
All the other functions work as per the on-line version of the software but
it should be understood that the software is slower than if it were working
on a LAN due to the restrictions in connection speed for dial-up users.
Load Address book on start-up:
This feature has been designed for slower networks where users do not
wish to wait for the address book to load when starting the software.
Use Local Address Book (for Slow Connections):
This facility is available on larger network groups and / or for slow
connections.
What happens here is that an address book is created locally on your PC,
once this option is checked, and once contacts are added to it.
Although it updates your Gateway address book it will first check to load
your local address book. It operates in a cached mode.
27
User Interface:
Figure 29
Minimise to System Tray:
If you want Mobile Messenger to be unobtrusive while you're not using
it, check this option. While it is checked, the program will go to the
System Tray (near the clock, at the bottom right of the screen) when you
minimize it. When it is placed in the System Tray and you wish to
send/read an SMS, double-click on the Mobile Messenger Icon to bring
the program back up.
Location:
This setting is for International users of this software. The user should
select the country where the software is being used in order that the
default dialling prefix is correct.
In order to set the location, choose the correct country from the list and
press, “Set Location”.
28
Help:
Figure 30
Help:
We have included a User Manual with Mobile Messenger, in Microsoft® Word and
Adobe® PDF format. You can check for the latest versions by following the links.
Support:
To receive Support, you will need to browse to the Mobile Messenger website.
This can be found at: http://www.mobilemessenger.co.za
You will need to click the Support link, and then enter your SIM number. This is
the number of the actual SIM card that sends out the SMS: if you do not know
this, contact your Network Administrator.
Once we have received your Support Query, our team will investigate and
respond to you ASAP.
Alternatively, you can contact us on: +27 (31) 7647085.
29
Mobile Messenger Installation:
LAN (Local Area Network) Mobile Messenger client Set-up:
The following set-up is for additional LAN client users.
NOTE: Before moving to the client PC, FIRST establish the IP address of
the Gateway PC as all the Mobile Messenger Client software must point
to that IP address.
• Run the CD, or double-click on the install icon, and follow the
“Install shield” instructions:
Figure 31
30
Figure 32
Figure 33
31
Figure 34
Figure 35
32
Opening Mobile Messenger:
At this point: Run the Mobile Messenger client software:
• In Windows Go: Start, Programs, Mobile Messenger and Mobile Messenger.
This will bring up:
Figure 36
•
Insert the Admin User Name and Password, the Gateway IP
address and press Connect.
•
•
The Status should read “Gateway Contacted. Logged In”.
Establish a User Name and Password of choice for the Client
user.
Alternatively you can use a proxy SOCKS 5 connection and
enter the respective settings.
•
33
Mobile Messenger Support:
Figure 37
Mobile Messenger Support:
To receive Support, you will need to browse to the Mobile Messenger website.
This can be found at: http://www.mobilemessenger.co.za
You will need to click the Support link, and then enter your SIM number. This is
the number of the actual SIM card that sends out the SMS: if you do not know
this, contact your Network Administrator.
Once we have received your Support Query, our team will investigate and
respond to you ASAP.
Alternatively, you can contact us on: +27 (31) 7647085.
34