1
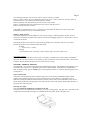
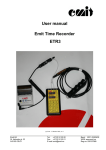
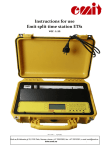
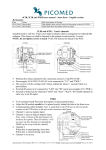
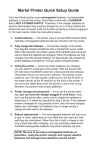
USER-MANUAL
EMIT
MINI TIME RECORDER
VERSION 3
AND
THERMAL PRINTER
(c) Emit 19.oct 2003, rev 3
Emit AS
St. Halvards gt. 33
0192 OSLO
Tel: 22 91 03 00
Fax: 22 91 03 01
E-mail: [email protected]
Bank: 6011.05.80439
WEB: www.emit.no
Foretaksnr: 930127868
Page 2
The Emit Mini Time Recorder version 3 (MTR3) is especially developed for use together with our
Electronic Punching and Timing system (EPT) when using “electronic timing”, i.e. when the runner’s total
time is to be recorded by the electronic card carried by each participant.
The MTR3 is programmed to communicate both a PC or with the thermal printer EPR-3 or the previous
version Martel MCP9810.
PRINTER OPERATION
Printing on Martel MCP9810
In order to print with MTR3 to the Martel printer a special split-cable (Y-cable) has to be used. This cable is
available as optional equipment from Emit.
Connect the cable to the MTR3 and printer (and PC if PC is in use) before turning on the Martel Printer.
Printing on the EPR-3.
A separate cable with a small 6-pin PS-2 cable is used to connect to the EPR-3. Plug the cable into the
printer before powering up the printer. If this cable is too short it can be extended by using a PC-keyboard
extension cable. Maximum 3 meters of extension is allowed as longer cables can draw more current from
built-in battery.
Simultaneous printers and PC
It is possible to connect printer and PC at the same time. It is also possible to connect 2 printers at the same
time (with or without the PC), but a special Y-cable has to be used for this purpose. When using a two
printer setup, no extension cables should be used.
Reset
The MTR3 can be reset making a short circuit on pin 23 and 24.
OPERATION
To read an ECard, place it in on top of the MTR3. The antenna in the ecard is on the opposite side of the
rubber-band attachment. That side of the ECard should be centered to make the MTR3 read the Ecard. The
green LED (thumbs up) on top of the MTR3 will flash, and a beep will sound when the ECard has correctly
been read by the MTR3. If the red LED is lighted (no sound) the MTR3 has not correctly read the ECard.
Try to realign the ECard in order to get a better "antenna contact" between the ECard and the MTR3.
The MTR3 will only make one printout of an ECard if you want another printout of the same ECard,
another ECard has to be read first before allowing the previous ECard to be re-printed.
Normal printout
First line of printout is "EMIT timing system"
Second line is time and date in "hh:mm:ss DD:MM:YYYY" format.
Third line is the ECards-serial number followed by "race-time" or "Total time" in expanded font.
The total time is the time from the ECard left a start-control (0) to the time it was placed on the last control
before the MTR3 reads the ECard. If the ECard has been placed on several start-control's or placed on
several MTR's (or 250-controls) the total time is the time from the LAST start control to the last control
before the FIRST MTR2 (or 250-control). Under normal situations, the maximum number of controls that
the ECard can hold is 48 controls (not counting Start(0) and MTR(250)).
Page 3
The remaining printout is one for every control visited it consists of 4 fields:
Field 1: Control counter. This is a sequential count of every line / control of the race. The last control is
printed with an "F" for finish instead of the sequence number
Field 2: Split time. The time from the previous control to this control.
Field 3: Accumulated time. The time from the start-unit (0) until this control.
Field 4: Control code of this control.
If the MTR3's internal battery is low, a special line is printed after the last line of controls with some
parameters and the word "low" at the end of the line.
Memory dump-printout
If an ECard is placed on top the MTR3 for more than 6 seconds, a "Memory-dump" printout of all 50
positions in the ECards is printed. This printout in meant for debugging purposes i.e. if more than one race
is stored in the ECard.
The attached printer will on the first line print the tag number, the "total-time" and (for "non yellow"
ECards) the number of races the ECard has been used,
Example
" 12345 1:02.17 L0027"
meaning
Ecard number 12345, total time 1 hour 2 minutes and 17 seconds, and 27 races.
Low-power controls.
When controls have week batteries, they insert a "99-code" just before their control number. The MTR3
does print this 99-control number as an ordinary control just after the control with low battery. The controlcounter in the first field of the printout will in such case be too high.
THE EPR-3 THERMAL PRINTER
The Emit EPR-3 is a compact and light weight portable thermal printer with an RS232 serial interface via a
6-pin PS/2 style connector. It is powered from an environment friendly, replacable7,2V Ni-MH battery
pack. Average printing speed is 12 lines per second and paper width is 57 or 58mm. Operating range is 0 to
+50 degrees C.
Paper-out detection
The printer will automatically detect when the paper has run out and the red ERROR-LED will blink
rapidly. After replacing the paper, the printer will continue to print all data in its 10K buffer. This is
sufficient to hold print-data for about 20 ECards (with 20 controls each). One should NOT power off the
printer during replacement of the paper as the print-data then will be lost (but the MTR3 keeps the data, so
spooling to PC will still work).
Inserting new paper.
Note that maximum roll-diameter for EPR-3 is 40 mm.
The printer has a "clam-shell design" making it very easy to change paper. The paper roll is inserted into the
compartment, and the end of the paper is extended outside the printer while closing the cover.
Page 4
Charging the battery
The power-adapter will charge an empty battery full in approximately 4 to 5 hours. The adapter shows a
steady red-light when charging the printer. When fully charged it will change to a green light.
Battery-capacity
A new and full battery pack has sufficient power to print continuously for approximately 1 hour. When
battery level becomes low the green power-LED will blink red while printing, indicating that battery should
be changed or charged. One hour of printing is approximately printing of 1200 ECards with 15 punches.
Power On Self-Test
The self-test procedure is initiated by turning on the printer with the FEED button pressed.
Release the feed button and the self-test procedure will start. This will check most of the printer functions
and also print the firmware version and protocol in use. The protocol should show:
MODE = RS-232C.
SERIAL = 9600 BAUD
8 DATA BIT
NO PARITY
1 STOP BIT
Resetting the protocol.
The protocol of the printer was correctly set when the printer left EMIT. If the protocol has been changed, it
can be reset to the correct reading by following this procedure. If in doubt, you can at any moment turn the
printer off in an on to start over without storing modifications. The modification will only be stored when
pressing MODE and FEED at the same time (see step 17 below).
1.
2.
3.
4.
5.
6.
7.
8.
9.
10.
11.
12.
13.
14.
15.
16.
17.
Turn the printer ON.
Press and hold the MODE button down until the red ERROR-LED has flashed 5 times, then release
MODE. The MODE-LED should now blink once (com.settings) and the ERROR-LED should also
blink once (RS232C Mode)
If the ERROR-LED didn't blink once, press MODE once (shortly), and count the number of times
the ERROR-LED blinks.
Repeat step 3 until the ERROR-LED blinks only once (it will cycle through 1, 2 and 3 blinks, 1
blink means RS 232-C protocol).
Press FEED button once, shortly (the MODE-LED will blink twice indicating that we are entering
baudrate-selection mode). Count the number of blinks on the ERROR-LED; it should be 4
(meaning 9600 baud).
If there were NOT 4 blinks, press MODE shortly and count number of ERROR-LED blinks
Repeat step 6 until ERROR-LED blinks 4 times.
Press FEED button once. (the MODE-LED should blink 3 times). Count the number of blinks on
the ERROR-LED; it should be 2.
If there were NOT 2 blinks, press MODE shortly and count number of ERROR-LED blinks.
Repeat step 9 until ERROR-LED blinks 2 times.
Press FEED button once (the MODE-LED should blink 4 times). Count the number of blinks on
the ERROR-LED; it should be 1.
If there was not 1 blink, press MODE shortly and count number of ERROR-LED blinks.
Repeat step 12 until ERROR-LED blinks 1 time.
Press FEED button once (the MODE-LED should blink 5 times). Count the number of blinks on
the ERROR-LED; it should be 3.
If there were not 3 blinks, press MODE shortly and count number of ERROR-LED blinks.
Repeat step 15 until ERROR-LED blinks 3 times.
Press MODE and FEED simultaneously to store new settings.
Page 5
PC-OPERATION
POWER-ON
To connect the MTR3 to the PC using the enclosed 9 pin female to 25 pin male connector. If using the
optional split-cable (Y -cable) the 9 pin female connector is for attaching to a standard PC serial port, the 9
pin male connector for connection a Martel printer. The protocol used is public and can be found on EMIT's
WEB site (www.emit.no).
OPERATION OF MTR3 WHEN PC IS CONNECTED.
The MTR is operated in the same way as when the printer is attached. If the PC is sending commands to the
MTR, requesting data or status messages, delays can eventually be noticed when reading an ECard.
ECARD-HISTORY FILE.
The MTR will store the most recent ECard's internal memory (ECard-history file). When
this memory is filled, the oldest data is discarded. The number of ECards that a MTR can
hold depends on the number of controls stored in each ECard. The following guide gives
an indication of how many ECards a MTR3 can hold.
10 controls->1000 ECards
20 controls->600 ECards
50 controls->250 ECards
The MTR3 also stores "pointers" to the first ECard read after an approximate 8 hour delay
(without reading) or after sending a /NS (new session command). Some software
programs might use this information to ease the downloading of data from the previous
event and not loading data from earlier events. The last 8 session pointers are kept in the
MTR3.
BATTERIES.
The MTR3 uses a built in 3,6 V Lithium battery. This battery has sufficient power to provide approximately
10 years of "average" use. The most power-consuming operation is spooling the MTR's memory. The
lifetime calculations have been done by assuming that every card that is read by the MTR3 is sent 3 times to
a PC/printer (once when reading, and then 2 later spooling operations). If spooling is done much more
frequent or software is "abusing" the MTR by requesting information repeatedly (polling) the lifetime of the
MTR will be shortened.
ENVIRONMENT
The MTR3 is "almost" waterproof. It is not advisable to submerge the MTR into water, as the buzzer might
be damaged from the water-pressure. It will work fine in temperatures down to minus 20 degrees Celsius
(the thermal printer however is not designed to tolerate water or temperatures below 0 degrees).