1
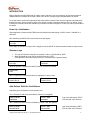
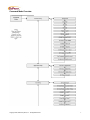
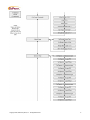
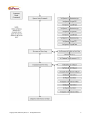
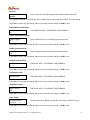
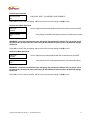
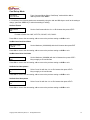
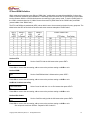
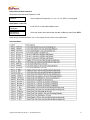
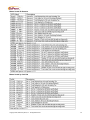
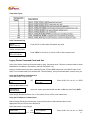
MINI TRANSACTION TILL - ENCODER
User Manual
February 2009
GOPRINT MINI-TRANSACTION TILL
Table of Contents
SALES AND SERVICE ............................................................................................................................................. 3
QUICK REFERENCE
………………………………………………………………………………………………………....4
INTRODUCTION ....................................................................................................................................................... 5
OPERATOR LOGIN .....................................................................................................................................................
ADD, REFUND, DEBIT CARDS
5
………………………………………………………………………………………………….5
FLAG CARD HANDLING
………………………………………………………………………………………………………..6
COMMAND MODE OVERVIEW ............................................................................................................................... 7
SETUP ................................................................................................................................................................... 10
TERMINAL SETUP ……………………………………………………………………………………………………………10
APPLICATION SETUP MODE (FOR RECEIPT PRINTERS) ................................................................................ 13
OPERATOR SETUP
MODE………………………………………………………………………………………………...17
AUTO ENCODE FUNCTION ................................................................................................................................. 6
SERVICE MODE (LOGS & TRANSACTION METERS) ........................................................................................ 20
PRINT METERS ........................................................................................................................................................ 22
CLEAR TRANSACTION LOG
…………………………………………………………………………………………………..24
ENCODE CASH COMMAND CARD ...................................................................................................................... 25
ERROR MESSAGES .............................................................................................................................................. 25
CABLES .................................................................................................................................................................. 29
Copyright 2009, GoPrint Systems, Inc. All Rights Reserved
2
Sales and Service
At GoPrint, complete customer satisfaction is our number one goal. As such, customer support is readily available
to satisfy any need you may have. Whether it's sales information, a service requirement or just general inquiry,
you can be assured of a prompt response to your need(s).
SALES
If you are a new or existing customer with a new installation in mind, our highly qualified sales staff can custom
tailor a product solution for "your" particular needs. Simply telephone GoPrint in the United States at 1-888-52PRINT and ask for sales assistance. You may also email us at [email protected]
UNITED STATES
GoPrint Systems, Inc.
One Annabel Lane, Suite 105
San Ramon, CA 94583
Tel:
Fax:
1-888-52-PRINT
1-925-790-0071
SERVICE
If you require technical assistance advice or parts please contact our support department
at 1-888-52-PRINT ext. 30 or email us at [email protected]
Repairs in the should be sent to:
GoPrint Systems, Inc.
One Annabel Lane, Suite 105
San Ramon, CA 94583
Tel:
Fax:
1-888-52-PRINT ext. 30
1-925-790-0071
Please visit us at - http://www.goprint.com
Copyright 2009, GoPrint Systems, Inc. All Rights Reserved
3
Quick Reference Guide
Initial Programming:
• At the operator prompt, log into administrative features by entering D-9-5-1-ENT
• Select Command Mode by hitting ENT (or up/down with A, B keys.)
• Enter Password 1-5-3-5
***Press ENT to select or save, CLR to take you to the next menu or cancel, A/B to arrow up/down
Key Features to program in Command Mode:
o Terminal Setup Æ ENT Æ Show # Decimal Pt Æ Should read 2 (CLR)
o Card Setup Æ ENT Æ STX Æ Should Read 12
o Card Setup Æ ENT Æ ROM Æ Should Read 6
o Card Setup Æ ENT Æ Site 1 Æ Should be specific customer Site Code
o When finished Continue to Hit clear until you get to the main screen (Enter Operator)
Encoding Cards – Operator Log-in
There are 8 separate operators able to use the Encoder. If you wish to have record keeping ability, you can
assign each person a separate Operator Number. This will help you determine who made the
additions/subtractions on cards.
•
•
Log into the unit by keying in your Operator Number (1-8), Press Enter
Enter Your unique Password. Default is 1111 for Operator 1, 2222 for Operator 2, 3333 for operator 3
etc. (you can change the password from default if you wish – but cannot recover lost passwords).
KEYA= Add
B = Refund Card Balance
D = Debit/Subtract from Balance
At this point you are able to begin encoding cards. You can:
• Insert user’s card you wish to add value/subtract value, press A to add, and then enter the amount. Card
will eject when finished
• Insert single blank card Æ This will lay down the track and encode with Site code and $0 balance, press
eject button to return
• Mass Encoding of blank cards – insert Grey, Encode Cash Card (given with original installation packet).
o Enter the value you wish to do mass encoding (this will display to the tenth of a cent)
o Press Enter
o Begin Entering User Cards
o Press Clear when finished
Operator Log-Out
When all cards are ejected, press CLR, then confirm the logoff by pressing D.
In activity in a given period of time, will automatically logoff the Operator.
Copyright 2009, GoPrint Systems, Inc. All Rights Reserved
4
INTRODUCTION
Before operating the MiniTill/Encoder in Legacy mode it will have to be set up properly for the card format and
characteristics it is intended to work with. Refer to the section “Setup through Command Mode” for details.
To encode cash or Units cards optional Encode cards will be required. There are other optional command cards
that perform some service functions. Refer to the Section “Legacy Command Cards and Use” for details. These
Encode and Command cards are available for purchase from GoPrint Systems. Contact your sales representative
for details.
Power Up / Initialization
Upon application of power the MiniTill/Encoder will initialize itself and display :“M1535 Version” “#.##.##” for a
short time.
After initializing the MiniTill will enter the Idle mode and display:
Enter Operator
# to Login
At this stage an operator can login via the keypad to use the MiniTill or initiate command modes to setup the unit.
Operator Login
•
•
To Login the Operator first enters an operator number (1-8) followed by <ENT>
When prompted the Login PIN is entered followed by <ENT>.
(The Operators’ PIN and Access are set-up in command mode: Operator Setup)
Enter Operator
# to Login
Operator #
Password
While an operator is logged in the MiniTill waits for a card to be inserted
Please Insert
Card
When a valid card is inserted its balance is displayed in Cash or Units
Purse1: $ ##.##
Press A B or D
Purse1: ####
Press A B or D
Add, Refund, Debit the Card Balance
Depending upon the Operator’s Authorization level:
<A> is Pressed to Add to the card balance (Taxes are not applied)
Balance$ ##.##
Add$ ##.##
Purse1: ####
Add ####
Type value followed by <ENT>
CLR will clear value & cancel
<B> is Pressed to Refund to the card balance (Taxes, if Set, are applied)
Balance$ ##.##
Refund$ ##.##
Copyright 2009, GoPrint Systems, Inc. All Rights Reserved
Purse1: ####
Refund ####
type value followed by <ENT>
CLR will clear value & Cancel
5
Multiple Refunds may be made during a single transaction. After applying the last refund press ENT to end the
transaction, write the new balance and return the card
<D> is Pressed to Debit from the card balance (Taxes, if Set, are applied)
Balance$ ##.##
Debit $ ##.##
Purse1: ####
Debit ####
type value followed by <ENT>
CLR will clear value & Cancel
Multiple Debits may be made during a single transaction. After applying the last refund press ENT to end the
transaction, write the new balance and return the card
Transaction Receipts
If a receipt printer is attached and set-up in Command Mode: MiniTill Setup a receipt will be printed after the card
is ejected at the end of the Transaction.
Printing Receipt
Pressing C before inserting the next card will print a copy of the last receipt unless a new operator has logged in
or the power to the MiniTill was reset.
Flagged card Handling
If the card inserted is Flagged, and the Operator’s Authorization level allows unflagging of cards the operator can
press A to remove the flag from the card.
Card Flagged
A to Unflag
Pressing any other key will cause the card to be ejected without
removing the flag
If the Operator does not have Authorization to unflag cards or the unflag option is turned off in Command mode:
MiniTill Setup the flagged card will be immediately rejected.
Flagged Card
Operator Logoff
Please Insert
reader
Card
To logoff the operator presses <CLR> while there is no card in the
Log off ?
D=Yes CLR=No
Confirm the desire to logoff by pressing <D>
Once the Auto logoff time has expired (from the time the operator Logged on) the MiniTill will automatically log the
operator off (unless he is in the middle of a transaction). Auto Logoff time is set for each Operator in command
mode: Operator Settings.
Copyright 2009, GoPrint Systems, Inc. All Rights Reserved
6
Command Mode Overview
Copyright 2009, GoPrint Systems, Inc. All Rights Reserved
7
Copyright 2009, GoPrint Systems, Inc. All Rights Reserved
8
Copyright 2009, GoPrint Systems, Inc. All Rights Reserved
9
Setup through Command Mode
Before using the unit it must be set up according to the customer’s site and operational requirements. The
Command Mode menus follow a common structure throughout the setup.
To access command mode:
At the Idle prompt or Login Prompt
Please Insert
Card
OR
Enter Operator
# to Login
Press
Clear – D- 9-5-1 – Ent
Mode Selection
Command Mode
On the keypad use <A> or <B> to select Command Mode Then Press <ENT>
Default Command Mode Password
The default command mode password is 1535
Password:
_
At the Password Prompt press 1-5-3-5- ENT on the keypad
Terminal Setup Mode
Terminal Setup
A or B to Scroll
From the command mode select Terminal Setup mode with the <A> or <B> keys
then press <ENT>
In “Terminal Set-up” the following options are accessed by using the <A> and <B> keys to scroll to the setting to
change, press the <ENT> key to select that setting for editing.
Set Terminal ID
Terminal ID
1
Press <B> to move to the next setting, <A> to move to the previous setting or <CLR> to exit.
Select Language
Language
English
Select English or French using the <A> <B> key followed by ENT
Press <B> to move to the next setting, <A> to move to the previous setting or <CLR> to exit.
Set Date
yy/mm/dd
##/##/##
Enter Current date using the keypad in the format yy/mm/dd. Press ENT
The Display will indicate “Date Changed” then re-display the current setting. Press <ENT> to confirm setting.
Press <B> to move to the next setting, <A> to move to the previous setting or <CLR> to exit.
Copyright 2009, GoPrint Systems, Inc. All Rights Reserved
10
Set Time
hh mm ss
##/##/##
Enter current time using the keypad in the format hh/mm/ss press ENT
The Display will indicate “Clock Changed” then re-display the current setting. Press <ENT> to confirm setting.
Press <B> to move to the next setting, <A> to move to the previous setting or <CLR> to exit.
Enable MAF Card Validation
Validate Cards
No
This DOES NOT APPLY TO GOPRINT CARD FORMATS
Enable Transaction Logging
Enable Logging?
No
Select Yes/No using the A or B Keys, press enter to save
Press <B> to move to the next setting, <A> to move to the previous setting or <CLR> to exit.
Enable Command Cards
Accept Command
Yes
Select Yes/No using the A or B keys, press enter to save
Press <B> to move to the next setting, <A> to move to the previous setting or <CLR> to exit.
Set Gateway/Host RFID
Gateway/Host RIF
D 0
DOES NOT APPLY TO GOPRINT CARD FORMATS
Press <B> to move to the next setting, <A> to move to the previous setting or <CLR> to exit.
Set Default Host ID
Default Host ID
0
DOES NOT APPLY TO GOPRINT CARD FORMATS
Press <B> to move to the next setting, <A> to move to the previous setting or <CLR> to exit.
Set Offline Timeout
Offline Timeout
100
DOES NOT APPLY TO GOPRINT CARD FORMATS
Press <B> to move to the next setting, <A> to move to the previous setting or <CLR> to exit.
Show Tenth?
Show #Decimal pt
On values
2
set decimal points to display (0-3) with the A or B keys, press ENT to save
Press <B> to move to the next setting, <A> to move to the previous setting or <CLR> to exit.
Copyright 2009, GoPrint Systems, Inc. All Rights Reserved
11
Set Command Card PIN
Command Card
PIN
DOES NOT APPLY TO GOPRINT CARD FORMATS
Press <B> to move to the next setting, <A> to move to the previous setting or <CLR> to exit.
Set Command Mode Password
Enter New
Passwrd
Verify Password
ENT
Set the 4-digit command mode password with the 0-9 buttons then press ENT
Verify 4-digit command mode password with the 0-9 buttons then press
WARNING!! Once this password has been changed to old password is deleted. The only way to revert
the password is to return the unit to the factory to RE-Initialize the memory where all data and settings
will be lost
Press <B> to move to the next setting, <A> to move to the previous setting or <CLR> to exit.
Set Service Mode Password
Enter New
Passwrd
Verify Password
ENT
Set the 4-digit service mode password with the 0-9 buttons then press ENT
Verify 4-digit service mode password with the 0-9 buttons then press
WARNING!! Once this password has been changed to old password is deleted. The only way to revert
the password is to return the unit to the factory to RE-Initialize the memory where all data and settings
will be lost
Press <B> to move to the next setting, <A> to move to the previous setting or <CLR> to exit.
Copyright 2009, GoPrint Systems, Inc. All Rights Reserved
12
Application Set-up Mode
Aplication Setup
A or B to scroll
From Command Mode Select “Application Setup” mode with the
<A> or <B> keys then Press <ENT>
In “Application Set-up” the following options are accessed by using the <A> and <B> keys to scroll to the setting
to change, press the <ENT> key to select that setting for editing.
Set COM 1 Application
Com 1 App
Receipt Printer
Set the application connected to COM 1 with the <A> or <B> buttons
then press <ENT>
Applications to Select between: Receipt Printer or None
Press <B> to move to the next setting, <A> to move to the previous setting or <CLR> to exit.
Set COM 2 Application
Com 2 App
Meters Reports
Set the application connected to COM 2 with the <A> or <B> buttons
then press <ENT>
Applications to Select between: Meters Reports or None
Press <B> to move to the next setting, <A> to move to the previous setting or <CLR> to exit.
Set USB Application
USB App
Receipt Printer
Set the application connected to COM 1 with the <A> or <B> buttons
then press <ENT>
Applications to Select between: None
Press <B> to move to the next setting, <A> to move to the previous setting or <CLR> to exit.
Set Transaction Port
Transaction
Port
RF
Set the port for the Transactions to be transmitted through with the
<A> or <B> buttons then press <ENT>
Applications to Select between: RF, COM1, COM2, USB, or None
Press <B> to move to the next setting, <A> to move to the previous setting or <CLR> to exit.
Copyright 2009, GoPrint Systems, Inc. All Rights Reserved
13
Card Set-up Mode
Card Setup:
A or B to scroll
From Command Mode Select “Card Setup” mode with the <A> or
<B> keys then Press <ENT>
In “Card Set-up” the following options are accessed by using the <A> and <B> keys to scroll to the setting to
change, press the <ENT> key to select that setting for editing.
Set Card Format
Card Format
MAF
Set the Card format with the <A> or <B> buttons then press <ENT>
Formats to Select from: MAF, ACT/ITC, ICS/XCP, VCS, DANYL
Press <B> to move to the next setting, <A> to move to the previous setting or <CLR> to exit.
Set Maximum Cash Card Value
Max Value Cash
$ 100.00
Set the Maximum (0.00-999.99) with the 0-9 buttons then press ENT
Press <B> to move to the next setting, <A> to move to the previous setting or <CLR> to exit.
Set Maximum Units Card Value
Max Value Units
1000
Set the Maximum (0-999999) with the 0-9 buttons then press <ENT>
May not apply to all card formats
Press <B> to move to the next setting, <A> to move to the previous setting or <CLR> to exit.
Set Units Card Acceptance
Accept Units?
No
Select Yes or No with the <A> or <B> buttons then press <ENT>
May not apply to all card formats
Press <B> to move to the next setting, <A> to move to the previous setting or <CLR> to exit.
Set Cash Card Acceptance
Accept Cash?
Yes
Select Yes or No with the <A> or <B> buttons then press <ENT>
Press <B> to move to the next setting, <A> to move to the previous setting or <CLR> to exit.
Copyright 2009, GoPrint Systems, Inc. All Rights Reserved
14
STX and ROM Definition
Within most card formats there are different “ROM Code” combinations to expand the availability of unique site
codes for different institutions and installations. Traditionally these have been set on DIP Switches or hard coded
into the firmware. With the 1500 Series these are set under the Legacy set-up mode. To set the “ROM Code” on
the 1500 it must be broken into 2 “nibbles” hence the terms STX (Start nibble of the “ROM Code”) and ROM
(second nibble of the “ROM Code”).
The STX and ROM are hexadecimal (HEX) values which have to be converted to decimal for entry purposes. The
tables below the HEX to Decimal conversions and some common examples of “ROM Codes”.
Set Card STX
STX
12
Set the Card STX with the 0-9 buttons then press <ENT>
Press <B> to move to the next setting, <A> to move to the previous setting or <CLR> to exit.
Set Card ROM
ROM
6
Set the Card ROM with the 0-9 buttons then press <ENT>
Press <B> to move to the next setting, <A> to move to the previous setting or <CLR> to exit.
Set Blank Card Auto-encoding
AutoEncode Blank
No
Select Yes or No with the <A> or <B> buttons then press <ENT>
Press <B> to move to the next setting, <A> to move to the previous setting or <CLR> to exit.
Set Card Site Codes
Site 1
1644
Set the Card Site code(s) with the 0-9 buttons then press <ENT>
Press <B> to move to the next setting, <A> to move to the previous setting or <CLR> to exit.
Get unique site code from GoPrint - Repeat for Site Codes 2-5.
Copyright 2009, GoPrint Systems, Inc. All Rights Reserved
15
MiniTill Set-up Mode
MiniTill Setup:
A or B to scroll
From Command Mode Select “Minitill Setup” mode with the <A> or
<B> keys then Press <ENT>
In “MiniTill Set-up” the following options are accessed by using the <A> and <B> keys to scroll to the setting to
change, press the <ENT> key to select that setting for editing.
Set Receipt Printer Type
Receipt Printer
None
Select the printer type with the <A> or <B> buttons then press <ENT>
Printers to Select from:
None (Disable Receipt function)
No Cut (the receipt is manually torn of by the operator)
FF=Cut (The receipt is cut by the FF Command)
CBM 1000 (CBM 1000 Printer with integrated cutter)
Press <B> to move to the next setting, <A> to move to the previous setting or <CLR> to exit.
Set Receipt Copies to Print
Receipt Copies
1 Copy
Select the printer type with the <A> or <B> buttons then press <ENT>
Copies Select from:
1 Copy
2 Copies
3 Copies
On Demand (Receipt is only printed if C is pressed after the transaction)
Press <B> to move to the next setting, <A> to move to the previous setting or <CLR> to exit.
Entering Text with the 4X4 Keypad
0-9 Buttons
A Button
B Button
C Button
CLR Button
ENT Button
Used to input the characters 0 - 9
Used to input UPPERCASE text characters. Press <A> until desired character is
displayed. Press <ENT> to move to the next Character.
Used to input lowercase text characters. Press <B> until desired character is
displayed. Press <ENT> to move to the next Character.
Used to input Punctuation text characters. Press <B> until desired character is
displayed. Press <ENT> to move to the next Character.
Clear entire line
Set the current character and move to next. Press <ENT> again when the line is
completed.
Set Receipt Header Line 1 Text
Receipt line 1
1 Copy
Enter the text to print on line 1 of the header using 0-9, A, B, D
buttons then press <ENT>
Press <B> to move to the next setting, <A> to move to the previous setting or <CLR> to exit.
Set Receipt Header Line 2 Text
Receipt line 2
Enter the text to print on line 2 of the header using 0-9, A, B, D
2 Copy
buttons then press <ENT>
Press <B> to move to the next setting, <A> to move to the previous setting or <CLR> to exit.
Copyright 2009, GoPrint Systems, Inc. All Rights Reserved
16
Set Receipt Header Line 3 Text
Receipt line 3
3 Copy
Enter the text to print on line 3 of the header using 0-9, A, B, D
buttons then press <ENT>
Press <B> to move to the next setting, <A> to move to the previous setting or <CLR> to exit.
Set to Allow Card Unflagging
Allow Unflag?
No
Select Yes or No with the <A> or <B> buttons then press <ENT>
Press <B> to move to the next setting, <A> to move to the previous setting or <CLR> to exit.
NOTE: When entering the 3 header lines alpha characters and punctuation can be used.
Pressing <A> will cycle through UPPERCASE letters. Press ENT to select character.
Pressing <B> will cycle through lowercase letters. Press ENT to select character.
Pressing <A> will cycle through Punctuation characters. Press ENT to select character.
If a line is to end in a letter or punctuation character press ENT twice.
Operator Set-up Mode
Operator Setup:
A or B to scroll
From Command Mode Select “Operator Setup” mode with the <A>
or <B> keys then Press <ENT>
In “Operator Set-up” the following options are accessed by using the <A> and <B> keys to scroll
to the setting to change, press the <ENT> key to select that setting for editing.
Operator Authorization Levels
Each operator must have an authorization level assigned. Levels and functions are below:
Disable
Debit Only
Debit Refund
Add only
Add Debit Refund
All
Operator cannot change any field data including balances
Operator can only make Debits
Operator can only make Debits or Refunds
Operator can only make Credits
Operator can only make Credits, Debits or Refunds
Operator has Full control including changing field data
Operator Authorization
Operator 1 Auth
None
Select the Authorization level with the <A> or <B> buttons then press <ENT>
Press <B> to move to the next setting, <A> to move to the previous setting or <CLR> to exit.
Operator PIN
Operator 1 PIN
1111
Enter the 4 digit PIN with the 0-9 keys followed by <ENT>
NOTE: Default passwords are 1111 for Operator 1, 2222 for Operator 2, 3333 for Operator 3, etc.
Press <B> to move to the next setting, <A> to move to the previous setting or <CLR> to exit.
Copyright 2009, GoPrint Systems, Inc. All Rights Reserved
17
Operator Logoff
Operator 1
Logoff
time, Min 0
Enter the Operator Logoff time (0 to 99) with the 0-9 keys followed by
<ENT> A setting of 0 requires Operator logon each for transaction.
Press <B> to move to the next setting, <A> to move to the previous setting or <CLR> to exit.
These settings are repeated for each operator 2 - 8. Set appropriately.
Discount and tax Setup Mode
Discount and tax
A or B to scroll
From Command Mode Select “Discount and tax Setup” mode with
the <A> or <B> keys then Press <ENT>
In “Discount and tax Set-up” the following options are accessed by using the <A> and <B> keys
to scroll to the setting to change, press the <ENT> key to select that setting for editing.
Discount and Tax information.
Discounts are only applied to Cash Card Debit or refunds, Not Adds (Credits). Discounts are not applied to Units
cards. There is a discount assigned to each Card Profile or Card Site Code.
Taxes are only applied to Cash Card Debits or refunds, Not Adds (Credits). Taxes are not applied to Units cards.
There are 3 taxes that can be set, each with it’s own minimum value to apply to apply tax to.
Discounts to apply to Card sites
Site1 Discount%
0
Enter the Discount amount (0 to 100) with the 0-9 buttons followed by <ENT>
Press <B> to move to the next setting, <A> to move to the previous setting or <CLR> to exit.
Discounts are assigned for each of the Sites 1-5
Set Tax Rate 1
Tax rate 1 %
0.00
Enter the tax rate (0.00 to 99.99) with the 0-9 buttons followed by <ENT>
Press <B> to move to the next setting, <A> to move to the previous setting or <CLR> to exit.
Set Tax Rate 2
Tax rate 2 %
0.00
Enter the tax rate (0.00 to 99.99) with the 0-9 buttons followed by <ENT>
Press <B> to move to the next setting, <A> to move to the previous setting or <CLR> to exit.
Set Tax Rate 3
Tax rate 3 %
Enter the tax rate (0.00 to 99.99) with the 0-9 buttons followed by <ENT>
0.00
Press <B> to move to the next setting, <A> to move to the previous setting or <CLR> to exit.
Copyright 2009, GoPrint Systems, Inc. All Rights Reserved
18
Set Minimum taxable value for Tax 1
Min Tax 1
$0.00
Enter the minimum taxable amount with the 0-9 buttons followed by <ENT>
Press <B> to move to the next setting, <A> to move to the previous setting or <CLR> to exit.
Set Minimum taxable value for Tax 2
Min Tax 2
$0.00
Enter the minimum taxable amount with the 0-9 buttons followed by <ENT>
Press <B> to move to the next setting, <A> to move to the previous setting or <CLR> to exit.
Set Minimum taxable value for Tax 3
Min Tax 3
$0.00
Enter the minimum taxable amount with the 0-9 buttons followed by <ENT>
Press <B> to move to the next setting, <A> to move to the previous setting or <CLR> to exit.
Communication Setup Mode
Comm Setup
A or B to scroll
From Command Mode Select “Comm Setup” mode with the <A> or <B> keys
then Press <ENT>
In “Communication Set-up” the following options are accessed by using the <A> and <B> keys to scroll to the
setting to change, press the <ENT> key to select that setting for editing.
Set USB Baud rate
Baud Rate USB
9600
Select the Baud Rate with the <A> or <B> buttons then press <ENT>
Press <B> to move to the next setting, <A> to move to the previous setting or <CLR> to exit.
Set USB Parity condition
Parity USB
none
Select the None, Odd or Even with the <A> or <B> buttons then press <ENT>
Press <B> to move to the next setting, <A> to move to the previous setting or <CLR> to exit.
Set USB number of Data Bits
Data bits USB
8
Select 7 or 8 with the <A> or <B> buttons then press <ENT>
Press <B> to move to the next setting, <A> to move to the previous setting or <CLR> to exit.
Set COM 1 Baud rate
Baud Rate COM1
9600
Select the Baud Rate with the <A> or <B> buttons then press <ENT>
Copyright 2009, GoPrint Systems, Inc. All Rights Reserved
19
Press <B> to move to the next setting, <A> to move to the previous setting or <CLR> to exit.
Set COM 1 Parity condition
Parity COM2
none
Select the None, Odd or Even with the <A> or <B> buttons then press <ENT>
Press <B> to move to the next setting, <A> to move to the previous setting or <CLR> to exit.
Set COM 1 number of Data Bits
Data bits COM1
8
Select 7 or 8 with the <A> or <B> buttons then press <ENT>
Press <B> to move to the next setting, <A> to move to the previous setting or <CLR> to exit.
Set COM 2 Baud rate
Baud Rate COM2
9600
Select the Baud Rate with the <A> or <B> buttons then press <ENT>
NOTE: Com 2 is on RF board only
Press <B> to move to the next setting, <A> to move to the previous setting or <CLR> to exit.
Set COM 2 Parity condition
Parity COM2
None
Select the None, Odd or Even with the <A> or <B> buttons then press <ENT>
NOTE: Com 2 is on RF board only
Press <B> to move to the next setting, <A> to move to the previous setting or <CLR> to exit.
Set COM 2 number of Data Bits
Data bits COM2
8
Select 7 or 8 with the <A> or <B> buttons then press <ENT>
NOTE: Com 2 is on RF board only
Press <B> to move to the next setting, <A> to move to the previous setting or <CLR> to exit.
Service mode
Service Mode is used to access meters and logs that record the transaction details.
To access Service mode:
At the Idle prompt or Login Prompt
Please Insert
Card
Mode Selection:
Service Mode
OR
Enter Operator
# to Login
Press <CLR> <D> <9> <5> <1> <ENT>
On the Keypad Use <A> or <B> to select “Service Mode” Then Press <ENT>.
Copyright 2009, GoPrint Systems, Inc. All Rights Reserved
20
Default Service Mode Password
The default Command Mode Password is 1536
Password:
_
At the Password Prompt press <1> <5> <3> <6> <ENT> on the keypad.
Read Meters on the LCD
Service
Print Meters
Press <ENT> to Select Read Meters mode
Sort Meters by
Summary Only
Select the meters report desired with the <A> or <B> keys then Press <ENT>
Scroll through the Meters with the <A> or <B> buttons. Press <CLR> to exit read meters
Summary Meters
Copyright 2009, GoPrint Systems, Inc. All Rights Reserved
21
Meters Sorted By Operator
Meters Sorted by Card Site
Copyright 2009, GoPrint Systems, Inc. All Rights Reserved
22
Print (dump) Meters through Com Port
Service
Print Meters
Press <ENT> to Select Print Meters mode.
Before Printing (Sending) meters be sure to connect the printer or data collection device to the appropriate Com
port on the rear of the MiniTill.
Sort Meters by
Summary Only
Select the meters report desired with the <A> or <B> keys then Press <ENT> to
send it out the Com port specified in Setup
Printing Meters
Upon selecting Print meters from service mode the above meters are sent out the serial port
formatted to print a report 37 characters wide as shown in the example below:
Clear Meters
Service
Clear Meters
Press <ENT> to Select Clear Meters mode.
Confirm clear meters
Clear Meters?
ENT=Yes CLR=No
Press <ENT> to Clear the meters. Press <CLR> to leave meters intact
Print (dump) Transaction Log through Com Port
Before Printing (Sending) meters be sure to connect the printer or data collection device to the appropriate Com
port on the rear of the MiniTill.
Service
Print Trans Log
Press <ENT> to print (send) Transaction Log.
Copyright 2009, GoPrint Systems, Inc. All Rights Reserved
23
Transaction Types
Clear Transaction Log
Service
Clear Trans Log
Press <ENT> to Select Clear Transaction log mode.
Confirm to clear meters
Clear Log?
ENT=Yes CLR=No
Press <ENT> to Clear the Log. Press <CLR> to leave meters intact
Legacy Format Command Cards and Use
Some of the Service functions can be achieved by using “Command” cards. There are command cards to initiate
Read Meters, Print Meters, Clear Meters, and Print Transaction Log.
Legacy Command cards must be the matching Format, STX and ROM code as set in the MiniTill under “Card
Setup” For Command cards to be accepted the “Terminal Setting” “Accept Command cards” must be set to yes.
Using the Read Meters Command Card
At the Idle prompt or Login Prompt
Please Insert
Card
OR
Enter Operator
# to Login
Press <CLR> <D> <9> <5> <1> <ENT>
Insert the Read Meters Card.
Sort Meters by
Summary Only
Select the meters report desired with the <A> or <B> keys then Press <ENT>
Scroll through the Meters with the <A> or <B> buttons. Press <CLR> to exit read meters
Using the Print Meters Command Card
Before Printing (Sending) meters be sure to connect the printer or data collection device to the
appropriate Com port on the rear of the MiniTill.
At the Idle prompt or Login Prompt
Please Insert
OR
Enter Operator
Copyright 2009, GoPrint Systems, Inc. All Rights Reserved
Press <CLR> <D> <9> <5> <1> <ENT>
24
Card
# to Login
Insert the Print Meters Card.
Sort Meters by
Summary Only
Select the meters report desired with the <A> or <B> keys then Press
<ENT> to send it out the Com port specified in Setup
Using the Clear Meters Command Card
At the Idle prompt or Login Prompt
Please Insert
Card
OR
Enter Operator
# to Login
Press <CLR> <D> <9> <5> <1> <ENT>
Insert Clear meters card then confirm intension to clear meters.
Clear Meters?
ENT=Yes CLR=No
Press <ENT> to Clear the meters. Press <CLR> to leave meters intact
At the Idle prompt or Login Prompt
Please Insert
Card
OR
Enter Operator
# to Login
Press <CLR> <D> <9> <5> <1> <ENT>
Insert Clear meters card then confirm intension to clear meters.
Clear Meters?
ENT=Yes CLR=No
Press <ENT> to Clear the meters. Press <CLR> to leave meters intact
Copyright 2009, GoPrint Systems, Inc. All Rights Reserved
25
Using the Encode Cash Command Card
The Encode card will only function when an Operator with Credit Authorization is logged in.
Inserting the Encode cash card at any other time will result in the error message:
Operator Not
Authorized
OR
Not Logged In
With an appropriately Authorized operator logged in, Insert the Encode Cash card.
Purse Value
$ #.###
Where #.### is the preset value on the encode card
To change the value to encode simply enter a new value followed by ENT
Purse Value
$ N.NNN
Note Pressing clear will return to the original value of the Encode card.
When the desired value is set the display will show:
Encode $ #.###
Insert User Card
Where #.### is the preset value on the encode card
Insert the Card(s) to be encoded. Once finished press the CLR button to end the encode session.
If a receipt printer is attached and configured a receipt showing the Encode activity will be printed.
Using the Encode Units Command Card
Units cards may not apply to all card formats.
The Encode card will only function when an Operator with Credit Authorization is logged in.
Inserting the Encode Units card at any other time will result in the error message:
Operator Not
Authorized
OR
Not Logged In
With an appropriately Authorized operator logged in, Insert the Encode Units card.
Purse Value
####
Where #### is the preset value on the encode card
To change the value to encode simply enter a new value followed by ENT
Copyright 2009, GoPrint Systems, Inc. All Rights Reserved
26
Purse Value
NNNN
Note Pressing clear will return to the original value of the Encode card.
When the desired value is set the display will show:
Encode U ####
Insert User Card
Where #### is the preset value on the encode card
Insert the Card(s) to be encoded. Once finished press the CLR button to end the encode session.
If a receipt printer is attached and configured a receipt showing the Encode activity will be printed.
Copyright 2009, GoPrint Systems, Inc. All Rights Reserved
27
Card Error Messages
Possible errors generated during card reading and acceptance checking:
Copyright 2009, GoPrint Systems, Inc. All Rights Reserved
28
Receipt Printer Cables
Depending upon the Receipt printer used with the 1535, either a cable with a Male DB9 Connector or Male DB 25
is required. Receipt and report printers, Cables, and supplies can be purchased separately from GoPrint
Systems. Contact your sales representative for details.
Refer to the documentation with the printer to set its communications parameters (Baud, Parity,
Data Bits) to match those set on the 1535 in “Command Mode _ Communications Ports setup”.
PC communication Cables
In order to capture meters or logs the 1535 can be connected to a PC through RS-232 or USB. Cables and
supplies can be purchased separately from GoPrint Systems. Contact your sales representative for details.
RS232 Serial Cable
Copyright 2009, GoPrint Systems, Inc. All Rights Reserved
29
USB Serial Cable
The USB cable is a standard A to B type. ITC systems Part Number 901-USB
Copyright 2009, GoPrint Systems, Inc. All Rights Reserved
30