1
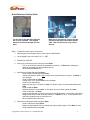
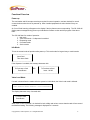
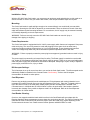
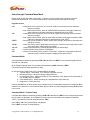
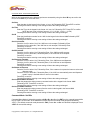
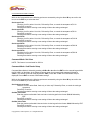
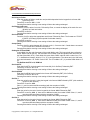
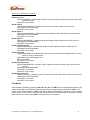
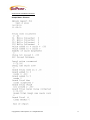
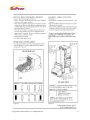
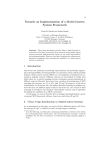
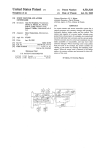
GS 1085
Cash Card Loader
May 2007
Table of Contents
SALES AND SERVICE...................................................................................................................................... 3
QUICK REFERENCE SET-UP GUIDE ………………………………………………………………………………. 4
FUNCTIONAL OVERVIEW................................................................................................................................ 6
INSTALLATION - SETUP ................................................................................................................................. 8
IDENTIFYING THE COMPONENTS.................................................................................................................. 9
SETUP THROUGH COMMAND MENU MODE................................................................................................10
SERVICE MODE: PRINTING, READING, CLEARING METERS .................................................................. 15
MAINTENANCE .............................................................................................................................................. 19
BILL ACCEPTOR MANUAL ........................................................................................................................... 20
FREQUENTLY ASKED QUESTIONS ............................................................................................................ 22
CARD ERROR CODES .................................................................................................................................. 23
Copyright 2007, GoPrint Systems, Inc. All Rights Reserved
2
Sales and Service
At GoPrint, complete customer satisfaction is our number one goal. As such, customer support is readily
available to satisfy any need you may have. Whether it's sales information, a service requirement or just
general inquiry, you can be assured of a prompt response to your need(s).
SALES
If you are a new or existing customer with a new installation in mind, our highly qualified sales staff can
custom tailor a product solution for "your" particular needs. Simply telephone GoPrint in the United States at
1-888-52-PRINT and ask for sales assistance. You may also email us at [email protected]
UNITED STATES
GoPrint Systems, Inc.
One Annabel Lane, Suite 105
San Ramon, CA 94583
Tel:
Fax:
1-888-52-PRINT
1-925-790-0071
SERVICE
If you require technical assistance advice or parts please contact our support department at
1-888-52-PRINT or email us at [email protected]
Repairs should be sent to:
GoPrint Systems, Inc.
One Annabel Lane, Suite 105
San Ramon, CA 94583
Tel:
Fax:
1-888-52-PRINT ext.30
1-925-790-0071
Please visit us at http://www.goprint.com
Copyright 2007, GoPrint Systems, Inc. All Rights Reserved
3
Quick Reference Set-Up Guide
You will need a keypad which typically
has one per shipment. This keypad
detaches and should be kept in a safe
place.
While unit is powered off, plug the keypad
into the top left main board inside the GS1085. This is located in the very back of
the unit.
Step 1 – Programming the Unit for the first time
1. After plugging in the Keypad, power up the Cash to Card Machine
2. On the keypad, type in the code D, 9, 5, 1, ENT
3. Password is 1085, ENT
4. Scroll (using A & B keys) to Set Currency and hit Enter
- Turn on or off the $10, $20 bill as requested by customer. Hit Enter when making any
changes (by default both denominations are on)
- When finished hit Clear once
5. Scroll down to Reader Setup and hit Enter
- Scroll to Max Card Value $ and hit Enter
- Change the default of $100 to $50 or other value requested by the customer. Hit Enter to
save changes
- Scroll to card format & hit Enter
- Change to ACT/ITC and hit Enter to save changes
- Scroll to STX and hit Enter
- Make sure this says 12 if it does hit enter, if it doesn’t press 12 on the number pad and hit
Enter
- Scroll to ROM hit Enter
- ROM Should be 6 if it is hit enter, if it isn’t press 6 on the number pad and hit enter
- Scroll to Card Site 1 hit Enter
- Using the number pad, type the site code for the campus/location – this number is previously
assigned and can be found on the site code doc. Hit Enter To Save. If more than one site
code then repeat this step on Card Site 2 etc.
- When finished Press Clear Once
6. Scroll down to Dispenser Setup and press Enter
- Scroll to Card Price and hit Enter
- Make sure this Reads $1.00 if not change using the number keypad. Press Enter to save
- Scroll to Max Escrow press enter
Copyright 2007, GoPrint Systems, Inc. All Rights Reserved
4
-
-
Change from Default of $5 to $1.00 Press Enter to save
Scroll to Value of Dispensed card (equals the value on the cards sitting in the dispenser).
This is a predetermined amount by the customer – usually 50¢). Press Enter
Enter the Value on the cards using the number pad press enter to save.
Scroll to Dispenser Inventory and press enter. NOTE: this feature is only necessary for
customers who wish to take meter readings from the unit. No need to set it if they don’t want
meter readings
Enter the number of cards in the dispenser using the number pad – if using this feature.
Press Enter to save
***Note: sites doing a conversion or using units follow slightly different set-up instructions. Contact
GoPrint Hardware Support for information.
Copyright 2007, GoPrint Systems, Inc. All Rights Reserved
5
Functional Overview
Power up:
The card reader and bill acceptor are always required for normal operation, and are checked for normal
communications when the unit is powered up. Other installed peripherals are also checked if they are
enabled.
An ‘Out of Order’ warning will appear on the display if the key features are not responding. The GS 1085 will
display status messages during power up to indicate the firmware version and the progress of the above
tests.
The GS 1085 has five modes of operation:
1. Idle mode
2. Value Load mode - if a dispenser is enabled
3. Dispensing mode
4. Command mode
5. Service mode
Idle Mode:
This is the normal mode of operation after power up. This mode waits for keypad entry or card insertion.
________________________
Insert Card
Then Insert Cash
________________________
If the dispenser is enabled, this message alternates with:
________________________
________________________
To Purchase a Card
Press Button
________________________
OR
To Purchase a Card
Insert 1.00 bill
________________________
Value Load Mode:
If a card is inserted into the reader while the system is in Idle Mode, the Value Load mode is initiated.
Insert Cash
Card: <balance> Where <balance> = current card balance
The display alternates every 2 seconds with:
To remove Card
Press Button
When a bill or coin is inserted, it is checked for both validity and value to ensure that the card will not exceed
the MaxCard setting. The following message is displayed for 2 seconds:
Copyright 2007, GoPrint Systems, Inc. All Rights Reserved
6
GS 1085 Functional Overview
w Continued
Accepted $x
The value is added to the card value. If the card is a units card, the bill value goes through the
‘units per dollar’ conversion before adding to the card.
At any point the Eject Button can be pressed to end the transaction which will cause the system to add the
new value to the card and release it back to the customer
Dispensing mode:
When the GS 1085 is in dispensing mode the display will read:
To Purchase Card
Insert $1 Bill
•
•
The Dispensing mode is cancelled after 2 minutes if money is not inserted.
Inserting any bill other than $1 will cause the bill to be rejected
Inserting a $1 bill will cause a card to be dispensed and the display will read:
Please Remove Card
The GS 1085 will then return to Idle Mode.
Command Mode:
To enter the administrative features – or the Command Mode – press from the keypad:
<CLR> <D> <9> <5> <1> <ENT>
Enter the command mode password followed by <ENT>.
Default command password is 1085 <ENT>.
OR
Enter the Service mode password followed by <ENT>
Default service password is 1086 <ENT>
Command and Service menus are detailed later in this document
Copyright 2007, GoPrint Systems, Inc. All Rights Reserved
7
Installation - Setup
With the GS 1085 Cash Card Loader, your customers can purchase cards and add value to their cards on a
self-serve basis. In order to use your Cash Card Loader, a few simple installation steps are required.
Mounting:
The Cash Card Loader is small and light enough to be mounted directly onto a solid wall (concrete block,
wood, etc.). Mounting the GS 1085 on drywall is not recommended. There are holes in the back of the case
which will facilitate required mounting hardware. For convenience, the AC supply may be mounted internally
or Externally depending on the site requirements.
WARNING - Failure to securely mount the GS 1085 Cash Card Loader can result in injury or
damage due to tipping or dropping.
Power Requirements:
The Cash Card Loader is equipped with a 24 Volt AC power supply which features an integrated 6 foot power
cable and a plug. The use of long extension cords and plugging into the same circuit as other heavy
equipment (vending machines, photocopiers, etc.) is not recommended. These situations can introduce
"noise" and voltage drops which may cause intermittent operational problems with the GS 1085.
WARNING – Failure to properly connect the power plug into an approved, grounded outlet can result in injury
or death
The power supply is protected by an internal fuse for safety. The Power supply is a sealed non-serviceable
unit. Under no circumstances should the Power Supply case be opened. There are no user serviceable parts
within the power supply and modifications should not be attempted. Attempting to repair, modify or adjust the
power supply could result in fire, injury or death.
Bill Acceptor Settings:
The bill acceptor is set up for normal use when you receive the Cash Card Loader. The bills accepted can be
individually enabled or disabled in the Command menu “Set Currency”. Refer to the bill acceptor
documentation for details on other options.
Card Dispenser:
Remove any packaging material from the card dispenser. Fill the dispenser with cards (orientation is not
important but customers usually like to see the card dispensed “Face-up”). Place the "I" shaped weight on
top of the stack of cards. If the cards were loaded properly and the card dispenser is enabled in the
Command menu, in Idle Mode the GS 1085 will allow a card to be purchased. If the cards are installed
incorrectly the message “Sorry unable to dispense cards” will be displayed. Refer to the Card Dispenser
documentation for further details.
Card Reader Cleaning:
Over time, the magnetic read/write head and drive rollers in the Card Reader will accumulate with dirt.
Regular cleaning of these components can save down time and prolong their life. The GoPrint Cleaning Card
(Part #40-50 CR-50 or #40-80 CR-80) should be used to clean the reader every month depending on the
environment and volume of use. Please contact GoPrint Systems at 888-52-PRINT to order.
Copyright 2007, GoPrint Systems, Inc. All Rights Reserved
8
Identifying the Components
Copyright 2007, GoPrint Systems, Inc. All Rights Reserved
9
Setup through Command Menu Mode
Before using the GS 1085 Cash Card Loader, it must be set up according to the customer’s site and
operational requirements. The command menus follow a common structure throughout the setup.
Keypad Function
<A>
<B>
<ENT>
<CLR>
<0>-<9>
<C>
<D>
- Changes the current selection “up” one level; used to move through menus and select
options or settings.
- Also used for Alpha Entries, press for CAPITALIZED characters, press again to advance
alpha character until desired character is displayed then press <ENT>.
- Changes the current selection “down” one level; used to move through menus and select
options or settings.
- Also used for Alpha Entries, press for lower-case characters, press again to advance alpha
character until desired character is displayed then press <ENT>.
- Selects the current selection or option, used to move through menus and to save options or
settings to memory
- Clears the current value or steps back one-menu item, used to move through menus and to
clear values when setting options or settings.
- Used for Numerical Entry, press the appropriate key for desired digit.
- Used for Alpha Entries; press for “Back-Space”.
- Used for Punctuation Entries, press for “Punctuation” characters, press again to advance
character until the desired character is displayed then press <ENT>.
Command Mode:
Command Mode is initiated by pressing <CLR> <D> <9> <5> <1> <ENT> on the external keypad while the
GS 1085 is in Idle Mode.
At the Password prompt enter the command mode password (1085) followed by <ENT>.
(The default command mode password is 1085).
In Command menu mode there are 5 “Command Menus” available.
1. Terminal Setup – Allows Date, Time & Active Peripheral to be set
2. Bill Acceptor Setup - Allows the setting of Bill parameters.
3. Coin Acceptor Setup – Allows the setting of Coin parameters. (Only applies if unit is fitted with a
coin acceptor and it is enabled.
4. Card Reader Setup – Allows the setting of Card parameters (site codes etc).
5. Diagnostics - Factory Use Only.
Pressing the ENT key will allow access to the settings for the Command Menu selected. Pressing A or B will
advance to the previous or next Command Menu prompt. While a prompt is displayed pressing CLR will back
out one level.
Command Mode: Terminal Setup
Command Menu Mode is initiated by pressing <CLR> <D> <9> <5> <1> <ENT> on the external keypad while
the GS 1085 is in Idle Mode. At the Password: Prompt enter the command mode password followed by
<ENT>. (The default command mode password is 1085).
Press <A> or <B> until Terminal Setup is displayed.
Press <ENT> to access Terminal Settings.
Copyright 2007, GoPrint Systems, Inc. All Rights Reserved
10
Command Mode: Terminal Setup Continued:
While in this Command Menu the following options are accessed by using the A and B keys to scroll to the
item, then the ENT key to select that item.
Set Date
Enter the date via the keypad in the format: yy / mm / dd Followed by ENT. Press ENT to confirm.
Pressing Enter before entering a new setting will leave the setting unchanged.
Set Time
Enter the Time via the keypad in the format: hh / mm / ss Followed by ENT. Press ENT to confirm.
NOTE the hour is set in 24 hour format (1-12 = 1-12 AM ; 13-23 = 1-11 PM)
Pressing Enter before entering a new setting will leave the setting unchanged.
Set ID
Enter the identification number for the 1085 via the keypad in the format: #### Followed by ENT.
Press ENT to confirm.
Pressing Enter before entering a new setting will leave the setting unchanged.
Set Coin Installed
Press the A or B to select Yes ,if the 1085 has a coin acceptor, Followed by Enter
Press the A or B to select No ,if the 1085 has no coin acceptor, Followed by Enter
Press ENT to confirm.
Pressing Enter before entering a new setting will leave the setting unchanged.
Set Bill Installed
Press the A or B to select Yes, Followed by Enter, if the 1085 has a bill acceptor.
Press the A or B to select No, Followed by Enter, if the 1085 has no bill acceptor.
Press ENT to confirm.
Pressing Enter before entering a new setting will leave the setting unchanged.
Set Dispenser Installed
Press the A or B to select Yes, Followed by Enter, if the 1085 has a card dispenser.
Press the A or B to select No, Followed by Enter, if the 1085 has no card dispenser.
Press ENT to confirm.
Pressing Enter before entering a new setting will leave the setting unchanged.
Set Button to Dispense
Press the A or B to select Yes, Followed by Enter, if the customer is to press the button to select card
dispense mode
Press the A or B to select No, Followed by Enter, if the 1085 is to automatically enter card dispense
mode if money is inserted while no card is in the reader.
Press ENT to confirm.
Pressing Enter before entering a new setting will leave the setting unchanged.
Set Command Mode Password
Enter the password to allow access to command mode via the keypad in the format: ####
Followed by ENT. Press ENT to confirm.
Pressing Enter before entering a new setting will leave the setting unchanged.
Set Service Mode Password
Enter the password to allow access to Service mode via the keypad in the format: ####
Followed by ENT. Press ENT to confirm.
Pressing Enter before entering a new setting will leave the setting unchanged.
Command Mode: Set Bills
Command Menu Mode is initiated by pressing <CLR> <D> <9> <5> <1> <ENT> on the external keypad while
the GS 1085 is in idle mode. At the Password: Prompt enter the command mode password followed by
<ENT>. (The default command mode password is 1085). Press <A> or <B> until Set Bills is displayed. Press
<ENT> to access bills settings.
Copyright 2007, GoPrint Systems, Inc. All Rights Reserved
11
Command Mode: Set Bills Continued:
While in this Command Menu the following options are accessed by using the A and B keys to scroll to the
item, then the ENT key to select that item.
Set Accept $1.00
Press the A or B to select Yes or No, Followed by Enter, to control the acceptance of $1.00
Press ENT to confirm.
Pressing Enter before entering a new setting will leave the setting unchanged.
Set Accept $5.00
Press the A or B to select Yes or No, Followed by Enter, to control the acceptance of $5.00
Press ENT to confirm.
Pressing Enter before entering a new setting will leave the setting unchanged.
Set Accept $10.00
Press the A or B to select Yes or No, Followed by Enter, to control the acceptance of $10.00
Press ENT to confirm.
Pressing Enter before entering a new setting will leave the setting unchanged.
Set Accept $20.00
Press the A or B to select Yes or No, Followed by Enter, to control the acceptance of $20.00
Press ENT to confirm.
Pressing Enter before entering a new setting will leave the setting unchanged.
Set Accept $50.00
Press the A or B to select Yes or No, Followed by Enter, to control the acceptance of $50.00
Press ENT to confirm.
Pressing Enter before entering a new setting will leave the setting unchanged.
Command Mode: Set Coins
NOTE: This feature is not activated for GoPrint.
Command Mode: Card Reader Setup
Command Menu Mode is initiated by pressing <CLR> <D> <9> <5> <1> <ENT> on the external keypad while
the GS 1085 is in Idle Mode. At the Password prompt enter the command mode password followed by
<ENT>. (The default command mode password is 1085). Press <A> or <B> until Card Reader Setup is
displayed. Press <ENT> to access Card Reader settings.
While in this Command Menu the following options are accessed by using the A and B keys to scroll to the
item, then the ENT key to select that item.
Set Card type to Accept
Press the A or B to select Both, Cash only or Units only Followed by Enter, to control the card type
acceptance
Press ENT to confirm.
Pressing Enter before entering a new setting will leave the setting unchanged.
Set Max Value Cash
Enter the maximum allowable Cash card value via the keypad in the format: $###.## followed by
ENT.
Press ENT to confirm.
Pressing Enter before entering a new setting will leave the setting unchanged.
Set Max Value Units
Enter the maximum allowable Units card value via the keypad in the format: ###### followed by ENT.
Press ENT to confirm.
Pressing Enter before entering a new setting will leave the setting unchanged.
Copyright 2007, GoPrint Systems, Inc. All Rights Reserved
12
Command Mode: Card Reader Setup Continued:
Set Units per Dollar
Enter the number of Units to credit the card per dollar deposited via the keypad in the format: ###
Followed by ENT.
Press ENT to confirm. ### = 1-100
Pressing Enter before entering a new setting will leave the setting unchanged.
Set Display tenth cent
Press the A or B to select Yes or No, Followed by Enter, to control the display of the tenth of a cent
($0.00X) for Cash card values.
Press ENT to confirm.
Pressing Enter before entering a new setting will leave the setting unchanged.
Set Card format
Press the A or B to select the appropriate card format, Followed by Enter. The formats are: ITC/ACT
ICX/XCP VCS Danyl (requires special Card reader chassis)
Press ENT to confirm.
Pressing Enter before entering a new setting will leave the setting unchanged.
Accept Danyl
Press the A or B to select between NO, Convert to site 1, Convert to site 2. Cards that are converted
to ITC format will be tracked in the meters.
Pressing Enter before entering a new setting will leave the setting unchanged.
Setting the STX and ROM
A two nibble (four bit) code forms part of the overall facility code. This has typically been referred to
as the “ROM” code for the site. The first nibble of this “ROM” code has typically been referred to as
the Start (first nibble, STX). Each nibble of the two nibble “ROM” code can have a value from “0” to
“F” in hexadecimal notation, which is “0” to “15” in decimal notation. The values set in the 1085 must
be in decimal notation. I.E. “ROM” Code of “B9”. The STX nibble is “B” (11) and the ROM nibble is “9”
(9).
For GoPrint the STX is 12, ROM is 6
Set Card STX
Enter the Card STX via the keypad in the format: ## (12 for GoPrint) Followed by ENT.
Press ENT to confirm. ## = 0-15
Pressing Enter before entering a new setting will leave the setting unchanged.
Set Card ROM
Enter the Card ROM via the keypad in the format: ## Followed by ENT (6 for GoPrint)
Press ENT to confirm. ## = 0-15
Pressing Enter before entering a new setting will leave the setting unchanged.
Set Site 1
Enter the value for site code 1 using the keypad in the format: #### Followed by ENT. (this number is
unique for each location)
Press ENT to confirm. ####
Sites 1, 2, and 3 must have different settings (with the exception of 4095).
Pressing Enter before entering a new setting will leave the setting unchanged.
Set Site 2
Enter the value for site code 2 via the keypad in the format: #### Followed by ENT.
Press ENT to confirm. #### (if there are no additional codes, the number is 4095. Sites 1, 2, and 3
must have different settings (with the exception of 4095).
Pressing Enter before entering a new setting will leave the setting unchanged.
Set Site 3
Enter the value for site code 2 via the keypad in the format: #### Followed by ENT.
Press ENT to confirm. #### (if there are no additional codes, the number is 4095. Sites 1, 2, and 3
must have different settings (with the exception of 4095).
Pressing Enter before entering a new setting will leave the setting unchanged.
Copyright 2007, GoPrint Systems, Inc. All Rights Reserved
13
Command Mode: Card Reader Setup Continued:
Set Sites d4 to d10
Enter the value for site d X using the keypad in the format: #### Followed by ENT.
Press ENT to confirm. #### = 1-4095 where 4095 = “no site code assigned”. Setting these sites
will allow conversion of up to 8 Danyl site codes to ITC card format if the Convert function
is enabled and the appropriate site codes are set.
Pressing Enter before entering a new setting will leave the setting unchanged.
Copyright 2007, GoPrint Systems, Inc. All Rights Reserved
14
Service Mode
Service Mode is initiated by pressing <CLR> <D> <9> <5> <1> <ENT> on the external keypad while the
1085U is in Idle Mode. At the Password prompt enter the Service mode password followed by <ENT>.
(The default command mode password is 1086).
In Command Menu Mode there are 3 “Service Menus” available.
1. Read Meters via LCD Display.
2. Print Meters using Com 1
3. Clear Meters
Pressing the ENT key will allow access to the Service Menu selected. Pressing A or B will advance to the
previous or next Service Menu prompt. While a prompt is displayed pressing CLR will back out one level.
Read Meters
Service Mode is initiated by pressing <CLR> <D> <9> <5> <1> <ENT> on the external keypad while the GS
1085 is in Idle Mode. At the Password: Prompt enter the service mode password followed by <ENT>. (The
default service mode password is 1086). Press <A> or <B> until Read Meters is displayed. Press <ENT> to
read the meters via the LCD display.
Total Cash In
Display reads $ NNN.NN - indicates the amount of cash received since the meters were last cleared
Press ENT for next meter.
$1 Bills
Display reads NNNN - indicates the number of $1 bills received since meters were last cleared.
Press ENT for next meter.
$5 Bills
Display Reads NNNN - indicates number of $5 bills received since meters were last cleared.
Press ENT for next meter.
$10 Bills
Display Reads NNNN - indicates the number of $10 bills received since the meters were last cleared.
Press ENT for next meter.
$20 Bills
Display Reads NNNN - indicates the number of $20 bills received since the meters were last cleared.
Press ENT for next meter.
**NOTE only bills that can be accepted will be displayed
Value added to $
Display Reads $NNN.NN – Indicates Dollar Value added to cash cards since meters were cleared.
Press ENT for next meter.
Value added to U
Display Reads NNNNN – indicates the Value added to Units cards since meters were last cleared.
Press ENT for next meter.
# Cards Dispensed
Display reads NNNNN - indicates number of cards dispensed since meters were last cleared
Press ENT for next meter.
Value not issued
Display reads $NNN.NN - indicates the Value not issued (caused by card dispense failure or write
failure) since the meters were last cleared.
Press ENT for next meter.
Danyl Value Conv
Display Reads $NNN.NN - indicates the Value of cards converted from Danyl Format since meters
were last cleared.
Press ENT for next meter.
Copyright 2007, GoPrint Systems, Inc. All Rights Reserved
15
Service Mode: Read Meters Contintued:
Danyl num Conv
Display Reads NNN – indicates the Number of cards converted from Danyl Format since the meters
were last cleared.
Press ENT for next meter.
Grand Cash In
Display Reads $ NNN.NN - indicates the total amount of cash received since it was built.
Grand totals are Non-Resettable
Press ENT for next meter.
Grand Add to $
Display Reads $ NNN.NN - indicates total amount added to Cash cards since the 1085 was built.
Grand totals are Non-Resettable
Press ENT for next meter.
Grand Add to U
Display Reads NNNNN – Indicates total amount added to Units cards since the 1085 was built.
Grand totals are Non-Resettable
Press ENT for next meter.
Grand Cards Dispensed
Display reads NNNNN - indicates total number of cards dispensed since the 1085 was built.
Grand totals are Non-Resettable
Press ENT for next meter.
Grand not issued
Display Reads $NNN.NN - indicates the Value not issued (caused by card dispense failure or write
failure) since the 1085 was built.
Grand totals are Non-Resettable Press
ENT for next meter
Press ENT for next meter.
Grand Danyl Value Conv
Display Reads $NNN.NN – indicates Value of cards converted from Danyl Format since the 1085
was built.
Grand totals are Non-Resettable
Press ENT for next meter..
Press ENT for next meter.
Grand Danyl num Conv
Display reads NNN – indicates Number of cards converted from Danyl Format since 1085 was built.
Grand totals are Non-Resettable
Press ENT for next meter..
Press ENT for next meter.
Print Meters
Service Mode is initiated by pressing <CLR> <D> <9> <5> <1> <ENT> on the external keypad while the GS
1085 is in Idle Mode. At the Password prompt enter the service mode password followed by <ENT>. (The
default service mode password is 1086). Press <A> or <B> until Print Meters is displayed. Connect a serial
device (Printer or PC) to Com 1 of the GS 1085. Set the serial device for 9600 baud, no parity and 1 stop bit.
When the device is online, press <ENT> to send the meters to the device.
Copyright 2007, GoPrint Systems, Inc. All Rights Reserved
16
Service Mode: Print Meters Continued:
Sample Meters ‘Print-out’
Copyright 2007, GoPrint Systems, Inc. All Rights Reserved
17
Service Mode: Print Meters Continued:
Cable to PC
Cable to Printer
Clear Meters
Service Mode is initiated by pressing <CLR> <D> <9> <5> <1> <ENT> on the external keypad while the GS
1085 is in Idle Mode. At the Password prompt enter the service mode password followed by <ENT>. (The
default service mode password is 1086). Press <A> or <B> until Clear Meters is displayed. Press <ENT>,
then at the Prompt “Clear Meters” “C=Yes” Press the C key to clear the meters. Any other key will leave the
meters intact.
Copyright 2007, GoPrint Systems, Inc. All Rights Reserved
18
Maintenance
General Maintenance
The lock shaft should be kept lubricated with Lithium grease to ensure easy opening and closing. The outer
metal can be cleaned with a mild household cleaner such as window cleaner. The use of cleaners with
abrasives is not recommended as they could scratch the housing. The Plastic LCD display cover should be
cleaned with a soft rag moistened with water or isopropyl alcohol. Check the condition of the Power supply
cable and replace immediately if any damage is observed.
Card Reader Maintenance
The Card Reader in the GS 1085 is the universal Serial Insert Reader and is cared for in the same way as
any other Card Reader. The head and rollers should be kept clean with GoPrint Systems’ Cleaning Cards 4050 or 40-80. Any dirt or loose bits of paper impeding the sensors should be blown out with canned air.
Severe card jams can be removed by manually by manipulating the gears and rollers. Press up on the roller
at the bottom of the Reader and turn both it and the gears back and forth until the card comes clear.
Sometimes it is necessary to push a small screwdriver blade up into the card near the hole for the head and
rollers to release a badly bent card.
Bill Acceptor Maintenance
The bill acceptors used in the GS 1085 series have proven to be dependable units. Occasional servicing may
be necessary. Please refer to the appropriate Bill Acceptor Operation and Service Manual.
Copyright 2007, GoPrint Systems, Inc. All Rights Reserved
19
Bill Acceptor Manual
Copyright 2007, GoPrint Systems, Inc. All Rights Reserved
20
Copyright 2007, GoPrint Systems, Inc. All Rights Reserved
21
Frequently Asked Questions
The LCD display is Blank.
• Check that the 1085 is plugged into a Live power Outlet
• Check that the power supply is attached to J8 AC In on the main board
• Check that the fuse on the main board is not blown
The Display Indicated unable to dispense cards.
• Ensure that a supply of cards are properly loaded in the dispenser chute
• Ensure that the card weight is installed on the card stack
• Ensure that the cables between the Dispenser, main and auxiliary power board are properly affixed
How and when should the bill Acceptor be cleaned?
• Refer to the section Bill Acceptor Maintenance in this manual
How and when should the Card Reader be cleaned?
• Refer to the section Card Reader Maintenance in this manual
When a card is inserted an error code is displayed.
• Ensure that the card being tried is good; test it in another device
• Ensure that the card reader is clean (clean with cleaning cards available from GoPrint)
• Ensure that the card settings on the 1085 match the locations cards.
• Refer to the Error code list for specific error information.
Copyright 2007, GoPrint Systems, Inc. All Rights Reserved
22
Card Error Codes
Here is a list of common error codes & their descriptions that may be encountered in the GS 1085.
Error 1
• Check for jammed card
• Check for sensor blockage (i.e. dust or paper)
• Check for mechanical problem not allowing card to be taken in
Error 2
• Reader thinks card is blank - was card inserted in proper direction? Try alternate card.
• Bad head connection at head
• check head connection at sideboard
• check head – is it dirty, worn or mis-aligned?
Error 3
• STX Code error - verify settings of STX and ROM under Card reader set-up
Error 4
• ROM Code error - verify settings of STX and ROM under Card reader set-up
Errors 5, 6, 7
• Check condition of card – Is it scratched, bent, or worn?
• Try alternate card in Reader.
• Check head alignment and cleanliness.
• Ensure drive roller and an idler roller are properly aligned in the card transport.
Error 8
• Card is flagged due to power interruption. Re-encode the card
Error 9
• Site Code error - verify settings of Site1 – 3 under Card reader set-up
Copyright 2007, GoPrint Systems, Inc. All Rights Reserved
23