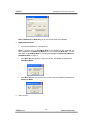
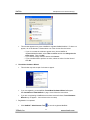
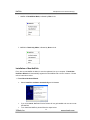
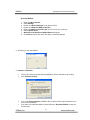
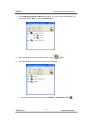
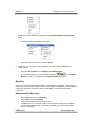
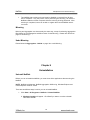
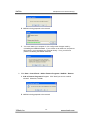
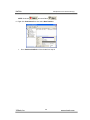
1
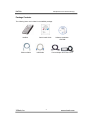
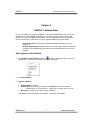
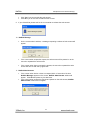
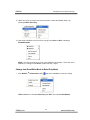
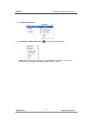
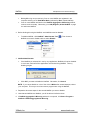
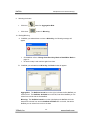
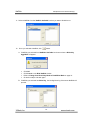
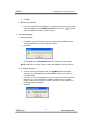
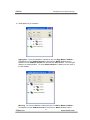
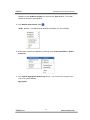
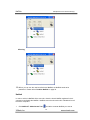
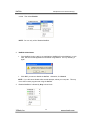
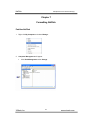
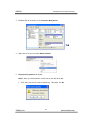
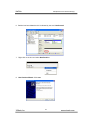
NetDisk
NDAS(Network Direct Attached Storage)
NetDisk TM
User Manual
Ximeta Technology
www.ximeta.com
NetDisk
NDAS(Network Direct Attached Storage)
Table of Content
Chapter 1 Preface
Introduction
Warranty
License
Main Features of NetDisk
Different NetDisk Mode Application
NDAS Mode
Ethernet Mode
USB2.0 Portable Mode
NetDisk Models Covered By This Guide
Package Contents
Chapter 2 Requirements
Hardware Requirement
NDAS Mode Usage
Ethernet Mode Usage
USB2.0 Mode Usage
Software Requirement
Chapter 3 Installation
For The First Time Users
NDAS Mode Easy Installation
Ethernet Mode Easy Installation
USB2.0 mode Easy Installation
For Advanced Users
Chapter 4 NetDisk Administrator
Add (Register) A New NetDisk
Installation of New NetDisk
NDAS Status And Mode Indicator
NetDisk Administrator Tool Menu
NetDisk Functionality
Change from Read Only Mode to Read/Write Mode
Change from Read/Write Mode to Read Only Mode
Chapter 5 Advanced Functions
Aggregation
Requirements For Aggregation
Bind
Unbind
Mirroring
Requirements For Mirroring
Mirroring
Undo Mirroring
Chapter 6 Uninstallation
NetDisk Uninstall
Chapter 7 Formatting NetDisk
Partition NetDisk
Initialize NetDisk
Chapter 8 Contact Information
XiMeta, Inc
2
3
3
3
4
4
4
4
4
4
5
5
5
5
5
7
7
8
8
8
9
12
13
15
17
19
23
24
24
32
36
36
36
37
39
44
45
www.ximeta.com
NetDisk
NDAS(Network Direct Attached Storage)
Chapter 1
Preface
Introduction
Congratulations on your purchase of the NetDisk Network Direct Attached Storage
Solution.
This NetDisk User Manual is intended to help you install the product quickly and easily.
The NetDisk Installation Guide is intended for individual users who need to install and support
one or more NetDisk on their PC’s or Ethernet network. The NetDisk user manual assumes
a user has the basic understanding of PC’s and networks.
NetDisk Installation User Manual
XiMeta, Inc.
15251 Alton Parkway
Irvine, CA 92618
Copyright © 2003, All rights reserved. Reproduction in any manner or translation without
prior written permission of XiMeta, Inc. is strictly prohibited.
Warranty
XiMeta, Inc. reserves the right to revise this publication and to make changes to the content
hereof without the obligation of XiMeta, Inc. to notify any person of such revision or changes.
XiMeta, Inc. provides this publication “as is” without warranty of any kind, either express or
implied, including but not limited to the implied warranties of merchantability or fitness for a
particular purpose.
License
The software described in this document is furnished under a license agreement. The
software may be used only in accordance with the terms of the license agreement.
All trademarks are the property of their respective owners.
XiMeta, Inc
3
www.ximeta.com
NetDisk
NDAS(Network Direct Attached Storage)
Main Features of NetDisk
•
•
•
•
•
Advanced Network Storage, NDAS (Network Directly Attached Storage)
External and Portable Storage Device
Multi-interface (Ethernet, USB2.0)
Aggregation function
Backup and Mirroring function
Different NetDisk Mode Application
1. NDAS Mode
With NDAS mode, NetDisk is directly attached to 100BaseT full duplex switching hub,
and each user in the network can use NetDisk as a local disk drive. In addition, each
and every user can easily enjoy all of the advanced NDAS features such as mirroring,
aggregation, and flexible expansion.
2. Ethernet Mode
With Ethernet mode, NetDisk can be directly attached to PC’s Ethernet port by using
cross-over cables without using switching Hub. Without networking, individual users
can use high performance external storage via Ethernet.
3. USB2.0 Portable Mode
With USB2.0 mode, NetDisk can be used as a simple and easy high speed external
storage. USB 2.0 mode is the most convenient way for data carrying and external
storage.
NetDisk Models Covered By This Guide
This NetDisk Installation Guide includes information on the following models:
•
•
•
NDU10-80
NDU10-120
NDU10-160
XiMeta, Inc
4
www.ximeta.com
NetDisk
NDAS(Network Direct Attached Storage)
Package Contents
The following items are included in the NetDisk package:
NetDisk
Ethernet Cable
XiMeta, Inc
Quick Install Guide
USB Cable
Software Installation
CD-ROM
Power Adapter and Power Cord
5
www.ximeta.com
NetDisk
NDAS(Network Direct Attached Storage)
Chapter 2
Requirements
Hardware Requirement
NDAS Mode Usage
- Fast Ethernet Hub (100BASE-T / 802.3u) or
Wi-Fi WLAN (802.11a or 802.11g) for wireless configuration.
Ethernet Mode Usage
PC with Ethernet port
Cross-over LAN cable (not included)
USB2.0 Mode Usage
PC with USB port
Software Requirement
-
The NetDisk Administration software V.1x only supports Windows 2000 and
Windows XP.
Windows 2000 or XP users may need to install USB2.0 driver which is included
in the installation CD.
XiMeta, Inc
6
www.ximeta.com
NetDisk
NDAS(Network Direct Attached Storage)
Chapter 3
Installation
Installation of NetDisk hardware and software are simple and easy. Insert included “NetDisk
installation CD” to your CD-Rom driver, and select the NetDisk mode you want to use. The
intelligent installation guide will lead you to complete the installation for both hardware and
software. Simply follow step by step instructions and complete the installation.
For The First Time Users
The NetDisk is unique and it is the world’s first NDAS system. NetDisk is the world’s first
Ethernet and USB combination external HDD. It is strongly recommended for the first time
NetDisk users to select easy installation from the main menu.
NDAS Mode Easy Installation
-
-
XiMeta, Inc
This installation guides users to complete installation of both hardware
and software as a NDAS mode. It takes users through step by step easy
to understand explanations.
The first time NetDisk users who want to use NetDisk in NDAS mode,
are strongly recommended to choose this menu.
7
www.ximeta.com
NetDisk
NDAS(Network Direct Attached Storage)
-
Select “NDAS mode easy installation” and click “next” button. The
installation guide will lead you through the installation.
Ethernet Mode Easy Installation
-
-
This installation guides users to complete installation of both hardware
and software of NetDisk as a Ethernet mode. It takes users through step
by step easy to understand explanations.
First time NetDisk users who want to use NetDisk in Ethernet mode, are
strongly recommended to choose this menu.
Select “Ethernet mode easy installation” and click “next” button. The
installation guide will lead you through the installation.
USB2.0 Mode Easy Installation
-
-
This installation guides users to complete installation of NetDisk as a
USB mode. It takes users through step by step easy to understand
explanations.
First time NetDisk users who want to use NetDisk in USB mode, are
strongly recommended to choose this menu.
Select “USB mode easy installation” and click “next” button, the
installation guide will lead you through the installation.
For Advanced Users
Once you get comfortable installing or using NetDisk, you do not need to follow the User
Guide. Simply click “Advanced user installation” to skip step by step installation instructions.
XiMeta, Inc
8
www.ximeta.com
NetDisk
NDAS(Network Direct Attached Storage)
Chapter 4
NetDisk™ Administrator
Once you complete your software installation, you will find a NetDisk launcher icon on your
desktop screen and a NetDisk Administrator Tool icon on the bottom right corner of the
system tray. Using the NetDisk Administrator Tool, each NetDisk needs to be registered
before it can be used. Instructions on how to register NetDisk can be found below.
- NetDisk launcher will activate and upload the NetDisk Administrator on the
system tray.
- NetDisk Administrator Tool adds, deletes, activates, de-activates and refreshes
the status of the NetDisk along with serving other administrative functions of the
NetDisk.
Add (Register) A New NetDisk
1.
Click NetDisk™ Administrator Tool Icon
located on the bottom right corner of the
system tray. A menu box, just like the one below, will appear:
2.
Click New NetDisk.
3.
Register a NetDisk
•
•
•
NetDisk Name is optional.
NetDisk ID must be correctly entered or else Add button will not be enabled.
o NetDisk does not contain letter O. Please use 0 (number zero) for all 0s.
Write Key is needed to gain write access of NetDisk.
Click Add if you want to add the new NetDisk. Otherwise, click Cancel.
XiMeta, Inc
9
www.ximeta.com
NetDisk
NDAS(Network Direct Attached Storage)
NOTE: NetDisk ID and Write Key can be found underneath each NetDisk.
4.
NetDisk Administrator
•
Confirms the NetDisk you just registered.
NOTE: If another user is in Read/Write Mode for the NetDisk you just registered, you
will be registered in as Read Only Mode even if you entered the Write Key. You can
later switch to Read/Write Mode by following the Change from Read Only Mode to
Read/Write Mode on page 19.
5.
i.
If the Write Key was entered in the previous step, the NetDisk is registered as
Read/Write Mode .
ii.
If the Write Key was not entered in the previous step, the NetDisk is registered as
Read Only Mode.
Action window.
XiMeta, Inc
10
www.ximeta.com
NetDisk
•
NDAS(Network Direct Attached Storage)
This window appears every time a NetDisk is registered/added/enabled. If it does not
appear, do not be alarmed. Please select one of the choices from the below.
o If you do not want the window to appear every time a NetDisk is
registered/added/enabled, select Take no action and the box Always do the
same action. Then click OK.
o If you want to simply close the window click Cancel.
o If you want Windows to perform an action, select an action from the list and
click OK.
6.
Found New Hardware Wizard
•
This window may take couple of minutes to appear.
•
If you are registering a new NetDisk, Found New Hardware Wizard will appear.
See Installation of New NetDisk on page 12 and follow the instructions.
•
If you are re-registering a NetDisk that has been removed before, Found Hardware
Wizard may not appear. Just continue to the next step.
7. Registration is completed.
•
Click NetDisk™ Administrator Tool
XiMeta, Inc
to see the registered NetDisk.
11
www.ximeta.com
NetDisk
NDAS(Network Direct Attached Storage)
i. NetDisk in Read/Write Mode, indicated by Blue circle.
ii. NetDisk in Read Only Mode, indicated by Green circle.
Installation of New NetDisk
Every time a new NetDisk is added, it must be registered into your computer. Found New
Hardware Wizard will automatically register the new NetDisk with a click of a button. Please
refer to instructions below.
1. Found New Hardware Wizard
•
Select Install the software automatically and click next.
•
If you click Cancel, NetDisk’s Device Drivers will not get installed and one cannot use
the NetDisk.
To re-install the NetDisk, please follow the steps below.
•
XiMeta, Inc
12
www.ximeta.com
NetDisk
NDAS(Network Direct Attached Storage)
Re-Install NetDisk
1.
2.
3.
4.
5.
6.
7.
8.
Right click My Computer
Select Manage
Double click Device Manager under System Tools
Double click SCSI and RAID controllers
Right click XiMeta_LanscsiBus_XX (XX can be any two numbers)
Select Update Driver
Welcome to the Hardware Update Wizard will appear.
Click Next and follow the rest of the steps to install the NetDisk.
2. Searching for the new NetDisk.
3. Hardware Installation:
•
•
This is just a warning window advising NetDisk to perform Windows Logo Testing.
Click Continue Anyway.
•
If you click STOP Installation, NetDisk’s Device Drivers will not get installed and one
cannot use the NetDisk.
If you want to re-install the NetDisk, please follow the Re-Install NetDisk in step one
of this section.
•
XiMeta, Inc
13
www.ximeta.com
NetDisk
NDAS(Network Direct Attached Storage)
4. Installation is completed.
•
Click Finish.
5. New NetDisk has been registered to your computer.
NDAS Status and Mode Indicator
•
•
•
•
NetDisk provides users with seven basic Modes.
When a user first registers his/her NetDisk, it is either registered in as a Read Only
Mode or Read/Write Mode. Once the NetDisk is successfully registered with either of
the two Modes, user can change the Mode of the NetDisk or perform advanced
functions, such as aggregation or mirroring. Fore more information on Aggregation
and Mirroring, please refer to sections on Aggregation or Mirroring on pages 24 and
36.
Read Only Mode and Read/Write Mode will be the two most commonly used Modes.
Instructions on how to change back and forth from these two Modes can be found on
19 (Change from Read Only Mode to Read/Write Mode) and 23 (Change from
Read/Write Mode to Read Only Mode).
Below is a chart describing each of the NetDisk’s Mode and the icons that
correspond with each Mode.
NetDisk Color
Icon
NetDisk Icon
Read/Write Mode
• Users can read and write to and
from NetDisk.
• Only one user can write to a
specific NetDisk at a time (one
writer per NetDisk).
• No users can write to NetDisk until
the current writer of the NetDisk
passes on the writing access to
another user.
Read Only Mode
• Users can only read from NetDisk.
• Any number of users can read
from a NetDisk or from a same file
Blue
Green
XiMeta, Inc
Mode/Meaning
14
www.ximeta.com
NetDisk
NDAS(Network Direct Attached Storage)
in a specific NetDisk.
NetDisk is not recognized
• You can only remove this NetDisk
from your computer or view its
property.
Disabled Mode
• Disabled from your computer (but
still connected to the network)
• From this mode NetDisk can either
enabled back to Read Only Mode,
Read/Write Mode, or be removed
from your computer.
Busy Mode
• Someone else is using the NetDisk
so no other user can access (write
or enable) the NetDisk.
• Until the current user releases the
NetDisk, you cannot use the
NetDisk.
Disconnected Mode
• Not connected to the network.
• It usually means either the power
cord or the Ethernet (USB) cord is
unplugged. Once the cords are
connected again, you can resume
whatever you were doing.
• It can also mean a NetDisk is no
longer connected to the LAN.
• Too many disconnected NetDisk
on your computer can cause your
computer to slow down. In such
case, remove disconnected
NetDisk and re-register them
again.
Slave Mode
• Slave disk (used for aggregation
and mirroring)
• You can only remove it from your
computer or view its property.
Red
Gray
White
Black
Yellow
NetDisk Administrator Tool Menu
Click NetDisk™ Administrator Tool
NetDisk Administrator Tool Menu.
XiMeta, Inc
. All the registered NetDisk will be displayed on the
15
www.ximeta.com
NetDisk
NDAS(Network Direct Attached Storage)
A. NetDisk - Displays all the functionality of a specific NetDisk.
•
•
If you named your NetDisk druing the registration step, the new name will be
displayed in place of NetDisk #.
Please refer to NetDisk functionality on page 17 for more detailed information on
NetDisk functionality.
B. Refresh Status - Updates the status of NetDisk that are connected to the network.
NOTE: If a NetDisk is displayed by a Black colored circle, it means network cable or
power cable of the NetDisk is disconnected. This will cause operations of other NetDisk
to slow down. We recommend you remove the Black NetDisk and re-register. You can
remove the NetDisk by selecting the Block colored NetDisk and choosing Remove.
C. New NetDisk - Registers a new NetDisk to your computer.
•
•
•
NetDisk Name is optional
Enter the correct NetDisk ID.
Write Key is needed to write to the NetDisk.
D. About - Displays NetDisk Administrator version.
XiMeta, Inc
16
www.ximeta.com
NetDisk
NDAS(Network Direct Attached Storage)
E. Exit - Exits NetDisk Administrator.
•
Click Yes if you want to exit. Otherwise, click No,
•
NetDisk Administrator Tool can be restored by double clicking
the screen.
icon on
NetDisk Functionality
Click NetDisk Administrator Tool
and place the cursor on one of the NetDisk to view its
functions. Each of the NetDisk Modes has its own distinguished functions. Please refer to
the diagram on the next page.
Displays functionality of each NetDisk Mode
Read Only Mode
XiMeta, Inc
Read/Write Mode
17
www.ximeta.com
NetDisk
NDAS(Network Direct Attached Storage)
Disabled Mode
Slave Mode
Busy Mode
Disconnected Mode
Different NetDisk
There are seven functionalities NetDisk can perform in all; Disable, Edit Name, Enable
Read Only, Enable Read/Write, Property, Refresh and, Remove. All of the functionalities
are listed below with detailed descriptions.
To access the function, just simply go to NetDisk Administrator Tool, select a NetDisk and,
click on the function you want the NetDisk to perform.
A Disable - Disables you from writing and reading to and from the NetDisk.
•
When you select Disable, a warning window will appear. If want to disable the
NetDisk click OK. Otherwise click Cancel.
•
If the NetDisk is being used by any applications, NetDisk will not be disabled. In such
case, wait until all the applications are finished using NetDisk. Then try disabling it
again.
•
If you still cannot disable after several attempts, reboot your computer. This may
occur when unknown programs are using NetDisk.
B. Edit Name - Changes the name of the NetDisk.
•
Type in the new name for the NetDisk on Edit a NetDisk window then click OK. If
you do not want to change the name of the NetDisk, simply click Cancel.
XiMeta, Inc
18
www.ximeta.com
NetDisk
NDAS(Network Direct Attached Storage)
C. Enable Read Only - Enables you back into Read Only Mode.
D. Enable Read/Write - Enables you back into Read/Write Mode.
•
Sometimes a NetDisk cannot enable the write access because the NetDisk is busy
with other applications or another user. In such a case, NetDisk Administrator
window will appear.
•
Click OK then try enabling it again later.
E. Properties – Display’s properties of the NetDisk.
XiMeta, Inc
19
www.ximeta.com
NetDisk
NDAS(Network Direct Attached Storage)
F. Refresh - Updates the NetDisk’s data from which you are reading.
G. Remove - Removes the NetDisk from your computer.
•
NetDisk Administrator appears when you select remove. Click OK if you want to
remove the NetDisk. Otherwise, click Cancel.
Change from Read Only Mode to Read/Write Mode
The following instructions guide a user in changing NetDisk’s Mode (from Read Only to
Read/Write).
1. Click NetDisk
TM
Administrator Tool
and select a NetDisk you want to change.
NOTE: Green circle indicates Read Only Mode and Blue circle indicates Read/Write
Mode.
2. Click Enable Read/Write
XiMeta, Inc
20
www.ximeta.com
NetDisk
3.
NDAS(Network Direct Attached Storage)
NetDisk Administrator
•
•
If you are enabling Read/Write without the Write Key, NetDisk Administrator will
appear reminding you to register Write Key. Click OK.
If you have registered the Write Key during the registration step, skip to step 8.
4. Edit a NetDisk
•
Enter a Write Key. Write Key can be found underneath the NetDisk.
NOTE: The Add button will only be enabled when the correct Write Key is entered.
5.
Occasionally, a NetDisk cannot enable the write access because the NetDisk is busy
with other applications or another user. In such a case, NetDisk Administrator window
will appear. Otherwise, just move to the next step.
XiMeta, Inc
21
www.ximeta.com
NetDisk
•
6.
NDAS(Network Direct Attached Storage)
Click OK then try it again later.
TM
Again, go to NetDisk
Administrator Tool
and select the same NetDisk you
selected in step one. You will notice the color of the circle icon has changed to Gray. If
not, wait few seconds for the system to update the change.
NOTE: Sometimes the color of the circle changes to White instead of Gray. This
indicates that NetDisk is busy. Please wait until later time or enable the NetDisk back to
Read Only Mode.
7.
Once the circle icon has changed to Gray, select Enable Read/Write.
8.
NetDisk Administrator
•
NetDisk Administrator will ask if you want to take the write access away from the
current writer of the NetDisk.
XiMeta, Inc
22
www.ximeta.com
NetDisk
•
•
9.
NDAS(Network Direct Attached Storage)
Click Yes if you want to take the write access.
Click No if you do not want to take the write access.
If you clicked Yes, please wait for the current writer to release the write access.
10. NetDisk Message
•
On the current writer’s window, a message requesting a release of write access will
appear.
•
If the current writer accepts the request, the write access will be passed on to the
user who requested the write access.
•
If the current writer does not accept the request, the user who requested the write
access will have to wait and try again later.
11. NetDisk Administrator
•
•
If the current writer denies or does not respond within 15 seconds of the time
NetDisk Message appears on the screen, NetDisk Administrator window will
appear. Click OK then please try it at later time.
If the current writer accepts the request and passes on the write access, NetDisk
Administrator window will not appear.
XiMeta, Inc
23
www.ximeta.com
NetDisk
NDAS(Network Direct Attached Storage)
12. Writer who gives up his/her write access needs to enable the NetDisk back in by
selecting Enable Read Only.
13. New writer’s NetDisk circle icon will be change from Green to Blue, indicating a
Read/Write Mode .
NOTE: Give few seconds for the color of the NetDisk to be updated. If the color of the
NetDisk you changed is still Green, repeat from step 1 again.
Change from Read/Write Mode to Read Only Mode
1. Click NetDisk
TM
Administrator Tool
and select a NetDisk you want to change.
NOTE: Green circle indicates Read Only and Blue circle indicates Read/Write.
XiMeta, Inc
24
www.ximeta.com
NetDisk
NDAS(Network Direct Attached Storage)
2. Click Enable Read Only.
3. Click NetDisk™ Administrator Tool
to view the changed NetDisk.
NOTE: Give few seconds for the color of the NetDisk to be updated. If the color of
the NetDisk you changed is still Blue, repeat from step 1 again.
XiMeta, Inc
25
www.ximeta.com
NetDisk
NDAS(Network Direct Attached Storage)
Chapter 5
Advanced Functions
Aggregation
Aggregation is one of the two advanced features NetDisk provides. Aggregation allows users
to enable multiple NetDisk units to be recognized as a single large disk drive. This feature is
extremely useful where a larger storage device is needed. Please follow the steps below to
aggregate NetDisk.
Requirements For Aggregation:
•
•
•
•
•
Only two NetDisk can be bound at a time.
Each NetDisk has to have a Write Key.
Each NetDisk has to be disabled.
Cannot bind NetDisk that is already bound.
Two NetDisk that are being bound must be disabled from all of the user’s computers.
Only one person, who is performing the binding, can have the NetDisk enabled on
his/her computer while the binding is being performed. After the binding is completed,
the bound NetDisk needs to be enabled back into Read Only Mode or Read/Write
Mode before it can be used.
Bind
1. Click Start > Program > NetDisk > NetDisk Aggregation & Mirroring
NetDisk Aggregation & Mirroring window displays all the NetDisk installed and
registered in your computer.
XiMeta, Inc
26
www.ximeta.com
NetDisk
•
•
NDAS(Network Direct Attached Storage)
Binding/Mirroring can proceed only if two or more NetDisk are registered in the
computer and they are in Read/Write Mode (indicated by Blue colored NetDisk).
If two or more NetDisk are listed on the NetDisk Aggregation & Mirroring window,
continue to the next step. Otherwise, go to Add (Register) A New NetDisk on page
9 to add more NetDisk.
2. Before binding/mirroring the NetDisk, each NetDisk must be disabled.
•
To disable NetDisk, click NetDisk™ Administrator Tool
NetDisk you want to disable and then select Disable.
. Then choose a
3. NetDisk Administrator
•
If the NetDisk you selected is in use by any applications, NetDisk will not be disabled.
In such case, wait until all the applications are finished using NetDisk. Then try
disabling it again.
•
Click OK if you want to disable the NetDisk. Otherwise, click Cancel.
NOTE: If you cannot disable or color of the circle is White after several attempts, reboot
your computer. This may occur when unseen programs are using the NetDisk,
4. Repeat the above two steps for the second NetDisk you want to disable.
5.
Now that two NetDisk are disabled, you will be able to bind/mirror them.
6.
If NetDisk Aggregation & Mirroring window is not opened, click Start > Program >
NetDisk > NetDisk Aggregation & Mirroring
XiMeta, Inc
27
www.ximeta.com
NetDisk
NDAS(Network Direct Attached Storage)
NOTE: Disabled NetDisk will be indicated by Gray colored NetDisk.
•
Give few seconds for the changes to take place. If the color of the disabled NetDisk
has not been changed to Gray, click Status. If the color still has not changed, repeat
steps 2 and 3 for every NetDisk that did not get disabled.
7.
Once two NetDisk have been disabled, binding/mirroring can begin.
8.
Select one of the two NetDisk you just disabled. Once you select a NetDisk,
Aggregation-bind and Mirroring buttons will be enabled.
NOTE: You can only bind/mirror disabled NetDisk. If you select a NetDisk that is not
disabled, Aggr or Mirror button will not be enabled. In such case, go back to step 2 and
disable the NetDisk.
XiMeta, Inc
28
www.ximeta.com
NetDisk
9.
NDAS(Network Direct Attached Storage)
Selecting the button.
•
Click bind
•
Click mirror
button for Aggregation-Bind.
button for Mirroring.
10. Binding/Mirroring
A. If NetDisk you selected does not have a Write Key, the following message will
appear.
•
•
Click OK then refer to Change from Read Only Mode to Read/Write Mode on
page 19.
Go back to step 2 and continue again from there.
B. If NetDisk you selected has a Write Key, the Bind window will appear.
Aggregation: The NetDisks bound box on the right, indicates the first NetDisk you
select to bind. The NetDisks Available box on the left, lists all the NetDisk you can
select from to bind with the first NetDisk.
Mirroring: The NetDisks bound box on the right displays the NetDisk which the
data will be mirrored from and the NetDisks Available box on the left, lists all the
NetDisk you can select from to mirror the data.
XiMeta, Inc
29
www.ximeta.com
NetDisk
NDAS(Network Direct Attached Storage)
11. Select a NetDisk from the NetDisk Available box that you want to bind/mirror to.
12. Once you selected a NetDisk, click
button.
A. If NetDisk you selected from NetDisks Available box does not have a Write Key
AggrMirUI will appear.
•
•
•
•
Click OK.
Click Cancel on the Bind NetDisk window.
Refer to Change from Read Only Mode to Read/Write Mode on page 19.
Go back to step 2 and start again.
B. If NetDisk you selected has Write Key, the binding/mirroring of these two NetDisk will
proceed.
XiMeta, Inc
30
www.ximeta.com
NetDisk
NDAS(Network Direct Attached Storage)
• Click OK.
•
C. Selected wrong NetDisk.
•
If you have selected a wrong NetDisk to be aggregated/mirrored, you can simply
select the NetDisk from the NetDisks bound window and click
unbind the NetDisk and take you back to step 11.
. This will
13. For mirroring only.
A. Warning Message
•
•
If a NetDisk you are mirroring the data to is smaller than the NetDisk you are
mirroring the data from, warning window will appear.
Click OK.
•
Click Cancel from the Bind NetDisk window and repeat from step 8 again.
NOTE: Make sure you select a larger or same size NetDisk to mirror the data to.
B. Formatting/Partitioning
•
•
•
Once the mirroring successfully starts, the AggrMirUi window will appear
advising you to format/partition the master NetDisk before you can use the
mirrored NetDisk.
Instruction on how to format/partition can be found at the end of this document.
But before you can format/partition a NetDisk, NetDisk has to be enabled.
Please continue to the next step for further instructions on both enabling and
formatting/partitioning NetDisk.
Click OK.
XiMeta, Inc
31
www.ximeta.com
NetDisk
NDAS(Network Direct Attached Storage)
14. Binding/Mirroring is completed.
Aggregation: The bound NetDisk is indicated by the word Aggr Master: NetDisk 1.
The NetDisk from the NetDisks bound box becomes the Master NetDisk and the
NetDisk from the NetDisks available box becomes the Slave NetDisk. The slave gets
added to the master NetDisk. The name Master NetDisk 1 is Master plus the name of
the first NetDisk.
Mirroring: The mirrored NetDisk is indicated by the word Mirror Master: NetDisk 1.
The NetDisk from the NetDisks bound box becomes the Master NetDisk and the
XiMeta, Inc
32
www.ximeta.com
NetDisk
NDAS(Network Direct Attached Storage)
NetDisk from the NetDisks available box becomes the Slave NetDisk. The master
NetDisk is mirrored to slave NetDisk.
15. Click NetDisk Administrator Tool
.
NOTE: NetDisk 1 is disabled master NetDisk and NetDisk 3 is slave NetDisk.
16. Enable the bound/mirrored NetDisk by selecting either Enable Read/Write or Enable
Read Only.
17. Go to NetDisk Aggregation & Mirroring window. You will notice the changes in the
color of the master NetDisk.
Aggregation
XiMeta, Inc
33
www.ximeta.com
NetDisk
NDAS(Network Direct Attached Storage)
Mirroring
18. Before you can use the new bound/mirrored NetDisk, the NetDisk needs to be
partitioned. Please refer to Partition NetDisk on page 39.
Unbind
In order to unbind a NetDisk all the users who have the bound NetDisk registered in their
computer must disable the NetDisk. NetDisk cannot be unbound until it is disabled from all
the users’ computers.
1.
Click NetDi sk™ Administrator Tool
XiMeta, Inc
and select a master NetDisk you want to
34
www.ximeta.com
NetDisk
NDAS(Network Direct Attached Storage)
unbind. Then select Disable.
NOTE: You can only unbind disabled NetDisk.
2.
NetDisk Administrator
•
If the NetDisk is being used by any applications, NetDisk will not be disabled. In such
case, wait until all the applications are finished using NetDisk. Then try disabling it
again.
•
Click OK if you want to disable the NetDisk. Otherwise, click Cancel.
NOTE: If you still cannot disable after several attempts, reboot your computer. This may
occur when unseen programs are using the NetDisk.
3.
Disabled NetDisk is indicated by Gray colored circle.
XiMeta, Inc
35
www.ximeta.com
NetDisk
NDAS(Network Direct Attached Storage)
4.
Go to NetDisk Aggregation & Mirroring window. The color of the master NetDisk you
just disabled will be Gray. If not, press Status button.
5.
Select a NetDisk you want to unbind and click unbind
6.
The bound NetDisk will unbind into the two original NetDisk.
•
button.
Two unbound NetDisk is also visible from NetDisk™ Administrator Tool
XiMeta, Inc
36
.
www.ximeta.com
NetDisk
7.
8.
NDAS(Network Direct Attached Storage)
Enable the unbound NetDisk by selecting either Enable Read/Write or Enable Read
Only.
•
NetDisk cannot be used before it is enabled.
•
Repeat this step for the second unbound NetDisk.
Before you can use the two unbound NetDisk, you need to either initialize them or
partition them.
•
Right click My Computer. Click Manage > Disk Management.
•
If an unbound NetDisk is not yet initialized, indicated by
, go to Initialize
NetDisk on page 44. Otherwise go to Partition NetDisk on page 39.
Mirroring
Mirroring is another advanced feature NetDisk provides beside aggregation. The purpose of
mirroring is to continuously create and save a copy of data in one NetDisk to another NetDisk,
in real time, whenever a new data is written to the NetDisk. Please refer to the below
instructions.
Requirements for Mirroring:
•
•
•
•
Each NetDisk has to have a Write Key.
Each NetDisk has to be disabled.
Cannot mirror NetDisk that is already mirrored.
A NetDisk that you are saving the data to must be same or larger than the NetDisk
you are copying the data from. Otherwise, the NetDisk you are saving the data to
may run out of space.
XiMeta, Inc
37
www.ximeta.com
NetDisk
•
NDAS(Network Direct Attached Storage)
Two NetDisk that are being mirrored must be disabled or removed from all other
user’s computers. Only one person, who is performing the mirroring, can have the
NetDisk enabled on his/her computer while the mirroring is being performed. After
mirroring is completed, users can enable or register the mirrored NetDisk at their
convinces.
Mirroring
Mirroring and Aggregation are done exactly the same way, except for selecting AggregationBind button for the Aggregation and Mirror button for the Mirroring. Please refer to Bind on
page for 24 Mirroring.
Undo Mirroring
Please follow the Aggregation - Unbind on page 32 to undo Mirroring.
Chapter 6
Uninstallation
Uninstall NetDisk
Before you can uninstall the NetDisk, you must close all the applications that are using the
NetDisk.
NOTE: NetDisk Administrator, NetDisk Aggregation & Mirroring, Windows Explorer and
Internet Explorer must be closed.
There are two different ways in which you can uninstall NetDisk.
1.
Click Start > All Programs > NetDisk > Uninstall NetDisk.
A. Windows Installer will appear. Click Yes if you want to continue uninstall.
Otherwise click No.
XiMeta, Inc
38
www.ximeta.com
NetDisk
NDAS(Network Direct Attached Storage)
B. NetDisk is being prepared to be removed
C. You must restart your computer for it to configure the changes made by
uninstalling the NetDisk Software. If you choose not to restart our computer at
this moment, you must restart your computer shortly. If not, you will have
problem re-installing the NetDisk Software.
2.
Click Start > Control Panel > Add or Remove Programs > NetDisk > Remove
A. Add or Remove Programs will appear. Click Yes if you want to continue
uninstall. Otherwise, click No.
B. NetDisk is being prepared to be removed
XiMeta, Inc
39
www.ximeta.com
NetDisk
NDAS(Network Direct Attached Storage)
C. You must restart your computer for it to configure the changes made by
uninstalling the NetDisk Software. If you choose not to restart our computer at
this moment, you must restart your computer shortly. If not, you will have
problem re-installing the NetDisk Software.
NOTE: Problem Ejecting NetDisk appears when applications are using the NetDisk you
are trying to remove. Click OK and try removing the NetDisk again after a few minutes.
XiMeta, Inc
40
www.ximeta.com
NetDisk
NDAS(Network Direct Attached Storage)
Chapter 7
Formatting NetDisk
Partition NetDisk
1.
Right click My Computer and select Manage.
2.
Computer Management will appear.
•
Click Disk Management under Storage.
XiMeta, Inc
41
www.ximeta.com
NetDisk
NDAS(Network Direct Attached Storage)
3.
Disabled disk will be shown on the Computer Management.
4.
Right click on the box and select Delete Partition.
5.
Delete primary partition will appear.
NOTE: When you delete partition, all the data on the disk will be last.
•
Click Yes if you want to continue partitioning. Otherwise, click No.
XiMeta, Inc
42
www.ximeta.com
NetDisk
NDAS(Network Direct Attached Storage)
6. Partition has been deleted and it is indicated by the word Unallocated.
7.
Right click on the box and select New Partition.
8.
New Partition Wizard: Click next.
XiMeta, Inc
43
www.ximeta.com
NetDisk
9.
NDAS(Network Direct Attached Storage)
Select Partition Type: Select Primary partition and click Next.
10. Specify Partition Size: Click Next.
NOTE: The partition size is automatically set. No need to change the size.
11. Assign Drive Letter or Path: Select Assign the following driver letter and choose a
name for the drive from list. Then click Next.
XiMeta, Inc
44
www.ximeta.com
NetDisk
NDAS(Network Direct Attached Storage)
12. Format Partition: Select Format this partition with the following Settings and
Perform a quick format (Recommended).
•
Click next.
13. Partitioning is finished. Click Finish.
14. You can see the partitioned disk.
XiMeta, Inc
45
www.ximeta.com
NetDisk
NDAS(Network Direct Attached Storage)
Initialize NetDisk
1.
Right click My Computer and select Manage.
2. Computer Management window will appear. Click Disk Management under Storage.
3. Computer Management window will list all the disks in the computer.
XiMeta, Inc
46
www.ximeta.com
NetDisk
•
NDAS(Network Direct Attached Storage)
Find NetDisk you want to format and right click
NOTE: NetDisk you are looking for is the unknown or not initialized disk.
4. Select Initialize NetDisk. Initialize NetDisk window will appear. Select the right disk and
click Ok.
5. NetDisk will be automatically initialized.
XiMeta, Inc
47
www.ximeta.com
NetDisk
NOTE: Unknown
NDAS(Network Direct Attached Storage)
becomes Basic
6. Right click Unallocated box then select New Partition.
•
Go to Partition NetDisk on 39 and start from step 8.
XiMeta, Inc
48
www.ximeta.com
NetDisk
NDAS(Network Direct Attached Storage)
Chapter 8
Contact Information
How to Contact XiMeta, Inc.
XiMeta, Inc.
15251 Alton Parkway
Irvine, CA 92618
What to do before you contact us:
Whenever you contact XiMeta, Inc. for technical support, please have the following
information available:
Product name, model, serial number and software version number.
Technical Support on the Internet:
For the latest information on NetDisk, visit our website at www.ximeta.com
Technical Support by E-Mail:
Our e-mail address for technical support is [email protected]
XiMeta, Inc
49
www.ximeta.com