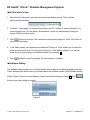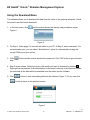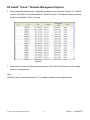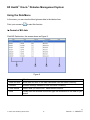
1
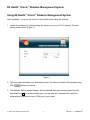
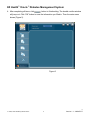
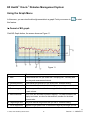
Version 1.1
Tremblay Harrison Inc.
1684 Dufferin St
Toronto, ON M6H 3M1
1 866 829-7926
EZ Health™ Oracle™ Diabetes Management System
Introduction
The EZ Health™ Oracle™ Diabetes Management System is a personal computer (PC) software
application that allows users to upload test data from meters, store the data in the Diabetes
Management System application and analyzes the data by graphs and other software tools.
The EZ Health™ Oracle™ Diabetes Management System is intended for use in home and clinical
settings as an aid for users and their health care professionals to review, analyze and evaluate
the historical test results to support health management effectively.
Warnings
The EZ Health™ Oracle™ Diabetes Management System does not recommend your therapy
instruction. Before determining and using the blood glucose report, please consult your
Health Care Professional.
To avoid the possibility of electrical shock, never perform a blood glucose test while the meter
is connected to the computer.
Upload data into a user’s name only if the meter contains only that person’s data. The
software cannot upload a specific portion of data from a meter if data is intermixed with the
data from another person.
Hardware Requirements
The requirements for the EZ Health™ Oracle™ Diabetes Management System are:
Personal computer with 400 megahertz (MHz) or higher processor clock speed
recommended; the software does not run on Apple computers.
Random access memory (RAM) of 64 megabytes (MB) or more recommended.
Available hard disk space of 30 MB for running the program.
Microsoft® Windows 98, SE, 2000, NT, ME, XP or Vista (32) operating systems.
Monitor with 1024 x 768 or higher resolution.
Keyboard and mouse.
available USB port for device connection
Optional Requirements
Windows-compatible printer (required if you want to print copies of reports).
© 2008, 2009 Tremblay Harrison Inc.
1
Version 1.1 – 2009/07/07
EZ Health™ Oracle™ Diabetes Management System
Contents
INSTALLING EZ HEALTH™ ORACLE™ DIABETES MANAGEMENT SYSTEM........................................................... 3
CONNECTING A METER TO YOUR PC ................................................................................................................................ 4
USING EZ HEALTH™ ORACLE™ DIABETES MANAGEMENT SYSTEM....................................................................... 5
USING THE SETTING MENU .................................................................................................................................................. 7
PERSONAL SETTING ................................................................................................................................................................ 7
PERSONAL INFORMATION ....................................................................................................................................................... 7
MEASUREMENT INTERVAL...................................................................................................................................................... 7
INSTRUMENT SETTING ............................................................................................................................................................ 8
DELETE THE METER’S MEMORY .............................................................................................................................................. 8
SET THE METER’S TIME ........................................................................................................................................................... 9
SOFTWARE SETTING................................................................................................................................................................ 9
USING THE DOWNLOAD MENU ......................................................................................................................................... 10
USING THE DATA MENU ....................................................................................................................................................... 12
FORMAT OF BG DATA ........................................................................................................................................................... 12
CONSTRUCT YOUR BG DATA ................................................................................................................................................ 13
USING THE GRAPH MENU ................................................................................................................................................... 14
FORMAT OF BG GRAPH ........................................................................................................................................................ 14
CONSTRUCT YOUR BG GRAPH.............................................................................................................................................. 15
USING THE PRINT MENU ..................................................................................................................................................... 16
© 2008, 2009 Tremblay Harrison Inc.
2
Version 1.1 – 2009/07/07
EZ Health™ Oracle™ Diabetes Management System
Installing EZ Health™ Oracle™ Diabetes Management System
EZ Health™ Oracle™ Diabetes Management System is free, downloaded from
http://www.oraclediabetes.com/ (go to the Software Download page) or available on the CD
included with your monitor.
Web Based Install
1. Go to EZ Health™ Oracle™ Diabetes Management System website. Go to the Software
Download page.
2. Download EZ Health™ Oracle™ Diabetes Management System into your PC. The File
Download will display on your screen.
3. Click “Run” button to install the software into your PC. Follow the step-by-sep procedures to
finish the installation. Go To Step 4.
CD Based Install
1. Locate the “Software” directory on your CD
2. Double Click the file “EZ Health Oracle_DiabetesMgtSys_090115.exe”.
3. Follow the step-by-step procedures to finish the installation.
4. Once the installation is successful, the “Installation Complete” screen displays. Click the
“Close” button to exit this installation.
5. The EZ Health™ Oracle™ Diabetes Management System icon appears on your desktop, and
the EZ Health™ Oracle™ Diabetes Management System are added to your PC’s Programs
list.
© 2008, 2009 Tremblay Harrison Inc.
3
3
Version 1.1 – 2009/07/07
EZ Health™ Oracle™ Diabetes Management System
Connecting a Meter to Your PC
Before you download the historical data from the meter to your PC or before you do the
instrument setting, you have to connect the meter to your PC according to the following steps:
1. When the meter is off, connect the one end of the interface cable to the meter data port.
2. Connect the other end of the interface cable to the USB port on your PC.
3. “PC” will be shown on the blood glucose meter. The communication between the meter and
your PC is ready.
4. Open the program to start download or instrument setting.
Note: If you have difficulties connecting the Glucose Monitor to your computer running Windows
98, SE, ME, 2000, NT or XP, or Vista(32) you may need the USB driver software for the USB
cable. You can download the driver for free, from http://www.oraclediabetes.com. Go to the
Software Download page. The drivers are also on the CD included with your monitor.
Please be sure to order the correct cable for your Windows version.
© 2008, 2009 Tremblay Harrison Inc.
4
4
Version 1.1 – 2009/07/07
EZ Health™ Oracle™ Diabetes Management System
Using EZ Health™ Oracle™ Diabetes Management System
After installation, you must first enter the user profile before using the software.
1. Launch the software by double-clicking the System icon on your PC’s desktop. The user
setting screen shows (Figure 1).
Figure 1
2. Type your name and select your birth data and sex. The Name is limited to 50 characters long.
button to continue.
Click
3. The Software Setting screen displays. Set the desired setting by selecting items from the
drop-down box . For communication port, you can click the “Autodetection” option for
automatically locating the correct COM port of your meter.
© 2008, 2009 Tremblay Harrison Inc.
5
5
Version 1.1 – 2009/07/07
EZ Health™ Oracle™ Diabetes Management System
4. After completing all items, click
button to finish setting. The double confirm window
will jump out. Click “OK” button to save the information you filled in. Then the main menu
shows (Figure 2).
Figure 2
© 2008, 2009 Tremblay Harrison Inc.
6
6
Version 1.1 – 2009/07/07
EZ Health™ Oracle™ Diabetes Management System
Using the Setting Menu
Personal Setting
The personal setting screen contains two tabs: personal information and measurement interval.
Parameters set under the personal setting will be reflected when you review your test data.
Personal information
In the main menu, point to
and then click to the “Personal Setting” button (Figure 3).
Personal information screen shows first. You can enter settings by clicking on or typing
numbers.
Figure 3
Measurement interval
This program provides users to organize data according to eight intervals set in this menu.
1. Select the Measurement interval tab.
2. Select AM or PM first by clicking or .
3. Change the hour and the minute by directly click on it. Then directly type the desired number
or click or to make changes.
4. Click
button to save your information. The double confirm window will jump out. Click
“OK” button to save the information you filled in.
© 2008, 2009 Tremblay Harrison Inc.
7
7
Version 1.1 – 2009/07/07
EZ Health™ Oracle™ Diabetes Management System
Instrument Setting
The Instrument Setting allows you to do meter settings from your PC, including meter’s
memory deletion and time setting.
Delete the meter’s memory
1. Click the Instrument Setting button (Figure 4). Delete the meter’s memory screen shows with
step-by-step procedures.
Figure 4
2. For Step 1, follow page 3 to connect the meter to your PC. At Step 2, select the instrument.
For communication port, you can select “Autodetection” option for automatically locating the
correct COM port of your meter.
3. Click
button. The confirm window will jump out. Click “OK” button to go to Step3.
4. In Step3 screen, click
button to delete the meter’s data. The double confirmation
window then jumps out. Click “Yes” button to delete the meter’s data or click “No” button to
return to the previous screen.
5. After you click “Yes” button, the meter’s data is completely cleared. Click
button to
return to the Delete the meter’s memory screen.
© 2008, 2009 Tremblay Harrison Inc.
8
8
Version 1.1 – 2009/07/07
EZ Health™ Oracle™ Diabetes Management System
Set the meter’s time
1. Select the Set the meter’s time tab in the Instrument Setting screen. Then it shows
step-by-step procedures.
2. For Step 1, follow page 3 to connect the meter to your PC. At Step 2, select instrument. For
communication port, you can select “Autodetection” option for automatically locating the
correct COM port of your meter.
button to continue. The confirmation window then jumps out. Click “OK” button to
3. Click
continue the next step.
4. In the Step3 screen, two options can be selected. Clicking on “Time” allows you to match the
meter clock time with your PC clock time. Clicking on “Time Setting” allows you to set the
meter clock by directly typing the desired number or by clicking .
5. Click
button to save the settings. The time setting is complete.
Software Setting
The Software Setting allows you to set the display of the software, including languages and units.
Those setting will be shown when you review data in this software system. Click Software Setting
button (Figure 5) and the screen displays. Select the desired setting by clicking . Click
button to save the setting you made.
Figure 5
© 2008, 2009 Tremblay Harrison Inc.
9
9
Version 1.1 – 2009/07/07
EZ Health™ Oracle™ Diabetes Management System
Using the Download Menu
This software allows you to download the data from the meter to the personal computer. Check
the current user first before download.
1. In the main menu, click
and the screen shows the step-by-step procedures as per
Figure 6.
Figure 6
2. For Step 1, follow page 3 to connect the meter to your PC. At Step 2, select instrument. For
communication port, you can select “Autodetection” option for automatically locating the
correct COM port of your device.
3. Click
step.
button and the confirm window then jumps out. Click “OK” button to go to the next
4. Step 3 screen shows. Select how many test results you want to download by clicking .
Eight options are provided. If the data number on the meter’s memory is less than the number
you selected, all the data will be transmitted from the meter into the software.
5. Click
button to start transmitting data into the software (Figure 7). Or you can click
button to return to the previous screen.
Figure 7
© 2008, 2009 Tremblay Harrison Inc.
10
10
Version 1.1 – 2009/07/07
EZ Health™ Oracle™ Diabetes Management System
6. When completing transmission, all data will be shown on the screen as Figure 8. For “Status”
column, if the data is first time transferred, “Saved” is shown. If the data has been previously
saved in the software, “Exist” is shown.
Figure 8
7. Disconnect the meter from the personal computer. Then click the Data menu or the Graph
menu to do analysis now.
Note:
While the meter is connected to the PC, it is unable to perform a blood glucose test.
© 2008, 2009 Tremblay Harrison Inc.
11
11
Version 1.1 – 2009/07/07
EZ Health™ Oracle™ Diabetes Management System
Using the Data Menu
In the menu, you can view the blood glucose data in the tabular form.
Point your mouse to
to start this function.
Format of BG data
Click BG Data button, the screen shows as Figure 9.
Figure 9
Column
What it means
1. Date and time
Show date and time of the data transferred from the meter’s memory.
2. Glucose
Glucose readings transferred from the meter’s memory.
3. Time interval
Reflect what you select from “Measurement interval”.
4. Note
Double click the selected column and type the information of the data for your
record.
© 2008, 2009 Tremblay Harrison Inc.
12
12
Version 1.1 – 2009/07/07
EZ Health™ Oracle™ Diabetes Management System
Construct your BG data
1. Click BG Data button and the screen shows as Figure10. Select the date interval or a specific
date range to organize your data.
Figure 10
2. If you select the date interval. Click and five intervals shows from the drop-down list. Click
button and your data will be presented at the interval you selected.
3. If you select a specific date range. Directly type the desired date or click to select the
desired date and the desired measurement interval.
4. Click
button to confirm. The data will be presented at the specific interval you
selected.
© 2008, 2009 Tremblay Harrison Inc.
13
13
Version 1.1 – 2009/07/07
EZ Health™ Oracle™ Diabetes Management System
Using the Graph Menu
In this menu, you can view the blood glucose data in a graph. Point your mouse to
to start
this feature.
Format of BG graph
Click BG Graph button, the screen shows as Figure 11.
Figure 11
Item
What it means
1. Date
X-axis reflects the unit you chose from “Grouping Unit”, including date,
time, day and measurement interval.
2. Glucose (mmol/L)
Y-axis shows the glucose unit you chose from “Software setting”.
3. Data point
The red dot “●” stands for the individual glucose readings.
4. Data average point
The blue square “” stands for the average of individual glucose readings
in each column.
5. Data information
Point to the dot and data information displays. The data information will
display two boxes, one box for date and time, another for the blood
glucose value.
6. Target range area
Gray area reflects the glucose level you set in “Personal setting”.
7. Out of target area
Appears in light yellow color. It reflects the range beyond target you set.
© 2008, 2009 Tremblay Harrison Inc.
14
14
Version 1.1 – 2009/07/07
EZ Health™ Oracle™ Diabetes Management System
Construct your BG graph
1. Click BG Graph. Select the date interval or a specific date range to organize your data
(Figure12).
Figure 12
2. If you select the date interval. Click and five intervals show in the drop-down list. Select the
desired one.
3. If you select a specific date range. Select a specific date by clicking or directly typing the
number. Then select measurement interval by clicking . Next, determine the grouping unit
by clicking , which will be reflected in the X-axis.
4. Click
button to confirm. The data will be presented at the specific interval you selected.
© 2008, 2009 Tremblay Harrison Inc.
15
15
Version 1.1 – 2009/07/07
EZ Health™ Oracle™ Diabetes Management System
Using the Print Menu
In this menu, you can print out the reports according to the measurement interval you selected.
Point to
to start this feature.
1. Click the Print Data (BG) button and the screen shows as Figure 13. Select the date interval
or a specific date range at first.
Figure 13
2. If you select the date interval. Click and five intervals show in the drop-down list. Select the
desired one.
3. If you select a specific date range. Click and select the desired date, or directly typing the
number. Select the measurement interval. Click and 8 intervals show in the drop-down list.
Select the desired one.
4. The Report name is set as a default by the program. Select the grouping unit by clicking .
5. Click
button to confirm. The blood glucose report shows and presents according to
the options you selected.
6. Click
(from the toolbar in the top) to print out the report.
Note:
1. You cannot save the Blood glucose report in your PC. This report is only for printing.
2. This report does not provide treatment recommendations. Before determining and using this
report, please consult your Health Care Professional.
© 2008, 2009 Tremblay Harrison Inc.
16
16
Version 1.1 – 2009/07/07