1
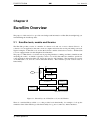
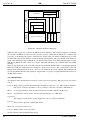
EuroSim Mk4.0
Owner’s Manual
National
Aerospace
Laboratory NLR
iss: 4 rev: 0
OM
FSS-EFO-TN-530
Summary
EuroSim Mk4.0 is an engineering simulator to support the design, development and verification of space
(sub) systems defined by ESA programmes of various scales. The facility provides a reconfigurable
real-time execution environment with the possibility of man-in-the-loop and/or hardware-in-the-loop
additions.
This document specifies the install procedure and hints to maintain the EuroSim installation.
c Copyright Dutch Space BV
All rights reserved. Disclosure to third parties of this document or any part thereof, or the use of any
information contained therein for purposes other than provided for by this document, is not permitted,
except with the prior and express written permission of Dutch Space BV, PO Box 32070, 2303 DB,
Leiden, The Netherlands.
ii
c Dutch Space BV
OM
FSS-EFO-TN-530
iss: 4 rev: 0
Revision Record
Issue
Revision
1
Date
Reason for change
1997-Apr-14
document creation
1
1
1997-May-02
update after internal review
1
2
1997-Jun-02
update for SPR-1721
1
3
1997-Jun-25
update for SPR-1771, SPR-1783 and
Changes
SPR-1803
1
4
1999-Nov-18
update for IRIX 6.5 port
2
0
2000-Mar-03
official EuroSim Mk2 release
2
1
2000-May-2
Mk2rev1 release: added Appendix D:
EuroSim RTI: HLA extension
2
2
2000-Oct-6
Mk2rev2 release: fixed SPR-1830, add
installation dependency a2ps, add
installation for Linux version
3
0
2002-May-14
EuroSim Mk3 release
3
1
2003-Sep-12
EuroSim Mk3.1 release
3
2
2004-Oct-08
EuroSim Mk3.2 release
4
0
2006-Feb-23
EuroSim Mk4.0 release
Updated requirements.
This document replaces two other documents:
• EuroSim Installation Guide (ING), FSS-EFO-TN-460
• EuroSim Installation Verification Procedure (IVP), FSS-EFO-PLN-513
These documents are consequently discontinued.
c Dutch Space BV
iii
iss: 4 rev: 0
iv
OM
FSS-EFO-TN-530
c Dutch Space BV
OM
FSS-EFO-TN-530
iss: 4 rev: 0
Contents
1
.
.
.
.
.
.
.
.
.
.
.
.
.
.
.
.
.
.
.
.
.
.
.
.
.
.
.
.
.
.
.
.
.
.
.
.
.
.
.
.
.
.
.
.
.
.
.
.
.
.
.
.
.
.
.
.
.
.
.
.
.
.
.
.
.
.
.
.
.
.
.
.
.
.
.
.
.
.
.
.
.
.
.
.
.
.
.
.
.
.
.
.
.
.
.
.
.
.
.
.
.
.
.
.
.
.
.
.
.
.
.
.
.
.
.
.
.
.
.
.
.
.
.
.
.
.
.
.
.
.
.
.
.
.
.
.
.
.
.
.
1
1
1
1
1
2
EuroSim Overview
2.1 EuroSim tools, models and libraries .
2.2 EuroSim users and projects . . . . . .
2.3 EuroSim licenses and daemon esimd
2.4 Lay-out of EuroSim installation . . .
2.5 EuroSim environment variables . . . .
2.6 EuroSim user’s files . . . . . . . . . .
.
.
.
.
.
.
.
.
.
.
.
.
.
.
.
.
.
.
.
.
.
.
.
.
.
.
.
.
.
.
.
.
.
.
.
.
.
.
.
.
.
.
.
.
.
.
.
.
.
.
.
.
.
.
.
.
.
.
.
.
.
.
.
.
.
.
.
.
.
.
.
.
.
.
.
.
.
.
.
.
.
.
.
.
.
.
.
.
.
.
.
.
.
.
.
.
.
.
.
.
.
.
.
.
.
.
.
.
.
.
.
.
.
.
.
.
.
.
.
.
.
.
.
.
.
.
.
.
.
.
.
.
.
.
.
.
.
.
.
.
.
.
.
.
.
.
.
.
.
.
.
.
.
.
.
.
.
.
.
.
.
.
5
5
6
6
7
8
8
3
Pre-Installation (system requirements)
3.1 SGI IRIX . . . . . . . . . . . . . . . . . . . . . . . . . . . . . . . . . . . . . . . . . .
3.2 i386 Linux . . . . . . . . . . . . . . . . . . . . . . . . . . . . . . . . . . . . . . . . . .
3.3 Windows NT . . . . . . . . . . . . . . . . . . . . . . . . . . . . . . . . . . . . . . . .
11
11
12
12
4
Installation & Customization
4.1 EuroSim installation procedure for IRIX . . . . . . . .
4.2 EuroSim installation procedure for Linux (not Debian)
4.3 EuroSim installation procedure for Debian Linux . . .
4.4 EuroSim installation procedure for Windows NT . . .
4.5 Starting the EuroSim daemon under IRIX . . . . . . .
4.6 Starting the EuroSim daemon under Linux . . . . . . .
4.7 Starting the EuroSim daemon under Windows NT . . .
.
.
.
.
.
.
.
15
15
18
20
21
21
22
23
.
.
.
.
25
25
26
28
28
6
EuroSim Projects & Users
6.1 Adding a EuroSim user . . . . . . . . . . . . . . . . . . . . . . . . . . . . . . . . . . .
6.2 Adding a EuroSim project . . . . . . . . . . . . . . . . . . . . . . . . . . . . . . . . .
6.3 EuroSim repository . . . . . . . . . . . . . . . . . . . . . . . . . . . . . . . . . . . . .
35
35
35
36
7
System Problems
37
A Source Code Listings
39
2
5
Introduction
1.1 Purpose . . . . . . . . . . . . . .
1.2 Audience . . . . . . . . . . . . .
1.3 Scope . . . . . . . . . . . . . . .
1.4 Document Structure and Notation
1.5 Abbreviations . . . . . . . . . . .
.
.
.
.
.
Installation Verification Procedure
5.1 IRIX . . . . . . . . . . . . . . . . . . . . . . . . . . .
5.2 Linux . . . . . . . . . . . . . . . . . . . . . . . . . .
5.3 Windows . . . . . . . . . . . . . . . . . . . . . . . .
5.4 Exercise a number of the EuroSim tools/functionalities
c Dutch Space BV
.
.
.
.
.
.
.
.
.
.
.
.
.
.
.
.
.
.
.
.
.
.
.
.
.
.
.
.
.
.
.
.
.
.
.
.
.
.
.
.
.
.
.
.
.
.
.
.
.
.
.
.
.
.
.
.
.
.
.
.
.
.
.
.
.
.
.
.
.
.
.
.
.
.
.
.
.
.
.
.
.
.
.
.
.
.
.
.
.
.
.
.
.
.
.
.
.
.
.
.
.
.
.
.
.
.
.
.
.
.
.
.
.
.
.
.
.
.
.
.
.
.
.
.
.
.
.
.
.
.
.
.
.
.
.
.
.
.
.
.
.
.
.
.
.
.
.
.
.
.
.
.
.
.
.
.
.
.
.
.
.
.
.
.
.
.
.
.
.
.
.
.
.
.
.
.
.
.
.
.
.
.
.
.
.
.
.
v
iss: 4 rev: 0
FSS-EFO-TN-530
B EuroSim Software Problem Reporting System
43
C EuroSim RTI: HLA extension
47
Bibliography
vi
OM
49
c Dutch Space BV
FSS-EFO-TN-530
OM
iss: 4 rev: 0
Chapter 1
Introduction
1.1
Purpose
The purpose of this document is twofold:
1. Specify the procedure to install EuroSim on a target system.
2. Provide some guidelines that might help the EuroSim facility manager to maintain EuroSim in an
operational state.
1.2
Audience
This document is written for the EuroSim facility manager. The facility manager will be considered
the owner of the EuroSim installation, and hence will also be referred to—for brevity—as owner. It is
assumed that the facility manager is also the (computer) system administrator and thus has root privileges.
1.3
Scope
This document applies to EuroSim Mk4.0. It contains information on how to install EuroSim and to
keep it in an operational state. For information on how to use EuroSim, one is referred to the EuroSim
Software User Manual [SUM05]. For information pertaining to the latest release of EuroSim, please
consult the EuroSim Software Release Notes [SRN05].
1.4
Document Structure and Notation
This document is laid-out as follows:
Introduction
Purpose of present document and references to other documents.
EuroSim Overview
Short overview of EuroSim in terms of environment variables, processes, files and directories
that might help the owner to maintain the installation. It is not intended to provide a full file
list, but only a description of the more important files and their use.
Pre-Installation
Prerequisites for the EuroSim installation: machine types, disk space, other software required,
saving user data.
Installation & Customization
Procedure how to install and customize EuroSim.
Installation Verification Procedure
How to verify correct installation.
c Dutch Space BV
1
OM
iss: 4 rev: 0
FSS-EFO-TN-530
EuroSim projects and users
Some example strategies will be provided how to set up EuroSim projects, users and repositories.
System Problems
Suggestions for solutions in case of problems (log files, FAQ, SPR, helpdesk).
Document references are given with a mnemonic between square brackets, like [SUM05]; these mnemonics are listed in the bibliography on page 49.
For the procedures described in this document, the following notation is used:
Type string
Type ‘string’ at UNIX shell prompt using keyboard.
Choose a:b:c
Choose menu item ‘c’ from sub-menu ‘b’ from menubar option ‘a’, using
mouse.
Select item
Select ‘item’ (usually an icon) using mouse.
Press button
Press button called ‘button’ with mouse.
Literal text
Literal text is written in Courier (monospaced) font.
1.5
2
Abbreviations
Abbreviation
Description
ANSI
American National Standardization Institute
API
Application Programming Interface
APT
Advanced Package Tool
ASAP
As Soon As Possible
BV
Besloten Vennootschap
EFO
EuroSim Follow-On
ESA
European Space Agency
ESTEC
European Space Technology Centre
F77
Fortran 77
FAQ
Frequently Asked Questions
FORTRAN
Formula Translator
DS
Dutch Space
GNAT
GNU
GNU
Not UNIX
GUI
Graphical User Interface
HTML
Hyper Text Mark-up Language
IRIX
SGI
IVP
Installation Verification Procedure
MB
Mouse Button
MB1
Left Mouse Button
MB2
Middle Mouse Button
MB3
Right Mouse Button
MIF
Maker Interchange Format
Ada Translator
version of UNIX
c Dutch Space BV
OM
FSS-EFO-TN-530
Abbreviation
Description
NIVR
Nederlands Instituut voor Vliegtuig en Ruimtevaartontwikkeling
NLR
Nationaal Lucht- en Ruimtevaart Laboratorium
PSS05
ESA’s
RAM
Random Access Memory
RCS
Revision Control System
ROM
Rough Order of Magnitude
SGI
Silicon Graphics Inc.
SPR
Software Problem Report
SR
System Requirement
SRN
Software Release Note
SUM
Software User Manual
SWRB
SoftWare Review Board
TBW
To Be Written
TC
Tele Command
TM
Telemetry
TN
Technical Note
URL
Universal Resource Locator
WWW
World Wide Web
c Dutch Space BV
iss: 4 rev: 0
Software Engineering Standard
3
iss: 4 rev: 0
4
OM
FSS-EFO-TN-530
c Dutch Space BV
OM
FSS-EFO-TN-530
iss: 4 rev: 0
Chapter 2
EuroSim Overview
The purpose of this section is to provide some background information on EuroSim, that might help you
in maintaining the installed product.
2.1
EuroSim tools, models and libraries
The EuroSim product consists of a number of software tools and one or more software libraries. A
software tool is an application, that runs on a host computer and assists the user in performing some task.
Typical examples of EuroSim tools are the Model Editor and the Simulation Controller. All EuroSim
tools are equipped with a modern Graphical User Interface.
The purpose of EuroSim is to assist the user in preparing simulators, running (real-time) simulations and
analyzing the results. A simulator typically consists of a model, that makes the simulator specific for
some application and an invariant part, that is the same for each simulator. The invariant part consists
of the EuroSim tools, and one or more EuroSim libraries. These libraries provide a whole suite of
functionality.
Users
Hardware
in-the-loop
EuroSim
Tools
GUI
API
Application
Model SW
EuroSim
SW Libraries
Operating System &
Device Drivers
Man
in-the-loop
Computer Hardware
Configurable
Operator Deck
Client/Server Architecture
Figure 2.1: General lay-out of EuroSim: tools, model, libraries
There is a standard library called esim, that provides basic functionality, for example to look up the
simulation time. Other libraries provide functionality for e.g. RS232, MIL1553, TM/TC interfaces.
c Dutch Space BV
5
OM
iss: 4 rev: 0
2.2
FSS-EFO-TN-530
EuroSim users and projects
The EuroSim users are the people on your system, using the EuroSim tooling to prepare, run and analyze
simulations. Users can cooperate in a EuroSim simulation project. A EuroSim project consists of:
• A description.
• A directory where the files reside (also called the project root).
• A repository where the versioned files reside (for configuration control).
• A default model.
Project definitions can be kept in two places:
1. In a local EuroSim project description file. By setting the environment variable EFO_HOME, a
user can override the default EuroSim project file in $HOME/.eurosim. A local project file (and
there can be many of them) and the associated projects are managed by the user (see section 6.2).
He/she can define projects at a local level. Projects and users are protected against each other by
the normal OS protection mechanisms, which are respected by the EuroSim tooling.
2. In a system wide EuroSim project description file. This file is managed by you, the EuroSim
owner (also called facility manager). Users must set the EFO_HOME environment variable to the
directory with the system wide project file. You can use this file to create EuroSim projects and
allocate a working directory (i.e. disk storage) to them.
2.3
EuroSim licenses and daemon esimd
EuroSim simulators are started via the EuroSim daemon1 esimd. Through this daemon it is possible to
run a simulation not only on the local machine, but also on any other machine in the network that has
a EuroSim daemon running2 . To prepare a host computer for the purpose of real-time simulations, root
privileges are required: hence the EuroSim daemon will normally run with root privileges. Although the
daemon is started as root, and the simulation processes start off being owned by root when running realtime, this only takes as long as is needed to set things up. Non-real-time simulators are never run as root.
The root privileges are needed to isolate processors (daemon) and to run on these isolated processors
(simulator).
The EuroSim daemon also serves as a license manager. The EuroSim daemon can only run on hosts
listed in the EuroSim license file. All EuroSim tools will contact the EuroSim daemon to check whether
their host is listed in the license file. As the EuroSim tools can check for the daemon over the network,
the EuroSim daemon needs only to be installed on the host that will run the actual EuroSim simulation
processes; this host is called the simulation server. EuroSim tools can thus run on a host without a license
daemon, while simulations can only be run on a host that has EuroSim daemon running.
Three different license types are available for EuroSim:
User license
This is the standard license, that allows the user to use the EuroSim functionality for model
development, test preparation and execution (i.e. simulation) and test analysis.
Run-time license
This is a scaled down license, that allows the user to use the EuroSim functionality for test
preparation and execution (i.e. simulation) and test analysis. This requires the availability of a
ready-to-run EuroSim simulator, prepared by Dutch Space BV or anyone else with a EuroSim
user license.
1
2
6
Under Windows NT, esimd is run as a service.
Provided—of course—that that machine has equal access to your simulator files as the local machine, e.g. via NFS.
c Dutch Space BV
OM
FSS-EFO-TN-530
iss: 4 rev: 0
Developers license
This license allows the licensee to extend the EuroSim functionality and/or to integrate EuroSim
with other software products, by having access to the EuroSim object code, header files and
developers manual pages.
Your type of license is indicated on the EuroSim license agreement.
2.4
Lay-out of EuroSim installation
The directory structure under /usr/EuroSim (Windows NT: C:\Eurosim) is laid-out as follows.
Directory3
Contents
Typical/important file
Description
adainclude
Package
specifications for
Ada.
esim.ads
Ada package
specification for
esim library.
bin
All the EuroSim
executables.
esim
EuroSim entry
point.
etc
Miscellaneous files.
user.sh
Script that defines
the environment
variables needed.
EuroSim.licenses
License file.
SoftwareReleaseNote
Software release
note [SRN05].
include
The include files for
C and Fortran.
esim.h
C include for basic
EuroSim functions.
lib
All EuroSim tcl,
perl, python and
java libraries.
EuroSim shared
object libraries
(Linux).
tcl, perl, python, java
Tcl, perl, python
and java EuroSim
support.
lib32
EuroSim shared
object libraries
(IRIX).
libes.so
Library file of basic
EuroSim functions.
doc
EuroSim html and
pdf documentation.
OM.pdf, SUM.pdf
Owner’s Manual
and Software User’s
Manual.
man
The EuroSim
manual pages.
man1/esim.1
Manual page for
esim tool.
man3/esim.3
Manual page for
esim library.
Table 2.1: Lay-out of EuroSim installation (/usr/EuroSim directory)
3
Starting at /usr/EuroSim
c Dutch Space BV
7
OM
iss: 4 rev: 0
2.5
FSS-EFO-TN-530
EuroSim environment variables
For its correct operation, EuroSim depends on a number of environment variables. The most important
one is $EFOROOT, which has to point to where the EuroSim files are installed (i.e. /usr/EuroSim).
EFOROOT and related environment variables are set automatically by EuroSim when using Linux and
Windows. Under IRIX you have to set $EFOROOT yourself and source $EFOROOT/etc/user.(c)sh.
Name
Purpose
EFO_HOME
Optional. Points to the location of the EuroSim project file. If not set,
then $HOME/.eurosim is used.
LD_LIBRARYN32_PATH
Shared library search path for n32 (new 32-bit ABI) programs [IRIX
6.x].
MANPATH
This variable is extended with $EFOROOT/man, so that the EuroSim
manual pages can be found.
PATH
This variable is extended with $EFOROOT/bin, so that the EuroSim
executables can be found.
Table 2.2: Environment variables needed before starting EuroSim
When the above environment variables are set, EuroSim can be started by typing esim on the command line. After selecting a project and role, some more environment variables are set automatically by
EuroSim for that session. A complete list is given below for information.
Name
Purpose/meaning
PROJECTHOME
Home directory of the current project.
EFO_XTERM
The terminal emulation program (if not set xterm is used).
EFO_VC
The current configuration control system. Possible values are cadese
or cvs. If not set, then no configuration control is used.
EFO_SHAREDMEMSIZE
The shared memory size used by the simulator. By default 4 MB is
reserved. If more is needed then this environment variable should be set
with the required memory size in bytes.
EFO_STACKSIZE
The stack size reserved for each thread of the simulator. By default 128k
(IRIX) or 16k (Linux) is reserved. If more is needed then this
environment variable should be set with the required stack size in bytes.
Table 2.3: Environment variables used within EuroSim
Note: additionally, one can set the environment variable EFO_DAEMON to the host that runs the EuroSim
daemon, if that differs from the local host.
2.6
EuroSim user’s files
EuroSim will create and/or look for certain files in the user’s home and/or current working directory;
details are listed below.
8
c Dutch Space BV
OM
FSS-EFO-TN-530
iss: 4 rev: 0
Directory
Filename
Purpose
$HOME/.eurosim
projectmanagerrc
Contains the user preferences and
GUI settings for the Project
Manager.
modeleditorrc
Contains the user preferences and
GUI settings for the Model Editor.
scheduleeditorrc
Contains the user preferences and
GUI settings for the Schedule Editor.
simulationctrlrc
Contains the user preferences and
GUI settings for the Simulation
Controller.
testanalyzerrc
Contains the user preferences and
GUI settings for the Test Analyzer.
modeldescriptioneditorrc
Contains the user preferences and
GUI settings for the Model
Description Editor.
parameterexchangeeditorrc
Contains the user preferences and
GUI settings for the Parameter
Exchange Editor.
$EFO HOME
projects.db
By setting $EFO HOME to the
directory where projects.db
resides, one can override EuroSim’s
default project description file.
$PROJECTHOME
.cadeserc
This file defines the location of the
project’s repository for the Cadese
tooling.
Table 2.4: EuroSim user files
c Dutch Space BV
9
iss: 4 rev: 0
10
OM
FSS-EFO-TN-530
c Dutch Space BV
FSS-EFO-TN-530
OM
iss: 4 rev: 0
Chapter 3
Pre-Installation (system requirements)
The purpose of this section is to list the requirements to be met to allow EuroSim to be installed and run.
Some requirements are mandatory, while other are optional, depending on the user’s requirements for
the related EuroSim functionality. Optional requirements are clearly marked as such.
3.1
SGI IRIX
ReqID
Requirement
IR–1
Host computer shall be a Silicon Graphics
Indy, O2, Indigo, Challenge, Onyx or
Origin.
IR–2
Host operating system shall be IRIX
6.5.20m or better.
IR–3
Host RAM shall be 512 MB or more.
IR–4
Free disk space shall be 85 MB or more
Needed for EuroSim installation.
IR–5
Basic development system (C compiler and
linker) shall be available, version 7.3.
Not required for run-time license.
IR–6
F77 compiler shall be available, version 7.3.
Only required when using F77 sub-models.
IR–7
Ada environment ‘GNAT Ada95 v1.3’ shall
be available.
Only required when using Ada sub-models.
IR–8
PV-Wave, version 6.x shall be available.
Only required when using EuroSim’s
test-analysis functionality with the PV-Wave
back end.
IR–9
Gnuplot shall be available.
Only required when using EuroSim’s test
analysis functionality with the gnuplot back
end.
IR–10
FrameMaker version 4.x shall be available.
Only required when using Frame MIF file
for model documentation.
IR–11
NetScape version 4.07 or higher shall be
available.
Only required for on-line availability of the
EuroSim SUM.
c Dutch Space BV
Remarks
11
OM
iss: 4 rev: 0
3.2
i386 Linux
ReqID
Requirement
IR–1
Host computer shall be an Intel Pentium
compatible PC or better.
IR–2
Linux distribution shall be RedHat 8.0.
IR–3
Host RAM shall be 512 MB or more.
IR–4
Free disk space shall be 100 MB or more.
Needed for EuroSim installation.
IR–5
Basic development system (C compiler,
linker and make) shall be available.
Not required for run-time license part of
RedHat distribution.
IR–6
F77 compiler shall be available.
Part of Linux distribution. Only required
when using F77 sub-models.
IR–7
Ada compiler shall be available.
Part of Linux distribution. Only required
when using Ada sub-models.
IR–8
RCS shall be available.
Part of Linux distribution. Only required
when using configuration control with the
cadese backend.
IR–9
CVS shall be available.
Part of Linux distribution. Only required
when using configuration control with the
cvs backend.
IR–10
Perl 5.8.0 shall be available.
Part of Linux distribution. Only required
when using the batch utility.
IR–11
Readline 4.3 shall be available.
Part of Linux distribution. Only required
when using the batch utility.
IR–12
PV-Wave, version 6.x shall be available.
Only required when using EuroSim’s test
analysis functionality with the PV-Wave
back end.
IR–13
Gnuplot shall be available.
Part of Linux distribution. Only required
when using EuroSim’s test analysis
functionality with the gnuplot back end.
IR–14
FrameMaker version 4.x or higher shall be
available.
Only required when using Frame MIF file
for model documentation.
IR–15
Mozilla shall be available.
Part of Linux distribution. Only required for
on-line availability of the EuroSim SUM.
3.3
12
FSS-EFO-TN-530
Remarks
Packages for RedHat 7.3 (client libraries
only), RedHat 9.0, Fedora Core 1, 2, 3 and
4, SuSE 9.1 and 9.2 and Debian 3.1 are also
available. However, the EuroSim test
campaign is only performed for RedHat 8.0.
Windows NT
ReqID
Requirement
IR–1
Host computer shall be an Intel Pentium
compatible PC or better.
Remarks
c Dutch Space BV
FSS-EFO-TN-530
OM
ReqID
Requirement
IR–2
Operating System shall be either Windows
NT, Windows 2000 or Windows XP (SP 1 or
2).
IR–3
Host RAM shall be 512 MB or more.
IR–4
Free disk space shall be 500 MB or more.
c Dutch Space BV
iss: 4 rev: 0
Remarks
Needed for EuroSim and Cygwin
installation.
13
iss: 4 rev: 0
14
OM
FSS-EFO-TN-530
c Dutch Space BV
FSS-EFO-TN-530
OM
iss: 4 rev: 0
Chapter 4
Installation & Customization
This section lists—step by step—the procedure to install EuroSim on a computer system. This procedure
can be used for a first time installation, as well as for any subsequent installations, e.g. installing a new
version.
IMPORTANT NOTICE:
You might want to save the license file /usr/EuroSim/etc/EuroSim.licenses from an existing EuroSim installation.
4.1
EuroSim installation procedure for IRIX
Step
Description
4.1–1
Log in to the system as ‘root’.
4.1–2
Insert the EuroSim CD-ROM. After some time the CD-ROM is mounted automatically under
/CDROM.
4.1–3
You should have at least 180 MB free disk space in /usr. The main portion will be
installed in /usr/EuroSim.
4.1–4
Start the swmgr.
4.1–5
By default only the EuroSim base software is selected for installation. You will also see
various other packages selected for installation. These packages are required by EuroSim.
There are also three device drivers available for installation. Choose the driver for the
devices present in your computer.
4.1–6
If you want to use the r2hdf command which converts EuroSim recorder files into HDF5
data files, you also need to select the HDF5 package for installation.
4.1–7
Hit the start button to install the software. In case you have installed one of the device
drivers the system will need a reboot.
c Dutch Space BV
15
OM
iss: 4 rev: 0
FSS-EFO-TN-530
IMPORTANT NOTICE:
The following steps are only required if this is a first-time installation.
Step
Description
4.1–8
Edit /etc/services or NIS equivalent and add the following (depending on local
configuration you may of course use other port-numbers) ports:
esim-client-0
esim-client-1
esim-client-2
esim-client-3
esim-client-4
esim-client-5
esim-client-6
esim-client-7
esim-client-8
esim-client-9
4.1–9
4850/tcp
4851/tcp
4852/tcp
4853/tcp
4854/tcp
4855/tcp
4856/tcp
4857/tcp
4858/tcp
4859/tcp
Add the following line at the end of /var/sysgen/stune:
% the following setting removes the ‘‘must run’’ attribute
% from netproc threads which allows those threads to run
% anywhere, therefore removing the impact on real-time CPU’s
netthread_float = 1
4.1–10
Determine the pagesize of your system by running sysconf PAGESIZE. If the result is
4096 then add at the end of /var/sysgen/stune:
maxlkmem = 16384
If the result is 16384 then add at the end of /var/sysgen/stune:
maxlkmem = 4096
This value determines the maximum locked memory size: maxlkmem x pagesize =
maximum locked memory.
4.1–11
Add the following lines to /var/sysgen/system/irix.sm. Place them after a
paragraph mentioning this option. Add as many processors to the variable NOINTR as
there are in your machine minus the first processor (0). The example below is for a four
processor Origin 200.
NOINTR: 1 2 3
4.1–12
In case EuroSim will be configured for the use of external interrupt 1 the following variable
DEVICE_ADMIN has to be added to the above mentioned file, e.g. (check exact device
path!):
DEVICE_ADMIN: /hw/module/1/slot/MotherBoard/node/xtalk/8/pci/3 \
INTR_TARGET=/hw/cpunum/1
For external interrupt 2 add the following line (check exact device path!):
DEVICE_ADMIN: /hw/module/2/slot/MotherBoard/node/xtalk/8/pci/3 \
INTR_TARGET=/hw/cpunum/2
16
c Dutch Space BV
FSS-EFO-TN-530
OM
iss: 4 rev: 0
Step
Description
4.1–13
For the IRIG-B interface board add the following line for Origin 200 systems (check exact
device path!):
DEVICE_ADMIN: /hw/module/1/slot/MotherBoard/node/io/8/pci/5 \
INTR_TARGET=/hw/cpunum/1
For Origin 300 systems add the following lines (check exact device path):
DEVICE_ADMIN: /hw/module/001p02/Pbrick/xtalk/14/pci \
INTR_TARGET=/hw/cpunum/1
DEVICE_ADMIN: /hw/module/001p02/Pbrick/xtalk/14/pci/1/tfp \
INTR_TARGET=/hw/cpunum/1
4.1–14
For the PCI-VME bridge add the following line for Origin 200 systems (check exact device
path!):
DEVICE_ADMIN: /hw/module/2/slot/MotherBoard/node/io/8/pci/5 \
INTR_TARGET=/hw/cpunum/2
For Origin 300 systems add the following lines (check exact device path):
DEVICE_ADMIN: /hw/module/001p02/Pbrick/xtalk/12/pci \
INTR_TARGET=/hw/cpunum/2
DEVICE_ADMIN: /hw/module/001p02/Pbrick/xtalk/12/pci/1 \
INTR_TARGET=/hw/cpunum/2
4.1–15
For the VMIC Reflective Memory card add the following line for Origin 200 systems
(check exact device path!):
DEVICE_ADMIN: /hw/module/2/slot/MotherBoard/node/xtalk/8/pci/7 \
INTR_TARGET=/hw/cpunum/2
For Origin 300 systems add the following lines (check exact device path):
DEVICE_ADMIN: /hw/module/001p02/Pbrick/xtalk/13/pci \
INTR_TARGET=/hw/cpunum/2
DEVICE_ADMIN: /hw/module/001p02/Pbrick/xtalk/13/pci/1/rfm \
INTR_TARGET=/hw/cpunum/2
4.1–16
To activate the new stune variables, reboot the system twice, or run
/etc/autoconfig and reboot once.
c Dutch Space BV
17
OM
iss: 4 rev: 0
4.2
FSS-EFO-TN-530
EuroSim installation procedure for Linux (not Debian)
If you are installing EuroSim on a Debian distribution, then go to section 4.3.
Step
Description
4.2–1
Log in to the system as ‘root’.
4.2–2
Insert and mount the EuroSim CD-ROM.
4.2–3
Change directory to the linux subdirectory on the CD-ROM.
4.2–4
You should have at least 100 MB free disk space in /usr. The main portion will be
installed in /usr/EuroSim.
4.2–5
Install Linux kernel with POSIX timer patch. (Only required for 2.4 kernel based
distributions. If you have a Linux 2.6 kernel based distribution then go to step 4.2–9.)
rpm -ivh kernel-2.4.20-18.timer.i386.rpm
Several kernel versions are available. Choose the one that matches your hardware best.
4.2–6
If you are using the Grub bootloader, then go to step 4.2–9. Add the lines below to
/etc/lilo.conf and replace /dev/hda5 with your boot disk/partition:
image=/boot/vmlinuz-2.4.20-18.timer
label=linux-timer
initrd=/boot/initrd-2.4.20-18.timer.img
read-only
root=/dev/hda5
4.2–7
Optional: to make this kernel the default kernel add/replace the line with default in
/etc/lilo.conf:
default=linux-timer
4.2–8
Run lilo to make the kernel accessible from the boot menu.
4.2–9
Install hdf5 package
rpm -Uvh hdf5-1.2.2-1.i386.rpm
4.2–10
Install gnuplot package from Linux installation CD (if not already installed by default).
Actual version number may differ from the example below depending on the used
distribution.
rpm -Uvh gnuplot-4.0.0-4.i386.rpm
4.2–11
Install expect package from Linux installation CD (if not already installed by default).
Actual version number may differ from the example below depending on the used
distribution.
rpm -Uvh expect-5.42.1-1.i386.rpm
18
c Dutch Space BV
FSS-EFO-TN-530
OM
iss: 4 rev: 0
Step
Description
4.2–12
Install qt. This is not required if you install the EuroSim client package only. This is only
required on the following distributions: RedHat 8.0, RedHat 9, Fedora Core 1. The
EuroSim GUIs require a newer qt version than is shipped with RedHat. The new qt must be
installed alongside the existing qt. So don’t use the -U option when running rpm.
rpm -ivh qt-3.3.2-0.i386.rpm
4.2–13
Install make package. This is only required on SUSE Linux 9.1 and SUSE Linux 9.2.
rpm -Uvh --oldpackage make-3.80-5.i386.rpm
4.2–14
Install EuroSim
rpm -Uvh eurosim-4.0-1.rh8.i386.rpm
If you only need the client libraries, then instead of installing the
eurosim-4.0-1.rh8.i386.rpm you can install
eurosim-client-4.0-1.rh8.i386.rpm.
Replace rh8 by rh73 (RedHat 7.3), rh9 (RedHat 9), fc1 (Fedora Core 1), fc2 (Fedora
Core 2), fc3 (Fedora Core 3), fc4 (Fedora Core 4), suse91 (SUSE Linux 9.1) or
suse92 (SUSE Linux 9.2) when installing on the corresponding Linux distribution.
4.2–15
Install EuroSim batch utility
rpm -Uvh perl-*.rpm
4.2–16
Reboot with the new kernel. This is only required if you have installed the special kernel
before.
reboot
When the lilo or grub prompt appears select the linux-timer kernel.
To prevent booting the wrong kernel for EuroSim perform step 4.2–7. This makes the
patched kernel the default. No specific actions have to be performed at boot time.
c Dutch Space BV
19
OM
iss: 4 rev: 0
4.3
FSS-EFO-TN-530
EuroSim installation procedure for Debian Linux
If you are not installing EuroSim on a Debian distribution, then go to section 4.2.
Step
Description
4.3–1
You should have at least 100 MB free disk space in /usr. The main portion will be
installed in /usr/EuroSim.
4.3–2
Log in to the system as ‘root’.
4.3–3
Insert and mount the EuroSim CD-ROM.
4.3–4
Modify the /etc/apt/sources.list file such that the Packages.gz file can be
found on the EuroSim CD-ROM. Your /etc/apt/sources.list should look
something like this (last line points to the CD-ROM).
deb http://ftp.nl.debian.org/debian/ stable main
deb-src http://ftp.nl.debian.org/debian/ stable main
deb http://security.debian.org/ stable/updates main
deb file:///mnt/cdrom/linux /
4.3–5
Update the APT database
apt-get update
4.3–6
Install the EuroSim package
apt-get install eurosim
If you only need the client libraries, then instead of installing the eurosim package you
can install the eurosim-client package.
You will be informed about missing packages that EuroSim depends on. They are
automatically downloaded and installed.
4.3–7
Optionally install Perl support for EuroSim
apt-get install perl-eurosim
20
c Dutch Space BV
FSS-EFO-TN-530
4.4
OM
iss: 4 rev: 0
EuroSim installation procedure for Windows NT
Step
Description
4.4–1
Ensure that you have a valid license file EuroSim.licenses available (f.i. on a diskette).
4.4–2
Log in to the system as ‘Administrator’ (or as a user with Administrator privileges).
4.4–3
Insert the EuroSim CD-ROM.
4.4–4
Run the setup program. (See document Installation notes in the windows directory on the
EuroSim CD-ROM for details.)
4.5
Starting the EuroSim daemon under IRIX
A license key is required to start the EuroSim daemon. Normally, the key for your system will already
be included in the license file /usr/EuroSim/etc/EuroSim.licenses.
If you need a new licenses key, you can mail that request to [email protected], providing
the following info:
1. The reference number of your EuroSim license agreement.
2. Your computer’s name, type and OS version.
3. All the first non-zero characters (letters, digits) of the output of the sysinfo command.
Now, proceed as follows (still as user ‘root’, and assuming this is a first-time installation).
Step
Description
4.5–1
Append your license key (a string starting with EuroSim) to the license file:
# cat >> /usr/EuroSim/etc/EuroSim.licenses
Usually this step is not needed.
4.5–2
Do:
# chkconfig -f esim on
to make sure the daemon will start-up when told to do so.
4.5–3
Start the daemon:
# /etc/init.d/esim start
To stop the daemon again you should do:
# /etc/init.d/esim stop
When only an EuroSim update has been installed, it is wise to stop and start the EuroSim daemon
(step 4.5–3), to make sure that the running esimd is compatible with the new version of EuroSim.
As delivered, the EuroSim daemon will write simulator messages1 to esimd.‘hostname‘.log in
directory /var/adm. You can configure that by editing the file /etc/init.d/esim. By leaving out
the -l switch altogether, the EuroSim daemon will write its messages to the system’s console.
To prevent the daemon log file from growing out of bounds, you may want to add an entry to your
system’s crontab to cycle it daily, weekly or monthly. For example, adding:
1
The daemon writes its own messages to syslog, and routes the messages from started simulators to the indicated log file.
So, what is in the log file, is in fact, output from EuroSim simulators.
c Dutch Space BV
21
OM
iss: 4 rev: 0
FSS-EFO-TN-530
0 5 * * * /usr/EuroSim/etc/esim.cron
to your root’s crontab will cycle the contents of the file overnight. The script will keep 5 older log files.
For more information on the EuroSim daemon, see man esimd.
4.6
Starting the EuroSim daemon under Linux
A license key is required to start the EuroSim daemon. Normally, the key for your system will already
be included in the license file /usr/EuroSim/etc/EuroSim.licenses.
If you need a new licenses key, you can mail that request to [email protected], providing
the following info:
1. The reference number of your EuroSim license agreement.
2. Your computer’s name, type and OS version.
3. The first line of the output of the sysinfo command. The information produced uses the MAC
address of the first Ethernet card present in the system. If there is no Ethernet card present in your
system, you cannot get a license for EuroSim.
Now, proceed as follows (still as user ‘root’, and assuming this is a first-time installation).
Step
Description
4.6–1
Append your license key (a string starting with EuroSim) to the license file:
cat >> /usr/EuroSim/etc/EuroSim.licenses
Usually this step is not needed.
4.6–2
Start the daemon:
# /etc/init.d/esim start
To stop the daemon again you should do:
# /etc/init.d/esim stop
When only an EuroSim update has been installed, it is wise to stop and start the EuroSim daemon
(step 4.6–2), to make sure that the running esimd is compatible with the new version of EuroSim.
As delivered, the EuroSim daemon will write simulator messages2 to esimd.‘hostname‘.log in
directory /var/log. You can configure that by editing the file /etc/init.d/esim. By leaving out the -l switch altogether, the EuroSim daemon will write its messages to the system log file
/var/log/messages. Not all messages are logged however. If you want to see all messages you
must make a minor modification to the file /etc/syslog.conf. Just add ;local0.* to the list of
filters which write to /var/log/messages. The line would then look something like:
*.info;mail.none;authpriv.none;cron.none;local0.* /var/log/messages
To prevent the daemon log file from growing out of bounds, you may want to add an entry to your
system’s crontab to cycle it daily, weekly or monthly. For example, adding:
0 5 * * * /usr/EuroSim/etc/esim.cron
to your root’s crontab will cycle the contents of the file overnight. The script will keep 5 older log files.
For more information on the EuroSim daemon, see man esimd.
2
The daemon writes its own messages to syslog, and routes the messages from started simulators to the indicated log file.
So, what is in the log file, is in fact, output from EuroSim simulators.
22
c Dutch Space BV
FSS-EFO-TN-530
4.7
OM
iss: 4 rev: 0
Starting the EuroSim daemon under Windows NT
A license key is required to start the EuroSim daemon. Normally, the key for your system will already
be included in the license file EuroSim/etc/EuroSim.licenses (the EuroSim installer program
will ask you for a license file).
If you need a new licenses key, you can mail that request to [email protected], providing
the following info:
1. The reference number of your EuroSim license agreement.
2. Your computer’s name, type and OS version.
3. The first line of the output of the $EFOROOT/bin/sysinfo command. The information produced uses the MAC address of the first Ethernet card present in the system. If there is no Ethernet
card present in your system, you cannot get a license for EuroSim.
In the event of license prolongation, proceed as follows:
Step
Description
4.7–1
Append your license key (a string starting with EuroSim) to the license file
EuroSim.licenses.
4.7–2
Stop the EuroSim daemon. Open a command shell and type the following command
followed by the Enter key:
net stop esimd
4.7–3
Start the EuroSim daemon. Open a command shell and type the following command
followed by the Enter key:
net start esimd
The EuroSim daemon is implemented as a Windows service. As an alternative to typing the net start and
net stop commands, you can open the Service Control Manager (SCM) from the Windows Control Panel
and start/stop the EuroSim daemon from there. It’s name is esimd.
The EuroSim daemon writes event messages to the application event log. Use the Windows Event Log
program to view them.
c Dutch Space BV
23
iss: 4 rev: 0
24
OM
FSS-EFO-TN-530
c Dutch Space BV
OM
FSS-EFO-TN-530
iss: 4 rev: 0
Chapter 5
Installation Verification Procedure
In order to write down the procedures as compactly as possible, the procedure steps are often specified
at a higher level of abstraction. E.g. instead of saying ‘Choose Create:New:Project and type project
my_project and then press OK’ it is simply written ‘Create new project my_project’. Consult
[SUM05] for details.
Optional steps are indicated by a procedure step number in a grey field; the condition is listed directly
above that grey field.
5.1
5.1.1
IRIX
Host system
Purpose: verify that host is compatible with EuroSim.
Step
Procedure
5.1–1
Inspect
make.
5.1–2
Note processor type (use
hinv).
Should be MIPS R4xxx for Indy, Indigo, Challenge
or Onyx. Should be MIPS R5000 or R10000 for O2.
Should be MIPS R10000 for Origin 200, Origin
2000 or Onyx 2. Should be MIPS R14000 for Origin
300.
5.1–3
Note memory size (use
hinv).
Item should be ≥512 MB.
5.1–4
Note free disk space (use
df .).
Free disk space should be ≥100 MB.
5.1.2
Expected Result
host
system
Checked
Should be a Silicon Graphics Indy, Indigo,
Challenge, Onyx or Origin.
Host operating system
Purpose: verify that host’s operating system is compatible with EuroSim.
Step
Procedure
Expected Result
5.1–5
Inspect
operating
system
(use
/bin/uname -R).
Should be Silicon Graphics IRIX version 6.5.20m.
5.1.3
Checked
Third party software
Purpose: verify required third party software; note any exceptions.
c Dutch Space BV
25
OM
iss: 4 rev: 0
FSS-EFO-TN-530
Step
Procedure
Remark
Result
5.1–6
Check basic
development system is
available (use
showprods)
Not required for
EuroSim run-time
license.
c fe (C Front-end, 7.4),
c dev (C Headers and
Libraries, 7.4),
compiler eoe (IRIX
Standard Execution
Environment (Base
Compiler Headers and
Libraries, 7.4))
installed.
5.1–7
Check if the F77
compiler is available.
Optional.
ftn77 fe (Fortran 77
Front-end, 7.4), f77 dev
(Fortran 77 Headers and
Libraries, 7.4) installed.
5.1–8
Check if the Ada
compiler is available.
Optional.
gnat dev (GNAT Ada95
v1.3), gnat eoe (GNAT
Ada 95 v1.3) installed.
5.1–9
Check if the C++
compiler is available.
Optional.
c++ fe (C++ Front-end,
7.4), c++ eoe (Standard
Execution Environment
(C++ Headers and
Libraries, 7.4)),
c++ dev (C++ Headers
and Libraries, 7.4)
installed.
5.1–10
Check if the RCS
utilities are available.
Optional.
eoe.sw.rcs (Revision
Control System
Utilities) installed.
5.1–11
Check if the CVS
utilities are available.
Optional.
fw cvs (cvs-1.11.6
Concurrent Versions
System) installed.
5.1–12
Check if PV-Wave is
available.
Optional.
Version 6.x installed.
5.1–13
Check if FrameMaker is
available.
Optional.
Version 4.x installed.
5.1–14
Check if Netscape is
available.
Optional.
Version 4.72 or higher
installed.
5.2
5.2.1
Checked
Linux
Host system
Purpose: verify that host is compatible with EuroSim.
26
Step
Procedure
Expected Result
5.2–1
Note processor type (use
hinv).
Should be Intel Pentium or better.
5.2–2
Note memory size (use
hinv).
Should be ≥512 MB.
Checked
c Dutch Space BV
OM
FSS-EFO-TN-530
iss: 4 rev: 0
Step
Procedure
Expected Result
5.2–3
Note free disk space (use
df .).
Free disk space should be ≥100 MB.
5.2.2
Checked
Host operating system
Purpose: verify that host’s operating system is compatible with EuroSim.
Step
Procedure
Expected Result
5.2–4
Inspect operating system
(use uname -sr).
Should be Linux 2.4.20-18.timer or Linux 2.6.*.
5.2.3
Checked
Third party software
Purpose: verify required third party software; note any exceptions.
Step
Procedure
Remark
Result
5.2–5
Check basic
development system is
available (use
rpm -qa for RedHat
Linux, Fedora Core and
SUSE Linux, use
dpkg -l for Debian
Linux).
Not required for
EuroSim run-time
license.
gcc-3.2-7 or higher
installed.
5.2–6
Check if the F77
compiler is available.
Optional.
gcc-g77-3.2-7 or higher
installed. Fedora Core 4
requires
compat-gcc-32-g77-3.2
5.2–7
Check if the Ada
compiler is available.
Optional.
gcc-gnat-3.2-7 or higher
installed.
5.2–8
Check if the C++
compiler is available.
Optional.
gcc-c++-3.2-7 or higher
installed.
5.2–9
Check if the RCS
utilities are available.
Optional.
rcs-5.7-18 or higher
installed.
5.2–10
Check if the CVS
utilities are available.
Optional.
cvs-1.11.5-2 or higher
installed.
5.2–11
Check if PV-Wave is
available.
Optional.
Version 6.x installed.
5.2–12
Check if FrameMaker is
available.
Optional.
Version 4.x installed.
5.2–13
Check if Mozilla is
available.
Optional.
Version 1.0 or higher
installed.
c Dutch Space BV
Checked
27
OM
iss: 4 rev: 0
5.3
5.3.1
FSS-EFO-TN-530
Windows
Host system
Purpose: verify that host is compatible with EuroSim.
Use Control Panel:System to get system information.
Step
Procedure
Expected Result
5.3–1
Note processor type.
Should be Intel Pentium or better.
5.3–2
Note memory size.
Should be ≥512 MB.
5.3–3
Note free disk space.
Free disk space should be ≥500 MB.
5.3.2
Checked
Host operating system
Purpose: verify that host’s operating system is compatible with EuroSim.
Step
Procedure
Expected Result
5.3–4
Inspect operating system.
Should be Windows NT (≥4.0), Windows 2000 or
Windows XP.
5.4
Checked
Exercise a number of the EuroSim tools/functionalities
Purpose: test proper functioning of EuroSim on (new) host.
Step
Tool
5.4–1
Procedure
Result
Checked
Prepare user environment as
described in section 6.1
Environment variables set.
5.4–2
Project
Manager
Linux/UNIX: type esim;
Windows: double click
desktop icon
Project Manager tool appears.
5.4–3
Project
Manager
Choose Help:About
About dialog appears with
version number.
5.4–4
Project
Manager
Create new project IVP.
Project IVP appears in the
Project Manager.
Only perform step 5.4–5 if Netscape or Mozilla1 is needed/installed:
Step
Tool
Procedure
Result
5.4–5
Netscape or
Mozilla
Choose Help:Contents in the
Project Manager.
Index to all on-line
documentation appears on
screen.
5.4–6
Project
Manager
Select project IVP and press
the Model Editor button
Model Editor starts with empty
canvas.
1
28
Checked
On Windows the viewer associated with .html documents will be started
c Dutch Space BV
OM
FSS-EFO-TN-530
iss: 4 rev: 0
Step
Tool
Procedure
Result
5.4–7
Model
Editor
Attach file node ansi.c and
edit file to insert code as per
Appendix A. View file
(Edit:View Source) and save
model as IVP.model.
Model hierarchy extended with
file node; source code editor
starts correctly; source code
viewer starts correctly.
5.4–8
Model
Editor
Expand node ansi.c.
Variables and procedures that
are candidates for the API are
shown.
5.4–9
Model
Editor
API-fy variables c_y,
c_ampl, c_freq and entry
point ansi_c by checking the
corresponding checkboxes in
the listview.
Selected variables appear with
checkmark.
Checked
Only perform step 5.4–10 if Fortran is needed/installed:
Step
Tool
Procedure
Result
5.4–10
Model
Editor
Make file node fortran.f.
Insert code as per Appendix A
(be sure to insert 6 spaces at
the beginning of each line
according to the Fortran 77
syntax rules). Select Tools:Set
Build Options and select
Linux2 Fortran runtime
libraries in the Support tab.
Select OK. API-fy variables.
API-fiable variables and
procedures are shown.
Selected variables appear with
checkmark.
Checked
Only perform step 5.4–11 if Ada is needed/installed:
Step
Tool
Procedure
Result
5.4–11
Model
Editor
Make Org node ada and
attach file nodes mada.adb3
and mada.ads. Insert code
as per Appendix A, but do not
copy/paste it from HTML
browser or PDF viewer.
Instead, copy them from
$EFOROOT/src/IVP (note:
including the API header).
Specified API items appear on
canvas (after a number of
warnings for incomplete
model).
5.4–12
Model
Editor
Add file node IVP.env.
Choose Edit:Edit Source.
Press Get Current
Environment and save.
Environment editor starts up
and loads current
environment.
2
3
Checked
Or Irix or Windows, depending on your platform
GNAT doesn’t allow a file called ada.xxx.
c Dutch Space BV
29
OM
iss: 4 rev: 0
FSS-EFO-TN-530
Step
Tool
Procedure
Result
Checked
5.4–13
Model
Editor
Choose Edit:View Source.
Environment viewer starts OK
and shows no difference
between stored and current
environment.
Only perform step 5.4–14 if FrameMaker4 is needed/installed:
Step
Tool
Procedure
Result
5.4–14
FrameMaker
Create a file Model.mif
with FrameMaker add the file
to the model. Choose
Edit:Edit Source. Save (as
MIF) and exit.
FrameMaker starts and shows
the file created earlier.
5.4–15
Model
Editor
Choose Tools:Set Build
Options. Select Gnat Ada
runtime libraries.
Build Options window
appears.
5.4–16
Model
Editor
Choose Tools:Build All.
Makefile, .exe and .dict
are successfully generated.
5.4–17
Project
Manager
Press Schedule Editor.
Schedule Editor starts with
empty schedule.
5.4–18
Schedule
Editor
Select File:Select Model and
choose the model created
earlier. For the executing state
(View:Executing), schedule
the C, F77 and Ada entry
points (as appropriate)
periodically, e.g. at 20, 10 and
5 Hz respectively. Save and
exit.
No problem.
5.4–19
Project
Manager
Press Simulation Controller.
Simulation Controller starts
OK with empty canvas.
5.4–20
Simulation
Controller
Press File:New to choose
model and schedule. Choose
model IVP.model and
schedule IVP.sched. Select
API tab page.
Wizard appears. API tab
shows IVP.model data
dictionary.
5.4–21
Simulation
Controller
Select Insert:New MMI and
call the new MMI IVP.mmi.
Select Insert:New Monitor
and select variable
ansi:ansi_c:y. Change
to plot against simulation time
and save as
ansi_c_y vs t.
A new MMI tab appears.
Monitor editor starts. Monitor
appears on MMI tab.
4
30
Checked
Create a file Model.doc for Windows platforms. The editor associated with .doc files will be started.
c Dutch Space BV
OM
FSS-EFO-TN-530
iss: 4 rev: 0
Step
Tool
Procedure
Result
5.4–22
Simulation
Controller
Select Insert:New Scenario
and call the new scenario
IVP.mdl. Choose
Insert:New Recorder. Select
var ansi:ansi_c:y and
save as ansi_c_y.
Action editor starts. Recorder
icon appears on canvas.
5.4–23
Simulation
Controller
Choose Insert:New Initial
Condition. When prompted to
save the file, save if as
IVP.init.
The initial condition editor
appears.
Change initial condition of
variable ampl. Press OK.
The Input Files tab shows the
new initial condition file.
5.4–24
5.4–25
Simulation
Controller
Choose Server:Select Server.
A dialog with a list of
available servers is shown.
5.4–26
Simulation
Controller
Press Init.
You are asked to save the
changes: save the .sim file as
IVP.sim. The simulator
initializes and reaches
stand-by state. Ignore
warnings on inconsistent
default values in the Fortran
model; this is a known SPR.
5.4–27
Simulation
Controller
Press Go.
State changes to executing.
The simulation time is
continuously incremented.
Recording action on scenario
tab has status EA (executing
and active). Monitor on the
MMI tab is continuously
updated and shows a sinus.
The variables on the API tab
are continuously updated.
5.4–28
Simulation
Controller
Create alpha numeric monitor
and check that the initial
condition (see step 5.4–24)
has been set correctly. Enter
another value on-line.
Variable’s value is OK.
Observe effect in time history
plot.
5.4–29
Simulation
Controller
Press Pause. Press Stop.
Choose File:Exit.
Simulator reaches
unconfigured state.
5.4–30
Project
Manager
Press Test Analyzer
Test Analyzer starts OK with
empty canvas.
5.4–31
Test
Analyzer
Select File:Select test result
file. Select: IVP.model.tr
(in sub-directory
<date>/<time>/).
File selector appears.
Recording file
ansi_c_y.rec appears on
screen.
c Dutch Space BV
Checked
31
OM
iss: 4 rev: 0
32
FSS-EFO-TN-530
Step
Tool
Procedure
Result
Checked
5.4–32
Test
Analyzer
Choose View:Expand all
nodes. Select variable
ansi_c:y. Drop variable on
Test Analyzer’s canvas. Select
Next, Next and Finish.
Hierarchy is shown. Plot
editor appears showing
variable.
simulation_time is
listed as X variable. Plot icon
appears on canvas and a
window with the graph
appears.
5.4–33
Test
Analyzer
Select plot icon. Choose
File:Print. Note that the plot
backend print dialog may be
hidden behind an application
window.
Choose Tools:Plot Backend
Interface.
Plot is printed. Plot backend
command log appears,
indicating plot is spooled to
printer.
5.4–34
Test
Analyzer
Choose File:Exit and discard
results.
Test Analyzer window
disappears.
5.4–35
Project
Manager
Choose File:Exit.
The Project Manager
disappears.
c Dutch Space BV
FSS-EFO-TN-530
OM
iss: 4 rev: 0
Conclusion
Test successfully executed:
EuroSim version
Hostname
OS version
Tester’s name
Date
Remarks
c Dutch Space BV
33
iss: 4 rev: 0
34
OM
FSS-EFO-TN-530
c Dutch Space BV
OM
FSS-EFO-TN-530
iss: 4 rev: 0
Chapter 6
EuroSim Projects & Users
6.1
6.1.1
Adding a EuroSim user
Adding a EuroSim user under Linux/UNIX
When a user of your system wants to start using EuroSim, he/she should do the following:
Step
Description
Remarks
6.1–1
export EFOROOT=/usr/EuroSim
IRIX
6.1–2
export EFO_HOME=xxx
Optional. By default ˜/.eurosim will be
used.
6.1–3
.
IRIX
$EFOROOT/etc/user.sh
only.
only.
Table 6.1: EuroSim user set-up for /bin/sh or bash
Step
Description
Remarks
6.1–4
setenv EFOROOT /usr/EuroSim
IRIX
6.1–5
setenv EFO_HOME xxx
Optional. By default ˜/.eurosim will be
used.
6.1–6
source $EFOROOT/etc/user.csh
IRIX
only.
only.
Table 6.2: EuroSim user set-up for /bin/csh
6.1.2
Adding a EuroSim user under Windows
When a user of your system wants to start using EuroSim, he/she should set the EFO_HOME environment
variable to point to the directory where the project files are created. On Windows NT, open the Control
Panel (Start:Settings:Control Panel) and double click the System icon. Select the Environment tab and
add the EFO_HOME variable. Whether you add the variable to the list of System Variables or User
Variables depends on whether you want to share your project directory with other users or keep your
projects in a private directory (i.e. not shared). Make sure that the directory name does not contain
spaces.
6.2
Adding a EuroSim project
A EuroSim project simply consists of an entry in a EuroSim project database. By setting $EFO HOME
to the directory where the project database resides, the user can select a project from the list and execute
c Dutch Space BV
35
OM
iss: 4 rev: 0
FSS-EFO-TN-530
one or more of the tools. How to add a EuroSim project is described in [SUM05], section 5.
If you use a shared project database, every user can access any project listed there. If you want to avoid
this, you should use the Operating System’s file protection mechanism. Various possibilities exist1 , and
the following is given as a starting point only.
When using the system-wide EuroSim project description file
1. The file $EFO HOME/project.db is readable by everybody but writable by user=root or
group=sys only. The normal user can thus not change its contents.
2. When you create a new project (by editing the afore mentioned project description file) also create
a new UNIX group and add the users working on the project to this group. Make the project’s home
directory of this group, and set the group s-bit. Make the directory writable to group members
only. You may either make it readable to everybody or to the group only, depending on security
requirements.
When using local EuroSim project description files
By default every user creates a local project database and can create projects. He/She is only bound by
the standard UNIX protection mechanisms you have set up as a system administrator.
As an intermediate between the two extremes sketched above, you might consider the use of a project
librarian. This librarian is made responsible for the maintenance of a local project description file, of
which he/she is made the owner. Make the project description file writable by the owner exclusively, and
place it in a new directory. Create a new UNIX group, and make the aforementioned directory read/write
by this group and set the group s-bit. Assign the people wishing to use this project description file
to this new group. By doing so, the project librarian can create projects and assign users to them,
without needing your assistance; the project home directories should—of course—be sub-directories of
the directory created by you. Projects managed by one project librarian are protected from those by other
project librarians by the UNIX group protection. Projects within a group are not protected against each
other, except maybe by making file write-only for the owner.
6.3
EuroSim repository
When defining a project, one can set the project’s repository, i.e. the directory where versioned files will
be stored.
When using Cadese for version control, the default project repository is a sub-directory called RCS
located in the project directory. People working on the same project share a single repository. By
placing the repository in a higher level directory, multiple projects may share the same repository. This
possibility comes in handy, if people want to have their own working space. Then they simply define
their own projects (using a local project definition file), but set their repository variable to the same,
shared repository.
When using CVS for version control, the project repository can be chosen arbitrarily.
1
36
Please consult one of the many books on UNIX or W INDOWS system administration.
c Dutch Space BV
OM
FSS-EFO-TN-530
iss: 4 rev: 0
Chapter 7
System Problems
When experiencing problems with EuroSim, there are a number of places you can look for hints as to
how to solve them.
1. When something goes wrong, EuroSim often provides feedback directly on the GUI or on stdout
or stderr. Especially important to check are the command logs in the Model Editor (when
generating a simulator) and in the Simulation Controller (when running a simulation).
2. When the EuroSim daemon1 esimd has been started with the -v flag, a EuroSim simulator will
output diagnostic information in the daemon’s log file2 (specified with the -l flag) or on the
system’s console.
3. When started with the -v flag, the EuroSim daemon will output information on what it has been
doing to the syslog. Check the syslog and search for ‘esimd’ to find that information.
4. EuroSim is delivered with a so-called ‘FAQ’; this is a list of frequently asked questions (and answers!). You can browse this list, which is in HTML format on the CD-ROM, with a standard
browser.
When the problem persists, you can contact the EuroSim help desk:
EuroSim Help Desk
Dutch Space BV
PO Box 32070
2303 DB Leiden
The Netherlands
Tel: +31 71 5245 550
Fax: +31 71 5245 498
e-mail: [email protected]
In all communications, please provide your EuroSim version and license number.
To help you in reporting problems experienced with EuroSim, EuroSim is provided with a tool that
allows you to fill in a detailed Software Problem Report and send it to Dutch Space BV via e-mail. You
can start this tool, by typing spr on the command line, provided $EFOROOT and $PATH are set as
required for normal EuroSim operation. More information on the EuroSim SPR system can be found in
Appendix B.
1
2
Implemented as a service on Windows NT platforms.
Use the event viewer in the adminstrative tools group on Windows NT platforms.
c Dutch Space BV
37
iss: 4 rev: 0
38
OM
FSS-EFO-TN-530
c Dutch Space BV
FSS-EFO-TN-530
OM
iss: 4 rev: 0
Appendix A
Source Code Listings
C source of ansi.c
/*
* File: ansi.c
*
* Contents:
*
* $Id: ansi.c,v 2.1 1997/08/18 14:39:55 brandt Exp $
*/
#include <esim.h>
#include <math.h>
static double c_y=0;
static double c_freq=1.5; /* rad/sec */
static double c_ampl=3.14;
void ansi_c(void) {
double t = esimGetSimtime();
c_y = c_ampl * sin(c_freq*t);
}
Fortran source of fortran.f
CC File:
C
C Contents:
C
C $Id: fortran.f,v 2.0 1997/03/03 14:33:53 alison Exp $
C
subroutine F77
implicit none
include "esim.inc"
double precision T, Y, AMPL, FREQ
common /FORTRAN/ T, Y, AMPL, FREQ
data Y, AMPL, FREQ /10, 3.14, 0.5/
T = esimgetsimtime()
Y = AMPL*sin(FREQ*T)
return
end
C
C
block data
double Y, AMPL, FREQ
c Dutch Space BV
39
iss: 4 rev: 0
C
C
C
40
OM
FSS-EFO-TN-530
common /FORTRAN/ Y, AMPL, FREQ
data Y, AMPL, FREQ /10, 3.14, 0.5/
end
c Dutch Space BV
FSS-EFO-TN-530
OM
iss: 4 rev: 0
Ada source of mada.ads
--- File:
--- Contents:
--- $Id: mada.ads,v 2.0 1997/03/03 14:33:55 alison Exp $
--package MADA is
procedure ADA95;
y:
Long_float;
ampl: Long_float;
freq: Long_float;
end MADA;
Ada source of mada.adb
-----------
’Global_State_Variables
LONG_FLOAT MADA.ampl:
INIT="3.14",
LONG_FLOAT MADA.freq:
INIT="0.5"
’Entry_Point MADA.ADA95
’Global_Output_Variables
LONG_FLOAT MADA.y:
INIT="0.0"
--- File:
--- Contents:
--- $Id: mada.adb,v 2.1 1997/08/18 14:39:56 brandt Exp $
--with esim; use esim;
-- with math_h; use math_h;
with Ada.Numerics.Long_Elementary_Functions;
use Ada.Numerics.Long_Elementary_Functions;
package body MADA is
procedure ADA95 is
t: Long_float;
begin
t := esimgetsimtime;
y := ampl*sin(freq*t);
-y := ampl*t;
end ADA95;
begin
freq := 0.5;
ampl := 3.14;
c Dutch Space BV
41
iss: 4 rev: 0
OM
FSS-EFO-TN-530
end MADA;
42
c Dutch Space BV
FSS-EFO-TN-530
OM
iss: 4 rev: 0
Appendix B
EuroSim Software Problem Reporting
System
A software problem report, or SPR, can be submitted via spr1 , a GUI tool provided with each EuroSim
installation or via WWW,
URL=http://www-eurosim.dutchspace.nl/EuroSim
The SPR comes in as an e-mail message to [email protected]. Incoming SPRs get an
unique identification number and are then stored in a central database, having the status of unreviewed.
The SPR submitter is notified of the SPR number automatically via e-mail. With this number, he or she
can track the status of this and all other SPRs, via WWW, using the same URL as mentioned above.
At regular intervals, the EuroSim software review board (SWRB) convenes, and categorizes the new SPRs
in one of the following categories:
Approved for implementation
It is agreed that the software and/or the documentation has to be modified. The SWRB then
also indicates which of the EuroSim configuration items are affected, and in which upcoming
EuroSim release the modification is planned to be included.
Action
Further investigation is required to be able to reach a decision on the SPR.
Pending
The SPR is waiting for further occurrences of the same problem, as it is unclear whether it is a
EuroSim problem or not (e.g. user error) or it is a minor point and currently no resources are
available to evaluate alternatives.
Covered by
The same problem has been submitted earlier, so this SPR is covered by that earlier SPR or it is
a problem that will be fixed in an already planned new release.
Nice to have
The suggested EuroSim modification is considered by the SWRB as very desirable, but cannot
be implemented due to prevailing resource constraints.
Rejected
The SPR is rejected and EuroSim will not be modified.
Where appropriate, the SWRB will include with the SPR an explanation of the SWRB decision, that can
again be examined via WWW.
1
Not part of the installation for Windows NT.
c Dutch Space BV
43
OM
iss: 4 rev: 0
Action
Not Started
Started
Covered
Approved for Release
Nice to have
Implemented
Rejected
Closed
Pending
Approved for Implementation
Stalled
Open
Unreviewed
FSS-EFO-TN-530
Figure B.1: SPR State Transition Diagram
When an SPR is approved, software modification can commence. The software engineer can change
the software modification status from Not started to Started. When the modification is complete and
tested, he or she changes the status to Implemented, and provides a Software modification report. The
modified files and version numbers are automatically listed with the SPR, provided the SPR number is
given when checking in the modifications. If unforeseen problems arise during implementation of the
SPR, the modification status can be set to Stalled. The SPR will than be re-evaluated in the next SWRB
meeting.
The last stage in the life cycle of an SPR is that the SWRB checks that the SPR is correctly implemented.
When all is OK, the SWRB decision is changed to Approved for release. The overall status of the SPR
changes then automatically from Open to Closed, as no further work on it is required. The submitter will
receive the SPR fix either through a patch (for urgent SPRs) or as part of a regular maintenance release of
the EuroSim software.
SPR
classification
An SPR has both a classification from a user as from a project perspective. The User Criticality can be
one of:
Critical Being a major problem that hinders the completion of the user’s job. This category includes a
time aspect, solution is needed as soon as possible, for the user to be able to finish his job.
Major
A serious problem has been encountered, but user can still continue with his work.
Minor
A problem was noted, but it is not seriously affecting the use of EuroSim.
Suggestion
This category can be used to collect suggestions on how to improve EuroSim.
Question
To be used for questions on EuroSim details.
The Project criticality can be one of:
Urgent Fix this SPR as soon as possible.
Normal Fix this SPR for the indicated release.
44
c Dutch Space BV
FSS-EFO-TN-530
OM
iss: 4 rev: 0
Maintenance
Fix this SPR as part of regular maintenance.
c Dutch Space BV
45
iss: 4 rev: 0
46
OM
FSS-EFO-TN-530
c Dutch Space BV
OM
FSS-EFO-TN-530
iss: 4 rev: 0
Appendix C
EuroSim RTI: HLA extension
This appendix describes the additional installation requirements for the EsimRTI: the HLA extension of
EuroSim.
Software to install
To use the EsimRTI the following software must be installed:
• IRIX 6.5 as OS.
• EuroSim (with EsimRTI extension).
• DMSO RTI 1.3v6
• the OS patches required by the RTI.
• A CC (C++) compiler to allow the EsimRTI and RTI to be linked (e.g. MIPSpro C++ version
7.30).
More information can be found on the DMSO homepage: http://www.dmso.mil.
Environment variables
The following environment variables are required to use the RTI:
Environment Variable
Description
RTI_HOME
Should point to the RTI-installation directory.
RTI_CONFIG
Should point to the config directory in RTI_HOME.
RTI_SAVE_PATH
Should point to a save directory in RTI_HOME.
RTI_MESSAGE_VERSION
Should be set to some valid value (e.g. 1).
LD_LIBRARYN32_PATH
Should be extended with:
$RTI HOME/lang/C++/lib/IRIX-6.5-n32
c Dutch Space BV
47
iss: 4 rev: 0
48
OM
FSS-EFO-TN-530
c Dutch Space BV
FSS-EFO-TN-530
OM
iss: 4 rev: 0
Bibliography
[SRN05] EuroSim Mk4.0 software release notes, 2005, FSS-EFO-SRN-388. Stored in
$EFOROOT/etc/SoftwareReleaseNote. Final word from developers before
packaging; always contains last and latest information concerning delivered EuroSim release.
[SUM05] Dutch Space BV, EuroSim Mk4.0 software user’s manual, 2005, NLR-EFO-SUM-002. Stored
in $EFOROOT/doc/pdf/SUM.pdf. This file contains the EuroSim Software User Manual in Adobe Acrobat format. Also stored in directory $EFOROOT/doc/html/SUM. This
directory contains the EuroSim Software User Manual in HTML format.
c Dutch Space BV
49