1
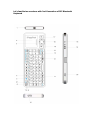
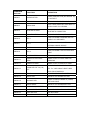
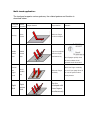
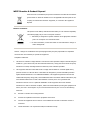
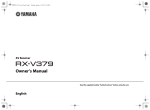
2nd Generation of RII Bluetooth Keyboard
- Multi-language supporting
- Multi-Touch & Scrolling bar
User Manual
Introduction:
2nd Generation of RII Bluetooth Keyboard consists of keyboard, mouse,
touchpad, and laser pointer which is designed small and portable size. It
provides people a unique & capable tool to operate their personal computer
wirelessly. It is widely used for:
z
z
the people who need to be apart from their personal computer yet must
control it for their presentation, teaching, and lecturing with large screen
or projector, up to 33 feet wireless operation distance provides you big
free space to communicate with your audience.
the people who want to sit at their easy and comfortable chair to view the
internet content, network television, such as IPTV, or internet movies
instead of physically change its channel, it is a really computer remote
controller, of course not a TV remote controller.
What's in your Package?
In the package with 2nd Generation of RII Bluetooth Keyboard, you will find a
USB cable for charging the 2nd Generation of RII Bluetooth Keyboard.
Features and specifications:
z
z
z
z
z
z
z
z
z
z
Bluetooth connection
Built-in re-chargeable Lithium-ion battery Backlit for operation in darken room
Portable size: 57 x 150 x 12.5mm Charge voltage/current: 5V/300mA Standby time: 600 hours QWERTY keyboard Built-in laser pointer
Multi-language support
Multi-touch
Let's familiarize ourselves with 2nd Generation of RII Bluetooth
Keyboard
NUMBERED
FEATURE
FUNCTION
OPERATION
PRESS LASER BUTTON (SEE ARROW 19)
ARROW 1
LASER EMITTER
ARROW 2
TOUCHPAD
ARROW 3
SCROLL BAR
ARROW 4
BLUETOOTH RESET
ARROW 5
BACKLIT BUTTON
ARROW 6
LED 1
ARROW 7
LED 2
ARROW 8
LED 3
ARROW 9
LED 4
ARROW 10
POWER SWITCH
TURN ON /OFF THE UNIT
SHORTCUT FOR START
PRESS TO GO TO START MENU ON
MENU
WINDOWS
SHORTCUT MENU
PRESS TO GO TO SHORTCUT MENU
ARROW 11
ARROW 12
ARROW 13
COMBO KEY OF “Ctrl, Alt,
Del”
TO ACTIVE IT
SLIDE YOUR FINGER TO MOVER MOUSE
SLIDE YOUR FINGER ON THIS AREA TO
SCROLL PAGE YOU VIEWING
PRESS THIS KEY TO RE-BUILD
BLUETOOTH CONNECTION
PRESS TO POWER ON /OFF BACKLIT
LIGHT ON WHEN CHARGING AND OFF
WHEN FULLY RECHAGED
LIGHT ON WHEN CONNECTED TO
EXTERNAL POWER SOURCE
FLASHES WHEN SIGNAL TRANSMIT
LIGHT ON WHEN TURN TO CAPS LOCK
INPUT
PRESS THIS KEY TOGETHER WITH
KEY “Fn” LIKE PRESS THESE THREE
KEYS SIMULTANEOUSLY
ARROW 14
KEY Fn
WORK TOGETHER WITH OHTERS
ARROW 15
MOUSE LEFT
OPERATE LIKE MOUSE LEFT KEY
ARROW 16
NAVIGATE KEY
ARROW 17
MOUSE RIGHT
OPERATE LIKE MOUSE RIGHT KEY
ARROW 18
PAGE DOWN/UP BUTTON
TURN PAGE UP OR DOWN
ARROW 19
LASER POINTER BUTTON
PRESS TO EMIT LASER AND RELEASE
ARROW 20
MINI USB PORT
FOR RECHARGE
ARROW 21
TOUCHPAD ROTATION
TOUCHPAD INPUT DIRECTION ROTATE
PRESS TO MOVE CURSOR UP, DOWN,
LEFT AND RIGHT
Pairing and establishing connection with computer - Let’s take Microsoft
Bluetooth Software as an example to describe Bluetooth Search, Pairing and
Connection, other Bluetooth software please refer to its own user manual.
1.
2.
3.
4.
5.
6.
7.
8.
9.
Turn on unit by moving the power switch to ON, (see arrow 10), press key
BLUETOOTH RESET indicated by arrow 4, then LED3 will blink, that means
your unit is ready and searching other Bluetooth device for pairing.
Click “Start”, “Control Panel” (make sure you’re in Classic View), and then
double-click Bluetooth Devices.
Click “Add”.
In the Add Bluetooth Device Wizard, select the “My device is set up and
ready to be found check box”, and then click “Next”.
After icon of “Bluetooth iPazzPort” appear, click “Bluetooth iPazzPort”, and
then click “Next”.
When the wizard asks you which passkey you want to use, click “Choose a
passkey for me”. Then click “Next”.
After you are prompted to enter your passkey, please type the passkey on
2nd Generation of RII Bluetooth Keyboard, and then press Enter. You also
can choose no passkey to go next step. (PLEASE DO REMEMBER TO USE
THE KEY OF 2nd Generation of RII Bluetooth Keyboard WHEN INPUT
PASSKEY)
In the final page of the wizard, click Finish, and then click OK. Your 2nd
Generation of RII Bluetooth Keyboard should now be successfully paired
with your PC and ready to use.
LED3 will goes out when connection is established successfully
Starting 2nd Generation of RII Bluetooth Keyboard
1.
2.
2nd Generation of RII Bluetooth Keyboard has a battery saving feature This feature puts the device into sleep mode if you do not use it for a long
time. You can wake up the unit by pressing any key for one second.
Arrow 14 points to the Fn key - In order to bring users more convenience,
2nd Generation of RII Bluetooth Keyboard also provides F1, F2, F3...F12
which operate like those keys on the standard keyboard. Please press Key
Fn together with the key you want to operate them, but if you only press F1,
F2, F3...F12 on 2nd Generation of RII Bluetooth Keyboard, that will make
no sense. The following keys need to be used with key Fn: F1,F2...F12,
combo key of CTRL+ALT+DEL, Ins, Prt Scr, Home, End, Del, and Touchpad
3.
4.
5.
6.
7.
8.
rotation key (see arrow 21)
Arrow 13 points to Ctrl+Alt+Del key - In many occasions we need to use
keys: Ctrl+Alt+Del on standard keyboard when operate computer, such as
restart system, lock users, terminate applications.... But now with 2nd
Generation of RII Bluetooth Keyboard, you only press key Fn together with
key “Enter” to complete your mission.
Arrow 21 points to key of touchpad rotation - As we know, sometimes we
want to operate 2nd Generation of RII Bluetooth Keyboard vertically, and
sometimes horizontally, when operation direction is rotated from vertical to
horizontal, but touchpad will not. For example, the operated direction is
rotated. When you slide your finger on the touchpad vertically, and the
mouse cursor on the screen of computer will move horizontally, so please
press key Fn together with key of touchpad rotation to rotate the touchpad,
this way, mouse cursor will move in corresponding direction.
When the backlit lights up without any operation, this indicates your
battery voltage has a low charge and needs to be recharged. 2nd
Generation of RII Bluetooth Keyboard is equipped with a re-chargeable
battery. We have supplied you with a USB cable, which is plugged into a
vacant USB slot on your computer and the bottom of the 2nd Generation of
RII Bluetooth Keyboard, as indicated by arrow 21 above. During charging
LED1 will light up with a steady on. When fully charged, LED 1 will go out
and LED2 will on, unplug the 2nd Generation of RII Bluetooth Keyboard
from the USB cable and LED2 will go out too.
If you wish to operate 2nd Generation of RII Bluetooth Keyboard in a
darkened room, then you will want to use the Backlight Keyboard feature.
In order to activate the Backlight feature, please press backlit button
indicated by arrow 5 to turn on/off the backlight.
The Touch Mouse Pad (TMP) is quite versatile. To create input with the
TMP, place your finger on the pad. Just move your finger on the TMP as
though you were using your mouse pad. Watch the mouse move to where
you want it, and then use the keyboard for whatever action you desire.
You can draw patters using the TMP if you have installed MS Pain,
ScreenPen or other Paint software.
2nd Generation of RII Bluetooth Keyboard has built-in Laser Pointer, which
provide an enhanced tool for your presentation, training, and conference.
Press the Laser Pointer button indicated by arrow19 to operate it, you can
use this feature no matter the unit is on or off.
Multi-touch application:
The touchpad supports various gestures, the related gesture and function is
described below:
Touchpad
Mouse
Function
Function
Finger Gesture
Finger Action
Move
Slide one finger
Cursor
on the touchpad
Middle
Middle
Tap the touchpad
button
button
with two finger
click
click
simultaneously
Moving
Remark
Scroll pages quickly when
browse website Scroll
upward Scroll downward
Vertical
two
finger
scroll
Right
click
Scroll
middle
key
Right
button
click
Slide two finger vertically
Slide two finger
to scroll your page Zoom in
vertically
or out the picture when
view pictures
Tap the
touchpad with
three fingers
simultaneously
WEEE Directive & Product Disposal
At the end of its serviceable life, this product should not be treated as household or
general waste. It should be handed over to the applicable collection point for the
recycling of electrical and electronic equipment, or returned to the supplier for
disposal.
Notice to customers
This symbol on the battery indicates that the battery is to be collected separately.
The following apply only to users in European countries.
• This battery is designed for separate collection at an appropriate collection
point. Do not dispose of as household waste
• For more information, contact the retailer or local authorities in charge of
waste management.
Caution : Changes or modifications not expressly approved by the party responsible for compliance
could void the user's authority to operate the equipment.
Compliance statement:
1.
This device is verified to comply with Part 15 of the FCC Rules. Operation subject to the following two
conditions: (1) this device may not cause harmful interference, and (2) this device must accept any
interference received, including interference that may cause undesired operation.
2.
This equipment has been tested and found to comply with the limits for a Class B digital device,
pursuant to Part 15 of the FCC Rules. These limits are designed to provide reasonable protection
against harmful interference in a residential installation. This equipment generates uses and can
radiate radio frequency energy and, if not installed and used in accordance with the instructions, may
cause harmful interference to radio communications. However, there is no guarantee that
interference will not occur in a particular installation. If this equipment does cause harmful
interference to radio or television reception, which can be determined by turning the equipment off
and on, the user is encouraged to try to correct the interference by one or more of the following
measures:
z
Reorient or relocate the receiving antenna.
z
Increase the separation between the equipment and receiver.
z
Connect the equipment into an outlet on a circuit different from that to which the receiver is
connected.
z
Consult the dealer or an experienced radio/TV technician for help