1
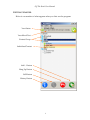
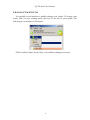
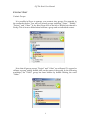
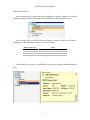
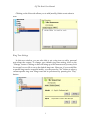
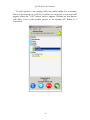
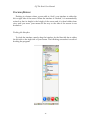
s OFF THE HOOK
SKYPEPHONE USER MANUAL
stc2104 | Steven Chen
kxj1 | Kelvin Jiang
msw2103 | Michael Wasserman
ehz2101 | Eric Zhang
Off The Hook: User Manual TABLE OF CONTENTS
GETTING STARTED......................................................................................................... 3
CHANGING YOUR STATUS ............................................................................................ 4
CONTACT LIST ................................................................................................................ 5
CONTACT LIST ................................................................................................................ 5
Contact Groups............................................................................................................ 5
Individual Contacts ..................................................................................................... 6
Ring Tone Settings ...................................................................................................... 7
Adding a Contact......................................................................................................... 8
MAKING/RECEIVING CALLS.......................................................................................... 9
Calling a Contact......................................................................................................... 9
Conference Calling .................................................................................................... 11
Accepting a Call......................................................................................................... 13
HISTORY ........................................................................................................................ 14
Bringing up the History Window ............................................................................. 14
History Window Contents ........................................................................................ 14
Call Specific Details................................................................................................... 15
DOCKING/HIDING ....................................................................................................... 16
Docking the Interface................................................................................................. 16
Enable Hiding the Interface....................................................................................... 17
OTHER INTERFACE FEATURES ..................................................................................... 18
Dragging the Interface............................................................................................... 18
KNOWN ISSUES ............................................................................................................. 19
2
Off The Hook: User Manual GETTING STARTED
Below is a screenshot of what appears when you first run the program:
Your Status
Your Mood Text
Contact Group
Individual Contact
Add… Button
Hang Up Button
Call Button
History Button
3
Off The Hook: User Manual CHANGING YOUR STATUS
It is possible in our interface to quickly change your ‘status.’ To change your
status, click on your existing status (the icon to the left of your name). The
following is a screenshot of this action:
Click on either Online, Away, Busy, or Invisible to change your status.
4
Off The Hook: User Manual CONTACT LIST
Contact Groups
It is possible in Skype to arrange your contacts into groups. For example, in
the screenshot below, you will see several groups including “Sister,” “Family,”
“Project,” and “Other.” A sky blue Skype Icon to the left of bolded text denotes a
Group. This is how to differentiate between a group and an individual contact.
Note that all groups except “Project” and “Other” are collapsed. To expand or
collapse a group, simply double click on the name of the group. In the following
screenshot, the “Other” group has been hidden by double clicking the word
“Other.”
5
Off The Hook: User Manual Individual Contacts
In our contact list, you will see that we display a contact’s name on a colored
background and with his/her status icon to the left of the name like below:
In our contact list, you will see that we display a contact’s name on a colored
background. The table below shows our color scheme:
Background Color
Status
White
Blue
Red
Orange
Not Connected to the Skype Network
Available
Busy
Away
Upon clicking on a user, you will be able to see more specific details about the
user:
6
Off The Hook: User Manual Clicking on the Notes tab allows you to add/modify/delete a note about a
user.
Ring Tone Settings
In this new window, you are also able to set a ring tone or add a personal
note about the contact. To change your default ring tone setting, click on the
“Change” button. Clicking on this will bring up a file browser and you may look
for an mp3 or wav file to set as the default ring tone. However, if you would like
a specific ring tone for a specific buddy, you can press the “Set” button to select a
contact-specific ring tone. Ring tones can be previewed by pressing the “Play”
button.
7
Off The Hook: User Manual Adding a Contact
To add a new contact, click on the Add… Button on the bottom right corner
of the interface and choose “Add Contact.”
Upon clicking on “Add Contact,” the Skype Add Contact Window will
appear and adding a contact will be the same procedure as using the original
Skype interface.
8
Off The Hook: User Manual MAKING/RECEIVING CALLS
Calling a Contact
There are a couple of ways of calling an individual contact. The simplest is to
double click on their name. However, you can single click on their name and
then click on the “Call” Button as illustrated below. Confirmation of the call
shows up in the “Call Notification” area.
Call Notification
Call Button
9
Off The Hook: User Manual Furthermore, you can also place a call by right clicking on a contact and then
selecting “Call this Person.”
10
Off The Hook: User Manual Conference Calling
To make a conference call, simply hold the CONTROL key and select the
users you would like to conference call. The Call button at the bottom of the
screen will now change to a Conference Call button. Click this button to initiate
the conference call. Confirmation of participants in the conference call is shown
in the Call Notification area.
11
Off The Hook: User Manual To add a person to an existing call is also fairly simple. Let us assume
that you are already in a call. If you click on a new user, a new icon will
appear where the “Call” button used to appear. Clicking on that button
will allow you to add another person to an existing call. Below is a
screenshot:
12
Off The Hook: User Manual Accepting a Call
When a person calls you, a large notification area will show up asking you to
accept the call (the green button) or to ignore the call (the red button). The
following screen shot shows this feature:
13
Off The Hook: User Manual HISTORY
Bringing up the History Window
To bring up the history window, click on the blue history button at the
bottom left of the interface:
History Window Contents
The History window is sorted into several categories. Incoming calls are calls
that are made to you by others. Outgoing calls are calls that you have made to
other contacts. Missed calls are incoming calls that you failed to pick up. Refused
calls are incoming calls that you purposely ignored. Finally, ‘other’ calls include
calls that failed or were busy.
The following screenshot is what the History window looks like:
14
Off The Hook: User Manual Call Specific Details
Expanding a call in the History Window will give you more details about that
call.
In the example above, an incoming call from Mike occurred on May 2, 2006 at
5:46 AM. The call was successful because it ‘finished.’ The duration of the call
was 34 seconds.
15
Off The Hook: User Manual DOCKING/HIDING
Docking is a feature where you are able to ‘dock’ your interface to either the
left or right side of the screen. When the interface is ‘docked,’ it is automatically
resized so that its height is the height of the screen and it is then hidden from
view until you move your mouse all the way to the side of the screen it was
docked on.
Docking the Interface
To dock the interface, merely drag the interface by the blue title bar to either
the left side or the right side of your screen. The following screenshot is result of
docking the program:
16
Off The Hook: User Manual Enable Hiding the Interface
To be able to hide the interface when it is not active, select the option in the
Options menu like below:
After this feature is enabled, the interface is hidden from view until you move
your mouse to the side of the screen that the interface was docked on.
17
Off The Hook: User Manual OTHER INTERFACE FEATURES
Dragging the Interface
When the contact-specific details window or the history window is visible
and you drag the interface around, the window stays stuck to the side of the
interface. However, let’s say the history window currently appears to the left of
the interface and you drag your interface to the left side of the screen. The
interface will automatically move whatever extra window is stuck to it to the
other side of the interface.
The following screenshot shows the interface with the user-specific details
window to the left of the interface:
The following screenshot shows the interface with the user-specific details
window to the right of the interface:
18
Off The Hook: User Manual KNOWN ISSUES
Due to the advanced nature of some of our features, we were not able to sort
out every bug in our program. Below we will try and outline some of the bugs
that may occur during your execution of the program.
Ring Tones
The playback of the custom ring tones is not always 100% functional. Since
the mp3/wav playback feature of our program is from third party libraries, we
were not able to implement our ring tone feature perfectly.
Tooltips
Unfortunately, the tooltips we set are not visible in our program. Tooltips
would have been beneficial because it adds another layer of help to the user.
Omitted Functionality
In the interest of time, we omitted some features that were outside the
requirements of the assignment. For example, in our “Add… Button,” we
disabled the “Create Group,” “Delete Group,” and “Delete Selected Users”
functions. Furthermore, you are unable to actually create a group or add a
contact when you right click on the Contacts window. Also, we were unable to
load buddy icons from our contacts so we omitted this feature. Finally, two of
our menu items do nothing when clicked upon. The History menu item in the
File menu does not actively do anything. Also, our Help menu item was
supposed to link to this User Manual. However, we did not accomplish this task,
which was not a requirement for the assignment.
History Window Usability
The details of each call in the history window were not displayed exactly as
we would have liked.
Random Crashes
Because of all the features and work arounds in our program, we sometimes
run into Java problems causing the program to crash.
19