1
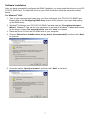
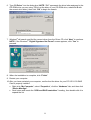
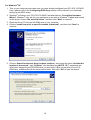
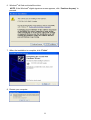
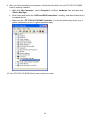
PCI ATA 133 RAID Card SKU: 329470 FCC and CE Radiation Norm FCC This equipment has been tested and found to comply with limits for Class B digital device pursuant to Part 15 of Federal Communications Commission (FCC) rules. CE This equipment has been tested and found to comply with the limits of the European Council Directive on the approximation of the law of the member states relating to electromagnetic compatibility (89/336/EEC) according to EN 55022 Class B. FCC and CE Compliance Statement These limits are designed to provide reasonable protection against frequency interference in residential installation. This equipment generates, uses and can radiate radio frequency energy, and if not installed or used in accordance with the instructions, may cause harmful interference to radio communication. However, there is no guarantee that interference will not occur in television reception, which can be determined by turning the equipment off and on. The user is encouraged to try and correct the interference by one or more of the following measures: Reorient or relocate the receiving antenna Increase the separation between the equipment and the receiver Connect the equipment into an outlet on a circuit different from that to which the receiver is connected to. CAUTION! The Federal Communications Commission warns the user that changes or modifications to the unit not expressly approved by the party responsible for compliance could void the user’s authority to operate the equipment. 2 Package Contents - PCI ATA 133 RAID Card - Two 80-wire/40-pin IDE Cables - Driver CD - User’s Manual System Requirements - Windows® 2000, XP - An available PCI slot - A minimum of one additional ATA hard drive - CD-ROM Drive (for driver installation) Specifications - Supports Ultra ATA/133, Ultra ATA/100, Ultra ATA/66, Ultra ATA/33, EIDE and Fast ATA-2 hard drives. - Supports hard drives up to 400GB Hardware Description Secondary IDE Primary IDE 3 RAID Configurations Your PCI ATA 133 RAID Card supports 5 different types of configurations, please refer to the following table for details: RAID Type Description Connection RAID 0 Disk Striping Requires 2 hard drives of the same model per array. In RAID 0 mode, files are broken into stripes and are sent to both drives simultaneously. This mode increases the data transfer rate and has the best overall speed performance among all RAID modes. Connect 1 hard drive to the Primary and Secondary IDE channels and set both hard drives to Master. Warning: This PCI ATA 133 RAID Card can only support one RAID 0 array of 2 hard disk drives due to the data transfer rate of 32bit PCI slots. Using more than 2 hard drives in one RAID 0 array could cause the controller to malfunction. RAID 1 Disk Mirroring Requires 2 hard drives of the same model per array. In RAID 1 mode, all data from the primary drive will be duplicated to the mirror drive in the array. This mode can prevent data loss by backing up your files to the mirror drive. Connect 1 hard drive to the Primary and Secondary IDE channels and set both hard drives to Master or both hard drives to Slave. RAID 0+1 Disk Striping + Mirroring Requires 4 hard drives of the same model per array. All the hard drives attached to the RAID controller will be configured into two RAID 0 arrays. Files are broken into stripes and are sent to the primary array for data striping and then duplicated to the mirror array for data mirroring. This mode increases data transfer rates and also backs up your data to prevent data loss. Connect 2 hard drives to the Primary and Secondary IDE channels and set one hard drive as the Master and the other as the Slave drive for both of the IDE channels. Requires 2 or more hard drives. JBOD Disk Concatenation All the hard drives attached to the RAID controller will be read as one large capacity hard drive by the system. IDE Normal Requires 1 or more hard drive(s). In IDE mode, all connected hard drives will be configured as independent drives. 4 Connect 2 hard disk drives to the Primary and Secondary IDE channels and set one hard drive as the Master and the other as the Slave drive for both of the IDE channels. User’s should connect hard drive(s) to the PCI ATA 133 RAID Card so that each IDE channel does not have two hard drives set as Master or two hard drives set as Slave. Hardware Installation To install your PCI ATA 133 RAID Card, please follow the instructions listed below: 1. Turn off your computer. Turn off the power switch on your power supply (if applicable) and disconnect the power cable from the back of your computer. 2. Remove the side cover of your computer case. 3. Locate an available PCI slot on your motherboard; if necessary, remove the expansion slot bracket from your computer case. 4. Align your PCI ATA 133 RAID Card with the PCI slot, and then carefully slide it into the PCI slot firmly until it is securely in place. 5. Secure your PCI ATA 133 RAID Card to your computer case with a mounting screw. 6. Attach your internal hard drive(s) to your PCI ATA 133 RAID Card using the enclosed IDE cable(s). NOTE: Make sure you have correctly set the master/slave jumper(s) for all your hard drive(s), and remember to connect your internal hard drive(s) to the power supply before you turn on your computer. 7. Replace the side cover of your computer case. 8. Connect the power cable to the back of your computer and turn on the power switch on your power supply (if applicable). Configuring RAID Array Once you have successfully installed your PCI ATA 133 RAID Card in your computer, you must configure the RAID controller through the RAID BIOS. Note: Please make sure you have correctly configured the RAID controller prior to the software installation for your PCI ATA 133 RAID Card. Failure to do so may result in system errors and/or hardware conflicts. TIPS: The bolded strings inside <> represent keys on your keyboard. 1. Turn on your computer. 2. At the RAID BIOS startup screen, press <Ctrl + F> or <Ctrl + E> to enter the RAID BIOS main menu. 5 3. Press the number key <1> on your keyboard to enter the “Auto Configuration” screen. 4. Select the desired RAID mode using the spacebar <space> or the left <←> and right <→> keys on your keyboard. 5. Press <Ctrl + Y> to save the selected RAID mode, and then press <Y> to confirm the new configuration. 6. The new setting will be saved automatically, press any key on your keyboard to go back to the main menu. 7. Press <Esc> to exit the RAID BIOS, and then press <Y> to confirm. 8. Restart your computer. 6 Software Installation After you have successfully configured the RAID Controller, you must install the driver for your PCI ATA 133 RAID Card. To install the driver for your RAID Controller follow the instructions listed below: For Windows® 2000 1. Turn on your computer and make sure you have configured your PCI ATA 133 RAID Card. Please refer to the Configuring RAID Array section of the manual if you need help setting up the RAID array. 2. Windows® will detect your PCI ATA 133 RAID Card and start the “Found New Hardware Wizard”. Windows® may ask for your permission to connect to Windows® Update and search for the driver, choose “No, not at this time” and click “Next” to continue. 3. Place the Driver CD into the CD-ROM drive of your computer. 4. Choose “Search for a suitable driver for my device (recommended)” and then click “Next” to continue. 5. Check the option “Specify a location” and then click “Next” to continue. 7 6. Type “D:\Driver” into the dialog box (NOTE: “D:\” represents the drive letter assigned to the CD-ROM drive you are using. If D is not the letter of your CD-ROM drive, substitute D with the correct drive letter), then click “OK” to begin the search. 7. Windows® will search and find the correct driver from the Driver CD, click “Next” to continue. NOTE: If the Windows® “Digital Signature Not Found” screen appears, click “Yes” to proceed. 8. When the installation is complete, click “Finish”. 9. Restart your computer. 10. After you have restarted your computer, confirm that the driver for your PCI ATA 133 RAID Card is properly installed. a. Right-click “My Computer”, select “Properties”, click the “Hardware” tab, and then click “Device Manager”. b. Scroll down and locate the “SCSI and RAID controllers” heading, then double-click it to expand the list. 8 c. Make sure the “ITE IT8212 ATA RAID Controller” is in the list without any errors (e.g. a yellow exclamation point or a green question mark). 11. Your PCI ATA 133 RAID Card is now ready to be used. 9 For Windows® XP 1. Turn on your computer and make sure you have already configured your PCI ATA 133 RAID Card, (please refer to the Configuring RAID Array section of the manual if you need help setting up the RAID array). 2. Windows® will detect your PCI ATA 133 RAID Card and start the “Found New Hardware Wizard”. Windows® may ask for your permission to connect to Windows® Update and search for the driver, choose “No, not at this time”, and then click “Next” to continue. 3. Place the Driver CD into the CD-ROM drive of your computer. 4. Choose “Install from a list or specific location (Advanced)”, and then click “Next” to continue. 5. Choose “Search for the best driver in these locations” and check the option “Include this location in the search”, type “D:\Driver” into the dialog box (NOTE: “D:\” represents the drive letter assigned to the CD-ROM drive you are using. If D is not the letter of your CDROM drive, substitute D with the correct drive letter), then click “OK” to start the search. 10 6. Windows® will find and install the driver. NOTE: If the Windows® digital signature screen appears, click “Continue Anyway” to proceed. 7. When the installation is complete, click “Finish”. 8. Restart your computer. 11 9. After you have restarted your computer, confirm that the driver for your PCI ATA 133 RAID Card is properly installed. a. Right-click “My Computer”, select “Properties”, click the “Hardware” tab, and then click “Device Manager”. b. Scroll down and locate the “SCSI and RAID controllers” heading, and then double-click it to expand the list. c. Make sure the “ITE IT8212 ATA RAID Controller” is in the list without any errors (e.g. a yellow exclamation point or a green question mark). 10. Your PCI ATA 133 RAID Card is now ready to be used. 12 13 14