1
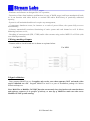
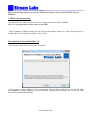
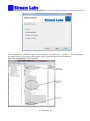
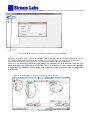
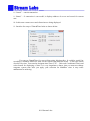
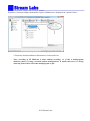
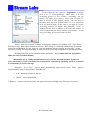
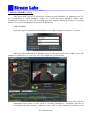
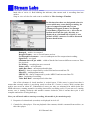
Videologger Radio&TV channels Stream MultiRec v2.0
MultiRec 2.0
User manual
2012 Stream Labs.
Content
Copyright and About the Company
Introduction
1. Wiring, marking of inputs.
2. Signal validation.
3. HDD setup(formatting).
4. Installation of Stream MultiRec 2.0.
5. Work with USB key.
6. Settings and features of Stream MultiRec 2.0.
7. Interface of MultiRec Viewer.
Contact us
2012 Stream Labs.
Copyright
© STREAM-Labs. The content of this document must not be copied on any media without
permission of STREAM Labs Inc. in writing. Copying, distribution of partially or fully protected by
copyright law software SL MultiRec, produced by STREAM-Labs, is forbidden. This rule applies to
server and client software SL MultiRec as a whole; and to separate modules and files as well.
About Company
Stream Labs Inc. was founded in 1991 and currently is one of the leading Russian companies,
working on 3 major lines of products:
- TV broadcast systems.
- Video surveillance systems.
- Systems for monitoring of TV broadcast.
Stream Labs Inc. is international company with offices in USA, Europe, Taiwan and Russia
(Moscow). It develops professional solutions for TV broadcast companies.
Stream Labs’ hardware and software developed for TV stations, satellite and cable TV providers gives
them excellent opportunity to automate TV broadcast, control quality of broadcast via automated
monitoring, implement interactive TV and advanced graphic design for TV programming.
Our company employs very creative team and our achievements in science and engineering
during 15 past years have significantly enhanced the quality of our production. We deploy the most
advanced technologies for design and manufacturing.
We keep developing along with our customers. We participate in all major trade shows and
conferences around the world and we are perfectly aware of challenges, which our customers are
facing. We have been trying to be one step ahead and meet their expectation. Partnership with our
clients combined with professionalism is the key approach in our bid to success.
Our goal is to become a leading designer and manufacturer of highly professional solutions for
TV industry around the globe.
Introduction
Video servers for recording are used for automated
recording of radio and TV broadcasts with standard and
reduced resolution.
Main features of Stream MultiRec servers:
- Operate with various number of recorded channels, types of AV-signals and interfaces (SD\HD-SDI,
CVBS, Analog Audio, ASI, IP). Circuit boards Stream FX416, Stream MS-2\4, Stream MH-4,
designed and manufactured by Stream Labs are used for multichannel ingest of AV-signals;
2012 Stream Labs.
- Hardware and software are designed for 24/7 operation;
- Protection of data from hardware malfunction (via use of RAID arrays) and from unauthorized break
in. It can function with either built-in or external HD and/or RAID-array of practically unlimited
capacity;
- System is self-maintained and doesn’t require any management;
- if emergency shutdown occurs, for instance as a result of power failure, the system fully recovers
automatically;
- Software automatically monitors functioning of entire system and each channel as well. It allows
balancing load on a server;
- Encoding of uncompressed (SDI, CVBS) audio-video streams using codecs MPEG-2 or H.264 (with
user defined parameters)
1.Wiring, marking of inputs:
- Connect cable to circuit board as it is shown on a picture below:
For MS2:
For MS4:
2.Signal validation:
- Start program MultiView.exe. It applies only to the case when separate (NOT on-board) video
card is installed on a PC. Program MultiView itself is a part of installation package for drivers
SLDriversSetup.exe.
Note: MultiView и MultiRec CANNOT function concurrently since they both use the same hardware
and software resources (it is specifics of driver); so start up of MultiView make sure that server
MultiRec IS NOT up and running.
2012 Stream Labs.
Result is displayed on a picture below:
- if PC uses on-board video card, then performance of such video card will not be sufficient for start up
of MultiView. In this case you should be able to check video signal using VLC media
player.(http://www.videolan.org/vlc/) Start VLC and select Media->Open Capture Device as shown on
a picture below:
2012 Stream Labs.
Select video input of corresponding capture card and press «Play» as shown below:
2012 Stream Labs.
Make sure that video signal is present for all inputs of capture card and ONLY THEN start up
MultiRec.
3. HDD setup (formatting).
- Format hard drive which you plan to use for storage of data recorded by MultiRec.
Note: it is very important to select cluster size 64 KB!
- After formatting of HDD switch to the tab General and uncheck check box ―Allow Indexing Service
to index this disc for fast file searching‖. Press «ОК».
4.Installation of Stream MultiRec 2.0
- Start setup.exe and follow instructions of installer.
- In the window ―Select Products‖ select components which will be installed on a PC. Stream Labs
drivers must be installed only if you use circuit boards, manufactured by Stream Labs. Driver for USB
key will be installed automatically.
2012 Stream Labs.
After completion of installation go to device manager (Control Panel -> System -> Device Manager)
and check if drivers for Stream Labs capture cards (if any) had been properly installed.
Note: it is not mandatory for IP version.
2012 Stream Labs.
If drivers for Stream Labs capture cards had not been properly installed during installation of
MultiRec 2.0, then you can install them manually from the folder C:\Program Files\Stream
Labs\Stream MultiRec 2.0\Drivers\SLCaptureDrivers
Driver for USB key has to register in Device Manager as shown on picture above. If it did not occur,
then you can install it manually from the folder Labs\Stream MultiRec 2.0\Drivers\SLCryptoKey.
5. Work with USB keyРабота с USB ключом
In order to make MultiRec 2.0 work, it is imperative to have USB key, manufactured by Stream
Labs. This key must always be inserted into PC where MultiRec is installed; it also contains license
information. In case if key is not inserted, then software will not start; or if it gets detached during
operation, then in 2 minutes you will receive a warning on your screen (see below):
It means, that server will stop recording in 8 minutes if corresponding USB key with registered
license will not be inserted into PC. It is important to know that random key with non-registered license
will not be accepted.
6.Settings and features of Stream MultiRec 2.0
MultiRec consists of three components: server, client (MultiRec Viewer) and configurator
(MultiRec Configurator). Usually server module is combined with archive and Starter modules (icon in
a system tray - it has auto and manual options for shut down and start up of server). Server could be
controlled from any computer in local network via MR Configurator, but those computers must have
special privileges for access, assigned to the them on a server MultiRec. Module MR Viewer is used for
monitoring of recording of data into archive (according Time line) and also for extraction of data for
further review.
After installation of MultiRec 2.0 and start of server we switch to MR Configurator.
2012 Stream Labs.
Go to File Menu and select Connect to connect to server MultiRec.
Designate IP address of PC with server MultiRec, then login and password for authorization on a server
(for instance, login:admin, pass:admin). In order to be on a safe side, it is necessary to create a new
entry with administrative privileges after very first login and then delete original entry.
Note: it is not allowed to duplicate login entries on computers in local network, since the next
duplicated entry will disable the previous one. Also it is prohibited to start concurrently MultiRec
Configurator and MultiRec Viewer, using same login entry. Also, you cannot run 2 configurators
concurrently.
After successful login you will see interface as shown below:
2012 Stream Labs.
1. Interface of configurator contains 5 tabs: User Rights, Disc space, Devices, Recorders, and
Running Tasks. We will return to detailed description of each tab.
2. Tab User Rights contains all entries with access rights of different level of access to
MultiRec.
3. Properties of each entry.
- Connection info: «Connected» could be True/False; if True - access entry is used and
False if it is not. «Connection Time» - timestamp of last authorization for selected access entry.
- User Info: Login, Password, User type – type of access (different types provide
different levels of access to MultiRec, for instance «admin» provides full access to configurator
and client; it also grants start and shutdown of recording process, whereas «media» provides
read-only access to configurator and MR Viewer)
Note: Grayed out fields are non editable. Only fields with black semi bold text are available
for editing. It applies to all submenus and tabs of MultiRec.
4. Entry for a new user.
To create record for additional user, enter new login, password and type of access. Press ―Add‖.
5.‖Remove‖ – removes existing entry from the list.
6. ―Sort‖ – you can sort entries either by category or in alphabetical order.
7. ‖Apply‖ – applies all changes to configuration.
2012 Stream Labs.
8. ―Cancel‖ – cancels transaction.
9. ―Status‖ – if connection is successful, it displays address of server and record for current
user.
10. In this area current server and client time are being displayed.
11. Interface for setup of Date&Time looks as shown below:
You can set Date&Time for server/client using this interface. It could be useful for
recording of channels which are aired for the regions with different locale – it will ease search
of archive by time. You can also designate time zone (UTC – Universal Coordinated Time) and
select format for displaying of time. It is very important to know, that you must not change
computer system time after you apply your selection for MultiRec since it may cause
malfunction in archiving.
2012 Stream Labs.
Tab Devices:
In this tab list of capture devices is displayed.
1. Network adapters.
2. Capture cards (for instance cards, manufactured by Stream Labs)
3. Properties of selected device (in our case it is network adapter).
2012 Stream Labs.
Properties of network adapter dedicated to ingest of Multicast are displayed on a picture below:
1. Address of network adapter and Multicast group.
2. Properties and miscellaneous information of selected device.
Note: recording of IP Multicast is done without re-coding, i.e. if this is multiprogram
multicast, then it is being recorded without modofications. It means that once it is being
extracted from archive it becomes multiprogram .ts file.
2012 Stream Labs.
Select capture device for video stream:
1. Capture card Stream Labs MS4 with 4 video inputs (4 channels for recording found
automatically; they are displayed under highlighted row).
2. Information about device: Device name, Driver version, Firmware version, Input channels
count – number of inputs, PCI Slot.
2012 Stream Labs.
Select a channel to display its properties.
1. Selected channel.
2. Properties of selected channel: format of audio/video. Work storage – will be
discussed in detail in Storage Manager.
Tab Recorders displays processes used for recording of different sources.
:
2012 Stream Labs.
1. We have started 3 recorders for data recording. Red dots next to names of recorders indicate
ongoing processes.
2. Parameters of selected (highlighted) recorder (audio/video format, encoder, information
about archive and type of recording). Some parameters could be altered, for instance bit rate
and duration of recording cycle. In order to make changes, the recorder has to be stopped by
pressing «Stop record». After all changes are done, start recorder again.
Note: you can only increase duration of recording cycle.
3. Start/Stop record.
4. Add new recorder
In window above we set parameters for a new recording task (recorder).
- Name of task
- Source of data
- Logotype for selected source
- Video/audio format, scaling
- Audio parameters
- Bit rate for video, type of encoder and its parameters
2012 Stream Labs.
In this widow our only concern is Performanc; it ranges
from 0 to 15. Correspondingly, when value is 0, then
recording process is less resource consuming, but the
quality will suffer. On contrary, when value becomes 15,
then it would be the highest quality, but the process
becomes more intensive. Default value is 9, it is considered
to be a balanced mode. If this value is too high for proper
recording (usually it means that MultiRec server is
underpowered), then we advise to decrease this number. It
is not recommended to alter parameters of encoder – it may
bring recording of selected channel to halt.
- Also in ―Add new recorder‖ window we designate duration of recording cycle. (Time limit –
first digit is days, then time in format hr:min:sec). Disc storage is calculated automatically depending
on bit rate and duration of cycle; however, you can designate storage capacity on your own – it this
case the recording will stop depending on what criteria it meets first: designated or calculated memory.
- Working Path. Pay special attention to this parameter – we recommend to set up separate
folder for each recorded channel.
Minimal bit rate is 1 Mbit, minimal duration of cycle 1hr, maximal duration depends on
space allocation for archive on HDD. Disc management, controlled by operating system is accounted
in calculations for archive storage.
- Autostart – if it is True – process starts automatically upon start of server. False – process
starts manually upon pressing button ―Start/Record‖.
1. Add – add new recorder to the list.
2. Cancel – cancel transaction.
5. Remove – remove selected recorder; this option becomes available only after stop of recorder.
2012 Stream Labs.
Tab Running Tasks:
1. Currently running tasks.
2. Information about selected task:
- ID of task and process ID.
- Task class, name and user name
- Name of storage.
- User name.
- CPU load for selected task (in %)
- Memory usage. (in KB)
- Status of task.
- Information about storage id and speed of recording.
3. Restart – restart the task.
4. Stop – stop the task.
2012 Stream Labs.
7. Interface MultiRec Viewer.
After start of MR Viewer it is necessary to connect to server MultiRec 2.0. Important note: it is
not recommended to install MultiRec Viewer on a same PC where MultiRec resides, since
simultaneous extraction of video and recording may have negative impact on quality of recording
because of excessive consumption of resources of RAID array.
1.File->Connect
Then enter login and password which had been set in MR Configurator and press ―Connect‖:
After successful authorization in MultiRec status in left hand bottom corner of MR Viewer will
change on Connected. IP: x.x.x.x User: xxx. See example on a picture below:
1. List of tasks (recorders) with visual interface, which displays status of current task; and also
information about source of data, speed of recording, Date&Time of beginning and end of
recorded data for task (recorder), selected in server archive. Visual interface is located on a left
2012 Stream Labs.
hand side of circle #1. Red blinking dot indicates, that current task is recording data into
archive.
Setup or view of color for each event is available in: File->Settings->Timeline
In this interface there are designated colors for
errors which may occur during recording, for
types of compression and other events
(Damaged, Dropped Frames, Not Enough
Performance, Signal Lost, etc.). All events are
built-in into Time line (p.4); also they are
displayed on a left hand side of circle #1 on a
picture of BNC connector. It will be discussed
in more detail below.
Damaged – archive is corrupted.
Dropped Frames – one or several frames are lost.
Not Enough Performance – server in underpowered for compression/recording.
Signal Lost – no signal.
Minimum interval pix width – width of border line between different events on Time
line in pixels.
No Writing – recording has never occured.
Pointer color – self explicable.
Audio Raw Data – uncompressed audio data.
H264 TS – data is compressed by codec H264 and converted into TS.
Mixed TS – multiprogram stream.
MPEG2 TS – data is compressed by codec MPEG2 and converted into TS.
Start – beginning of recording.
Video Raw Data – uncompressed video data.
One of the elements of visual interface is vertical arrow. If this arrow is grayed out, then it
means that currently archive is not being saved on client PC; if arrow is active, then it means that
archive was saved on client PC. Underneath of arrow you may see animated icon which looks like
HDD with arrow, rotating around it (recording into archive according cycle). If you can see 2 rotating
arrows, one is rotating clockwise and another counter clockwise, then it means that cycle is not
complete and archive is being built up).
Note: you will not be able to start/stop recording, this module is for monitoring only.
2. Properties of selected task (recorder) are displayed in circle #2.
3. Controls for video player. You can playback video content, which is extracted from archive, on
this video player.
2012 Stream Labs.
4. Time line — this is another dynamic element for visualization of recorded video content. You
can see 2 elements of Time line on a screenshot: upper time line displays status of entire
recording cycle; it is also used for navigation across archive with pre-recorded data. You may
designate any time frame and slide it using mouse or arrows on a keyboard. Lower Time line is
zoomed-in time frame, which was selected on upper Time line. It could be in turn zoomed
in/out which allows you to select time scope with precision up to 1 sec. Date&Time of the
beginning is located on left hand side and Date&Time of an end is located right hand side; time
scale is beneath of lower Time line. Using left mouse button you can move edges of Time line;
using right button of mouse you can mark beginning and without release start sliding along
Time line. Once you release the button, it will mark end of time frame. Using mouse wheel or
keyboard arrows you can slide selected time scope along the Time line. You can also control
Time line using buttons ‖Zoom on selection‖ and ‖Zoom on top scale‖ in circle #6 on a picture.
One of very important functions of Time line is displaying of alarms – color of Time line may
alter if MultiRec encounters malfunction.
5. After successful authorization on server MultiRec status of MR Viewer in left hand bottom
corner is switching to ―Connected. IP: x.x.x.x User: xxx‖. Otherwise the status will be «Not
connected».
6. Zoom on selection – stretches out selected time scope along Time line.
Zoom on top scale – displays entire recording cycle on Time line.
On a left hand side of these elements ―Zoom‖ is located. Using ―Zoom‖ you can also either
stretch or shrink Time line.
7.
Download – extract data from archive for designated time scope and download it.
2012 Stream Labs.
Tab Downloads:
1. List of files, downloaded from server. Properties of each file include: storage name, path to
file and Date&Time of the beginning and end of timeframe.
2. Screen of video player.
Note: It is recommended to view extracted multi program files using VLC player (Playback>Program)
2012 Stream Labs.
Tab Capture Devices:
1. List of capture devices found by MultiRec.
2. Inputs of Stream Labs Alpha HD; white font is for 2 existing inputs (gray font is for
potential inputs which could be on a 16-input capture card). Input 0 is green, what means
that it is currently in state of recording.
For time setup go to File->Settings->System:
Here you can set server/client time. It
could be useful for recording of channels which
are broadcasted in regions with different locale
and will ease search of archive, having time as a
search criteria. In this interface you may set
time zone (UTC) and time format. It is
important to remember, that it is prohibited to
change PC system time after MultiRec server
time has been set – it may cause malfunction of
archiving.
2012 Stream Labs.
View tab (File->Settings->Tab View) looks as follows:
Here you can select language for MultiRec Viewer
(Russian or English). In addition you can set up
transparency for MultiRec windows, skin and color of
fonts.
2012 Stream Labs.
Contact us
Stream Labs Inc.
Tel/Fax: (495) 662-37-00
E-mail: [email protected]
Address: 127273, Moscow, Berezovaya Alleya 5А , bldg.5, 4th floor
2012 Stream Labs.